[ESP-ENG] Tutorial: zarcillos decorados con mostacillas / Tutorial: tendrils decorated with beads
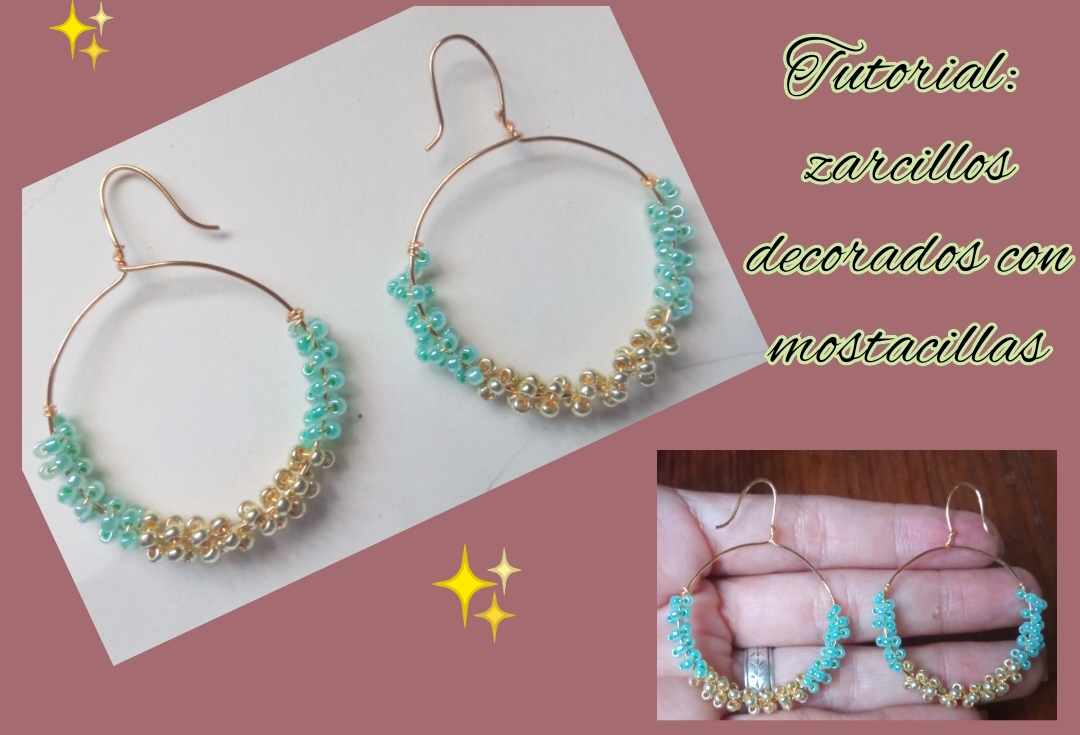
Feliz y bendecida Noche tengan todos, sean bienvenidos a mi blog, es un placer para mí el poder compartir con ustedes una vez más en esta ocasión para traerles un sencillo tutorial dónde deseo que juntos Elaboremos éstos bellos zarcillos con un diseño sencillo pero que podemos decorar a nuestro gusto. Este es un diseño muy fácil, rápido y económico de elaborar y podemos lucirlo en la ocasión que lo deseen pues a pesar de ser zarcillos casuales también tienen su toque de elegancia.
Happy and blessed night everyone, welcome to my blog, it is a pleasure for me to be able to share with you once again on this occasion to bring you a simple tutorial where I wish that together we will make these beautiful tendrils with a simple design but that we can decorate to our liking.
This is a very easy, fast and cheap design to make and we can wear it whenever you want because despite being casual earrings they also have a touch of elegance.
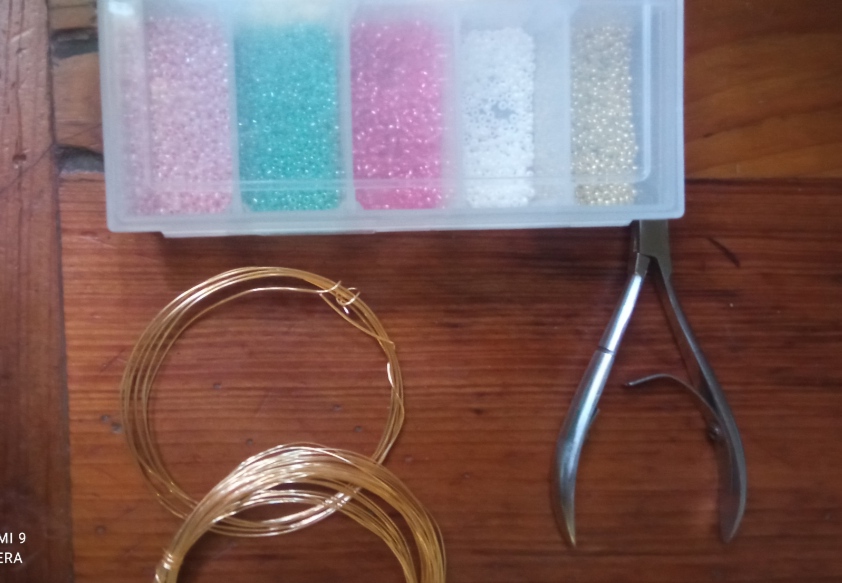
- Alambre de bisutería calibre 20.
- Alambre de bisutería calibre 26.
- Mostacillas color verde.
- Mostacillas color dorados.
- Pinza de bisutería.
- Tapa plástica de Refresco.
- 20 gauge jewelry wire.
- 26 gauge jewelry wire.
- Green beads.
- Golden colored beads.
- Jewelry tweezers.
- Plastic Refreshment lid.
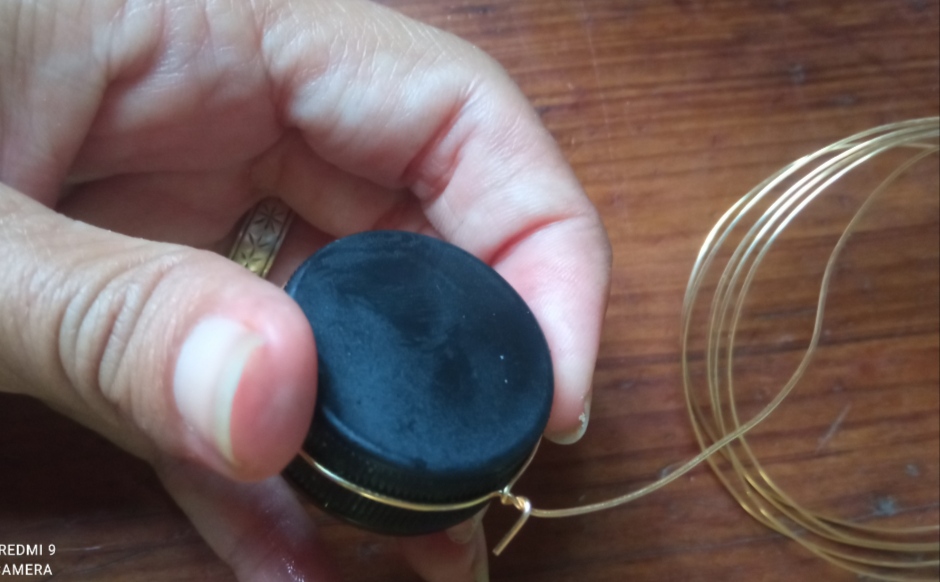
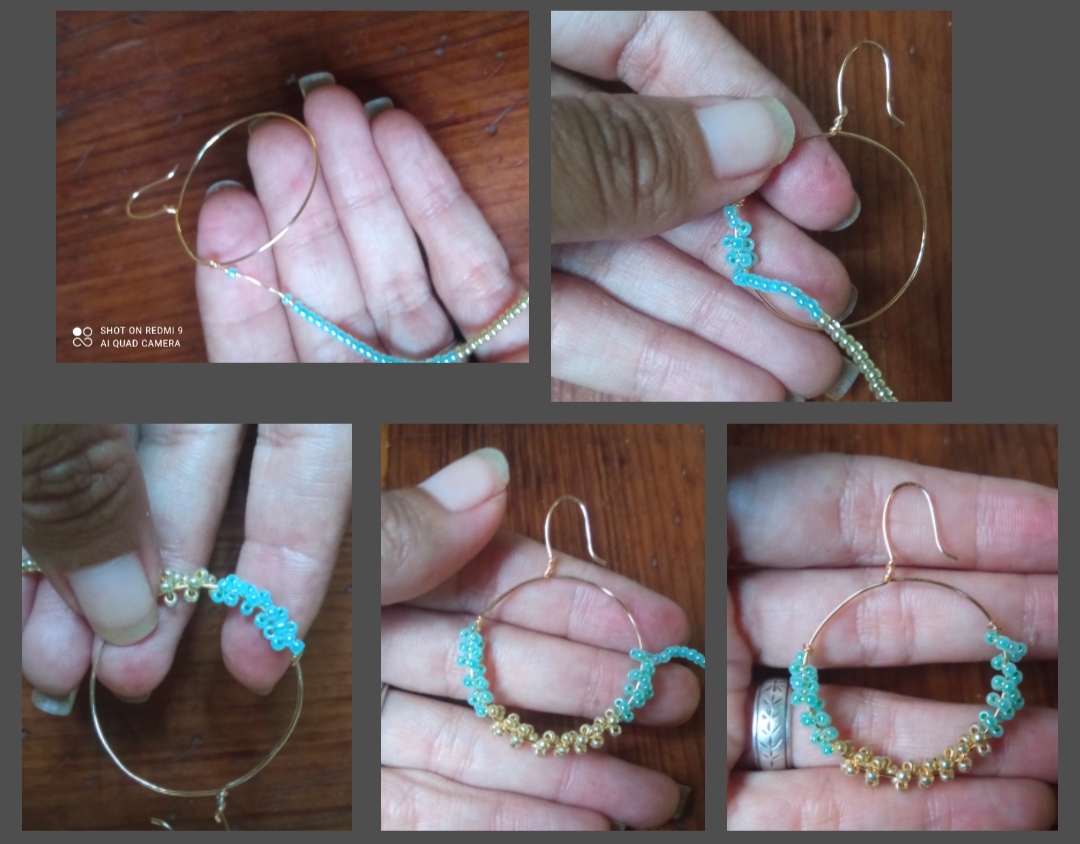
✴️ Paso 1: para iniciar la elaboración de este bello diseño lo primero que debemos hacer es tomar el alambre de bisutería calibre 20 y con ayuda de la tapa de refresco moldearemos el alambre, realizando una forma circular y en la parte superior con ayuda de la pinza de bisutería y sin sacar la tapa uniremos en los extremos para sostener la forma circular.
✴️ Step 1: to begin the elaboration of this beautiful design, the first thing we must do is take the 20-gauge costume jewelry wire and with the help of the soda lid we will shape the wire, making a circular shape and in the upper part with help of the jewelery pliers and without removing the lid we will join at the ends to hold the circular shape.
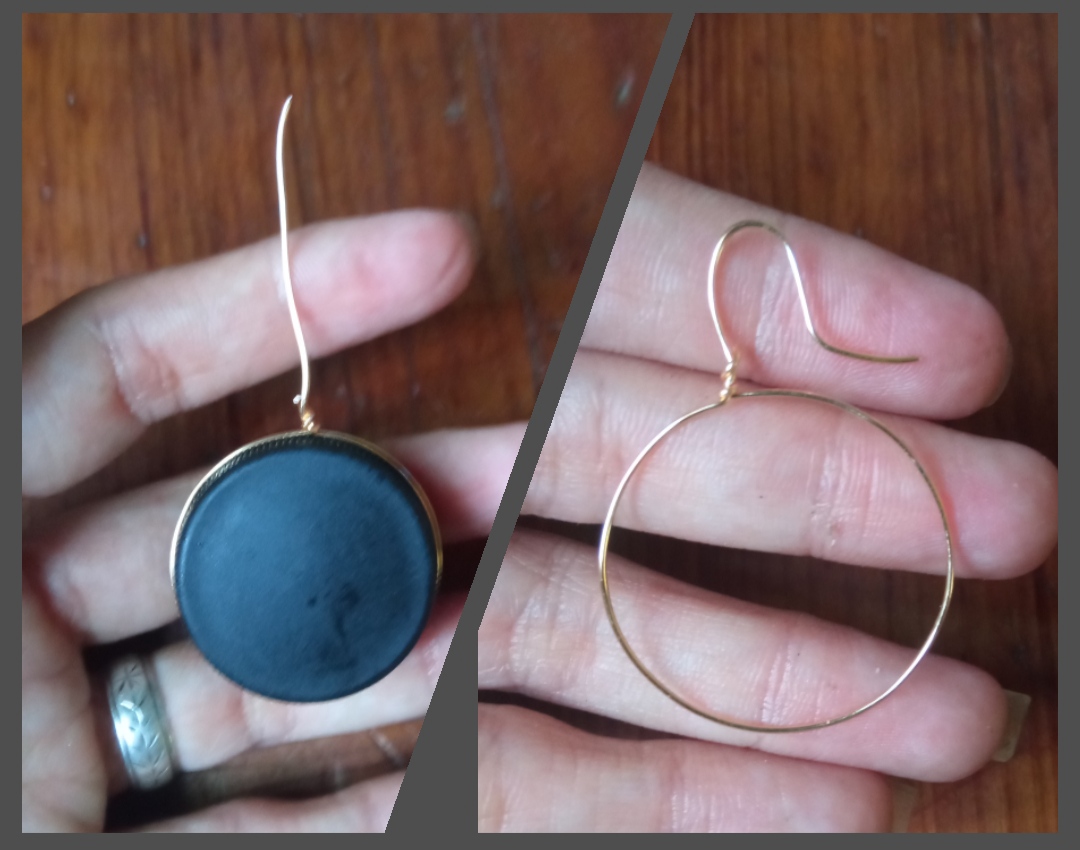
✴️ Paso 2: por encima de la forma circular dejaremos un pedazo de alambre de 3 cm el cual usaremos para moldear y dar forma al anzuelo para guindar el zarcillo.
✴️ Step 2: above the circular shape we will leave a 3 cm piece of wire which we will use to mold and shape the hook to hang the tendril.
✴️ Paso 3: para continuar cortaremos 2 tiras de 15cm de alambre de bisutería calibre 26, los uniremos en la punta realizando un amarre simple que luego podamos deshacer fácilmente, y comenzaremos a introducir mostacillas por una de estas tiras de alambre iniciando con las Mostacillas verde a una altura de 3cm e iniciamos a introducir las doradas 5cm de largo y y cerramos Introduciendo 3 cm más de mostacillas verdes.
✴️ Step 3: to continue we will cut 2 15cm strips of 26 gauge costume jewelry wire, we will join them at the end making a simple tie that we can easily undo later, and we will begin to introduce beads through one of these wire strips starting with the green Mostacillas at a height of 3 cm and we begin to introduce the golden ones 5 cm long and close by introducing 3 cm more of green mostacillas
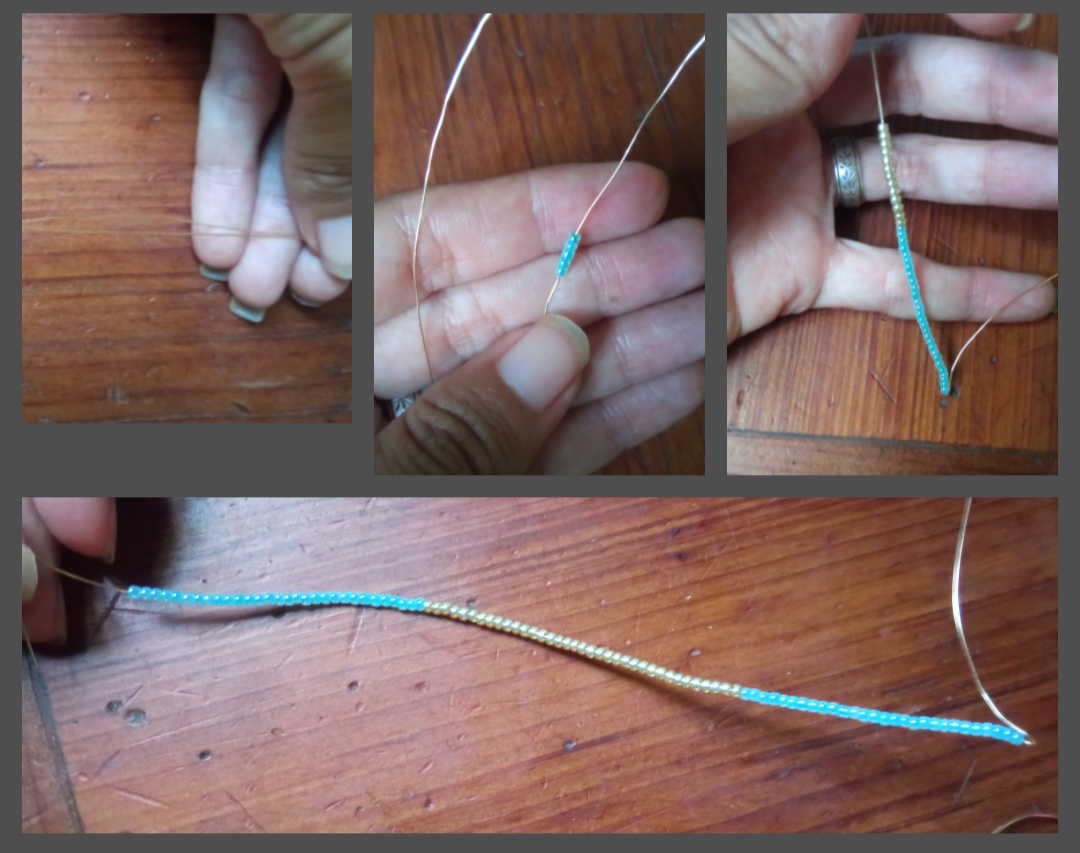
✴️ Paso 4: una vez tenemos esta tira lista realizamos un amarre al final para evitar se salgan las mostacillas del alambre, seguidamente desasemos una de los nudos de la punta y lo llevamos hasta la base circular de nuestro zarcillo y primeramente realizaremos varias vueltas de la punta sin mostacillas en la base y comenzaremos a realizar vueltas de esta tira de Mostacilla por la base. Realizaremos vueltas muy unidas tratando de que estás puedan cubran totalmente el alambre base, esto lo realizaremos en la parte posterior de el círculo y al culminar las mostacillas enrrollamos la punta del alambre a la base para sujetar la forma y listo. Ahora solo debemos repetir el procedimiento para elaborar la pareja de acsesorios.
✴️ Step 4: once we have this strip ready, we tie it at the end to prevent the beads from coming out of the wire, then we untie one of the knots at the tip and we take it to the circular base of our tendril and first we will make several turns of the tip without beads at the base and we will begin to make turns of this strip of Beads at the base.
We will make tight turns trying to ensure that these can fully cover the base wire, we will do this on the back of the circle and when we finish the beads we roll the tip of the wire to the base to hold the shape and that's it.
Now we just have to repeat the procedure to make the pair of accessories.
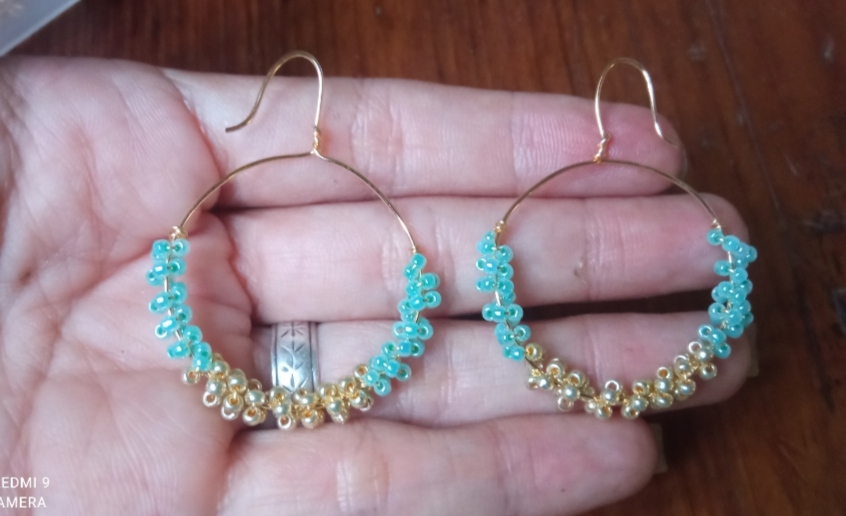
y así de sencillo y muy fácil podemos elaborar estos hermosos y elegantes zarcillos, el tamaño y el color pueden elaborarlos a su gusto y conveniencia, pero está es una idea muy creativa y Especial para decorar nuestros zarcillos sin muchos gastos ni complicaciones. Quiero invitarlos a visitar mi blog y disfrutar de algunas de mis otras creaciones realizadas con mostacillas y otros materiales.
and that simple and very easy we can make these beautiful and elegant tendrils, the size and color can be made to your liking and convenience, but this is a very creative and special idea to decorate our tendrils without much expense or complications.
I want to invite you to visit my blog and enjoy some of my other creations made with beads and other materials.
antes de despedirme quiero agradecerles por tomarse un poco de su tiempo para visitar mi blog y estaré anciosa de recibir sus comentarios y sugerencias. Me despido por esta oportunidad deseandoles una excelente noche. Saludos y bendiciones para ustedes.
Todas las Fotos son de mi autoría y fueron tomadas con mi Celular Redmi 9before I say goodbye I want to thank you for taking a bit of your time to visit my blog and I will be looking forward to receiving your comments and suggestions. I say goodbye for this opportunity wishing you an excellent night.
Greetings and blessings to you.
All Photos are my authorship and were taken with my Redmi 9 Cellphone
!discovery 30
This post was shared and voted inside the discord by the curators team of discovery-it
Join our Community and follow our Curation Trail
Discovery-it is also a Witness, vote for us here
Delegate to us for passive income. Check our 80% fee-back Program
Gracias por su apoyo.
https://twitter.com/1484196455719915527/status/1639129476482072576
The rewards earned on this comment will go directly to the people sharing the post on Twitter as long as they are registered with @poshtoken. Sign up at https://hiveposh.com.
Te quedaron bellos amiga, me gusta ese color y el diseño que le diste a los zarcillos ♥️
Gracias amiga me alegra su comentario 😊.
Saludos.
Que bellas te quedaron las argollas, con una buena elección de colores 🤗 este es un modelo de zarcillo que nos encanta lucir y esta manera que nos traes de realizarla esta muy práctica y sencilla, gracias por compartirla ✨💮✨💮
Gracias amiga, me alegra saber que le han gustado.
Saludos.