(ESP - ING) Elegantes zarcillos solitarios. / Elegant solitary tendrils.
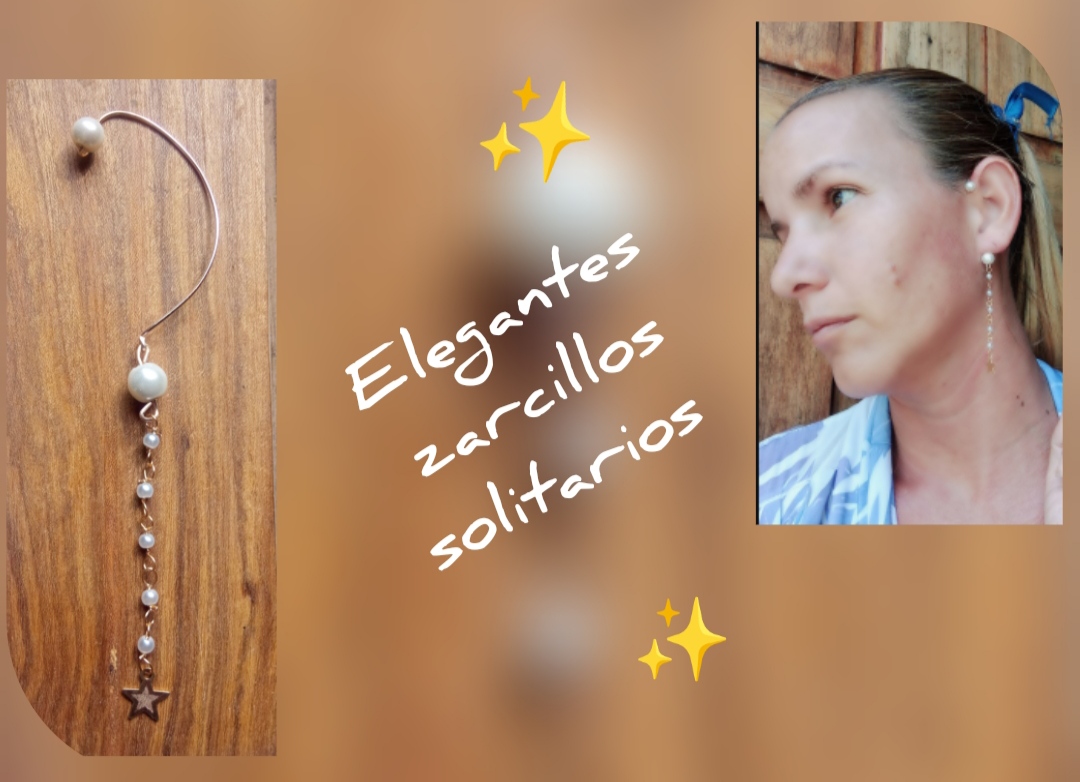
Feliz y bendecida noche tengan todos ustedes mis queridos y apreciados amigos creativos y amantes de la joyería, en esta nueva oportunidad quiero compartir con todos ustedes mi último diseño el cual elaboré con mucho cariño para compartir con todos ustedes se trata de un hermoso diseño de zarcillo solitario, elaborado con la técnica de alambrismo y el cual nos dará sin duda alguna un toque de elegancia y sofisticación. Actualmente está muy de moda todas estas decoraciones, elegantes y llamativas Y como siempre no podía perder la oportunidad de compartirles un diseño súper fácil y sencillo que podemos elaborar en casa con muy pocos materiales y con gran facilidad.
Happy and blessed night to all of you my dear and appreciated creative friends and jewelry lovers, in this new opportunity I want to share with all of you my latest design which I created with great love to share with all of you, it is a beautiful solitary tendril design, made with the wire technique and which will undoubtedly give us a touch of elegance and sophistication.
Currently, all these elegant and striking decorations are very fashionable. And as always, I couldn't miss the opportunity to share with you a super easy and simple design that we can make at home with very few materials and with great ease.
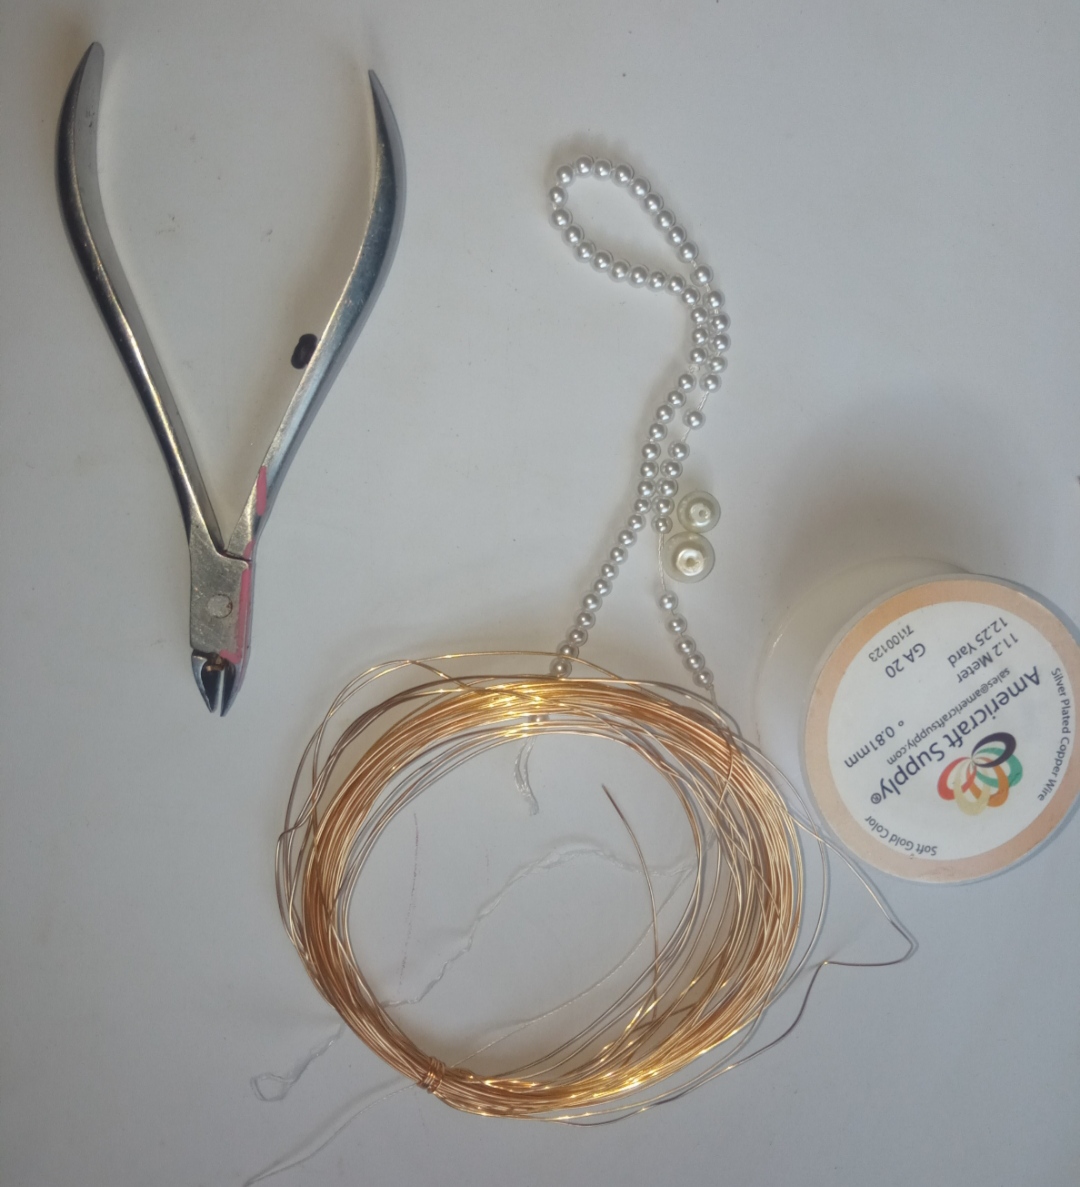
- Alambre de bisutería calibre 20.
- Alambre de bisutería calibre 26.
- Piedras perladas, medianas y pequeñas.
- un dije de estrellita.
- palillo.
- pinza de bisutería.
- 20 gauge jewelry wire.
- 26 gauge jewelry wire.
- Pearlized stones, medium and small.
- a little star pendant.
- toothpick.
- jewelry clamp.
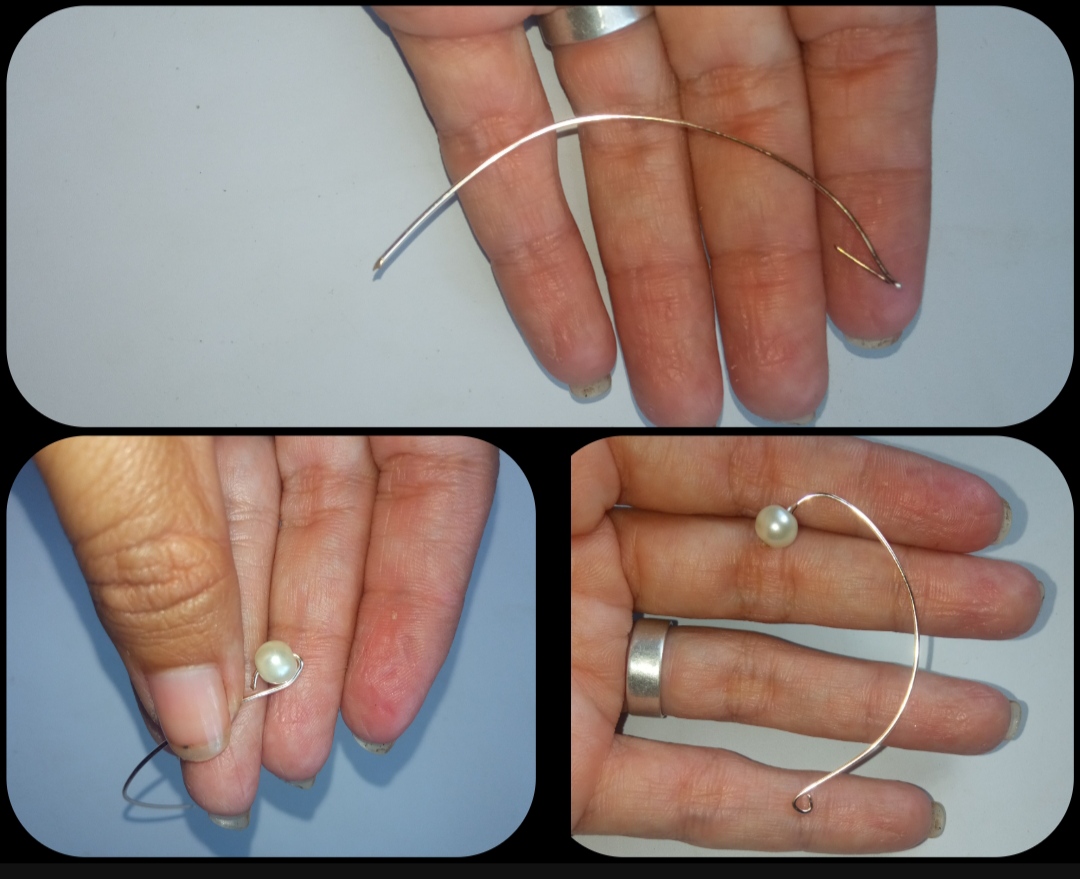
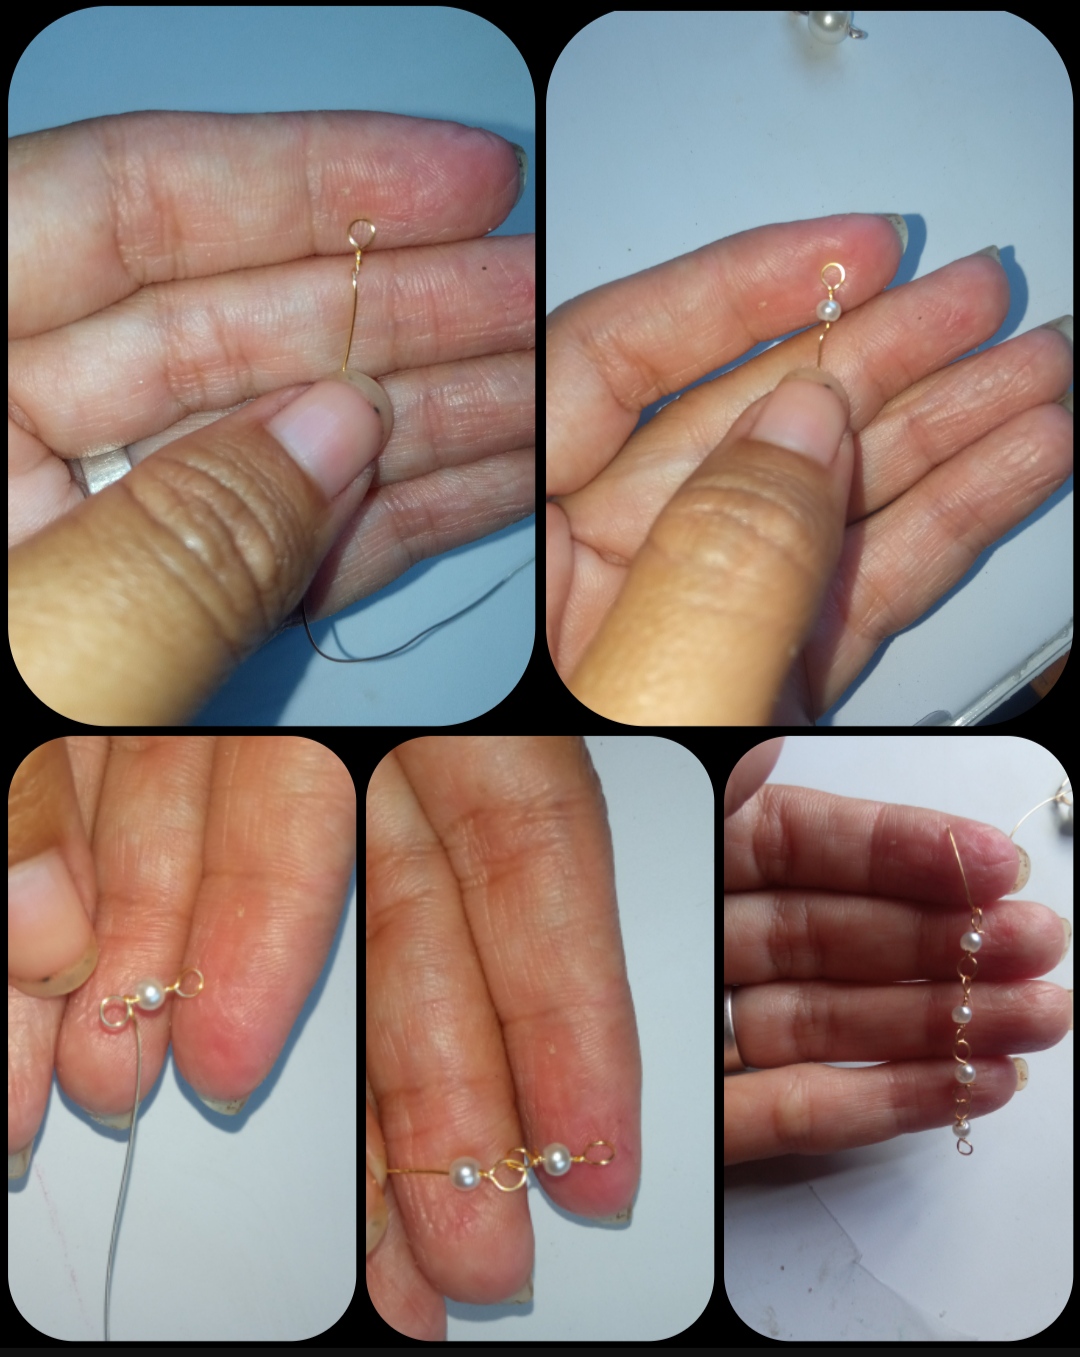
⭐ Paso 1: para iniciar está muy hermosa elaboración primeramente tomaremos el alambre de bisutería calibre 20 y picaremos un pedazo de 10 cm aproximadamente seguidamente en una de sus puntas introduciremos una piedra pelada mediana y doblaremos la punta del alambre alrededor de la misma sosteniendo esta piedra de manera que quede inmóvil en la punta del largo del alambre. Para continuar tomaremos una base cilíndrica y moldearemos un poco el alambre dándole la forma de la parte trasera de nuestra oreja tal cual pueden observar en las siguientes imágenes y en el otro extremo del alambre realizaremos un pequeño doblez en forma de gancho.
⭐ Step 1: to start this very beautiful preparation, we will first take the 20 gauge jewelry wire and chop a piece of approximately 10 cm, then at one of its tips we will insert a medium peeled stone and bend the tip of the wire around it holding this stone so that it is motionless at the end of the length of the wire. To continue, we will take a cylindrical base and mold the wire a little, giving it the shape of the back of our ear as you can see in the following images, and at the other end of the wire we will make a small hook-shaped bend.
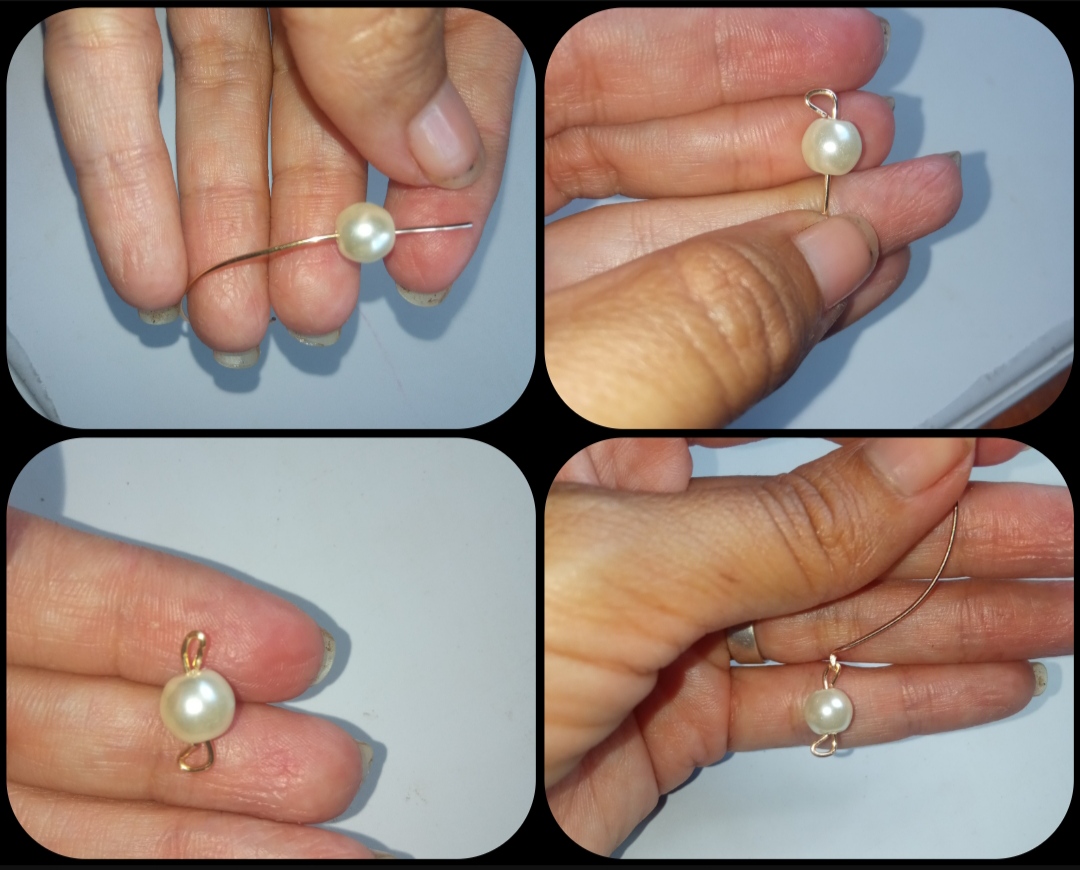
⭐ Paso 2: para continuar procederemos a tomar un pedacito muy pequeño de alambre de bisutería calibre 20 introduciremos la segunda piedra pelada mediana y realizaremos un doblez en cada extremo del alambre quedándonos esta pequeña pieza la cual a continuación engancharemos en el doblez posterior de nuestros zarcillos solitario.
⭐ Step 2: to continue, we will proceed to take a very small piece of 20 gauge jewelry wire, we will insert the second medium peeled stone and we will make a bend at each end of the wire, leaving this small piece which we will then hook into the subsequent bend. of our lonely tendrils.
⭐ Paso 3: ahora trabajaremos con el alambre calibre 26 para ello tomaremos un pedazo muy largo de este alambre y en uno de sus puntas realizaremos con ayuda del palillo una pequeña argolla circular seguidamente introduciremos por el otro extremo una pequeña piedra perlada y la llevaremos hasta esta forma circular y seguidamente en el mismo palillo elaboraremos una nueva forma circular luego de la piedra y cortaremos el exceso del alambre y nos quedará esta pequeña pieza que pueden ver a continuación. Procedemos nuevamente introducimos el alambre calibre 26 por la última argolla que elaboramos y la pieza anterior con el palillo realizamos una pequeña argolla circular de igual manera dentro decimos una piedra perlada y ciframos con una nueva forma circular y así sucesivamente iremos realizando esta hermosa cadeneta hasta lograr el largo deseado.
⭐ Step 3: now we will work with the 26 gauge wire. To do this, we will take a very long piece of this wire and at one of its ends we will make a small circular ring with the help of the toothpick, then we will insert a small pearl stone at the other end and We will take it to this circular shape and then on the same toothpick we will make a new circular shape after the stone and we will cut the excess of the wire and we will be left with this small piece that you can see below. We proceed again, we introduce the 26 gauge wire through the last ring that we made and the previous piece with the toothpick we make a small circular ring.
In the same way, inside we say a pearly stone and we encrypt it with a new circular shape and so on we will make this beautiful chain until we achieve the desired length.
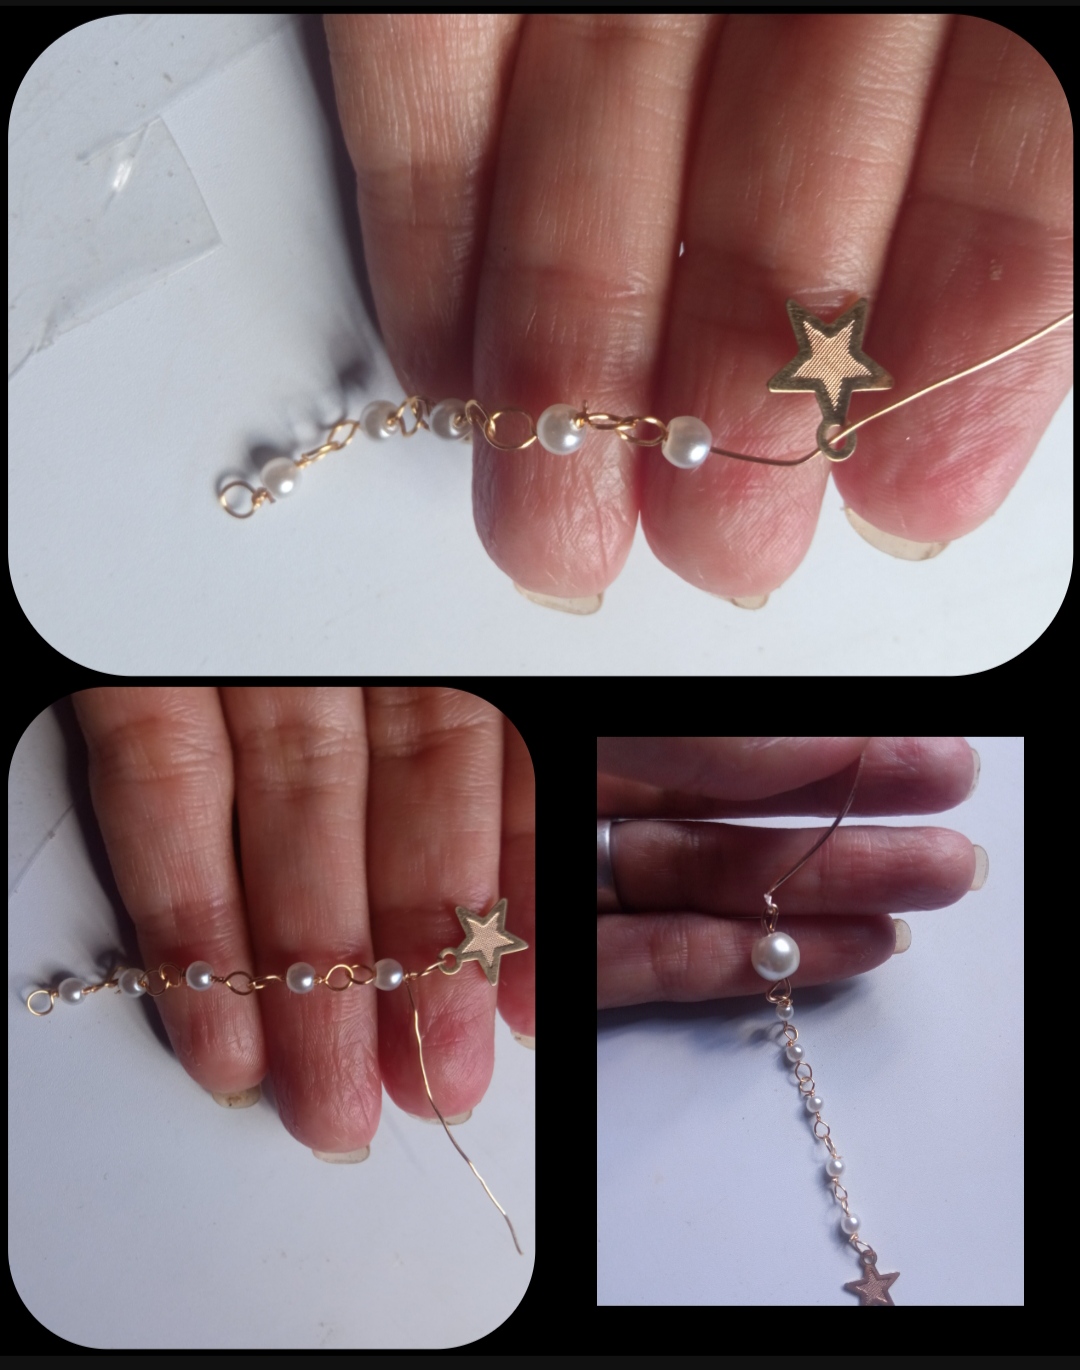
⭐ Paso 4: una vez obtenido el largo deseado en la última pieza o forma circular engancharemos antes de elaborarla introduciremos por el alambre la pequeña dije de estrella y luego elaboraremos la forma circular para que esta quede integrada a la cadena. Para culminar nuestra hermosa elaboración uniremos esta linda cadeneta a la piedra mediana y colocamos en la base de nuestro zarcillos como pueden observarlo En las siguientes imágenes.
⭐ Step 4: once the desired length is obtained in the last piece or circular shape, we will hook it before making it, we will insert the small star pendant through the wire and then we will make the circular shape so that it is integrated into the chain.
To complete our beautiful creation, we will attach this beautiful chain to the medium stone and place it at the base of our earrings, as you can see in the following images.
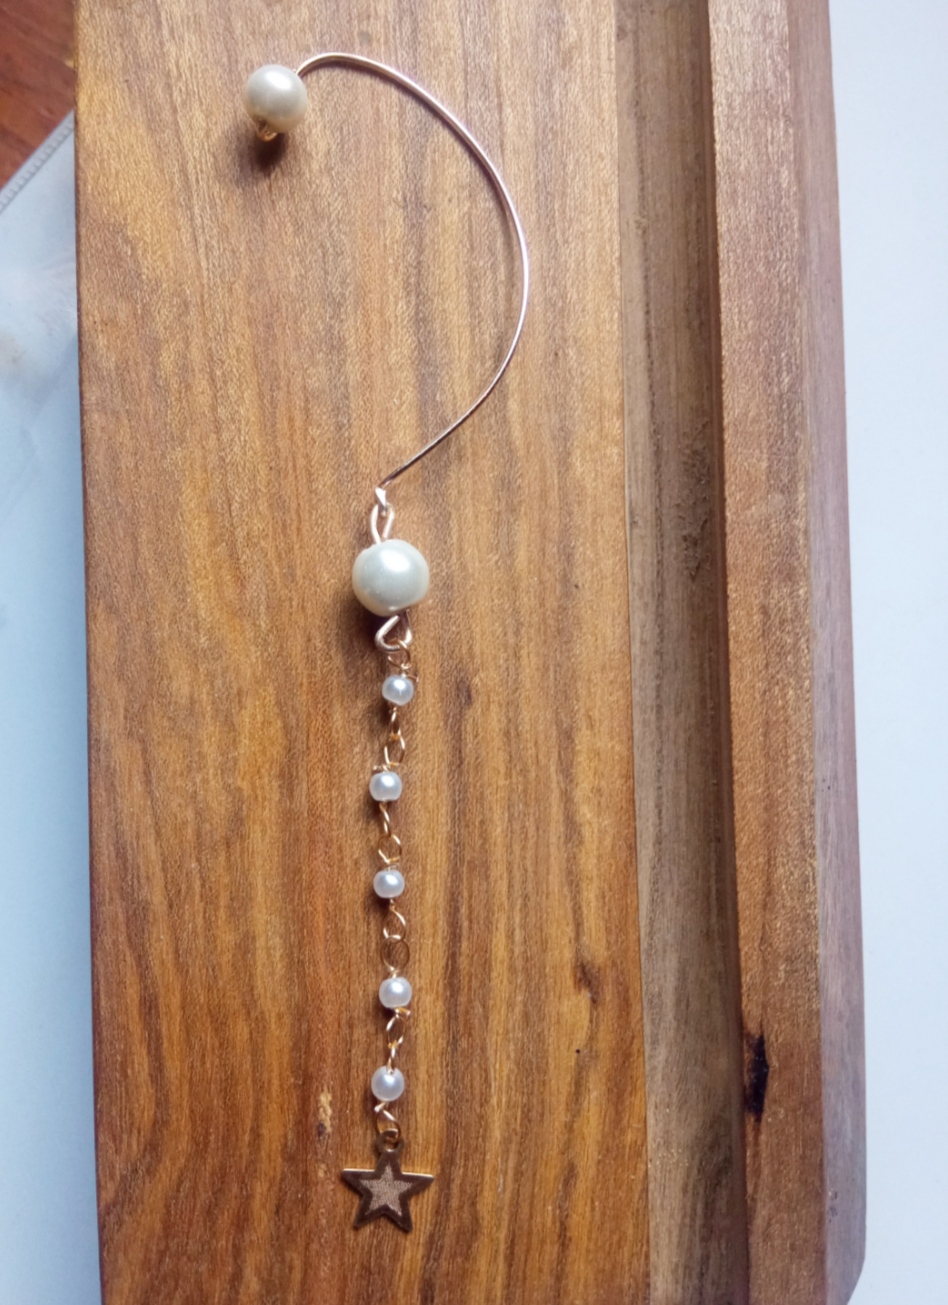
Todas las Fotos son de mi autoría y fueron tomadas con mi Celular Redmi 9.And so, my dear and appreciated friends, we will be able to make this beautiful and delicate accessory, ideal to wear on a special occasion. I confess that it is the first time that I have made and used a piece like this and the truth is that you will be super delighted and I hope that you find this simple design. please both you and me.
I say goodbye for this opportunity, grateful for your visit, it will be until a new opportunity, greetings and blessings.
All Photos are my authorship and were taken with my Redmi 9 Cellphone
Muy lindos, un modelo muy original 😁
Gracias amiga.
Que bien, me gustaron, yo debo experimentar hacer unos pero le he estado dando largas al asunto
Me alegra que te haya gustado.
Saludos.
Muy lindo trabajo creativo, genial para todos aquellos que no tienen perforaciones, aun así en lo personal, me encantan los solitarios y sin duda usaría uno como este.
Saludos...
!DIY
Me alegra mucho saber que te ha gustado amiga, gracias por su comentario.
Saludos.
Nice solitaire, certainly a nice creative and elegant work.
Muy bonito quedó el solitario , te felicito amiga @emmaris .
Gracias amiga, me alegra que te haya gustado.