(ESP - ING) Te enseño cómo realizar una pulsera de protección 🧿
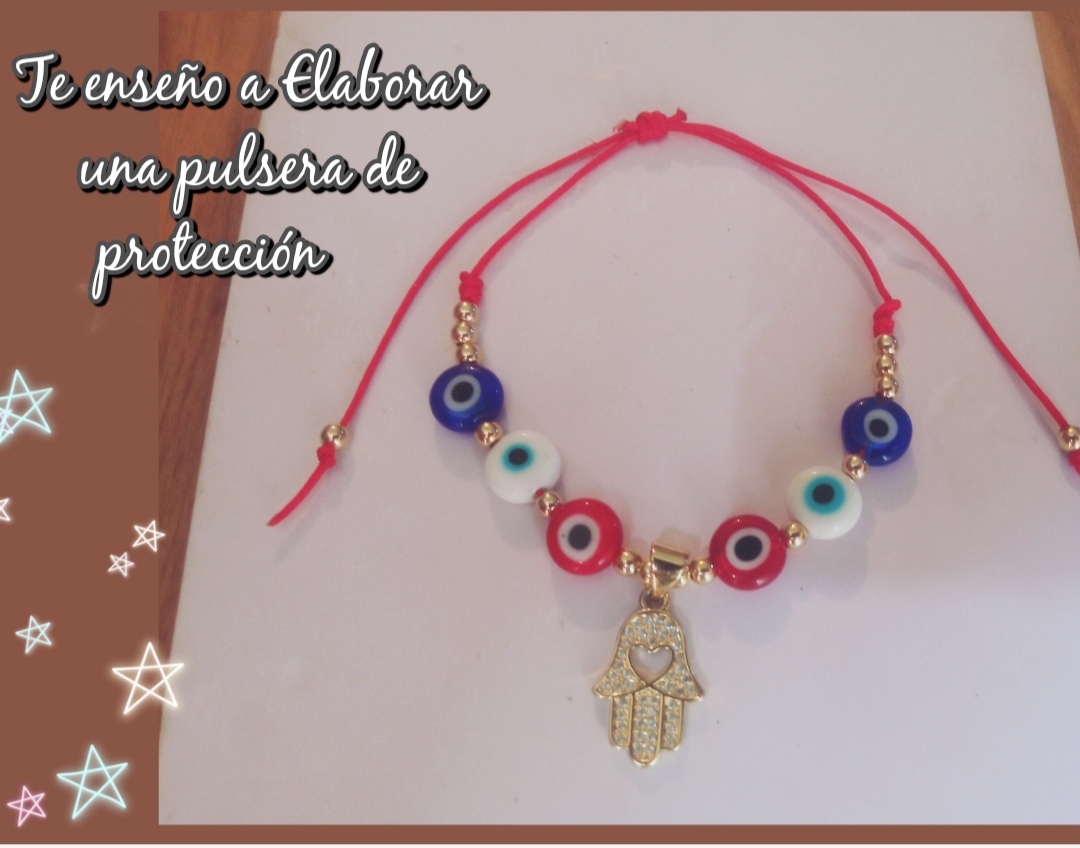
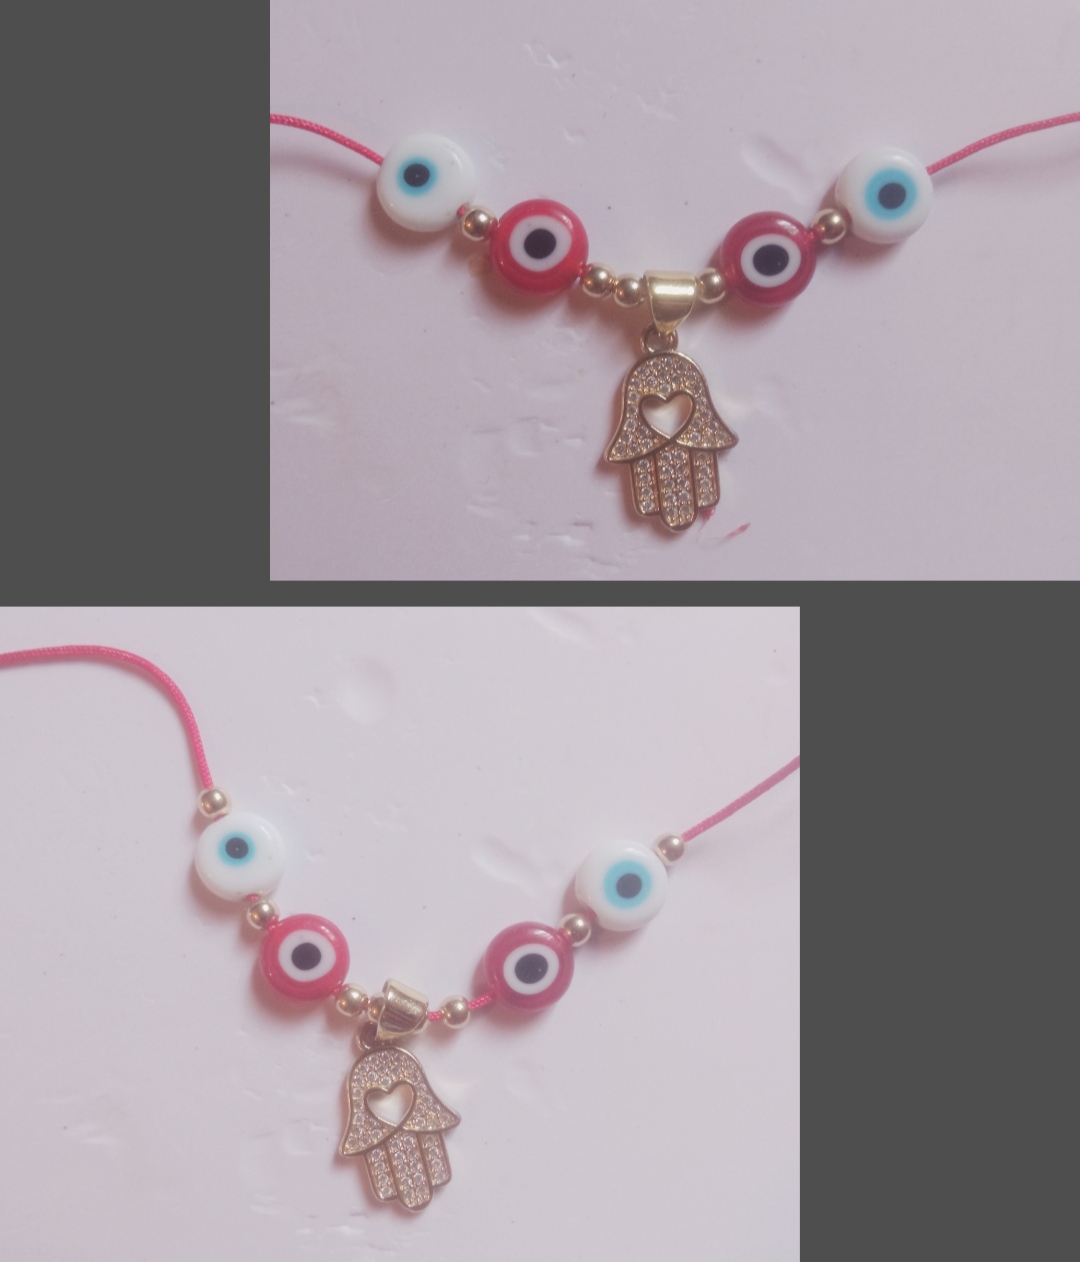
Feliz y bendecido día tengan todos ustedes mis apreciados amigos creativos de esta hermosa comunidad, el día de hoy quiero compartir con ustedes un muy sencillo tutorial para la elaboración de una hermosa pulsera de protección, les confieso que mis creaciones nunca había realizado una pulsera destinada a la protección y mucho menos con estos materiales, sin embargo una amiga a la cual le he revisado diversos diseños me solicitó este diseño en especial que tuviese estos ojitos turcos y la manito. Tuve la curiosidad e investigue un poco acerca del significado de estas piezas y encontré que ambas son utilizadas como amuleto para alejar y protegernos de las malas energías.
Happy and blessed day to all of you my appreciated creative friends of this beautiful community, today I want to share with you a very simple tutorial for making a beautiful protection bracelet, I confess that my creations had never made a bracelet intended for protection and much less with these materials, however a friend to whom I have reviewed various designs asked me for this design in particular that had these little Turkish eyes and the little hand with.
I was curious and did a little research about the meaning of these pieces and found that both are used as an amulet to ward off and protect us from bad energies.
So I set out to make this beautiful design, which I made with Turkish eyes in only three colors, however, these small pieces come in many other colors and each one has a special meaning. But since this one was made to the taste and needs of my friend Only these three were used, and here I wanted to share it with all of you through this simple tutorial which I hope will be useful to you.
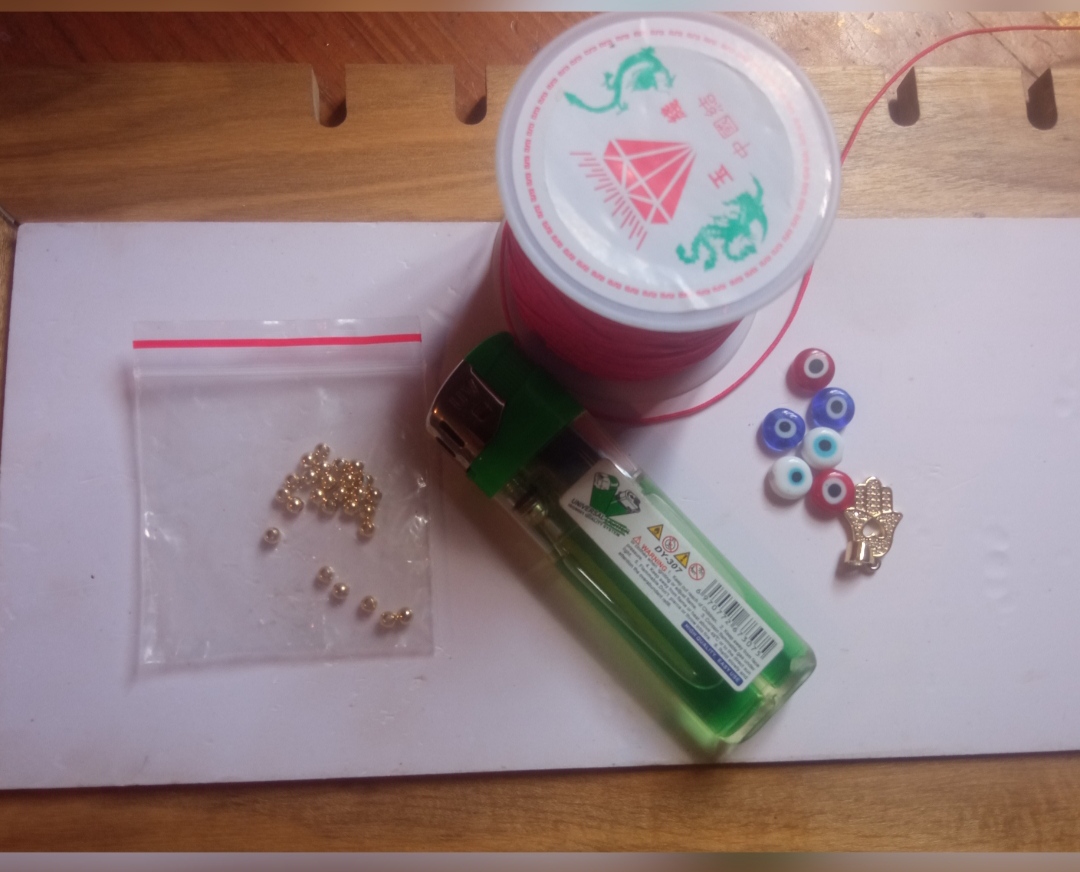
- Hilo chino Rojo.
- balines dorados.
- Ojitos turcos.
- Manito de protección.
- tijera.
- yesquero.
- pitillo.
- Red Chinese thread.
- golden pellets.
- Turkish eyes.
- Protection manitus.
- scissors.
- tinderbox.
- cigarette.
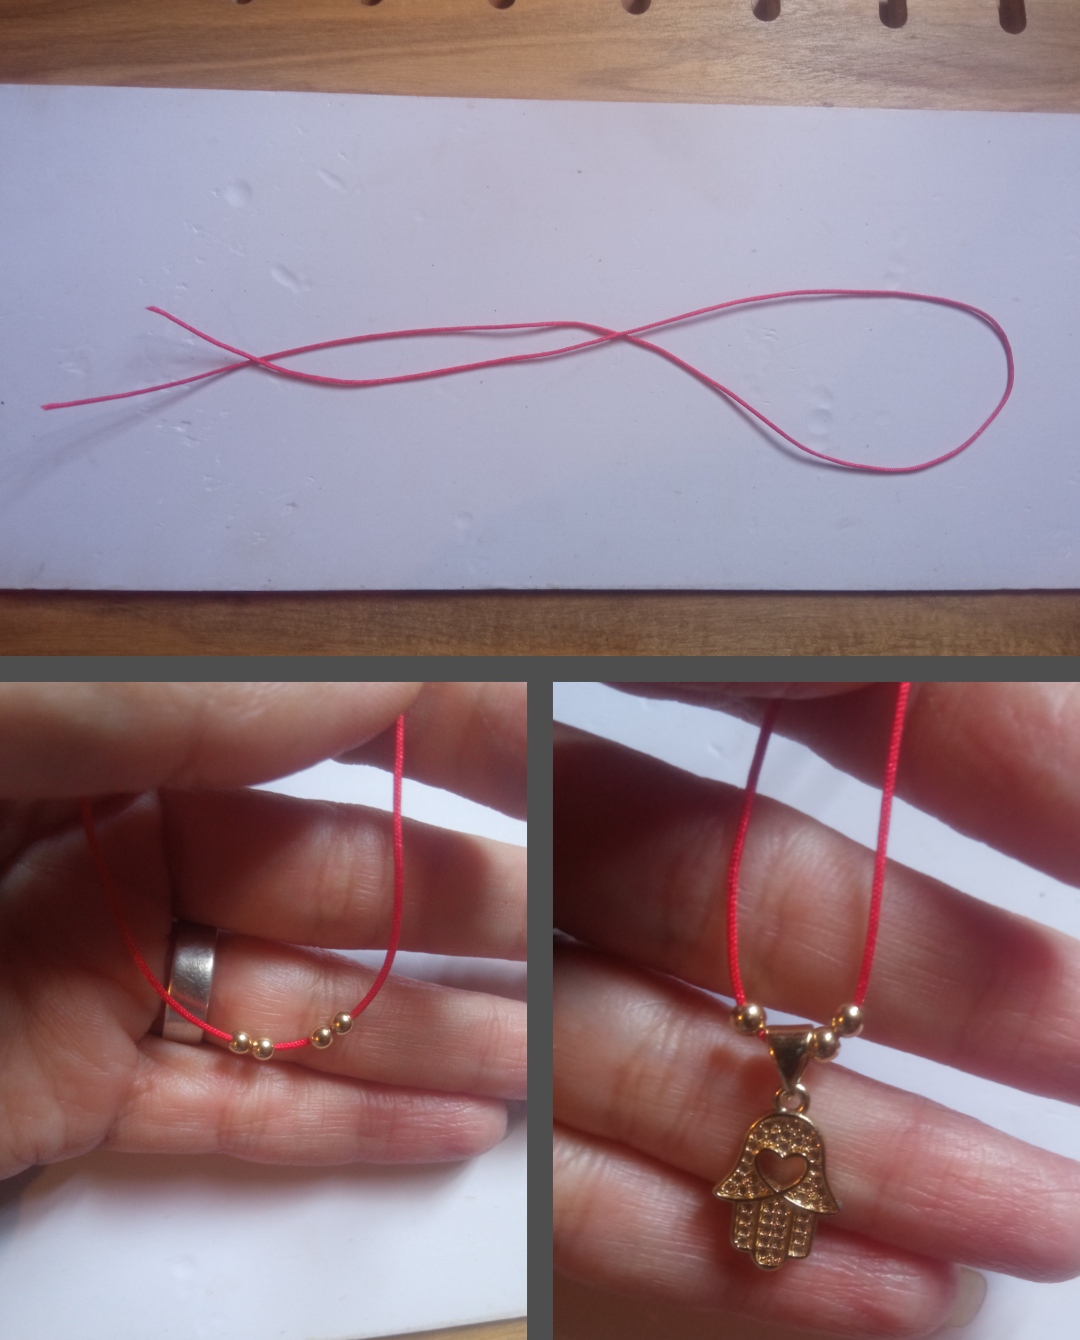
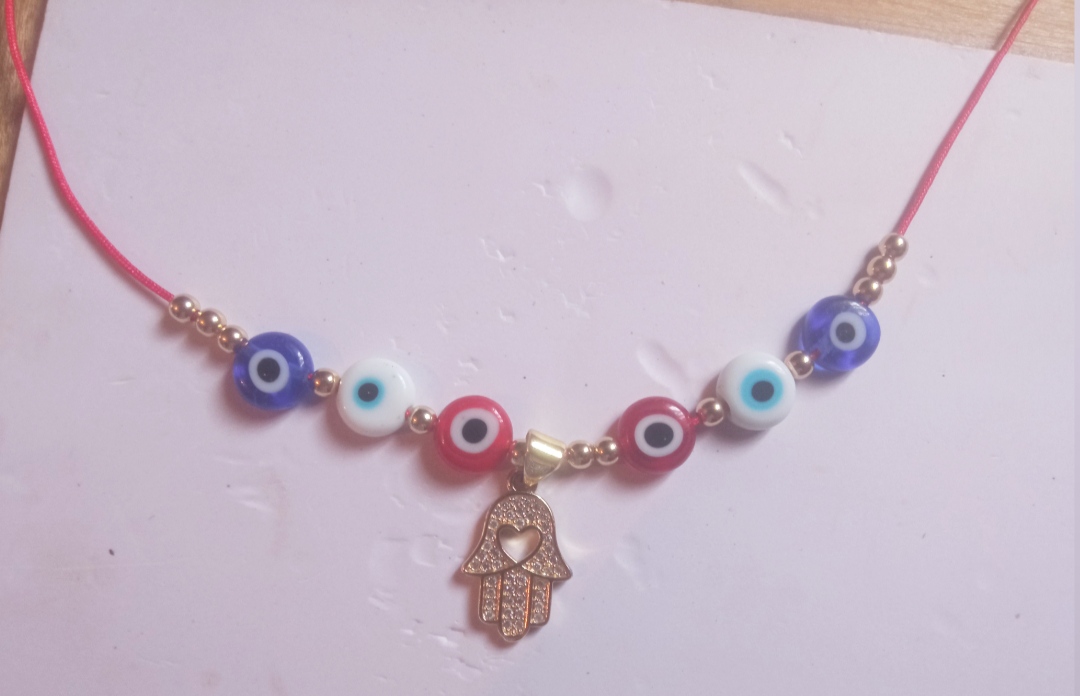
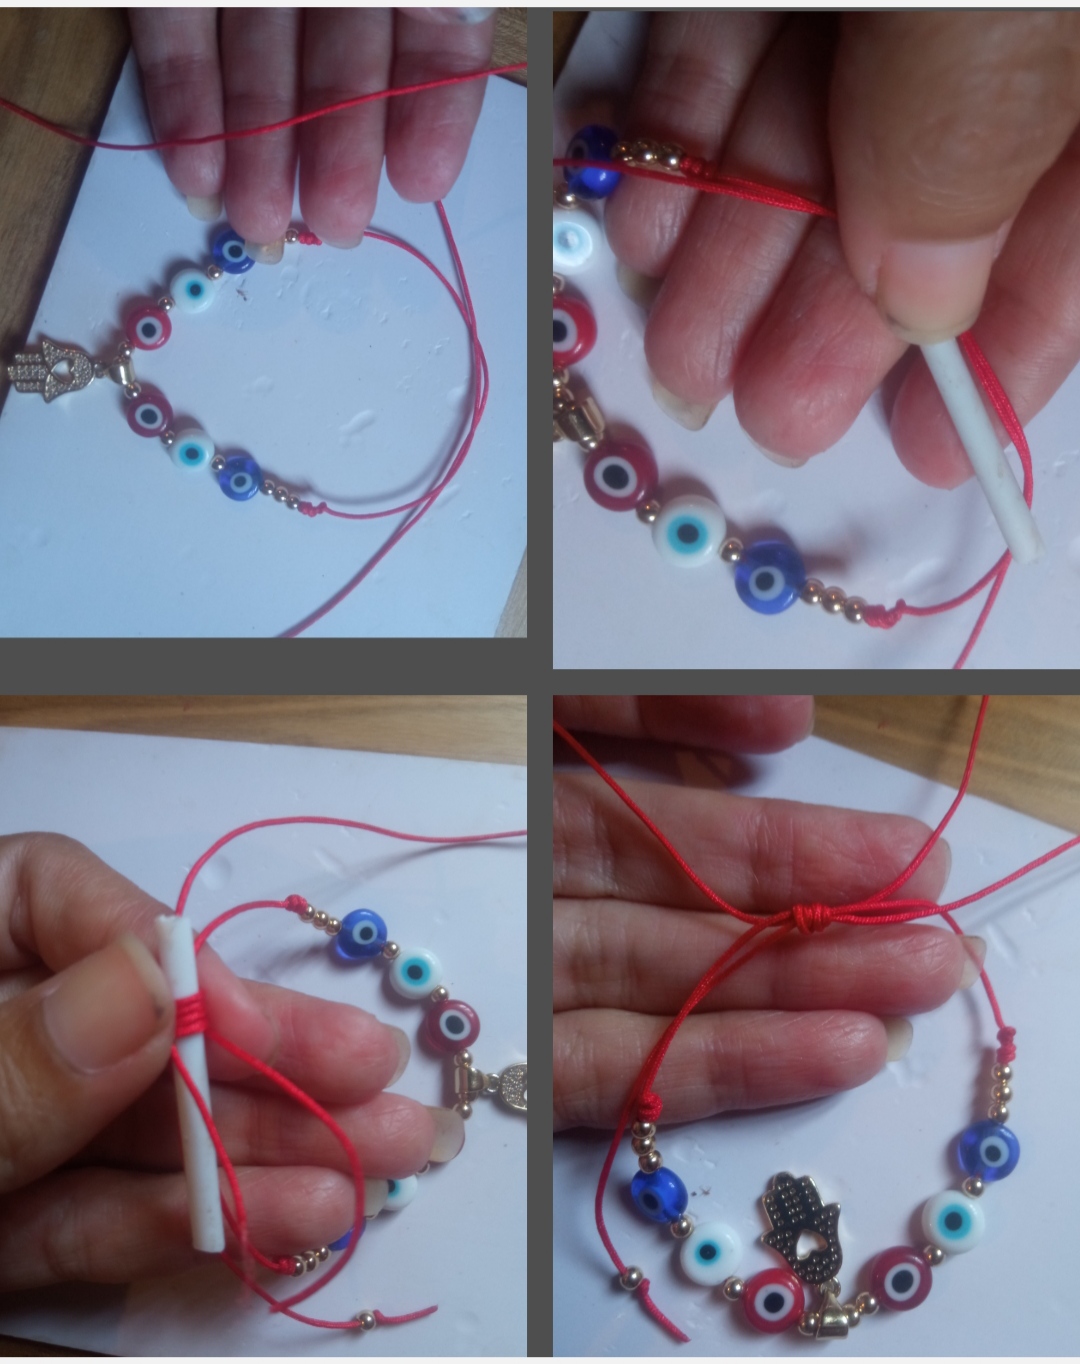
⭐ Paso 1: para iniciar la elaboración de este hermoso diseño lo primero que debemos hacer es tomar el hilo chino rojo y cortar un pedazo de aproximadamente 30 cm para trabajar con total libertad, seguidamente con el yesquero quemaremos un poco la punta del hilo chino para afinarla y que puedan pasar las piedras con facilidad. Iniciaremos introduciendo cuatro balines dorados los cuales llevaremos a la parte central del hilo chino como pueden observarlo a continuación Y encima de estos introduciremos con forma de mano.
⭐ Step 1: to start making this beautiful design, the first thing we must do is take the red Chinese thread and cut a piece of approximately 30 cm to work with total freedom, then with the tinder box we will burn the tip of the thread a little.
Chinese thread to tune it so that the stones can pass easily. We will start by introducing four golden pellets which we will take to the central part of the Chinese thread as you can see below. And on top of these we will insert the shape of a hand.
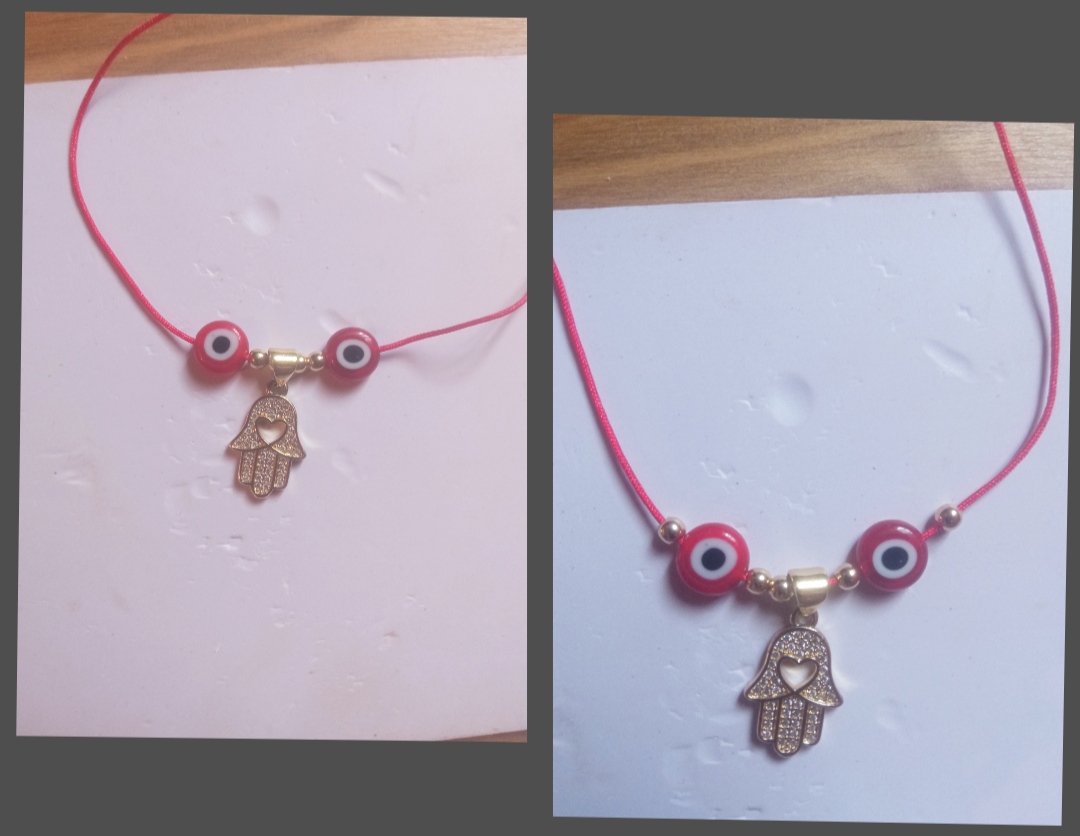
⭐ Paso 2: para continuar introduciremos el primer ojito turco que será el de color rojo introduciremos uno de cada lado y seguidamente introduciremos un balín dorado. De igual manera introduciremos un ojito turco blanco de cada extremo del hilo y un balín dorado.
⭐ Step 2: to continue we will introduce the first Turkish eye, which will be the red one, we will introduce one on each side and then we will introduce a golden pellet. In the same way we will introduce a white Turkish eye from each end of the thread and a golden ball.
⭐ Paso 3: seguidamente introduciremos los ojitos turcos color azul uno de cada lado y luego de esta pieza introduciremos tres balines dorados de cada lado tal cual pueden observarlo En las siguientes imágenes. Para sostener estas piezas en la parte central de la pulsera realizaremos un nudo franciscano luego de los balines para ello tomaremos un pedacito de pitillo lo colocaremos por encima del hilo chino y luego enrollaremos el hilo chino encima de pasando el hilo chino por dentro del pitillo y luego lo sacamos vamos jalando poco a poco hasta darle seguridad a este nudo, de igual manera realizaremos en el otro lado de la pulsera para sujetar así nuestras piezas en la parte central de la pulsera tal cual pueden observar a continuación.
⭐ Step 3: next we will introduce the blue Turkish eyes, one on each side and after this piece we will introduce three golden pellets on each side as you can see in the following images. To hold these pieces in the central part of the bracelet we will make a Franciscan knot after the beads.
For this we will take a small piece of straw, place it above the Chinese thread and then we will wind the Chinese thread on top, passing the Chinese thread inside the straw and Then we take it out, pulling it little by little until we secure this knot, in the same way we will do it on the other side of the bracelet to hold our pieces in the central part of the bracelet as you can see below.
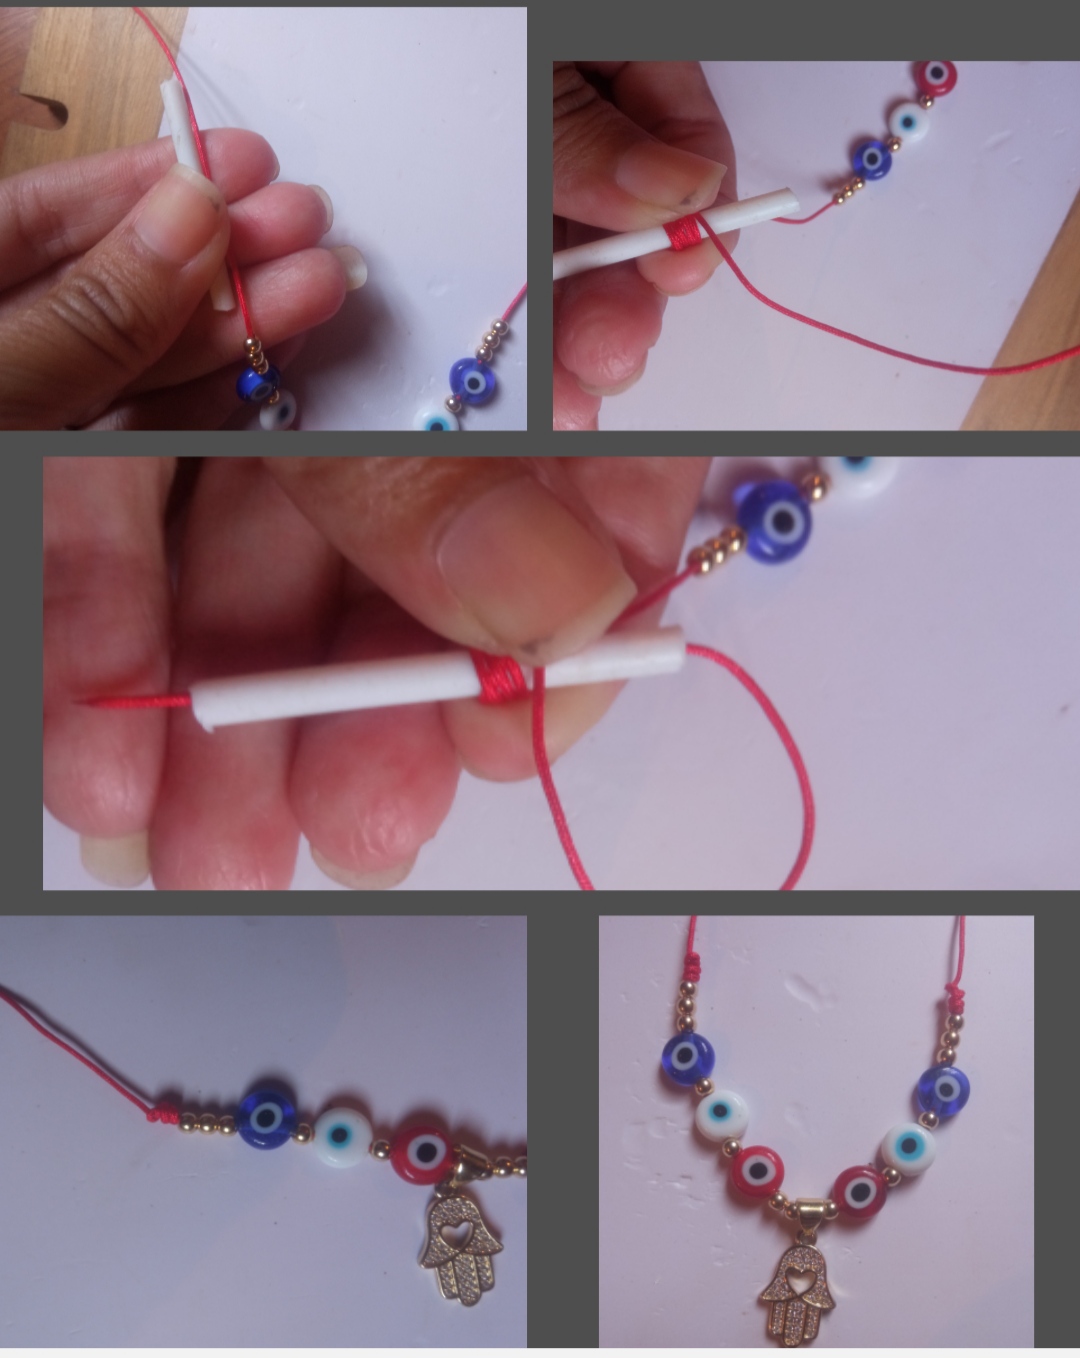
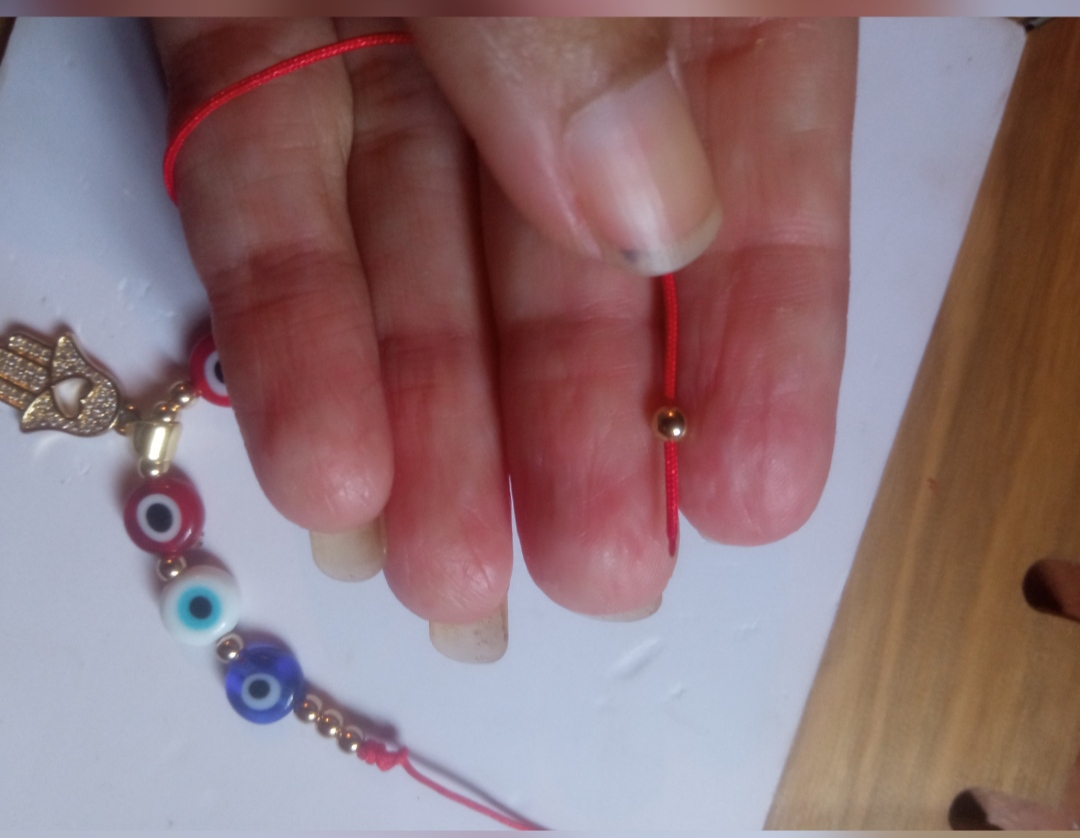
⭐ Paso 4: por último introduciremos un pequeño balín por cada extremo del hilo chino y creceremos un pequeño nudo normal en la punta del hilo chino para evitar perder este pequeño balín. Seguidamente cruzaremos los dos extremos ver hilo chino uno encima del otro como pueden observarlo en las imágenes y con otro pedacito de hilo chino color rojo y apoyándonos en el pequeño palillo realizaremos un nudo franciscano de igual manera que lo realizamos en El Paso anterior quemaremos la punta del hilo que nos sobre y así con este nudo podremos ajustar nuestra pulsera al tamaño deseado.
⭐ Step 4: finally we will insert a small ball at each end of the Chinese thread and we will grow a small normal knot at the end of the Chinese thread to avoid losing this small ball. Next we will cross the two ends, see Chinese thread, one on top of the other, as you can see in the images, and with another piece of red Chinese thread, and leaning on the small toothpick, we will make a Franciscan knot in the same way as we did in the previous El Paso, we will burn the tip.
of the leftover thread and so with this knot we can adjust our bracelet to the desired size.
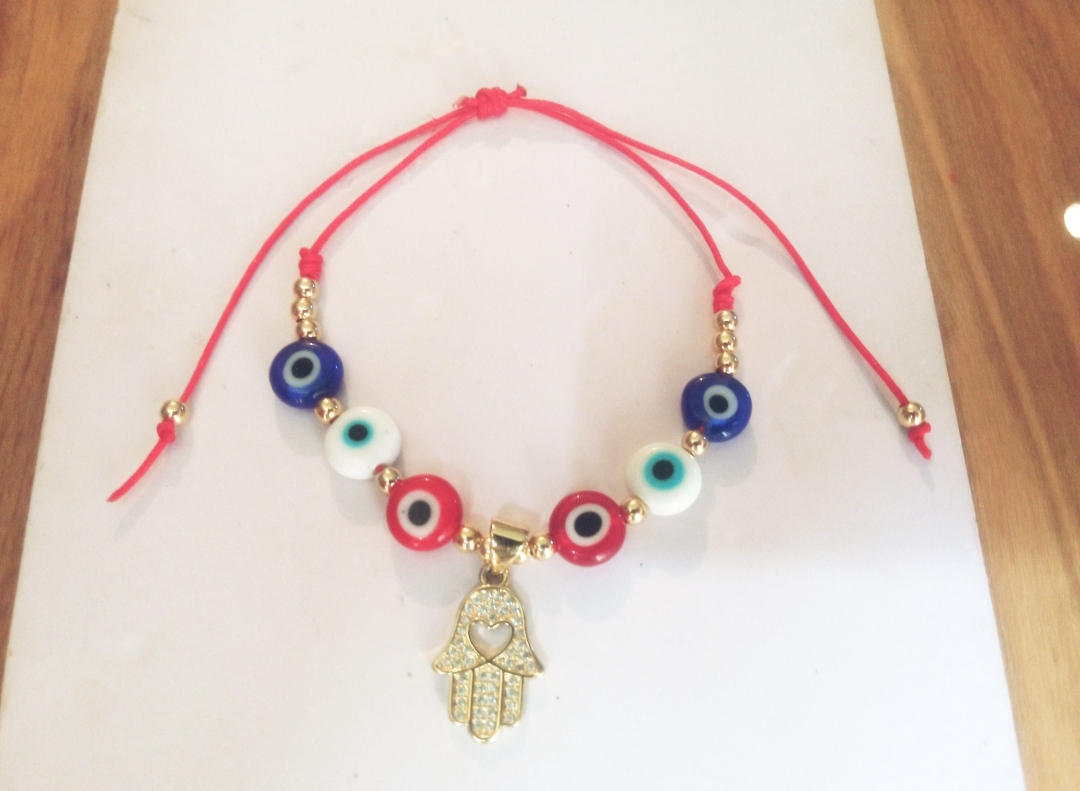
Todas las Fotos son de mi autoría y fueron tomadas con mi Celular Redmi 9.And so, my dear and appreciated friends, we will be able to make a very beautiful protection bracelet to ward off all those bad energies. I confess that my friend was delighted and so was I, because after making it I was so delighted that I wanted to make one for myself.
This is a very nice bracelet that, despite being very simple, usually has a great meaning for some people. My dear visitors, I thank you for coming this far with me in this tutorial. Now I must say goodbye for this opportunity, grateful to all of you for your visit and wishing you a great day.
All Photos are my authorship and were taken with my Redmi 9 Cellphone
Que bien te quedó amiga interesante su significado 😉
Gracias amiga, me alegra que te haya gustado 😊
!discovery 39
Gracias amiga ☺️
This post was shared and voted inside the discord by the curators team of discovery-it
Join our Community and follow our Curation Trail
Discovery-it is also a Witness, vote for us here
Delegate to us for passive income. Check our 80% fee-back Program
Gracias 😊
Estos ojos turcos están muy de moda y cada uno tiene su significado, nos encanta ver el resultado, muy sencillo y bonito 😉
WOW! It's so beautiful, stylish, and attractive. Love its color and design. Great job! Thank you for sharing this.