Tutorial : zarcillos de flores / Tutorial: flower tendrils (ESP - ING)

feliz y bendecido día tengan todos ustedes mis queridos y apreciados amigos creativos miembros de esta hermosa comunidad es un gran placer para mí el compartir un nuevo contenido con todos ustedes el día de hoy, en esta oportunidad me complace traerles un muy sencillo tutorial donde juntos elaboraremos unos hermosos zarcillos con forma de pequeña Flor utilizando la técnica del alambrismo. Este es un diseño de zarcillos de clavitos pegados a la oreja súper cómodos y muy hermosos ideales para lucir en cualquier ocasión.
Happy and blessed day to all of you my dear and appreciated creative friends, members of this beautiful community, it is a great pleasure for me to share new content with all of you today, on this occasion I am pleased to bring you a very simple tutorial where together we will make beautiful tendrils in the shape of a small flower using the wire technique.
This is a design of stud earrings attached to the ear that are super comfortable and very beautiful, ideal to wear on any occasion.
This is a design that we can make very easily in three simple steps because even a beginner with practice can easily make it at home.
Below I share the preparation process in detail step by step for all of you.
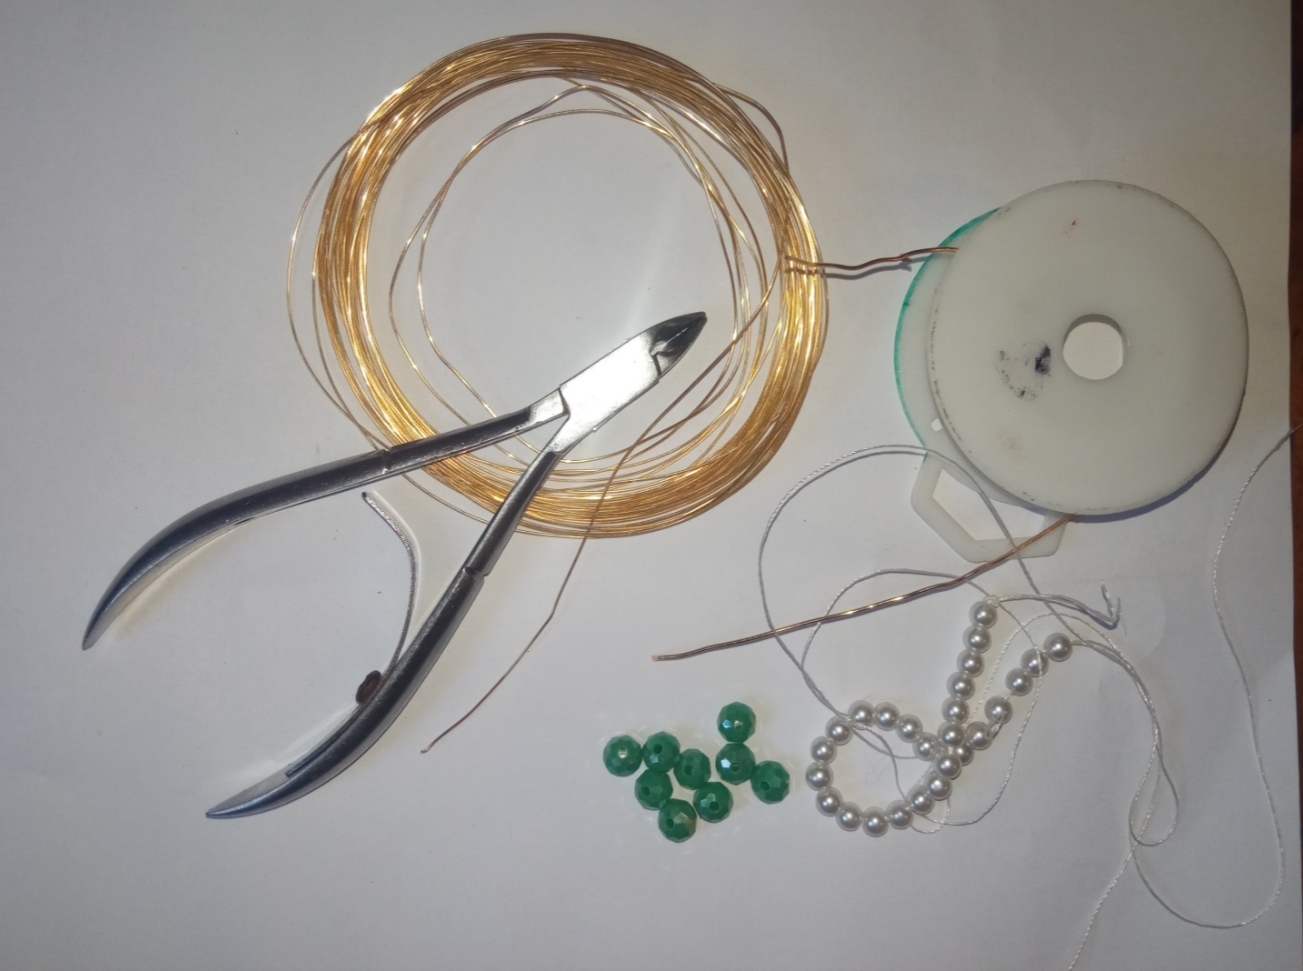
- Alambre de bisutería calibre 20.
- Alambre de bisutería calibre 26
- cristales medianos color verde.
- cristales pequeños verde tornasol.
- piedras Perladas pequeñas.
- pinza de bisutería.
- 20 gauge jewelry wire.
- 26 gauge jewelry wire
- medium green crystals.
- small iridescent green crystals.
- small pearl stones.
- jewelry clamp.
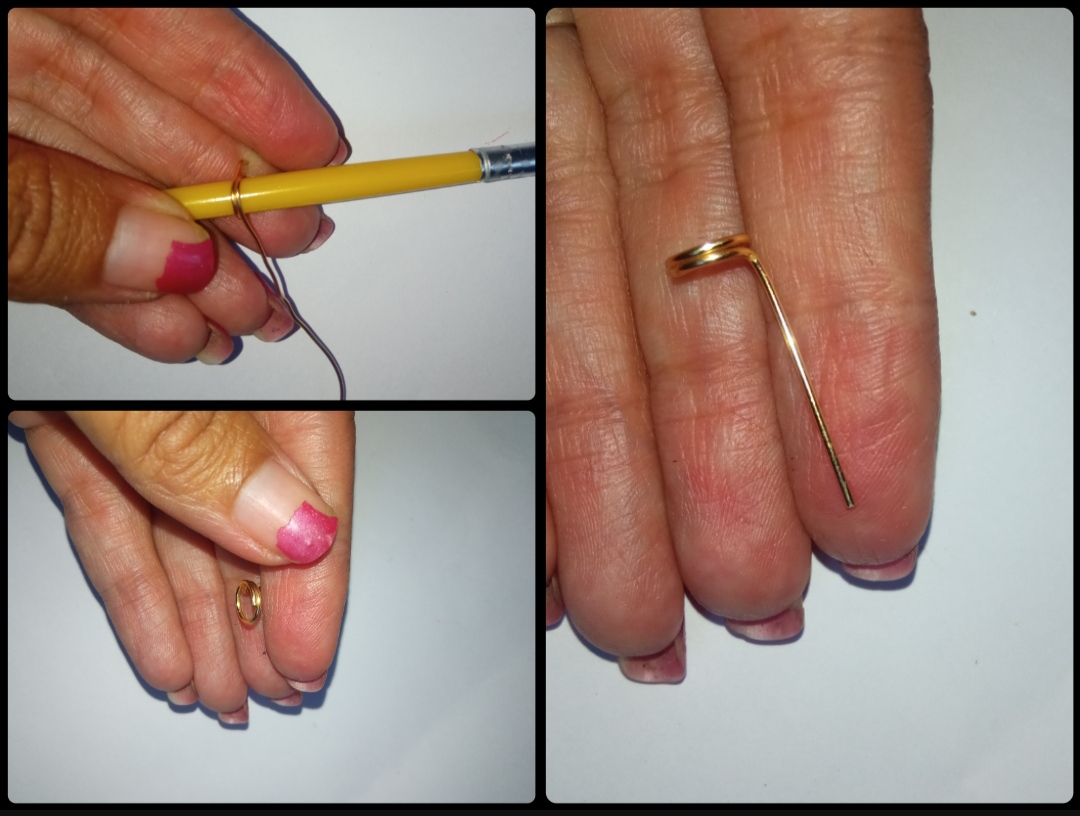
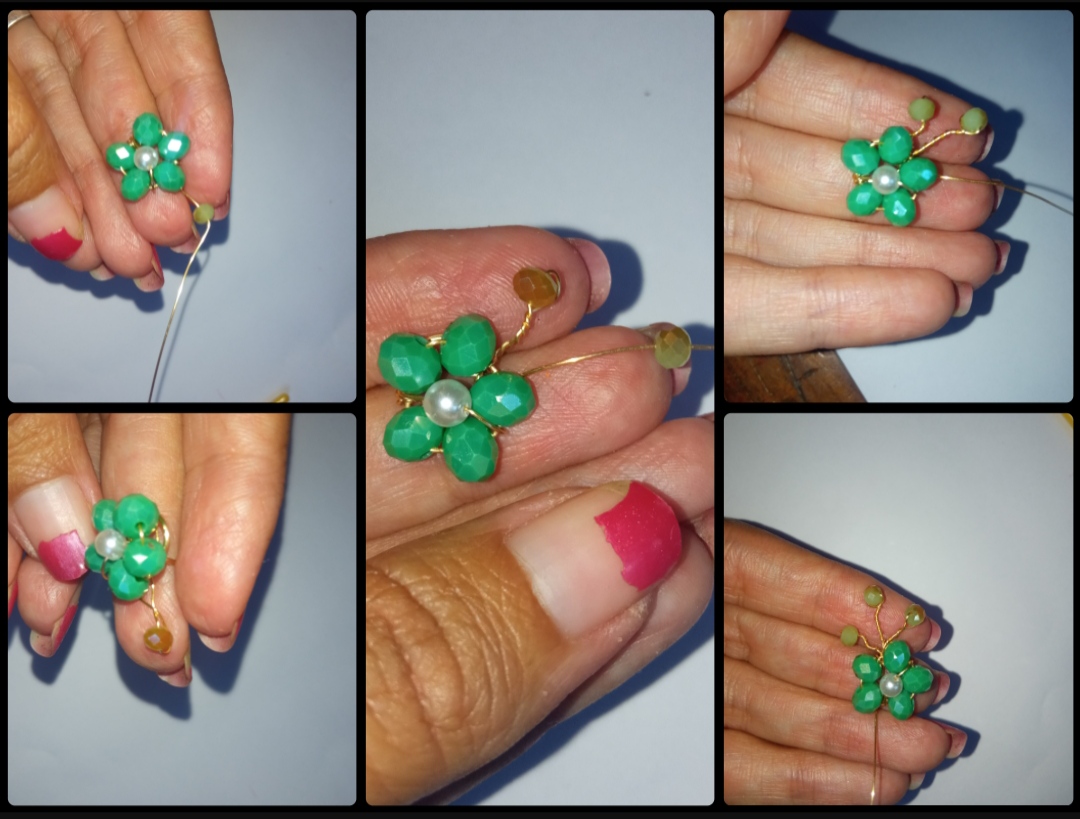
⭐ Paso 1: para iniciar la elaboración de este hermoso diseño lo primero que debemos hacer es tomar el alambre de bisutería calibre 20 y apoyándonos en la punta de la pinza o cómo es en mi caso en la base de un pincel elaboraremos una pequeña forma circular tal cual pueden observar en las siguientes imágenes. Una vez elaborada esta forma circular el exceso de alambre lo cruzaremos hacia la parte de atrás y dejaremos un pedazo de un centímetro y medio el cual será el clavo para colocar nuestro zarcillo y así ya tenemos la base principal de nuestro diseño.
⭐ Step 1: to start making this beautiful design, the first thing we must do is take the 20 gauge jewelry wire and, leaning on the tip of the tweezers or, as is the case in my case, at the base of a brush we will make a small circular shape as you can see in the following images. Once this circular shape is created, we will cross the excess wire towards the back and leave a piece of one and a half centimeters which will be the nail to place our tendril and thus we have the main base of our design.
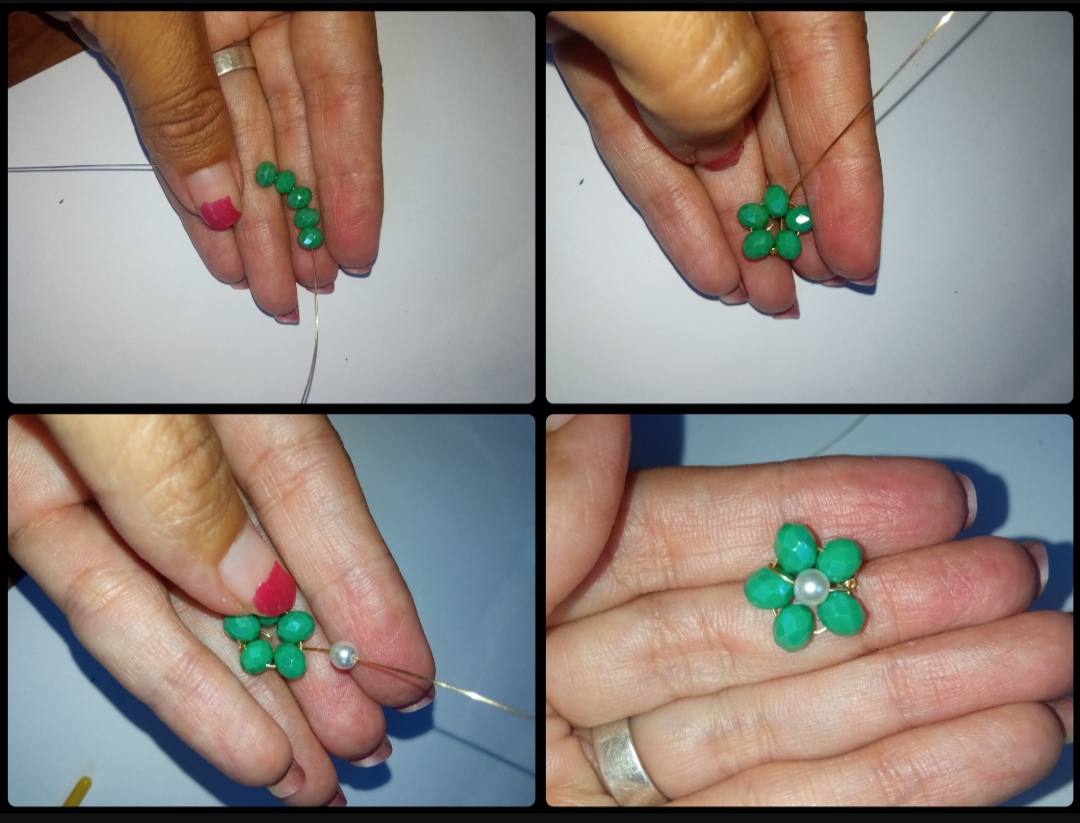
⭐ Paso 2: seguidamente tomaremos un pedazo de alambre de bisutería calibre 26 e introduciremos cinco cristales verdes de tamaño mediano y luego los uniremos los extremos de alambre formando una forma circular con los cristales para así ir dándole forma a nuestra pequeña Flor, seguidamente introduciremos una piedra perlada blanca y la cruzaremos por encima de esta forma circular colocando la piedra exactamente en el centro de este círculo y sujetaremos el alambre en el otro extremo como pueden observar a través de las siguientes imágenes.
⭐ Step 2: Next we will take a piece of 26 gauge jewelry wire and insert five medium-sized green crystals and then we will join the ends of the wire forming a circular shape with the crystals in order to shape our little Flower. Next we will introduce a white pearly stone and cross it over this circular shape, placing the stone exactly in the center of this circle and we will hold the wire at the other end as you can see in the following images.
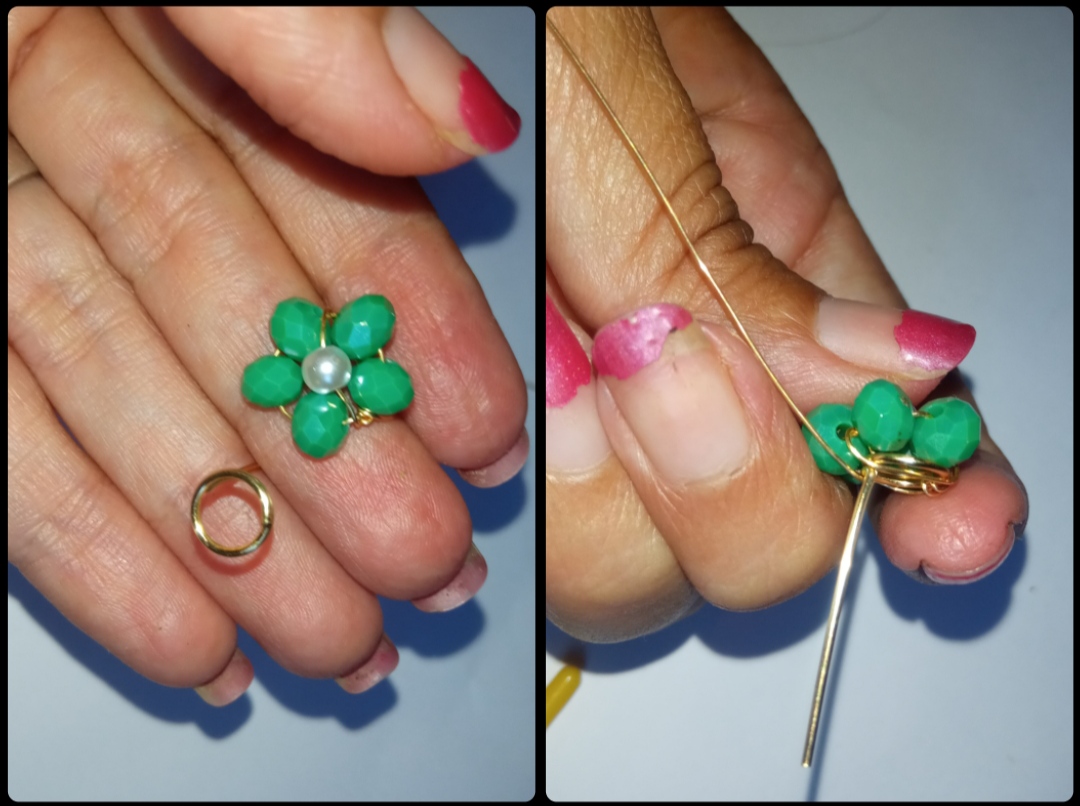
⭐ Paso 3: ya elaborada esta pequeña Flor procederemos con el mismo alambre calibre 26 que nos excede de la elaboración de la flor tomaremos la base que elaboramos en el primer paso y uniremos las dos formas colocando la flor encima del pequeño círculo de la base y con el alambre calibre 26 pasaremos el alambre por la parte de abajo de la base circular y lo subiremos entre las piedras de cristales y así le iremos pasando hasta sujetarlo muy bien a la base. Para culminar esta hermosa elaboración y darle un toque especial con el exceso del alambre calibre 26 elaboraremos pequeñas ganchitos con hojas para ello introduciremos un pequeño cristal verde el cual dejaremos a un centímetro de la flor doblaremos el alambre hacia abajo y comenzaremos a enrollar para sujetar la piedra en la parte superior y que la base quede enrolladito como pueden verlo En las siguientes imágenes de la misma manera realizaremos dos ganchitos más de diferentes tamaños todos estos a un lado de la flor y así culminaremos este hermoso diseño.
⭐ Step 3: Once this small Flower has been made, we will proceed with the same 26 gauge wire that is too much for us to make the flower. We will take the base that we made in the first step and join the two shapes by placing the flower on top of the small circle of the base and with the 26 gauge wire we will pass the wire through the bottom of the circular base and we will raise it between the crystal stones and in this way we will pass it until it is secured very well to the base.
To complete this beautiful creation and give it a special touch, with the excess of the 26 gauge wire, we will make small hooks with leaves. To do this, we will insert a small green crystal which we will leave one centimeter from the flower. We will bend the wire downwards and begin to roll it to hold the flower. stone at the top and that the base is rolled up as you can see. In the following images, in the same way we will make two more hooks of different sizes, all of these on one side of the flower and thus we will complete this beautiful design.
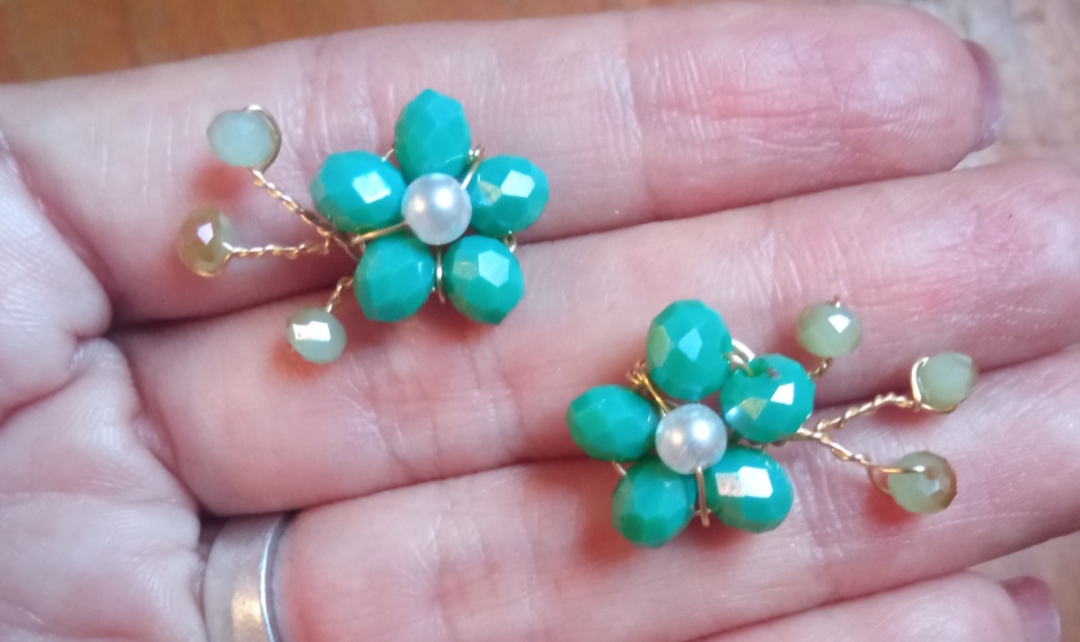
Todas las Fotos son de mi autoría y fueron tomadas con mi Celular Redmi 9.And so following these same steps we will make the second piece of this pair of elegant and beautiful tendrils. I wanted to make them in green because I loved this color of glass but you can make it in the color of your preference or combine the colors you want.
My dear and appreciated friends, this has been my preparation today for all of you, which I hope is to your complete liking. I say goodbye for this opportunity, thanking you for your visit. It will be until a new tutorial. Greetings and blessings.
All Photos are my authorship and were taken with my Redmi 9 Cellphone
Que cuchituras. Hermosos! Ya me dieron ganas de hacer unos jejjejeje. Muy buena explicación 🫶
Que bueno que te gustó amiga, a ti te deben quedar bellos.
Hermosos zarcillos, muy linda la combinación de colores.
Gracias amigo me alegra que te haya gustado.
Le agradezco por su comentario.
Sin duda un trabajo hermoso, me enamore de estos zarcillos, éxitos con este talento.
https://twitter.com/hivediy47901/status/1785565357211521461