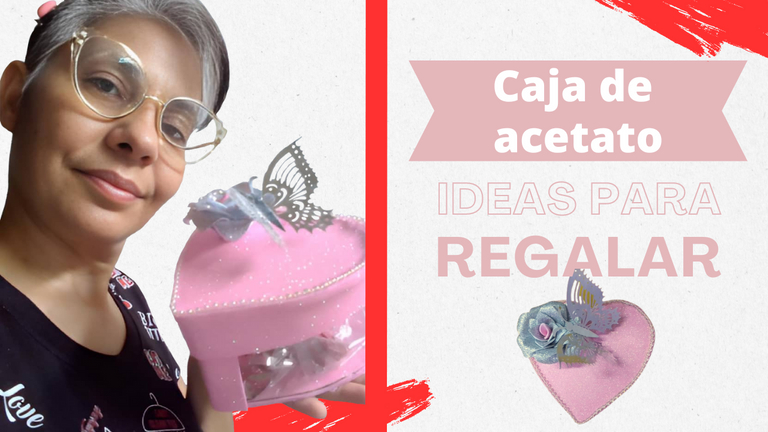
Acetate box , gift ideas / Caja de acetato , ideas para regalar (Esp/Eng)

 |  |
💜💜💜💜💜❤️💜💜💜💜💜
💜💜❤️💜💜
💜❤️💜
[Esp]
Amados, hoy estoy de nuevo por aquí, desde mi taller, mi oficina, desbordando creatividad, traigo para ti, un hermoso proyecto que espero sea de tu agrado
Comunidad artesana, me he sentido muy motivada estos días en hacer manualidades, para ello me he preparado mucho, he estado comprando materiales, herramientas, poco a poco para poder crear cositas bonitas y presentarlas aquí.
Son ideas que bien puedes usarlo como emprendimiento o como alternativa para obsequios, bomboneras, guardar cosas delicadas, puedes darle mucho usos.
El hermano de mi esposo se casó por el civil, hizo una reunión en su casa, quedaron muchas botellas de refrescos vacías, la abuela de mi hijo me dijo, creo que puedes hacer algo bueno con los acetatos de las botellas, para sorprenderla compré unos bombones y elaboré una cajita para obsequiarsela.
Con los gastos para su elaboración podría venderla entre 3 a 5 Dolares cada una, sería excelente para poder venderla. Ahora los dejo con mi paso a paso para que vean cómo puedes recrearla si es de tu agrado.
! [Scroll down to read the English version]
[Eng]
Beloved, today I am here again, from my workshop, my office, overflowing with creativity, I bring you a beautiful project that I hope you will enjoy.
Artisan community, I have felt very motivated these days to make crafts, for this I have prepared myself a lot, I have been buying materials, tools, little by little to create beautiful things and present them here.
These are ideas that you can use as a business venture or as an alternative for gifts, bonbonnieres, to keep delicate things, you can give it many uses.
My husband's brother got married in a civil ceremony, he had a meeting at his house, there were many empty soda bottles, my son's grandmother told me, I think you can do something good with the acetates from the bottles, to surprise her I bought some chocolates and made a little box to give her as a gift.
With the expenses for its elaboration I could sell it between 3 to 5 Dollars each one, it would be excellent to be able to sell it. Now I leave you with my step by step so you can see how you can make it.
💜💜💜💜💜❤️💜💜💜💜💜
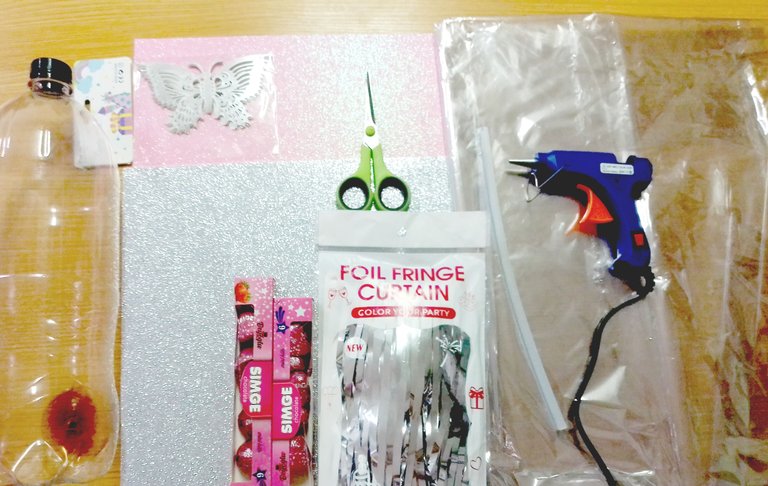
Materials / Materiales
💜💜💜💜💜❤️💜💜💜💜💜
[Esp]
💜 Pistola de silicón caliente, tijeras, cutter.
💜 2 botellas plásticas de resfresco vacías.
💜 Bombones o dulces a gusto
💜 Perla corrida tornazol para decorar.
💜 Mariposa de decoración.
💜 Cortina de decoración de cumpleaños.
💜 Foami escarchado plateado y rosado.
💜 Papel celofán.
💜 Cartón.
! [Scroll down to read the English version]
[Eng]
💜 Hot silicone gun, scissors, cutter.
💜 2 empty plastic bottles of soda.
💜 Chocolates or candies to taste.
💜 Tornazol pearl for decorating.
💜 Butterfly for decoration.
💜 Birthday decoration curtain.
💜 Silver and pink frosted foami.
💜 Cellophane paper.
💜Cardboard.
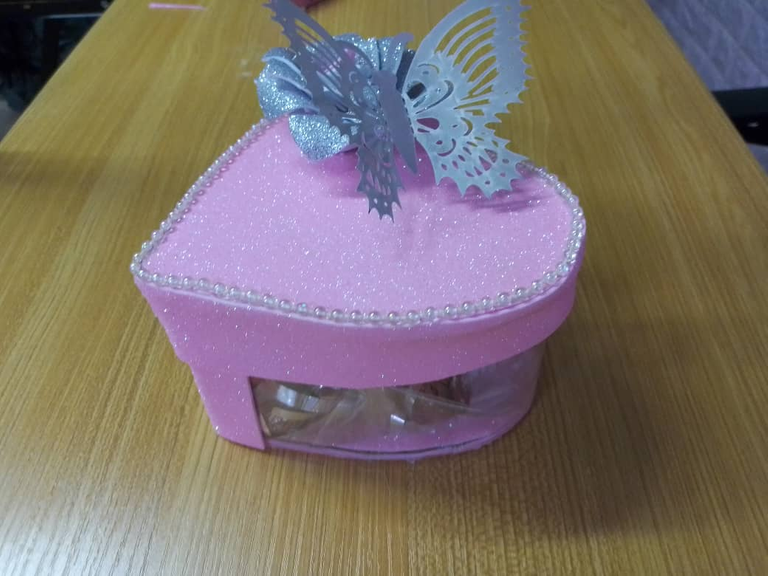
Step by Step / Paso a Paso
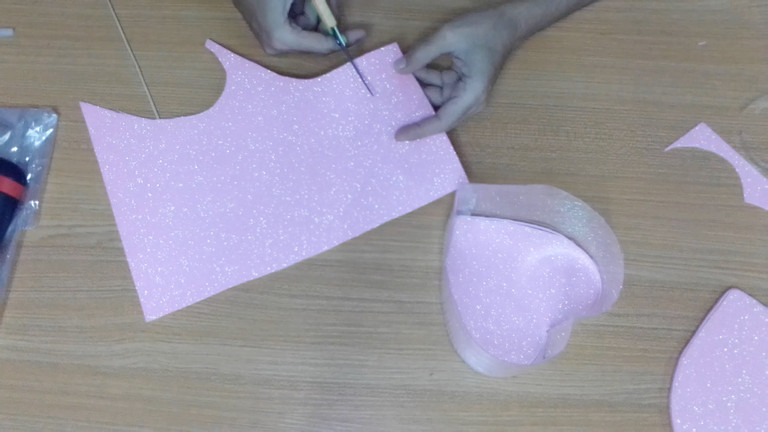
Step 1️⃣/ Paso 1️⃣
Assembling the box/ Armando la caja
 |  |  |
 |  |  |
[Esp]
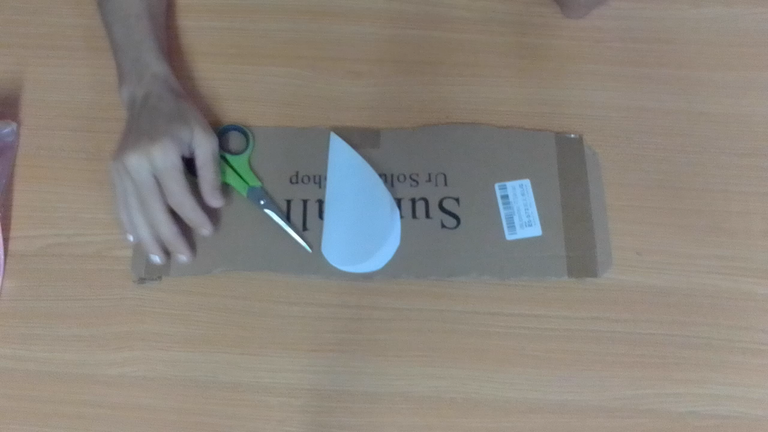
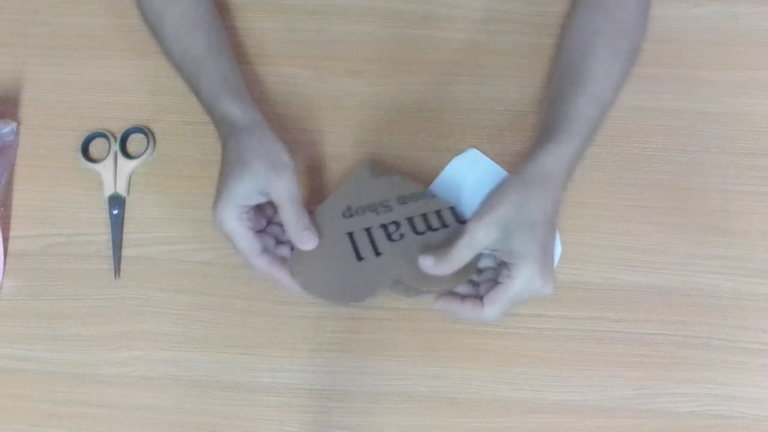
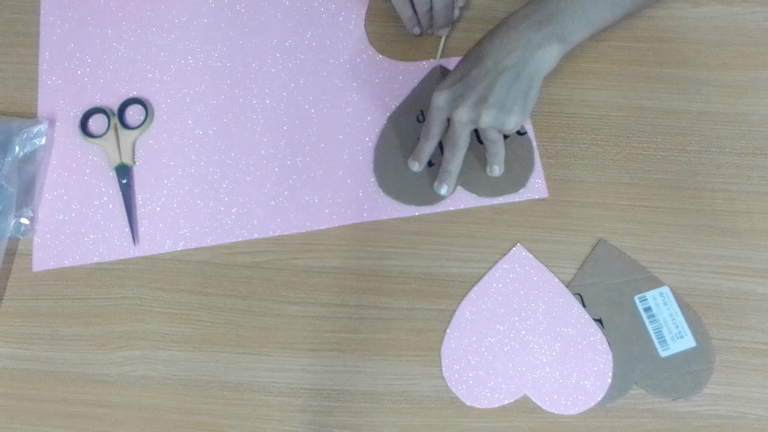
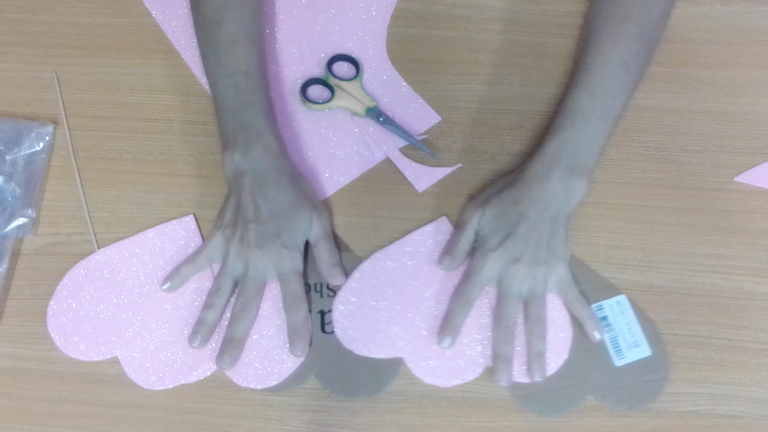
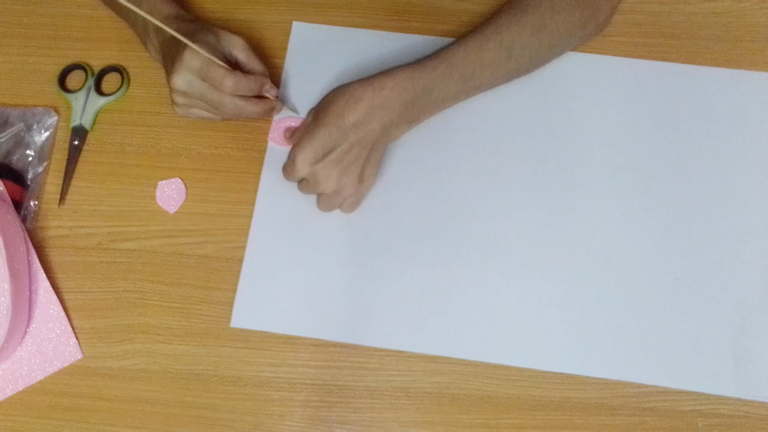
Recorta un molde con forma de corazon.
Usa el molde para recortar dos piezas de cartón. Una procura que sea 0.5 centímetros más grande que la otra, ya que será la tapa.
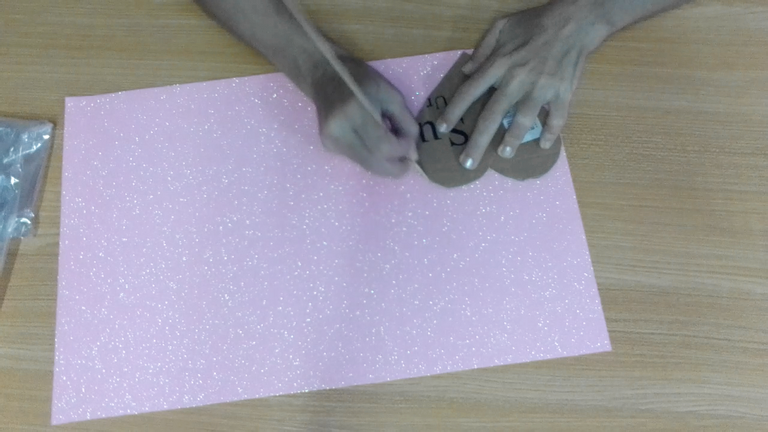
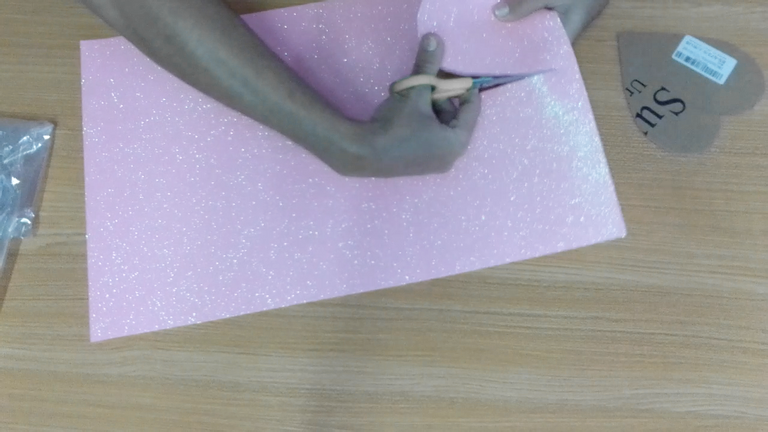
Usa los corazones de cartón para marcar el foami, te recomiendo marcar el foami con un palito de altura, de esta manera no dejarás marcas de lápiz.
Debes recortar 4 piezas, pues es necesario forrar el cartón en ambos lados.
! [Scroll down to read the English version]
[Eng]
Cut out a heart-shaped mold.
Use the mold to cut out two pieces of cardboard. One piece should be 0.5 centimeters larger than the other, as it will be the lid.
Use the cardboard hearts to mark the foami, I recommend marking the foami with a height stick, this way you will not leave pencil marks.
You must cut out 4 pieces, as it is necessary to line the cardboard on both sides.
💜💜💜💜💜❤️💜💜💜💜💜
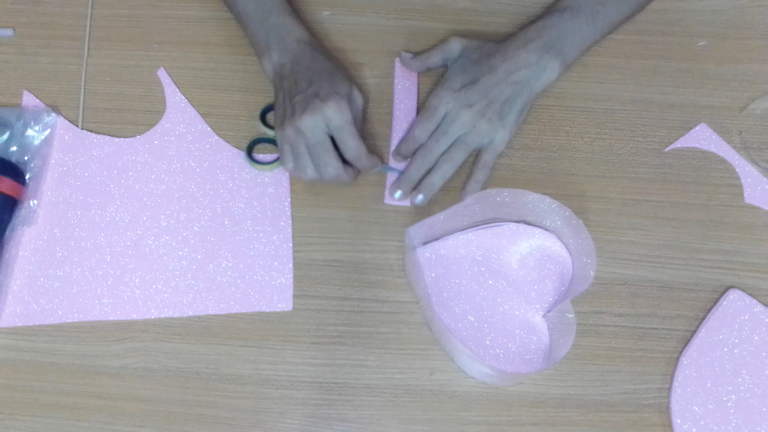
Step 2️⃣/ paso 2️⃣
 |  |  |
 |  |

[Esp]
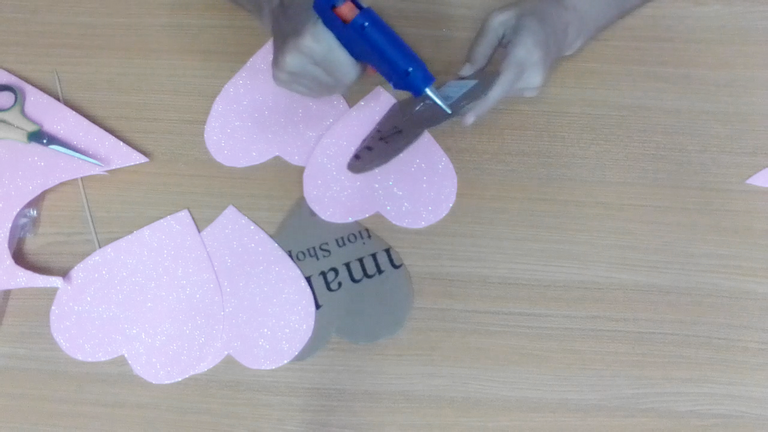
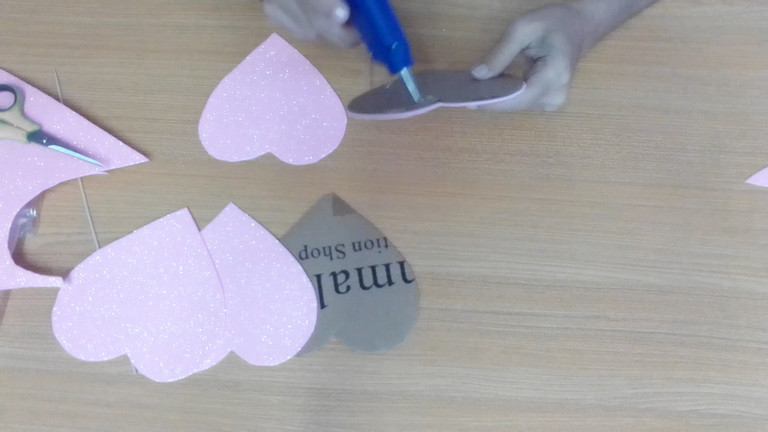
Pega ambas tapas a cada cartón.
Recorta unas tiras delgadas de 0.5 centímetros luego procede a usarlas para tapar la orilla de los corazones y ocultar el cartón.
Esto le dará un mejor acabado.
! [Scroll down to read the English version]
[Eng]
Glue the two lids to each cardboard.
Cut thin strips of 0.5 centimeters then proceed to use them to cover the edge of the hearts and hide the cardboard.
This will give a better finish.
💜💜💜💜💜❤️💜💜💜💜💜
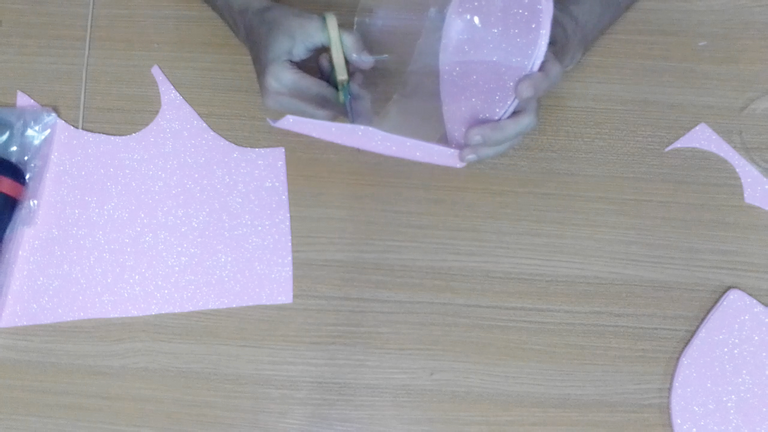
Step 3️⃣/ paso 3️⃣
 |  |  |
 |  |
[Esp]
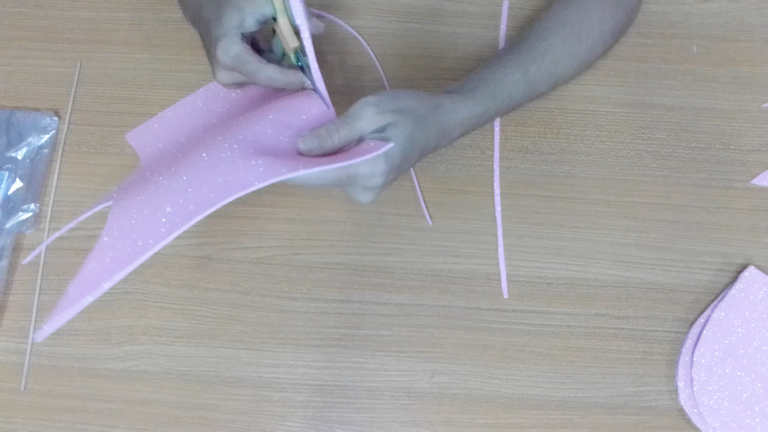
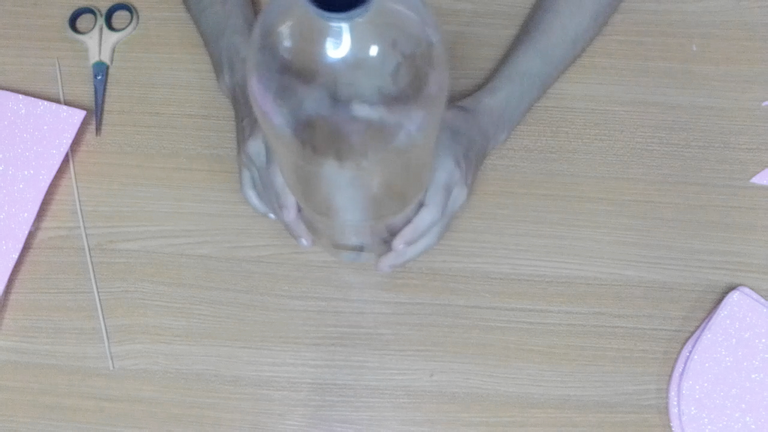
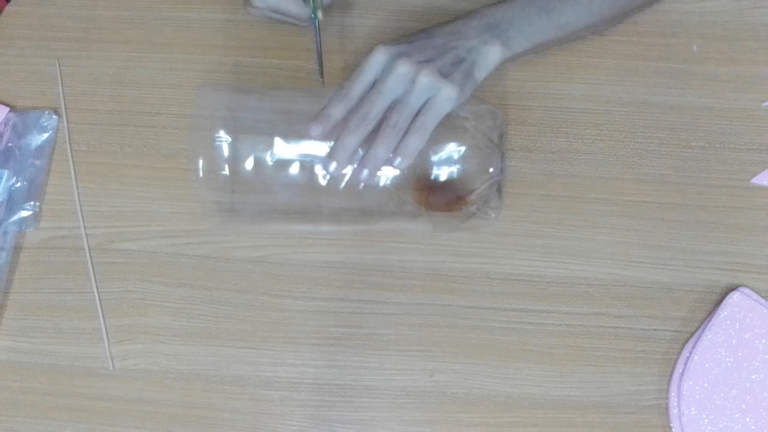
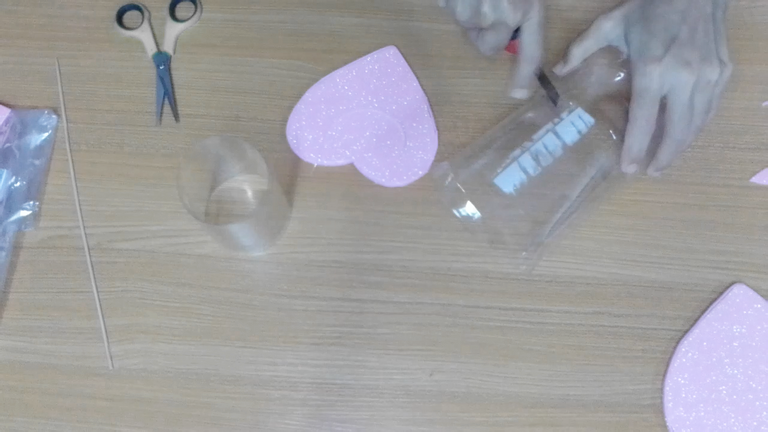
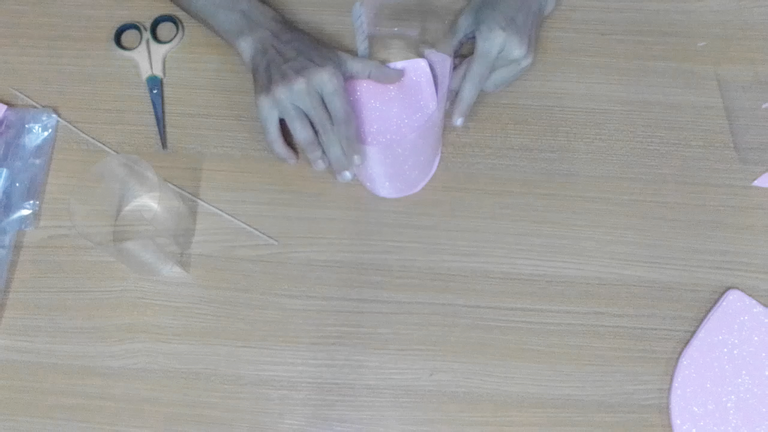
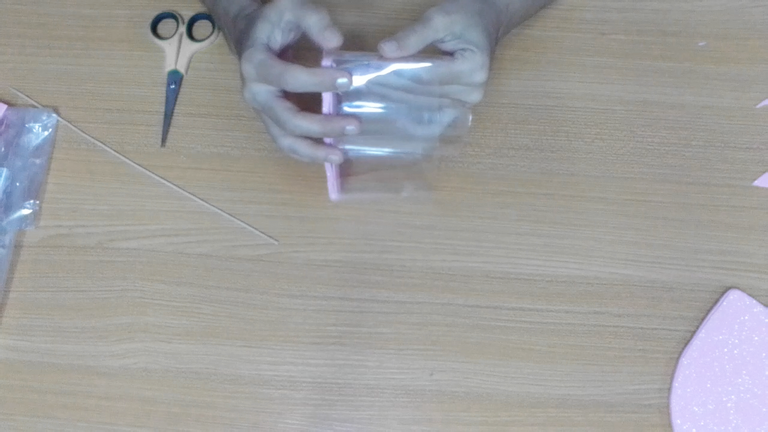
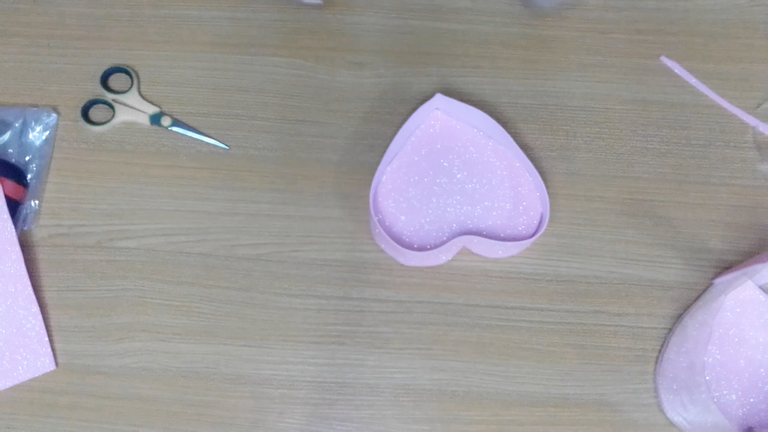
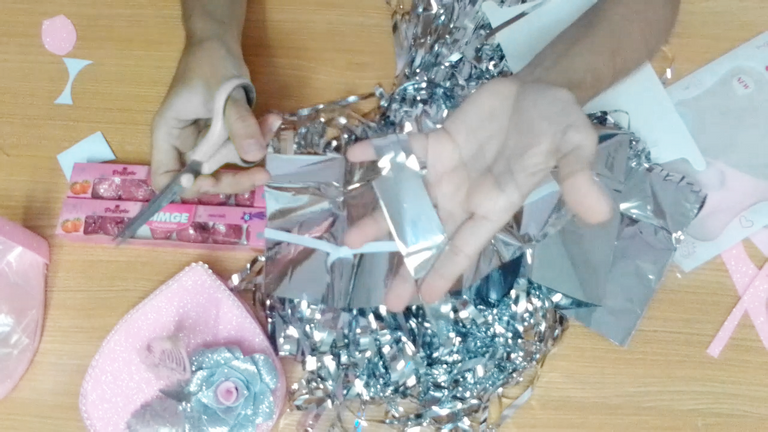
Toma la botella, corta con el cutter la parte de acetato liso, repite el procedimiento en la otra botella.
Limpia el acetato de la botella pues pudiera contener restos de refresco.
Toma la medida del corazón y recorta el acetato con la forma del mismo. Para los empates tan solo dobla una pestaña hacia adentro y la otra hacia afuera.
! [Scroll down to read the English version]
[Eng]
Take the bottle, cut with the cutter the smooth acetate part, repeat the procedure on the other bottle.
Clean the acetate from the bottle as it may contain traces of soda.
Take the measurement of the heart and cut the acetate in the shape of the heart. For the ties, just fold one flap inward and the other outward.
💜💜💜💜💜❤️💜💜💜💜💜
Step 4️⃣/ paso 4️⃣
 |  | |
 |  |
 |  | |
 |  |
[Esp]
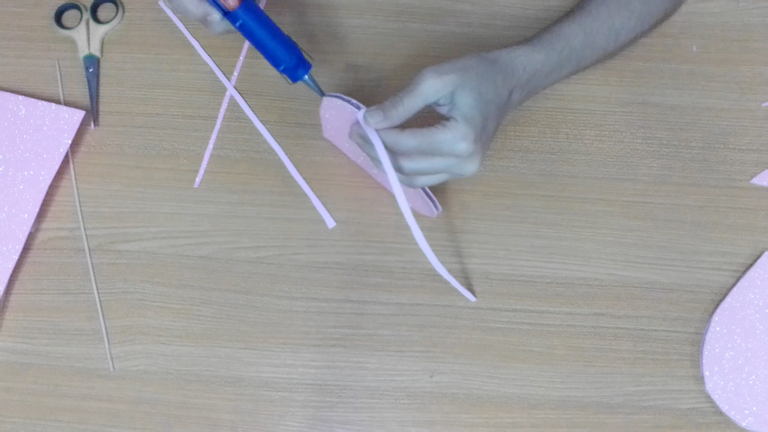
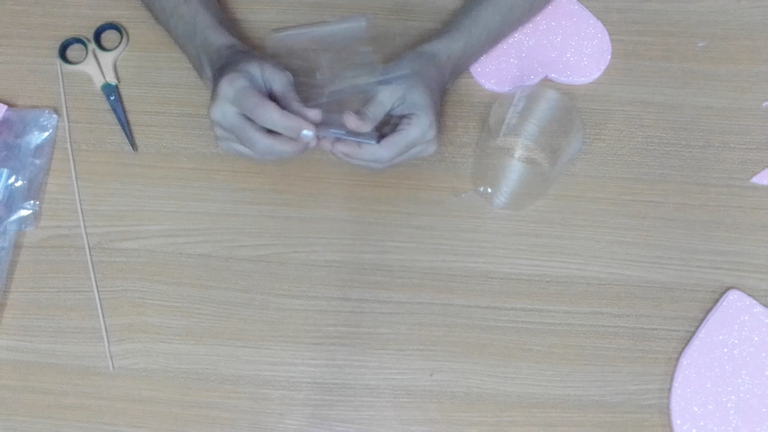
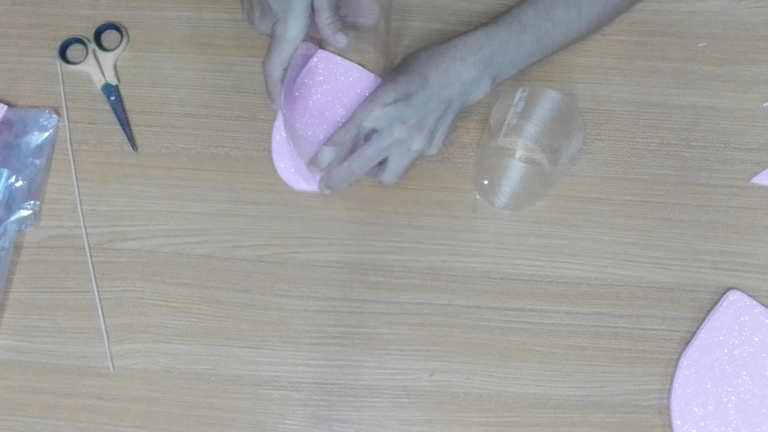
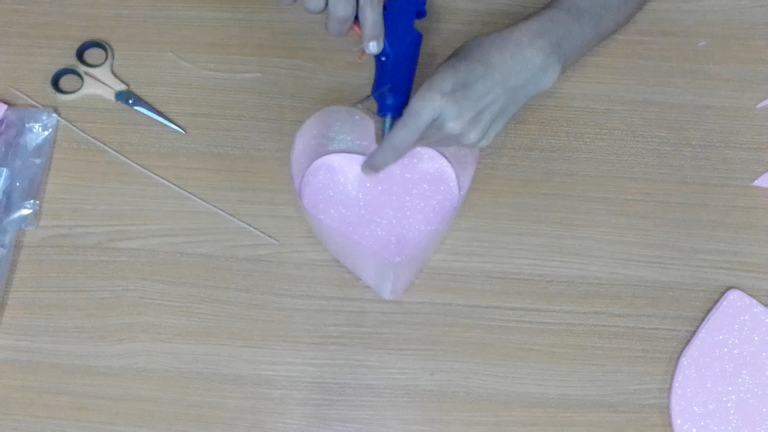
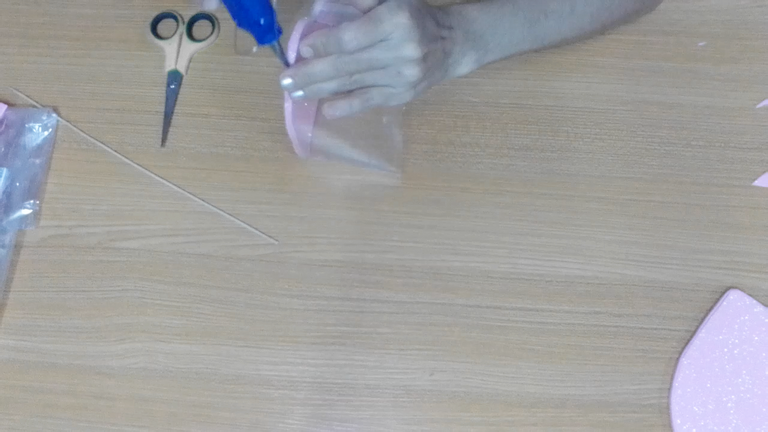
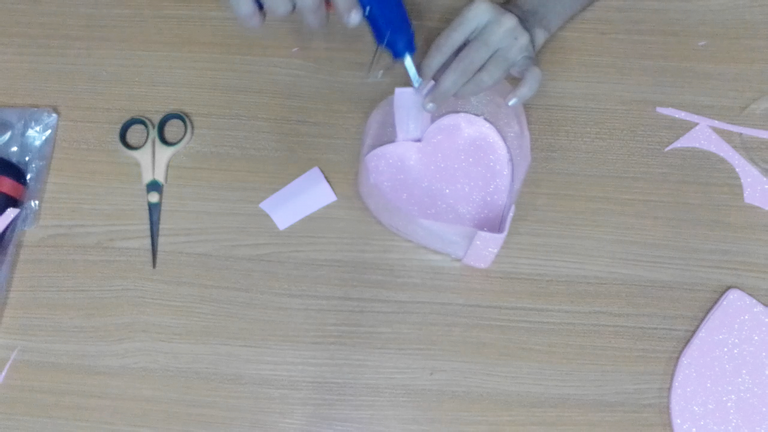
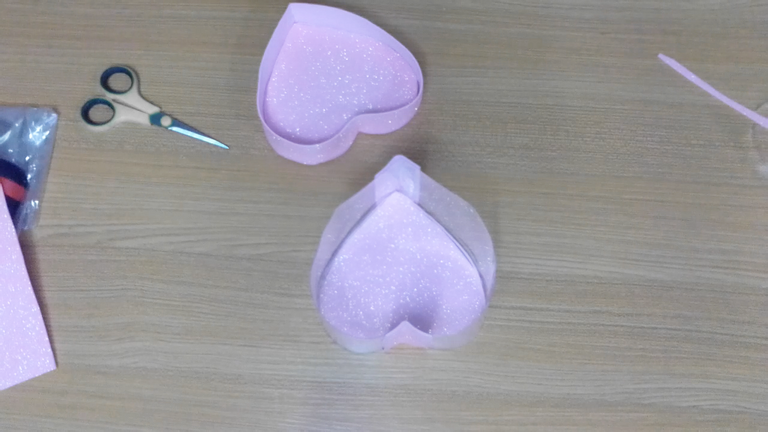
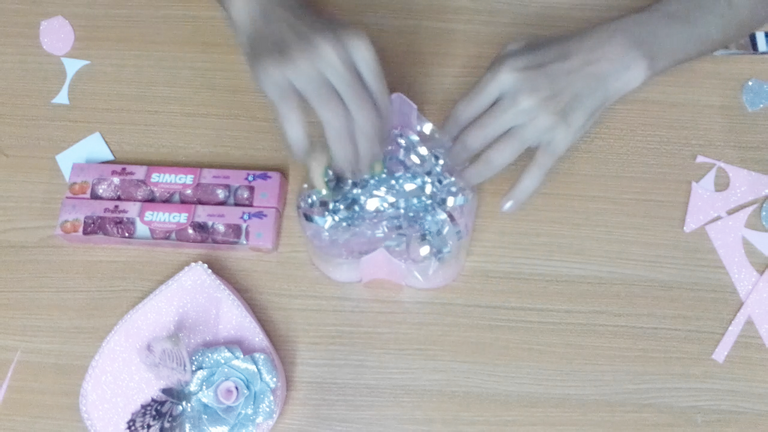
Pega el acetato por todo el borde del corazón, une los empates del acetato con el silicón caliente con mucho cuidado no se deforme por el calor.
Recorta unas tiras de 2 centímetros, utilizalas para cubrir los empates del acetato.
Con ello terminamos esta sección.
! [Scroll down to read the English version]
[Eng]
Glue the acetate all around the edge of the heart, join the acetate joints with the hot silicone, being very careful not to deform from the heat.
Cut out 2 cm strips, use them to cover the acetate ties.
This is the end of this section.
💜💜💜💜💜❤️💜💜💜💜💜
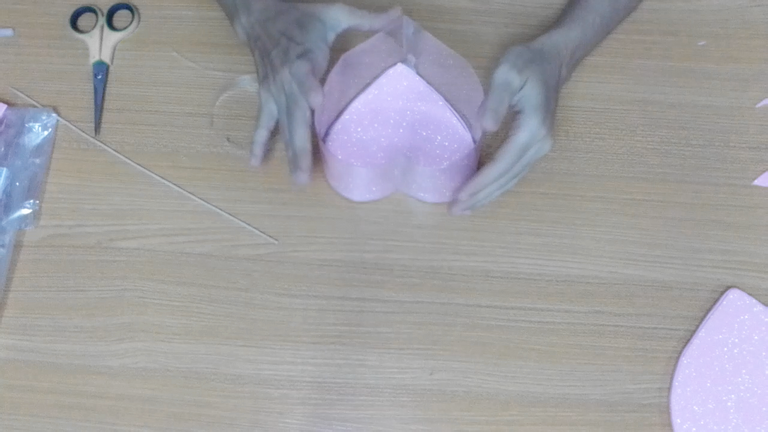
Step 5️⃣/ paso 5️⃣
 |  | |
 |  |
[Esp]
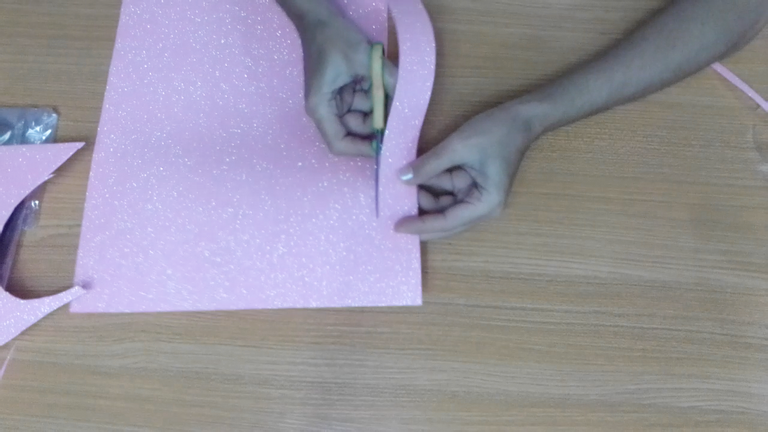
Recorta una tira larga de foami escarchado rosado, de 2 centímetros de ancho.
Pega la tira al corazón, esto servirpa como tapa.
Ahora verifica que se pueda abrir y cerrar sin problemas la caja.
! [Scroll down to read the English version]
[Eng]
Cut a long strip of pink frosted foami, 2 centimeters wide.
Glue the strip to the heart, this will serve as a lid.
Now check that the box can be opened and closed without any problems.
💜💜💜💜💜❤️💜💜💜💜💜
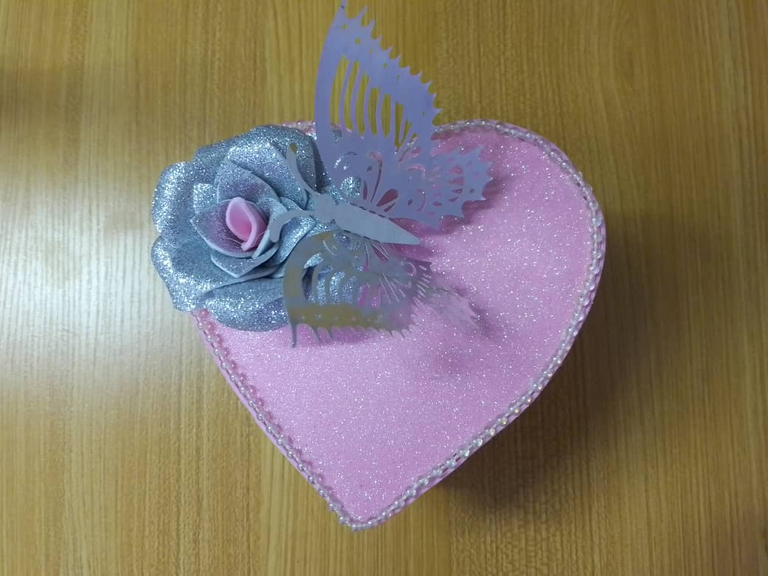
Step 6️⃣/ paso 6️⃣
Assembling the flower and decorating the lid. /
Armando la flor y decorando la tapa.
 |  |  |
 |  |
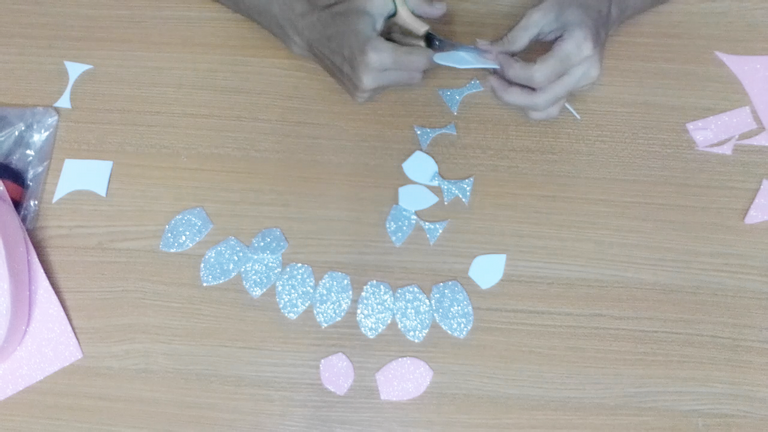
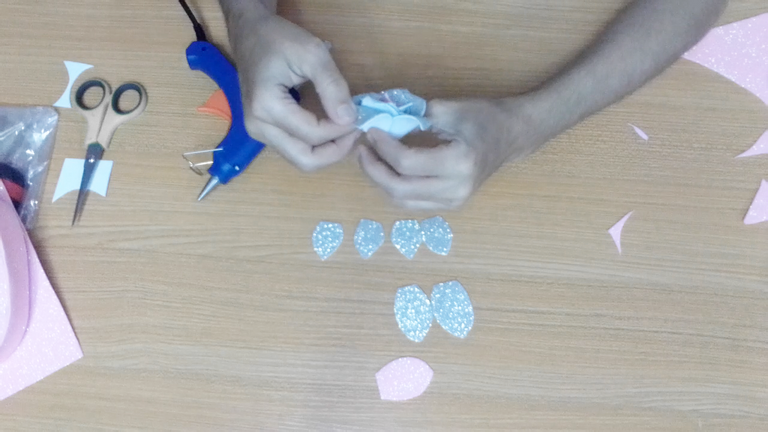
[Esp]
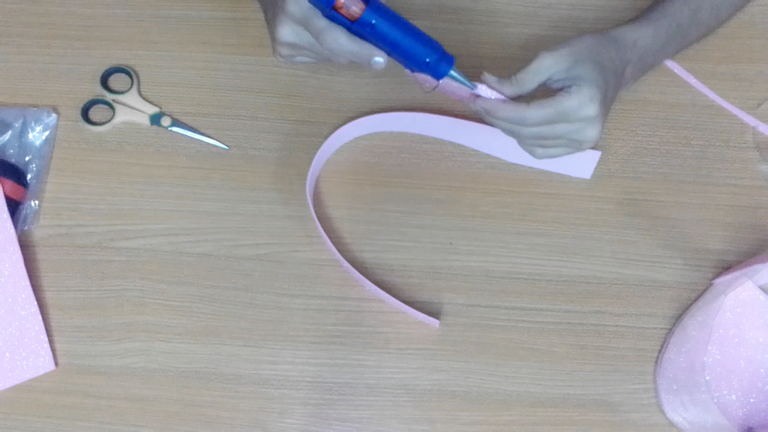
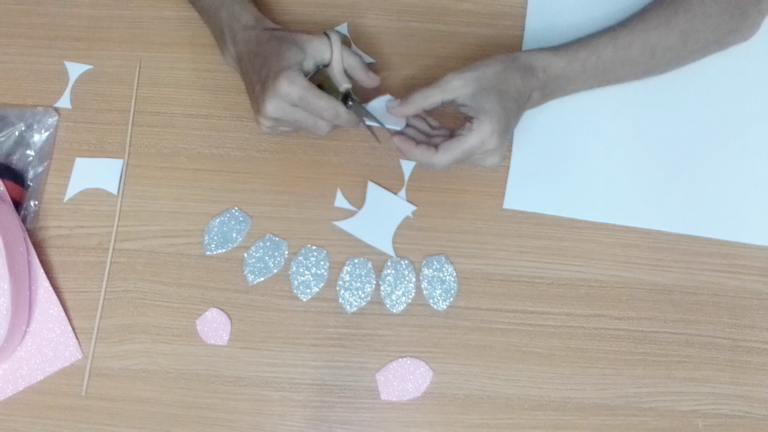
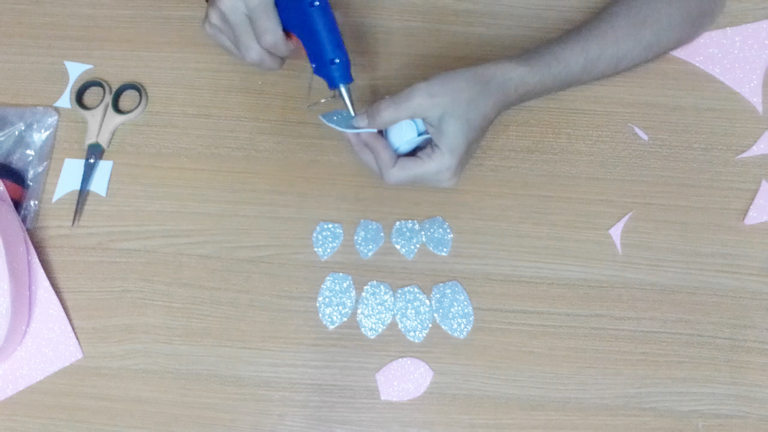
Para realizar la flor usa el foami de color plateado, con el palito de altura, marca los pétalos de la flor y procede a recortar, si notas hice dos tamaños de pétalos. Guarda un pétalo rosado para el centro de la flor.
Coloca pegamento en la orilla del pétalo rosado y enrolla el primer pétalo sobre si, ahora procede a ir pegando cada uno intercalando en los espacios vacíos.
! [Scroll down to read the English version]
[Eng]
To make the flower use the silver colored foami, with the height stick, mark the petals of the flower and proceed to cut out, if you notice I made two sizes of petals. Save one pink petal for the center of the flower.
Place glue on the edge of the pink petal and roll the first petal on itself, now proceed to glue each one of them in the empty spaces.
💜💜💜💜💜❤️💜💜💜💜💜
Step 7️⃣/ paso 7️⃣
 |  | |
 |  | |
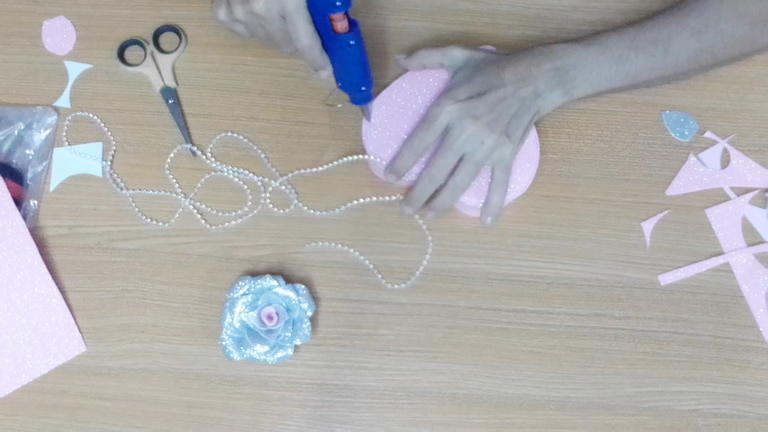 |  |
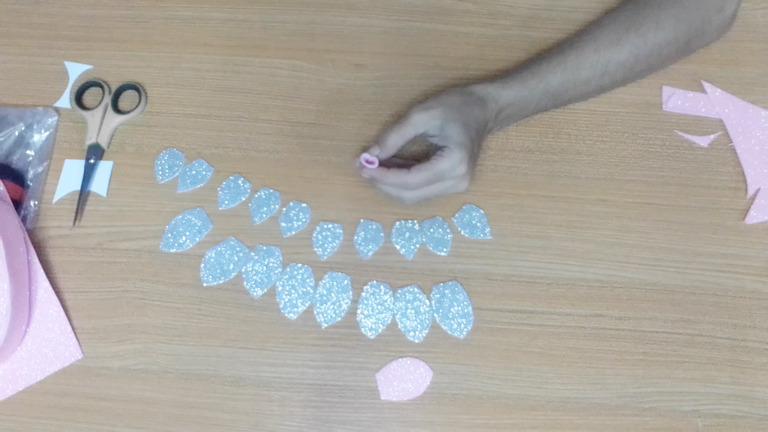
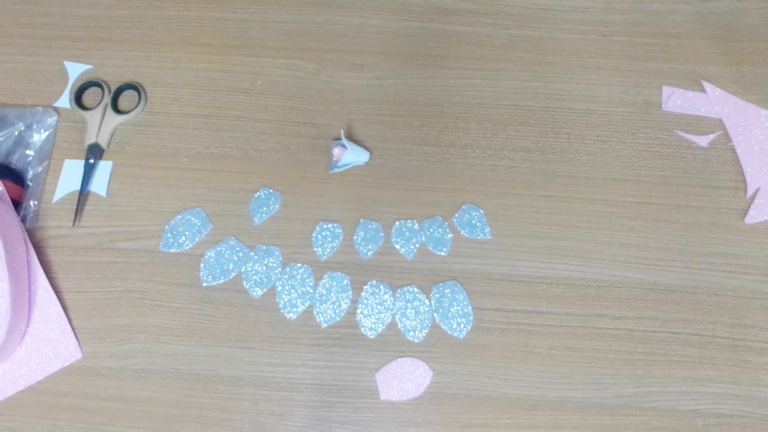
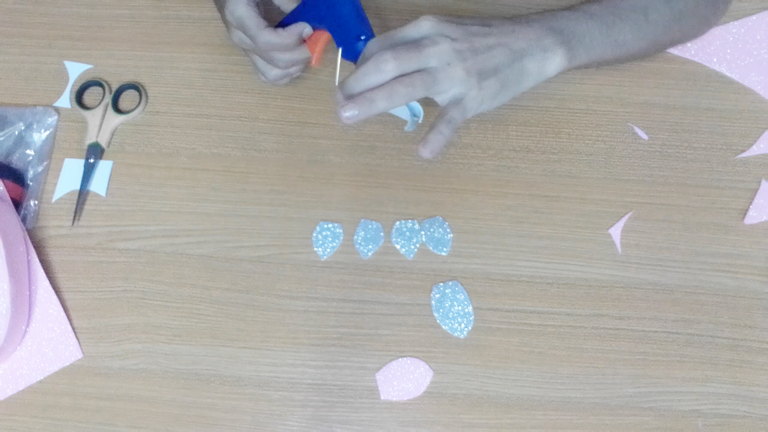
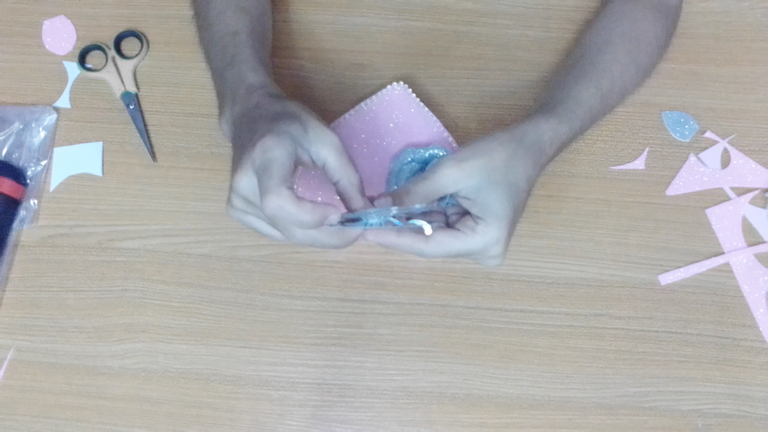
[Esp]
Puedes ir termoformando los pétalos con lo que tengas a tu alcance, una plancha de cabello o plancha normal, yo usé la punta de la pistola de silicón.
Continúa pegando cada pétalo, recordando que debes empezar desde el centro por los más pequeños y ya la segunda vuelta ir pegando los más grandes.
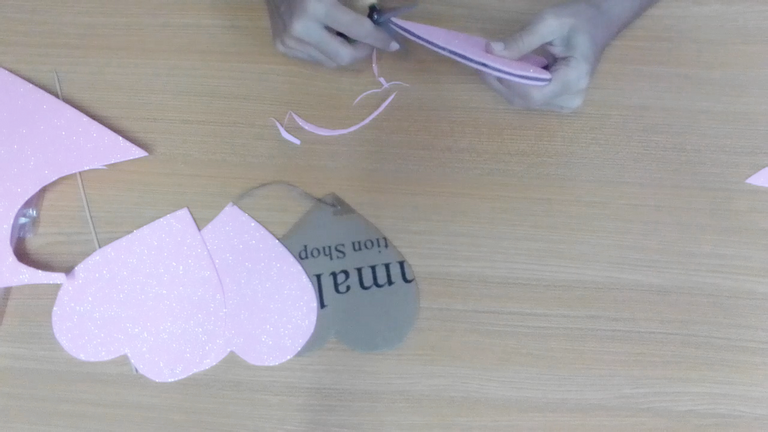
Usa la perla corrida para tapar el empate de la tapa de la caja, en su parte superior.
! [Scroll down to read the English version]
[Eng]
You can thermoform the petals with whatever you have at your fingertips, a hair iron or a normal iron, I used the tip of the silicone gun.
Continue gluing each petal, remembering to start from the center with the smaller ones and on the second round glue the larger ones.
Use the bead to cover the tie of the lid of the box, in its upper part.
💜💜💜💜💜❤️💜💜💜💜💜
Step 8️⃣/ paso 8️⃣
 |  | |
 |  | |
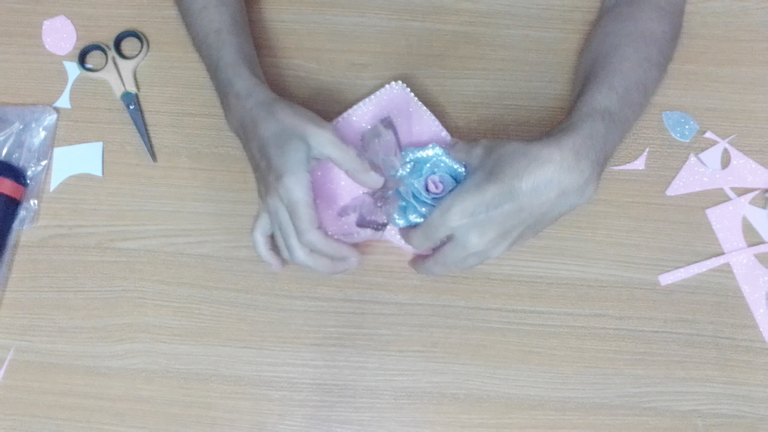 | 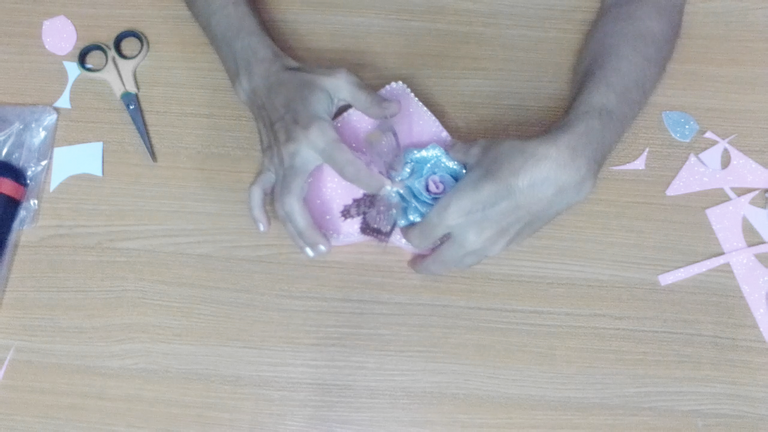 |
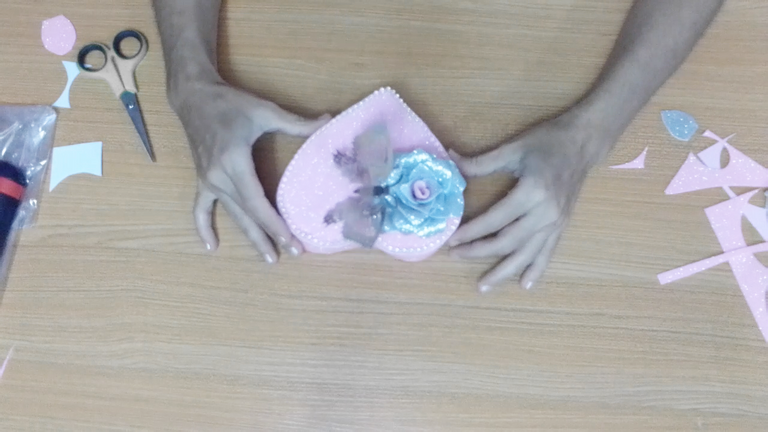
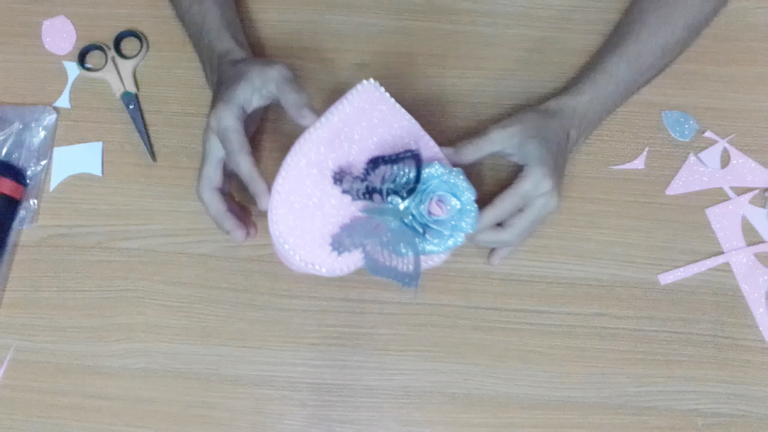
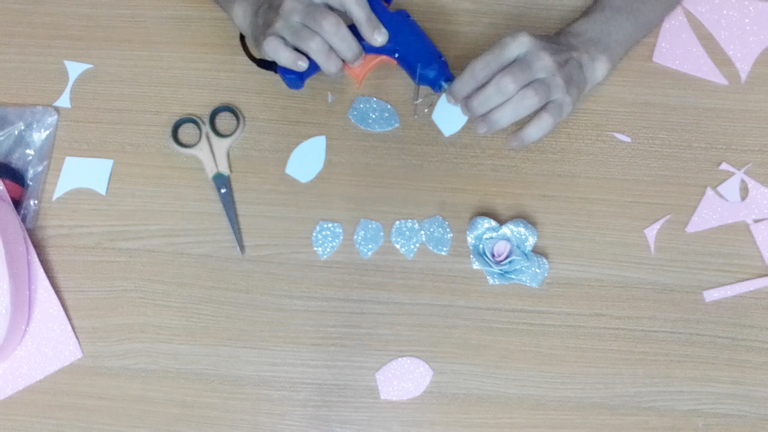
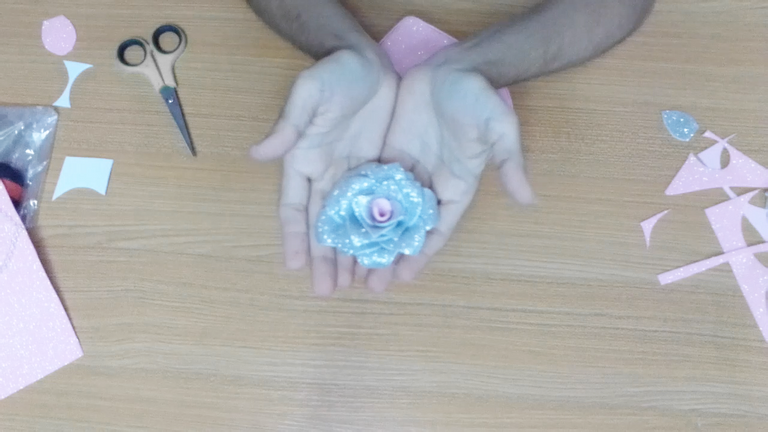
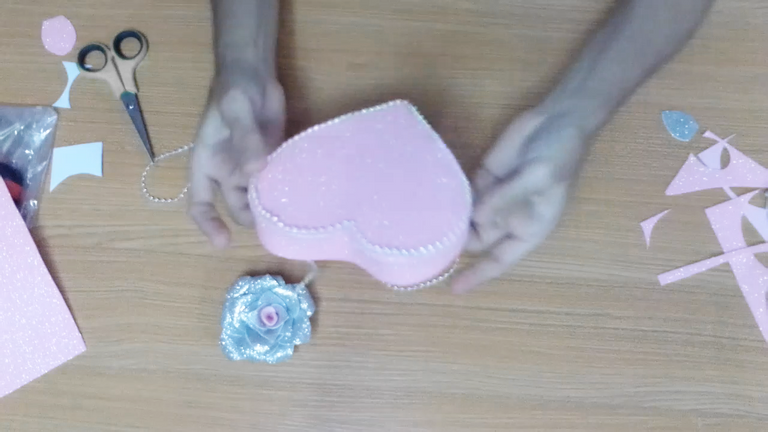
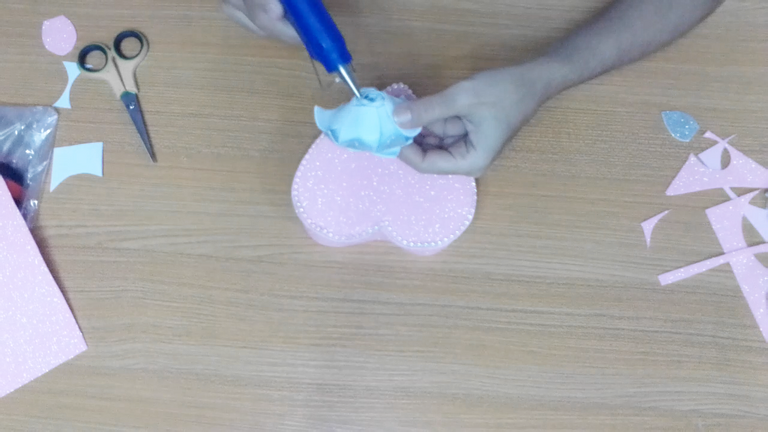
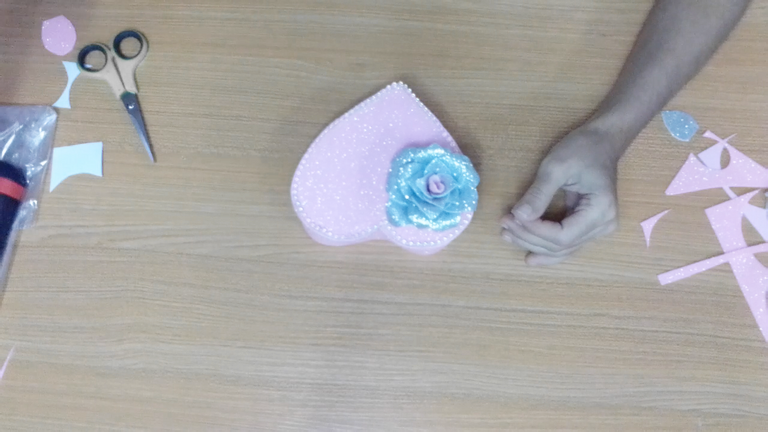
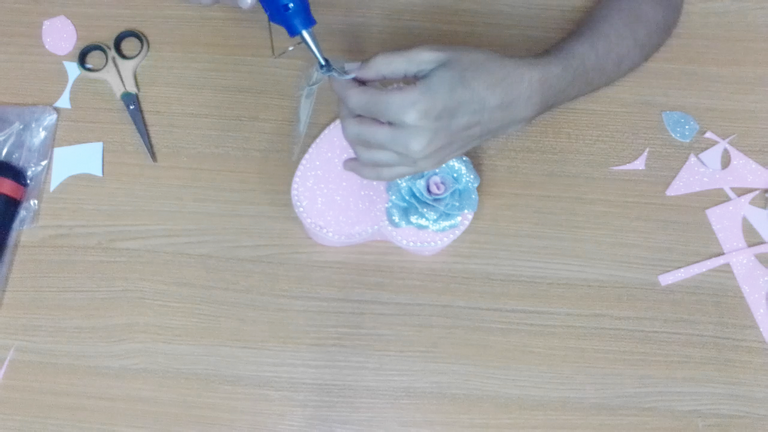
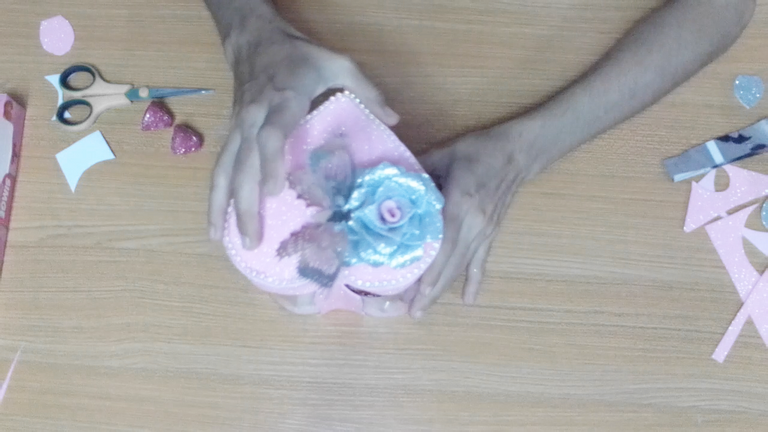
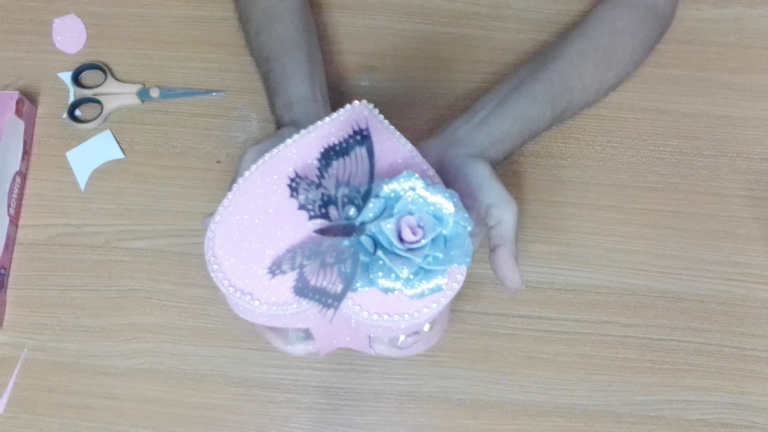
[Esp]
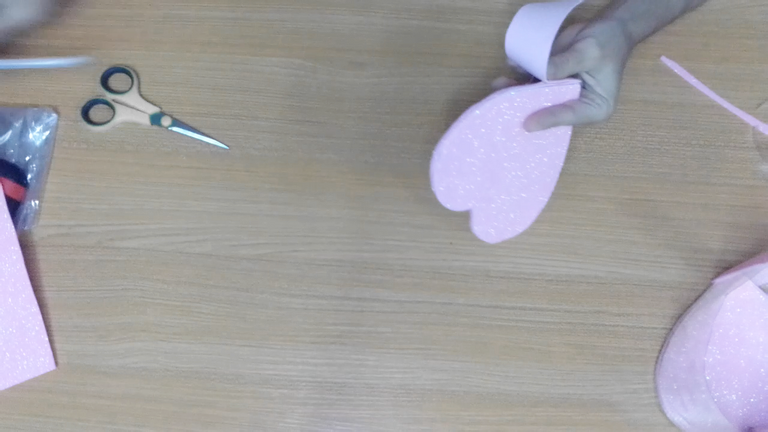
Pega la flor de la tapa de la caja.
Toma la mariposa y dobla sus alas para ajustarla.
Pega la mariposa a la flor.
Hemos terminado esta sección.
! [Scroll down to read the English version]
[Eng]
Glue the flower to the lid of the box.
Take the butterfly and fold its wings to fit it.
Glue the butterfly to the flower.
We have finished this section.
💜💜💜💜💜❤️💜💜💜💜💜
Step 9️⃣/ paso 9️⃣
Filling and internal decoration of the acetate box with candies or chocolates.
Llenado y decoración interna de la caja de acetato con dulces o bombones.
 |  | |
 |  | |
 |  |
 |  | |
 |  |
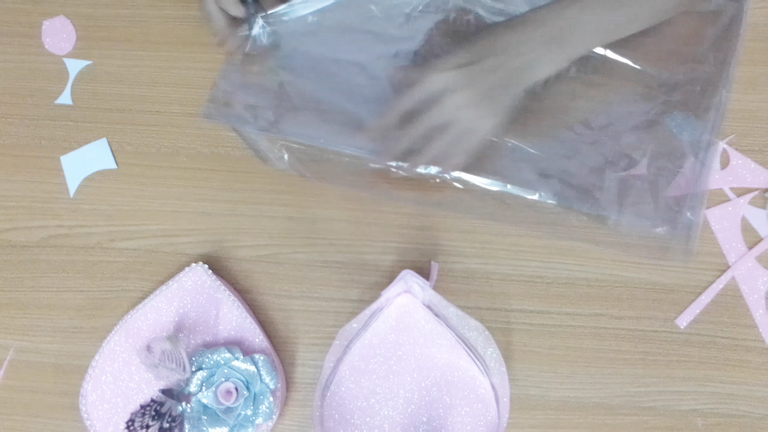
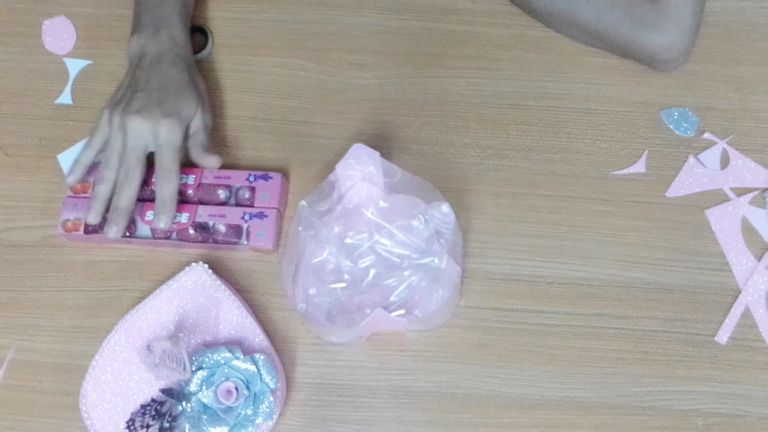
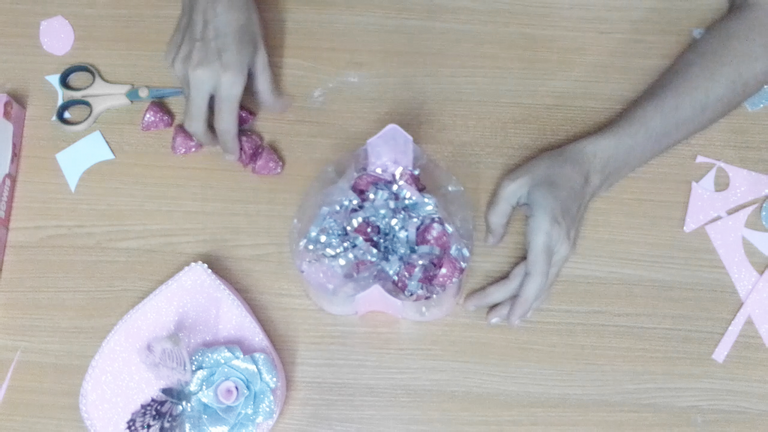
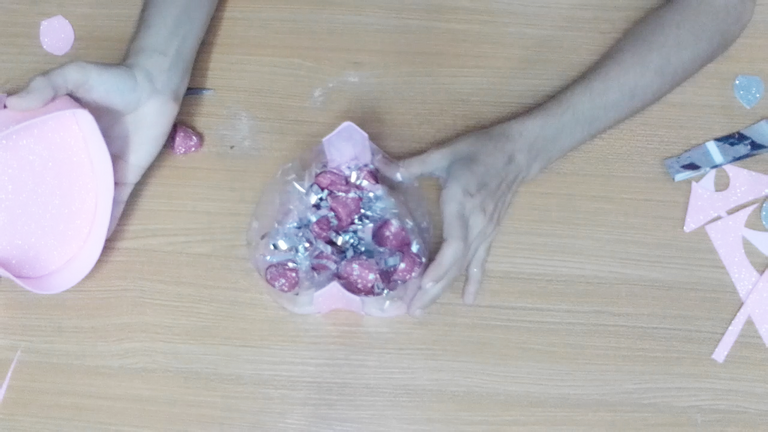
[Esp]
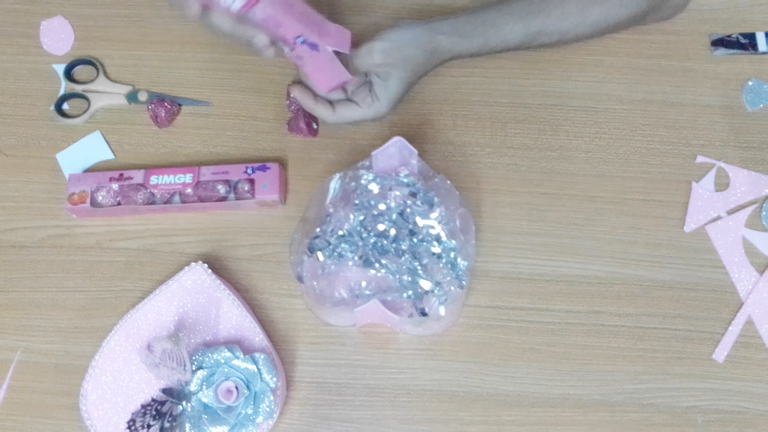
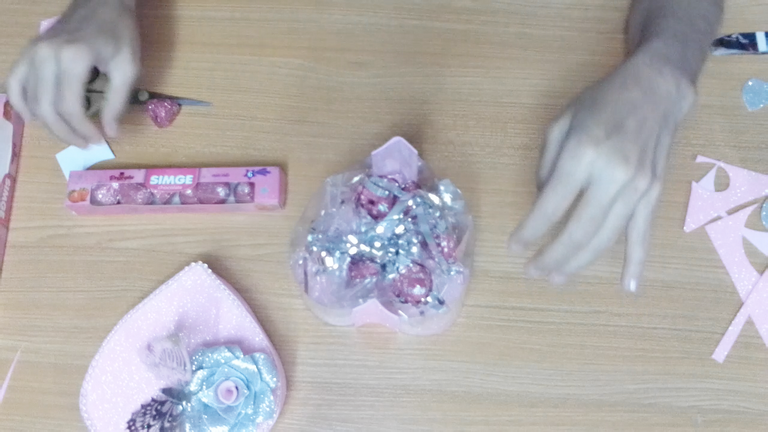
Recorta un rectángulo de papel celofán e introdúcelo dentro de la caja.
En estos tiempos puede ser muy difícil conseguir viruta para decorar, pero no te preocupes que te enseño un hack, puedes utilizar las hebras de una cortina de decoración de fiestas.
En este caso solo necesitarías tres hilos de todo el largo, recortas y lo introduces en la caja.
Ahora introduce los dulces y bombones, cierra la caja y con ello hemos culminado...
Espero sea de tu agrado esta idea para regalar y sorprender a tus seres queridos, además que puedes usarlo como emprendimiento.
! [Scroll down to read the English version]
[Eng]
Cut out a rectangle of cellophane paper and insert it inside the box.
In these times it can be very difficult to get shavings to decorate, but don't worry I show you a hack, you can use the strands of a curtain of party decorations.
In this case you would only need three strands the entire length, trim and insert it into the box.
Now insert the candies and chocolates, close the box and that's it....
I hope you like this idea to give and surprise your loved ones, besides you can use it as an undertaking.
💜💜💜💜💜❤️💜💜💜💜💜

Credits / Créditos.

All copyrights reserved / Reservados todos mis derechos


Vote la-colmena for witness
By @ylich

Hacks, DIY, Crafts, handmade arts Community

![]() 👉
👉 ![]() 👉
👉 ![]() 👉
👉  👉
👉 ![]()
Me encanto elresultado final, normalmente no tengo paciencia para esto pero cuando me dedico me lo paso super bien y me fijo en los detalles de verdad que tu proceso estuvo increible y nada mas lindo que dar un regalo hecho por uno mismo, considera que el valor aumenta 😍
Yosmary, no soy muy ducha para las manualidades, pero lo intento mucho porque quiero mejorar, lo mismo pasa con el dibujo, la practica hace que mejoremos en todo, nos hace más diestros. No importa cómo me quede, siempre lo intento y vuelvo una y otra vez, sin estresarme, disfrutando de todo el proceso.
Me hace feliz que te inspire y te guste, yo te envío mis mejores vibras, gracias por visitarme
Comparto ese pensamiento de ser constante y disciplinado, sin duda deja muy buenos resultados, un abrazo!❣️
Hello, my friend
That's a beautiful gift idea. The pink color is really suitable for giving to loved ones.
Thank you so much for sharing.
Well, I made a new post too and I hope you like it too.
Hai, temanku.
Itu adalah ide hadiah yang indah. Warna pink sangat cocok untuk diberikan sebagai hadiah orang yang tersayang.
Terima kasih telah berbagi
Oh ya, aku punya sebuah postingan baru juga. Aku harap kamu menyukai itu juga.
Greetings from Indonesia
Greetings, thanks for visiting me, I'm glad you liked my crafts.
This post has been manually curated by @steemflow from Indiaunited community. Join us on our Discord Server.
Do you know that you can earn a passive income by delegating to @indiaunited. We share more than 100 % of the curation rewards with the delegators in the form of IUC tokens. HP delegators and IUC token holders also get upto 20% additional vote weight.
Here are some handy links for delegations: 100HP, 250HP, 500HP, 1000HP.
100% of the rewards from this comment goes to the curator for their manual curation efforts. Please encourage the curator @steemflow by upvoting this comment and support the community by voting the posts made by @indiaunited.
Esta cajita debe llegarme llena de bombones 😂, vacía está bonita, pero yo quiero también los bombones. Ya ves que soy un poco inconforme jajaja. Me encanta cuando veo que es posible crear cosas tan lindas y útiles con materiales reciclados.
Gracias por traernos siempre tan buenas publicaciones ;)
Te mandaré una tonelada de los bombones de estos 😂😂😂😂
Gracias a ti por apreciar mis esfuerzos.
Que belleza esa cajita amiga @equipodelta, esta de ensueño. Un bellísimo envoltorio con grandes detalles para obsequiar algo hermoso. Digno para quedarse con ambas cosas, y atesorarlas. Un abrazo mi bella y mil bendiciones par ti.✨
!DIY
Gracias por tu apoyo amiga, lo valoro mucho.
Qué el universo te bendiga en plenitud.
Amen hermosa 💕
A beautiful little box with great details. Thank you for giving us this wonderful creative process @equipodelta // Una cajita hermosa con grandes detalles. Gracias por regalarnos ese maravilloso proceso creativo @equipodelta
You can query your personal balance by
!DIYSTATSCongratulations, your post has been upvoted by @dsc-r2cornell, which is the curating account for @R2cornell's Discord Community.
Enhorabuena, su "post" ha sido "up-voted" por @dsc-r2cornell, que es la "cuenta curating" de la Comunidad de la Discordia de @R2cornell.
Saludos @equipodelta, me encanto como quedo la cajita de corazón, ideal para regalar bombones de chocolates, y caramelos, feliz dia.
Gracias amiga, yo seria feliz si me regalaran una tambien
yo quiero una ejjejee
Con gusto mi corazon
Esa rosa me dejó enamorada, hacer rosas en foami siempre me ha costado, me gustó como explicas el proceso cuando necesite hacer una seguiré tus pasos, gracias por compartir tu creatividad.
Hola amiga, tampoco soy muy ducha con ellas, las practico lo más que puedo, algun dia me saldrán perfectas, como anecdota te puedo decir que las termoformé con el calor de la pistola de silicon
¡Hola @equipodelta! La abuela de tu hijo no se equivocó, cuando dijo que algo bueno podrías sacar de esas botellas vacías. Me imagino su alegría, al ver ese lindo estuche creado especialmente para ella. Te felicito por todo, por el estuche, el ingenio y por la sorpresa.
Esta demasiado hermosa, muy bien elaborada y muy bien explicado el paso a paso, además se ve muy delicada por el color, imagino tu suegra quedo encantada, gracias por compartir tan hermoso trabajo 🤗❤️