Bracelet with diamond shaped beads 💎. Macrame technique [ESP|ENG]
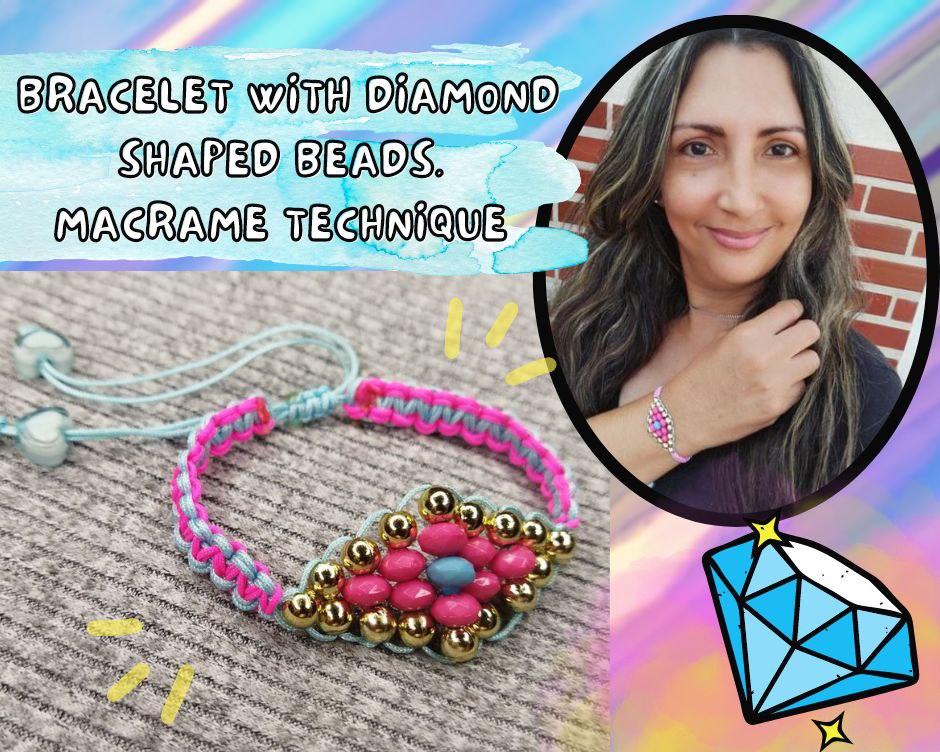
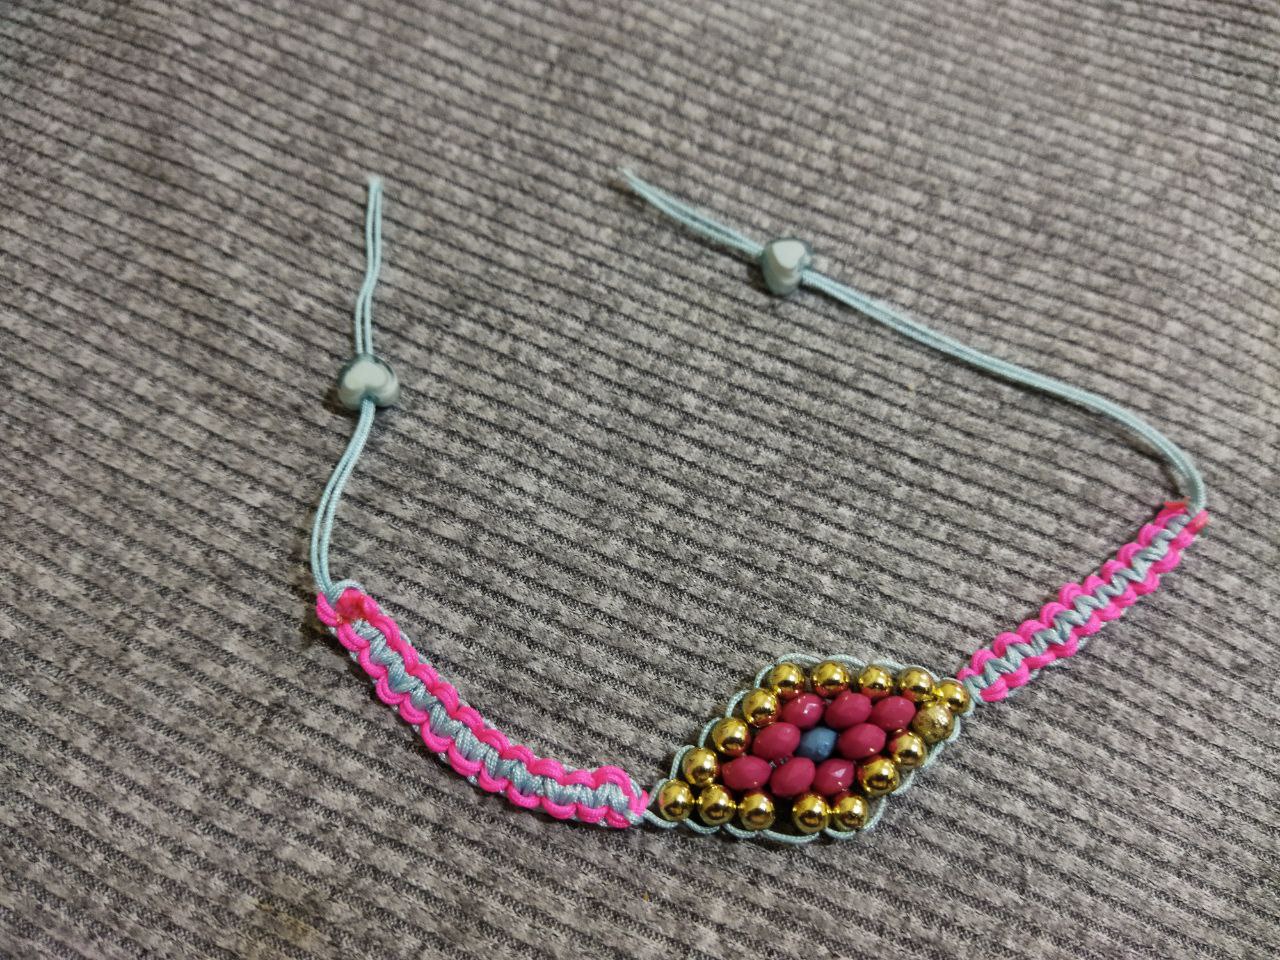
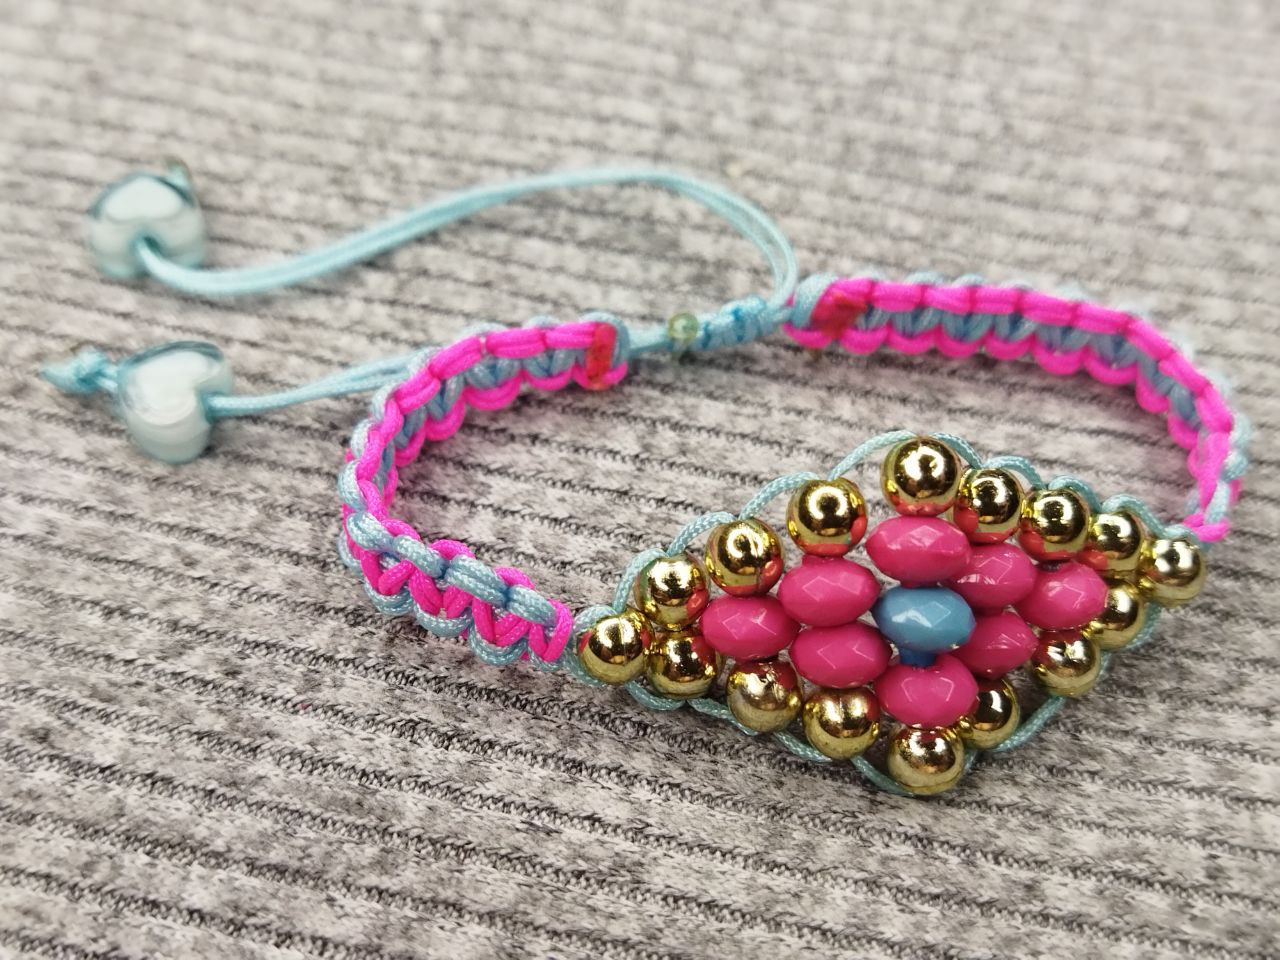
Un saludo mi querida comunidad @Jewelry feliz día 💜💎 las pulseras tejidas con la técnica macrame con diferentes diseños están muy de moda, por eso cada vez que salgo mi lugar preferido para visitar son las mercerías donde puedo encontrar gran variedad de hilos de diferentes colores, cuentas, dijes entre otras cosas que sean necesarias para elaborar esos modelos que tanto me gustan. Las cuentas son piezas fundamentales cuando queremos elaborar una figura por eso les comparto una hermosa pulsera en dos colores de hilo que me encanta mucho combinar como es el fucsia y el azul tejidos utilizando la técnica macrame en especifico el nudo plano con doble hebra, ademas elabore en la parte central de la pulsera una forma de diamante como diseño decorativo con cuentas en los mismos tonos de la pulsera y por todo el borde de la figura le coloque perlas doradas para darle un toque de brillo a la prenda. Como les he comentado cada prenda tiene un significado o un valor y el diamante es el símbolo de la fuerza y la pureza. Ahora materiales en manos que comenzamos con nuestro paso a paso
Greetings my dear community @Jewelry happy day 💜💎 bracelets woven with macrame technique with different designs are very fashionable, so every time I go out my favorite place to visit are the haberdasheries where I can find a variety of yarns of different colors, beads, charms among other things that are necessary to develop those models that I like so much. The beads are essential pieces when we want to develop a figure so I share a beautiful bracelet in two colors of thread that I love to combine as is the fuchsia and blue fabrics using the macrame technique specifically the flat knot with double strand, also elaborate in the central part of the bracelet a diamond shape as a decorative design with beads in the same tones of the bracelet and around the edge of the figure I placed golden pearls to give a touch of shine to the garment. As I have told you each garment has a meaning or a value and the diamond is the symbol of strength and purity. Now materials in hands we start with our step by step

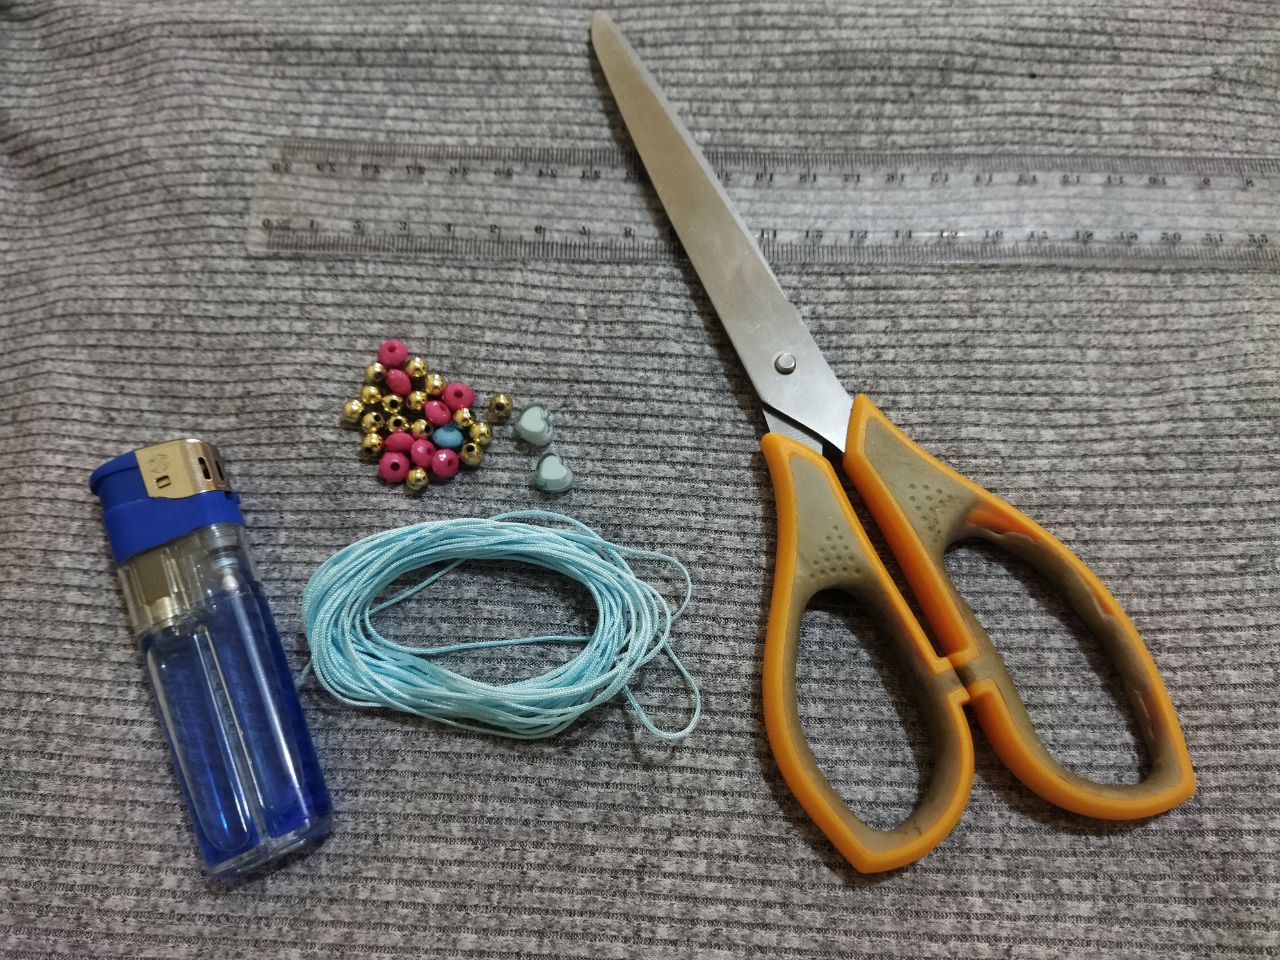
- Hilo chino en color azul y fucsia
- 8 Cuentas en color fucsia
- 1 cuenta en color azul
- 16 perlas doradas
- 2 cuentas de corazones en color azul
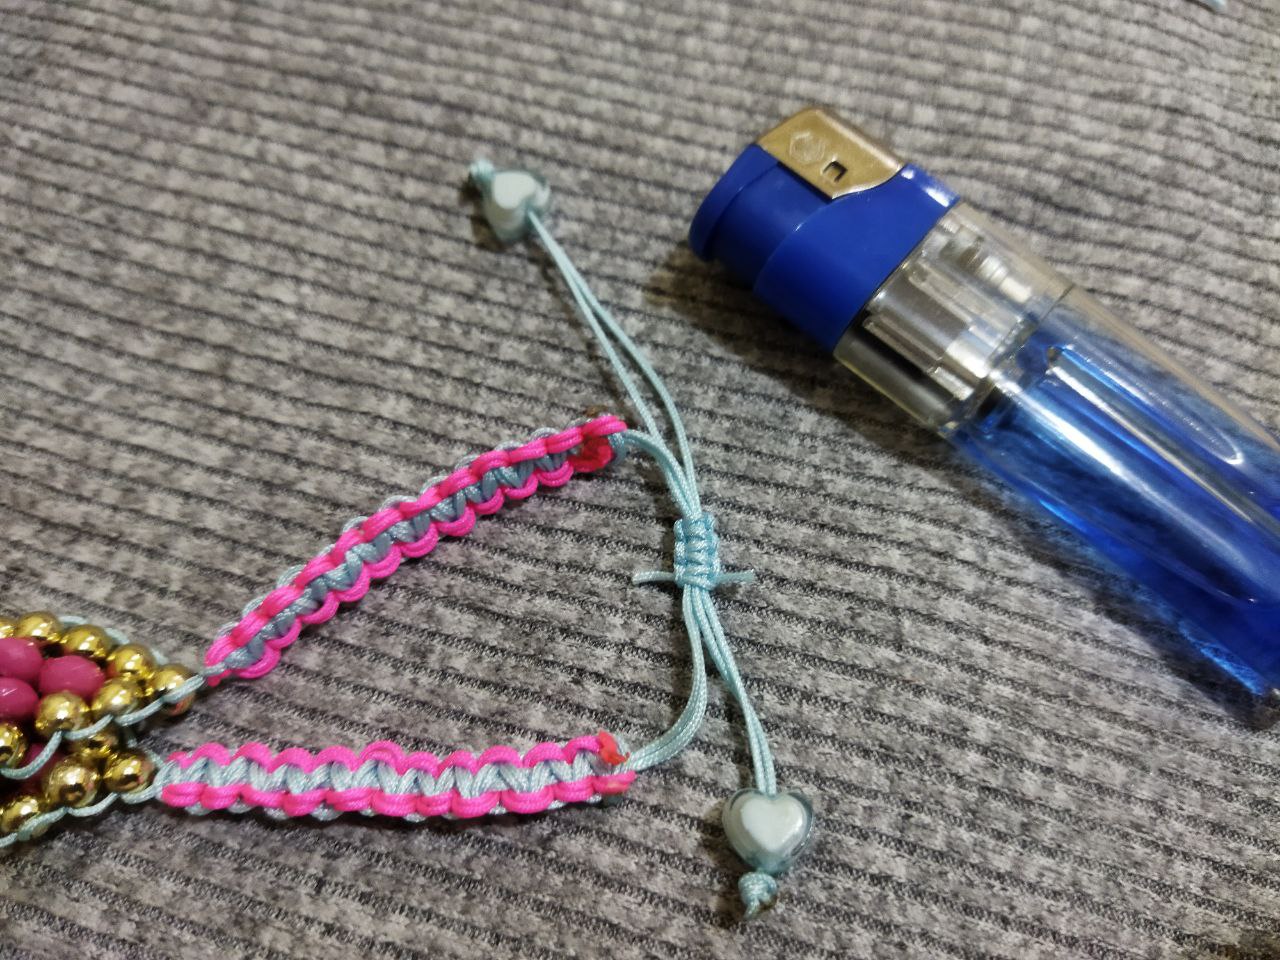
- Encendedor
- Tabla con pinza
- Tijera
- Regla
- Chinese thread in blue and fuchsia colors
- 8 beads in fuchsia color
- 1 bead in blue color
- 16 golden beads
- 2 beads of hearts in blue color
- Lighter
- Board with clamp
- Scissors
- Ruler
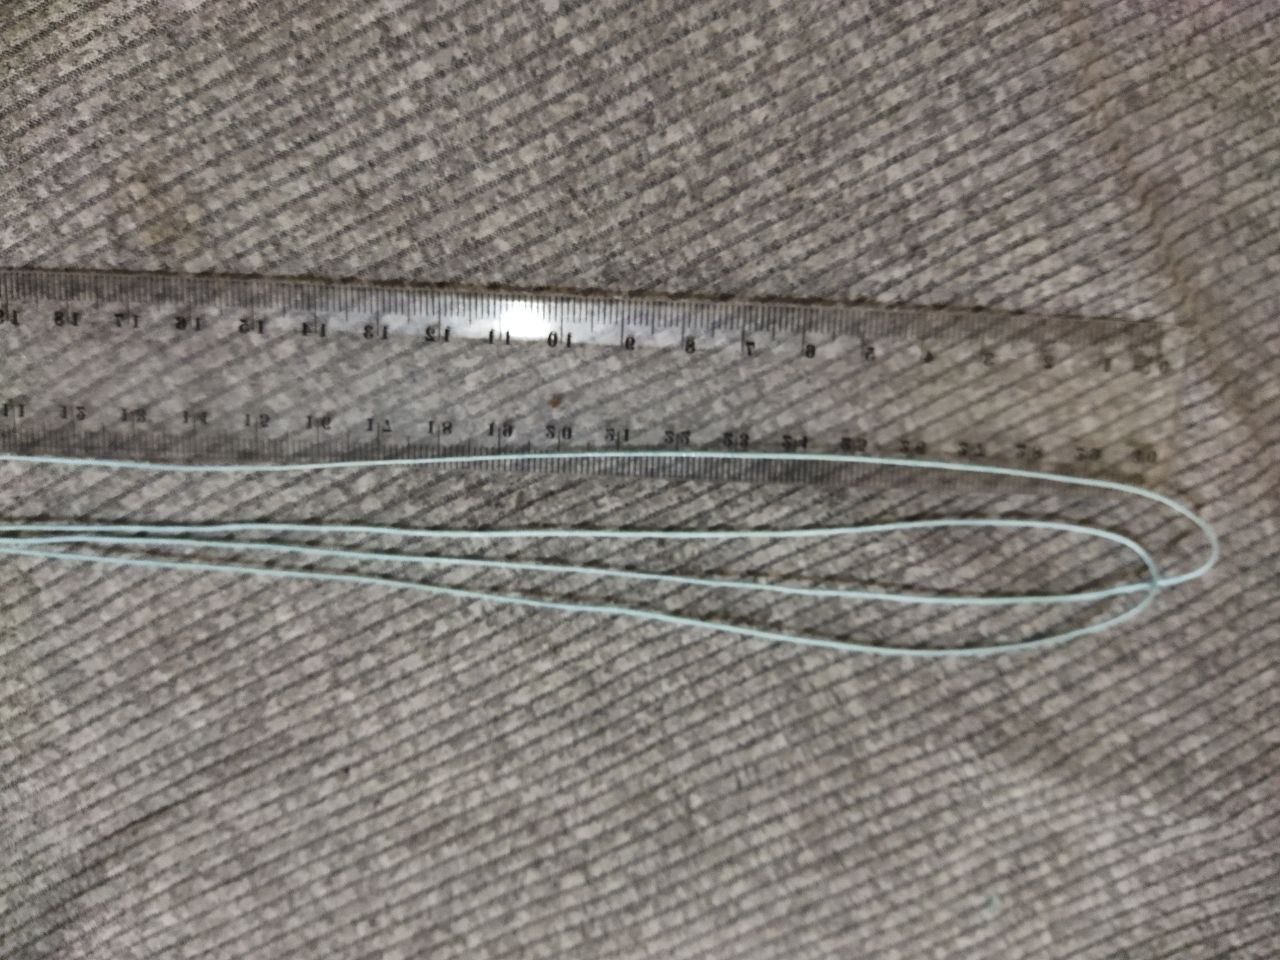
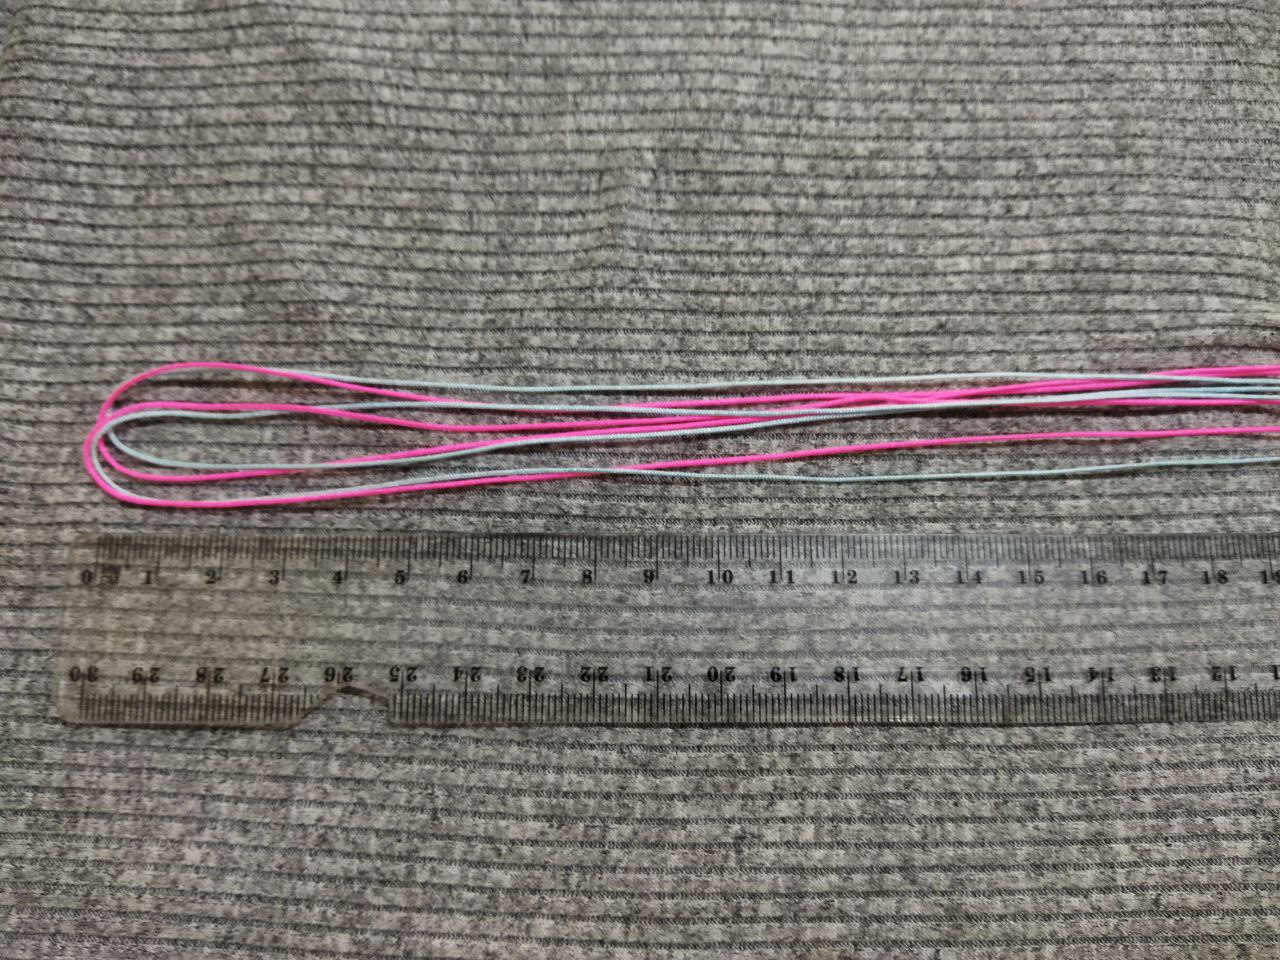
Comenzamos nuestro proyecto primeramente midiendo los diferentes hilos que vamos a utilizar. Iniciamos por los hilos guía que en este caso serán 2 de 50 centímetros, para tejer vamos a necesitar 2 hilos fucsia y 2 azules de 60 centímetros cada uno, siempre me gusta dejas un poquito de hilo sobre la medida ya que es mejor que sobre un poco y no que al comenzar a tejer nos falte hilo, por ultimo para el nudo corredizo usaremos 20 centímetros de hilo color azul
We start our project by first measuring the different yarns we are going to use. We start with the guide threads that in this case will be 2 of 50 centimeters, to weave we will need 2 fuchsia and 2 blue threads of 60 centimeters each, I always like to leave a little bit of thread over the measure because it is better to leave a little bit over and not that when we start to weave we lack thread, finally for the slipknot we will use 20 centimeters of blue thread.
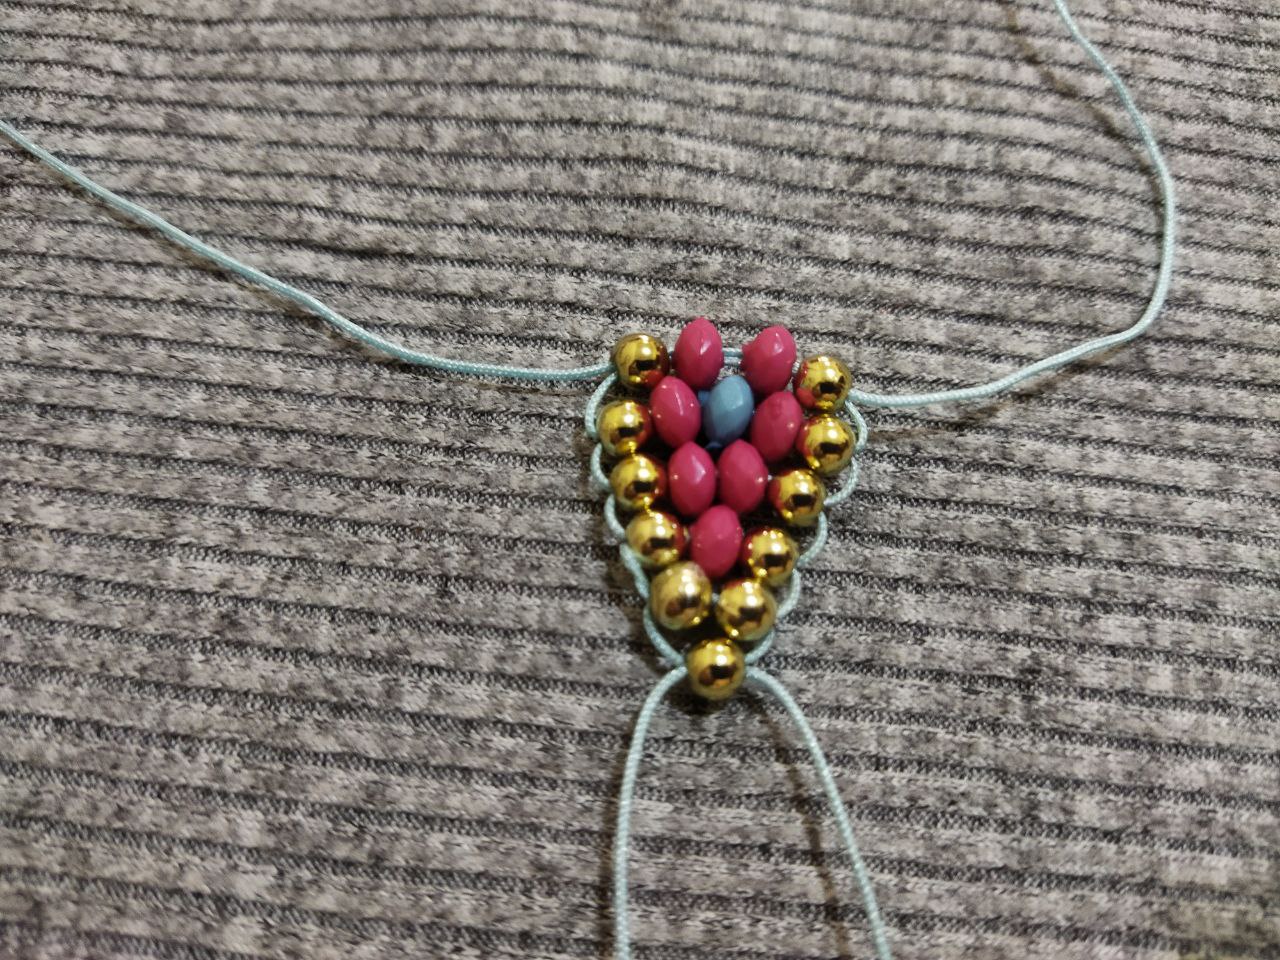
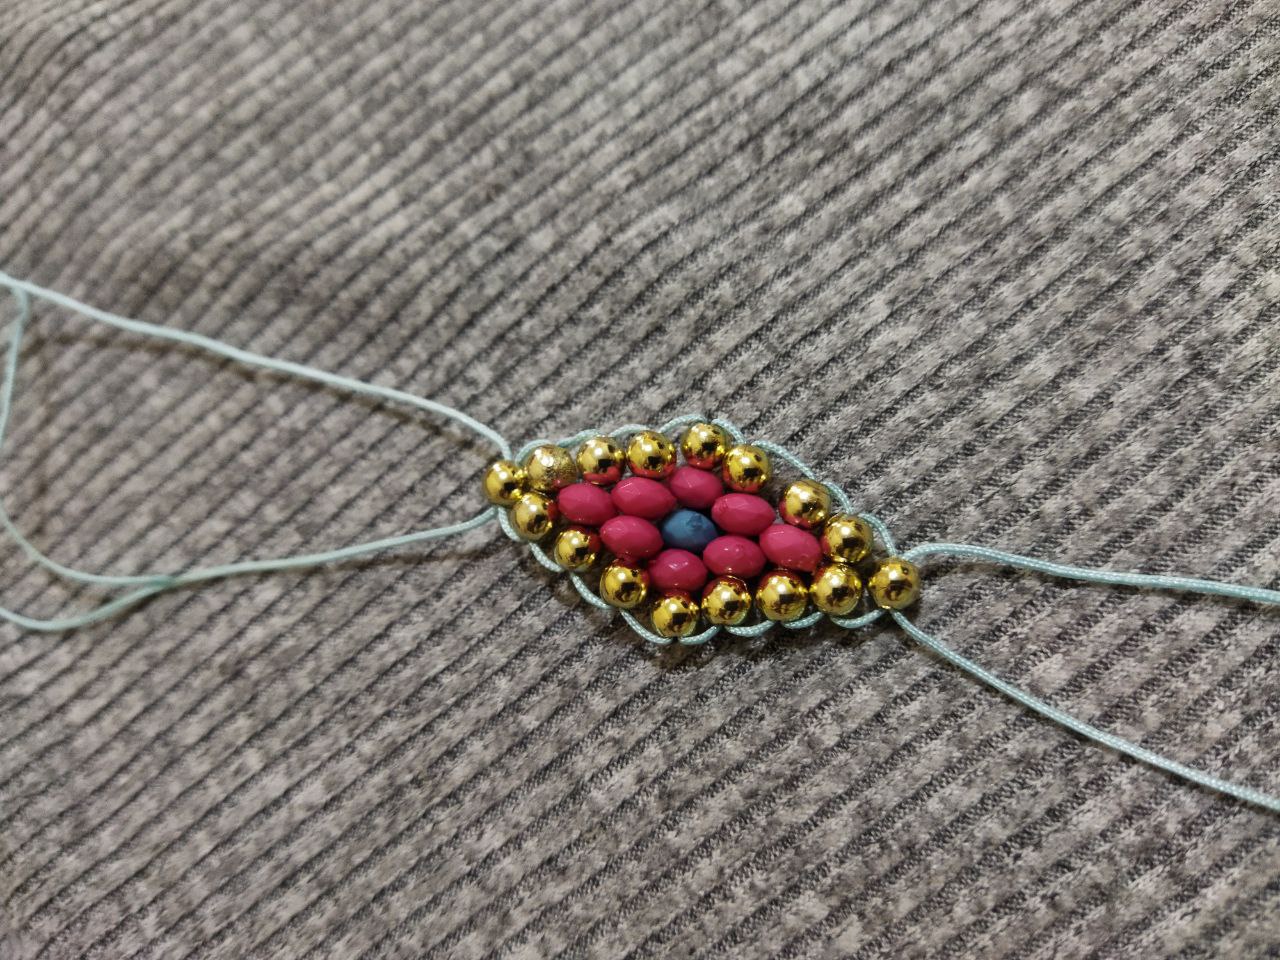
Con las cuentas vamos armar el boceto de la figura de nuestro diamante, como les comente anteriormente la pulsera se divide en dos mitades. Tomamos el primer hilo guía y lo introducimos por la hilera de cuentas que hace la mitad de laa figura y esta compuesta de la siguiente manera una perla dorada seguida de una cuenta fucsia otra azul continuamos con otra fucsia y terminamos en una perla dorada. este es el extremos mas ancho de la figura que consta de 5 cuentas. por esas mismas cuentas vamos a introducir el otro hilo guía, cada uno va tomar una dirección diferente uno sera el del lado izquierdo y el otro el derecho.
With the beads we are going to assemble the sketch of the figure of our diamond, as I mentioned before the bracelet is divided into two halves. We take the first guide wire and introduce it through the row of beads that makes half of the figure and is composed as follows: a golden bead followed by a fuchsia bead, another blue bead, we continue with another fuchsia bead and end with a golden bead. This is the widest end of the figure that consists of 5 beads. through these same beads we will introduce the other guide wire, each one will take a different direction, one will be on the left side and the other on the right side.
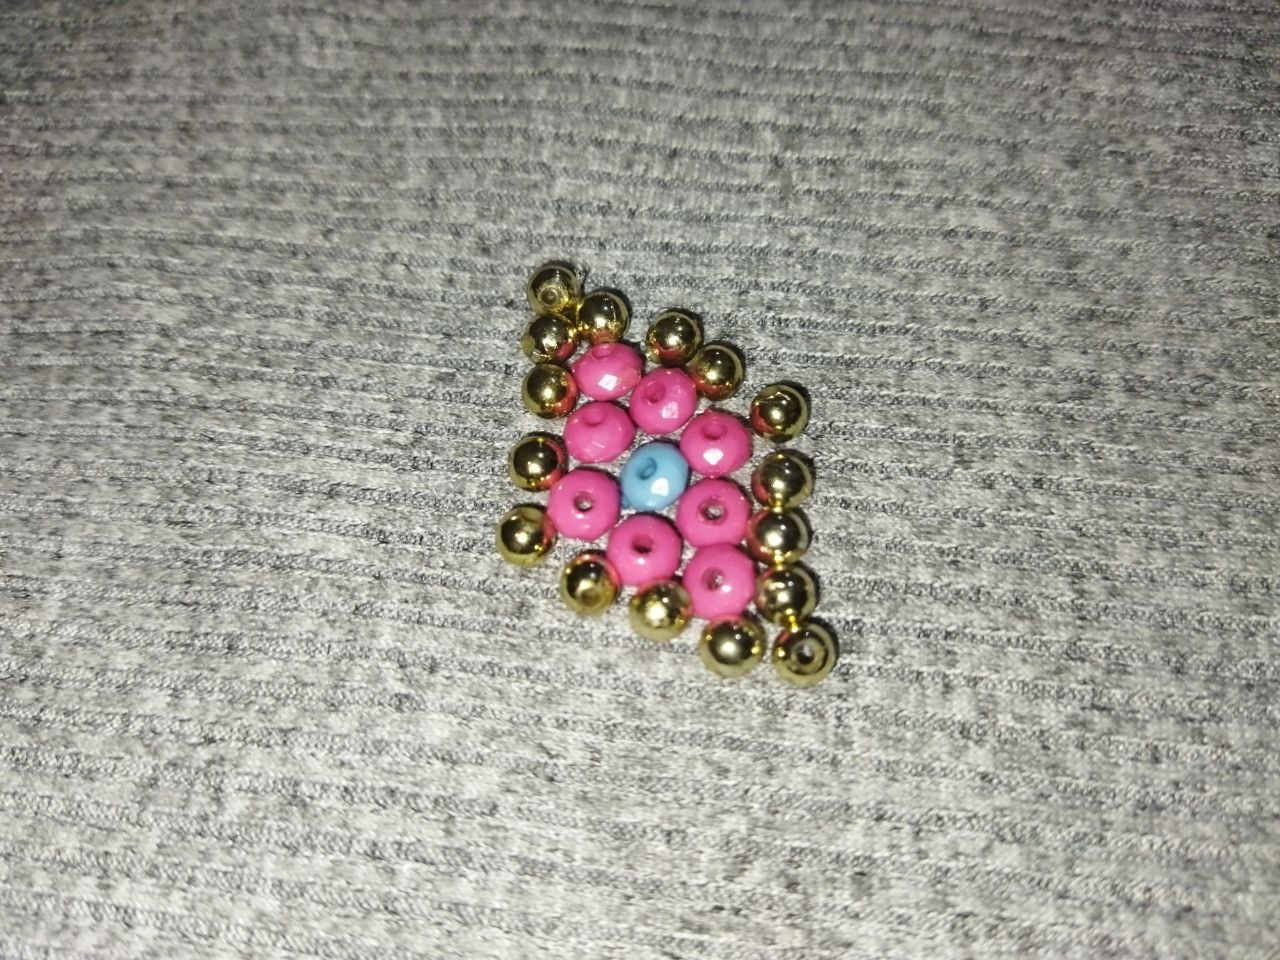

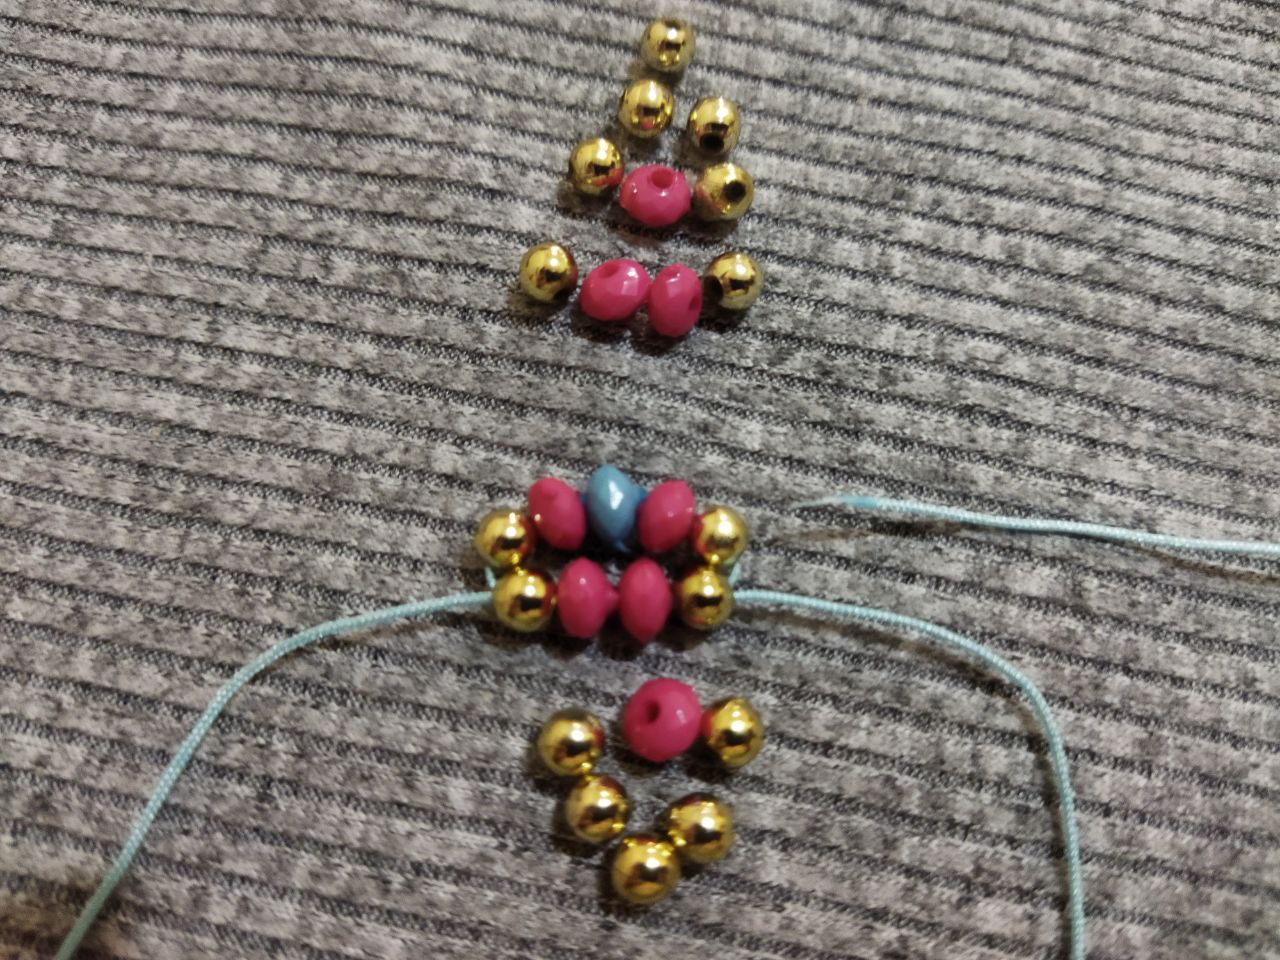
Las cuentas se van a insertar en cada extremo en forma descendente, la próxima hilera sera de 4 cuentas y así sucesivamente hasta llegar a una cuenta. La única sugerencia es que siempre en cada extremo de ir una perla dorada y el hilo se debe insertar por cada lado de las cuentas de esta manera las cuentas quedan ajustadas
The beads will be inserted at each end in descending order, the next row will be of 4 beads and so on until you reach a bead. The only suggestion is to always insert a golden bead at each end and the thread should be inserted on each side of the beads in this way the beads will be tight.
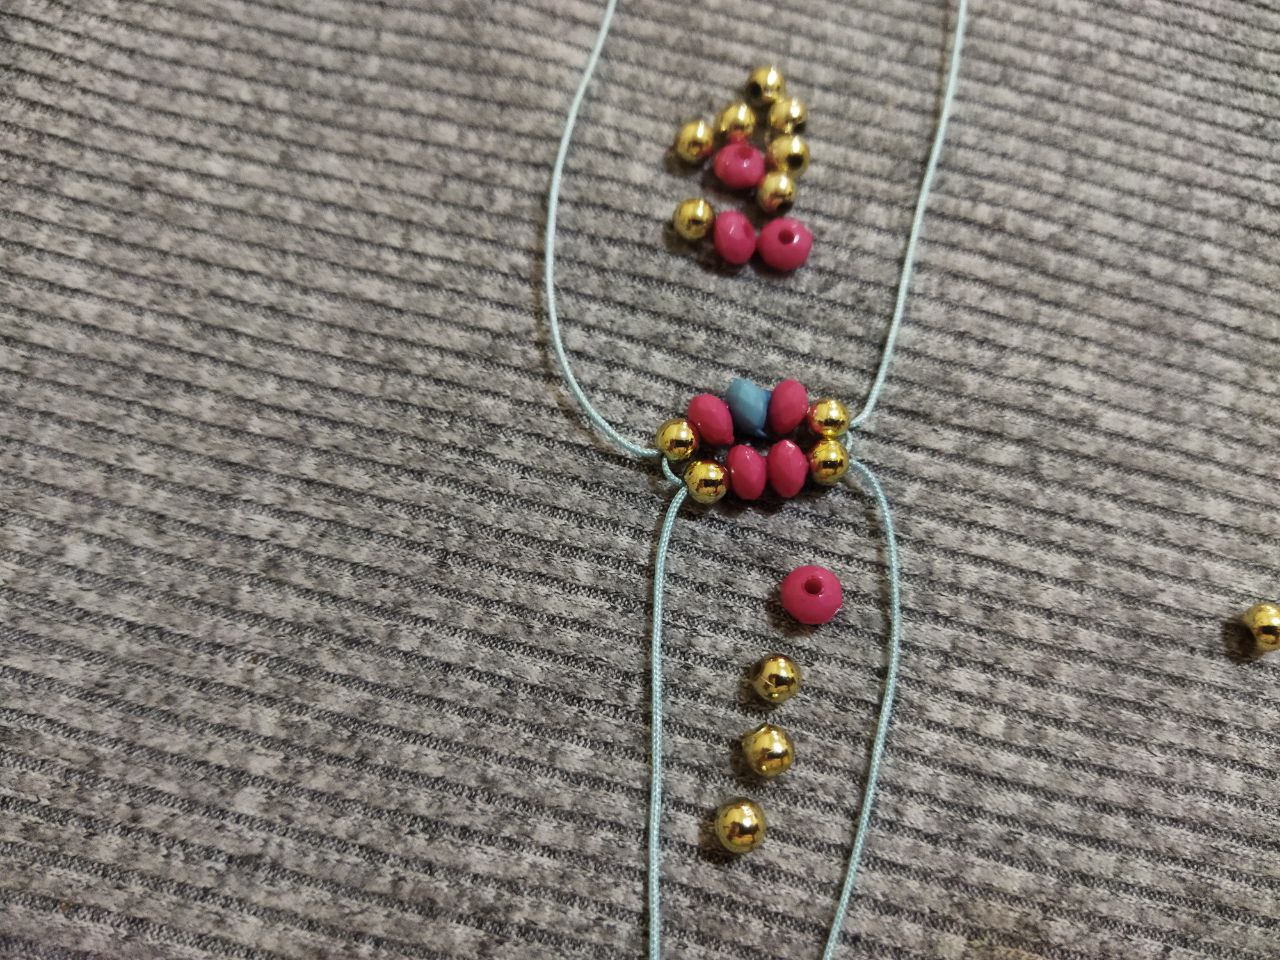
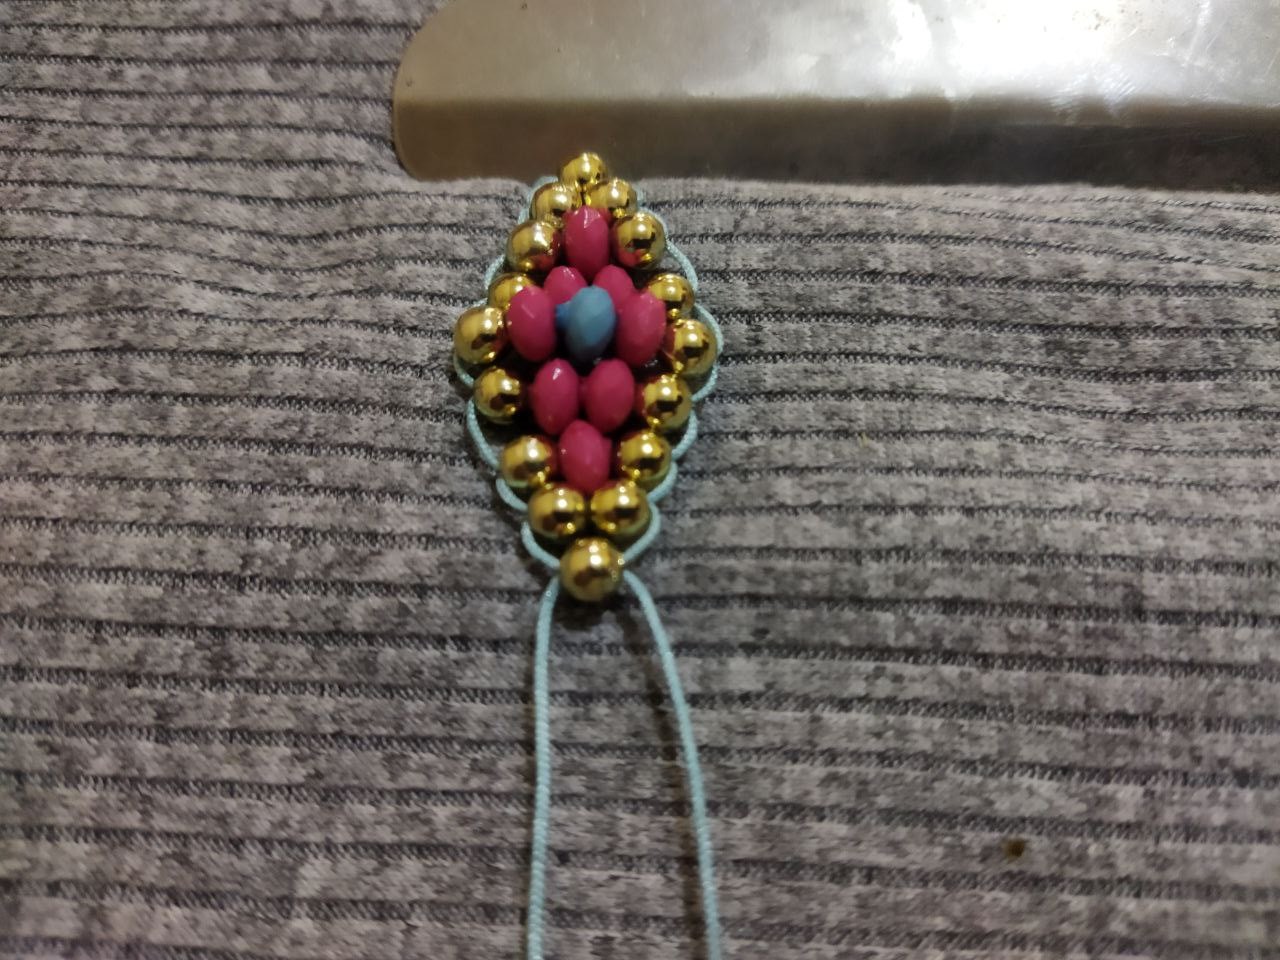
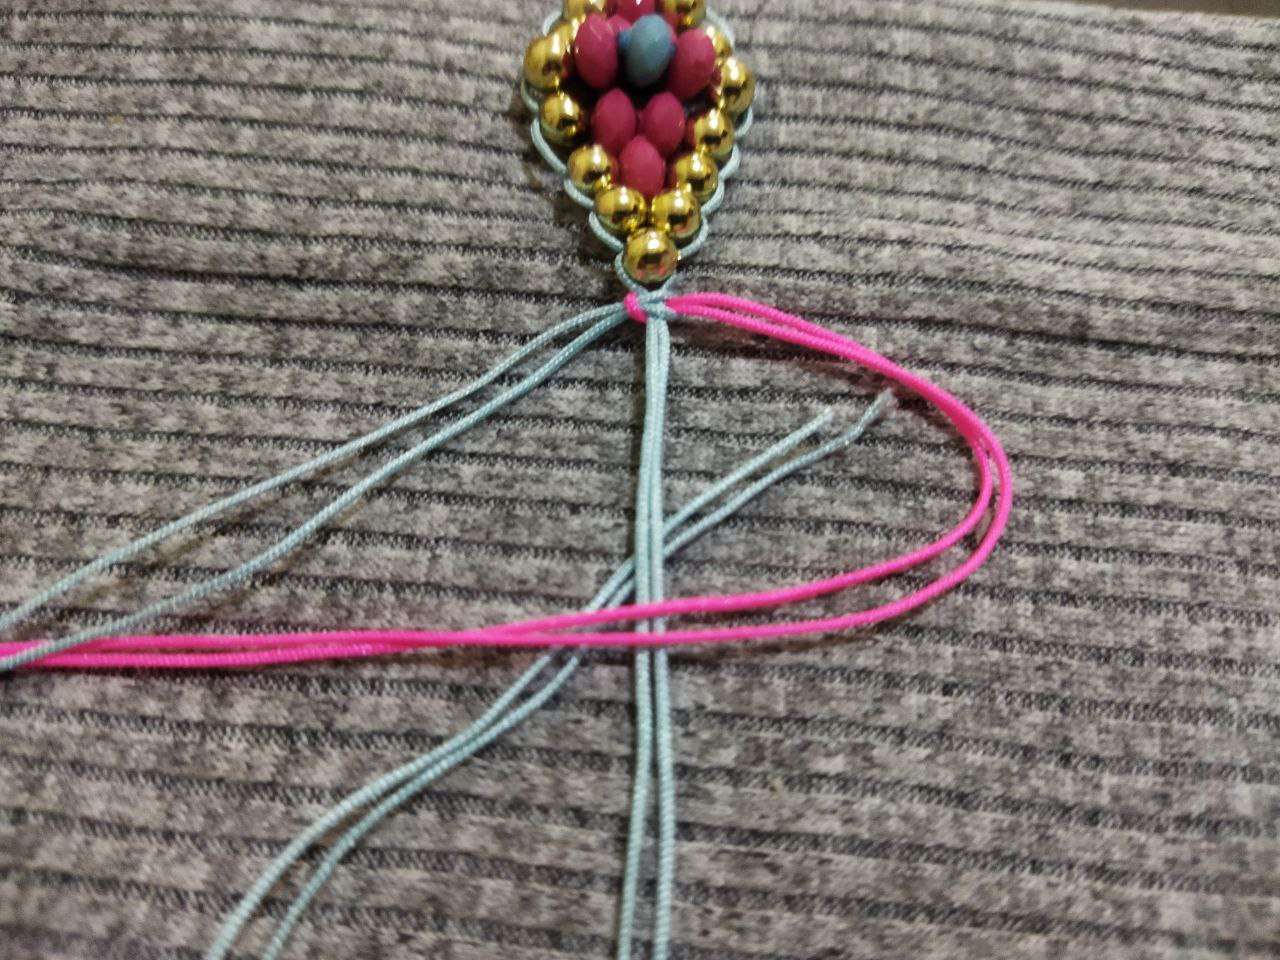
Teniendo la figura lista, pisamos un extremo con la pinza de la tabla para comenzar a tejer uno de los extremos. Tomamos una hebra azul y una fucsia, doblamos por la mitad y en ese dobles vamos a unir ambos hilos al hilo guía haciendo pasar uno por debajo y el otro por encima del hilo guía, después introducimos uno por dentro del otro y ajustamos el nudo
Having the figure ready, we step on one end with the clamp of the board to start weaving one of the ends. We take a blue and a fuchsia strand, we fold in half and in that double we are going to join both strands to the guide thread passing one under and the other over the guide thread, then we introduce one inside the other and tighten the knot.
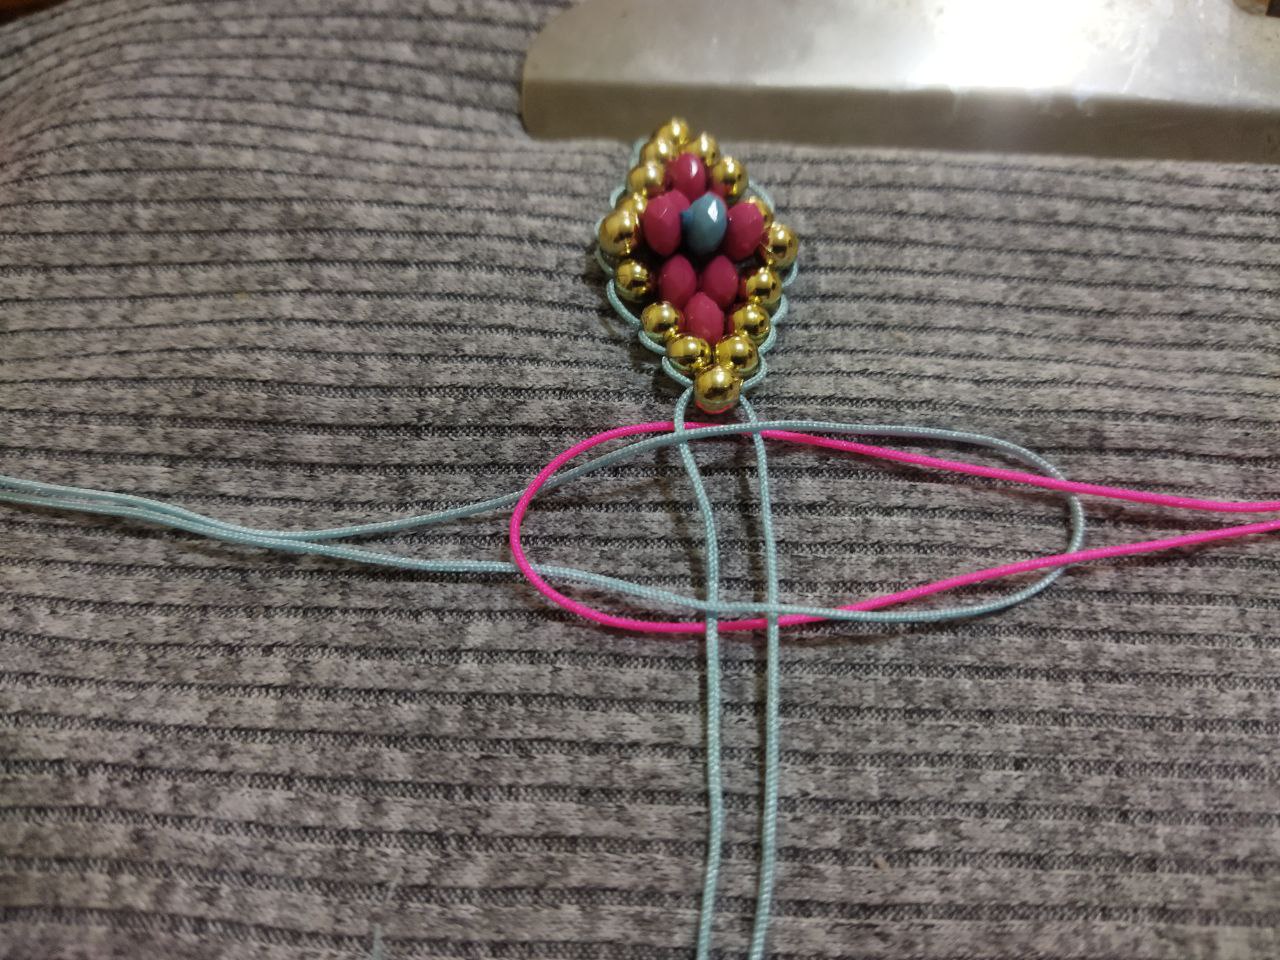
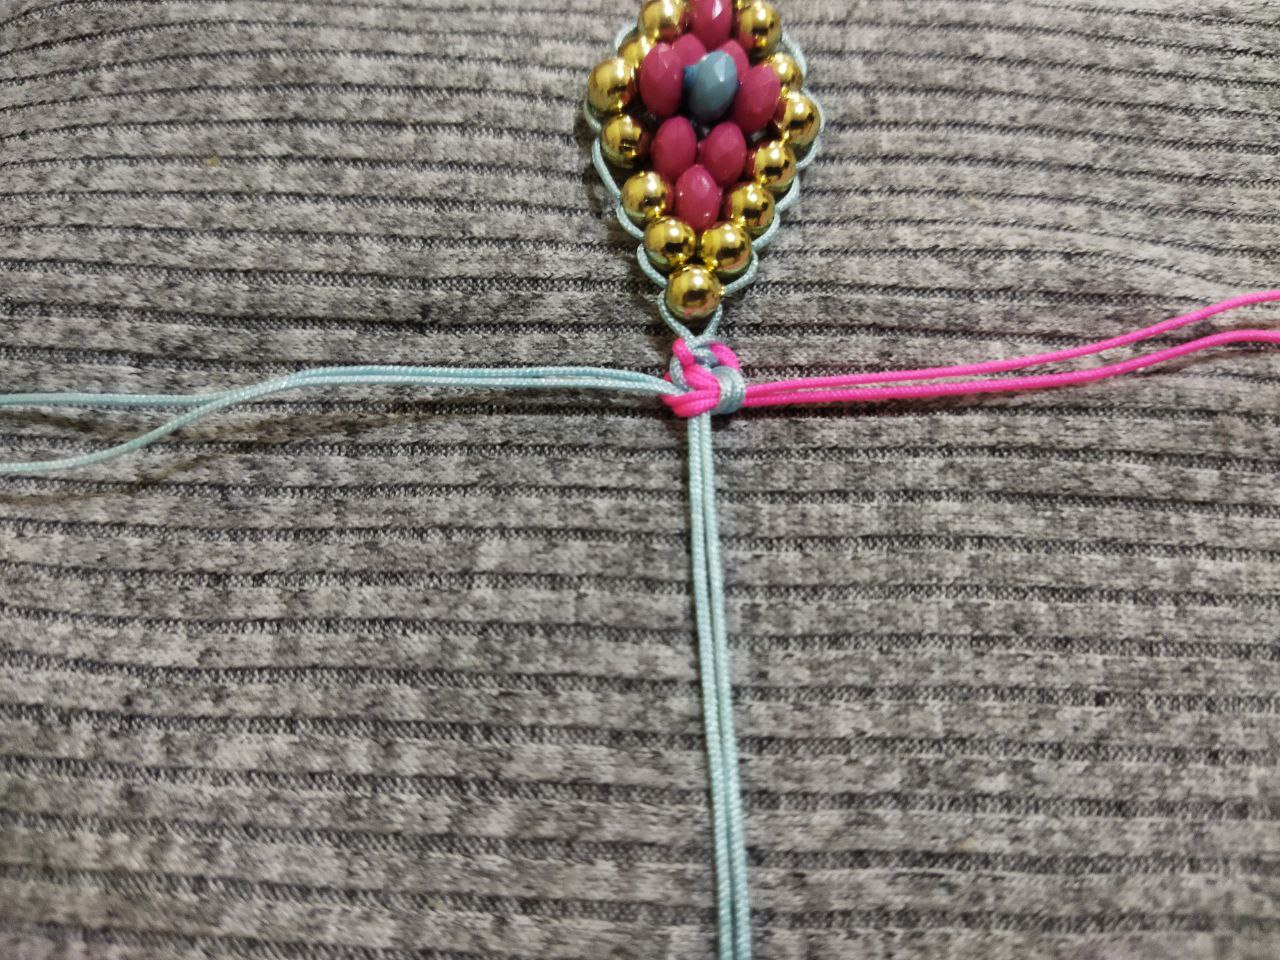
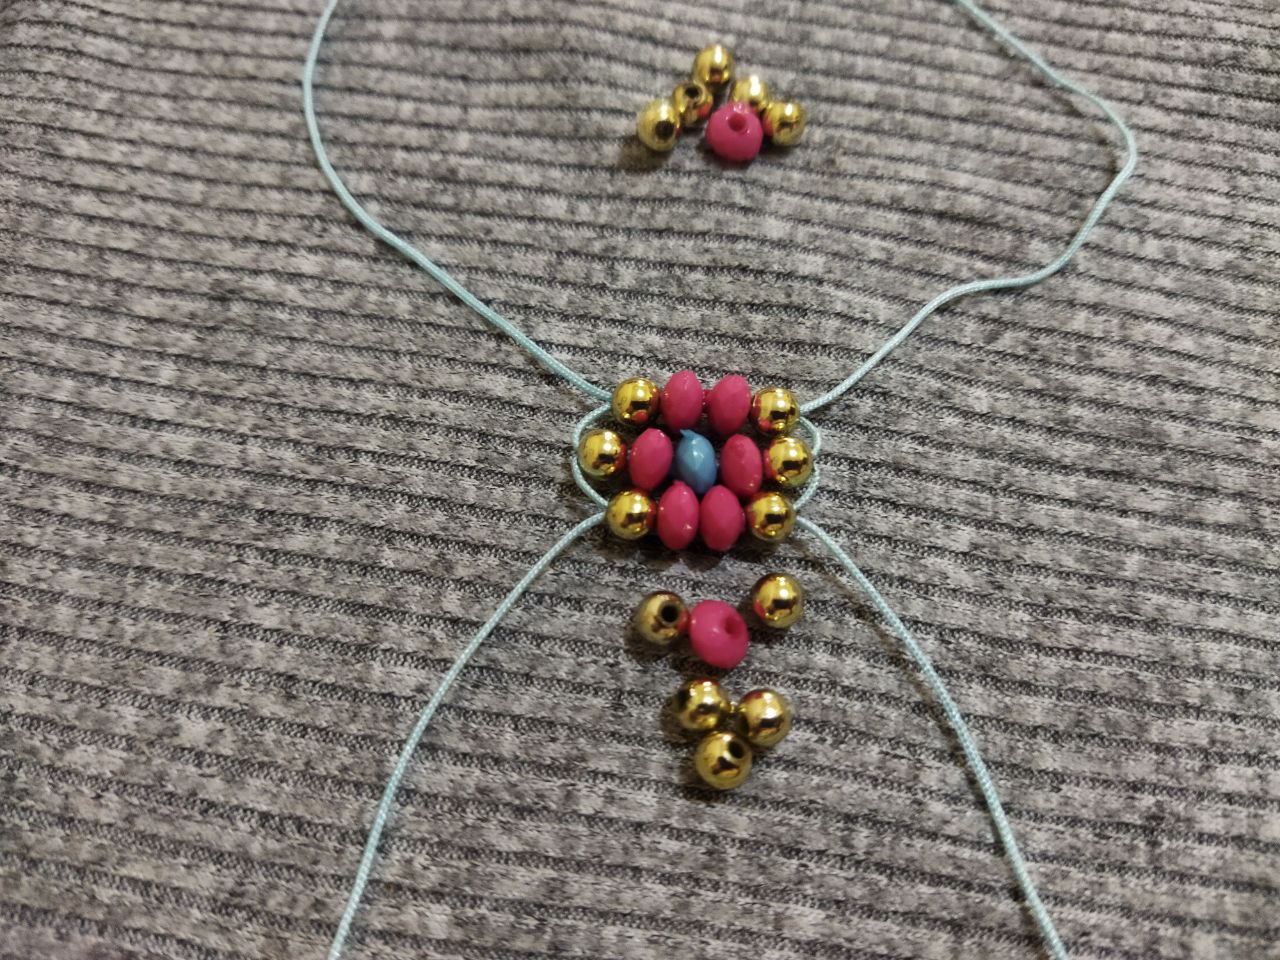
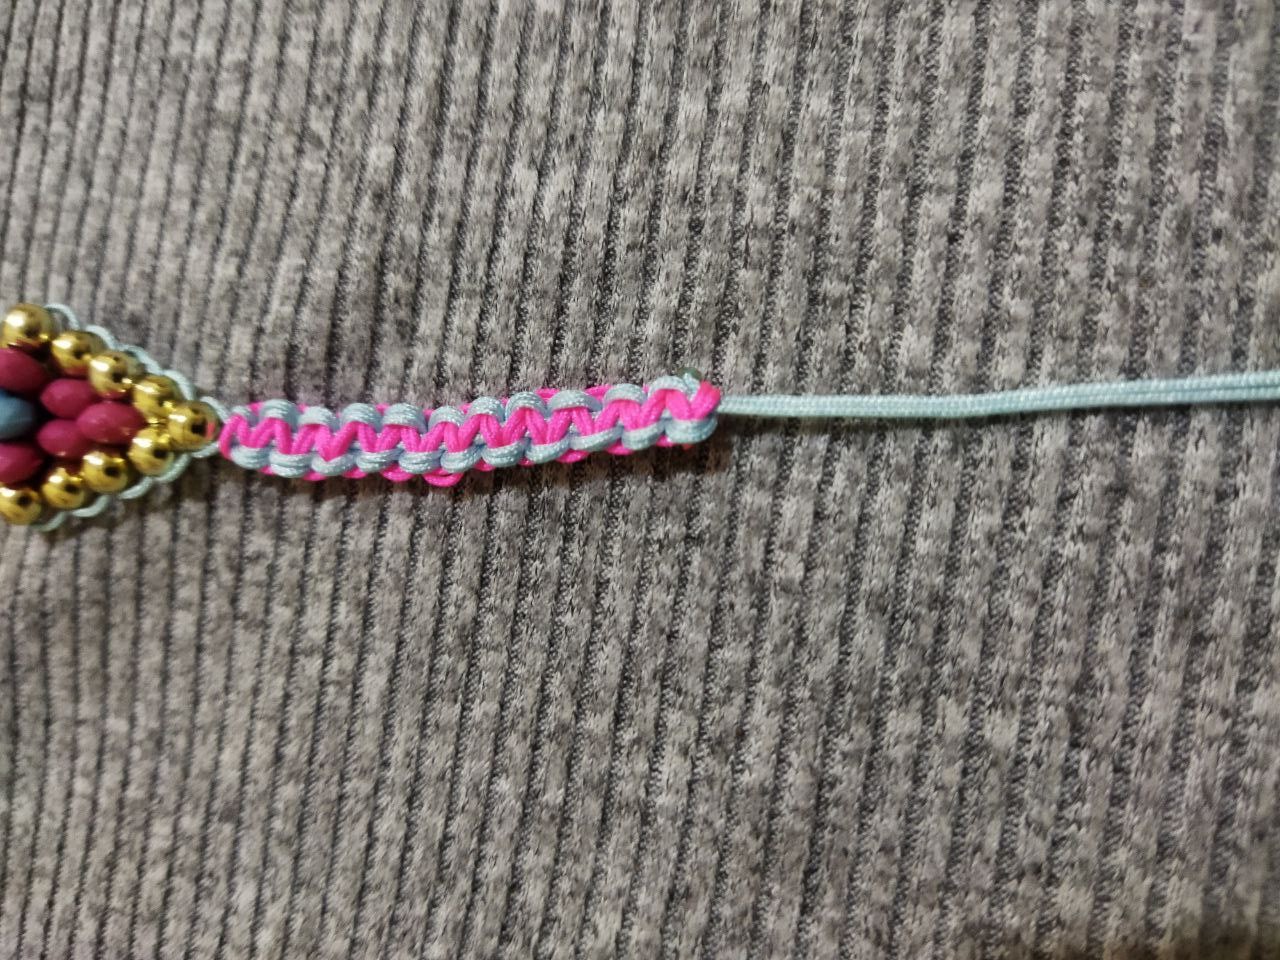
Lo siguiente sera hacer los nudos planos, como vemos tenemos dos hebras de hilo por cada lado de colores diferentes un lado azul y el otro fucsia. Para esto debemos escoger que color quieren que se vea por el borde del tejido en este caso escogí que fuera el azul, si es así la barriga de nuestro nudo plano la debemos hacer con el hilo de color fucsia y el azul pasara por debajo del hilo guía y luego por dentro de la P, siempre en cada lado la P sera en ese color. Si quieren que sea en fucsia el borde pues deben hacer lo contrario la P sera en color azul. Vamos a tejer por cada lado 4.5 centímetros
Next we will make the flat knots, as we can see we have two strands of thread on each side of different colors, one side blue and the other fuchsia. For this we must choose what color you want to be seen by the edge of the fabric in this case I chose blue, if so the belly of our flat knot we must do it with the fuchsia thread and the blue will pass under the guide thread and then inside the P, always on each side the P will be in that color. If you want the border to be in fuchsia, you must do the opposite, the P will be in blue. We are going to knit 4.5 centimeters on each side.

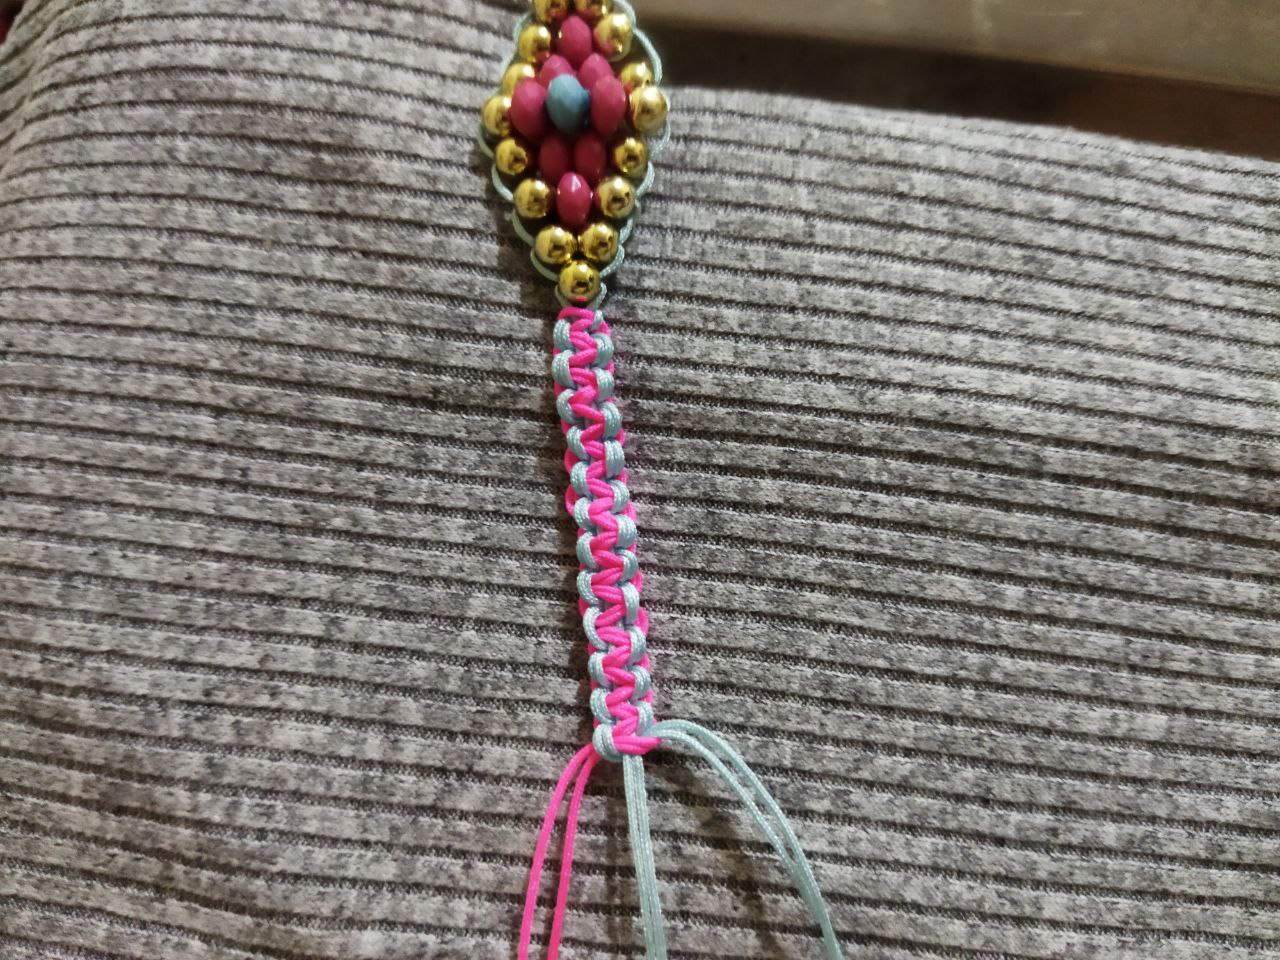
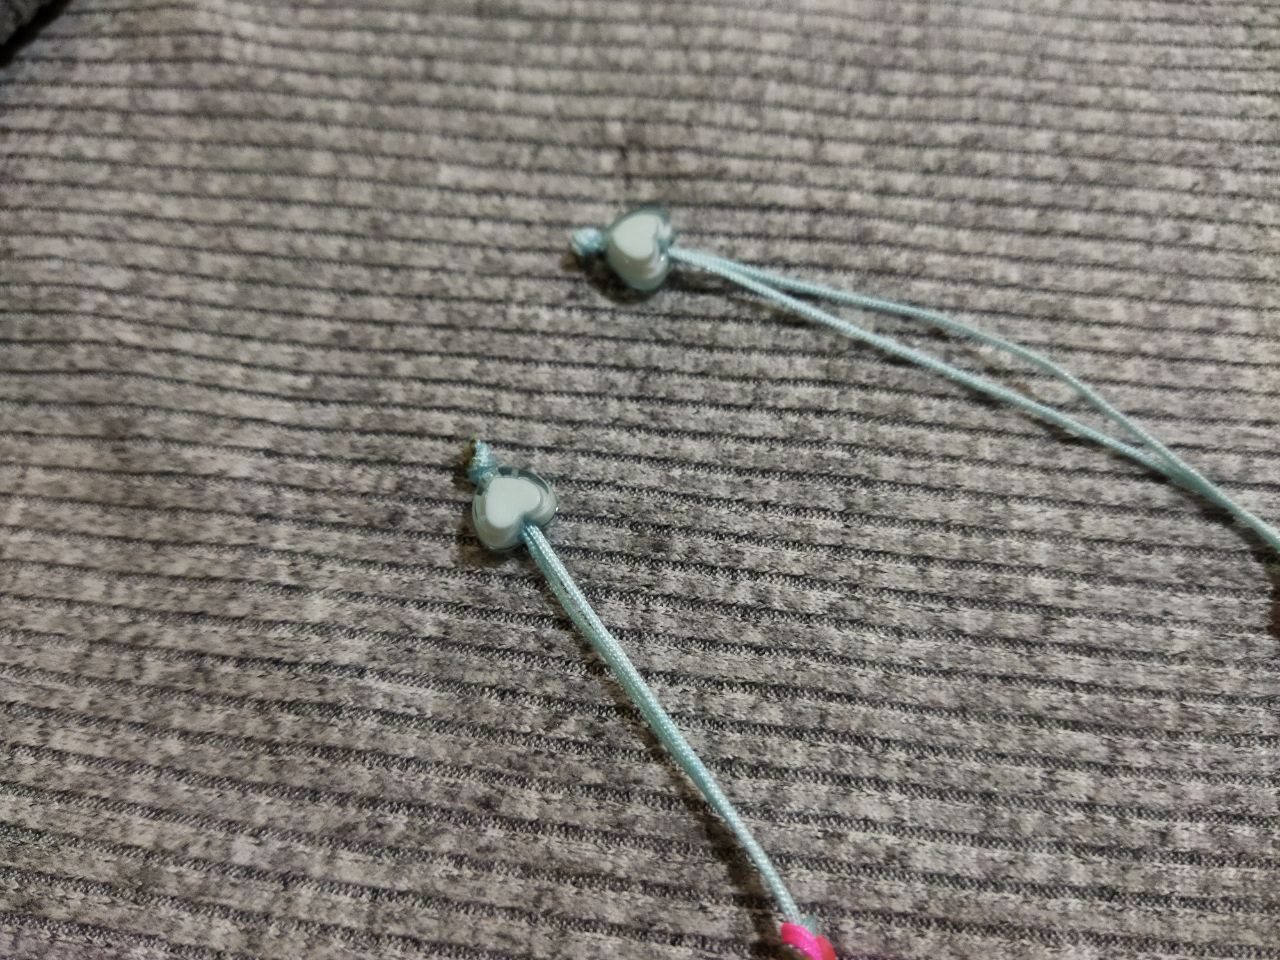
Cortamos los hilos de ambos lados y quemamos con el encendedor las puntas excedentes, dejando solo los hilos guía. Introducimos en cada punta para decorar unas cuentas en forma de corazón y hacemos unos nudos básico
Cut the threads on both sides and burn the excess ends with the lighter, leaving only the guide threads. Insert some heart-shaped beads in each end to decorate and tie some basic knots.
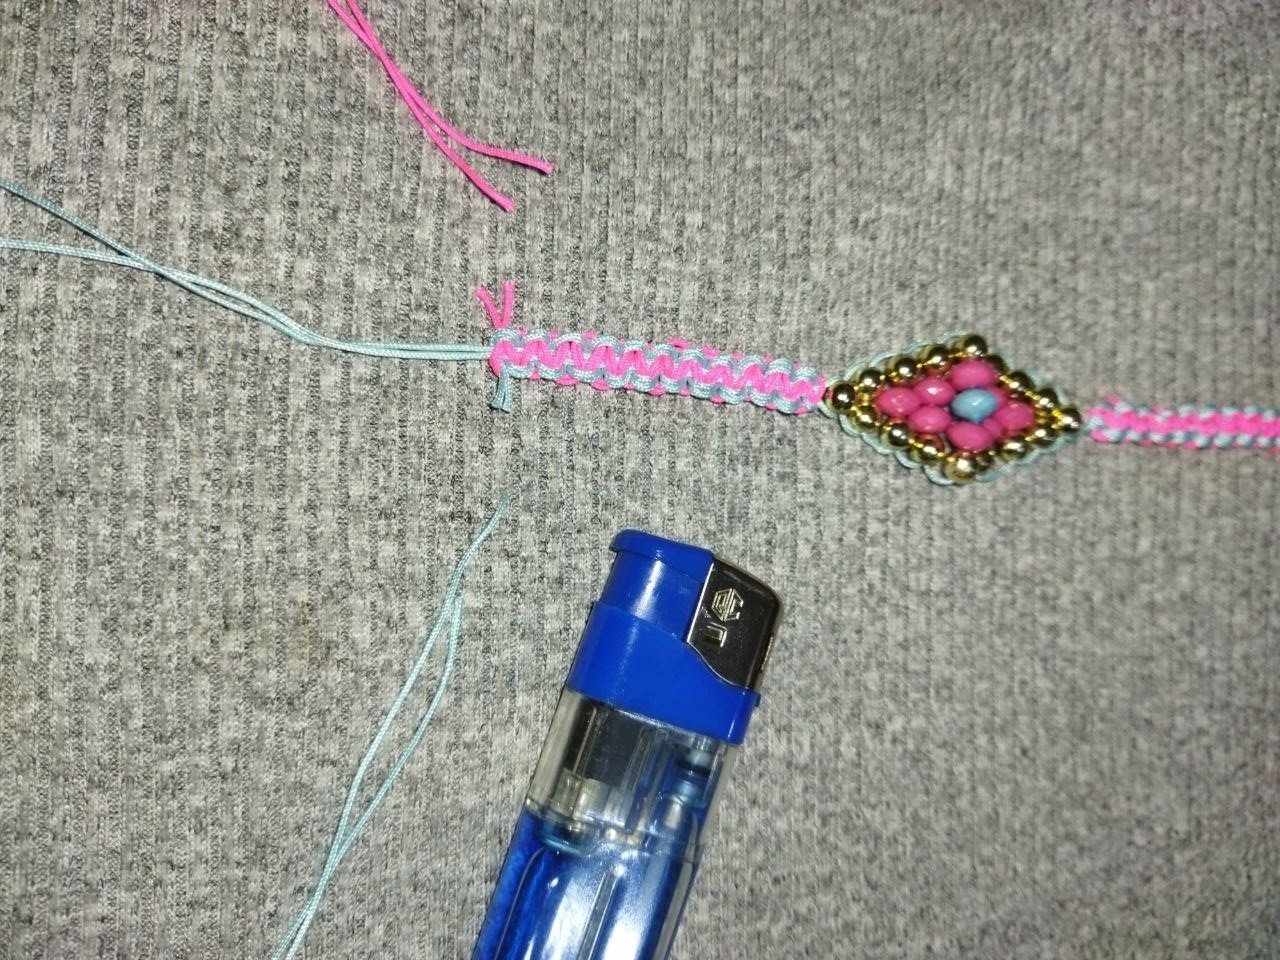
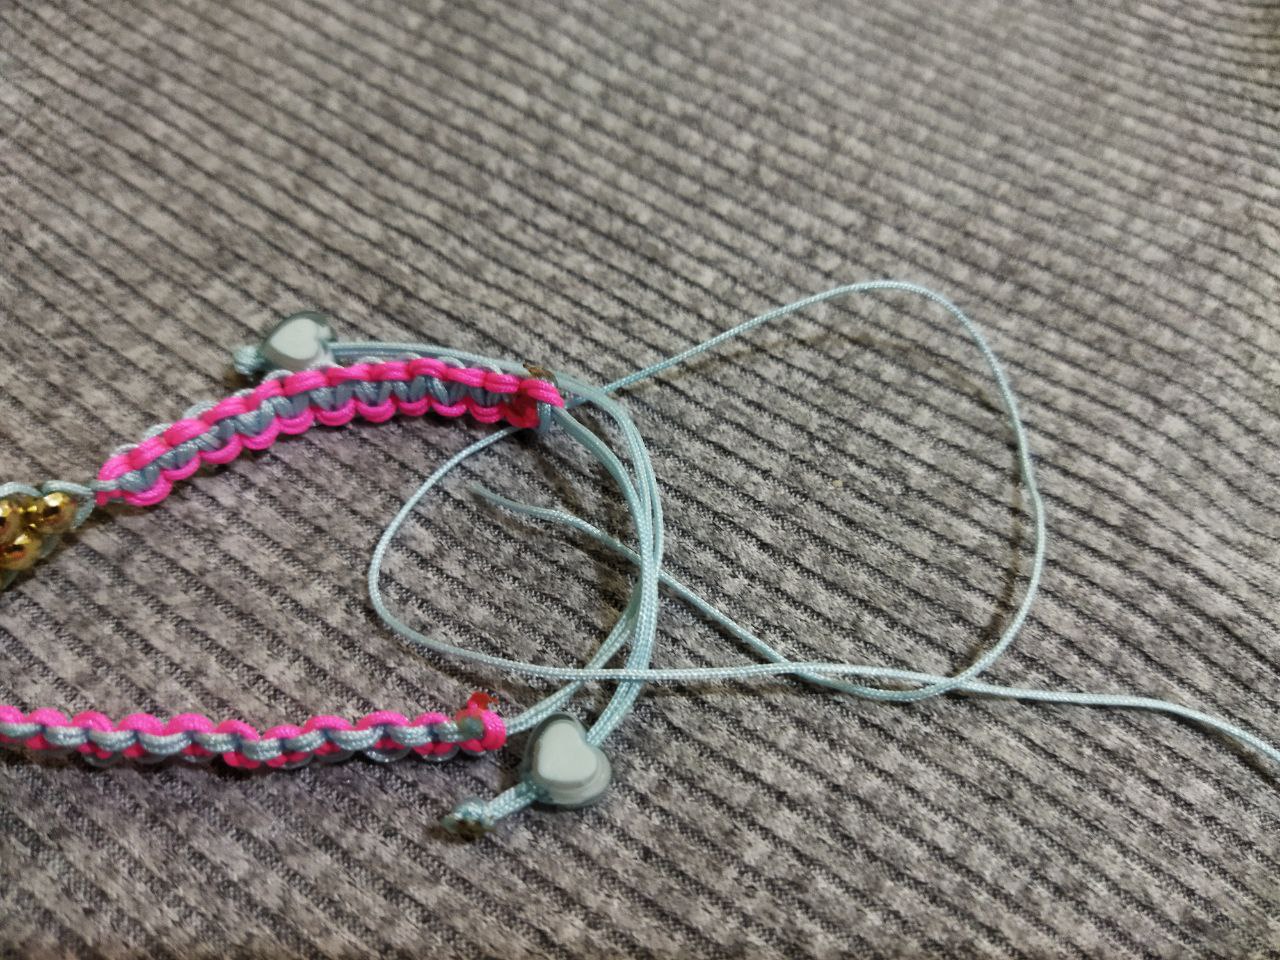
Por ultimo cruzamos ambos extremos y con otra hebra de hilo en color azul de 20 centímetros hacemos 6 nudos planos que servirán de nudos corredizos. Cortamos los hilos excedentes y quemamos con el encendedor
Finally we cross the threads of both ends and with another strand of blue thread of 20 centimeters we make 6 flat knots that will serve as slip knots. Cut the excess threads and burn them with the lighter.
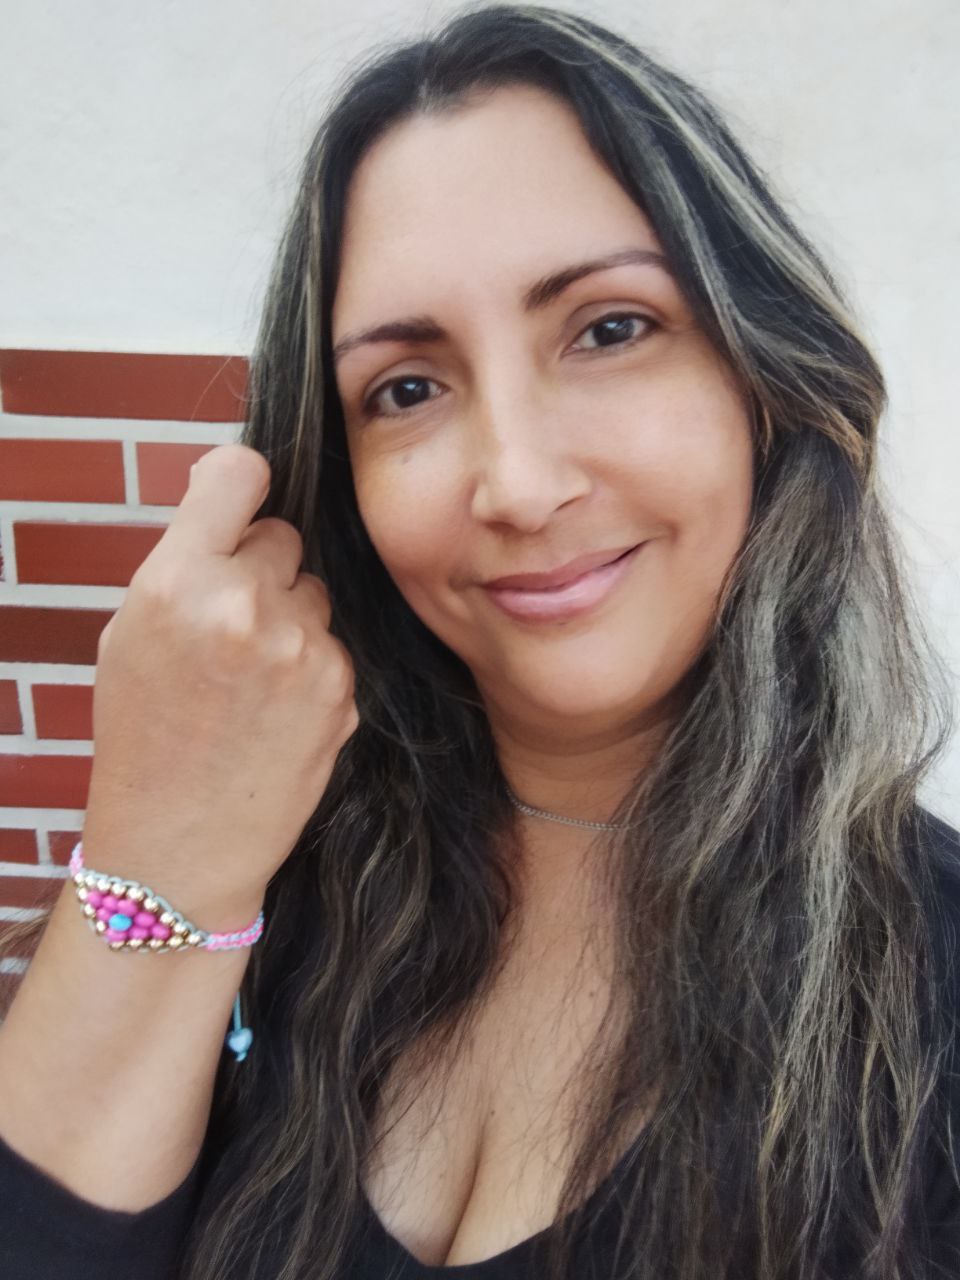
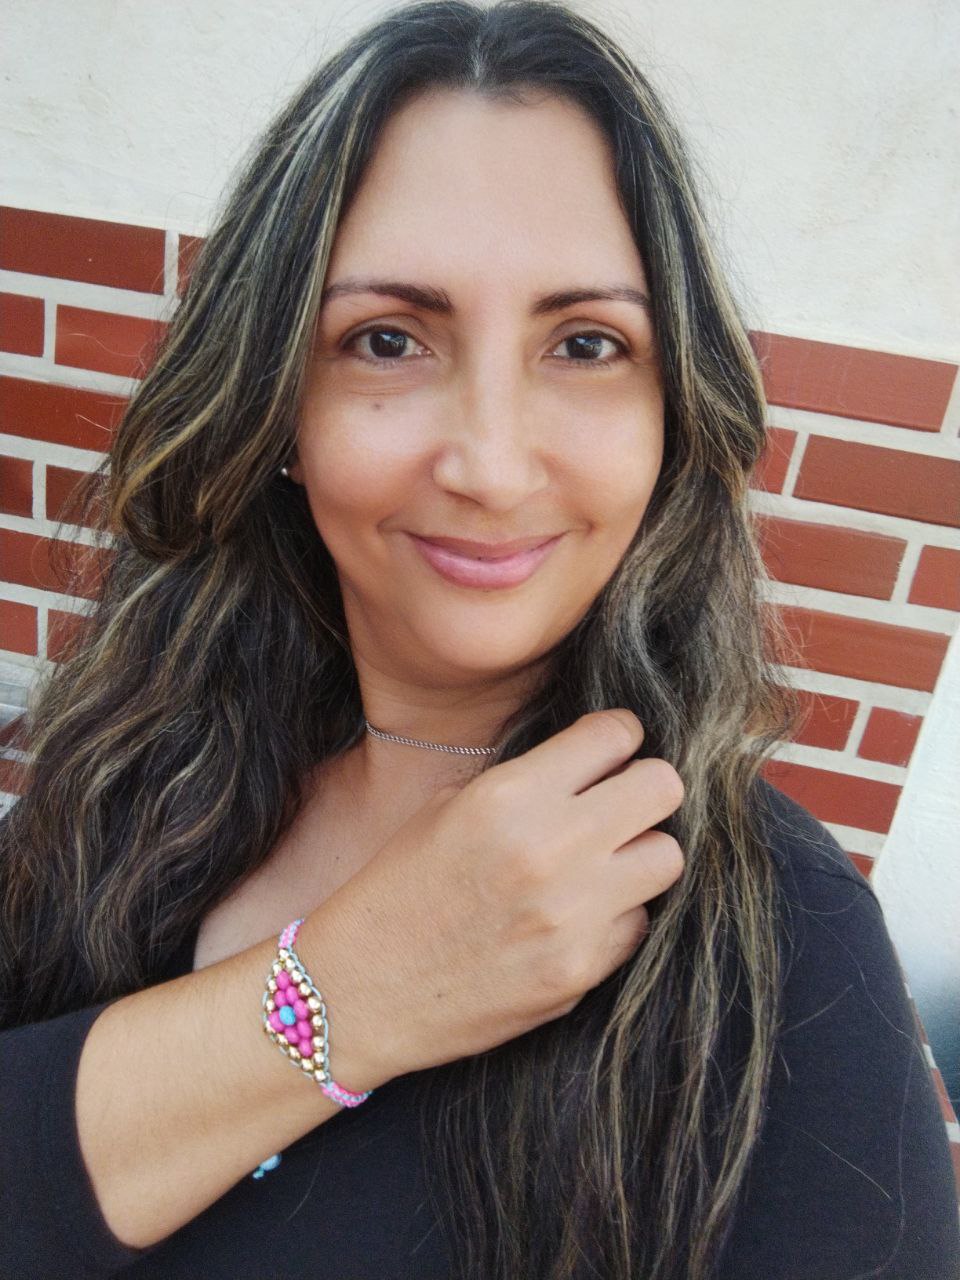
Ahora si Listo!!! ya culminamos con este hermoso proyecto como fue una pulsera con un bello diseño de diamante elaborad con cuentas que adorna la parte central de la misma como también el resto de la prenda esta tejida utilizando la técnica macrame. Con esmero y dedicación podemos lograr muchas cosas que nos proponemos
!! Un saludo y nos vemos en una próxima oportunidad!!
Now if Ready!!! we have finished with this beautiful project as it was a bracelet with a beautiful diamond design elaborated with beads that adorns the central part of the same as well as the rest of the garment is woven using the macrame technique. With care and dedication we can achieve many things that we set out to achieve.
!! Greetings and see you in the next opportunity!
| Pueden seguirme en 💙: | You can follow me on 💙: |
|---|---|
| eveyese1312 | |
| Discord | eveyese1312#6211 |
Las fotos y el contenido son de mi autoria
Imágenes editadas en PowerPoint Canva y Picsart
Para la traducción usé el traductor: DeepL
The photos and content are my own.
Images edited in PowerPoint Canva and Picsart
For the translation, I used the translator: DeepL
Totalmente hermosa, llamativa y creativa, quedé totalmente encantada, la combinación de colores es perfecta.
Excelente trabajo amiga.
Gracias amiga me alegra que te haya gustado mi trabajo, si esos colores me encantan ☺️. Bendiciones @emmaris
I love the diamond shape, there are perfect for making my jewelry. How you made the shape is amazing and nice.
Hello @apunawu the figure is extremely easy. As a recommendation you must first order the beads and form the figure, this time I divided it in two parts starting from the central row. The rest you can be guided by the explanation of the tutorial and the photos and also use the colors that you like. Thanks for visiting and I'm glad you liked it. Blessings
Wuaoh! te ha quedado espectacular esta pulsera. me enecanta!
Gracias amiga por tu hermoso comentario 😊 me alegra que te haya gustado mi proyecto, el resultado fue el esperado, puedes combinar las cuentas y los hilos con el color de tu preferencia. Bendiciones @divergente1
Muy linda la pulsera, esa forma de diamante quedó perfecta. Saludos 🤗
Hola @irenenavarroart me alegra leer tu lindo comentario y mucho más que te haya gustado mi trabajo. Si ese diamante me encantó es un hermoso detalle que resalta el diseño de esta pulsera. Gracias amiga muchas bendiciones y exito 😊
Quedó tan linda. Admiro la paciencia para hacer este tipo de diseño. Excelente trabajo.
Gracias por dejar tu comentario amiga @artsugar en realidad me caracterizo por tener mucha paciencia y cuando quiero elaborar algún diseño que me gusta, puedo armar y desarmar las veces que sean necesarias hasta que me salga como quiero. Saludos amiga y bendiciones ☺️
Hermosa pulsera muy casual y deportiva a la vez ideal para lucirlo en muchos eventos
Que bella, @eveyese1312 realmente un gran trabajo me encantó la combinación de colores... Gracias por compartir este proyecto con nosotros.