Crocheted snowflake tendrils for this Christmas season [ESP|ENG]


Un saludo mi querida comunidad @NeedleWorkMonday 💖. Para hoy les comparto un lindo proyecto tejido a crochet aprovechando las venideras festividades navideñas, la cual para mi es la época mas bonita del año en todos los sentidos y con su llegada hay un cambio de clima para nosotros un poco mas fresco pero en muchos países pueden disfrutar la hermosa nieve, por eso les quiero compartir unos zarcillos con el símbolo característico de un copo de nieve, en realidad me encanto el diseño para este accesorio, pero bien lo pueden realizar y utilizarlo como adorno para decorar el árbol de navidad, también deben quedar bien hermosos Así que materiales en manos y comencemos con este paso a paso
Greetings my dear community @NeedleWorkMonday 💖. For today I share with you a cute crochet knitted project taking advantage of the coming Christmas holidays, which for me is the most beautiful time of the year in every way and with its arrival there is a change of weather for us a little cooler but in many countries you can enjoy the beautiful snow, so I want to share with you some tendrils with the characteristic symbol of a snowflake, actually I love the design for this accessory, but you can make it and use it as an ornament to decorate the Christmas tree, they should also be beautiful. So materials in hands and let's start with this step by step.

- Hilo perle blanco
- Aguja para crochet
- Escarcha liquida disconacar
- Cola blanca
- Anzuelos para zarcillos
- Argollas
- Tijera
- White pearl yarn
- Crochet needle
- Disconnecting liquid frosting
- White glue
- Hooks for tendrils
- Hoops
- Scissors

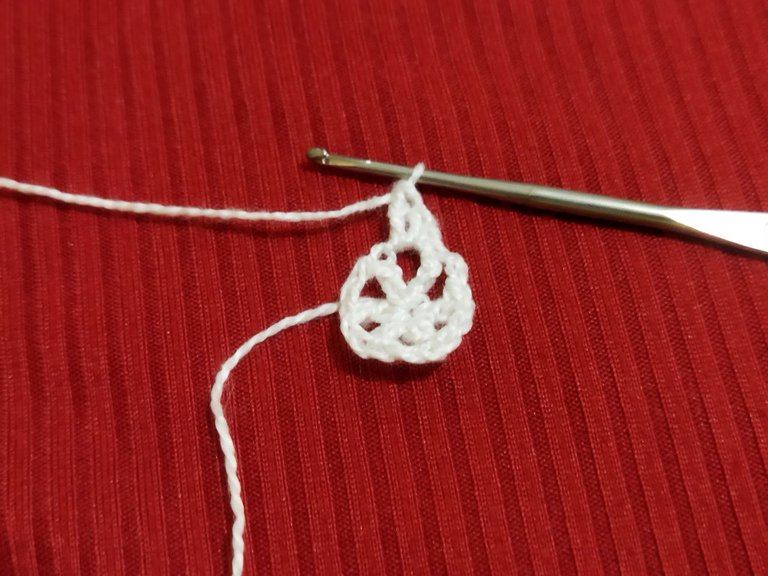
Comenzamos este lindo proyecto que les comparto hoy con mucho cariño y con el doy inicio a la época mas bonita del año como es la navidad, pueden darle el uso deseado en mi caso lo diseñe para usarlos como zarcillos, pero si ustedes desean y les gusta también pueden servir para decorar el árbol de navidad. Iniciamos elaborando un anillo mágico y subimos con una cadena de 5 puntos y un punto alto, luego 2 cadenas y 1 punto alto y así haremos hasta obtener 6 puntos altos
We begin this beautiful project that I share today with much affection and with it I start the most beautiful time of the year as Christmas, you can give the desired use in my case I designed it to use them as tendrils, but if you want and you like they can also serve to decorate the Christmas tree. We start by making a magic ring and go up with a chain of 5 stitches and a double crochet, then 2 chains and 1 double crochet and so on until we get 6 double crochets.


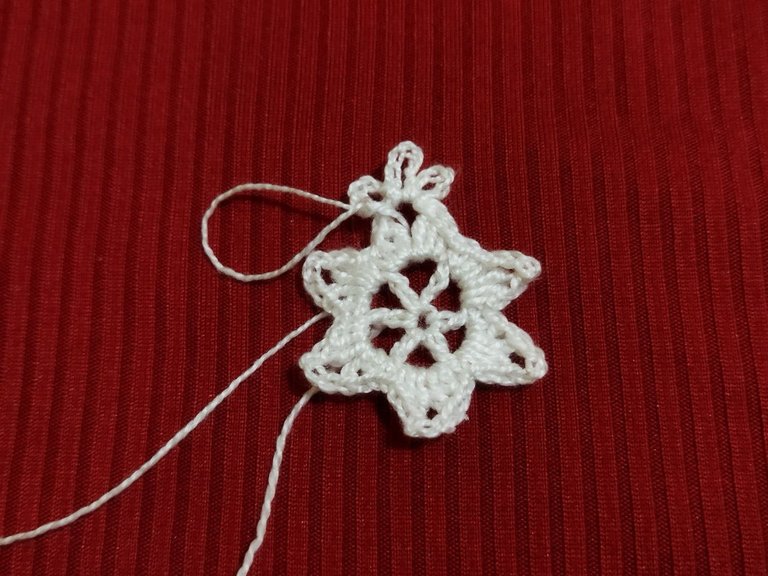
Para la siguiente vuelta nos vamos a pasar al primer espacio donde haremos la siguiente secuencia que se repetirá en cada uno de los espacios, primeramente un punto bajo seguido de 1 medio punto alto y luego un punto alto una cadena de dos puntos y repetimos haciendo esta secuencia invertida un punto alto, un medio punto alto y un punto bajo. Repetimos hasta completar la vuelta
For the next round we will move to the first space where we will make the following sequence that will be repeated in each of the spaces, first a single crochet followed by a half double crochet and then a single crochet, a chain of two stitches and repeat making this sequence in reverse, a double crochet, a half double crochet and a single crochet. Repeat until the round is complete.


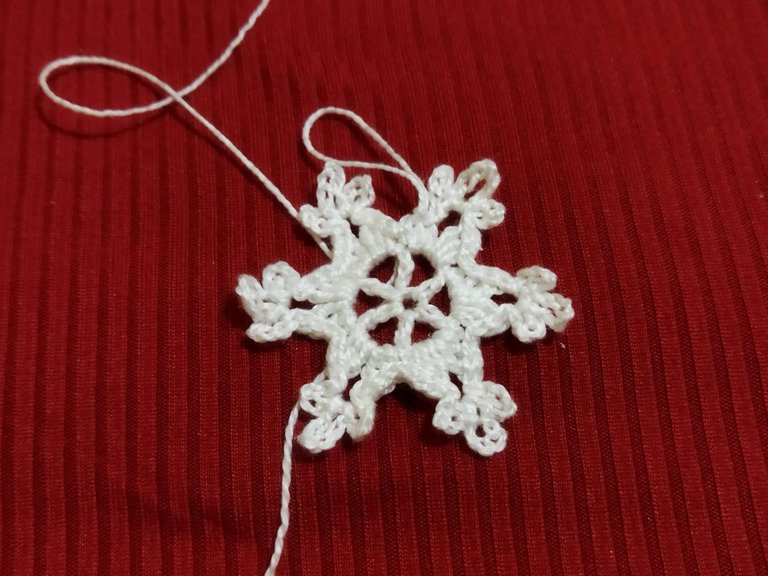
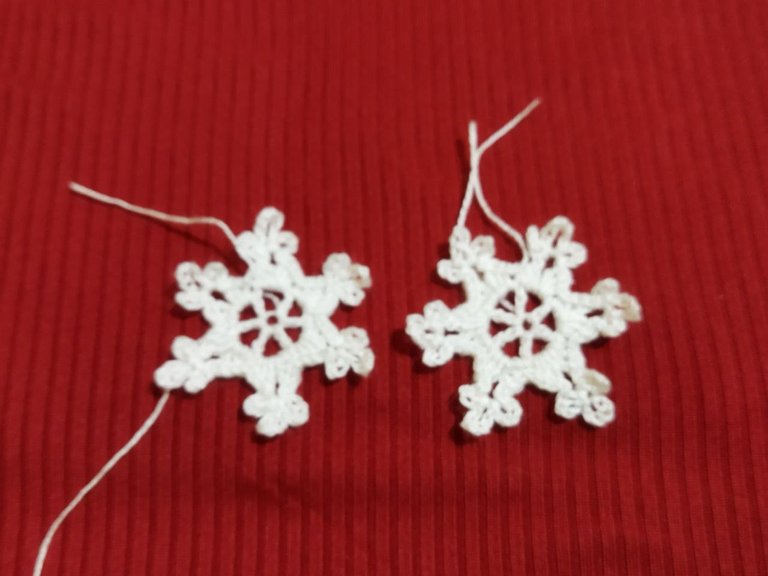
En esta ultima vuelta nos vamos a correr hasta el primer espacio de las cadenas haciendo puntos deslizados y en ese espacio hacemos una cadena de 4 puntos y la fijamos con un punto deslizado seguido de una cadena de 6 puntos de igual manera la fijamos con un punto deslizado y por ultimo una cadena de 4 puntos. De igual manera nos vamos a correr hacia el otro espacio donde esta la cadena haciendo puntos deslizados y repetimos el mismo paso que les acabo de explicar anteriormente y así continuamos la secuencia hasta terminar la vuelta. Con esto terminamos el primer copo de nieve, repetimos los mismos paso para elaborar la otra figura para los zarcillos
In this last row we are going to run to the first space of the chains making slipped stitches and in that space we make a chain of 4 stitches and we fix it with a slipped stitch followed by a chain of 6 stitches in the same way we fix it with a slipped stitch and finally a chain of 4 stitches. In the same way we are going to run to the other space where the chain is making slipped stitches and we repeat the same step that I just explained before and so we continue the sequence until we finish the round. With this we finish the first snowflake, we repeat the same steps to make the other figure for the tendrils.


Teniendo los copos de nieve listos escondemos los hilos y los vamos a endurecer con un poco de cola blanca que aplicaremos por el revés del tejido y con las manos le vamos a dar la forma adecuada luego dejamos secar. Si no tienen este otro material lo pueden dejar así, pero después que estos se secaron con un pincel le aplique por el derecho del tejido disconacar para añadirle unos destellos de brillo con esta escarcha liquida
Having the snowflakes ready we hide the threads and we are going to harden them with a little white glue that we will apply on the back of the fabric and with our hands we are going to give it the right shape and then let it dry. If you don't have this other material you can leave it like this but after these dried with a brush apply it on the right side of the fabric to add some sparkles of glitter with this liquid frost.


Ahora si Listo!!! ya culminamos mi primer proyecto navideño tejido a crochet como fue unos hermosos zarcillos copos de nieve, los cuales voy a usar como accesorio para estas fiestas decembrinas. Con esmero y dedicación podemos lograr muchas cosas que nos proponemos
!! Un saludo y nos vemos en una próxima oportunidad!!
Now we have finished my first crocheted Christmas project as it was a beautiful snowflake tendrils, which I am going to use as an accessory for this holiday season. With care and dedication we can achieve many things that we set out to do.
!! Greetings and see you in the next opportunity!


| Pueden seguirme en 💙: | You can follow me on 💙: |
|---|---|
| eveyese1312 | |
| Discord | eveyese1312#6211 |
Las fotos y el contenido son de mi autoria tomadas con mi teléfono POCO M3
Imágenes editadas en PowerPoint Canva
Para la traducción usé el traductor: DeepL
The photos and content are my own.
Images edited in PowerPoint Canva
For the translation, I used the translator: DeepL

https://leofinance.io/threads/eveyese1312/re-eveyese1312-2otyy36je
The rewards earned on this comment will go directly to the people ( eveyese1312 ) sharing the post on LeoThreads,LikeTu,dBuzz.
Que belleza 😍 amiga te quedaron espectaculares mil Bendiciones excelente habilidad.
Your crochet earrings with the theme of snowflake are absolutely beautiful and should be perfect for the holiday season. The steps should be helpful for anyone looking to work on something like this. Well done.
Que lindos y delicados te quedaron estos zarcillos, me gustaron mucho. Gracias por compartir. Saludos!
Muchas gracias me alegra que te hayan gustado. Me encanta usar para los accesorios hilos delgados para que el diseño se vea delicado y luzca mejor. Saludos, éxito y dulces sueños ☺️
Amiga que bellos. Gracias por este tutorial. Quiero hacer unos para mí decoración. Preciosos.
Qué bellas, y son fáciles de hacer. Gracias por compartir el paso a paso. Bien explicado. Saludos.
Muy bonito amiga!