Fish tail bracelet woven in macrame [ESP|ENG]


Un saludo mi querida comunidad @Jewelry feliz día 💜 si han podido notar una de las cosas que mas me gusta es tejer y desde que comencé a realizar accesorios o prendas con las diferentes técnicas de tejido quede enamorada con el resultado, ademas una de las cosas que mas disfruto es insertar cuentas de diferentes colores, tamaños y formas a los accesorios para que el diseño sea mas hermoso. Esta pulsera que les trago para hoy tienen un estilo marinero ya que se trata de una cola de pescado usando uno de los nudos de la técnica macrame como es el nudo Alondra y ademas le coloque un caracol para formar la figura completa de un pescado. Ahora materiales en manos que comenzamos con nuestro paso a paso
Greetings my dear community @Jewelry happy day 💜 if you have been able to notice one of the things I like most is weaving and since I started to make accessories or garments with different weaving techniques I fell in love with the result, also one of the things I enjoy most is to insert beads of different colors, sizes and shapes to the accessories to make the design more beautiful. This bracelet that I bring you today has a sailor style as it is a fish tail using one of the knots of the macrame technique such as the Alondra knot and also I put a snail to form the complete figure of a fish. Now materials in hands we start with our step by step

- Hilos encerados azul y fucsia
- Caracol
- Mostacillas azul
- Cuentas en forma de corazón
- Tabla con gancho de presión
- Dije de pescado
- Aro
- Encendedor
- Tijera
- Regla
- Blue and fuchsia waxed yarns
- snail
- Blue beads
- Heart-shaped beads
- Board with snap hook
- Fish charm
- Hoop
- Lighter
- Scissors
- Ruler

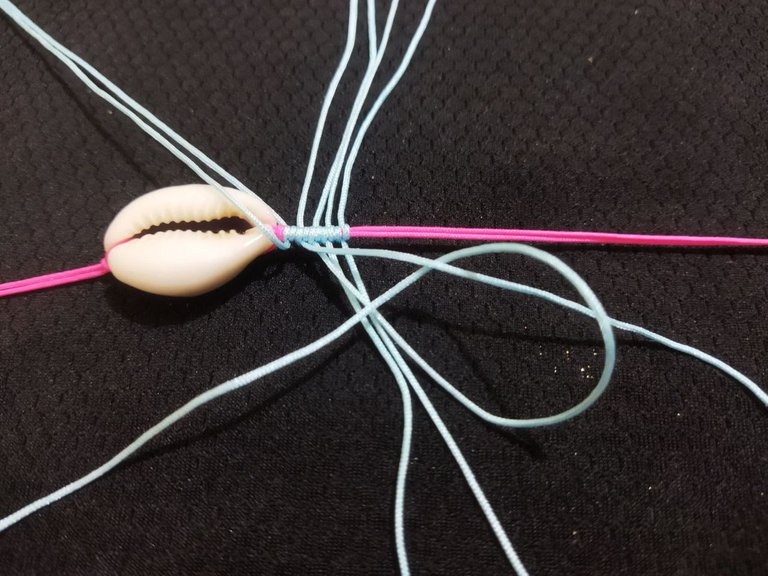
Iniciamos este nuevo proyecto como es elaborar una pulsera utilizando la técnica macrame con un diseño muy especial elaborando nudos alondras haremos una cola de pescado. Primeramente vamos a cortar los hilos con las siguientes medidas, en hilo color fucsia cortamos 2 de 40 centímetros, en hilo color azul cortaremos 6 hebras de hilo una de 35 centímetros y las otras 5 de 30 centímetros. Seguidamente comenzamos anudando los 2 hilos fucsia en cada extremo del caracol insertando el hilo por la parte superior del caracol
We start this new project as it is to make a bracelet using the macrame technique with a very special design elaborating larks knots we will make a fishtail. First we are going to cut the threads with the following measures, in fuchsia thread we cut 2 of 40 centimeters, in blue thread we will cut 6 strands of thread, one of 35 centimeters and the other 5 of 30 centimeters. Next we begin by knotting the 2 fuchsia threads at each end of the snail inserting the thread through the top of the snail.


Ahora vamos anudar todos hilos azules en uno de los extremos de los hilos fucsia, comenzando por el mas largo que es el que mide 35 centímetros de la siguiente manera hacemos pasar la hebra de hilo por debajo del hilo central haciendo coincidir la mitad del hilo y realizamos nudos alondra y de esta manera vamos anudar cada uno de los hilo hasta tener lo 6 hilos
Now we are going to knot all the blue threads in one of the ends of the fuchsia threads, starting with the longest which is the one that measures 35 centimeters in the following way we pass the thread strand under the central thread making the middle of the thread coincide and we make knots lark and in this way we are going to knot each one of the threads until we have 6 threads.


Iniciamos con el tejido de la cola de pescado pero primero tomamos el primer hilo que anudamos y lo subimos hacia donde tenemos el caracol para no confundirnos ya que con este no vamos a tejer. Colocamos la tabla en posición horizontal para comenzar a trabajar con uno de los costados, tomamos el siguiente hilo el cual solo le dará dirección al nudo alondra siempre debemos llevarlo hacia el hilo central haciendo tensión y con los siguientes hilo vamos a elaborar el nudo con cada hebra hasta llegar al final. La siguiente vuelta es igual iniciamos con la primer hilo para diseccionar y con las demás hacemos nudos sobre ella.
We start with the weaving of the fishtail but first we take the first thread that we knotted and we bring it up to where we have the snail so as not to get confused since we are not going to weave with this one. We place the board in horizontal position to start working with one of the sides, we take the next thread which will only give direction to the lark knot, we must always take it towards the central thread making tension and with the following threads we are going to elaborate the knot with each strand until we reach the end. The next round is the same, we start with the first thread to dissect and with the others we make knots over it.


En la tercera vuelta no vamos a iniciar con el primer hilo, vamos a tomar el siguiente y elaboramos los nudos alondras de la misma manera que las vueltas anteriores. En la cuarta vuelta tomamos el hilo que dejamos sin tejer en la vuelta anterior y comenzamos a tejer con la misma secuencia de las vueltas anteriores y al terminar vamos a observar como se va formando de un lado la forma de la cola
In the third row we are not going to start with the first yarn, we are going to take the next one and we elaborate the larks' knots in the same way as the previous rows. In the fourth row we take the yarn that we left unknitted in the previous row and we start knitting with the same sequence of the previous rows and at the end we are going to observe how the shape of the tail is formed on one side.


Giramos la tabla para comenzar a tejer por el otro lado y repetimos los mismos pasos o secuencias que hicimos para elaborar el primer la cola de pescado
We turn the board to start weaving on the other side and repeat the same steps or sequences we did to make the first fishtail.


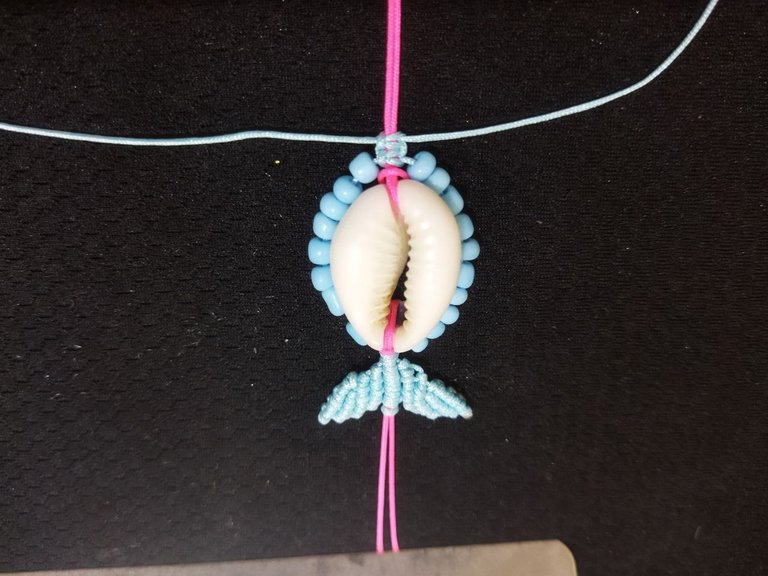
Terminada la colita de pescado cortamos los hilos y con el encendedor quemamos bien los hilos sobrantes para evitar que se suelten los nudos
Once the fish tail is finished, cut the threads and burn the excess threads with a lighter to prevent the knots from coming loose.


Ahora en los hilos que dejamos libres sin tejer vamos a insertar por cada lado la cantidad de mostacillas necesarias para bordear el caracol, luego traemos los hilos hacia el otro lado y elaboramos 4 nudos planos luego cortamos y quemamos los hilos sobrantes
Now in the threads that we left free without weaving we will insert on each side the amount of beads necessary to border the snail, then we bring the threads to the other side and we make 4 flat knots, then we cut and burn the excess threads.


Por ultimo entorchamos ambos lados de la pulsera e insertamos en cada lado una cuenta de corazón y aseguramos con un nudo y con otra hebra de hilo hacemos hacemos 6 nudos planos que servirá como nudo corredizo para abrir y ajustar la pulsera a nuestro brazo
Finally we twist both sides of the bracelet and insert on each side a heart bead and secure with a knot and with another strand of thread we make 6 flat knots that will serve as a slip knot to open and adjust the bracelet to our arm.


Ahora si Listo!!! ya culminamos con este hermoso proyecto como fue elaborar una linda pulsera cola de pescado tejida usando la técnica macrame y a la que ademas le coloque un caracol para completar la figura de un pescado, Espero que sea de su agrado y se animen a realizarlo. Con esmero y dedicación podemos lograr muchas cosas que nos proponemos
!! Un saludo y nos vemos en una próxima oportunidad!!
Now if Ready!!! we have finished with this beautiful project as it was to develop a nice fish tail bracelet woven using the macrame technique and also I put a snail to complete the figure of a fish, I hope you like it and are encouraged to do it. With care and dedication we can achieve many things that we propose.
!! Greetings and see you in a next opportunity!


| Pueden seguirme en 💙: | You can follow me on 💙: |
|---|---|
| eveyese1312 | |
| Discord | eveyese1312#6211 |
Las fotos y el contenido son de mi autoria tomadas con mi teléfono POCO M3
Imágenes editadas en PowerPoint Canva y PicMonkey
Para la traducción usé el traductor: DeepL
The photos and content are my own.
Images edited in PowerPoint Canva and PicMonkey
For the translation, I used the translator: DeepL
Demasiado bella, quiero aprender la técnica que usaste para la cola de la ballena, es espectacular.
Felicidades amiga y gracias por compartir.
Gracias amiga, está técnica con el nudo alondra parece difícil pero es súper fácil lo importantes es dominar primero este nudo ya que toda la cola está elaborada con el. Me alegra que te haya gustado 😊
Amiga de verdad te quedó espectacular, está muy bello💙✨ en cuanto lo vi, lo amé 💗
Gracias amiga me alegra ☺️ que te haya gustado, estaba desde hace rato por hacer un accesorio con este nudo de la técnica macramé y me inicie por esta figura que es fácil, ahora intentaré elaborar otra dónde se puedan insertar hilos de otros colores. Saludos y bendiciones
Que linda quedo esta pulsera ♥
Gracias amiga me alegra que te haya gustado ☺️