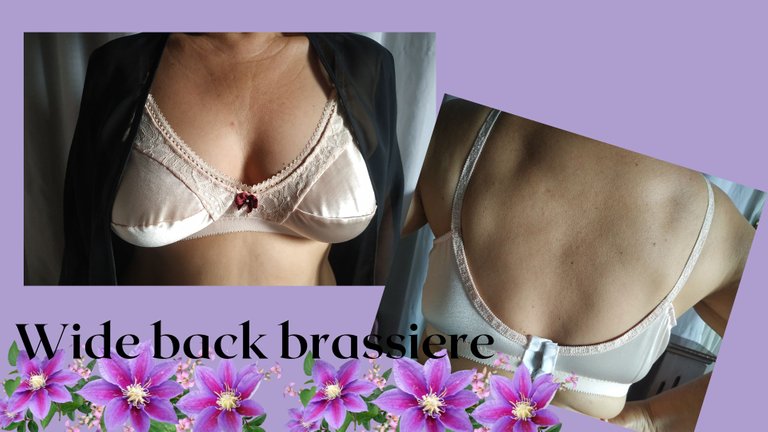
Brasier de espalda ancha [ESP - ENG]
Editado en Canva || Edited in canva

¿Cómo están mis queridos amigos de Hive? Feliz lunes y feliz inicio de semana para todos, el día de hoy les quiero compartir el paso a paso de cómo elaborar un bello y delicado brasier señorial con espalda ancha, para ello utilice seda elástica o Charmeuse color beige lo cual le da mucha elegancia a la prenda.
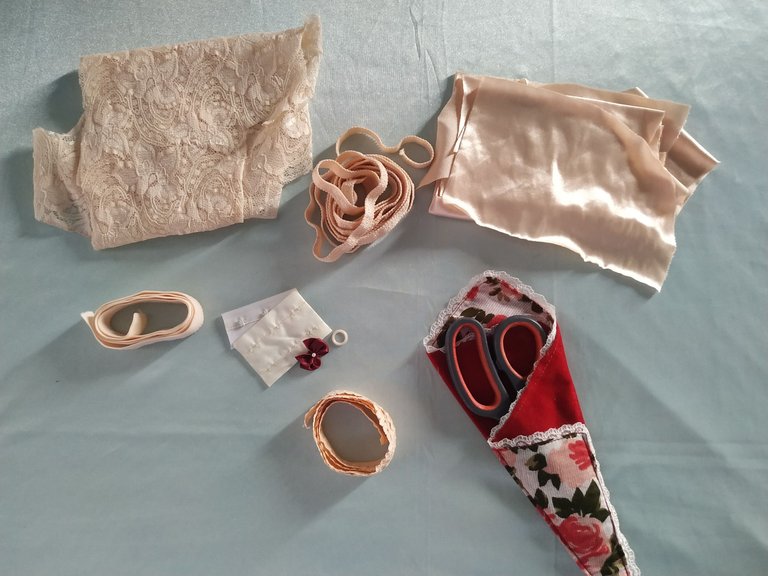
Este tipo de ropa intima lleva muchas piezas para el armado lo cual hace que tenga un poco más de trabajo pero también es bueno ya que podemos usar retazos de tela, porque estas piezas pequeñas utilizan muy poca tela.

- Tela Charmeuse.
- Encaje elástico.
- Morita.
- Elástico.
- Alfileres y agujas.
- Tijeras y cinta métrica.
- Aros.
- Gafete.

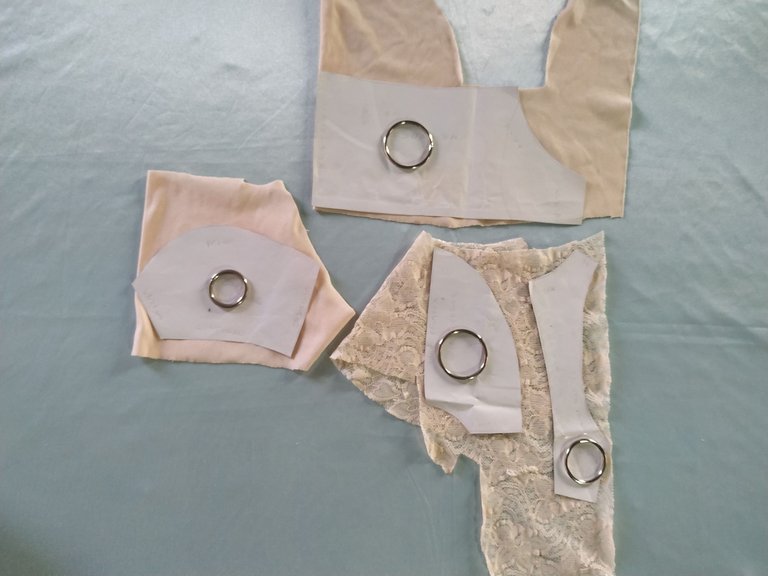
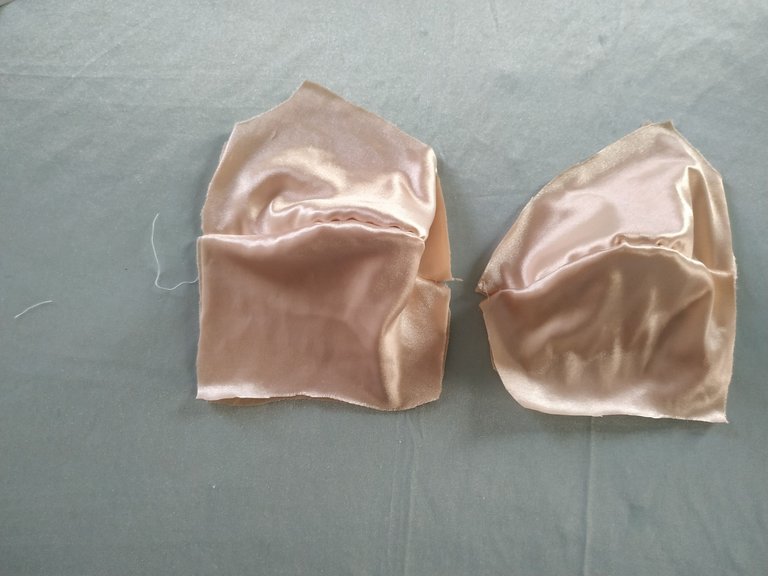
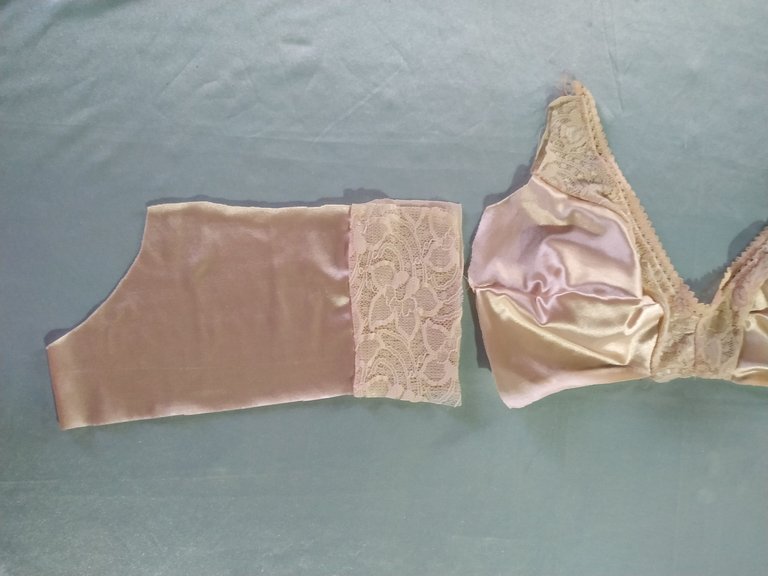
Sobre la tela colocamos los moldes sostenidos por unos aros de metal para poder recortar al ras de cada molde, nos deben de quedar estás piezas.
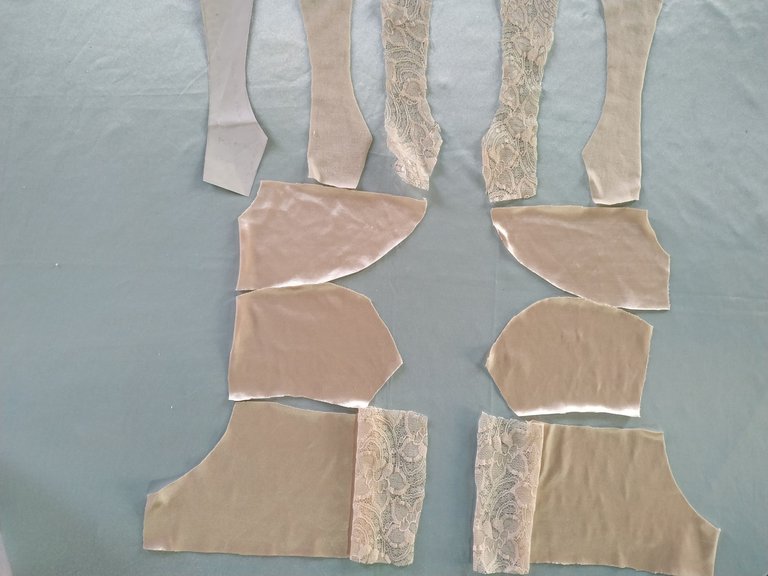
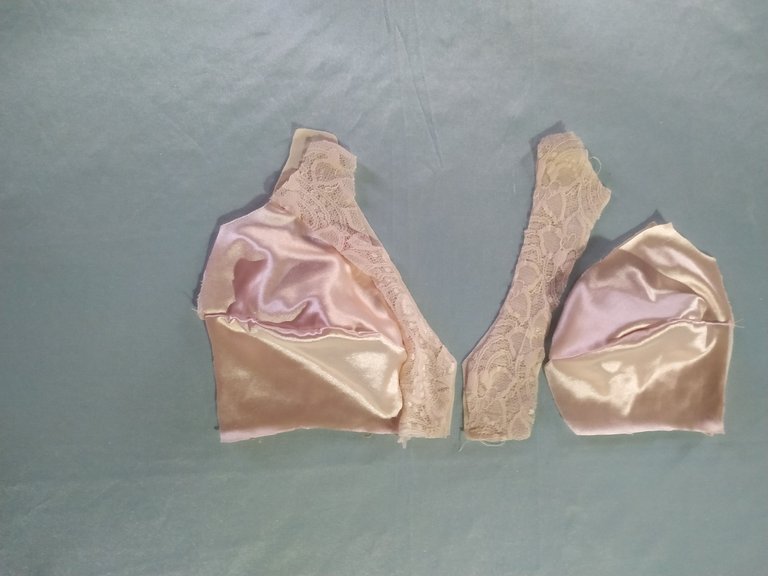
Debemos comenzar con el armado de las copas y para ello unimos la copa inferior con la copa superior por la parte del pezón.
Continuamos uniendo la pieza de encaje por la unión de copa, para cada una tenemos dos piezas, una de ella de encaje que es la que irá en la parte delantera y en la parte posterior o mejor dicho la que queda en el revés del bra es con la seda.
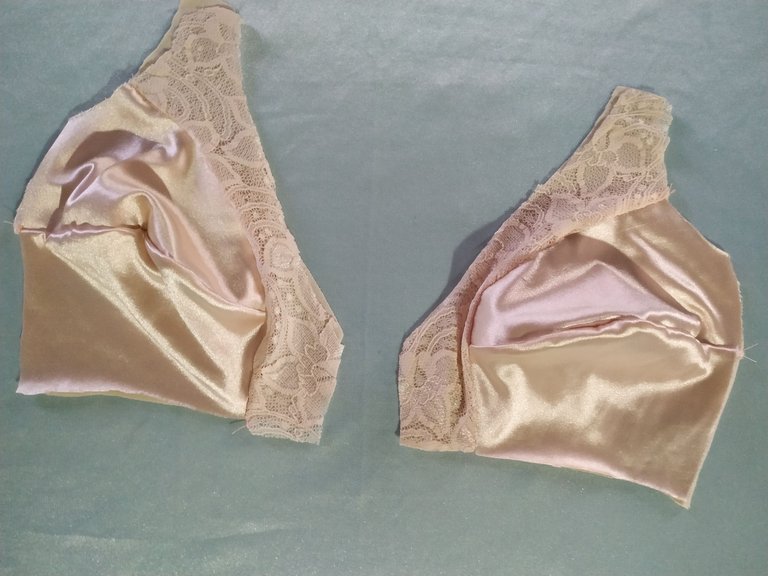
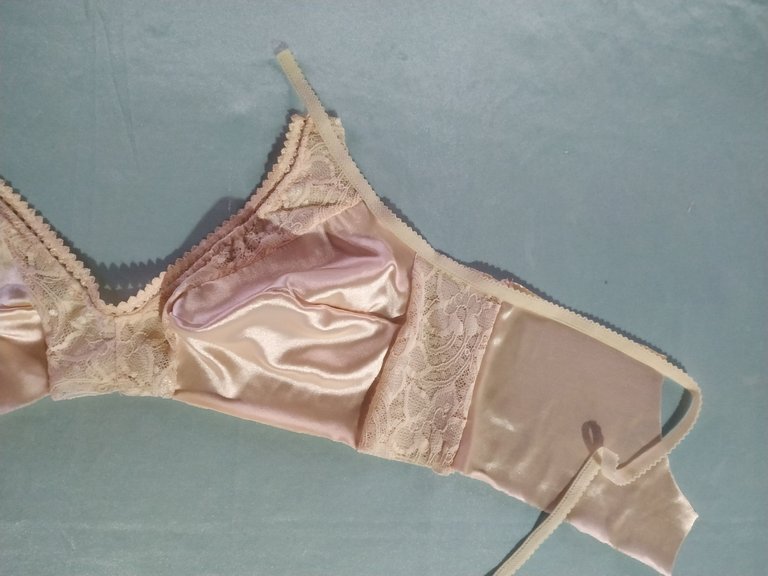
Ahora debemos unir ambas copas así que continuamos colocando el encaje elástico en la parte del escote de pecho.


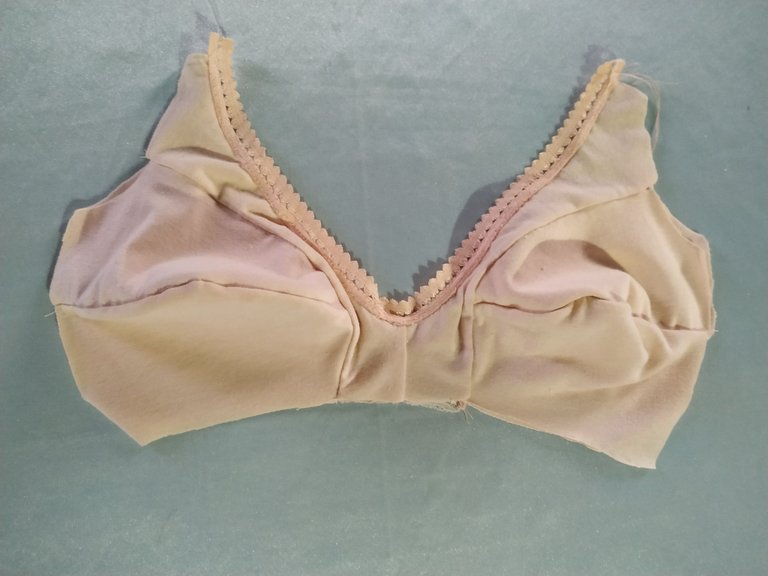
Luego debemos hacer la espalda del brasier así que cosemos la pieza en el costado.
Pegamos la morita por la sisa del brasier hasta llegar a la parte superior del escote de pecho delantero, vamos a pasar costura de zig zag estirando de 5 a 6.
Ahora colocamos la tira de brasier y la misma no debemos estirar mientras cosemos, está la unimos a la parte delantera con uno de los aros.
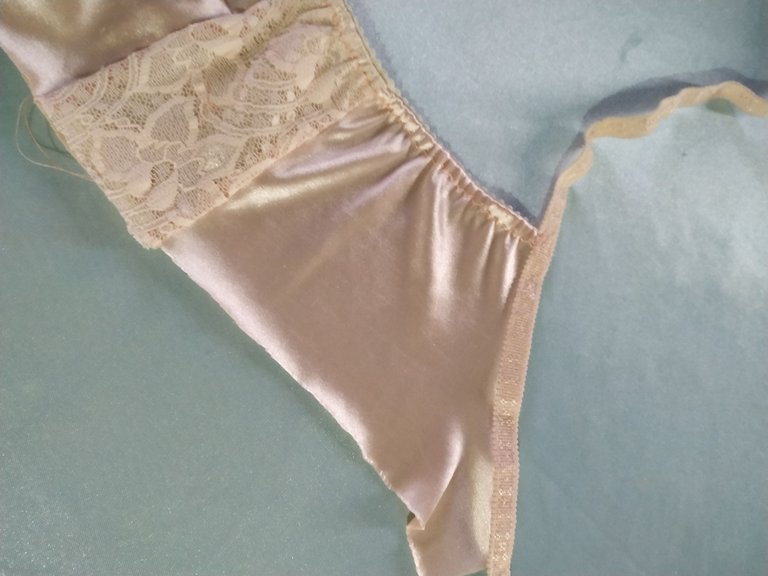
Colocamos en la parte inferior el encaje elástico ancho por todo el contorno sin estirar, con costura de zig zag y por último colocamos el gafete en la parte de la espalda.
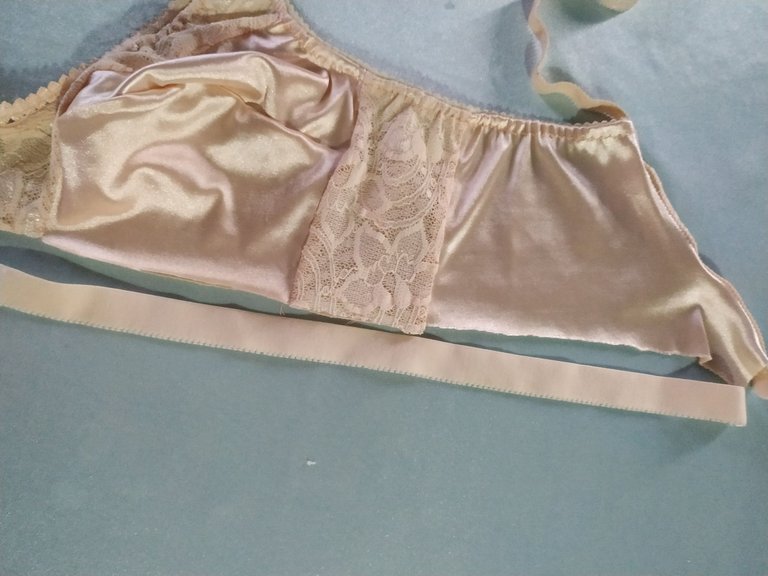
Decoramos con un lazo de forma opcional y con esto terminamos este brasier señorial de espalda ancha.
Espero les haya gustado mucho el paso a paso de hoy, y como siempre les deseo que tengan un buen día y noche.
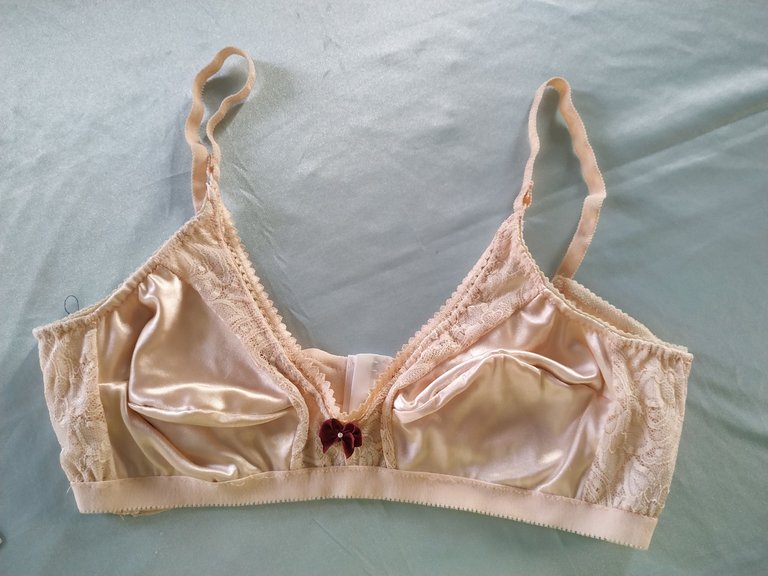

How are my dear friends of Hive? Happy Monday and happy start of the week for everyone, today I want to share with you the step by step of how to make a beautiful and delicate wide back bra, for this I use elastic silk or Charmeuse beige color which gives much elegance to the garment.
This type of intimate apparel takes many pieces for the assembly which makes it a little more work but it is also good because we can use scraps of fabric, because these small pieces use very little fabric.

- Charmeuse fabric.
- Elastic lace.
- Morita.
- Elastic.
- Pins and needles.
- Scissors and tape measure.
- Hoops.
- Badge.

On the fabric we place the molds supported by metal rings to be able to cut flush with each mold, we should have these pieces.
We must begin with the assembly of the cups and for this we join the lower cup with the upper cup by the nipple part.
We continue joining the lace piece by the cup union, for each one we have two pieces, one of them of lace which is the one that will go in the front and in the back or rather the one that is on the back of the bra is with the silk.
Now we must join both cups so we continue placing the elastic lace in the neckline part of the chest.
Then we have to make the back of the bra so we sew the piece on the side.
We glue the morita through the armhole of the bra until we reach the top of the front chest neckline, we will pass zig zag stitching stretching 5 to 6.
Now we place the bra strap and we must not stretch it while sewing, we join it to the front with one of the hoops.
We place the wide elastic lace all around the bottom without stretching, with zig zag stitching and finally we place the badge on the back.
We decorate with an optional bow and with this we finish this stately wide back bra.
I hope you liked today's step by step, and as always I wish you have a nice day and night.
Editado en Canva || Edited in canva
Fotos tomadas de mi teléfono Xiaomi Redmi Note 6 Pro || Photos taken from my Xiaomi Redmi Note 6 Pro phone.
Fuente del editor de imágenes y separadores || Image editor source and separators
Has sido votado por
PROYECTO ENLACE
'Conectando Ideas y Comunidades'
PROYECTO ENLACE es un proyecto de curación de habla hispana enfocado en recompensar contenido de calidad y apoyar autores en su proceso de crecimiento en HIVE.
Creemos y apostamos por el futuro de esta gran plataforma, y estamos muy emocionados de poder hacerla crecer junto a esta comunidad. Así que te invitamos a publicar en nuestra COMUNIDAD y estar atento a todas las actividades que tenemos preparadas y que estaremos publicando en breve.
¿QUIERES AUTOMATIZAR TUS GANANCIAS DE CURACIÓN? SE PARTE DEL PROYECTO ENLACE APOYANDO A NUESTRO TRAIL EN HIVE.VOTE INGRESA AQUÍ PARA CONOCER LOS DETALLES.
¿QUIERES INVERTIR ENLACE? DESCUBRE COMO HACERLO Y GENERAR INGRESOS DE FORMA SEMANAL MEDIANTE TU DELEGACIÓN DE HP AQUÍ TE EXPLICAMOS COMO.
Te invitamos a participar en nuestro servidor de Discord: https://discord.gg/3S9y7BbWfS
Atentamente
EQUIPO ENLACE 2023
Saludos @gabiramirez, te quedó espectacular el brassier, el color que usaste es muy lindo, aún estoy elaborando un brassier y lo llevo poco a poco es la primea vez que hago este tipo de prenda y quiero tomarme el tiempo necesario para hacerlo.
Feliz y bendecida noche!
Hola @gabimramirez, puedo ver que es un trabajo que amerita de mucha concentración y dedicación, para mí sería como armar un rompe cabezas. Te felicito por tu gran trabajo, la prenda quedó muy bonita.
You are really talented, i love what i am seeing, this bra look so beautiful and the material you use is a better material in which if it stain it can easily be wash
Sewing brasserie are really difficult I have never tried it but you have done a good job on this one.
Well done dear and thanks for sharing 😘💕
Very nice fabric combination😊
It doesn't look easy! How did you get the pattern for the bra?
Hola Gabi. Que hermoso ese modelo de corpiño, tengo ganas de hacer uno así con las copas con el recorte horizontal. Me gusta que estos diseños son quizás para contener un busto grande y como yo no lo tengo no me preocupo jajaja, pero a nivel confección quiero aprender a hacerlo. El tuyo te quedó muy lindo. ¡Te felicito ❤️!