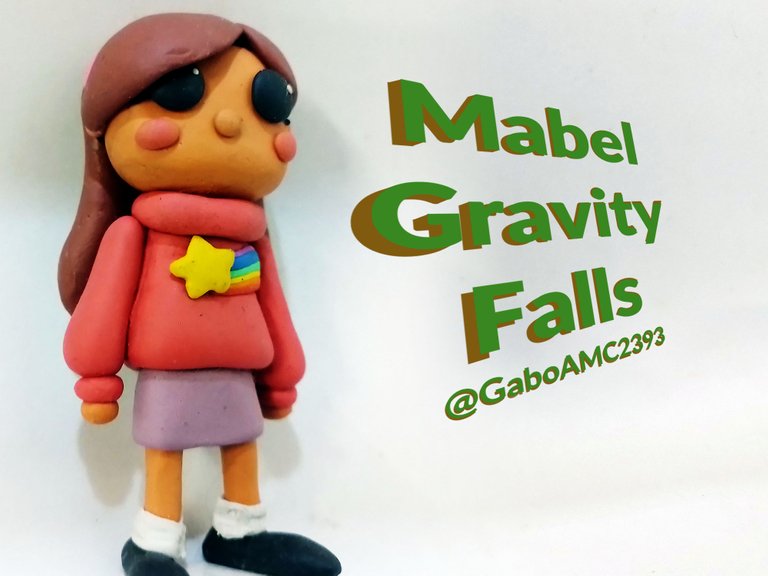
Gravity Falls: Mabel Sculpture [ENG/ESP]

English
The other day I was at my aunt's house, visiting. My 10 year old cousin lives there, so between the two of us we were making plasticine figurines.
When it was time to leave, she asked me to make her a figurine of a girl that appears in one of her favorite series, Gravity Falls. The character in question is Mabel. I don't know her, but I had to research what the character looked like to make her.
The truth is that I wanted to give her a chibi style and I wanted her to be a bit different from the original design. My cousin really liked the figurine I made for her, and at this point in the publication I gave it to her, so it was mission accomplished. On the other hand, I would like to share with you the step by step of this figurine, to show you how I did it.
Español
El otro día estuve en casa de mi tía, de visita. Ahí vive mi prima pequeña de 10 años así que entre los dos estuvimos haciendo figuritas de plastilina.
A la hora de irme, me solicitó que le hiciera una figurita de una chica que aparece en una de sus series favoritas, Gravity Falls. El personaje en cuestión es Mabel. No la conozco, pero tuve que investigar cómo era el personaje para hacerla.
La verdad quise darle un estilo chibi y que se distanciara un poco del diseño original. A mi prima le gustó mucho la figurita que le hice, ya a estas alturas que hago la publicación se la entregué, así que fue toda una misión cumplida. Por otra parte, me gustaría compartir con ustedes el paso a paso de esta figurita, para mostrarles cómo lo hice.
Step by step
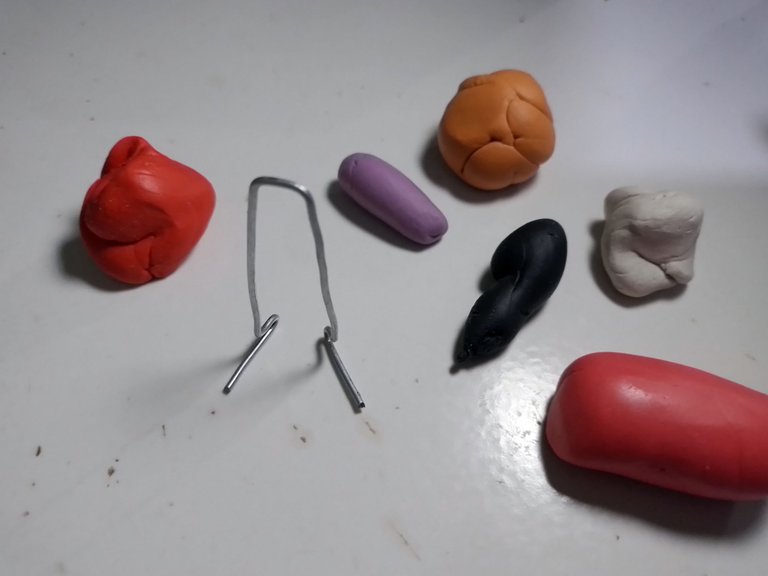
Well, as you can see in the picture above, the first thing I made was a wire skeleton for the legs. It's nothing fancy, in fact it's like a V shape with the ends bent forward for the feet.
Once the skeleton is ready, you have to start covering it with plasticine. The first plasticine I used was the skin colored one. I didn't have enough white so I had to make Mabel a little brown.
Paso a paso
Bien, como pueden ver en la imagen de arriba, lo primero que hice fue un esqueleto de alambre para las piernas. No es nada del otro mundo, de hecho es como una V con las puntas dobladas hacia adelante para los pies.
Una vez que está listo el esqueleto, hay que comenzar a cubrirlo con plastilina. La primera plastilina que utilicé fue la de color piel. No tenía suficiente blanco así que tuve que hacer a Mabel un poco morena.
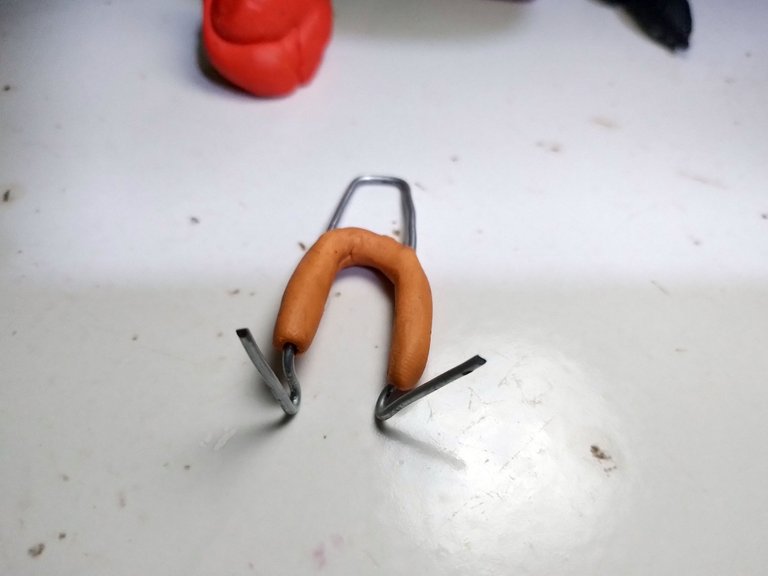
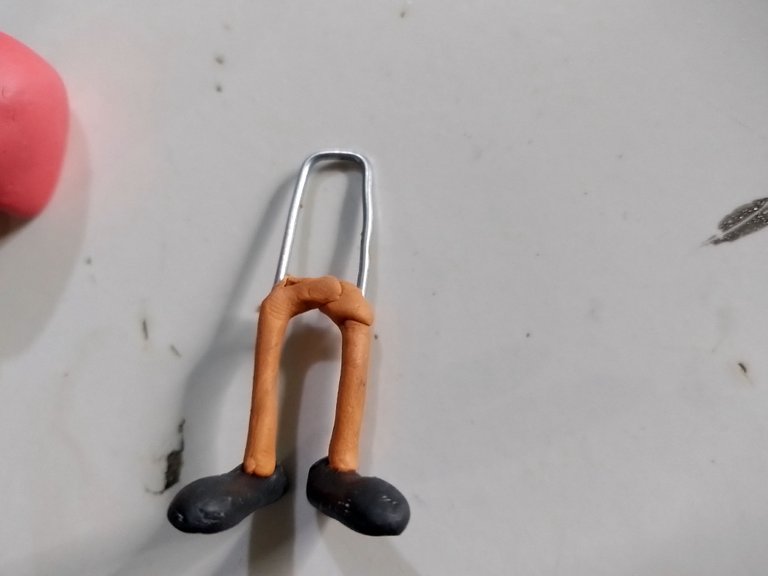
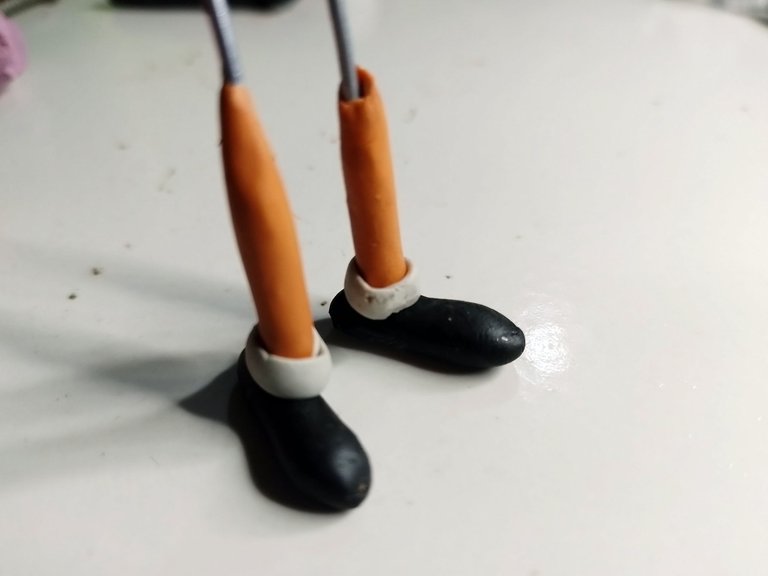
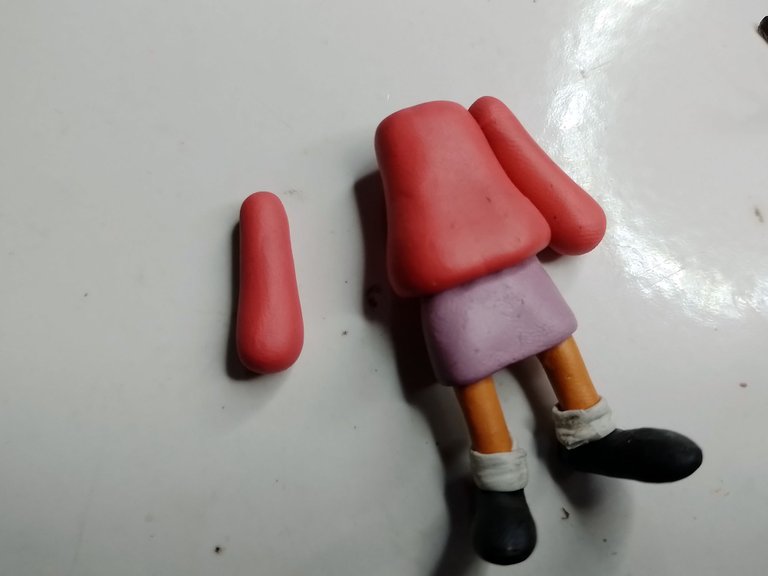
With my fingers I began to stretch the legs into the desired shape. Then I covered the wire tip of the skeleton, those two tips that were bent for the feet.
I covered it with black plasticine and then I covered the union between the black plasticine and the skin-colored plasticine with a strip of white plasticine, which would become the character's socks.
Con mis dedos comencé a estirar las piernas hasta darle la forma deseada. Luego cubrí la punta de alambre del esqueleto, esas dos puntas que se doblaron para los pies.
La cubrí con plastilina negra y luego cubrí la unión entre la plastilina negra y la plastilina color piel con una tira de plastilina blanca, que vendrían a ser los calcetines del personaje.
 |  |
|---|
Although I saw Mabel in various styles of clothing, I was inclined to go for the purple skirt, so I used a plasticine of that color to make it.
Aunque a Mabel la vi con varios estilos de ropa, me incliné por la falda de color violeta, así que usé una plastilina de ese color para hacerla.
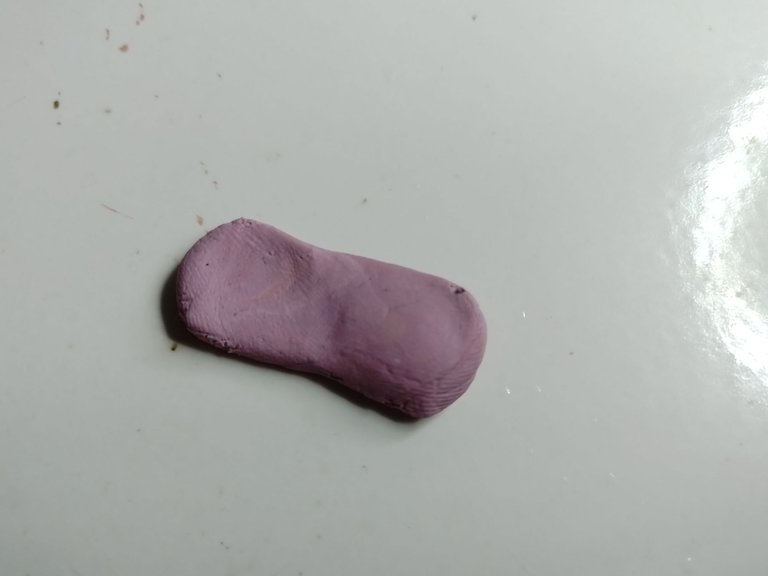
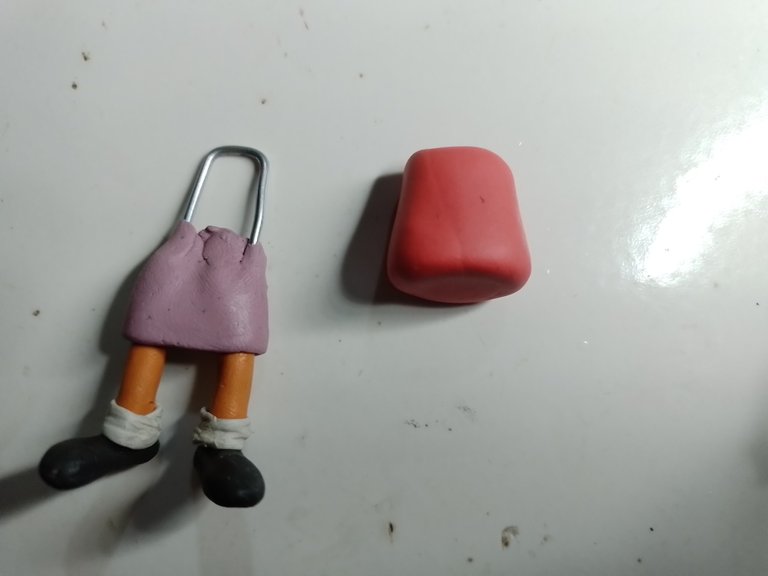
To make the foul you have to lengthen the plasticine to give it a shape similar to a rectangle, then cover with this piece all the waist of the character.
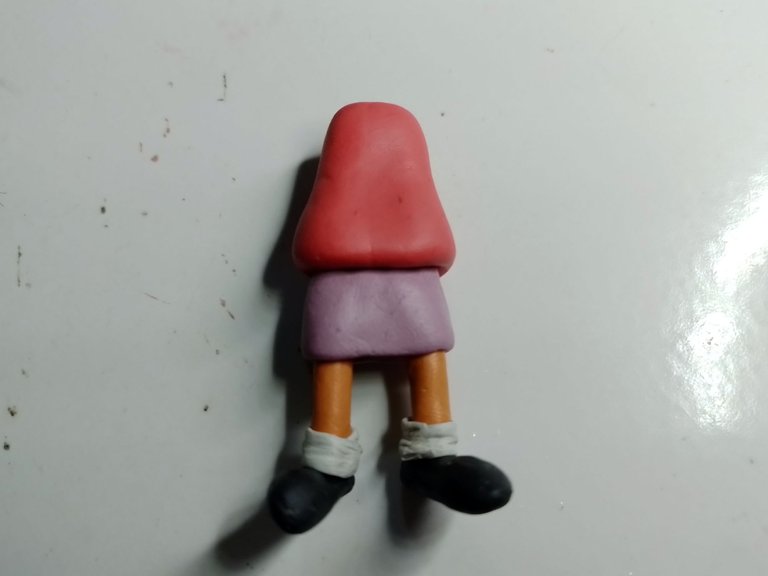
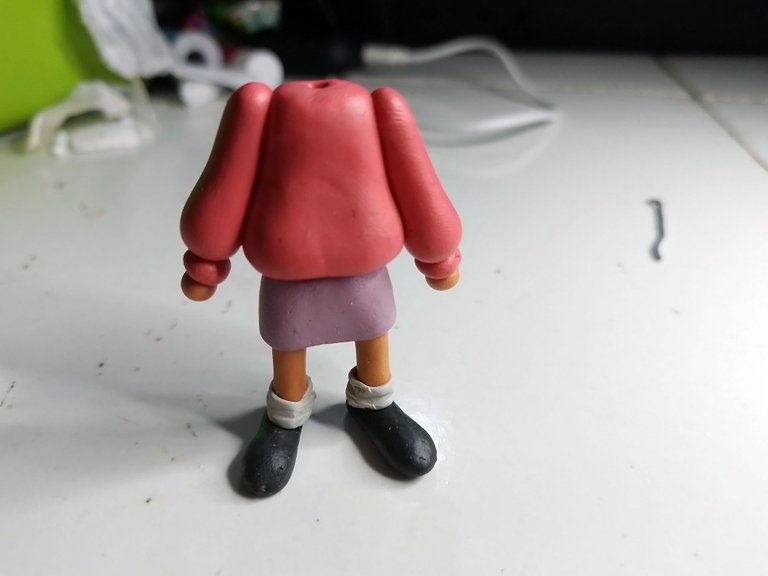
Below you can see a couple of pictures of how the foul turned out. Also, I took the opportunity to capture a before and after of how I made the torso. To do it I simply took a pink plasticine and gave it a shape similar to that of a pear, only more flattened.
Para hacer la falta hay que alargar la plastilina hasta darle una forma parecida a la de un rectángulo, luego cubrir con esta pieza toda la cintura del personaje.
A continuación pueden ver un par de fotos de cómo quedó la falta. Además, aproveché de capturar un antes y un después de cómo hice el torso. Para hacerlo simplemente tomé una plastilina rosada y le di una forma similar a la de una pera, solo que mas aplastada.
 |  |
|---|
To place it on the wire, you can make a cut in the center of the plasticine, so that it is embedded in the metal piece, as shown in the photo below:
Para colocarla en el alambre, pueden hacerle un corte en el centro de la plastilina, de modo que quede incrustada en la pieza de metal, tal como se observa en la foto a continuación:
To make the arms we will use two small pieces of the same pink plasticine. Two canes are made and placed in place, on each side of the doll's torso.
They are not heavy at all, so for this case it is not necessary to use any support. Although, if you want to place a wooden stick at the junction of the shoulder and torso, you can do that too.
Para hacer los brazos ocuparemos dos pedacitos de la misma plastilina rosada. Se hacen dos bastones y se colocan en su lugar, a cada lado del torso de la muñeca.
No son para nada pesados, así que para este caso no es necesario usar ningún soporte. Aunque, si quieren colocarle un palillo de madera en la unión del hombro y el torso, también pueden hacerlo.
 |  |
|---|
To make the wrists and hands, use two more spheres of pink plasticine and flatten them a little, for the hands use skin-colored plasticine and make two small spheres, but do not flatten them.
The pink spheres are placed where they should go, on the wrists, and the skin-colored spheres under the wrists. This is how the wrist is looking at this point.
Para hacer las muñecas y las manos, se usan dos esferas más de plastilina rosa y se aplastan un poco, para las manos se ocupa plastilina color piel y se hacen dos pequeñas esferas, pero no se van a aplastar.
Las esferas rosadas se colocan en el lugar donde tienen que ir, en las muñecas, y las esferas color piel debajo de las muñecas. Así está quedando la muñeca hasta este punto.
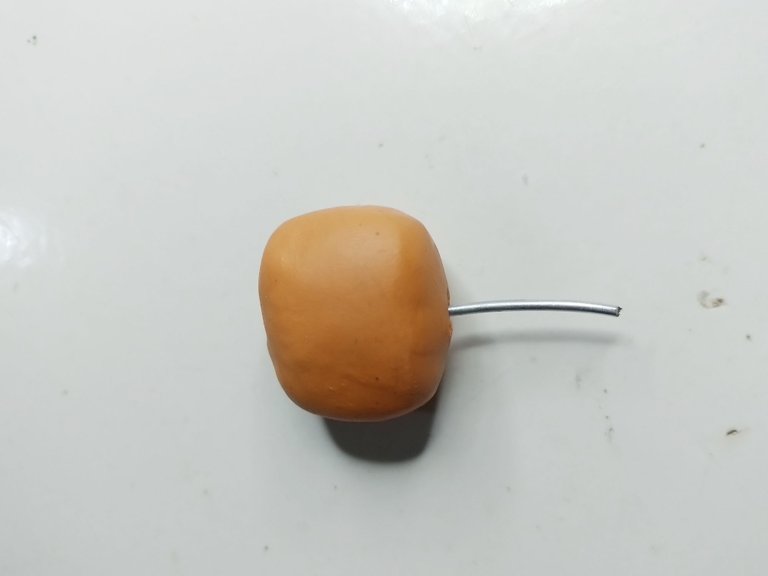
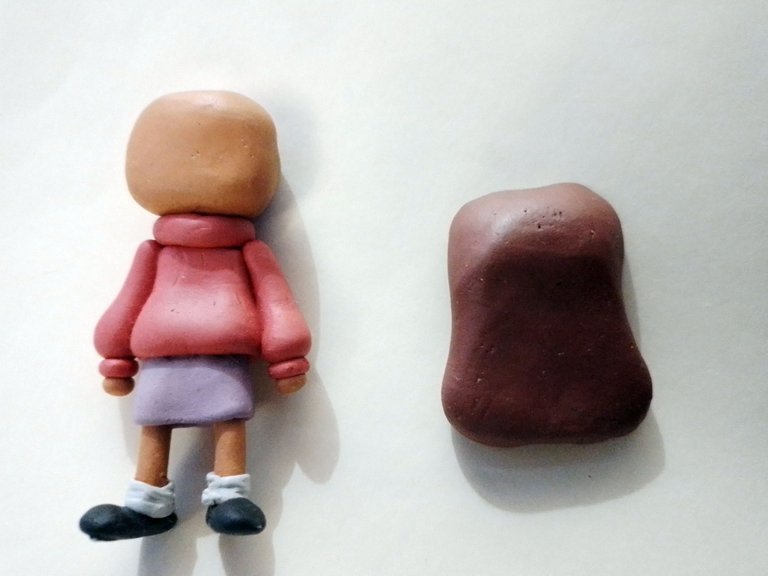
I made the head with the same skin-colored plasticine that I used for the legs and hands.
To make it, simply make a plasticine sphere and flatten it a little, so that it is a little elongated towards the sides. It is very important to place a support on it, because it is heavy.
Important note. If you want to make the figure lighter, simply use a paper or polystyrene sphere and then cover it with plasticine. I didn't do it this time, I wanted to use only plasticine.
La cabeza la hice con la misma plastilina de color piel que usé para las piernas y las manos.
Para su elaboración simplemente se hace una esfera de plastilina y se aplasta un poco, de modo que queda un poco alargada hacia los lados. Es muy importante colocarle a esta un soporte, porque esta sí es pesada.
Nota importante. Si quieren que sea mas ligera la figura, simplemente usen una esfera de papel o poliestirenos y luego la cubren con plastilina. Yo no lo hice en esta ocasión, quería usar solamente plastilina.
 |  |
|---|
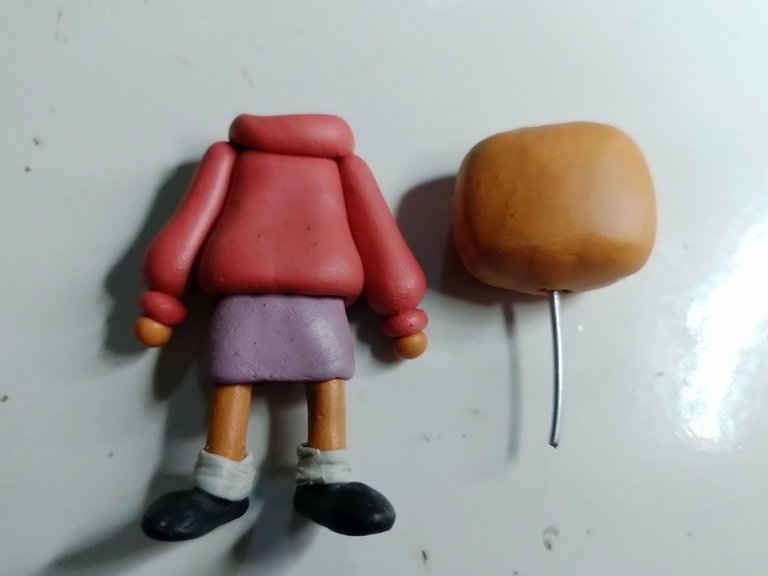
Once the head of the figurine is made, it is put in place, using the wire support. It should look like this:
Una vez hecha la cabeza de la figurita, se coloca en su lugar, usando el soporte de alambre. Debería quedar de la siguiente manera:

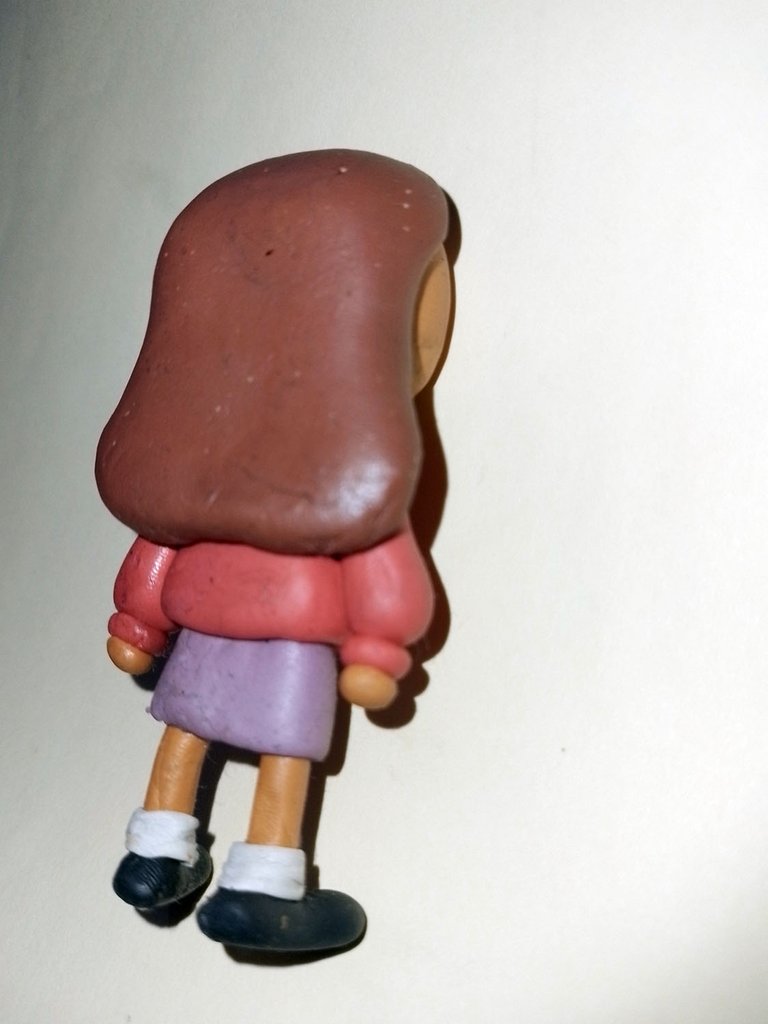
For the hair you should use a brown color, one that we have not used so far in the figurine. Simply make a shape similar to a pear and flatten it.
The upper part, which is the one that will be attached to Mabel's head, should be bent a little, as shown in the following pictures.
Para el cabello se debe usar un color marrón, uno que no hemos usado hasta ahora en la figurita. Simplemente hacemos una forma similar a una pera y se aplasta.
Se debe doblar un poco la parte superior, que es la que estará unida a la cabeza de Mabel, tal como se observa en las siguientes fotografías.
 |  |
|---|
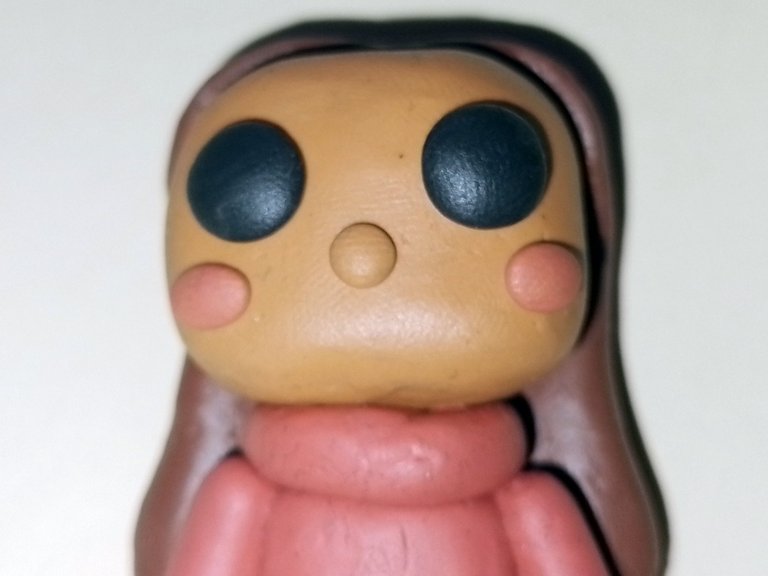
For the face it is easier. We use two black spheres and flatten them. They are placed in the place where the eyes go and that's it. For the nose we use a small sphere of skin-colored plasticine and place it between the eyes, a little lower.
Para la cara es más fácil la cosa. Ocupamos dos esferas de color negro y las aplastamos. Se colocan en el lugar en donde van los ojos y listo. Para la nariz se usa una pequeña esfera de plastilina color piel y se coloca entre los ojos, poco más abajo.
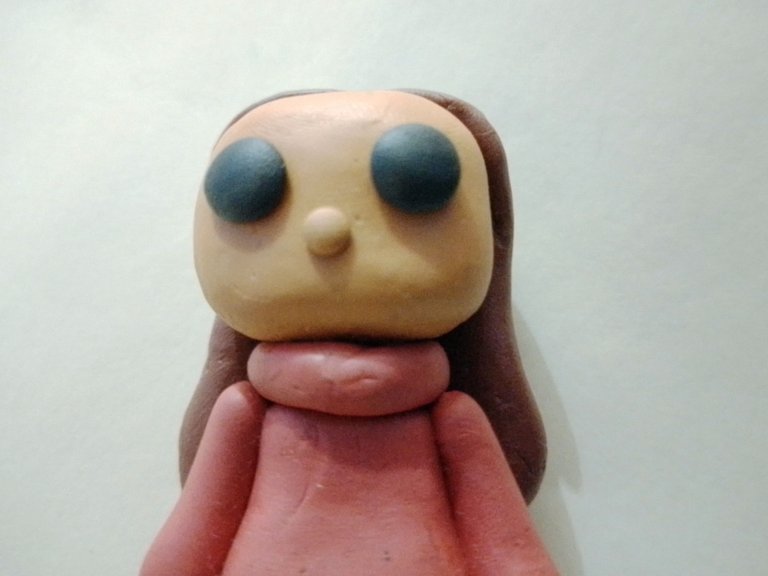
To this Mabel I made some small spheres, which I then flattened, on each side of her cheeks to simulate blushing.
A esta Mabel le hice unas pequeñas esferas, que luego aplasté, a cada lado de las mejillas para simular rubor.
 |  |
|---|
Next was the hair. I used two plates of brown plasticine and placed them on the front of the head, not on the forehead, but on the front where the hair goes.
Notice that one side is longer than the other, in this case the right side is longer. Watch out for that.
Lo siguiente fue el cabello. Usé dos placas de plastilina marrón y las coloqué en la parte delantera de la cabeza, no en la frente, sino en la parte delantera de donde va el cabello.
Fíjense que uno de los lados es mas largo que el otro, en este caso el derecho es mas largo. Ojo con eso.
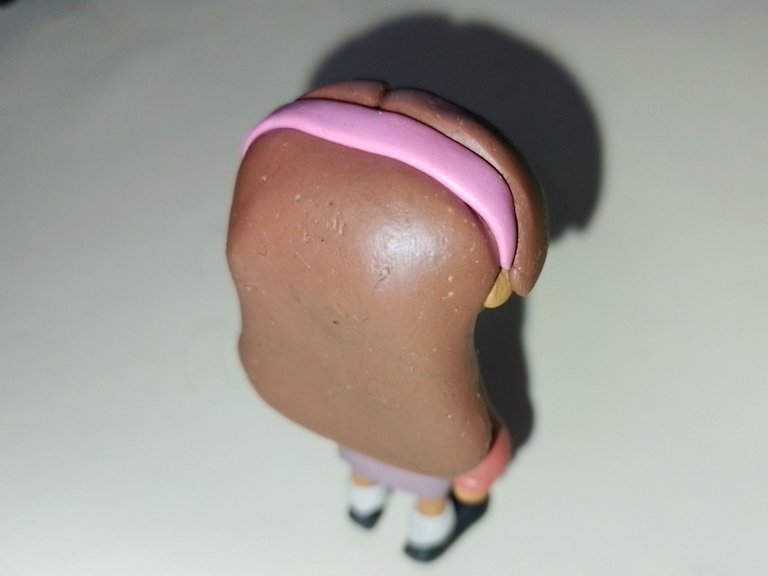
I also made a purple headband, the same color as the skirt.
También le hice un cintillo de color violeta, el mismo color de la falda.
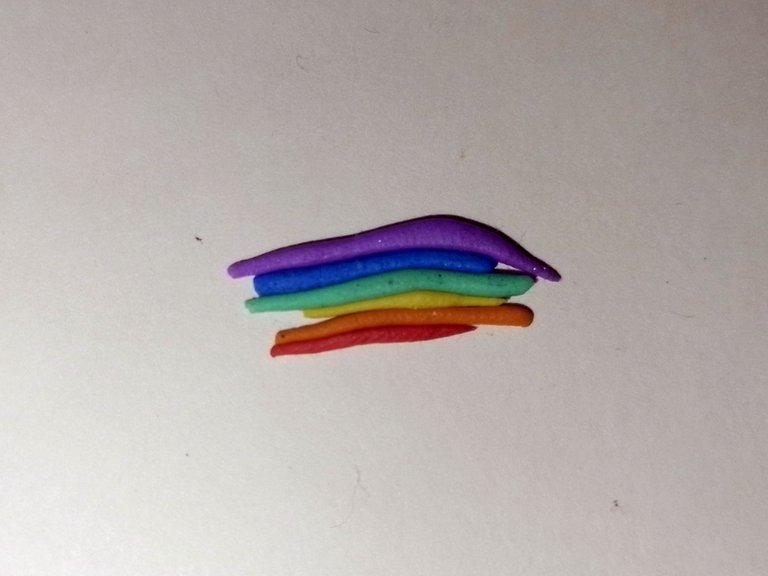
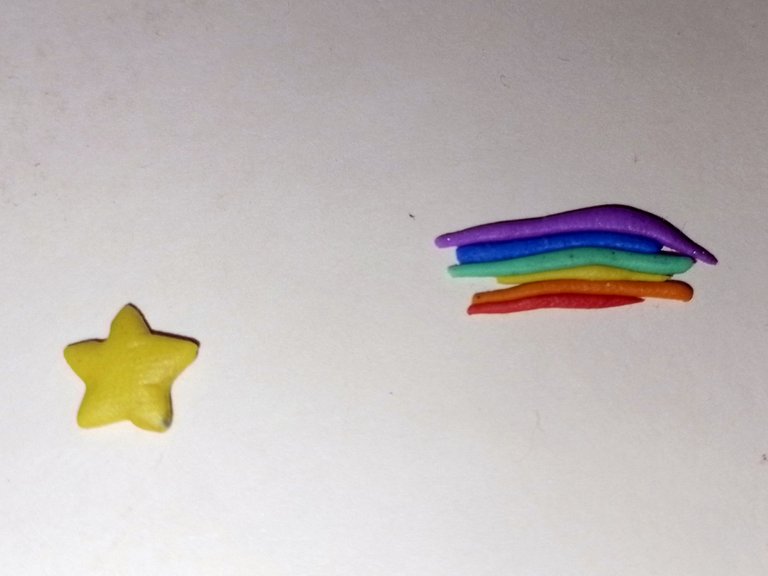
The last accessory, the most colorful, is a rainbow on the chest with a star. To make it you have to form small lines of plasticine of the colors you want to use. Once ready, they are stretched a little, cut and placed.
Below you can see some pictures of this process:
El último accesorio, el más colorido, es el de un arcoiris que tiene en el pecho con una estrella. Para hacerlo hay que formar pequeñas líneas de plastilina de los colores que se desean usar. Una vez que este listo, se estiran un poco, se corta y se colocan.
A continuación pueden ver unas fotografías de este proceso:
 |  |
|---|
 |  |
|---|
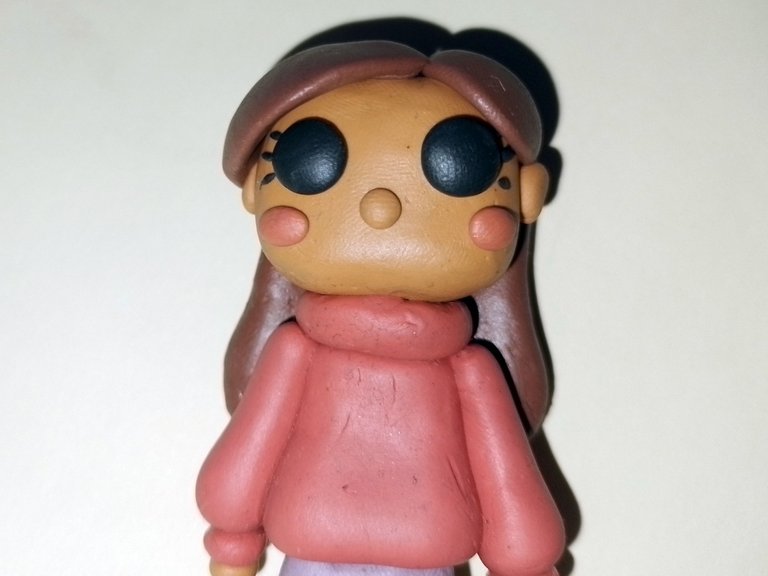
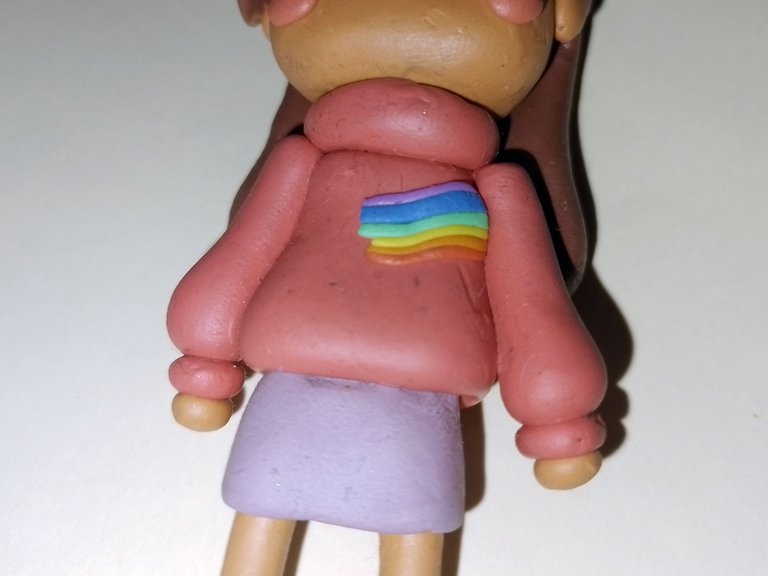
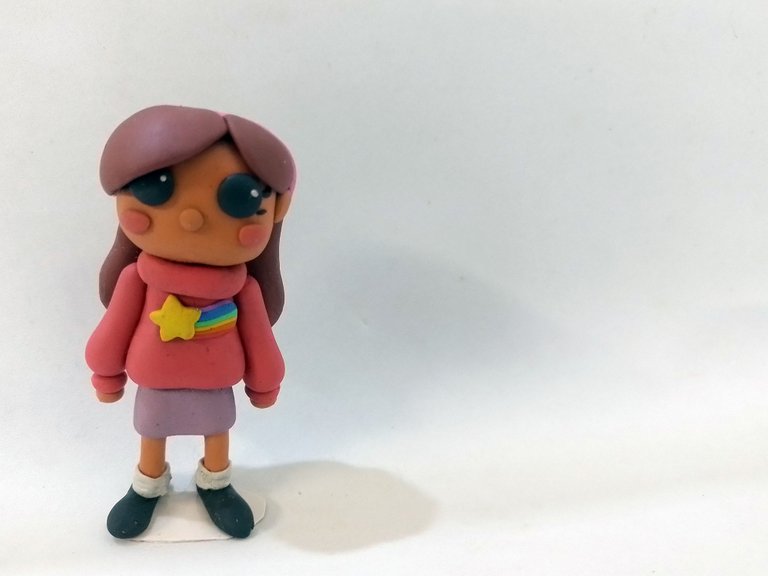
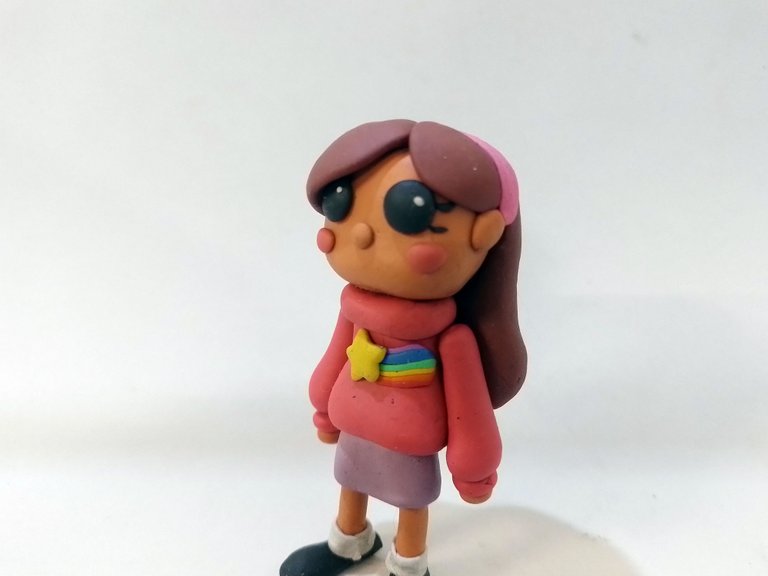
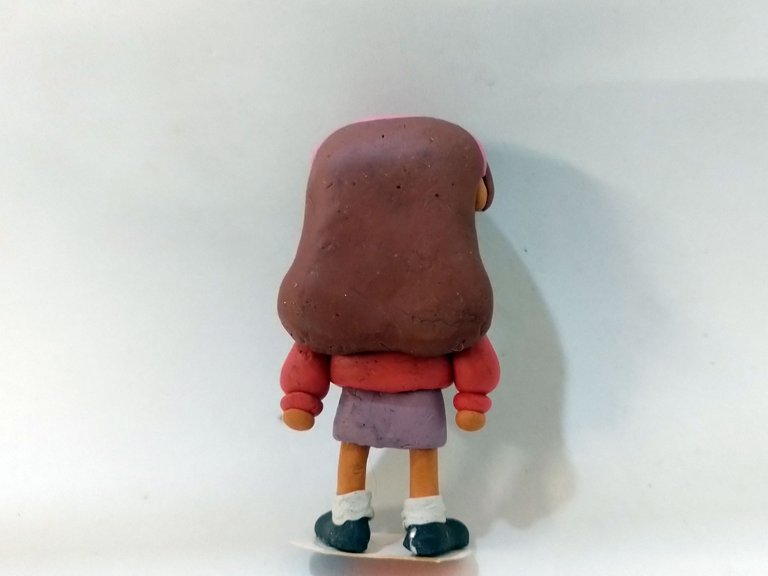
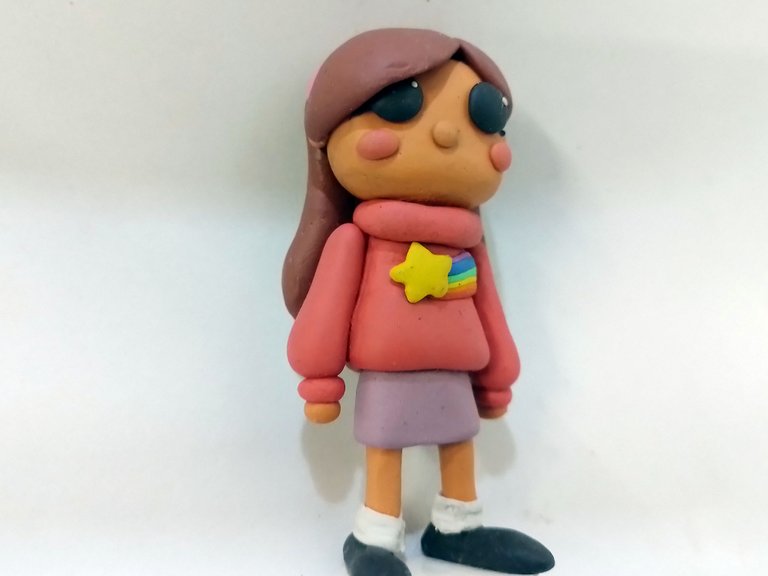
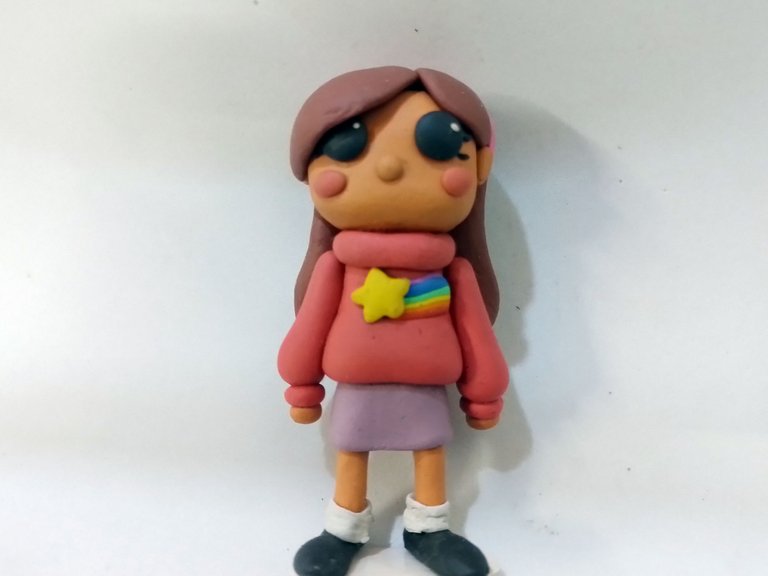
With this last detail, the doll was finished. As you can see, it is a charming character that looks great, despite having several mixed styles, like a chibi and a funko.
I leave you below with a series of pictures of the final result:
Con este último detalle, la muñequita quedó terminada. Como pueden ver, es un personaje encantador que luce muy bien, a pesar de tener varios estilos mezclados, como el de un chibi y el de un funko.
Los dejo a continuación con una serie de fotografías del resultado final:
And this way the figurine was finished, what did you think of it? As I told you, my cousin loved it, but I would like to know your opinions so you can leave them below in the comments, as always I will be happy to read them. With nothing more to add, I'll say goodbye then....
See you next time!
Y de esta manera la figurita quedó terminada. ¿A ustedes qué les pareció? Como les dije, a mi prima le encantó, pero me gustaría saber sus opiniones así que pueden dejarla abajo en los comentarios, como siempre estaré encantado de leerlos. Sin más que agregar, me despido entonces...
¡Hasta la próxima!

Bestial!
How beautiful, but this figurine if cuchi, I love.... 😍
A thousand successes my dear friend @gaboamc2393 ✨
Ayyy ñiomio, pero esta figurita si quedo cuchi, Me encanta... 😍
Mil éxitos mi apreciado amigo @gaboamc2393 ✨
!DIY
https://twitter.com/1241409678543904770/status/1620274819702067200
https://twitter.com/1484281013413023756/status/1620276500812693504
The rewards earned on this comment will go directly to the people( @gaboamc2393, @dayadam ) sharing the post on Twitter as long as they are registered with @poshtoken. Sign up at https://hiveposh.com.
Que linda muñeca de plastilina! Usted es todo un artistazo! Mis felicitaciones, amigo.
Thank you for sharing this post in the DIYHUB Community!
Your content got selected by our fellow curator ashikstd & you just received a little thank you upvote from us for your great work! Your post will be featured in one of our recurring compilations which are aiming to offer you a stage to widen your audience within the DIY scene of Hive. Stay creative & HIVE ON!
Please vote for our hive witness <3
¡Yo soy Mabel, que rima con papel! Al igual soy fan de Gravity falls, me encantaba jajaja y por supuesto Mabel siempre un personaje icónico. Te quedó demasiado hermoso, al igual que cada una de tus creaciones ❤️
Encantadora muñequita de plastilina, a mi me pasa lo mismo que a ti con el tejido, mira, me encantan las manualidades pero me siento incapaz de moldear la plastilina o cualquier material moldeable jajajaja, no se me da bien. Muy buen trabajo ❤️
Saludos @gaboamc2393, te quedó muy linda Mabel, trabajar con plastilina es relajante, no se me da mucho el moldeado pero en ocasiones con mi hijo hacemos figuras de plastilina es muy divertido.
Bendiciones!
Un gran talento para trabajar la plastilina!
Te felicito!
Yo lo mas que hago es una serpiente! jajaj
Amigooooo!
¡Ameeee con locura! el resultado de esta escultura!
Te quedo increíble.. Gracias por compartir!
Siempre he amado a Mabel como personaje, es quizás el mejor concepto de niña inocente que he visto en mi vida, ojala mi hija tuviera un poco de la imaginación y dulzura que Mabel tiene cuando llegue a su edad, saludos y un abrazo, que bonita te quedo :)
Wooow, tenía tiempo sin ver una escultura tuya hombre, y como siempre, está quedó genial