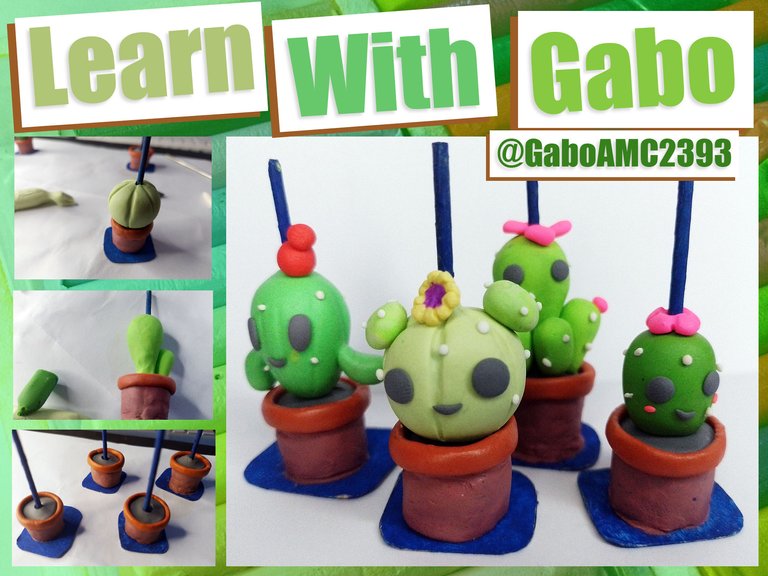
Learn With Gabo: Charming Cactuses [ENG/SPA]
Greetings friends, welcome to a new installment of my favorite section of my blog, Learn With Gabo. This is a section in which I use to teach you how to make plasticine figurines a little simpler for those who want to get into this world of sculpture.
In today's installment I will show you how to make a set of Chibi style cactus, I hope you like it. Join me, let's get started.
Español
Saludos amigos, sean bienvenidos a una nueva entrega de la sección favorita de mi blog, Learn With Gabo. Esta es una sección en la que acostumbro a enseñarles a hacer figuritas de plastilina un poco más sencillas para aquellos que quieran adentrarse en este mundo de la escultura.
En la entrega de hoy les enseñaré a hacer un conjunto de cactus estilo Chibi, espero de corazón que les guste. Acompáñenme, vamos a empezar.
Materials
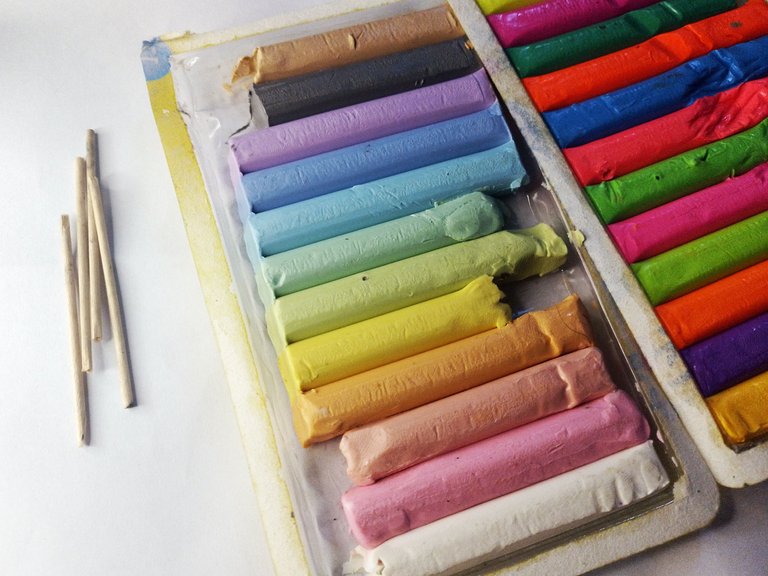
The materials used for these figurines are conventional materials, nothing fancy. I name them below:
- Plasticine
- Cardboard
- Glue
- Thread
- Wooden sticks
- Paint
Materiales
Los materiales utilizados para estas figuritas son materiales convencionales, nada del otro mundo. Los nombro a continuación:
Plastilina
Cartulina
Pegamento
Hilo
Palillos de madera
Pintura
Step by step
You may be wondering what these little things are and the truth is that they can be anything you want. They are figurines with sticks that can be used as topper or to stick any little thing on that stick to use them at your convenience.
The utility will be given by each person, but what we are going to concentrate on today is the figurine.
Paso a paso
Quizás se estén preguntan qué son estas cositas y la verdad pueden ser lo que tu quieras. Son figuritas con unos palillos que bien se pueden usar como topper o bien para pegarles cualquier cosita en ese palillo para usarlos a tu conveniencia.
La utilidad se la dará cada persona, pero en lo que nos vamos a concentrar hoy es en la figurita.

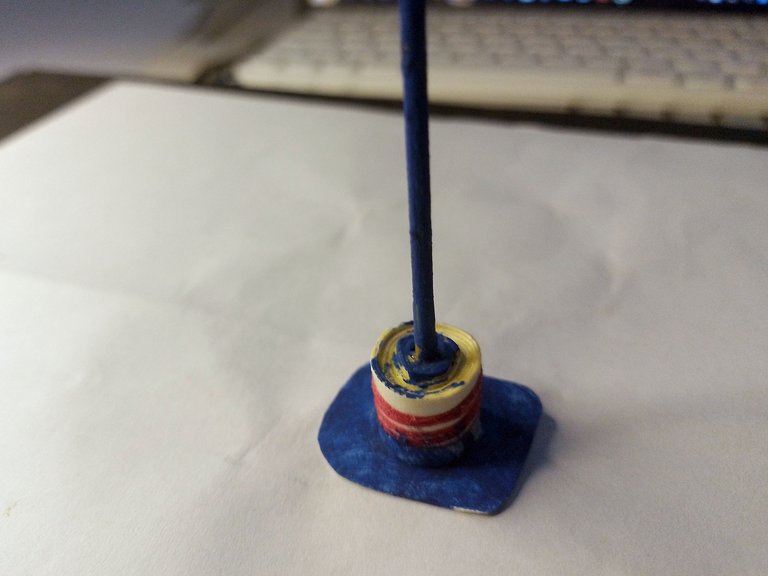
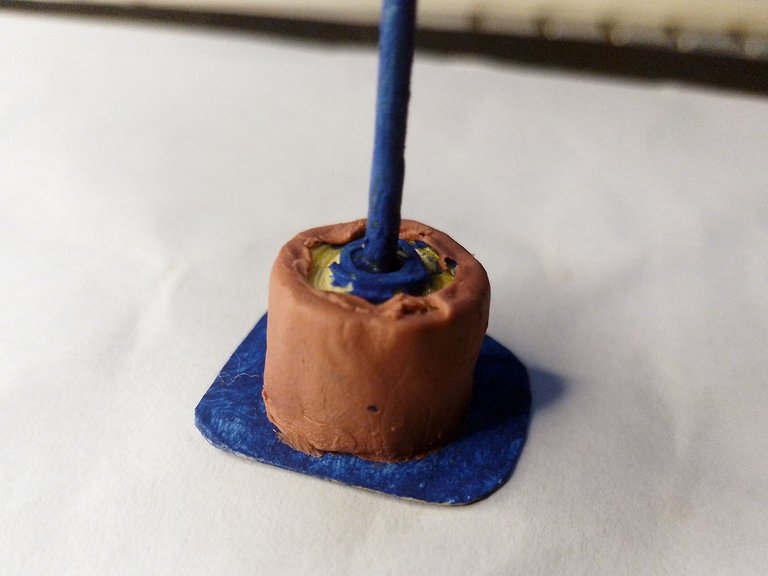
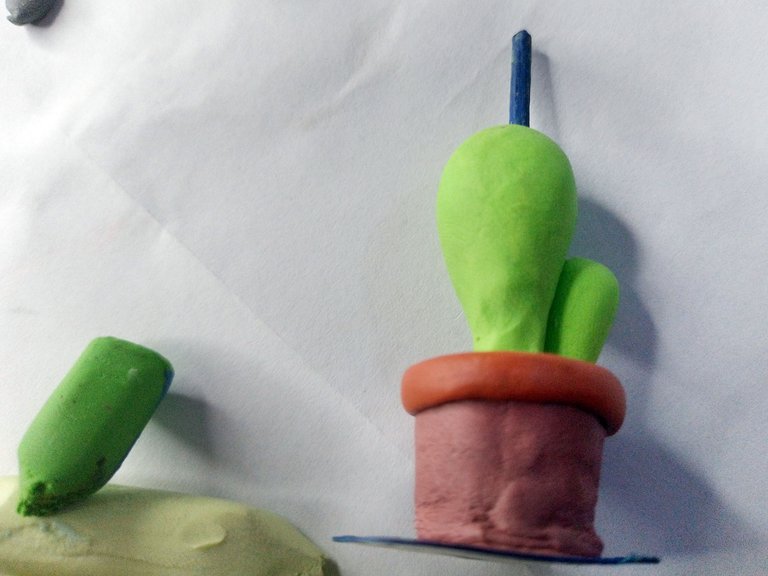
Although they are small figurines that technically would not need a sturdy base, the truth is that I made them a support that will help them stand over time. I cut the cardboard into small strips 1.5 cm wide. I cut the toothpicks to seven centimeters long, but they can be as long as you wish.
To make the base, simply roll the cardboard strips around the base of the toothpick to create a thick support, as this will be the support for the pot of the figurine. Then we cut a small square of cardboard and place it underneath. Finally the base is painted, as shown in the image below:
Aunque son figuritas pequeñas que técnicamente no necesitarían una base resistente, lo cierto es que les hice un soporte que las ayudará a mantenerse en el tiempo. La cartulina la corté en tiras pequeñas de 1.5 cm de ancho. Los palillos los corté de siete centímetros, pero pueden ser tan largos como ustedes lo deseen.
Para la elaboración de la base simplemente enrollamos las tiras de cartulina en la base del palillo, hasta crear un soporte grueso, pues este será el soporte de la maceta de la figurita. Luego cortamos un cuadrito de cartulina y se coloca debajo de todo. Finalmente se pinta la base, tal como se observa en la imagen a continuación:
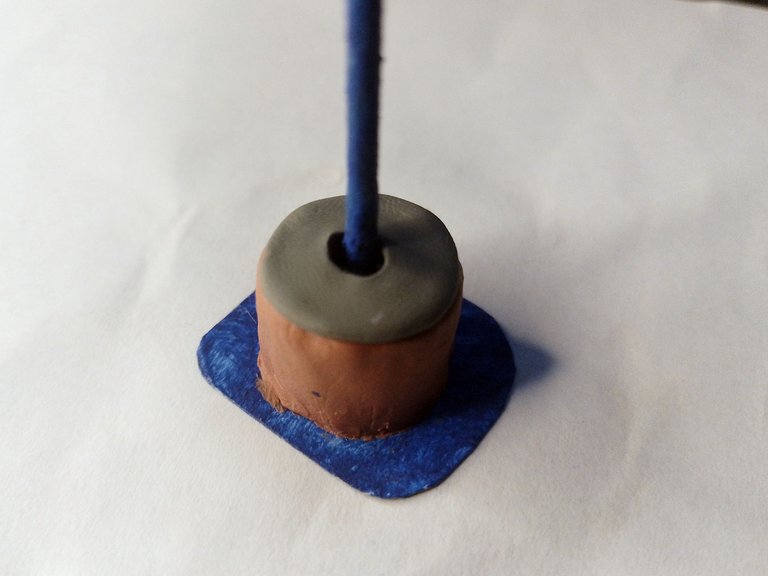
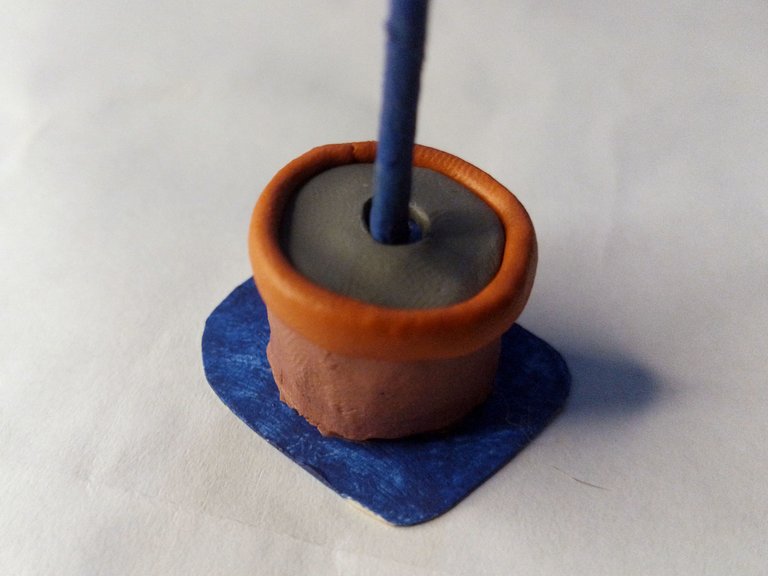
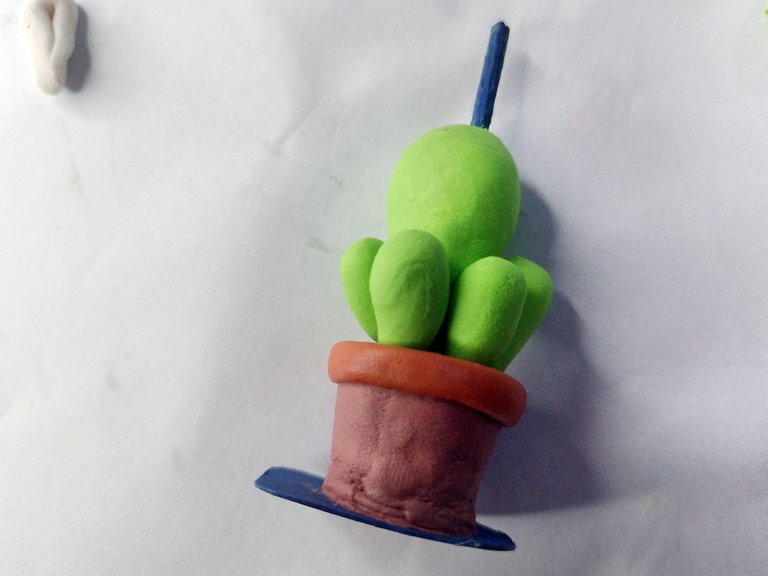
Once the support is dry, we begin to cover with plasticine the cardboard that we rolled on the stick. In this case I used brown plasticine for this purpose, I made a black plasticine tortilla and placed it on top of the base, as if it were a drum.
Una vez que esté seco el soporte, comenzamos a cubrir con plastilina la cartulina que enrollamos en el palillo. En este caso usé plastilina marrón para este propósito, hice una tortilla de plastilina negra y la coloqué encima de la base, como si fuese un tambor.
 |  |
|---|
To give it the pot-like appearance, I placed a brown rim around the black plasticine cover.
Para darle la apariencia similar a la de una maceta, le coloqué un borde marrón alrededor de la cubierta negra de plastilina.
 |  |
|---|
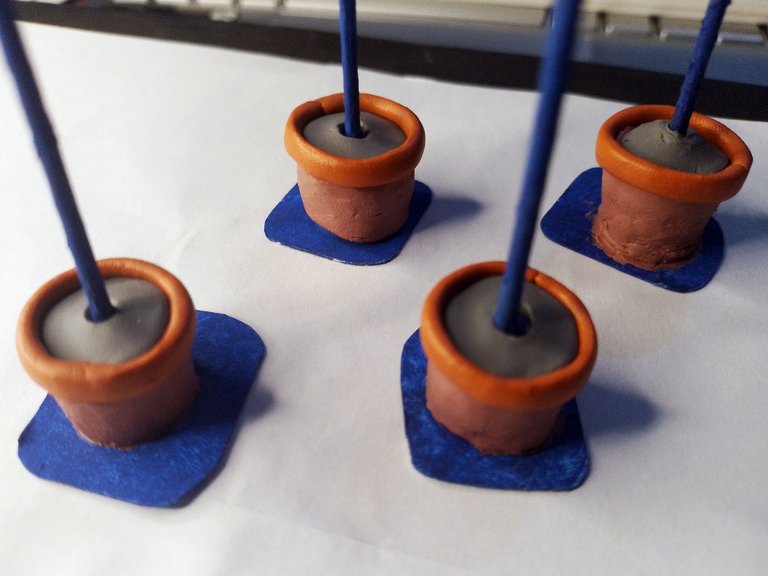
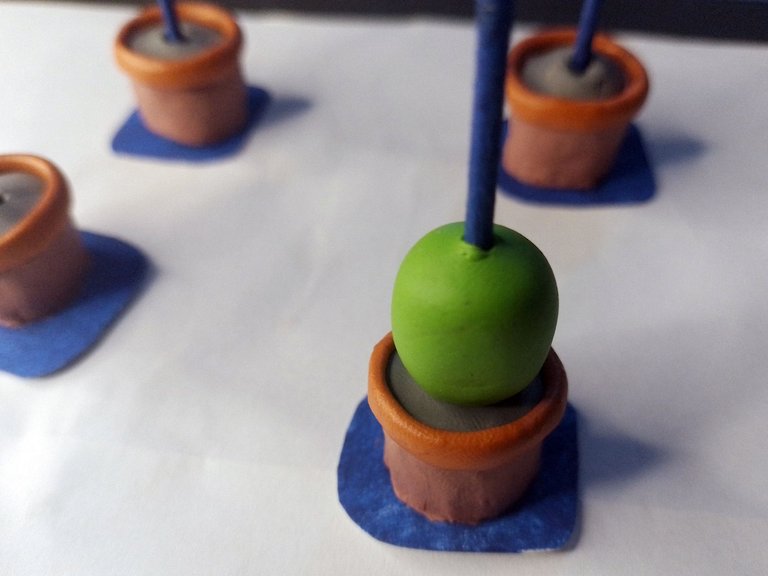
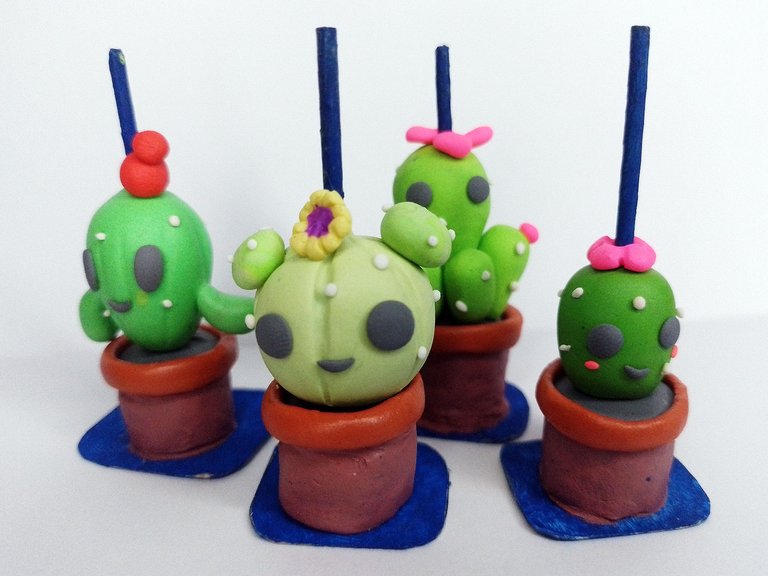
This is how the first part of the figure was finished, which are the pots, now we have to make the cactus. For this I used four different colors for each cactus, since each one would have a different shape, I also wanted to make a more evident distinctive.
Así quedó terminada la primera parte de la figura, que son las macetas, ahora hay que hacer los cactus. Para esto usé cuatro colores distintos para cada cactus, ya que cada uno tendría una forma distinta, también quise hacerle un distintivo más evidente.
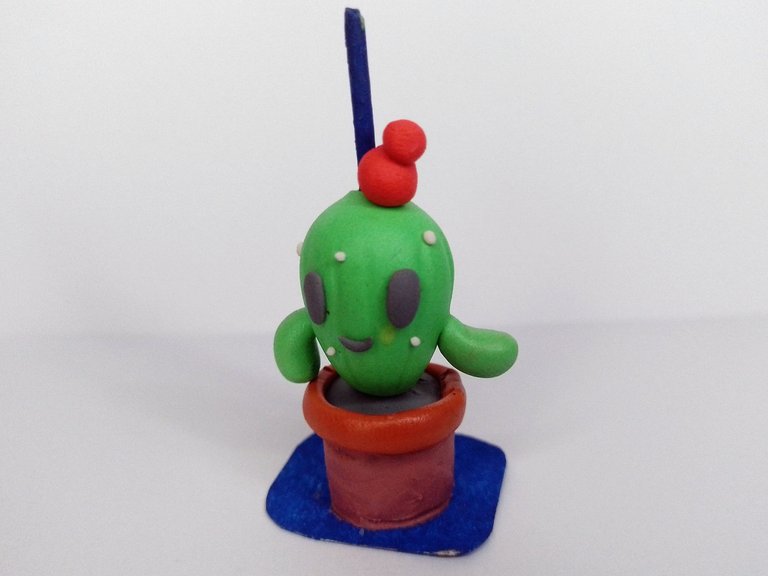
The first cactus is the most basic, the easiest to make. To make it we simply take a small piece of plasticine and mold it into a rounded shape but elongated upwards. We make a small hole in the middle and stick it in the toothpick, so it will be fixed in the support.
El primer cactus es el más básico, el más sencillo de hacer. Para hacerlo simplemente tomamos una masita de plastilina y la moldeamos hasta lograr una forma redondeada pero alargada hacia arriba. Se le hace un agujerito en el medio y se clava en el palillo, así quedará fija en el coporte.
The next thing is to place the eyes and mouth, which I made with small black plasticine tortillas and small lines for the mouth.
Lo siguiente es colocarle los ojos y la boca, los cuales los hice con pequeñas tortillas de plastilina negra y pequeñas líneas para la boca.
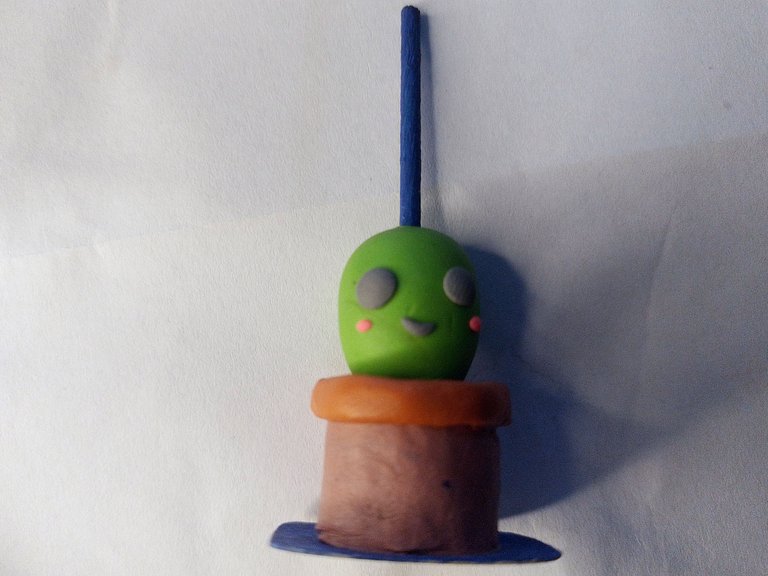
Additionally, I placed a small flower on his head to cover the hole made by the toothpick.
Adicionalmente le coloqué una pequeña flor en la cabeza, para cubrir el agujero que le hace el palillo.
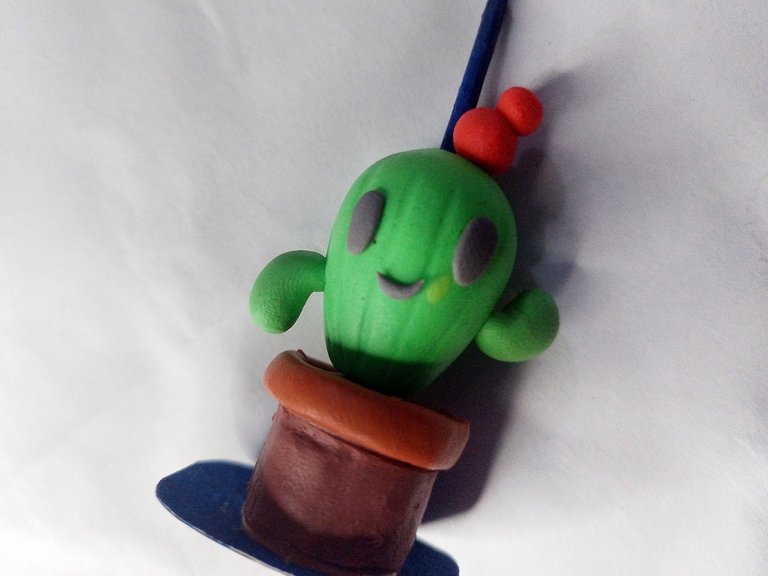
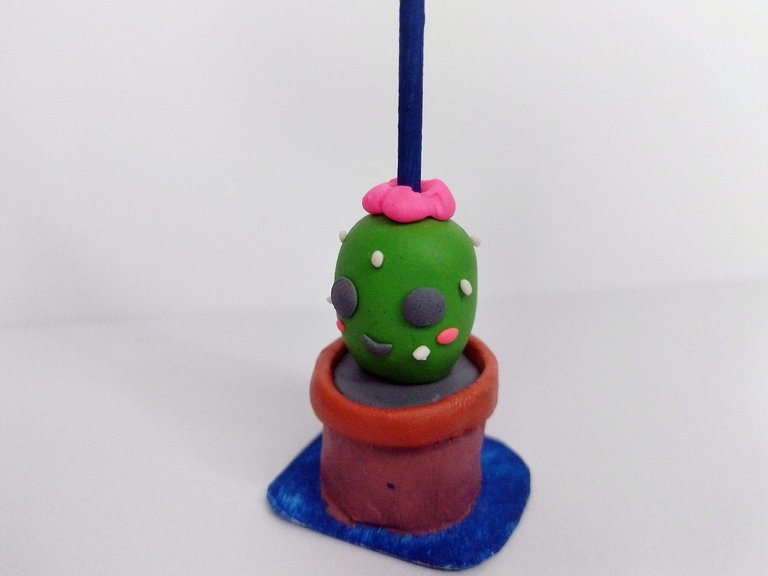
The second cactus is made in the same way, only with a much larger size. When the shape of the cactus is achieved, it is placed on the stick, just like the previous cactus.
El segundo cactus se hace de la misma forma, solo que con un tamaño mucho mayor. Al lograr la forma del cactus, este se coloca en el palillo, tal como el cactus anterior.
 |  |
|---|
The difference between this cactus and the other one is that I made the vertical lines to give the appearance of a slightly larger cactus.
La diferencia de este cactus con el otro es que le hice las líneas verticales para dar esa apariencia de un cactus un poco más crecido.
After making these lines, the face is made, with the same black tortillas for the eyes, only a little more elongated and some small spheres at the top to simulate the fruits of the cactus. I also added a pair of arms.
Después de hacer estas líneas se hace la cara, con las mismas tortillas negras para los ojos, solo que un poco más alargadas y unas pequeñas esferas en el tope para simular los frutos de los cactus. También le agregué un par de brazos.
 |  |
|---|
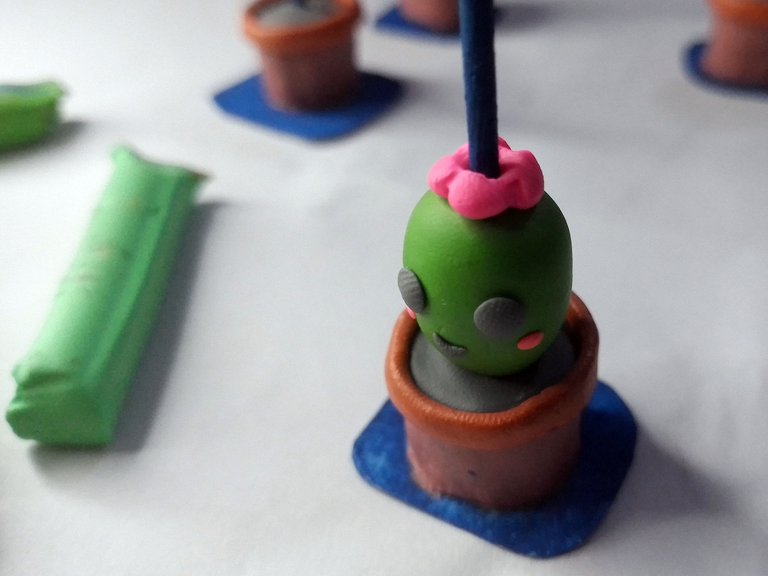
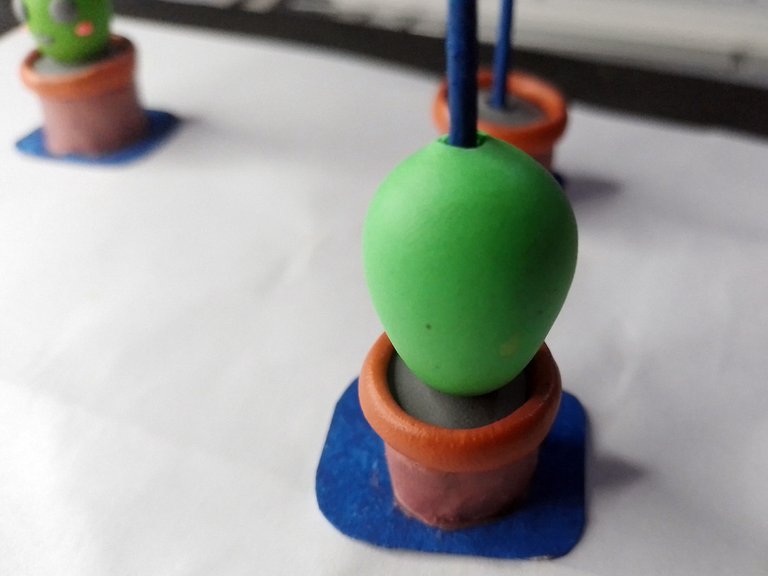
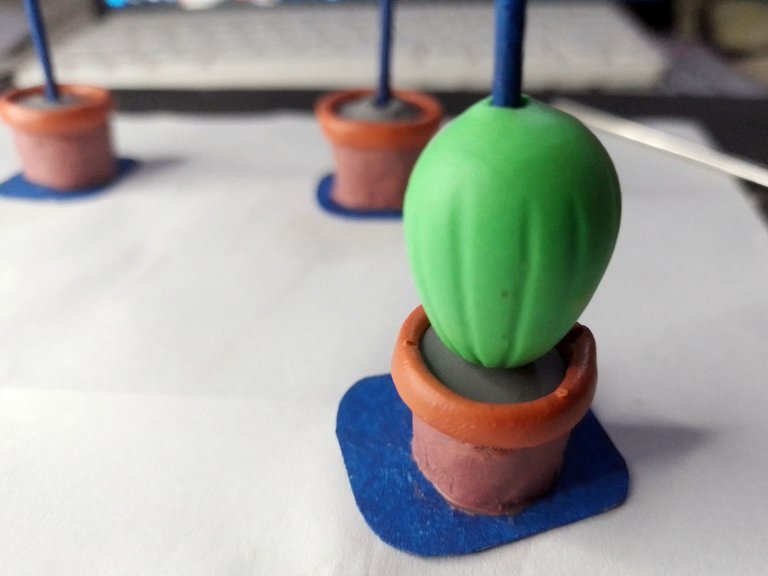
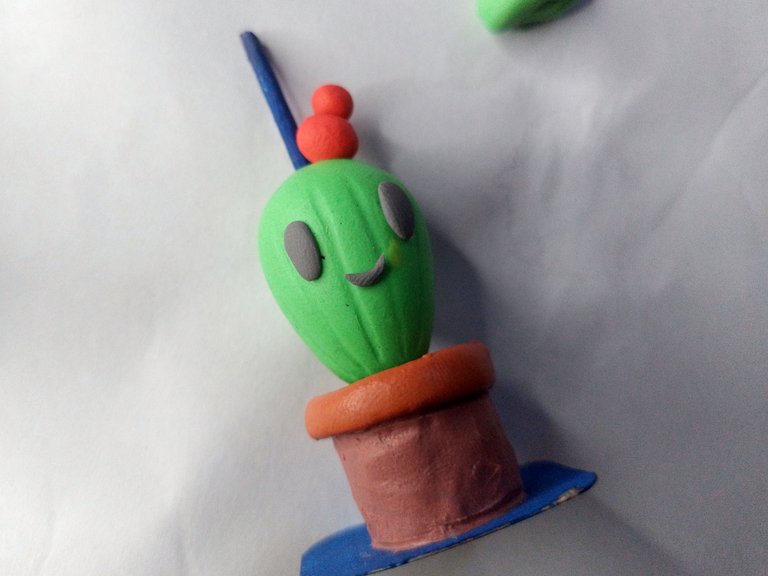
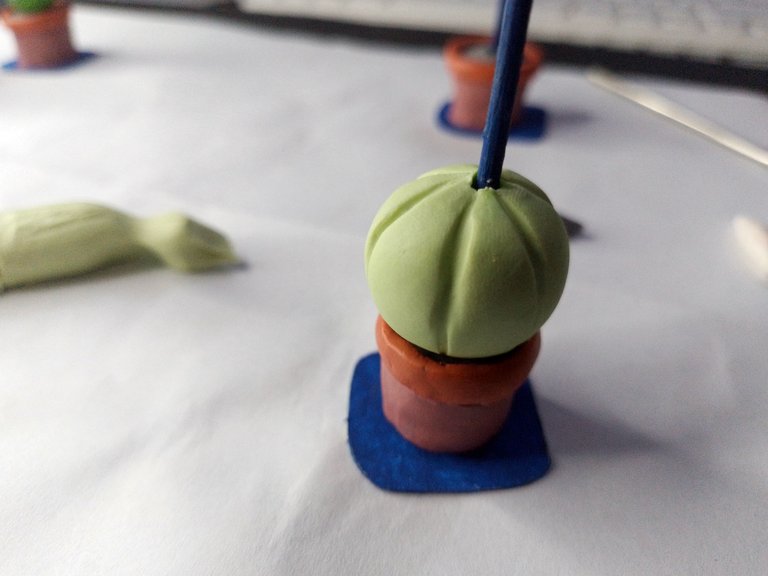
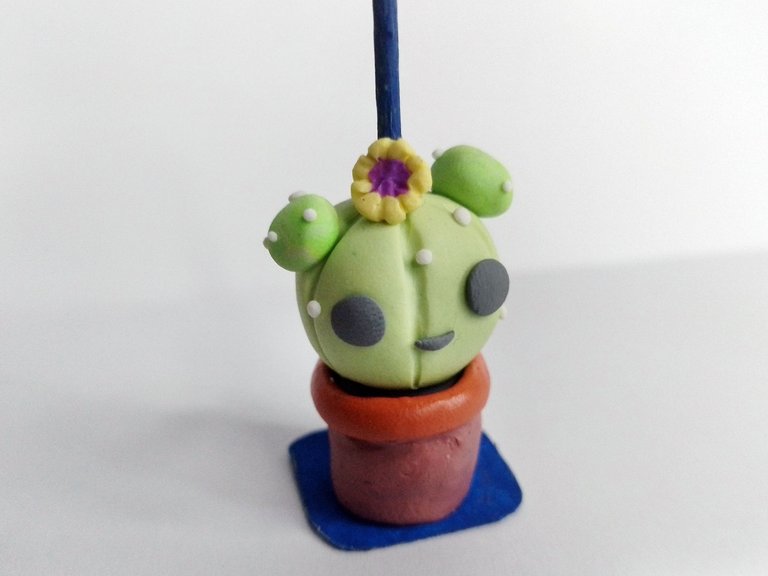
The third cactus is different from the previous ones, in fact, it is the most different of the 4, the one that least resembles the others, mostly because of its rounded shape.
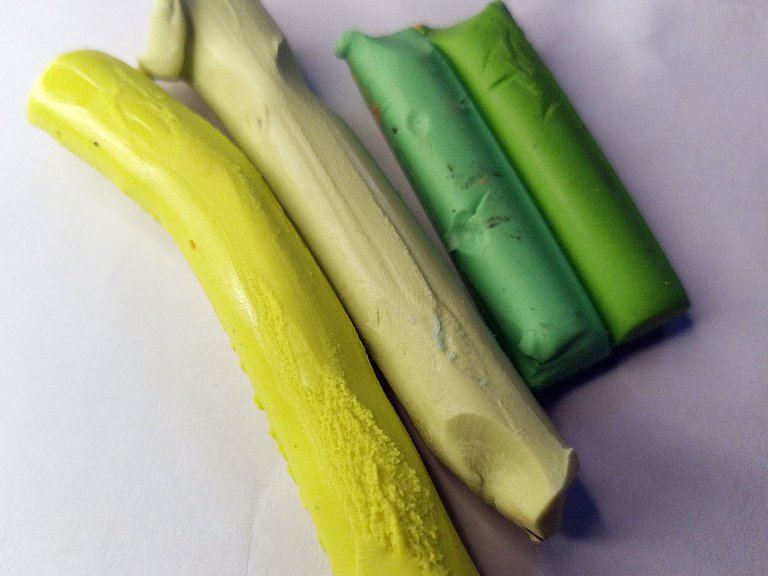
To start making this figure you just have to make a plasticine sphere, note that I used a light green plasticine, very pleasant to the eye. This sphere looks more like a pumpkin, because of the lines around it.
El tercer cactus es diferente a los anteriores, de hecho, es el más distinto de los 4, el que menos se parece a los otros, más que todo por su forma redondeada.
Para empezar a hacer esta figura solo hay que hacer una esfera de plastilina, fíjense que usé una plastilina de color verde claro, muy agradable a la vista. Esta esfera parece más bien una calabaza, por las líneas que tiene en los alrededores.
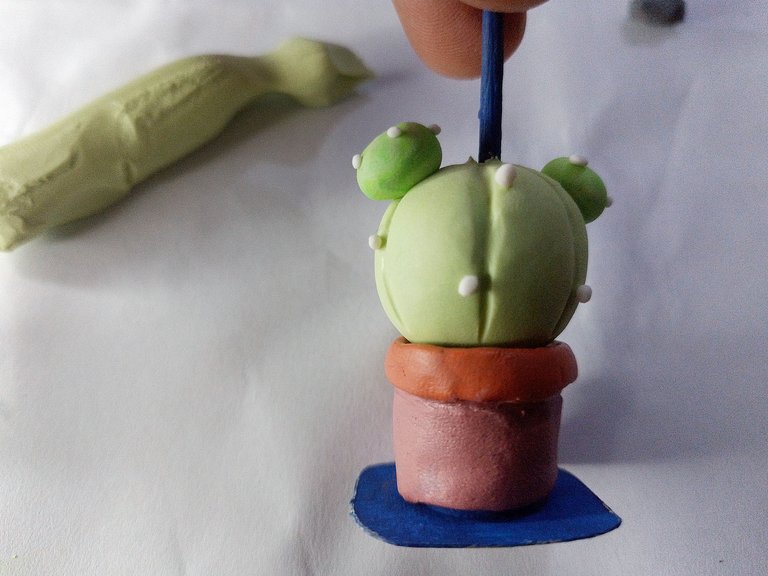
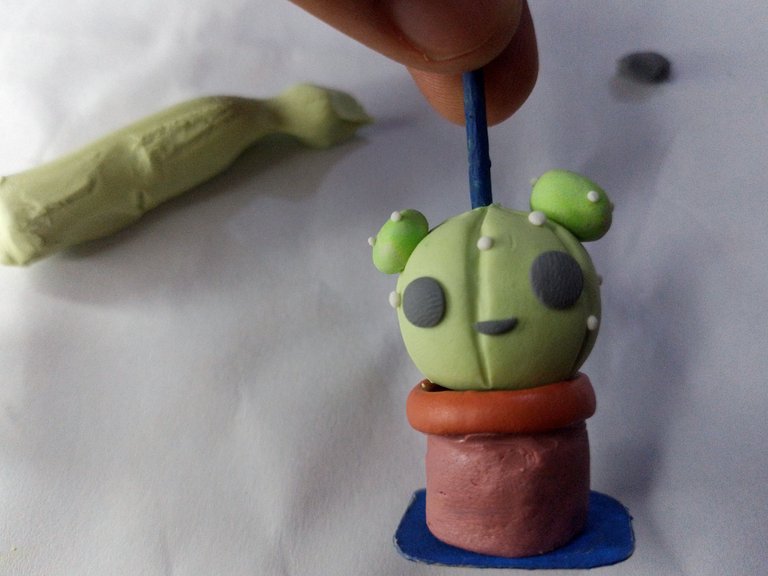
As with the other cactus, I placed small white dots to simulate the plant's spikes. I also added the face using the same black plasticine and the same style of eyes and mouth.
Al igual que con los otros cactus, les coloqué pequeños puntitos blancos para simular las púas de la planta. De igual manera, le coloqué la cara usando la misma plastilina negra y el mismo estilo de ojos y boca.
 |  |
|---|
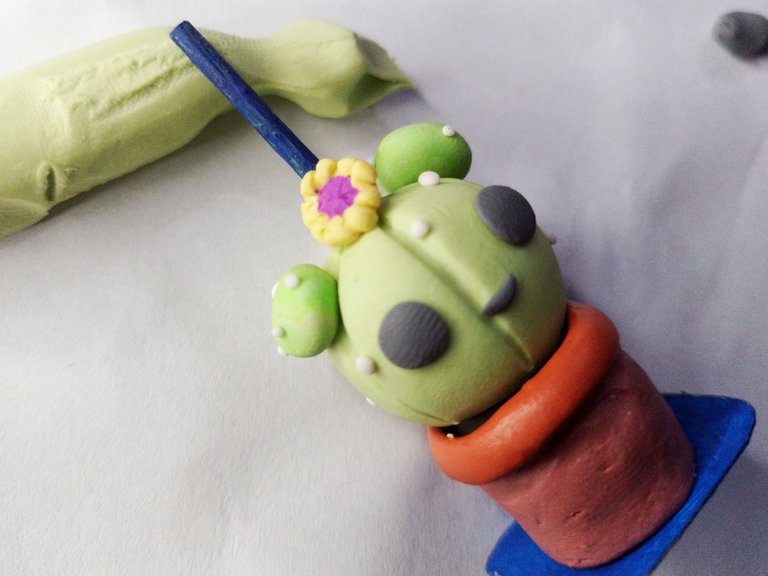
The last thing I did was to place a small detail near the edge of the support stick, a yellow flower with a pink center.
Lo último que hice fue colocarle un pequeño detalle cerca del borde del palillo de soporte, una flor amarilla con centro rosado.
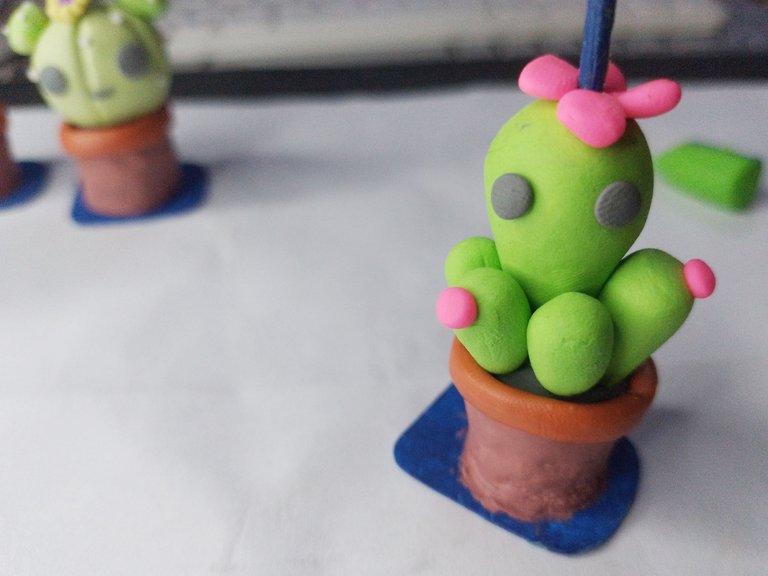
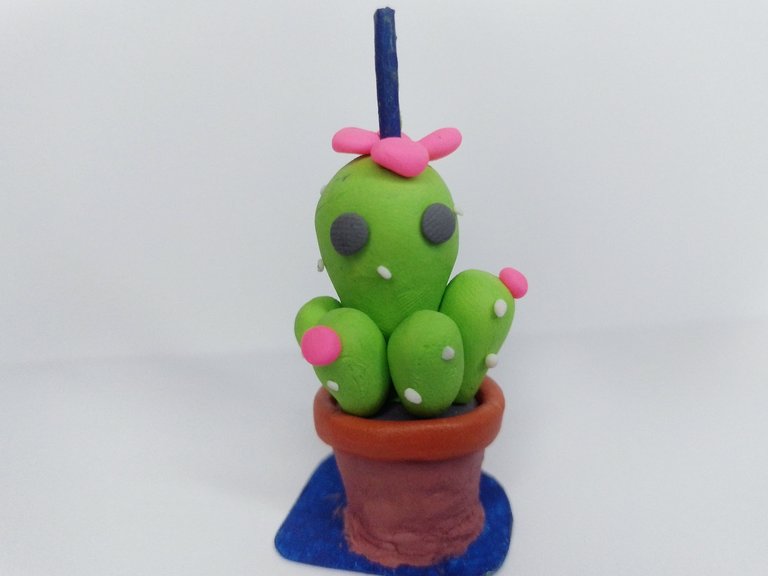
The last cactus is also different from the others. Although it keeps the shape of the first two cacti, this one differs in the amount of cacti in the pot.
This cactus is shaped like a cane, so this is the shape by which they have to be guided when making each part. Although the central part is the largest, the smaller parts keep the same cane shape only smaller.
El último cactus también guarda distinción con los otros. Aunque mantiene la forma de los dos primeros cactus, este se diferencia en la cantidad de cactus que hay en la maseta.
Este cactus tiene forma de bastón, así que esta es la forma por la que tienen que guiarse al hacer cada parte. Aunque la parte central es la más grande, las partes pequeñas mantienen la misma forma de bastón solo que más pequeña.
 |  |
|---|
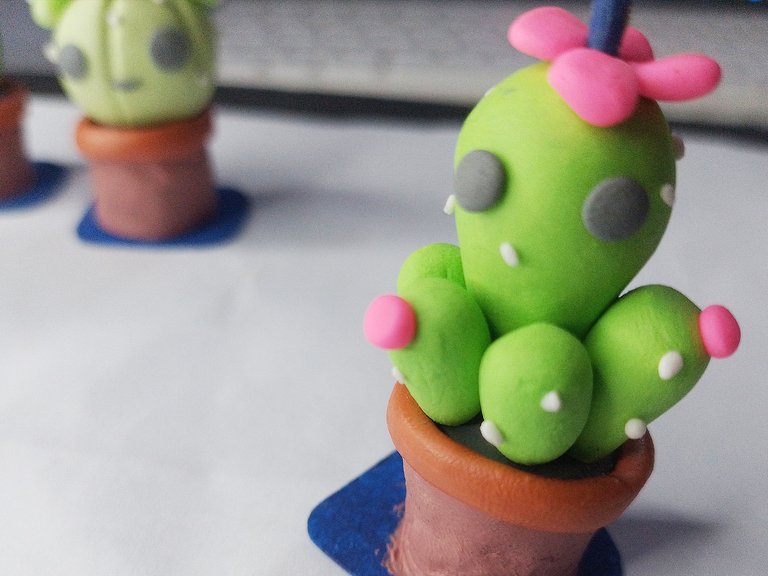
On this one I placed only two eyes with the same black plasticine, pink flowers on the top of the central cactus and two on the smaller cactus. As with the others, I placed the small white dots to simulate the spikes.
A este le coloqué solamente dos ojos con la misma plastilina negra, flores rosadas en la cima del cactus central y dos en los cactus más pequeños. Al igual que con los otros, coloqué los pequeños puntos blancos para simular las púas.
 |  |
|---|
Thus, this series of figurines was completed.
De esta manera, esta serie de figuritas quedaron terminadas.
As I said, this post is part of a section I run on my blog called "Learn With Gabo".
You can see other posts in this section by searching for the hashtag #lwgabo or by following this link:
https://peakd.com/created/lwgabo
I invite you to leave your opinions below in the comments, as always I will be happy to read them. With nothing more to add, I'll say goodbye then...
See you next time!!!
Como dije, esta publicación es parte de una sección que llevo en mi blog llamada “Learn With Gabo”.
Puedes ver otras publicaciones de esta sección buscando la etiqueta #lwgabo o bien siguiendo este enlace:
https://peakd.com/created/lwgabo
Los invito a dejar sus opiniones abajo en los comentarios, como siempre estaré encantado de leerlos. Sin más que agregar, me despido entonces…
¡Hasta la próxima!


Que hermosos, estan muy lindos como para decorar un espacio. Que ternura, gracias por compartirlo.
https://twitter.com/Chacald1/status/1729544107628920832
Aww! Que ternuras de cactus. Me gustó mucho este tutorial. Lo mejor es que está tan detallado que cualquiera podría seguir los pasos y hacer su propio cactus. Gracias por compartir tu técnica. Feliz día
!discovery 45
This post was shared and voted inside the discord by the curators team of discovery-it
Join our Community and follow our Curation Trail
Discovery-it is also a Witness, vote for us here
Delegate to us for passive income. Check our 80% fee-back Program
Cuanta ternura! Morí de amor, esos preciosos hijitos tuyos <3
Amigo que trabajo tan increíble!! Amo tus figuritas de plastilina, siempre haces cosas únicas y estos cactus quedaron geniales 👌🏻
Te quedo muy bonito amigo. Cada uno de estos cactus emite una personalidad diferente XD! Saludos
Amo los cactus, así que esta entrega me encantó, están demasiado lindos, y como dices sencillos para los que deseen iniciarse.
Gracias por compartir
¡Qué bonitos cactus!😍, te quedaron hermosos y están chéveres para decorar, pequeños, adorables y, como son de plastilina, probablemente la única planta que no pueda matar 😅
Están bellos los cactus muy creativo.
Ainssss niomiooo estos cactus son una total cuchitura, te quedaron tan hermoshitos y tiernos, son para morir pero de amor jajajaja.
Dios bendiga de manera infinita esas manos creadoras de bellezas @gaboamc2393 💙
!LUV
!DIY
@dayadam sent you LUV 🙂 (1/1)
Made with LUV by crrdlx
You can query your personal balance by
!DIYSTATSNuuu son muy lindos, adoro los cactus, solia tener muchos pequeños sobre mi ventana pero ya se me secaron todos (si, se me secaron los cactus 😂😂) Era una compradora compulsiva de cactus pero evidentemente no los cuidaba bien, bueno, todo se aprende jaja
Estan super adorables y prolijos, que lindo trabajito ❤️
Que hermoso!
Pero mira que cosita más bonita, me encantó el resultado final, están hermosos te felicito