LIKETU PHOTO EDITOR: "Annotate" function | Express Tutorial [SPA -ENG]
Hace unos días publiqué un post sobre una camioneta pick up a la que le agregué círculos de color fucsia simulando un diálogo con el lector.
En este corto tutorial que traigo hoy te muestro cómo lo hice. Tal vez te anime a hacer algo así en tu próxima publicación en @liketu. ¡Empecemos!
A few days ago I published a post about a pick up truck to which I added fuchsia circles simulating a dialogue with the reader.
In this short tutorial I show you how I did it. Maybe I'll encourage you to do something like this in your next post on @liketu. Let's get started!
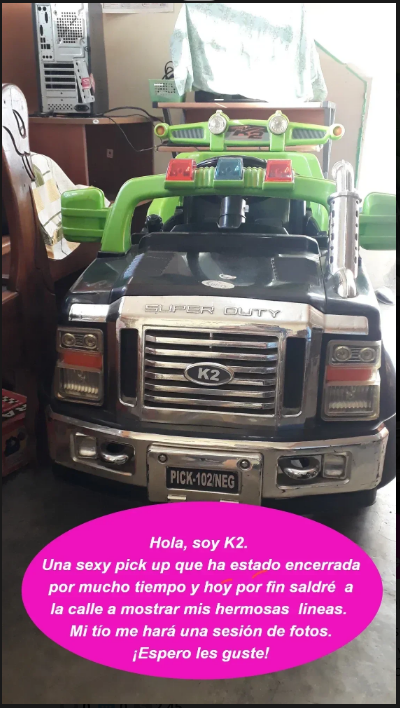
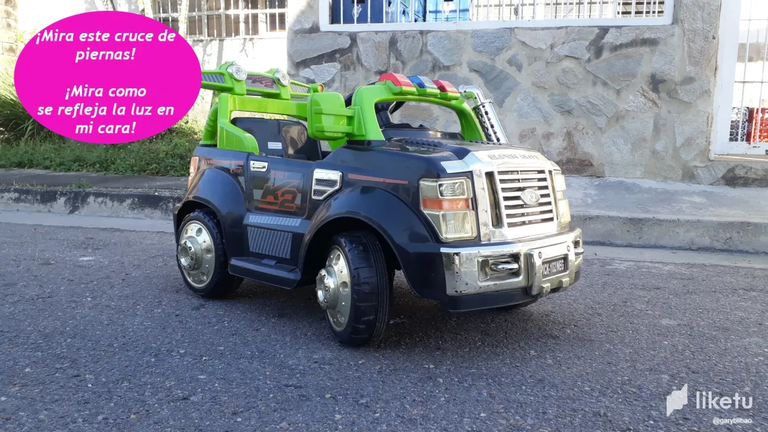
Esta fue la primera imagen del post.
This was the first image of the post.
Así la hice:
This is how I made it:
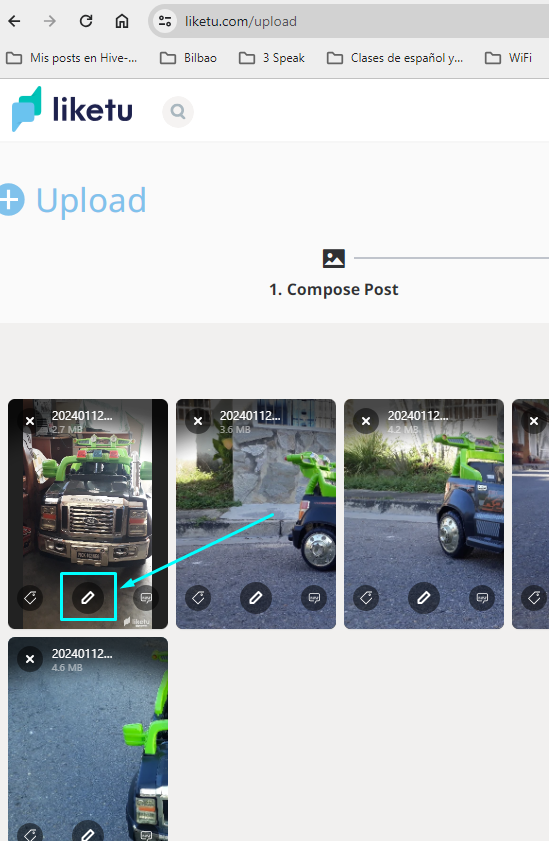
📷 Luego de cargar mis imágenes, entré al editor de fotos:
📷 After uploading my images, I went into the photo editor..
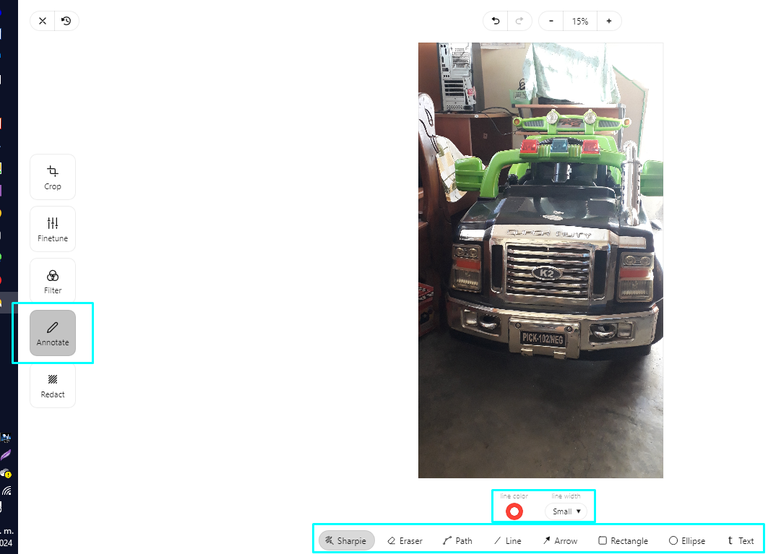
📷 Una vez dentro del editor, seleccioné la opción "Anotar" y se me habilita una serie de opciones en la parte inferior de la aplicación. (lo resalté en un rectángulo verde para que lo visualices mejor).
📷 Once inside the editor, I selected the "Annotate" option and a series of options are enabled at the bottom of the application (I highlighted it in a green rectangle for better visualization).
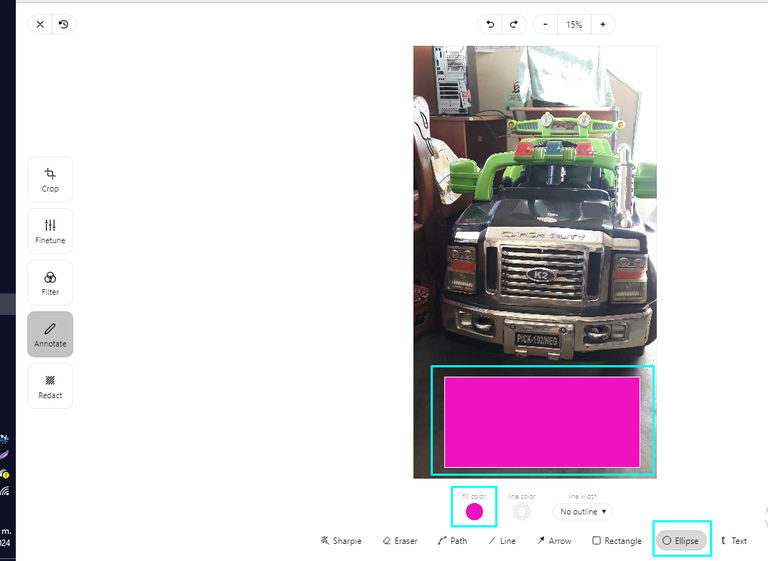
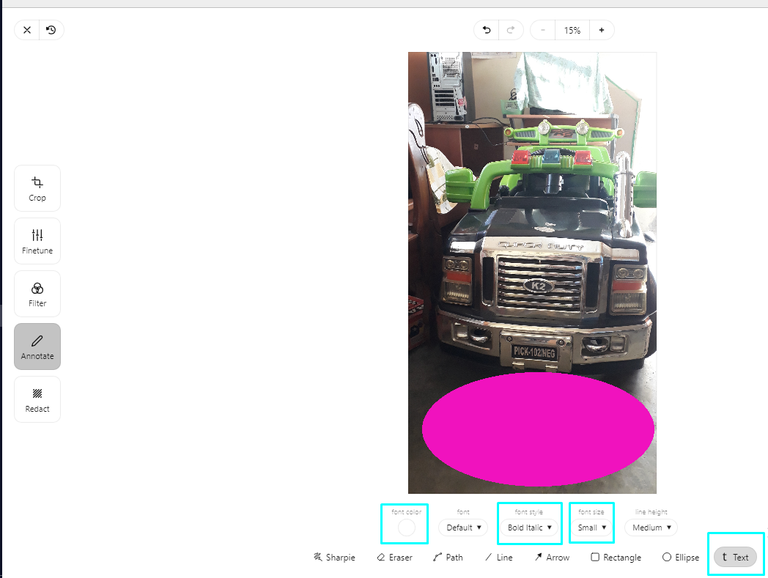
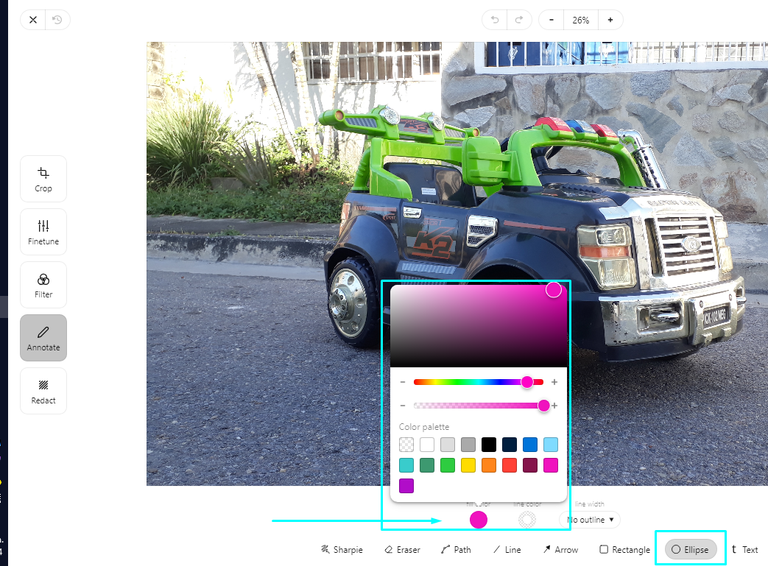
📷 Para irle dando forma a mi burbuja de texto, elijo la función "Elipse" y la opción "Color" y selecciono el color que quiero. El cursor del ratón se convierte en una cruz grisácea que estará lista para que dibujes tu forma. No te preocupes si vez que se está formando un rectángulo, luego que sueltas el cursor, se transforma en una elipse o círculo del tamaño que deseas. (observa la siguiente imagen).
📷 To shape my text bubble, I choose the "Ellipse" function and the "Color" option and select the color I want. The mouse cursor turns into a grayish cross that will be ready for you to draw your shape. Don't worry if you see a rectangle forming, after you release the cursor, it transforms into an ellipse or circle of the size you want (see the following image).
📷 Una vez dibujada tu forma con el color, tendrás unos puntos que servirán para ampliar o deformar la figura a tu antojo.
📷 Once you have drawn your shape with the color, you will have some points that will be used to enlarge or deform the figure as you wish.

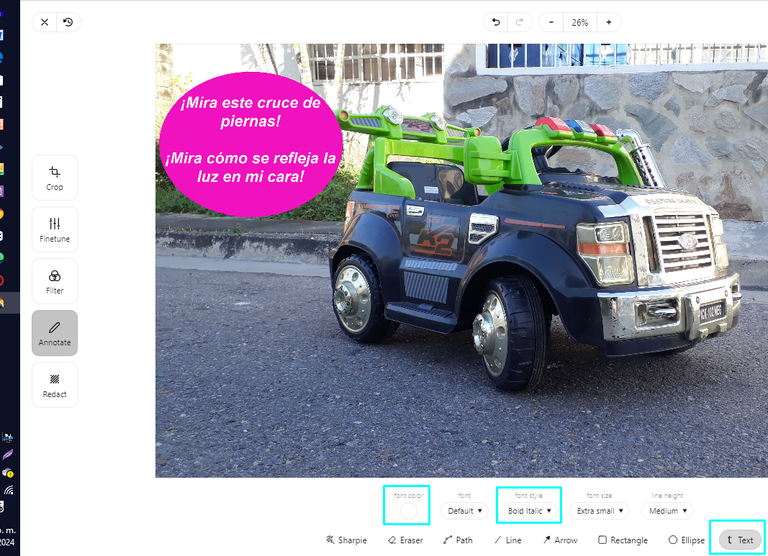
📷 Viene la opción de "Texto". Tal como lo ves en cuadrados verdes, usé estas funciones y opciones de edición de texto: tamaño, estilo de fuente, color. Igual que con la forma, el cursor del ratón se habilita para abrir un cuadro de texto y escribir.
📷 There is the "Text" option. As you see it in green squares, I used these functions and text editing options: size, font style, color. As with the shape, the mouse cursor is enabled to open a text box and type.
📷 Además te aparecen una serie de opciones que te permiten editar, borrar, copiar, entre otras. (Tal vez en un próximo tutorial ahonde en profundidad sobre estas funciones del editor de texto).
📷 You will also see a series of options that allow you to edit, delete, copy, among others. (Perhaps in a future tutorial I will go deeper into these functions of the text editor).

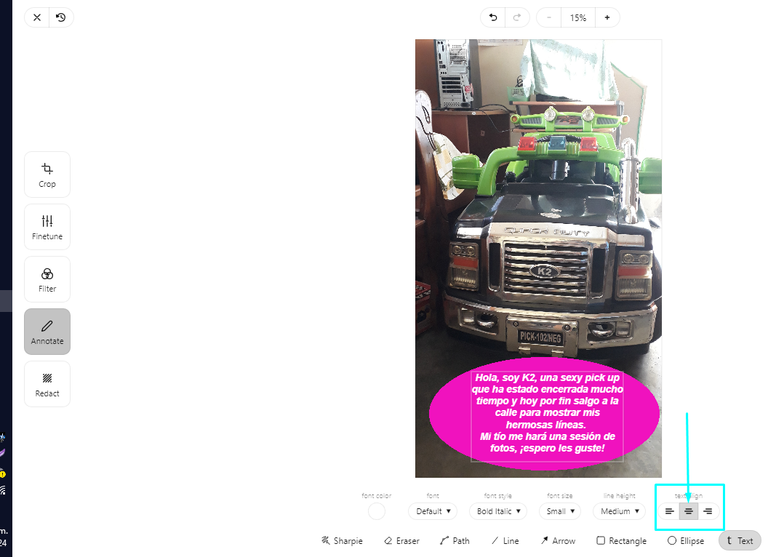
📷 Escribes el texto que deseas. En mi caso escribí lo que la pick up le decía a sus lectores. Al momento que se empieza a escribir, aparece abajo a la derecha de la aplicación, en el área de edición, la posibilidad de formatear el texto a la izquierda, centro o derecha. Yo elegí la opción centrada.
📷 You write the text you want. In my case I wrote what the pick up was telling its readers. As soon as you start typing, the option to format the text to the left, center or right appears at the bottom right. I chose the centered option.
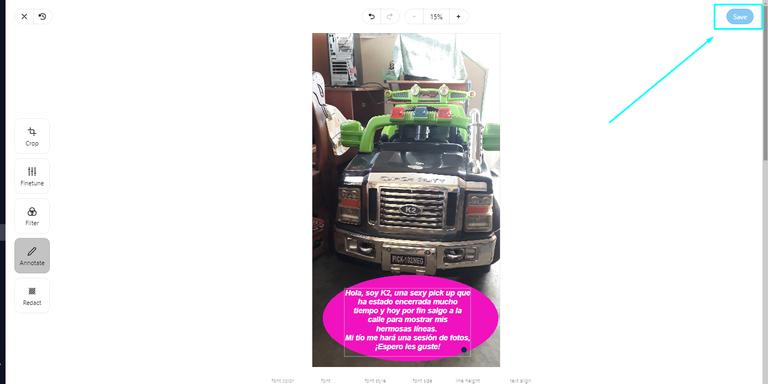
📷 Ya terminada la edición con texto, se guarda el trabajo en la parte superior izquierda de la aplicación, pulsando en "Save" o "Guardar".
📷 Once you have finished editing with text, save your work in the upper left part of the application by clicking on "Save".
📷
Y así se verá desde afuera tu imagen ya editada. A la espera de editar el resto, si es el caso.
And this is how your edited image will look from the outside. Waiting to edit the rest, if it is the case.
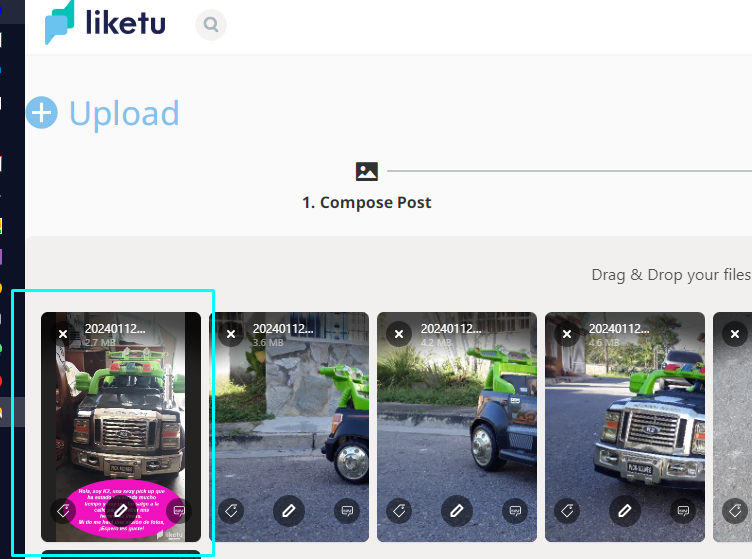
Procedemos con el resto de las imágenes y daré un repaso rápido con la tercera imagen de este post que estoy usando como ejemplo.
Let's proceed with the rest of the images and I'll give a quick review with the third image of this post that I'm using as an example.
📷 Esta opción donde salen los colores a elegir, seleccionas y hasta gradúas el color en la manera que necesites.
📷 This option where you can select the colors to choose, select and even graduate the color in the way you need.
📷 Recuerda la función texto y todas sus funciones.
📷 Remember the text function and all its functions.
📷 Si necesitas recortar, voltear, rotar y hacer zoom a algunas de las fotos, te dejo este tutorial que publiqué hace algún tiempo donde explico a detalle cada una de estas funciones. [SPA - ENG] LIKETU PHOTO EDITOR: crop, flip, rotate and zoom - Express Tutorial.
📷 If you need to crop, flip, rotate and zoom some of the photos, I leave you this tutorial I published some time ago where I explain in detail each of these functions. LIKETU PHOTO EDITOR: crop, flip, rotate and zoom - Express Tutorial.
📷
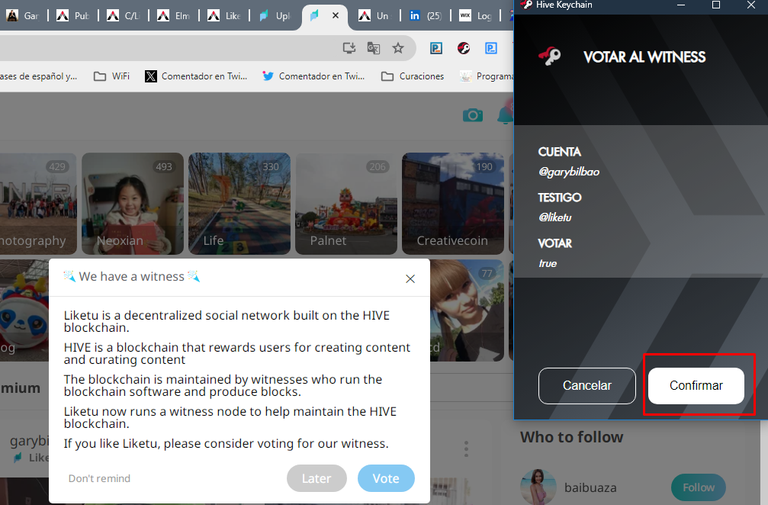
Sin más que agregar por ahora y esperando que este tutorial te sea de mucha utilidad para sacarle provecho a esta fantástica dapp de la blockchain de Hive, me despido hasta una próxima publicación. No sin antes agradecer a @elmerlin por su trabajo como desarrollador y ahora como testigo de Hive.
Puedes votarlo directamente cuando entras a la interfaz de #Liketu y confirmar tu voto con Hive Keychain, Hive Signer o el gestor que uses.
*Without more to add for now and hoping that this tutorial will be very useful for you to take advantage of this fantastic dapp of the Hive blockchain, I say goodbye until a future post. Not before thanking @elmerlin for his work as a developer and now as a Hive token You can vote it directly when you enter the #Liketu interface and confirm your vote with Hive Keychain, Hive Signer or the manager you use.

Más sobre mí
 🔥
🔥  🔥
🔥 
 🎙️
🎙️  🗣️
🗣️  🖋️
🖋️  🖱️
🖱️ 

🔥 🔥
🎙️ 🗣️ 🖋️ 🖱️
Wow i wasn't aware with this tool of Liketu. Thank you very much for sharing this information!
I'll try it in my next Liketu post