Puo, my amigurumi pet-Tutorial [ESP–ENG]


Saludos hivers amantes de los hilos y las agujas, me complace poder compartir una aventura más entre agujas; y es que se siente tan bien crear personajes, figuras y todo lo que deseemos en el arte del crochet que se termina con ganas de hacer mucho más.
Greetings hivers lovers of yarn and needles, I am pleased to be able to share one more adventure between needles; and it feels so good to create characters, figures and everything we want in the art of crochet that you end up wanting to do much more.
En esta ocasión, vengo con un mini proyecto, que es bastante sencillo, ideal para principiantes, ya que toma poco tiempo en hacerlo y es uno de los personajes con tejido muy básico, sin complicaciones y queda muy hermoso, lo cual hace que se genere motivación.
This time, I come with a mini project, which is quite simple, ideal for beginners, as it takes little time to make and is one of the characters with very basic knitting, uncomplicated and beautiful, which makes it generate motivation.
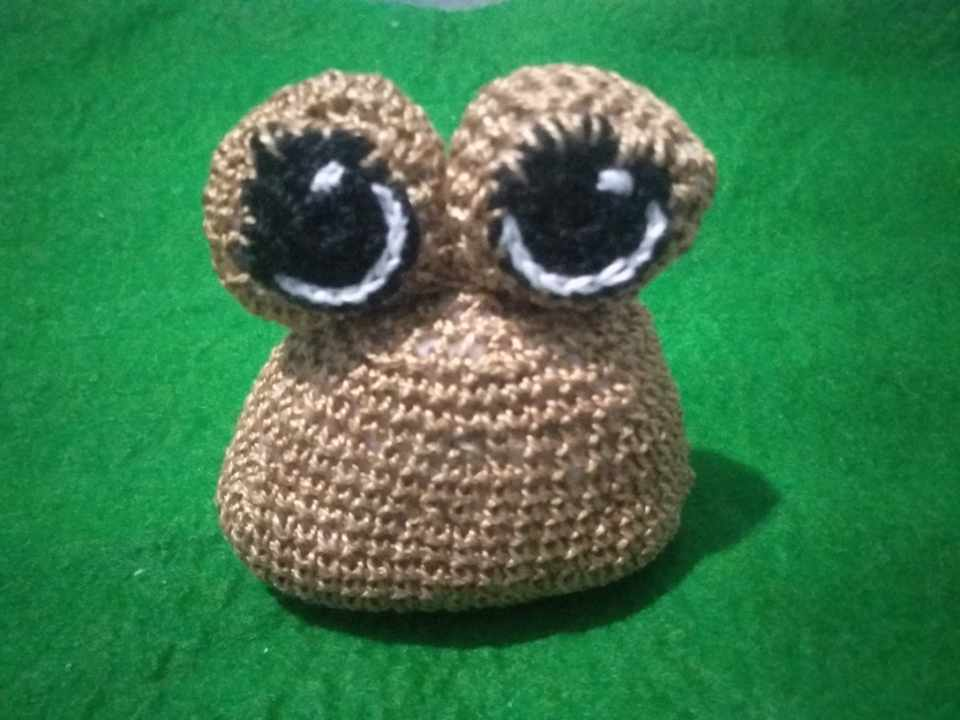
Pou es un personaje muy conocido, especialmente por los amantes de los videojuegos; es una mascota, esta mascota virtual representa a un alienígena con forma de papa a la que se le debe dar cuidados, como alimentarla, bañarla y todo lo que normalmente se hace con una mascota. En mi amigurumi, se puede observar a Pou con un cuerpo algo triangular e inmensos ojos sobre él.
Pou is a very well known character, especially for video game lovers; he is a pet, this virtual pet represents a potato-shaped alien that must be taken care of, like feeding it, bathing it and everything that is normally done with a pet. In my amigurumi, you can see Pou with a somewhat triangular body and huge eyes on it.
Materiales:
Hilo de crochet en colores marrón claro, negro y blanco
Relleno
Aguja de tejer ganchillo
Aguja lanera
Procedimiento/Procedure

Comenzamos a trabajar en el cuerpo y para ello usamos el hilo de color marrón, con el que vamos a levantar 13 cadenetas.
We start working on the body and for this we use the brown yarn, with which we are going to raise 13 chain stitches.

Para comenzar a tejer los puntos bajos, iniciamos desde la segunda cadena con un aumento, luego hacemos 10 puntos; cada uno en un espacio, seguimos con 4 puntos en un mismo punto para continuar tejiendo por el otro lado de la cadeneta con 10 puntos bajos y al final un punto aumentado, cerramos con punto deslizado, obteniendo así 28 puntos.
To start knitting the single crochet stitches, we start from the second chain with an increase, then we knit 10 stitches; each one in a space, we continue with 4 stitches in the same stitch to continue knitting on the other side of the chain with 10 single crochets and at the end an increased stitch, we close with a slip stitch, thus obtaining 28 stitches.
En la siguiente vuelta, comenzamos con 2 aumentos en puntos separados, luego 10 puntos, cada uno en un espacio, 4 aumentos, 10 puntos bajos y por último 2 aumentos para obtener 32 puntos bajos. En la vuelta 3, 1 punto bajo más un aumento(x2), 10 puntos bajos, 1 punto bajo más un aumento(x4), 10 puntos, 1 punto bajo más aumento(x2) y punto deslizado; dando esta vuelta como resultado 44 puntos bajos.
In the next round, we start with 2 increases in separate stitches, then 10 stitches, each in a space, 4 increases, 10 single crochets and finally 2 increases to obtain 32 single crochets. In row 3, 1 single crochet plus an increase(x2), 10 single crochets, 1 single crochet plus an increase(x4), 10 stitches, 1 single crochet plus increase(x2) and slip stitch; resulting in 44 single crochets.
Lo siguiente será realizar 5 vueltas de un punto en cada espacio; es decir, de 44 puntos cada una.
The next step is to knit 5 rows of one stitch in each space, that is, 44 stitches each.

Acá comenzamos con las disminuciones para darle forma al cuerpo, así que continuamos con la vuelta número 9 donde vamos a realizar 20 puntos bajos y una disminución(X2) con un resultado de 42 puntos, en la próxima vuelta trabajamos un punto en cada espacio, manteniendo siempre los 42 puntos; para la vuelta 11, son 5 puntos bajos más una disminución(x6) obteniendo 36 puntos, lo siguiente serán dos vueltas de 36 puntos cada una.
Here we start with the decreases to give shape to the body, so we continue with row number 9 where we are going to make 20 single crochets and a decrease (X2) with a result of 42 stitches, in the next row we work one stitch in each space, always keeping the 42 stitches; for row 11, there are 5 single crochets plus a decrease (x6) obtaining 36 stitches, the following will be two rows of 36 stitches each.
La vuelta 14 será de 4 puntos bajos y una disminución(x6) con un resultado de 30 puntos, continuamos con 2 vueltas de 30 puntos cada una; para la vuelta 17 serán 3 puntos y disminución(X6) con un resultado de 24 puntos y en este punto aprovechamos a rellenar. Seguimos con la vuelta 18 con 2 puntos y disminución, obteniendo 18 puntos, la última vuelta será de disminuciones, terminando con nueve puntos, cerramos con punto deslizado dejando la hebra larga para colocarla en la aguja lanera y con puntos muy sutiles, pero seguros, terminamos de cerrar, escondemos el hilo dentro del ismo tejido y cortamos el sobrante.
Row 14 will be 4 single crochets and a decrease (x6) with a result of 30 stitches, we continue with 2 rows of 30 stitches each; for row 17 will be 3 stitches and decrease (X6) with a result of 24 stitches and at this point we fill in. We continue with the 18th row with 2 stitches and decrease, obtaining 18 stitches, the last row will be of decreases, finishing with nine stitches, we close with slipped stitch leaving the long yarn to place it in the wool needle and with very subtle but secure stitches, we finish closing, we hide the yarn inside the same fabric and we cut the excess.
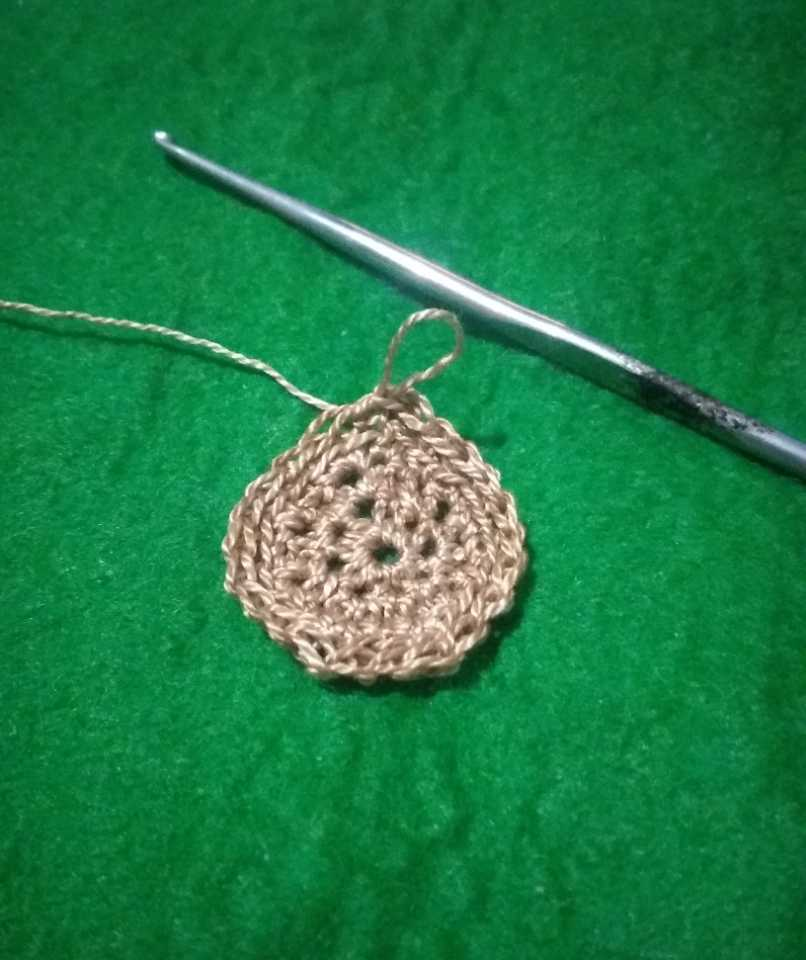
Para los ojos vamos a comenzar con el color marrón, haciendo un anillo mágico de 8 puntos bajos en la primera vuelta; la segunda vuelta será de aumentos, con la cual obtendremos 18 puntos, en la vuelta 3; hacemos 1 punto bajo y aumento, lo que nos dará 24 puntos. En la vuelta número 4 vamos a trabajar desde la hebra trasera un punto en cada espacio; continuamos con 3 vueltas de 24 puntos cada una.
For the eyes we are going to start with the brown color, making a magic ring of 8 single crochet stitches in the first row; the second row will be of increases, with which we will obtain 18 stitches, in row 3; we make 1 single crochet and increase, which will give us 24 stitches. In row number 4 we will work from the back yarn one stitch in each space; we will continue with 3 rows of 24 stitches each.

A partir de la vuelta 8 comenzamos a disminuir, así que hacemos 2 puntos bajos y disminución(x6) obteniendo 18 puntos, la vuelta 9 es 1 punto y disminución, culminando con 12 puntos y aquí rellenamos, la última vuelta es solo disminuciones, cerrar con punto deslizado dejando hebra larga para terminar de cerrar con la aguja lanera, esconder hilo y cortar.
From row 8 we start to decrease, so we make 2 single crochets and decrease (x6) obtaining 18 stitches, row 9 is 1 single crochet and decrease, ending with 12 stitches and here we fill in, the last row is only decreases, close with slip stitch leaving long strand to finish closing with the wool needle, hide yarn and cut.

Con el hilo de color negro continuamos el centro del ojo y para ello, hacemos un anillo mágico de 8 puntos, en la siguiente vuelta hacemos solo aumentos, lo cual nos resultaran 16 puntos, cerrar con punto deslizado y cortar el hilo.
With the black yarn we continue the center of the eye and for this, we make a magic ring of 8 stitches, in the next round we make only increases, which will result in 16 stitches, close with slipped stitch and cut the yarn.

Con el hilo blanco trabajamos desde la parte de adentro del ojo tratando de formar una U como se muestra en la fotografía, así que realizamos 8 puntos deslizados, al finalizar sacamos el hilo por la parte trasera para colocarlo en la aguja lanera y realizar una puntada abarcando 2 puntos; esto de manera que el ojo tenga brillo.
With the white thread we work from the inside of the eye trying to form a U shape as shown in the picture, so we make 8 slipped stitches, at the end we remove the thread from the back to place it on the wool needle and make a stitch covering 2 stitches; this so that the eye has shine.
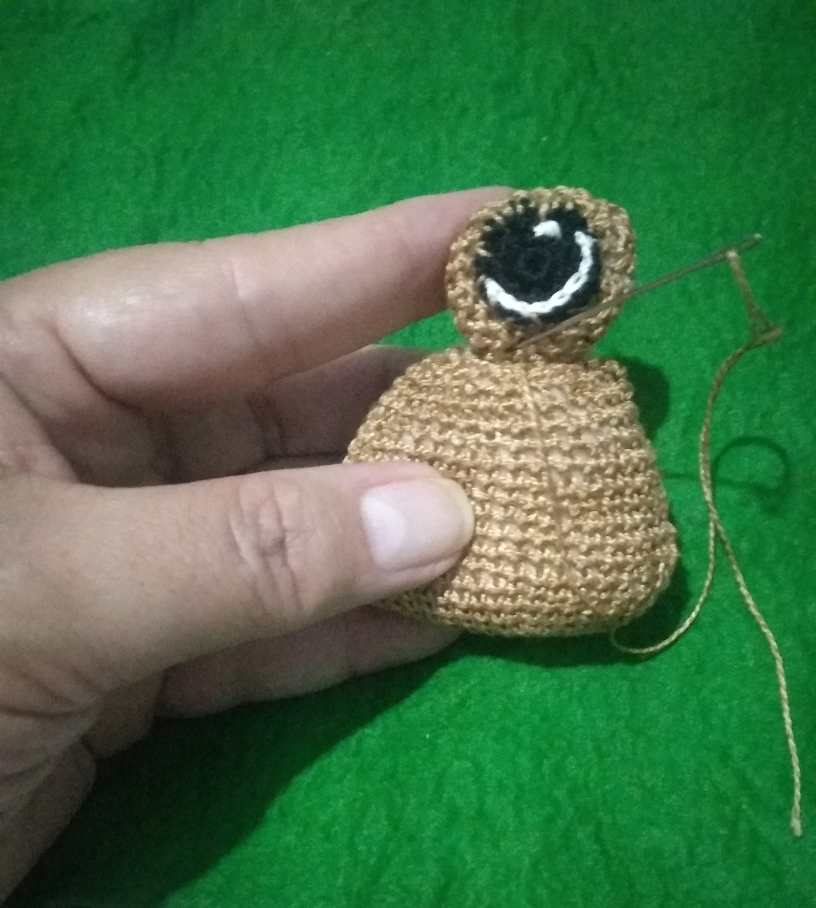
Lo siguiente será unir ambas piezas del ojo, con el hilo negro y aguja lanera, haciendo puntadas vistosas en la parte superior para simular las pestañas, el resto de las puntadas serán escondidas y luego cosemos los ojos al cuerpo.
The next step will be to join both pieces of the eye, with the black thread and wool needle, making showy stitches on the upper part to simulate the eyelashes, the rest of the stitches will be hidden and then we sew the eyes to the body.

Aquí el resultado; si deseamos le colocamos una puntada de color negro para hacer la boca o si lo preferimos lo dejamos así.
Here is the result; if we wish we can add a black stitch to make the mouth or if we prefer we can leave it like this.
📌📌📌📌📌📌📌📌📌
Nota: (x2), (x6)... son las veces que se debe repetir un proceso.
Note: (x2), (x6)... are the number of times a process must be repeated.
0
0
0.000
Que ternurita 😍
It’s really look like Gary from SpongeBob
I like how you did the eyes
They look realistic with the effects you gave it
This is so cute ❤️