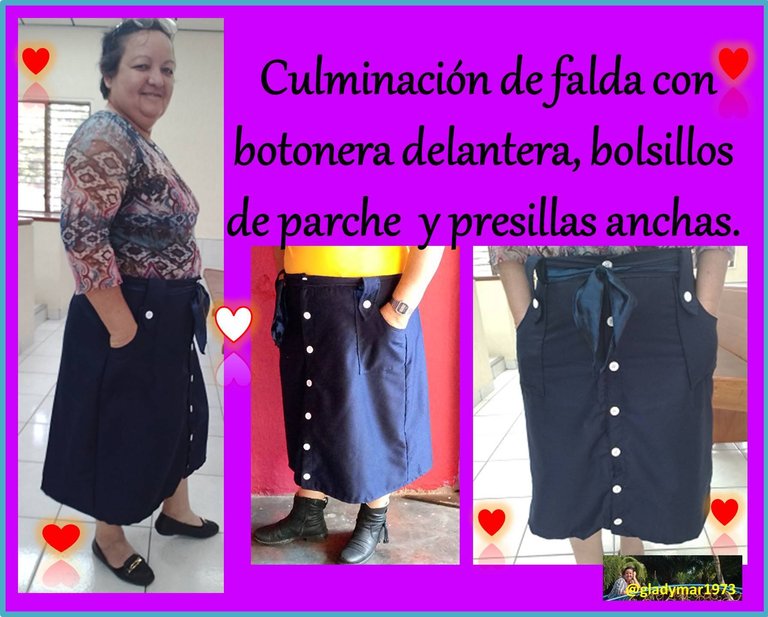
Culminación de falda con botonera delantera, bolsillos de parche y presillas anchas. // Culmination of skirt with front button placket, patch pockets and wide belt loops.
Un feliz inicio de semana para todos los creativos que hacen vida en @needleworkmonday.
A happy start of the week to all the creatives that make life in @needleworkmonday.
Lo prometido es deuda y como no me gustan la deudas, les vengo a compartir el proceso de confección de la falda de la semana pasada. Por lo que sin más preámbulo comenzaré indicarles el paso a paso.
What is promised is debt and as I don't like debts, I come to share the process of making the skirt of last week. So without further ado, I'll start with the step-by-step.
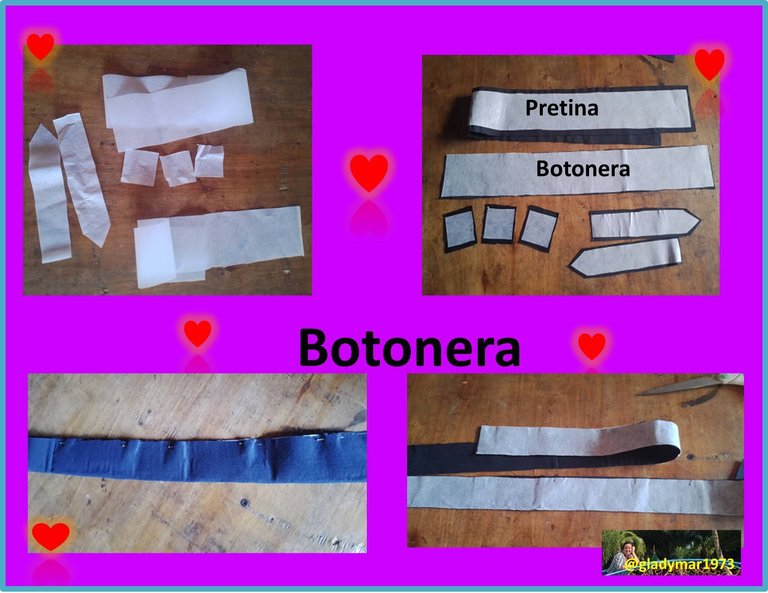
Paso 1 - Antes de comenzar a coser quise darle firmeza a las presillas, pretina y botonera, por lo que corté dichas piezas en entretela adhesiva y las pegué con ayuda de la plancha, luego con la ayuda de alfileres doblé la botonera a la mitad para sacar dos piezas de 5 cm cada una y corté.
Step 1 - Before starting to sew I wanted to give firmness to the loops, waistband and button placket, so I cut these pieces in adhesive interlining and glued them with the help of the iron, then with the help of pins I folded the button placket in half to get two pieces of 5 cm each and cut them.
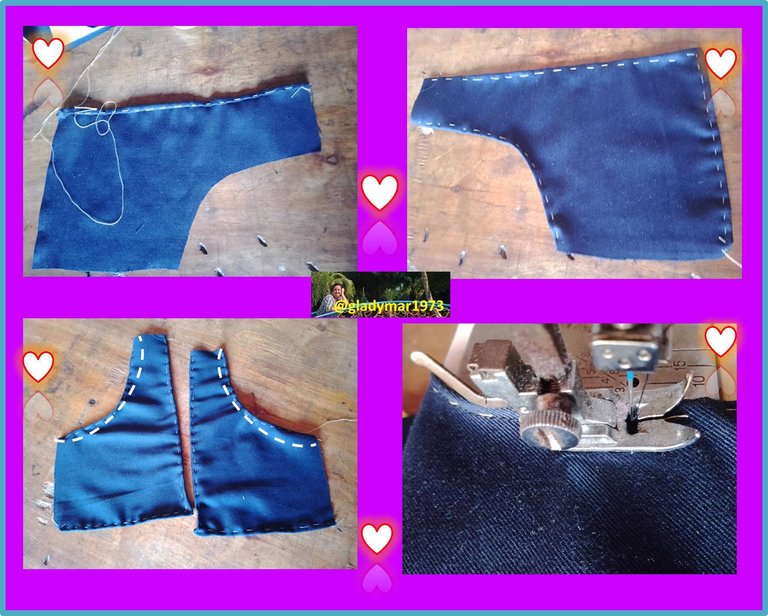
Paso 2 - Seguidamente procedí a pespuntear los bordes de los bolsillos y posteriormente cosí a máquina el extremo curvo.
Step 2 - Next I proceeded to stitch the edges of the pockets and then machine stitched the curved end.

Paso 3 -Para continuar armé las presillas, primero las rectangulares cocí uniendo los extremos laterales, seguido voltee y proseguí cosiendo en las puntas dejando la costura en el centro. Para las presillas delanteras cosí bordeando el orillo de la entretela, luego las voltee y les hice una doble costura, una cerca de la orilla y una a unos 5 mm de distancia.
Step 3 -To continue I assembled the loops, first the rectangular ones I sewed the side ends together, then I turned them over and continued sewing at the ends, leaving the seam in the center. For the front loops I sewed along the selvage of the interfacing, then flipped them over and made a double seam, one near the selvage and one about 5 mm apart.
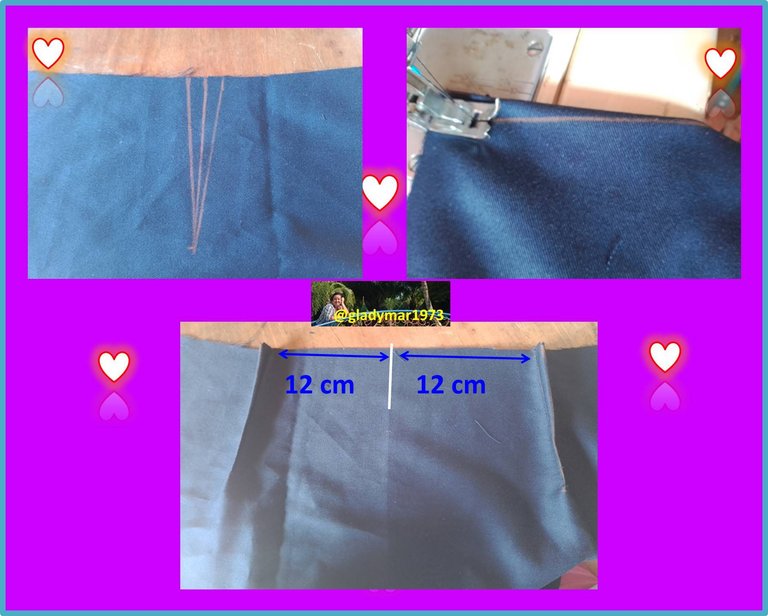
Paso 4 - ahora nos vamos a nuestra parte trasera de la falda, marcamos las pinzas a 12 cm del centro hacia los lados y marcamos a cada lado 1 cm, y bajamos 11 cm, seguido marcamos en forma triangular desde los 11 cm hasta el centímetro a cada lado de la pinza y posteriormente cosí ambas pinzas.
Step 4 - now we go to our back of the skirt, we mark the darts 12 cm from the center to the sides and mark each side 1 cm, and down 11 cm, then we mark in a triangular shape from 11 cm to the centimeter on each side of the clip and then sewed both clips.
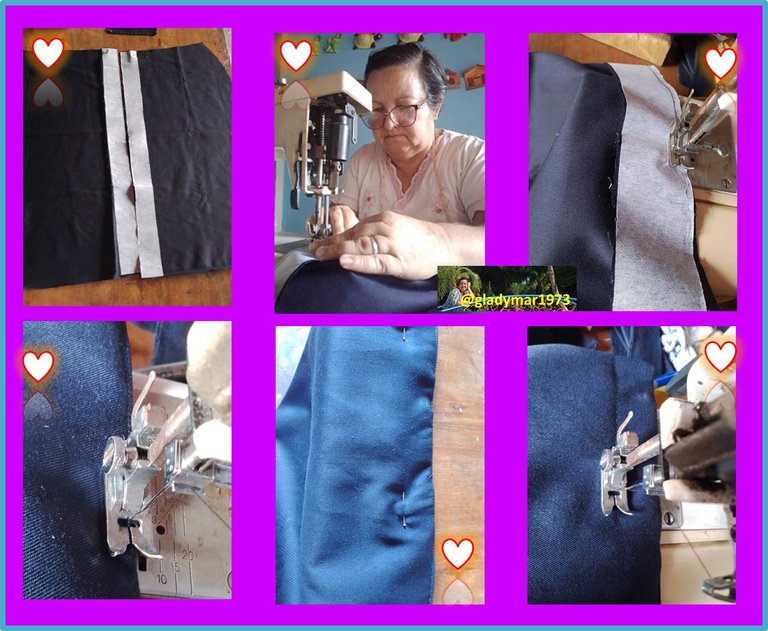
Paso 5 - Para la parte delantera proseguí a montar las botoneras, para ello uní cada botonera a cada pieza delantera, luego doble y planché para seguido realizar una costura a la orilla del doblez,
Step 5 -For the front part I proceeded to assemble the button panels, for this I joined each button panel to each front piece, then I folded and ironed and then sewed a seam at the edge of the fold,

Paso 6 - Acto seguido doble la botonera hacía la parte interna de la falda y ajustando con alfileres comencé a coser a 3 cm de la orilla, al terminar ambas piezas presenté los bolsillos y los ajusté con alfileres.
Step 6 - Then I folded the button panel to the inside of the skirt and adjusting with pins I began to sew 3 cm from the edge, when I finished both pieces I presented the pockets and adjusted them with pins.

Paso 7 - Seguidamente procedí a coser ambos bolsillos, para posteriormente presentar trasero y delantero de la falda y cerrar a los costados.
Step 7 - Next I proceeded to sew both pockets, to later present the back and front of the skirt and close the sides.

Paso 8 - Con la falda ya unida a los costados, tenemos todo listo para proceder a coser la pretina, así que ajustando primeramente con alfileres seguidamente comenzamos a coser, teniendo cuidado en la uniones de las telas y que la costura a todo lo ancho de la cintura quede a la misma distancia,
Posteriormente ajusté las costuras en los extremos, doblando a la mitad la pretina, y procedí a cerrar la pretina montando cada presilla en el lugar que le correspondía, y retomé la costura; en ocasiones se me desviaba la costura, por lo que me tocó muchas veces desbaratar la costura y comenzar de nuevo, hasta que al fin logré cerrar toda la pretina y seguido cosí el ruedo.
Step 8 - With the skirt already attached to the sides, we have everything ready to proceed to sew the waistband, so first adjusting with pins, we then began to sew, taking care in the joints of the fabrics and that the seam across the width of the waistband is at the same distance,
Then I adjusted the seams at the ends, folding the waistband in half, and proceeded to close the waistband by mounting each loop in its corresponding place, and resumed the sewing; sometimes the seam deviated, so I had to undo the seam many times and start again, until I finally managed to close the entire waistband and then I sewed the hem.

Paso 9 - ya con todo casi listo, solo quedan ojales y montar botones, esta parte es lo más difícil para mí, más ahí me defiendo, así que poco a poco fui haciendo los ojales marcando con color en botonera y cosí en la máquina uno a uno y con deshebrador fui abriendo cada ojal y fui cociendo a mano a cada botón, hasta el final que fueron los botones de adornos de las presillas, al principio le iba a colocar botones azules, pero vi que los blancos le resaltaban más.
Step 9 - with everything almost ready, there are only buttonholes and mounting buttons, this part is the most difficult for me, but there I defend myself, so little by little I was making the buttonholes marking with color in the buttonhole maker and sewed on the machine one by one and with thread remover I was opening each buttonhole and I was cooking by hand to each button, until the end that were the buttons of ornaments of the loops, at first I was going to put blue buttons, but I saw that the white ones stood out more.

Paso 10 - Ya para culminar m hacía falta un cintura o faja así que con unos retazos de tela le hice dos, uno azul para la blusa sea clara y uno estampado para cuando la blusa sea de color oscuro.
Step 10 - To finish, I needed a waistband, so with some fabric scraps I made two, one blue for a light colored blouse and a printed one for a dark colored blouse.

Y aquí termino todo mis queridas amigas @yessi08, @pekkymos, @kattycrochet, @irenenavarroart, @doreenarch, @artsugar y @ abenad gracias a todas por darme ánimo para seguir adelante y culminar mi falda, les deseo a todas una semana llena de muchas bendiciones.
And here I finish everything my dear friends @yessi08, @pekkymos, @kattycrochet, @irenenavarroart, @doreenarch, @artsugar and @ abenad thank you all for encouraging me to go ahead and finish my skirt, I wish you all a week full of many blessings.
Contenido Original.
Las fotos fueron tomadas con mi Celular Moto E6I y editadas en PowerPoint.
Separadores editados en PowerPoint.
Traducido con www.DeepL.com/Translator (versión gratuita)
Original Content.
Photos were taken with my Moto E6I cell phone and edited in PowerPoint.
Separators edited in PowerPoint.
Translated with www.DeepL.com/Translator (free version)
Looks really pretty
Thank you very much my dear @doreenarch , thank you for reading and commenting greetings
It looks really stylish from the beginning and then the buttons surprised me,now the result even look more nicer.
I'm glad you were surprised and liked it, thank you for your words happy day. Greetings
Saludos Amiga,meda mucho gusto ver tu proyecto terminado!
Te quedo hermosa, y te queda hermosa tu falda, me has animado a terminar la mia!jajajaj
Bendiciones!
lolztoken.com
ERROR: Joke failed.
@yessi08, You need more $LOLZ to use this command. The minimum requirement is 0.0 LOLZ.
You can get more $LOLZ on HE.
Saludos querida, gracias por tus palabras y claro se si arriba ese ánimo yessi puede yessi puede urra
great work , keep up the good work.
Congratulations @gladymar1973! You have completed the following achievement on the Hive blockchain And have been rewarded with New badge(s)
Your next target is to reach 8000 upvotes.
You can view your badges on your board and compare yourself to others in the Ranking
If you no longer want to receive notifications, reply to this comment with the word
STOPTo support your work, I also upvoted your post!
Hola @gladymar1973 gracias por mostrarnos el resultado final de este proyecto.
La falda luce muy bonita, todos esos detalles hacen que sea un hermoso diseño.
Buen trabajo!
Saludos @kattycrochet gracias por tus palabras, y por el apoyo que me brindas, me agrada que te haya gustado. feliz tarde
Éste modelo de falda le quedó muy hermoso, excelente tutorial, es una guía ideal para realizar este modelo de falda, muchas gracias por compartir espero tenga una feliz semana 🥰
Saludos gracias por tus palabras,.me alegra que le haya gustado el modelo y más aún que le sirva de guía para usted, feliz noche, espero ver su falda
This is such a beautiful skirt you made, you did an amazing job.
Thank you for your support and your comment, have a nice day.
Wow, this is really nice, it looks so beautiful well done ma'am
Thank you for your appreciation and for your beautiful words, greetings and have a great day.