Decoraciones navideñas 1ª parte, árbol de navidad en crochet. (Es/En)
Feliz día tengan todos mi Hivers amigos, después de una breve ausencia nuevamente estoy por aquí compartiendo con ustedes y que mejor que hacerlo que con los preparativos para nuestras fiestas decembrinas, hoy les quiero compartir uno de los adornos que estoy realizando para decorar próximamente mi árbol de navidad.
Happy day to all my Hivers friends, after a brief absence I am here again sharing with you and what better way to do it than with the preparations for our Christmas holidays, today I want to share with you one of the ornaments that I am making to decorate my Christmas tree soon.
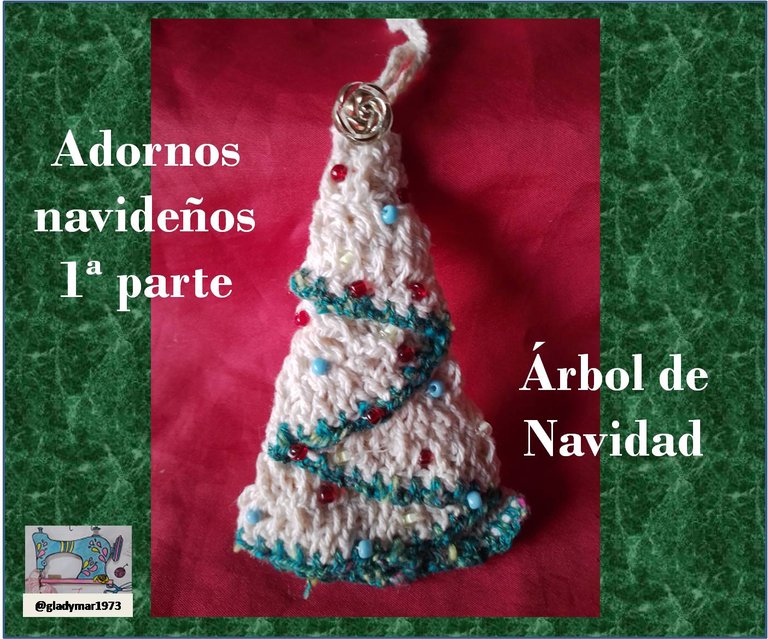
El año pasado realicé algunos sencillos adornos en crochet y este año quiero decir en la misma temática agregando unos en fieltro y otros en crochet, aprovechando retazos que van quedando de algunos hilos, a dándoles así una segunda oportunidad, para hoy te invito a tejer un pequeño pino para decorar tu árbol.
Last year I made some simple crochet ornaments and this year I want to say in the same theme adding some in felt and others in crochet, taking advantage of scraps that are left over from some threads, thus giving them a second chance, for today I invite you to knit a small pine tree to decorate your tree.
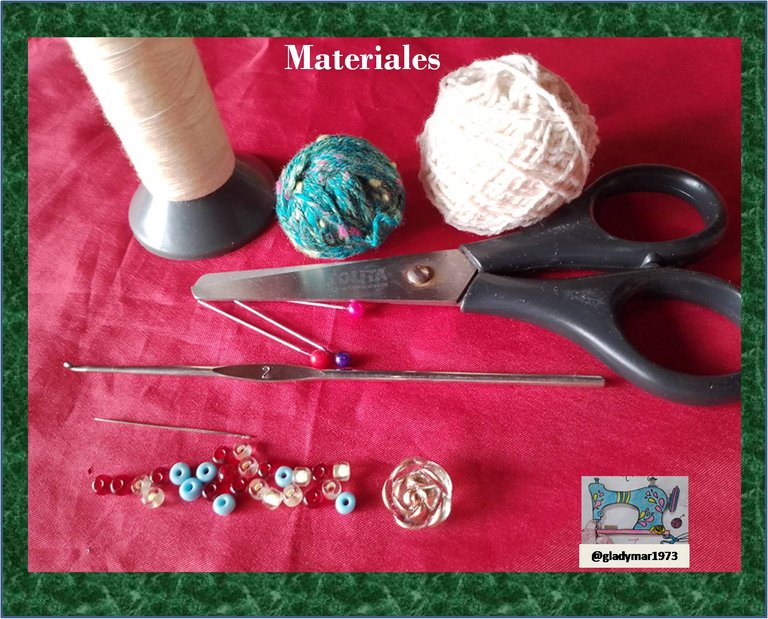
Materiales a necesitar:
- Hilos de algodón
- Hilo para decorar
- Hilo de coser del color semejante al del árbol
- aguja
- Ganchillo # 2
- 1 botón para adornar la copa del árbol
- Mostacillas de colores para decorar.
- Tijeras.
- Alfileres
Materials needed:
- Cotton yarn
- Thread for decorating
- Sewing thread of a color similar to the tree's color
- Needle
- Crochet hook #2
- 1 button to decorate the top of the tree
- Colored beads for decorating.
- Scissors.
- Pins
Procedimiento:
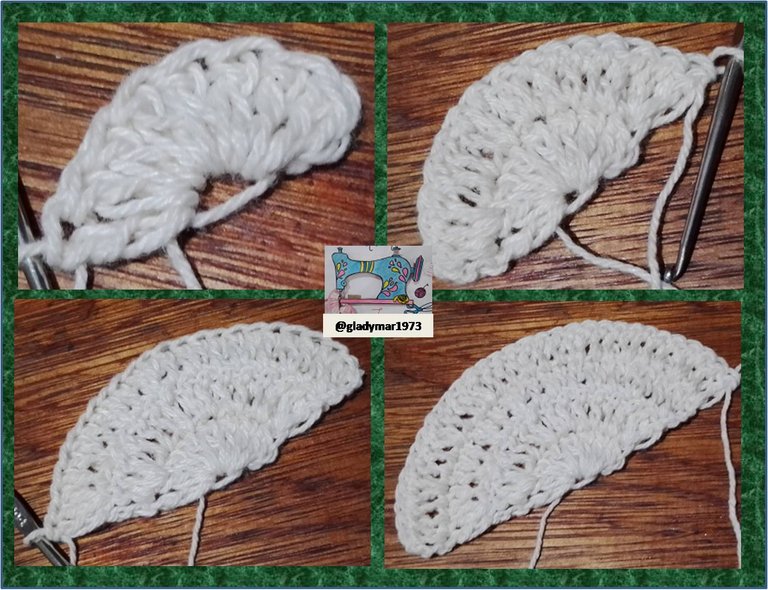
1ª vuelta: comenzamos nuestro árbol tejiendo 8 puntos altos sobre un anillo mágico, lo tejeremos en forma de semi círculo.
2ª vuelta: tejemos 3 cadenetas para formar 1 punto alto y volteamos nuestro tejido y hacemos un aumento con punto alto en el mismo punto, seguimos tejiendo 2 puntos altos en cada punto, para obtener 16 puntos.
3ª vuelta: tejemos 3 cadenetas para formar 1 punto alto y volteamos nuestro tejido y hacemos un aumento con punto alto en el mismo punto, seguimos tejiendo 1 punto alto y 1 aumento hasta obtener 24 puntos.
4ª vuelta: tejemos 3 cadenetas para formar 1 punto alto y volteamos nuestro tejido y hacemos un aumento con punto alto en el mismo punto, seguimos tejiendo 2 puntos altos y 1 aumento hasta obtener 32 puntos, manteniendo siempre nuestro semi círculo.
Procedure:
1st round: we start our tree by knitting 8 high stitches over a magic ring, we will knit it in the form of a semi-circle.
2nd row: we knit 3 chains to form 1 double crochet and we turn our knitting and make an increase with a double crochet in the same stitch, we continue knitting 2 double crochets in each stitch, to obtain 16 stitches.
3rd row: we knit 3 chains to form 1 double crochet and we turn our fabric and make an increase with double crochet in the same stitch, we continue knitting 1 double crochet and 1 increase until we obtain 24 stitches.
4th row: we knit 3 chains to form 1 double crochet and we turn our fabric and make an increase with double crochet in the same stitch, we continue knitting 2 double crochets and 1 increase until we obtain 32 stitches, always keeping our half circle.
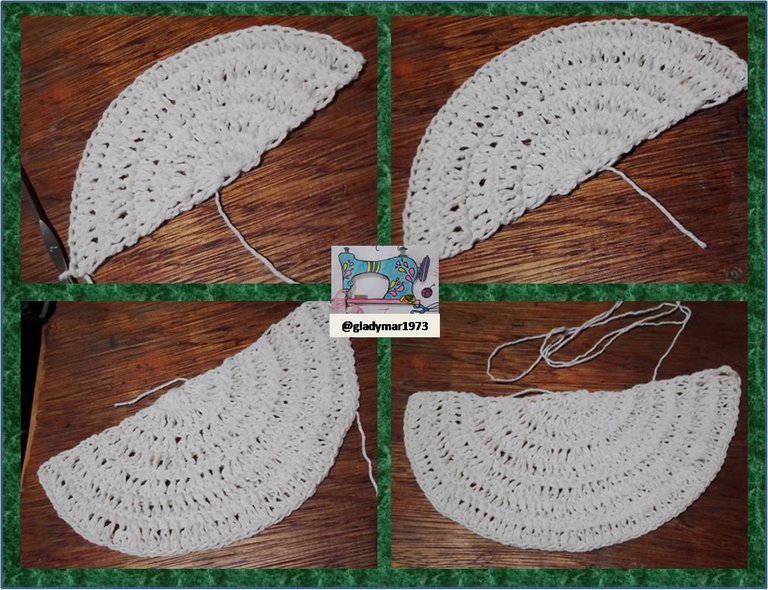
5ª vuelta: tejemos 3 cadenetas para formar 1 punto alto y volteamos nuestro tejido y hacemos un aumento con punto alto en el mismo punto, seguimos tejiendo 3 puntos altos y 1 aumento hasta obtener 40 puntos.
6ª vuelta: tejemos 3 cadenetas para formar 1 punto alto y volteamos nuestro tejido y hacemos un aumento con punto alto en el mismo punto, seguimos tejiendo 4 puntos altos y 1 aumento hasta obtener 48 puntos.
7ª vuelta: tejemos 3 cadenetas para formar 1 punto alto y volteamos nuestro tejido y hacemos un aumento con punto alto en el mismo punto, seguimos tejiendo 5 puntos altos y 1 aumento hasta obtener 56 puntos, manteniendo siempre nuestro semi círculo.
8ª vuelta: tejemos 3 cadenetas para formar 1 punto alto y volteamos nuestro tejido y hacemos un aumento con punto alto en el mismo punto, seguimos tejiendo 6 puntos altos y 1 aumento hasta obtener 64 puntos, cerramos el tejido con un nudo deslizado y dejamos una hebra larga la cual pasamos por ocultándola hasta llegar a la base de la cuarta vuelta, con esta hebra tejeremos nuestro cordón para guindar nuestro adorno.
Row 5: we knit 3 chains to form 1 double crochet and we turn our fabric and make an increase with double crochet in the same stitch, we continue knitting 3 double crochets and 1 increase until we obtain 40 stitches.
6th row: we knit 3 chains to form 1 double crochet and we turn our fabric and make an increase with double crochet in the same stitch, we continue knitting 4 double crochets and 1 increase until we obtain 48 stitches.
7th row: we knit 3 chains to form 1 double crochet and we turn our fabric and make an increase with double crochet in the same stitch, we continue knitting 5 double crochets and 1 increase until we obtain 56 stitches, always keeping our half circle.
8th row: we knit 3 chains to form 1 double crochet and we turn our fabric and make an increase with a double crochet in the same stitch, we continue knitting 6 double crochets and 1 increase until we obtain 64 stitches, we close the fabric with a slip knot and we leave a long strand which we pass through hiding it until we reach the base of the fourth row, with this strand we will knit our cord to hang our ornament.
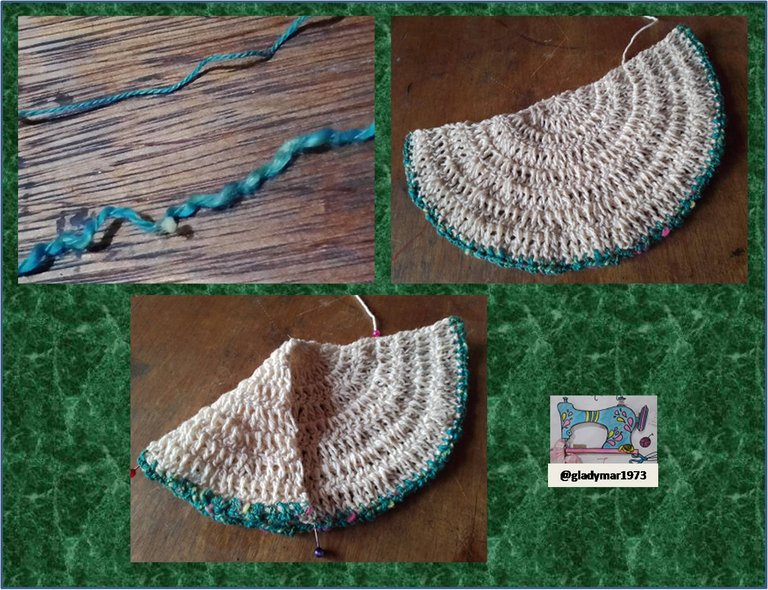
9ª vuelta: para esta vuelta usaremos el hilo decorativo, yo rebuscando entre mis cosas del baúl me encontré con un hilo que me habían obsequiado hacen años y lo había dejado olvidado, me gusto para este proyecto por sus varios puntos de colores, lo que vendría siendo mis luces de la guirnalda del arbolito. Como el hilo es de diferente diámetro tejeré de acuerdo a como se vaya presentando la textura del mismo, lo haré en puntos bajos y cadenetas en las partes delgadas del hilo y solo un punto bajo en las partes gruesas. Finalizamos con un nudo raso y cortamos la hebra.
Para armar nuestro árbol tomaremos tres referencias, primero del centro del tejido hacia abajo marcamos en línea recta con un alfiler el centro en nuestro arco, segundo de la parte derecha del semi cirulo hacia el centro marcamos la mitad o lo que sería igual la base de la 4ª vuelta y tercero buscamos la mitad desde la primera marca hasta el punto final del semi círculo y colocamos otro alfiler.
9th round: for this round we will use the decorative thread, I was looking through my things in the trunk and I found a thread that I had been given years ago and I had left it forgotten, I liked it for this project because of its various colored stitches, which would be my lights of the garland of the tree. As the yarn is of different diameter I will knit according to the texture of the yarn, I will knit in single crochet and chain stitches in the thin parts of the yarn and just a single crochet in the thick parts. We finish with a satin knot and cut the strand.
To assemble our tree we will take three references, first from the center of the fabric down we mark in a straight line with a pin the center in our arc, second from the right side of the half circle to the center we mark the middle or what would be equal to the base of the 4th round and third we look for the middle from the first mark to the end point of the half circle and place another pin.
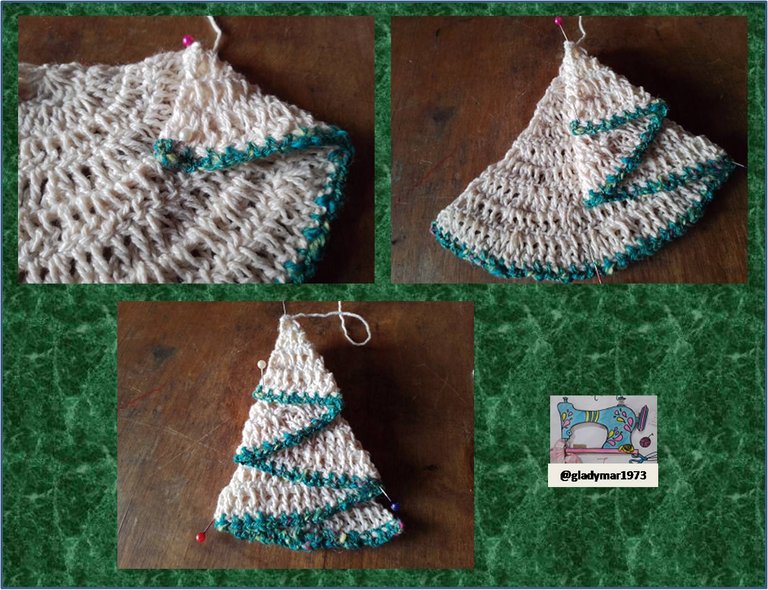
Seguido procedemos a doblar de la esquina derecha hacia abajo formamos un triangulo colocando la punta de nuestro tejido justo sobre la línea del tejido de la 4ª vuelta este será nuestra copa del árbol.
Luego doblamos desde el primer doblez hacía adentro manteniendo la línea recta desde la base del pico hasta cada una de las nuestras marcas en el semi círculo.
Para finalizar doblamos la parte que nos queda hacía la parte de atrás del tejido formando así nuestro árbol, para luego proceder a coser nuestro árbol.
Then we proceed to fold from the right corner downwards forming a triangle by placing the tip of our fabric right on the line of the fabric of the 4th round, this will be our tree top.
Then we fold from the first fold inwards keeping the straight line from the base of the peak to each of our marks on the half circle.
Finally we fold the remaining part towards the back of the fabric forming our tree, and then proceed to sew our tree.
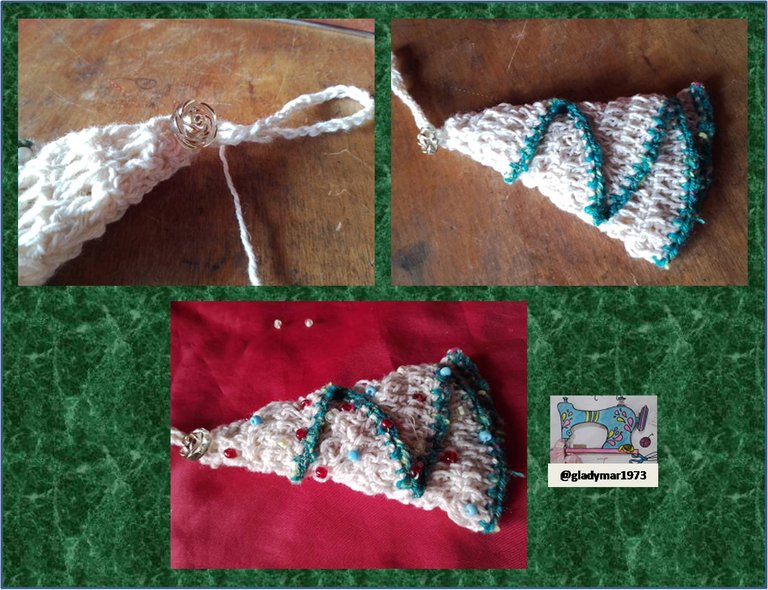
Antes de coser nuestro árbol fijamos primero el adorno de la copa o en mi caso el botón en forma de rosa con la hebra que habíamos dejado para el cordón y procedemos a tejer 30 cadenetas para el mismo lo cerramos en la base de la primera cadeneta y comenzamos a coser los bordes del árbol.
Cuando terminamos de coser el árbol por cada lado, enhebramos la aguja con hilo de coser y primero ajustamos bien nuestro botón para que quede fuerte y seguido procedemos a adornar nuestro árbol intercambiando los colores de nuestras mostacillas y listo ya tenemos un nuevo adorno para nuestro árbol.
Before sewing our tree we first fix the ornament of the cup or in my case the button in the shape of a rose with the thread that we had left for the cord and we proceed to weave 30 chains for it, we close it at the base of the first chain and we begin to sew the edges of the tree.
When we finished sewing the tree on each side, we thread the needle with sewing thread and first we adjust our button well so that it is strong and then we proceed to decorate our tree exchanging the colors of our beads and ready we have a new ornament for our tree.

No hay nada tan satisfactorio como lo es poder decorar con adornos hechos por tus propias manos. Les das un sentido de pertenencia, es algo que te identifica y te hace sentir gran gozo, sobre todo en estas fechas cuando el amor reina en el ambiente, al menos ese es mi sentir.
There is nothing as satisfying as being able to decorate with ornaments made by your own hands. You give them a sense of belonging, it is something that identifies you and makes you feel great joy, especially in these dates when love reigns in the atmosphere, at least that is my feeling.

Gracias por leer hasta aquí, te espero en mi siguiente blog con otro adorno para nuestro árbol.
Thanks for reading this far, I hope to see you in my next blog with another ornament for our tree.
Saludos, un fuerte abrazo para todos.
Greetings, a big hug to all.

Contenido original.
Las fotos fueron tomadas con mi celular Moto E6I y editada en PowerPoint.
Los banner fueron creados por mí en PowerPoint.
La traducción fue a través de www.DeepL.com,Translator (versión gratuita).
Original content.
The photos were taken with my Moto E6I cell phone and edited in PowerPoint.
The banners were created by me in PowerPoint
Translation was through www.DeepL.com,Translator (free version).
Thank you for sharing this post on HIVE!
Your content got selected by our fellow curator semarekha & you just received a little thank you upvote from us for your great work! Your post will be featured in one of our recurring compilations which are aiming to offer you a stage to widen your audience within the DIY scene of Hive. Next time make sure to post / cross-post your creation within the DIYHub community on HIVE and you will receive a higher upvote ;) Stay creative & HIVE ON!
Please vote for our hive witness <3
Thank you for the support and appreciation of semarekha and to the DIYHub community for the invitation and support will be a pleasure to publish in your community.
Greetings and happy afternoon
You're welcome. Keep up the good work and stay with us.
Te quedo muy lindo el arbolito, se que tu árbol de navidad quedará maravilloso con los adornos que le estás preparando. Saludos 😁
Gracias querida Irene, poco a poco estoy dejando de ser una gring en navidad, jeje por años me enfoqué en cuidar de mi madre y dejé la tradicón del árbol de navidad a un lado, espero ir año a año reuperando tradiciones.
Feliz Tarde y un fuerte abrazo.
Hola @gladymar1973, es la primera vez que veo este tipo de patrón para elaborar el arbolito tejido, me parece sencillo y practico de elaborar. Gracias por compartir este proyecto con nosotros.
Saludos y bendiciones.
Saludos querida Katty si es sencillo, lo complicado al principio fue el doblado, lo intenté varias veces,. pero no me di por vencida hasta que lo logré,
Gracias por comentar
feliz noche y un fuerte abrazo ✨🌹
¡Que curioso!, justo ese hilo color verde tiene manchas de colores, simulando las lucecitas. Este arbolito es único...¡Gran trabajo! y un abrazo.
Buenos días si ese hilo es especial por su decorado único, fue un regalo que tenía olvidado.
Saludos y un fuerte abrazo
Gracias por tomar ti tiempo para leer y comentar
mi querida amiga, tu tipo de tejido esta muy delicado :D felicidades amiga, adelante!
Muchas gracias querida, por tus palabras y por tomar tu tiempo para leer mi blog
Feliz tarde ✨✨🌹😘