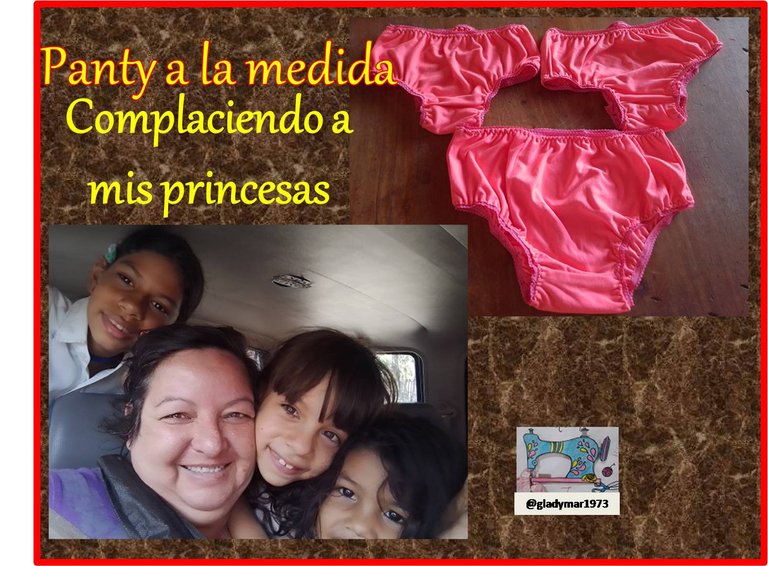
Panty a la medida, complaciendo a mis princesas. (Es/En)
Un gran saludo tengan todos mis Hivers amigos, deseándoles un feliz inicio del fin de semana y que esta semana haya estado llena de muchos éxitos y bendiciones, estuve algo ausente estas dos últimas semanas, pues mis manitas pidieron reposo obligado, más por acá estoy nuevamente con ustedes.
A big greeting to all my Hivers friends, wishing you a happy beginning of the weekend and that this week has been full of many successes and blessings, I was a little absent these last two weeks, because my little hands asked for a forced rest, but here I am again with you.
Aunque no he podido tejer en estas dos semanas, aproveche el tiempo para complacer a mis sobrinas, pues el domingo en la Iglesia ellas escucharon que darían un curso de ropa interior para niñas, por lo que al terminar nuestras reuniones dominicales me dijeron – tía tienes que hacer el curso de ropa interior para niñas y hacernos nuestras panty y los acostumbradores – me reí y les dije - ¿Por qué no le dicen a su mami, para que haga el curso? – y me dijeron ella no sabe coser y tú sí – a lo que no les pude refutar, y bueno acá les comparto la primera parte del taller.
Although I have not been able to knit in these two weeks, I took advantage of the time to please my nieces, because on Sunday at church they heard that there would be a course of underwear for girls, so at the end of our Sunday meetings they told me - aunt you have to do the course of underwear for girls and make us our pantyhose and the habituators - I laughed and told them - Why don't you tell your mommy, so she can do the course? - and they told me she doesn't know how to sew and you do - to which I couldn't refute them, and well here I share with you the first part of the workshop.
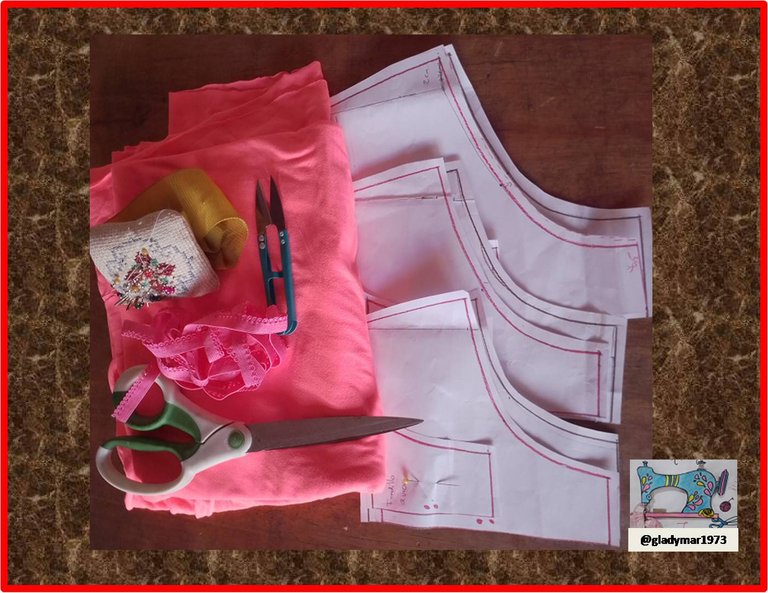
Materiales a necesitar:
- Tela micro fibra 180 o algodón
- Elástica para pantaletas
- tijera
- alfileres
- papel bond (para los patrones)
- regla
- lápiz de color
- cinta métrica
Materials needed:
- Microfiber fabric 180 or cotton
- Pants elastic
- scissors
- pins
- bond paper (for patterns)
- ruler
- colored pencil
- tape measure
Procedimiento:
Para realizar estas panty primeramente le tomé las medidas de la cintura, la altura de cadera y alto o largo de tiro a cada una de ellas; pues la medida que nos habían dado era la misma y conociéndolas como las conozco sé cómo les gustan sus pantaletas “que les cubran sus caderas”, es por ello es un poco difícil conseguirle una s que les gusten; así que teniendo las medidas procedí a realizar los patrones para sus panty.
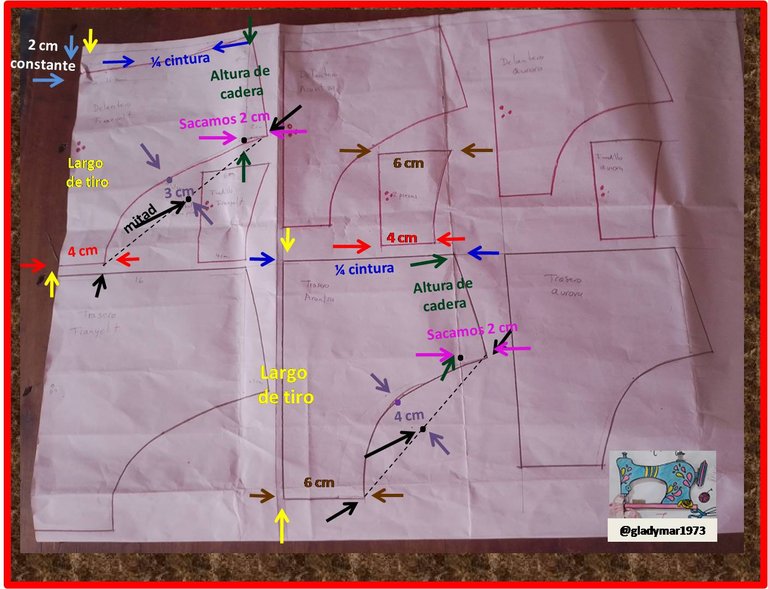
En la imagen vemos el patrón de cada una de ellas, para realizar el patrón básico reemplazando las medidas antes mencionadas; procedemos de la siguiente manera:
Parte delantera:
- marcamos un rectángulo desde la orilla de nuestro papel hacia la derecha ¼ de cintura y hacia abajo marcamos el largo del tiro,
- luego en el largo de tiro marcamos 4 cm para el fundillo y el ¼ de cintura bajamos la atura de cadera.
- De la altura de cadera sacamos a la derecha 2 cm constantes para darle el ancho de la cadera y marcamos una línea semi curva.
- Luego marcamos una línea desde los 4 cm del fundillo a los 2 cm de la cadera y marcamos la mitad entre ambos puntos.
- En el punto medio entre el fundillo y la cadera subimos 3 cm y marcamos una línea semi curva para darle la forma a la entre pierna. (si les gustan las panty con más escote en vez de 3 cm puede agregar más cm según el gusto).
- En el centro de la cintura bajamos 2 cm y marcamos una línea semi curva.
Parte trasera: - Repetimos el procedimiento de la parte delantera solo que en la cintura no bajaremos los 2 cm.
- En el fundillo marcaremos 6 cm.
- Y en el centro de línea desde el fundillo hasta la cadera subiremos 4 cm en vez de 3 cm.
Para el fundillo en un rectángulo base de 8 cm de largo marcamos 6 cm de la parte trasera en un extremo y los 4 cm en el otro extremo, cerramos con una línea semi curva.
Procedure:
To make these pantyhose I first took the measurements of the waist, hip height and high or long of shot to each of them; because the measure that they had given us was the same and knowing them as I know them I know how they like their panties "that cover their hips", that is why it is a little difficult to get a s that they like; so having the measurements I proceeded to make the patterns for their pantyhose.
In the image we see the pattern of each one of them, to make the basic pattern replacing the above mentioned measures; we proceed as follows:
Front part:
- we mark a rectangle from the edge of our paper to the right ¼ of waist and down we mark the length of the draft,
- then on the draft length we mark 4 cm for the casing and on the ¼ of waist we lower the hip height.
- From the hip height we draw a constant 2 cm to the right to give the width of the hip and mark a semi-curved line.
- Then we mark a line from the 4 cm of the holster to the 2 cm of the hip and mark the middle between both points.
- In the middle point between the bottom and the hip we go up 3 cm and mark a semi curved line to give the shape to the between leg (if you like pantyhose with more cleavage instead of 3 cm you can add more cm according to your taste).
- In the center of the waist we lower 2 cm and mark a semi curved line.
Back part:- We repeat the procedure of the front part only that in the waist we will not lower the 2 cm.
- On the bottom we mark 6 cm.
- And in the center of the line from the hem to the hip we will raise 4 cm instead of 3 cm.
For the hem on a base rectangle 8 cm long we mark 6 cm from the back at one end and 4 cm at the other end, we close with a semi curved line.
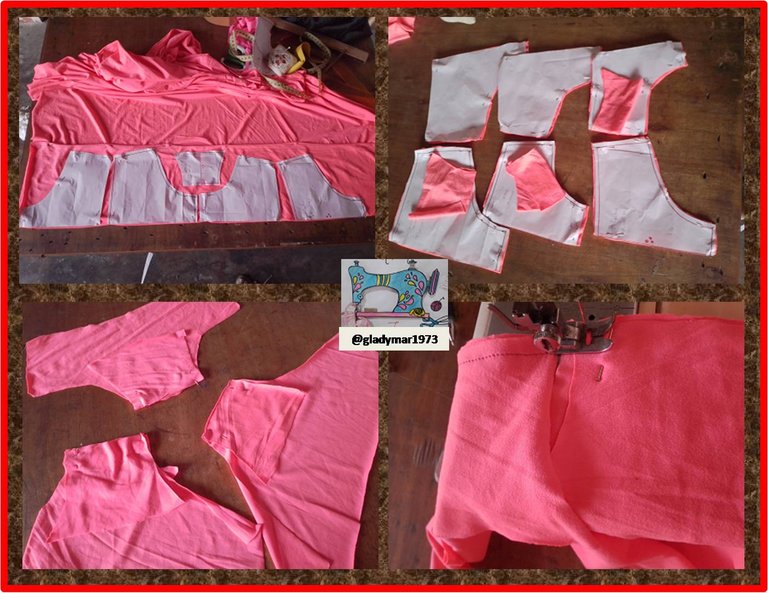
Ya teniendo todos patrones listos, monte los patrones en la tela (todos al doblez de la tela) para el delantero y trasero cortamos 1 pieza mientras que para el fundillo cortamos dos por cada panty, ya montado todos los patrones procedí a cortarlos.
Ya cortados comencé a unir los fundillos a la parte delantera de las panty; lo hacemos enfrentando el delantero de una pieza del fundillo, seguido con el frente de la parte delantera y posteriormente la otra pieza del fundillo, quedara como un sándwich.
- Already having all patterns ready, mount the patterns on the fabric (all to the fold of the fabric) for the front and back cut 1 piece while for the sleeve cut two for each pants, already mounted all patterns proceeded to cut them.
- Once all the patterns were cut I began to join the sleeves to the front of the pants; we do it facing the front of one piece of the sleeve, followed by the front of the front and then the other piece of the sleeve, it will be like a sandwich.
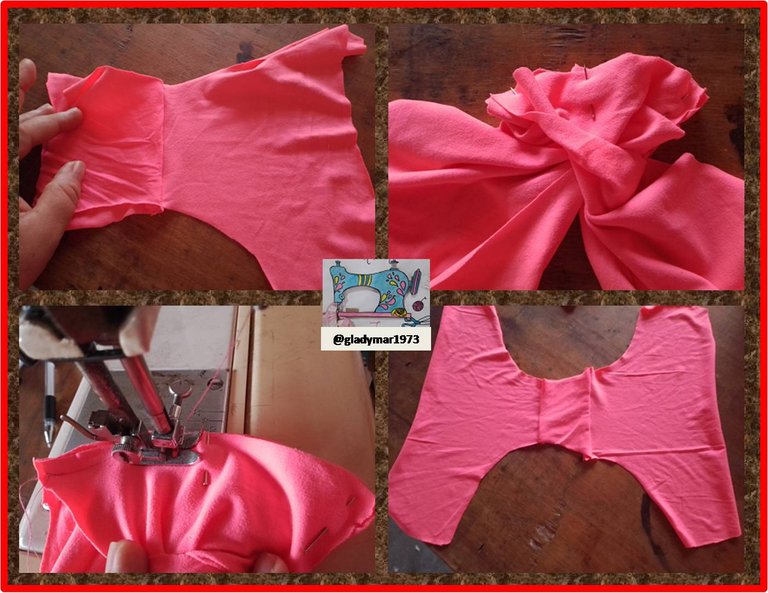
- Luego para unir la parte trasera al fundillo, es un poco complicado pero con práctica poco a poco se domina; es igual que montar un canesú a una camisa; tomamos un extremo de una pieza del fundillo, con un extremo del parte trasera y el extremo de la otra pieza del fundillo, ajustamos con un alfiler, seguido vamos ajustando con alfileres poco a poco el resto del borde de nuestras 3 piezas hasta llegar al otro extremo de las mismas.
Nos quedaran de manera incrustada una pieza entre la otra, procedemos a coser y desenrollamos las piezas, y ulala ya nuestras piezas están unidas.
- Then to join the back part to the sleeve, it is a little complicated but with practice little by little it is mastered; it is the same as assembling a yoke to a shirt; we take one end of a piece of the sleeve, with one end of the back part and the end of the other piece of the sleeve, we adjust with a pin, then we adjust with pins little by little the rest of the edge of our 3 pieces until we reach the other end of the same.
We will be so embedded a piece between the other, we proceed to sew and unroll the pieces, and ulala and our pieces are joined.
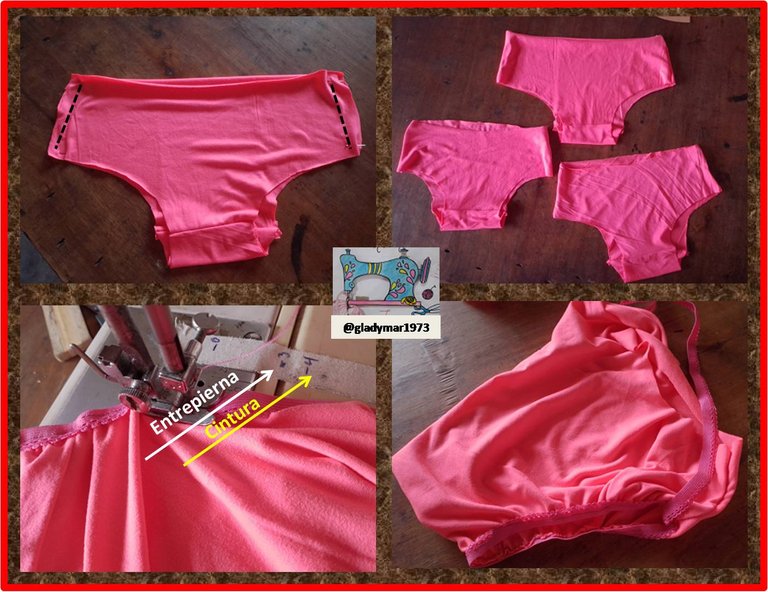
Luego procedemos a unir nuestras partes delanteras y traseras por la cadera con costura recta primeramente y luego con zigzag pues no tengo overlock.
Seguido procedí a montar la elástica (nota: la las entrepiernas se estira desde los 3 cm hasta los 8 cm, mientras que para la cintura se estira desde los 4 cm hasta los 8cm), primero montamos la elástica; con el adorno de la misma hacia la parte interna; con costura recta sobre la parte delantera de las panty.
- Then we proceed to join our front and back parts by the hip with straight stitching first and then with zigzag as I do not have overlock.
- Then I proceeded to assemble the elastic (note: the crotch elastic stretches from 3 cm to 8 cm, while the waist elastic stretches from 4 cm to 8 cm), first we assemble the elastic; with the trimming of the elastic towards the inside; with straight stitching on the front of the pantyhose.
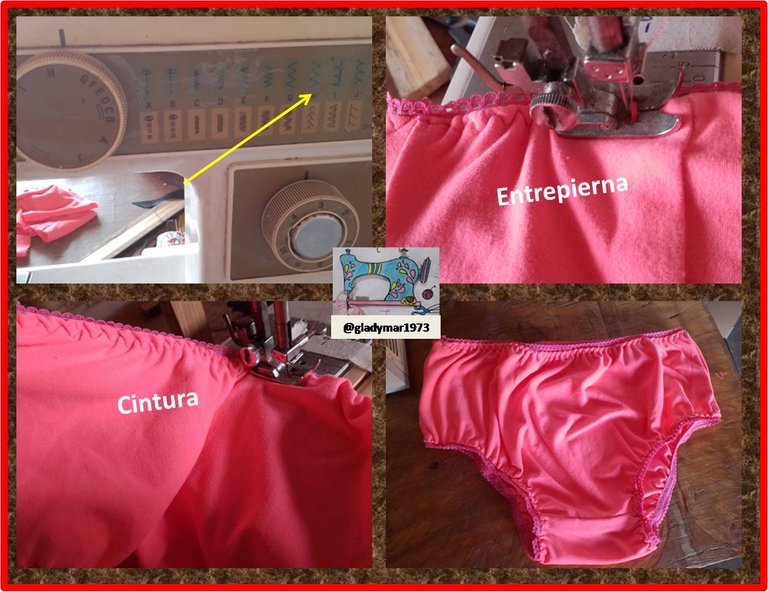
- Luego de tener las panty con la elástica en costura recta, buscamos en nuestra maquina el zigzag de punto y para coser doblamos hacia la parte interna de la panty quedando el adorno de la elástica a la orilla de nuestra cintura y entrepierna.
- After having the pants with the elastic in straight seam, we look for the zigzag stitch in our machine and to sew we fold towards the inside of the pants, leaving the elastic trim at the edge of our waist and crotch.
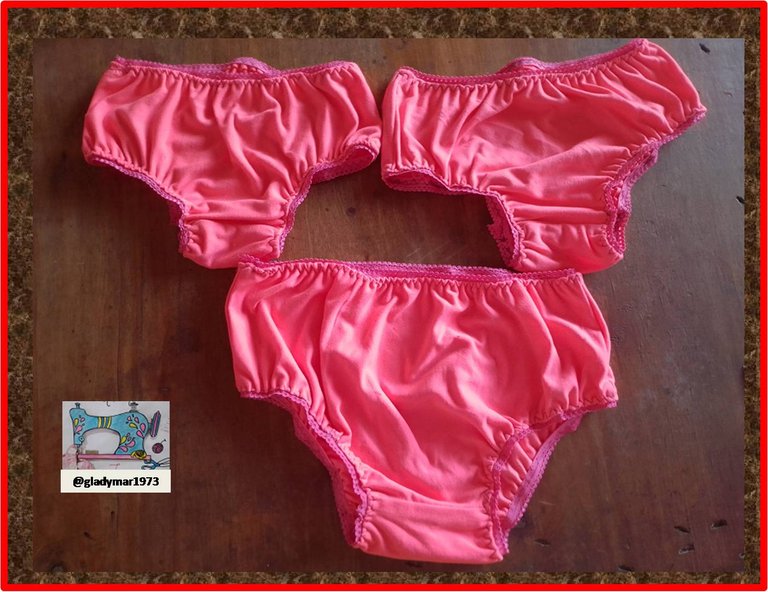
Luego limpiamos nuestras costura y listo ya las panty están listas, para ser lavadas y usadas, como ya saben no hay nada tan grato para mí como lo es ver la sonrisa de mis chiquitas en sus rostros, hacerlas felices a ella me hace feliz a mí, espero se animen a realizarle las panty a sus pequeñas.
Then we clean our seams and ready the pants are ready to be washed and used, as you know there is nothing as pleasant for me as it is to see the smile of my little girls on their faces, making them happy makes me happy to me, I hope you are encouraged to make the pants to your little ones.

Algo que pude notar al realizar estas panty, fue el ahorro monetario que se puede llegar a obtener siendo autosuficientes, pues al ver los precios en mercado de las panty estos están entre 1$ y 2$, mientras que sacando cuenta con lo gaste para estas 3 panty fueron 5 $ y me queda tela para hacer los acostumbradores que están entre 3 $ y 5 $. Claro esta debe gustarte coser para poder hacerlo y tener el deseo de desarrollar nuevas habilidades y talentos.
Something that I noticed when I made these pantyhose, was the monetary savings that can be obtained by being self-sufficient, because when I saw the market prices of the pantyhose these are between $ 1 and $ 2, while taking into account what I spent for these 3 pantyhose were $ 5 and I have fabric left to make the customizers that are between $ 3 and $ 5. Of course you must like sewing to be able to do it and have the desire to develop new skills and talents.

Si has llegado hasta te agradezco por ello, espero haya sido edificante y que te animes a practicar, saludos y feliz fin de semana, ah no te olvides de comentar.
If you have arrived until I thank you for it, I hope it has been edifying and that you are encouraged to practice, greetings and happy weekend, ah do not forget to comment.
Contenido original.
Las fotos fueron tomadas con mi celular Moto E6I y editada en PowerPoint.
Los banner fueron creados por mí en PowerPoint.
La traducción fue a través de www.DeepL.com,Translator (versión gratuita).
Original content.
The photos were taken with my Moto E6I cell phone and edited in PowerPoint.
The banners were created by me in PowerPoint
Translation was through www.DeepL.com,Translator (free version).
It was nice of you to do the course. I love the color of the panties and they look nice and comfortable.
Thanks for sharing the process :)
Saludos @gladymar1973, el color de la tela es perfecto, las panty te quedaron hermosas, tus niñas deben estar felices con las pantys.
Bendiciones!
Amazing tutorial. The outcome look so beautiful
Una tela muy linda para unas pantys, te felicito
Muchas gracias
Me encanta, siempre me han gustado estas pantys , de adulta aún busco comprar las que se parecen, son super cómodas. El color que escogiste está muy lindo para las niñas. Saludos
Gracias querida a mí también me encantan de este modelo,.sufro una barbaridad para conseguir de este modelo,.por ello quise aprender a hacerlas y así poder hacerme las mías, saludos un beso y abrazo para Rafael y Yole feliz fin de semana
Hola Gladys, que bonito que tengas ese talento y lo puedas compartir con tus seres amados, el color me encanta.
Saludos Carolina gracias bueno estoy aprendiendo poco a poco desarrollado talentos feliz noche, gracias por comentar