Sacrifice to Win -- Figuring Out How to Better Utilize The New Martyr Ability

It's been a few weeks since the update that brought us some new abilities to play with. As an avid Splinterlands player, I had spent plenty of time trying different team compositions with the new abilities to learn to use them properly. In this article, I will break down the Martyr ability and how to use it strategically in an efficient way.
What is Martyr?
Firstly, we must understand the effect of Martyr before we go any further:
When this Monster dies, adjacent Monsters get +1 to all stats.
The thing I love about this ability the most is that it goes against what I kept saying in my previous articles: To win more in Splinterlands, you want to try and keep your monsters alive for as long as possible and to kill your opponent's monsters as fast as you can. After we strip down all the numbers and abilities, you win by eliminating all the opposing monsters before they did the same to you. It's that simple.
Martyr, on the other hand, wants me to divert from my usual approach -- I need to kill my Martyr monster as fast as possible so I can buff up my other monsters for the win. This kind of interaction is available in many games, usually involving the likes of necromancers, warlocks, and other evil-aligned powers. In Magic the Gathering, sacrificing things for bigger rewards is a big theme. It's a game mechanic I absolutely love and a big reason why I spend time figuring out how to utilize Martyr.
Some players might approach this differently and that's fine. The game is fun because there are a lot of ways to do things. For me personally, I see Martyr monsters as sacrifice fodders that must go before others. Their damage is not important at all and I'd like them at low HP just so they can die quicker. This is quite the opposite of what we want from other cards where we care a lot about their damage and (preferably high) HP.
Martyr Monsters
Currently, there are five monsters with the Martyr ability. Let's break them down one by one before we continue further.
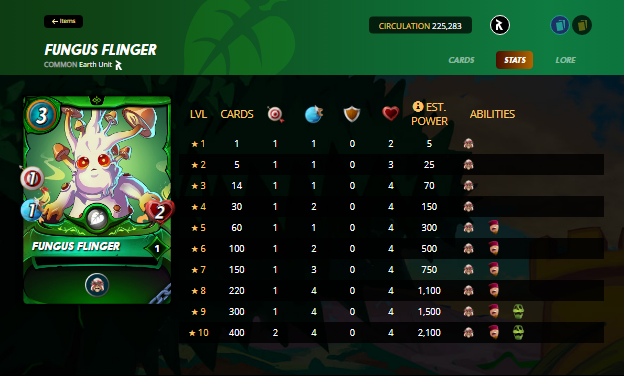
Fungus Flinger is a cute 3 mana Earth monster that is meant to be a sacrifice fodder. Its lore said it flings mushrooms to defend against enemies but I prefer to imagine it flinging itself to the enemy as a martyr.
If you ask me, I'd say this is a card you want to not level up at all even if you are in the champion leagues. Blind and Affliction are useful in their own right, but they are both abilities you want on a durable monster that can keep the debuff going for as long as possible (Blind) and can also get more hits in (more chance to put Affliction on the opponent). With a max of 4 HPs, this card is not the right monster for those abilities. Thus, I think you should just stick with a level 1 Fungus Flinger and let it die easier with 2 measly HP.
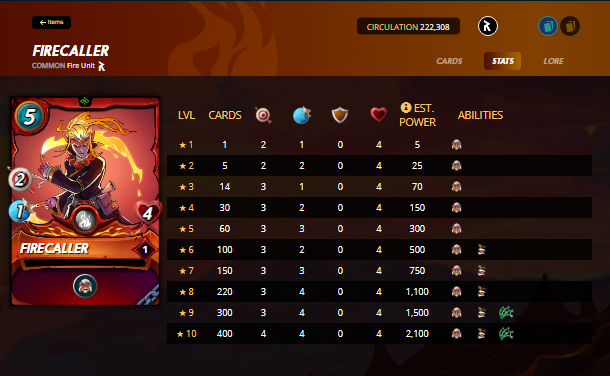
Next up, we have a 5 mana Fire monster -- Firecaller. This one has much better extra abilities than Fungus Flinger. Fury is only useful early on before the opposing big taunt monster dies. Snare is best if you can get it triggered in the first few turns, or it is likely too late to do much.
This is a card I would consider upgrading since it has 4 HP throughout all levels. She will not survive longer due to upgrading so we can just get her better so she can do more before she eventually goes down.
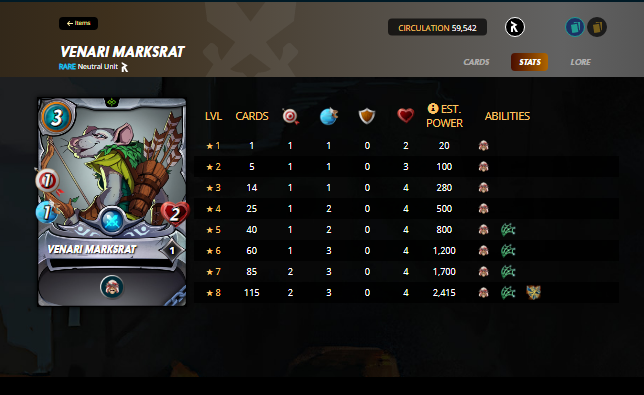
Venari Marksrat is the best sacrifice fodder in my opinion because it is a Neutral unit at 3 mana. This is a Fungus Flinger that can be used on any color. This is another card that I wouldn't care about upgrading, even though Shatter is a very good ability on turn 1. At the end of the day, I just want this thing to die first and foremost.
The thing I like about this card the most is the potential double martyr setup (this and Fungus Flinger) if I am playing an Earth team. Imagine hardcore buffing a very strong monster that sits in the middle of the two martyrs. That'd be like Bloodlust on steroids and I think we can all agree that Bloodlust is what makes all the Gladiator cards OP.
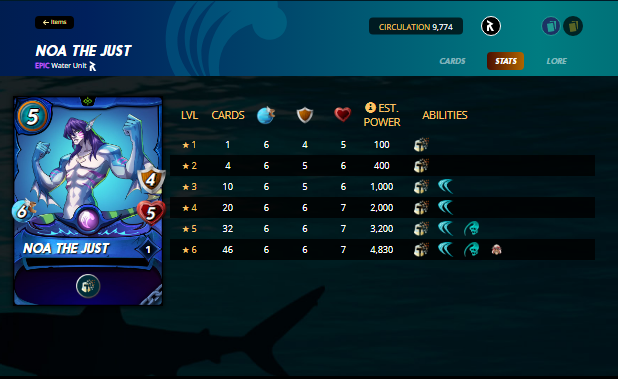
Now we are talking about the non-fodder Martyr cards. Noa The Just is obviously a tank support. At the lower levels, it is likely put in the middle of the lineup as a Rust support to take away the opposing shield. At the higher levels, it can also serve as a tank with the ability to Dodge and deal damage with Backfire.
As it only has Martyr at the max level, I have this card in a different category. It is clearly not a fodder that wants to die early. I have not played at the champion level and I'd not pretend to know what's up there. I'd say this guy should be used to tank and the Martyr ability to be seen as an extra boost when it dies.
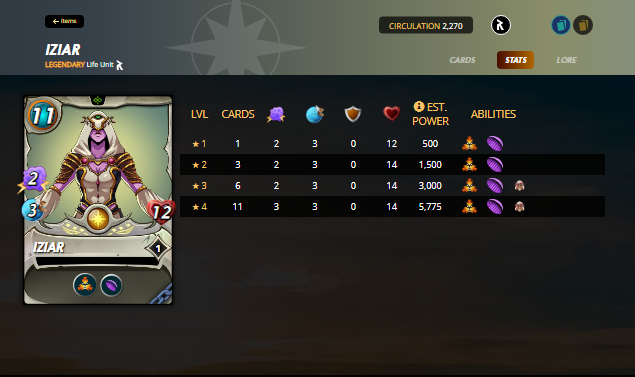
The final card is Iziar, a huge Life taunt magic tank at 11 mana. The best part of this card is the Taunt ability. This makes it very likely to go down before any other cards on our team. Even better, we can put it on any slot and we can expect the Martyr to be triggered with ease. These are superb advantages not found in other Martyr cards.
Furthermore, this card is very playable even without the Martyr ability. At the lower levels, it's an anti-magic tank that Life didn't have before.
Positioning Difficulty
Now that we understand the cards and the ability itself, let's talk about the biggest issue we have in hand -- it is super hard to set it up perfectly. Obviously, we need to put our sacrifice fodder in the middle of two monsters so that we can buff two teammates at once. The problem? It is very hard to die in the middle of a lineup. We aren't even talking about dying quickly, just trying to die is hard enough.
If we try to solve this problem and put the Martyr monster in the front or the back, yes, it will go down very fast but we can only buff up one teammate. That is only 50% of what Martyr is capable of doing -- we are not getting enough value out of it!
We are facing a conundrum here. If we want to get the most out of our sacrifice fodders, we need to figure out a way to get them dead quickly in the middle of a lineup. This is exactly why Iziar is a super good Martyr card. Taunt solves the conundrum without needing extra help from us. As for other cards, let's just say we need to formulate some ways to get the job done.
Martyr Killing Manual 101
Let's go through the many potential ways for our Martyr to die early in the middle of a lineup:
Predicting The Opponent
The most inconsistent but possible way is to predict our opponent correctly. There are some monster abilities that target monsters in the middle of a lineup: Snipe, Opportunity, and Blast come to mind. If we believe that our opponent will play monsters with these abilities, we can include some Martyr monsters in our squad. The targeting rules of these abilities are why I said it's better for these fodders to have low HP. Low HP means they will get targeted by Opportunities right away (unless you have 1 HP monsters in the lineup). Also, it is much faster for Blast damage to take them out.
If you expect Blast damage, make sure you put the fodder at the 2nd position of the lineup (just after the tank). This is risky but you can put a Reach monster in 3rd position. After the fodder dies, the Reach monster will go to 2nd and can hit with Reach.
Take Advantage of Rulesets
This is much better than relying on prediction because we can clearly see what we are up to and be 100% certain about them. We are trying to get those that can hurt ourselves or make the Martyr a prime target.
Earthquake, Noxious Fumes
These are the abilities we like to see as it provides us with the easiest and fastest way to die. Remember when I say you should keep your sacrifice fodders at card level 1? We do that to die faster when these rulesets are in-play. Level 1 Fungus Flinger and Venari Marksrat will go down in 1 round with just 2 HP and you will have two monsters buffed to start round 2. If you level them up, they take two rounds to go down so you are just hurting yourself with more HP in these rulesets. Just stick to level 1 for them and have them go down in 1 turn -- that's what Martyr is supposed to do!
Return Fire
Oh, you don't want to play ranged monsters in this rules set? Not now with Martyr! This is much slower than the rulesets above so you might want to have monsters that can survive longer. Keeping the fodders at 2 HP gives us the best timetable for a self-reflect kill to happen -- within 2 rounds. We also need to factor in that our ranged attack might miss (we do love Aim True) as our three main sacrifice fodders are slow. No reflect damage will be given on a miss. We'd love to go down by round 2 but it could be by round 3 or more if misses happen.
Of course, Reverse Speed is great for us when it comes to misses. Being killed early in the round instead of later is also helpful because the slower monsters can then attack with buffed-up damage on the same turn. Without Reverse Speed, the sacrifice fodders are bound to attack last and the buffed damage will only start helping on the next round.
I recommended leveling up Firecaller because it helps in this ruleset too. By level 3 and onward, it will die from 2 reflects instead of 4. The speed boost also reduces our chance to miss.
I know there's Counterspell too but I don't think intentionally hurting Iziar is a good game plan. Just let it tanks more for you instead!
Explosive Weaponry
For this one, I recommend setting the sacrifice fodder on the second slot for guaranteed blast damage. Alternatively, we can utilize Taunt and set the sacrifice fodder near the Taunter. This gives us more positional freedom as to where to put our fodder. It is a useful trick if we want to buff up good ranged attackers that we need to stick to the back.
Battle Example
Now that we know how to position our Martyr and how to attempt to kill it asap, it's time to put all our theories into testing! This is a Wild Silver battle but both of us are running slightly underleveled teams. I don't have enough of the Gladiator summoner cards to level it up yet when I get into this.

We are taking advantage of the Earthquake ruleset in this match. I run flying monsters besides my two buff targets and the fodder itself. Quora Towershead is one of the best gladiator units and it has healing to counteract the Earthquake damage. I am happy to take 2 damage every turn just to have Oaken Behemoth in play because it is that good of a card -- the Reach is especially helpful so that it can do both melee and magic attacks every turn. Duo attack monsters are great buff targets because they get +1 on both attacks.
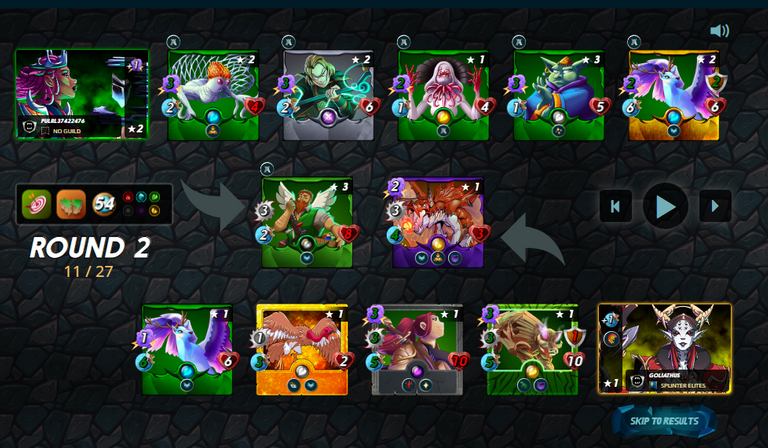
This is the start of round 2 after all the Earthquake triggers. My two big monsters are powered by mysterious mushroom powder and ready to go! The Flinger's sacrifice shall not be in vain!
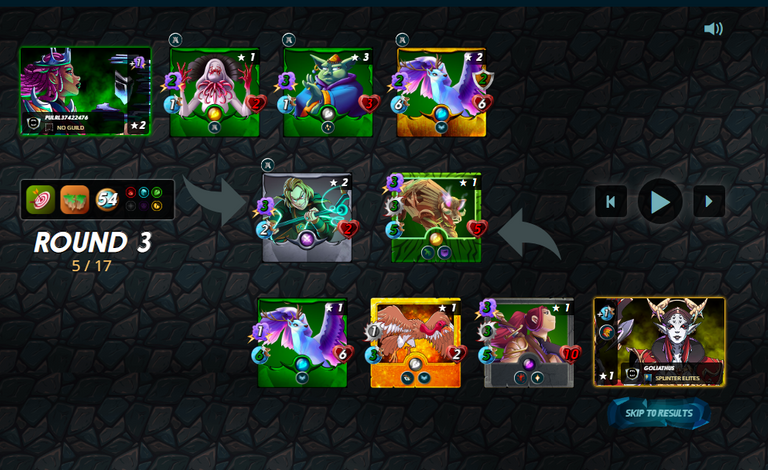
This is the beginning of round 3 and there's no way I can lose from here. If you want to watch the full battle and see both Martyr and Conscript in play, just check the link above! I hope I had shown how powerful an early Martyr death can be for our team.
Conclusion
Martyr is quite a difficult ability to use to its maximum value but if you manage to pull it off, wow! I absolutely love this ability for its design and the different playstyle it incentivized:
"Oh no, I don't want to play Ranged monsters into Return Fire -- not now with Martyr!"
"Oh how I hate Noxious Fume. I must have Immune or it just limits me to high HP monsters and Scavengers -- oh hello Martyr, I will happily run you with your measly HP count!"
It is a great design and rewards us when we pull off our great plan. My closing words are: Don't settle for less, you always want to buff up two monsters with Martyr, or don't play it at all! (Noa The Just is the only exception)
Thanks for reading and I will see you all in the next blog entry!
If you are not yet a warrior of the Splinterlands, grab your ticket and join us!
Disclaimer: Most screenshots are taken from the Splinterlands game itself. All other images are properly credited. All rights reserved.
https://twitter.com/1419666412616896512/status/1626536490607210496
The rewards earned on this comment will go directly to the people( @goliathus ) sharing the post on Twitter as long as they are registered with @poshtoken. Sign up at https://hiveposh.com.
Congratulations @goliathus! You have completed the following achievement on the Hive blockchain And have been rewarded with New badge(s)
Your next target is to reach 50 posts.
You can view your badges on your board and compare yourself to others in the Ranking
If you no longer want to receive notifications, reply to this comment with the word
STOPTo support your work, I also upvoted your post!
Check out our last posts:
Do you know you can win a Chaos Legion pack just by following some simple steps ?? Check out our Latest Daily Showcase and Participate our latest Giveaway. Thanks
Thanks for sharing! - @alokkumar121
