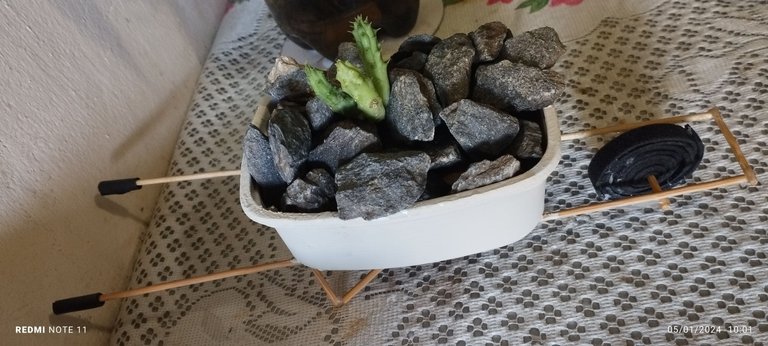
Linda Maseta con forma de Carretilla en materiales Reciclados. / Cute wheelbarrow shaped pot in recycled materials
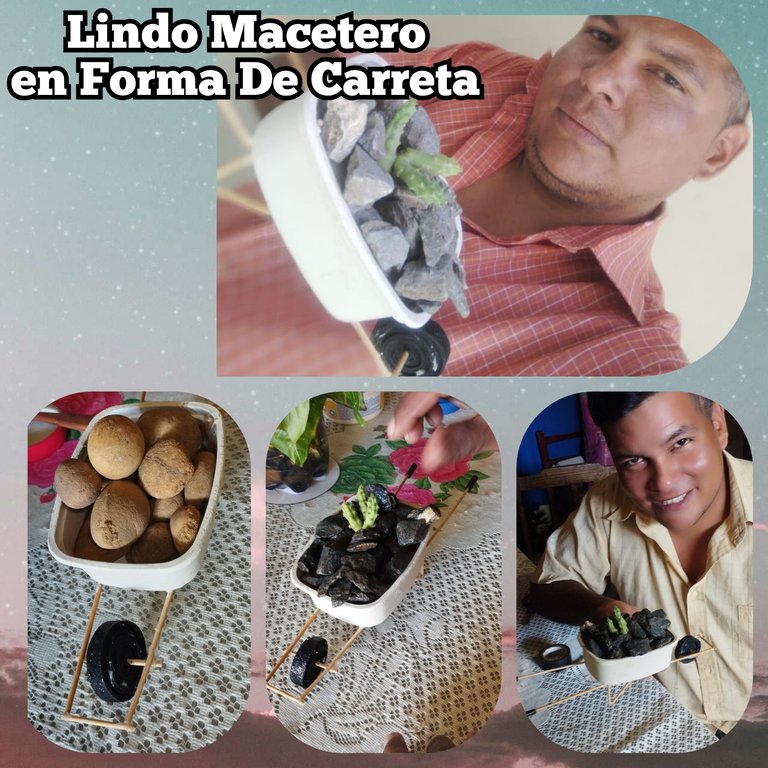
Saludos amigos creativos de @diyhub y de @hive, hoy quiero compartir esta hermosa idea para nuestros jardín. Elabore una hermosa macetas en forma de Carretilla para nuestras plantas de sombra o de lujo como son también muy reconocidas. Es ideal para nuestras plantas, ya que la podemos colocar en el jardín y se verá maravilloso y muy linda también sirve para que nuestras esposas decoren algún rincón en casa, como ya saben a ellas les encantan las plantas. Para elaborar mi carretilla utilice muy pocos materiales y casi todos los tenemos a la mano en casa.
Los materiales Utilizados en esta creación fueron:
MATERIALES:
✓ Palillos de altura
✓ Envase plastico reciclados de mantequilla.
✓ Foami Negro.
✓ Pintura al frío color beige.
✓ Silicón caliente.
✓ Plantas y piedras decorativas.
PASO A PASO:
PRIMERO:
Vamos a fijar dos palillos en la parte de abajo del envase de mantequilla, Este es el soporte de la rueda, Lo pegamos bien en las cuatro esquina.
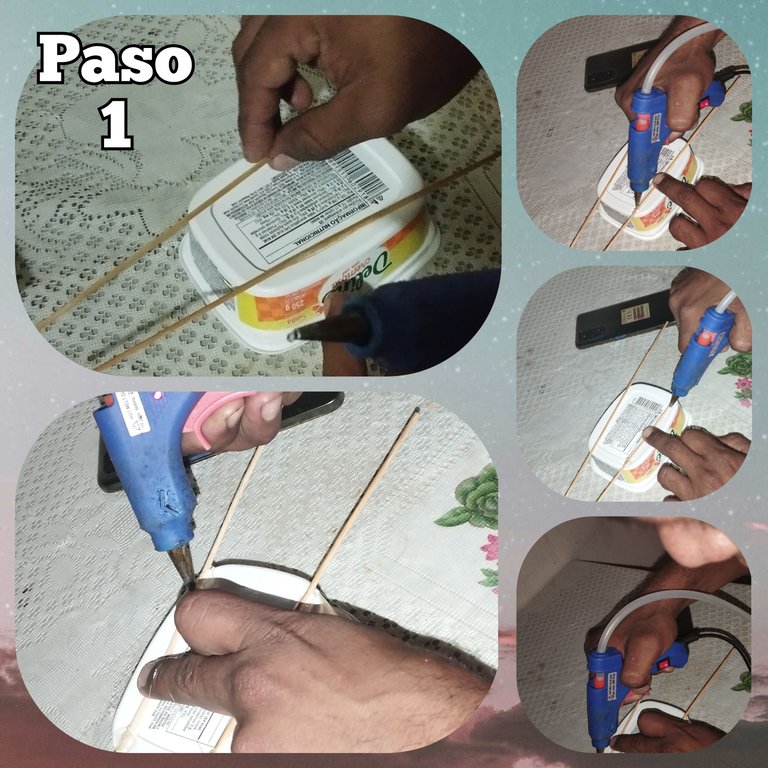
SEGUNDO:
Una ves terminado el primer paso y con los palillos ajustados. Vamos a realizar unos huecos al envase lo podemos hacer con algo punzante, en esta oportunidad yo use un tenedor y lo calenté col un encendedor. Se puede realizar con un clavo o algo de punta fina, vamos a introducir dos Palillos uno en cada esquina Y 5 centimetros delantero hacemos otro agujero.
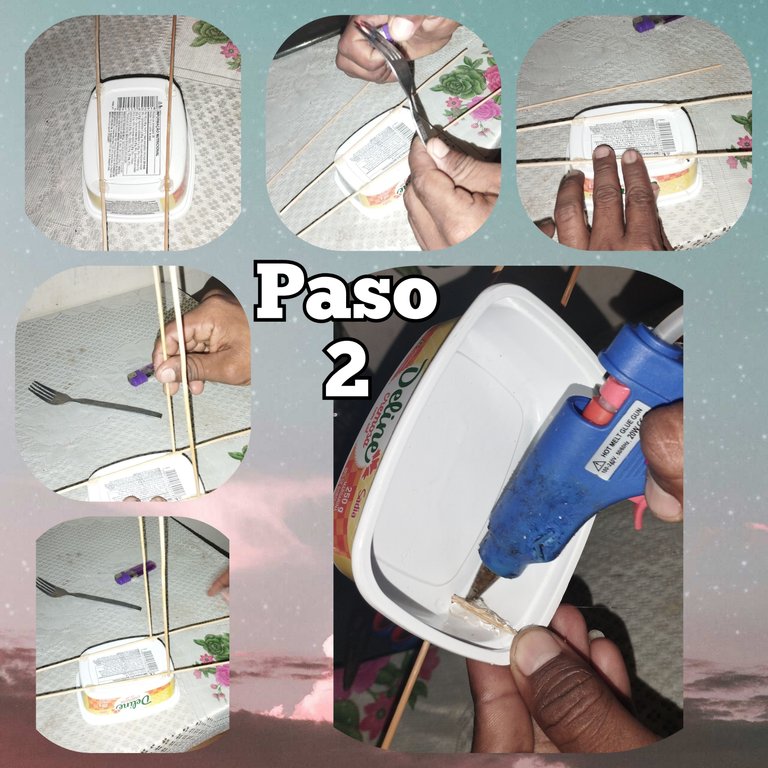
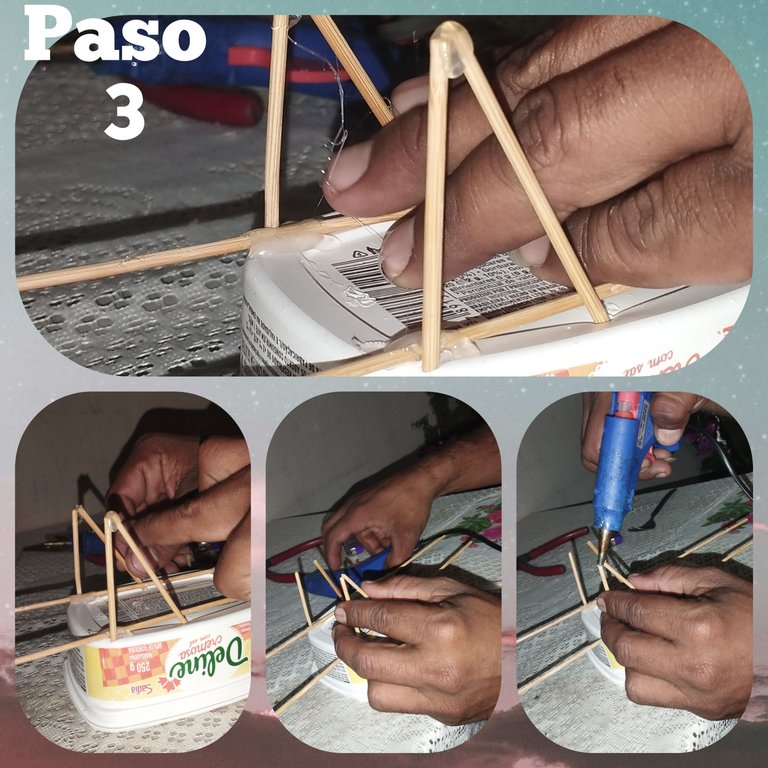
TERCERO:
Cortaremos los palillos a siete centimetro de altura y mediremos dos más con la misma medida, los cuales se colocaran diagonal es decir medio acostado para que formen las patas de la carreta, una vez medidos los pegamos con el silicón y los ajustamos bien de modo que no se muevan o despeguen rápido.
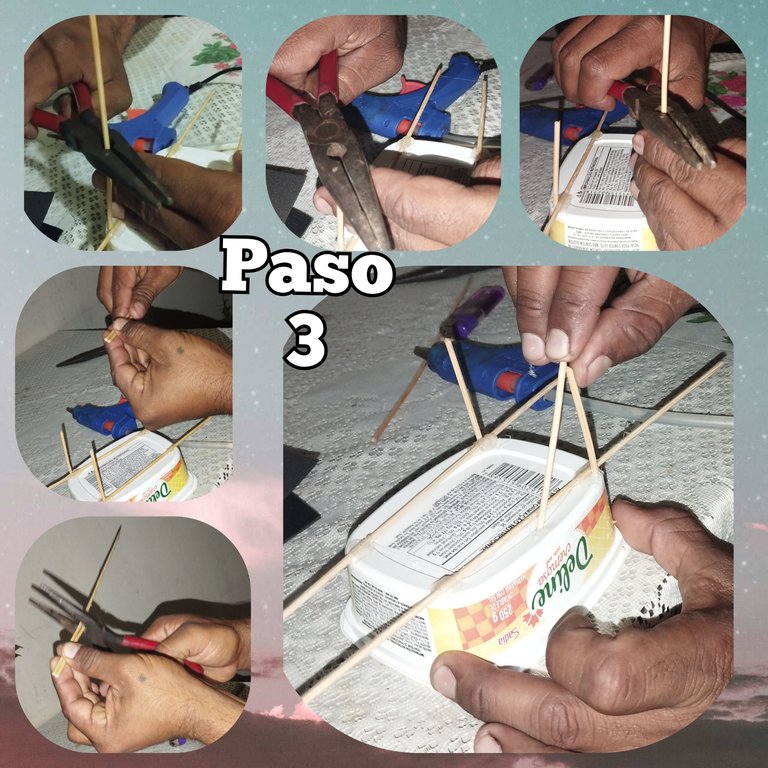
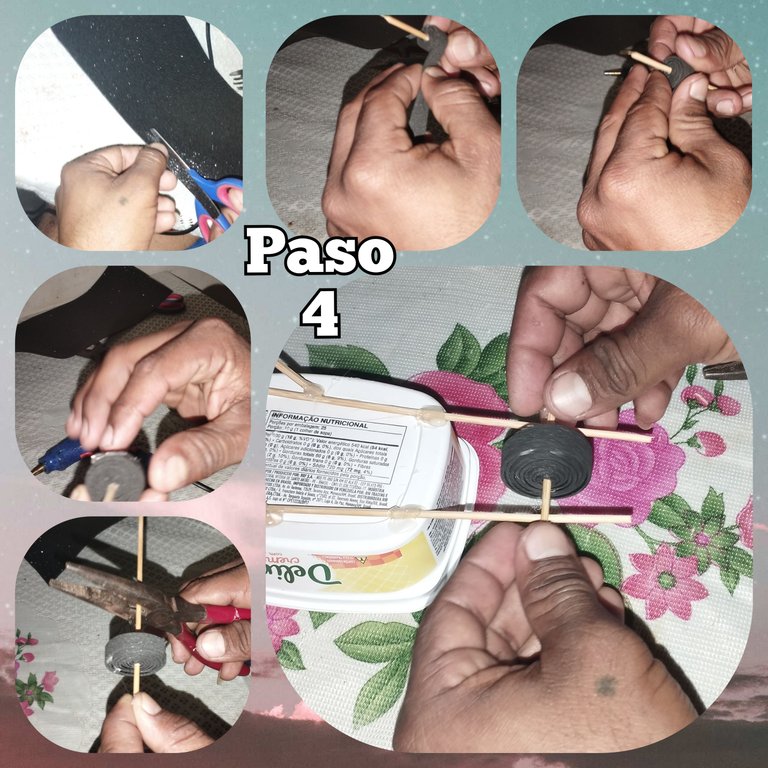
CUARTO:
Ahora con un pedazo de foami cortamos un listón de un centímetros de ancho. Yo use Foami por que lo tenía a la mano. También se puede utilizar cartón se corta un centímetro de ancho, el largo depende del tamaño que deseen la rueda. Y se pinta de color negro si la van a a elaborar de cartón.
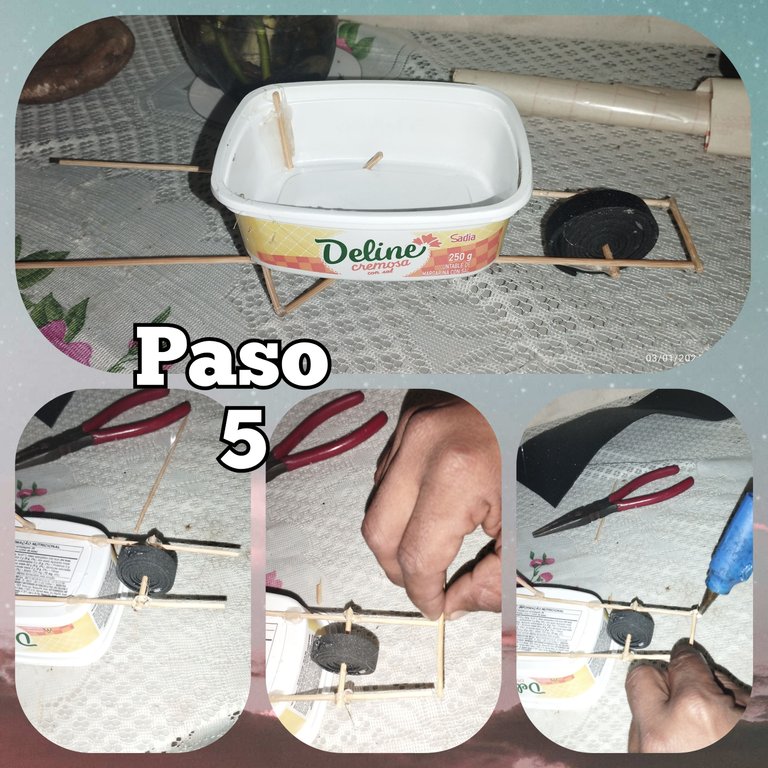
QUINTO:
una vez que tengamos la rueda lista la colocamos en la parte delantera, y luego colocamos un palillo más pequeño para hacer como un cierre delante.
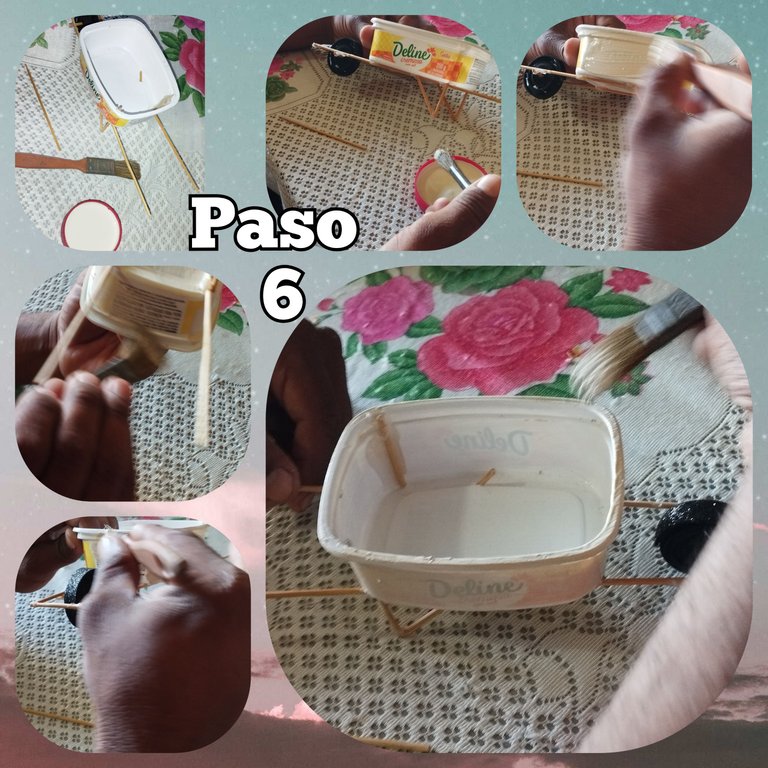
SEXTO:
Vamos ahora a pintar nuestro envase, le vamos a dar dos pasadas; es decir dos manos, para que quede bien cubierta y no se observen las letras del envase.
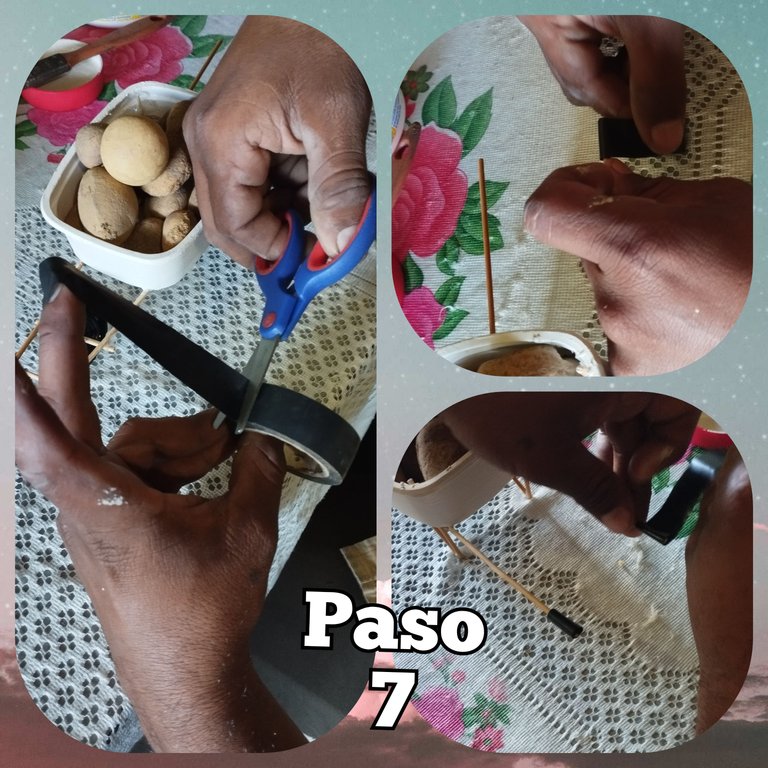
SÉPTIMO:
En este último paso vamos a colocar los detalles que querramos, por lo menos yo le Coloque unos teipes negros para que simulará el agarre del la carretilla. Y le puse algunas piedras a ver qué tanto aguantaba el peso y créame es bastante resistente, Así que no se limiten. Ya una ves lista le coloque otras piedras más ligeras de peso con un poco de arena y un cactus bebé.
Y de esta manera nos queda nuestra hermosa carretilla hecha con materiales Reciclados. Espero les guste mi creación del día de hoy. Les envío saludos, agredezco sus comentarios y espero les sirva de ejemplo para que creen los de ustedes.
Hasta la próxima!
Las imagenes me pertenecen, fueron tomadas de mi teléfono Redmi Note 11.
Las imágenes fueron editadas por programa de editor de fotos Polish.
traductor: Deepl Traslator.
ENGLISH
Greetings creative friends from @diyhub and @hive, today I want to share this beautiful idea for our garden. Create beautiful wheelbarrow-shaped pots for our shade or luxury plants, as they are also very well known. It is ideal for our plants, since we can place it in the garden and it will look wonderful and very pretty. It also serves for our wives to decorate some corner at home, as you know, they love plants. To make my wheelbarrow I used very few materials and we almost all have them on hand at home.
The materials used in this creation were:
MATERIALS:
✓ Tall sticks
✓ Recycled plastic butter container.
✓ Black Foami.
✓ Beige colored cold paint.
✓ Hot glue.
✓ Decorative plants and stones.
STEP BY STEP:
FIRST:
We are going to fix two sticks on the bottom of the butter container, This is the support of the wheel, We glue it well on the four corner.
SECOND:
Once finished the first step and with the chopsticks adjusted. We are going to make some holes in the container we can do it with something sharp, this time I used a fork and heated it with a lighter. It can be done with a nail or something with a fine point, we are going to introduce two toothpicks one in each corner and 5 centimeters in front we make another hole.
THIRD:
We will cut the sticks to seven centimeters high and measure two more with the same measure, which will be placed diagonally ie half lying down to form the legs of the cart, once measured stick them with silicone and adjust them well so that they do not move or take off quickly.
FOURTH:
Now with a piece of foami we cut a one centimeter wide ribbon. I used Foami because I had it at hand. You can also use cardboard cut a centimeter wide, the length depends on the size you want the wheel. And paint it black if you are going to make it out of cardboard.
FIFTH:
once we have the wheel ready we place it in the front, and then we place a smaller stick to make a closure in front.
SIXTH:
We are now going to paint our container, we are going to give it two passes; that is to say two coats, so that it is well covered and the letters of the container are not observed.
SEVENTH:
In this last step we will place the details we want, at least I put some black teipes to simulate the grip of the wheelbarrow. And I put some stones to see how much it would hold the weight and believe me it is quite resistant, so do not limit yourselves. Once it was ready I put other lighter weight stones with some sand and a baby cactus.
And this way we have our beautiful wheelbarrow made with recycled materials. I hope you like my creation today. I send you greetings, I appreciate your comments and I hope it serves as an example for you to create your own.
See you next time!
The images belong to me, they were taken from my Redmi Note 11 phone.
Images were edited by Polish photo editor program.
translator: Deepl Traslator.
Te ha quedado hermoso amigo. Saludos y muchos éxitos
Gracias amiga.. saludos!
Congratulations @hermerg01! You have completed the following achievement on the Hive blockchain And have been rewarded with New badge(s)
Your next target is to reach 200 comments.
You can view your badges on your board and compare yourself to others in the Ranking
If you no longer want to receive notifications, reply to this comment with the word
STOPTo support your work, I also upvoted your post!
Check out our last posts:
Thank you very much for the support.
You've got this @hermerg01! Keep putting in the effort and you'll reach your target in no time.
BTW, the HiveBuzz project needs your support! Help us continue bringing gamification, entertainment, and fun to the Hive blockchain. Check out our funding proposal and consider supporting us!
All you need to do is to click on the "support" button on this page: https://peakd.com/proposals/248.
Thank you!
The pots are actually really cute. They serve a fine aesthetic purpose too. Bravo.
Yes, and our homeowners love it. Thanks for your support.
¡Qué barbaridad de transformación!
Te felicito y te envío muchas bendiciones para tus manos y tu capacidad de transformar y reutilizar.
Un abrazo grande @hermerg01
Gracias amigo.. bendiciones para ti también.. saludos!
👍
Very easy tutorial,I love it and the design looks nice.
You’re creative
Thank you very much, I'm glad you liked it, greetings.