Let's Replace Some Mouse Switches! |Guide|
As many of you that have read my posts before may know, I have really bad luck with mice. I've came to the conclusion I have just absolutely monstrous fingers that destroy anything that comes in their way. Every mouse ends in the same sad way, double clicking and not holding my clicks when gaming or designing. This ends up being excruciating to deal with when it takes time and stops me from doing something. Let's fix that.
Hey guys and welcome to my soft tutorial of replacing switches in a Logitech G502! My hopes for this post is to explain the ease and possible problems that can happen while doing something like this. My thoughts throughout my career has generally been "wow that was easy, just takes time and a little bit of forethought." When I say anybody can do this, anybody can do this. Do not be afraid, patience is key. I am an amateur and do not possess any responsibility if you mess your mouse up. I am learning too and always improving.
Of course you do not need the same tools as me, but it makes the job much easier and reduces risk of breaking something. Along with the required things, that I cannot see you doing this without.

If one wanted to try doing this, highlighted are the tools that are absolutely necessary for successful install. I added the other parts to make my life easier and ready incase I need them.
A.) Screwdriver - This mouse has 4 screws that must be removed otherwise the mouse will not come apart. I used a PH-0 Bit, I suggest a small bit with a long, narrow shaft to get in the hole to reach the screw.
B.) Mouse of choice - Research your mouse, the G502 has "mechanical switches". Some mice do not, please check and do some looking around before you possibly break a perfect mouse by disassembling it. Razer uses "optical switches" generally. Besides that, do I really need to explain this? lol
C.) Soldering Iron - To replace mouse switches, we must de-solder the switch from the board to put a new one on. Many times, companies will use high-temperature solder to keep parts on and discourage users from doing this on their own. In which I suggest an iron that can go to 800°C or above. Too low of a temperature will not melt the solder and make it impossible to replace the switch. (I ran my iron at max, 840°C. Its a super cheap iron, so I'm not worried about shortened lifespan)
600°- 650°F (316°- 343°C) is a good place to start for lead-based solder and 650°- 700°F (343°- 371°C) for lead-free solder. You want the tip hot enough to melt the solder efficiency, but excess heat can damage components as the heat travels along the leads, and it will reduce the lifespan of the soldering tip. - Google Search
D.) Solder-Sucker and Extra Solder - These extras will likely come with the Soldering iron, but make sure to check as we cannot finish the replacement without these extras.
Depending on the mouse brand and model, the steps will vary a little. However, do not worry. patience is the important part, every mouse is the same as long as you take time and pay attention. A good site for disassembly guides, and the one I used when I was afraid of something breaking. IFixIt is most likely the best place to check, and here is the guide I used.
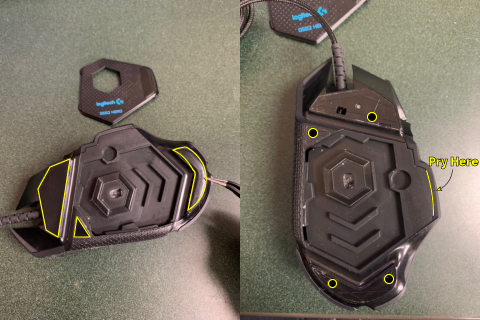
1.) let's start this guide with taking off the weights-cover. Proceeding, there are three rubber feet that need to be removed so we can access the screws hidden underneath. Be very delicate as we want to reuse these without buying adhesive to keep them sticking. IFixIt suggests using a heat gun or dryer to loosen the adhesive but I did not need to. Under the pads, there will be four screw holes and we need to take them out. This is where the thin shaft of the screwdriver will be handy.
2.) Pry the seam on the flared out side after the screws are removed. This should not require much effort. If this does not open, try a new position or area. The mouse will not completely open, but it will be split apart.
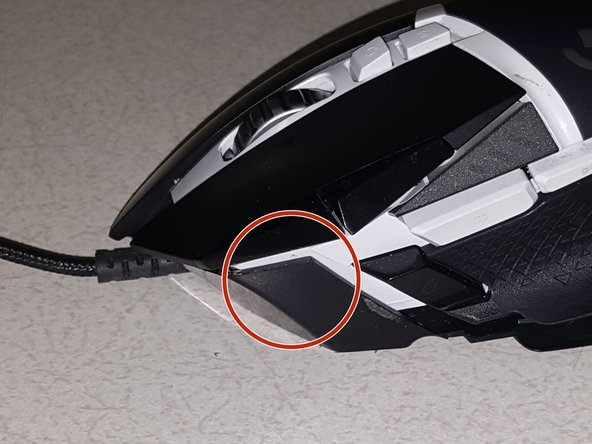
3.) Patience is key, this step is where things get complicated and can be quite frustrating. Do not lose your cool and begin strong-arming it. Be slow and methodical with medium pressure to ensure nothing breaks. From the previous step, we now go to the front left side right under the left click. A sloped surface will be present, you will need to get a pry tool or your fingers between the two pieces of plastic and split apart. I do not have a picture for this, so I will source IFixIt for a precise area.
If all steps are done correctly, you should now see the mouse in two halves. One will be all of the plastic buttons and ergonomic pieces, and the other being the bottom half of the shell, with the boards, sensor etc.
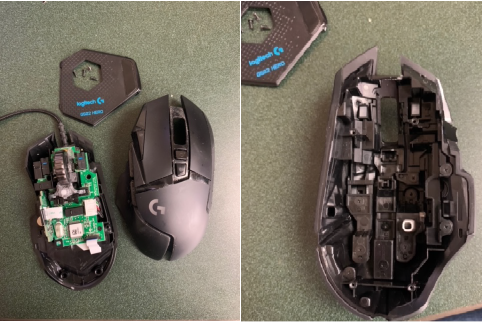
If you are replacing switches in your mouse, chances are that it is quite used and old. Take this time to clean the half with buttons and make it brand new. If you trust yourself, disassemble the buttons and clean every piece. This will not be covered but just take pictures and remember where screws go. You wont be doing this often, so take advantage and clean it good.
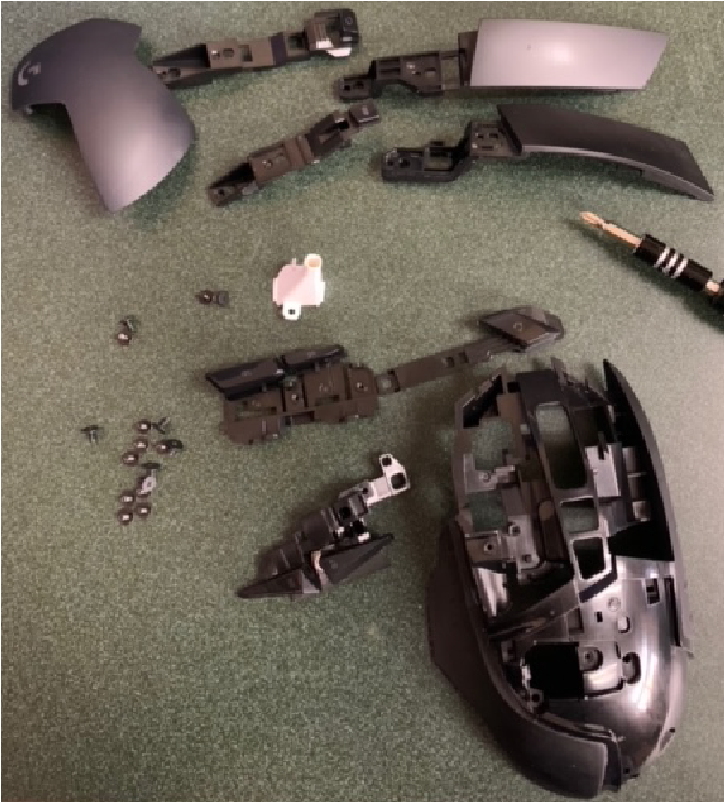
Screws seemed to be all the same size, but I still suggest to look and make sure. A thin-shafted screwdriver is needed for full dissasembly.
Congratulations! We are very close to the finish. If it is not obvious, unplug your mouse and make sure it is completely turned off. We will not know if our job worked until we are completely done.
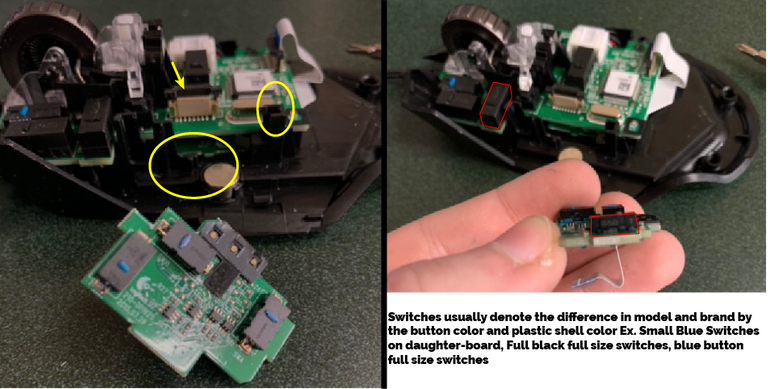
4.) Looking at the board portion of the mouse. We have a couple things we need to look for and be aware of. To begin, the ribbon cables are very brittle and need to be treated as priority. Remember this as we unplug all connections to the main board. Begin by unplugging the side mounted connector on the right side. Next, we have two connectors that are ribbon, these work differently than you may have every seen. Lift up the latch very carefully and it will release tension on the cable. When lifted enough, the cable can be pulled up from the "port". two circles denote ribbon cables and the arrow is the first normal cable.
A.) Once all cables are disconnected, take the side button board out and put it aside as we no longer need it until assembly. Please detail the height and size difference in those side switches and the main switches on the mouse. (Color coded in red) Typical mechanical switches will not fit the side buttons and must be a special kind. My educated guess is the same but low-profile.
5.) Removing the scroll wheel. This part had me puzzled so IFixIt was a savior for me before breaking something. Weirdly enough, there is a latch that locks the scroll wheel assembly in place, and we need to pull it to the left where the middle space is empty of any blockage. Once done, we can pull up slowly.
I have personally lost mine 4+ times. There are extremely tiny springs that must be watched or you will lose them. I have no clue the importance of them, but rather be safe than sorry after all of this work. They will be circled in the right image, keep them in a very safe place. The board is gone already but that's because I didn't even know they were there.
6.) Now it is time for finishing up the removal of the board. The post where that latch is, remove the two screws holding it in place. As well remove the screws holding in the main board, there are three in addition to the post with two. once done, the board should be lifted straight up with light pressure to remove it from the plastic casting of the mouse.
This part will be hard to explain and does not have any pictures to bring the point across. But I will do my best.
First, turn on your solder iron and get it heating up. Be careful for touching the metal, 800°C will instantly turn your skin into lizard scale (Burned to the point of crispy). When around a hot iron, any small loss of attention can end horrendously, be responsible and prepare for possible mistakes.
Flip the board over, from the back we should see a bunch of poles poking through. What we are looking for is at the end of the mouse and have 3 poles. Flip the board over to confirm which one you are looking at.
TLDR Option: Check out this amazing clip on Reddit that overviews everything I try to explain. If watched, skip to "Resoldering New Switches"
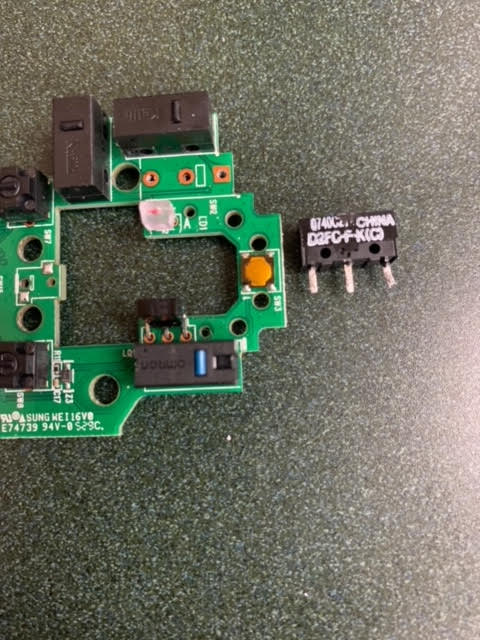
Once the iron is heated and you know the switch to remove, use the tip of the iron and press around the pole (one at a time). If the solder on the board melts then we are cooking with fire, get the solder sucker out and pumped. When the solder is liquid, put the nose of the sucker as close as possible to the post and press the button.
Continue doing this until all solder seems to be away for the post to move freely. A good indicator is when you can see through the board hole, if you don't understand you will once your first one is done. Now continue on repeating these steps until all three posts are moving freely. We can now pull the switch out from the top of the board. Boom! You did it!
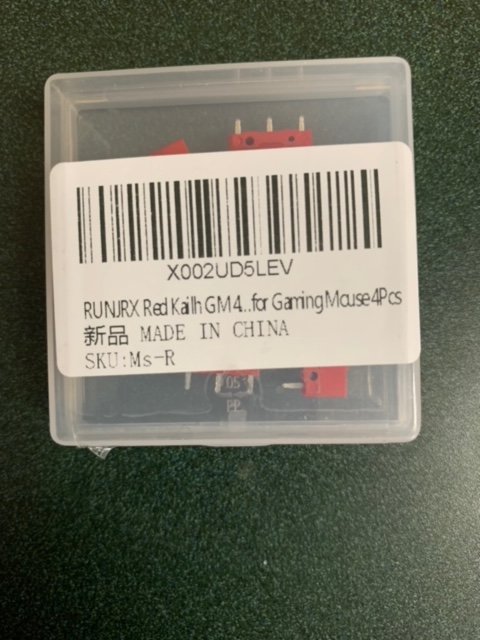
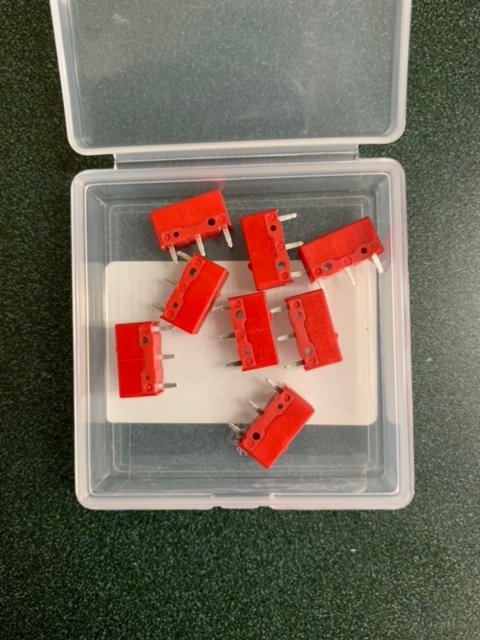
We are soo close! Don't give up. Look online and research some mechanical mouse switches, there are so many different varieties and brand to choose from. I knew nothing about mouse switches until now. So I chose Kailh GM 4.0, which can be bought here for $6.99 for 4 pieces (I bought 2 packs)
Watch out for orientation, but the posts should fit in perfectly. That marks the last step in this guide. Soldering time, like the real deal. Another area I am unsure of how to explain but I will do my best. Once the posts are all the way in and the top part cannot sit any deeper in, we want to prop this on something to keep it from moving while soldering our first joint.
Once in position, heated iron, and have some of that solder wire straightened. Then we are ready.
I personally begin by heating the post by leaving the iron to the side of it, not touching the board for 5 seconds. Continuing, I then push the straightened wire into the post's hole and move the iron away. This will create an amazing solder with a nice bubble to it. Do this two more times and you have installed a new switch. Repeat all of this if you are replacing both or more buttons.
I'm proud of you, good job. Now get out there and play some games enjoying those new mouse clicks!
I would help you reassemble, but its all the same as explained but backwards. And we are massively over limit for word count. I don't usually care but this "guide" is becoming a dang story. I am new to this stuff so hopefully I was able to help some others, and make sure to leave me feedback on what I did wrong.
Thanks for reading!
Until next time...

That's pretty awesome. I am glad you were able to dig into this and get it fixed. It's pretty easy these days to just throw stuff like this away when it goes bad. It is nice to know that isn't the only option.
Most definitely, I have went through 6-7 mice in my gaming/pc career and I'm sick of it. I mean it was $14 for essentially 4 new mice. While it's over $100 for the mice I like. The benefits of doing this outweigh the cons 10-fold. Hopefully I can help even just one person, it can save soo much $.
Definitely would buy a new one, but I loved to see and read how it also can be done !CTP
Thank you! I can understand, I felt that way for a very long time but I personally love taking things apart, but soldering scares me. Not anymore, my fears aren't going to stop me. Everything is an experience.
I've had the problem that the stupid ball in the heart of the mouse gets clogged up with gunk and the ball won't turn the the little wheels to track the mouse movement.
Even worse some computers no longer have a mouse port and I have to use a USB adapter.
I have a pile of dead mice that I haven't bothered trying to fix. Are there any parts of a mouse that is worth recycling?
Ahhhh I wish I could tell ya but I have no clue. I mean you could check out what switches they have and see if its worth taking them all for a stockpile/sell but I doubt that would be profitable at all. Those are old mice, so I'd assume nothing is really usable. Optical sensor and such would probably be big bucks but not on the rollers.
Take my reply with a grain of salt, I do not know much about mice haha
This is a one-time notice from SCHOOL OF MINNOWS, a free value added service on hive.
Getting started on hive can be super hard on these social platforms 😪 but luckily there is some communities that help support the little guy 😊, you might like school of minnows, we join forces with lots of other small accounts to help each other grow!
Finally a good curation trail that helps its users achieve rapid growth, its fun on a bun! check it out. https://hive.blog/schoolofminnows/@schoolofminnows/someeznz9em3ap
This is really cool. I used to take things apart just to see how they worked. Not so much anymore, lol
MY first step would have been opening the amazon page.
Thank you! I appreciate the kind words. Actually a fun fact, as I work in IT. Whenever I have free time, I will take things apart no matter what it is. HDDs, projectors, Intel Nucs, etc. By far my favorite aspect of the IT field.
Oh for sure, 100% agree. That step is how I found out about the different kinds of switches and such, just didn't think of it while writing.
I am glad to know how to do mouse repair but I think I would just buy a new one as inexpensive as they are. Thanks for sharing on ListNerds.
Knowing how to do everything is an all around good thing, the less you rely on others. The more potential you have and more cash you can save.
I can understand that, my fat fingers tend to waste mouse switches in less than a year. My mouse started to not stay clicked in the 8 month mark. So to me, spending $14 on 8 switches is more economical than say $140 for the gaming mice I like. Not to mention the pro of not having to get acclimated to a new mouse's ergonomics when the mouse you like gets retired.
Of course, and thank you for reading and sharing your opinion!
Congratulations @iikrypticsii! You have completed the following achievement on the Hive blockchain and have been rewarded with new badge(s):
Your next target is to reach 8000 upvotes.
You can view your badges on your board and compare yourself to others in the Ranking
If you no longer want to receive notifications, reply to this comment with the word
STOPCheck out the last post from @hivebuzz:
Support the HiveBuzz project. Vote for our proposal!
Never experienced destroying a mouse just by using it. It's just the chairs though. lol.
Anyway, good job putting up a tutorial on how to do it.
Just be careful with the soldering fumes - that is lead.
!1UP
Haha man, I really hoped it wasn't just me, maybe the lack of durability in new mice... Nope, I click like im the hulk while playing games I guess. Don't even get me started on chairs, 80% of my life is on that darn thing. Unless it is unusable, I'm not wasting the money to buy another. Fabric tears be darned.
Thank you, for the compliment as well the warning about the fumes. I tried to hold my breath for the most part lol.
LOL. I can't imagine how you use your mouse. 🙂
lmfao I just don't get it, if anything I'm being overly nice to my mice (besides game sessions and you need to clutch up or something along those lines, you might relate to that)
Let's just say its bad enough that besides when I can't use both hands, I will use a remapped G1 key on my keyboard (G1&2 for L+R click) so those switches are rarely being used.
I do slam my mouse a few times but it is still intact. lol.
Is it possible that you happened to have a mouse that skipped quality check? 😁
I mean possibly? I doubt it as this is my third mouse. But the world works in mysterious ways. (If I'm not mistaken, 2 corsair M65 Pros, and now this G502)
Lol. It is in your hands then. 🙂
You have received a 1UP from @thecuriousfool!
@stem-curator, @vyb-curator, @pob-curator, @neoxag-curatorAnd they will bring !PIZZA 🍕
Learn more about our delegation service to earn daily rewards. Join the family on Discord.
PIZZA Holders sent $PIZZA tips in this post's comments:
@curation-cartel(13/20) tipped @iikrypticsii (x1)
Please vote for pizza.witness!
Dear @iikrypticsii, we need your help!
The Hivebuzz proposal already got an important support from the community. However, it lost its funding few days ago and only needs a few more HP to get funded again.
May we ask you to support it so our team can continue its work this year?
You can do it on Peakd, ecency, Hive.blog or using HiveSigner.
https://peakd.com/me/proposals/199
Your support would be really helpful and you could make the difference! Thank you!