[ENG-ESP] My card, for Christmas Eve. / Mi tarjeta, para noche buena.
Good morning friends.
Welcome back to another of my new projects. The month that we all enjoy with joy and enthusiasm has arrived, and before Christmas Eve approaches, I prepared with a lot of love my card for that special day, so that I can express all my good wishes and at the same time enjoy it with me. daughter and mother.
Amigos buenos días.
Bienvenidos nuevamente a otros de mis nuevos proyectos. Ha llegado el mes que todos disfrutamos con alegría y entusiasmo, y antes que se acerque el día de noche buena, elabore con mucho amor mi tarjeta para ese día tan especial, para así poder plasmar todos mis buenos deseos y a la vez disfrutarla junto a mi hija y madre.
To make it, use white double-sided cardboard, EVA foam, gift ribbon, among others.
Step 1:
To first make the card, from the cardboard I measured a rectangle 24 cm long x 20 cm wide and cut it, then on each side I measured 6 cm horizontally, to proceed to fold inward.
Para realizarla, use cartulina doble faz blanca, goma eva, cinta de regalo, entre otros.
Paso 1:
Para hacer primero la tarjeta, de la cartulina medí un rectángulo de 24 cm de largo x 20 cm de ancho y corte, luego de cada lado medí 6 cm de forma horizontal, para proceder a doblar hacia adentro.

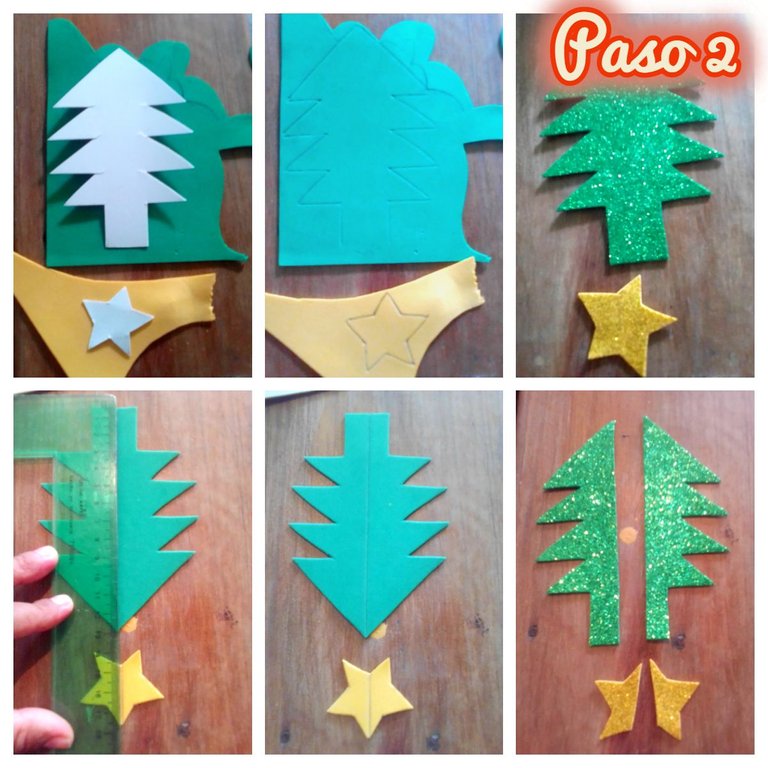
Step 2:
Then I used the frosty green and gold EVA foam, with a pattern I made a little tree and a star, in this part I use the gunwale to trace the little tree and the star all over the middle, which when cut both are divided.
Paso 2:
Luego utilice la goma eva verde escarchada y dorada, con un patrón hice un arbolito y estrella, en esta parte utilizo la regala para trazar por toda la mitad al arbolito y ka estrella, que al cortar ambos se dividen.
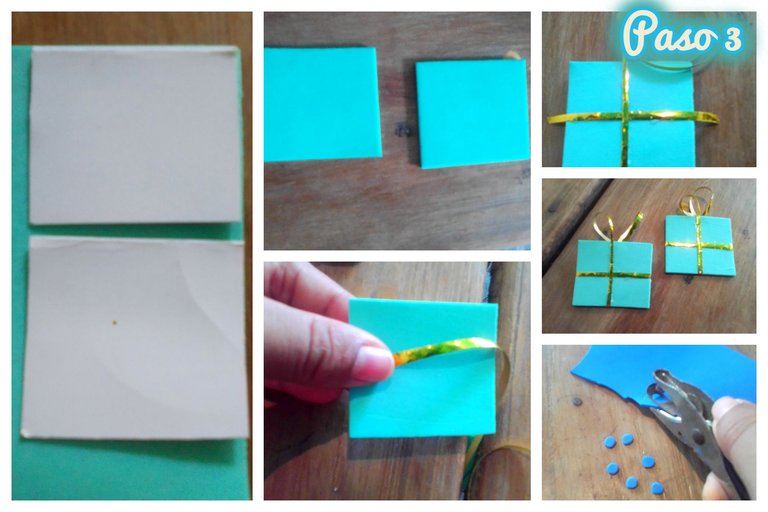
Step 3:
Cut 2 squares 5 cm wide x 5 cm long, using the light blue EVA foam. Then use a thin gold ribbon to place the squares and make some kind of gifts. With it, open a hole and take out some blue circles.
Paso 3:
Corte 2 cuadrados de 5 cm de ancho x 5 cm de largo, utilizando la goma eva azul claro. Luego use una cinta fina dorada, para colocarle a los cuadrados y hacer especie de unos regalos. Con él abre hueco saque unos círculos azules.
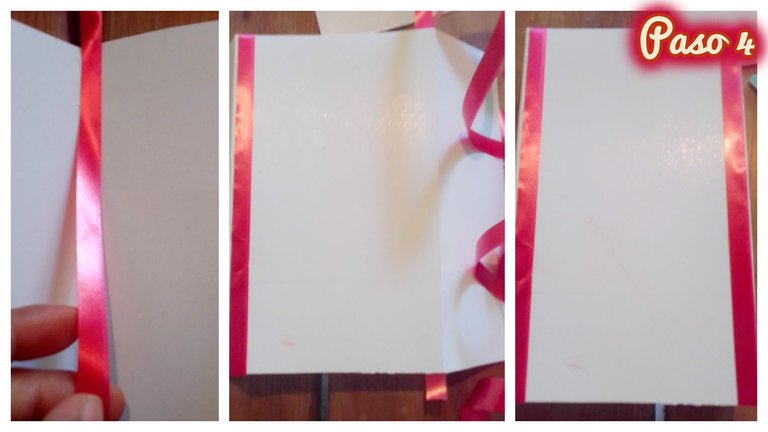
Step 4:
Use red tape, and stick it vertically, passing it along the entire contour where it folds, until you reach the back.
Paso 4:
Use cinta color rojo, y la pegue de forma vertical, pasándola por todo el contorno donde doble, hasta llegar por la parte de atrás.
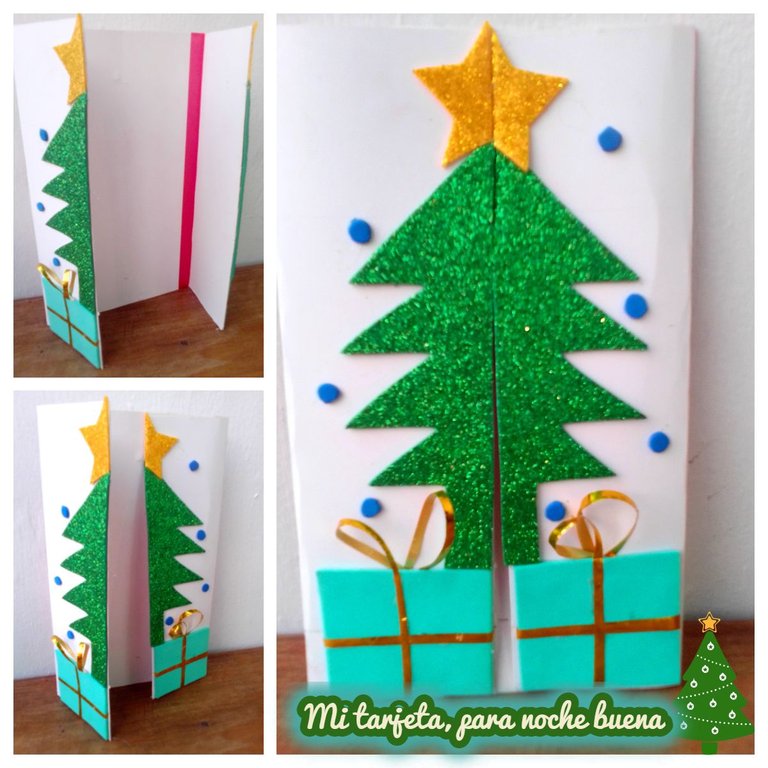
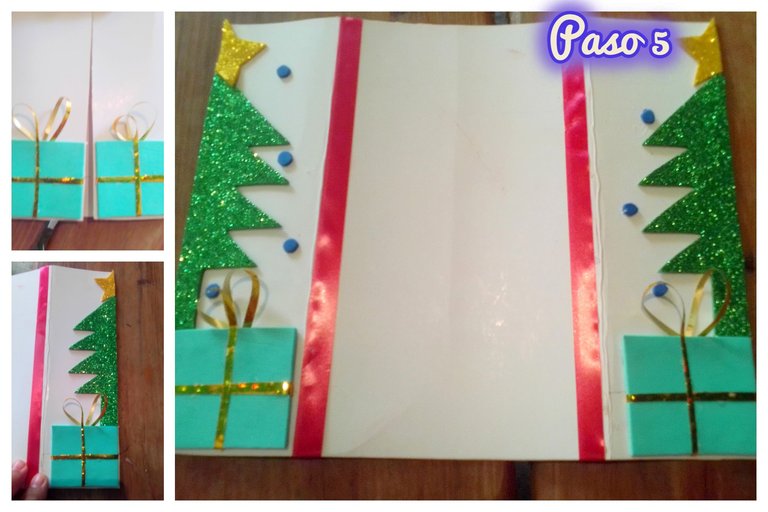
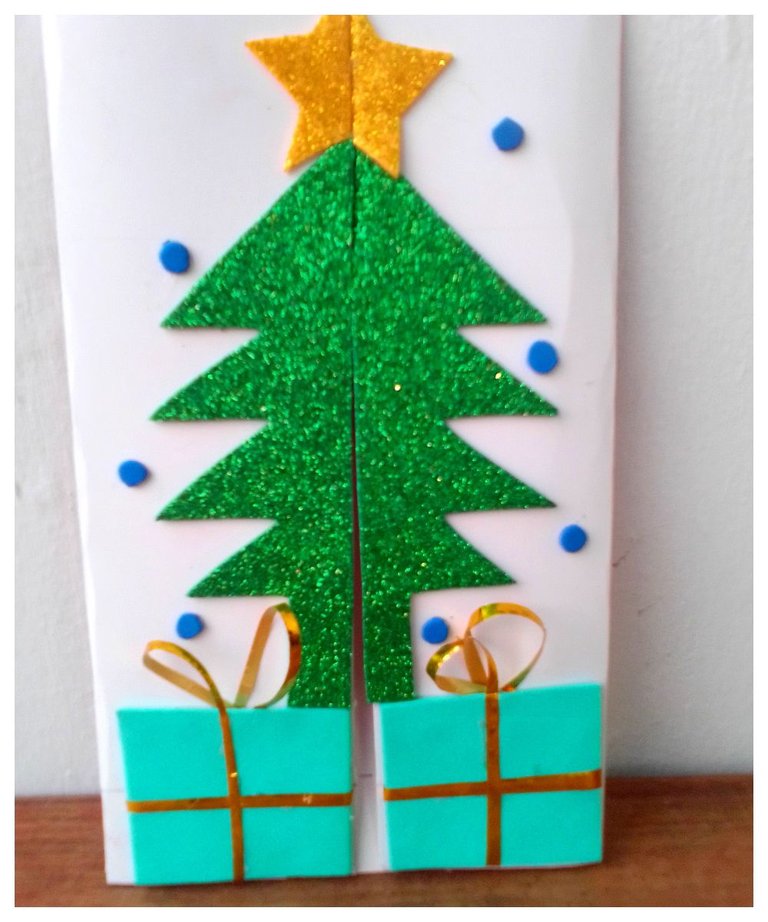
Step 5:
This part is what I love, it is where we put all our incentive to what we undertake, in this way I began to decorate the card, gluing the gifts on the bottom part, which is the bottom part, and so on. one of the windows of the card half of the tree and star, then I opened it and proceeded to glue the blue circles on it, this way you can see that when you close it it looks great.
Paso 5:
Esta parte es la que me encanta, es donde le colocamos todo nuestro incentivo a lo que emprendemos, de esta manera comencé a hacerle la decoración a la tarjeta, pegándole en la parte de abajo, que viene siendo la inferior, los regalos y así en una de las ventanas de la tarjeta la mitad del arbolito y estrella, luego la abrí y procedí a pegarle los círculos azules, de esta forma pueden ver que al cerrarla se ve genial.
FINAL SCORE:
Friends, here I show you my final result, I made this card with the purpose of writing my wishes. I know that you also have that light, which makes you shine both inside and out. Likewise, if you don't need to make it for Christmas Eve, the other option is to give it as a gift. In any case, if you dare to make it, here is a design.
Blessed day.
RESULTADO FINAL:
Amigos aquí les muestro mi resultado final, esta tarjeta la elaboré con la finalidad de escribir mis deseos. Sé que ustedes también tienen esa luz, que les hace brillar tanto por dentro como por fuera. De igual manera, si no la requieren hacer para noche buena, la otra opción es regalar, de todas formas si se animan a elaborarla, aquí les dejo un diseño.
Bendecido día.
Collage making program: Fotojet Link
Translated from google translator Link
Photo editing program: PhotoFiltre 7
Las fotos fueron tomadas desde un Xiaomi Mi A2.
Programa para hacer el collage: Fotojet Enlace
Traducido del traductor de Google Enlace
Programa para editar fotos: PhotoFiltre 7
I say goodbye until another opportunity.
Thanks for your support.
Me despido hasta otra oportunidad.
Gracias por su apoyo.
Copyright @imargasa. All rights reserved.
Congratulations, your post has been upvoted by @dsc-r2cornell, which is the curating account for @R2cornell's Discord Community.
https://twitter.com/hivediy47901/status/1731663379301847408