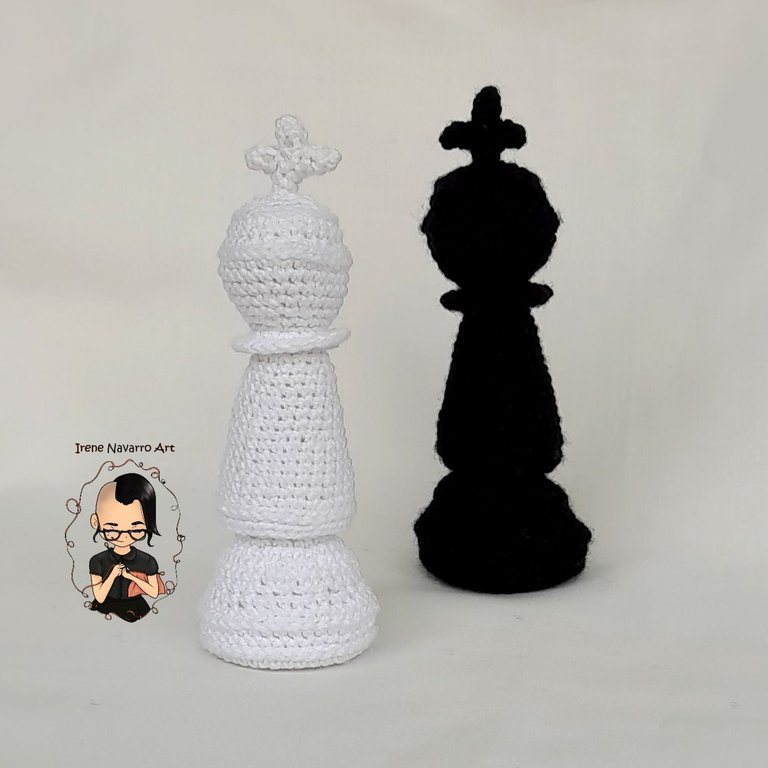
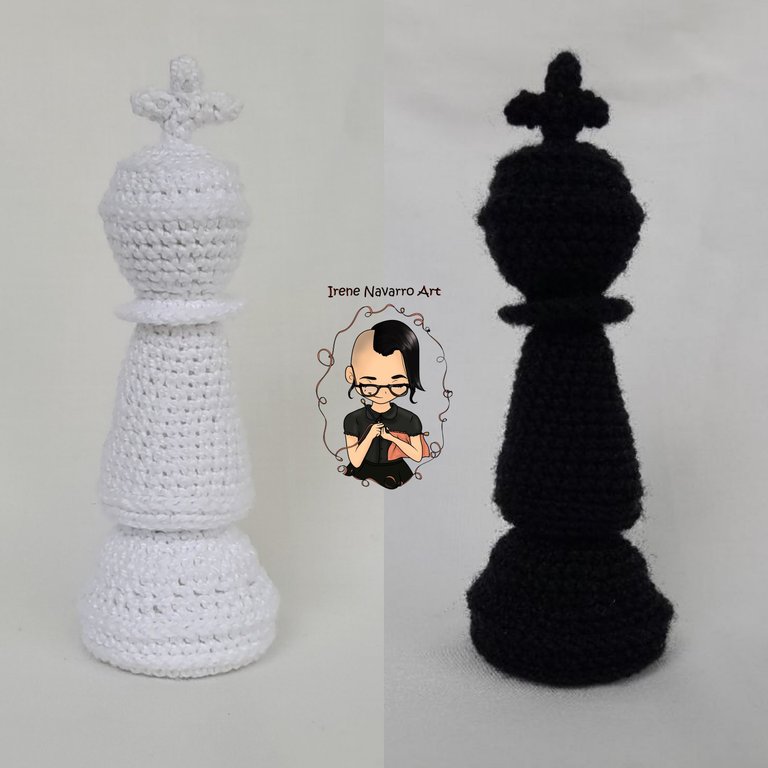
Ajedrez a crochet- Parte 6: Rey
Greetings dear community, with joy I share the tutorial of the King of chess piece, this is the piece that was missing, I will start working on the board and I hope soon to be able to share the completion of this great project, at the end of this publication you will be able to find the link to the previous tutorials, I hope you find it useful.


Materiales / Materials
- Hilo acrílico para crochet: blanco y negro
- Ganchillo # 4 (1.25mm)
- Aguja de ojal grande
- Relleno
- 2 canicas
- 2 círculos de plástico
- Tijera
- Hilo acrílico para crochet: blanco y negro
- Ganchillo # 4 (1.25mm)
- Aguja de ojal grande
- Relleno
- 2 canicas
- 2 círculos de plástico
- Tijera
Proceso / Process
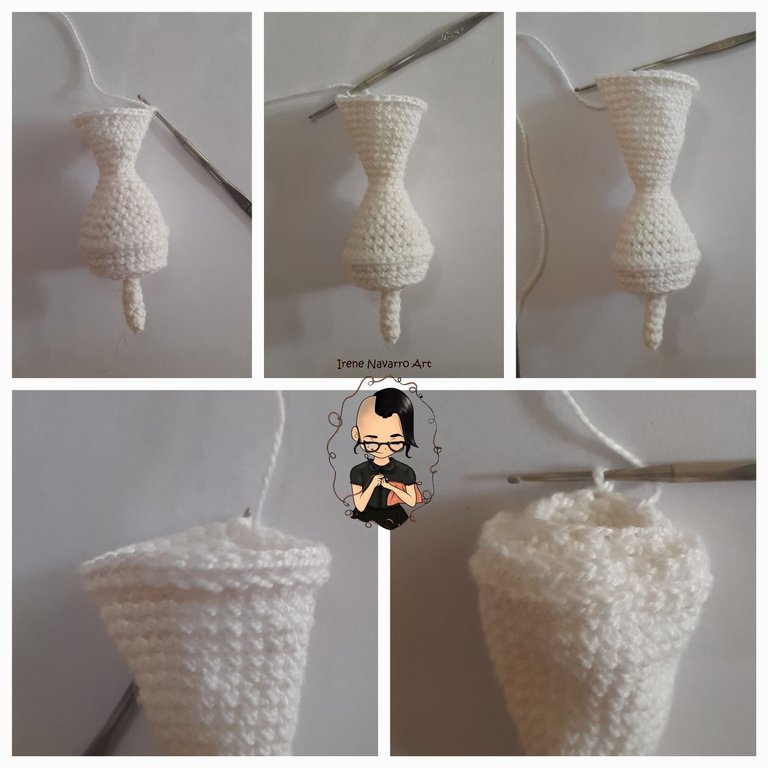
Comenzar con 4 puntos bajos en un anillo
Hileras 1-6: 4 puntos bajos
Hilera 7: 4 aumentos dobles. Total de puntadas: 12
Hilera 8: 12 aumentos. Total de puntadas: 24
Hilera 9: 24 puntos bajos
Hilera 10: Tomando solo el lado frontal hacer 24 puntos deslizados
Hilera 10.1: Tomando solo el lado de atrás de la hilera 9 hacer 24 puntos bajos
Hilera 11: 24 puntos bajos
Hilera 12: Tomando solo el lado frontal (1 punto bajo, 1 aumento) X 12. Total de puntadas: 36
Hilera 13: Tomando solo el lado frontal hacer 36 puntos deslizados
Hilera 13.1: Tomando solo el lado de atrás de la hilera 12 hacer (2 puntos bajos, 1 disminución, 2 puntos bajos) X 6. Total de puntadas: 30
Hilera 14: (4 puntos bajos, 1 disminución, 4 puntos bajos) X 3. Total de puntadas: 27
Hilera 15: (7 puntos bajos, 1 disminución) X 3. Total de puntadas: 24
Hilera 16: (3 puntos bajos, 1 disminución, 3 puntos bajos) X 3. Total de puntadas: 21
Hilera 17: (5 puntos bajos, 1 disminución) X 3. Total de puntadas: 18
Hilera 18: (2 puntos bajos, 1 disminución, 2 puntos bajos) X 3. Total de puntadas: 15
Hilera 19: (3 puntos bajos, 1 disminución) X 3. Total de puntadas: 12
Start with 4 single crochets in a ring
Rows 1-6: 4 single crochet
Row 7: 4 double increases. Total stitches: 12
Row 8: 12 increases. Total stitches: 24
Row 9: 24 single crochet
Row 10: Taking only the front side make 24 slip stitches
Row 10.1: Taking only the back side of row 9 make 24 single crochet
Row 11: 24 single crochets
Row 12: Taking only the front side (1 single crochet, 1 increase) X 12. Total stitches: 36
Row 13: Taking only the front side make 36 slip stitches
Row 13.1: Taking only the back side of row 12 make (2 single crochet, 1 decrease, 2 single crochet) X 6. Total stitches: 30
Row 14: (4 single crochet, 1 decrease, 4 single crochet) X 3. Total stitches: 27
Row 15: (7 single crochet, 1 decrease) X 3. Total stitches: 24
Row 16: (3 single crochet, 1 decrease, 3 single crochet) X 3. Total stitches: 21
Row 17: (5 single crochet, 1 decrease) X 3. Total stitches: 18
Row 18: (2 single crochet, 1 decrease, 2 single crochet) X 3. Total stitches: 15
Row 19: (3 single crochet, 1 decrease) X 3. Total stitches: 12

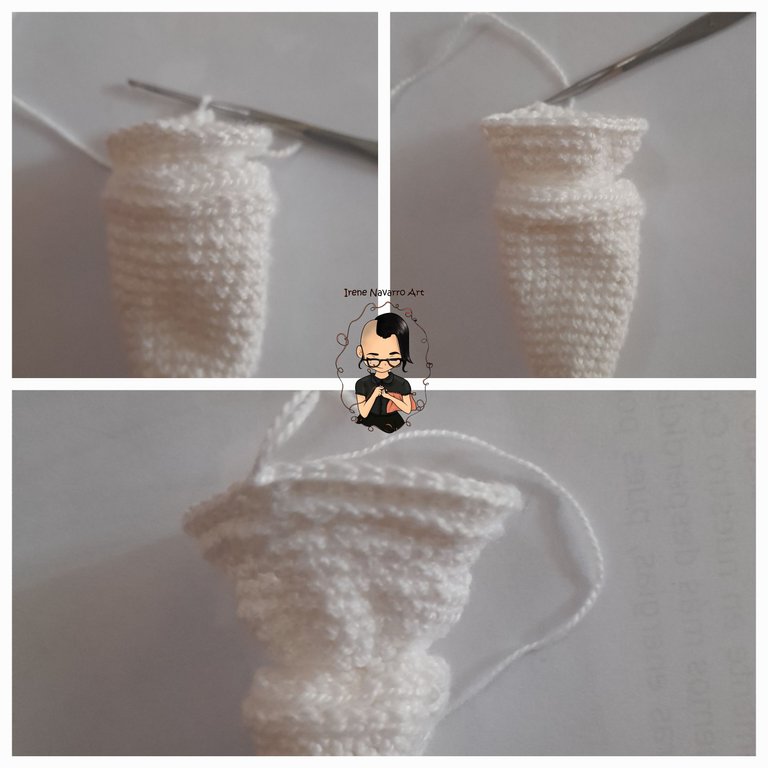
Hilera 20: Tomando solo el lado de atrás hacer 12 puntos bajos.
Hilera 21: 12 puntos bajos
Hilera 22: (3 puntos bajos, 1 aumento) X 3. Total de puntadas: 15
Hilera 23: (2 puntos bajos, 1 aumento, 2 puntos bajos) X 3. Total de puntadas: 18
Hileras 24-25: 18 puntos bajos
Hilera 26: (5 puntos bajos, 1 aumento) X 3. Total de puntadas: 21
Hileras 27-28: 21 puntos bajos
Hilera 29: (3 puntos bajos, 1 aumento, 3 puntos bajos) X 3. Total de puntadas: 24
Hileras 30-31 : 24 puntos bajos
Hilera 32: (7 puntos bajos, 1 aumento) X 3. Total de puntadas: 27
Hileras 33-34: 27 puntos bajos
Hilera 35: (4 puntos bajos, 1 aumento, 4 puntos bajos) X 3. Total de puntadas: 30
Hilera 36: Tomando solo el lado frontal hacer 30 puntos deslizados
Hilera 36.1: Tomando solo el lado de atrás de la hilera 35 hacer 30 puntos bajos
Hilera 37:Tomando solo el lado frontal hacer 30 puntos deslizados
Hilera 37.1: Tomando solo el lado de atrás de la hilera 36.1 hacer (3 puntos bajos, 1 disminución) X 6. Total de puntadas: 24
Hilera 38: 12 disminuciones
Row 20: Taking only the back side make 12 single crochet.
Row 21: 12 single crochet
Row 22: (3 single crochet, 1 increase) X 3. Total stitches: 15
Row 23: (2 single crochet, 1 increase, 2 single crochet) X 3. Total stitches: 18
Rows 24-25: 18 single crochet
Row 26: (5 single crochet, 1 increase) X 3. Total stitches: 21
Rows 27-28: 21 single crochets
Row 29: (3 single crochet, 1 increase, 3 single crochet) X 3. Total stitches: 24
Rows 30-31: 24 single crochets
Row 32: (7 single crochet, 1 increase) X 3. Total stitches: 27
Rows 33-34: 27 single crochets
Row 35: (4 single crochet, 1 increase, 4 single crochet) X 3. Total stitches: 30
Row 36: Taking only the front side make 30 slip stitches
Row 36.1: Taking only the back side of row 35 make 30 single crochet
Row 37:Taking only the front side make 30 slip stitches
Row 37.1: Taking only the back side of row 36.1 make (3 single crochet, 1 decrease) X 6. Total stitches: 24
Row 38: 12 decreases
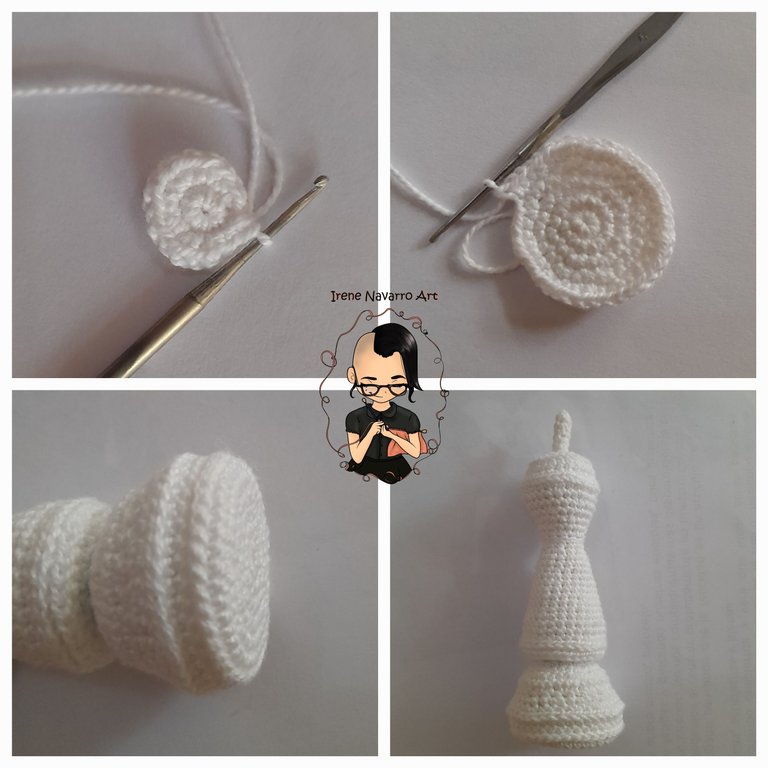
Hilera 39: Tomando solo el lado frontal hacer 12 aumentos. Total de puntadas: 24
Hilera 40: (3 puntos bajos, 1 aumento) X 6. Total de puntadas: 30
Hilera 41: (2 puntos bajos, 1 aumento, 2 puntos bajos) X 6. Total de puntadas: 36
Hilera 42: 36 puntos bajos
Hilera 43: (1 punto bajo, 1 disminución) X 12. Total de puntadas: 24
Hilera 44: (1 punto bajo, 1 aumento) X 12. Total de puntadas: 36
Hilera 45: (4 puntos bajos, 1 aumento, 4 puntos bajos) X 4. Total de puntadas: 40
Hilera 46:Tomando solo el lado frontal hacer 40 puntos deslizados
Hilera 46.1: Tomando solo el lado de atrás de la hilera 45 hacer 40 puntos bajos
Hilera 47: 40 puntos bajos .
Dejar en suspenso para hacer la base.
Row 39: Taking only the front side make 12 increases. Total stitches: 24
Row 40: (3 single crochet, 1 increase) X 6. Total stitches: 30
Row 41: (2 single crochet, 1 increase, 2 single crochet) X 6. Total stitches: 36
Row 42: 36 single crochets
Row 43: (1 single crochet, 1 decrease) X 12. Total stitches: 24
Row 44: (1 single crochet, 1 increase) X 12. Total stitches: 36
Row 45: (4 single crochet, 1 increase, 4 single crochet) X 4. Total stitches: 40
Row 46:Taking only the front side make 40 slip stitches
Row 46.1: Taking only the back side of row 45 make 40 single crochet
Row 47: 40 single crochet.
Suspend to make the base.
Para la base:
Hacer 8 puntos bajos en un anillo.
Hilera 1: 8 aumentos. Total de puntadas: 16
Hilera 2: (1 punto bajo, 1 aumento) X 8. Total de puntadas: 24
Hilera 3: (1 punto bajo, 1 aumento, 1 punto bajo) X 8. Total de puntadas: 32
Hilera 4: (3 puntos bajos, 1 aumento) X 8. Total de puntadas: 40
Hilera 5: 40 puntos bajos. Terminar con 1 punto deslizado.
Retomar el cuerpo y rellenar, introducir la canica y colocar el círculo de plástico. Tomando solo el lado frontal de ambos lados unir la base con una hilera de puntos deslizados. Esconder la hebra por dentro.
For the base:
For the base make 8 single crochets in a ring.
Row 1: 8 increases. Total stitches: 16
Row 2: (1 single crochet, 1 increase) X 8. Total stitches: 24
Row 3: (1 single crochet, 1 increase, 1 single crochet) X 8. Total stitches: 32
Row 4: (3 single crochet, 1 increase) X 8. Total stitches: 40
Row 5: 40 single crochet. Finish with 1 slip stitch.
Retake the body and fill, insert the marble and place the plastic circle. Taking only the front side of both sides join the base with a row of slip stitches. Hide the thread inside.
Para la cruz, iniciar con 4 puntos bajos en un anillo, hacer 4 puntos bajos y luego 1 unto deslizado. Hacer dos iguales y coser a ambos lados.
Para el cuello, retomar los lados frontales de las hilera 16 y hacer 12 aumentos, hacer 24 puntos bajos, tomando solo el lado de atrás hacer 24 puntos deslizados y esconder la hebra por dentro.
For the cross, start with 4 single crochets in a ring, work 4 single crochets and then 1 slip stitch. Make two of the same and sew on both sides.
For the neck, go back to the front sides of row 16 and make 12 increases, make 24 single crochets, taking only the back side make 24 slip stitches and hide the yarn inside.
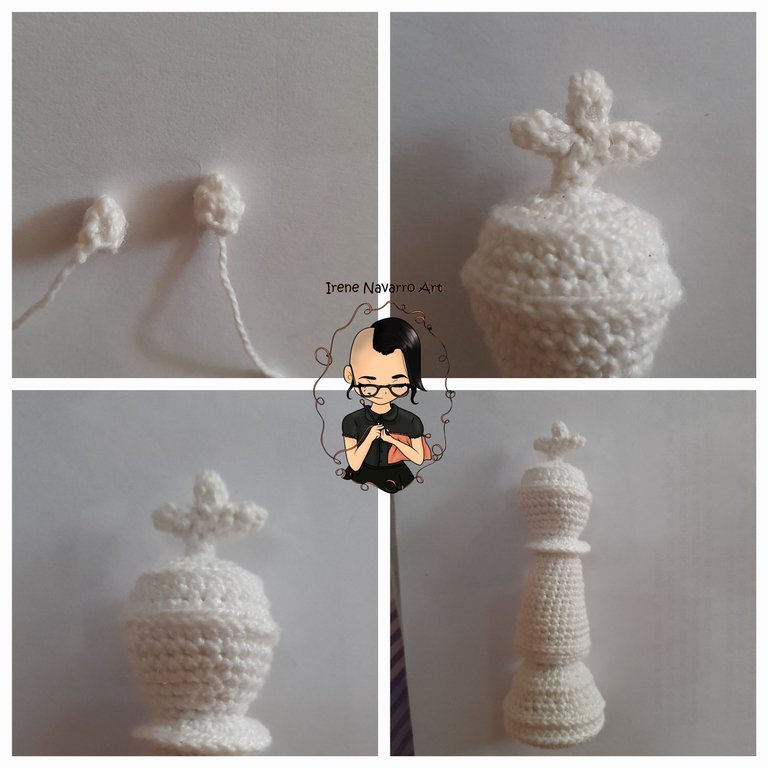
Resultado / Result
I hope you liked this tutorial, with these pieces the 32 pieces of chess are completed, it has been a bit of work but it has been worth it. I hope to meet expectations when I make the board. 🥰
Ajedrez a crochet – Parte 1: Peón
Ajedrez a crochet – Parte 2: Torre
Ajedrez a crochet – Parte 3: Alfil
Ajedrez a crochet – Parte 4: Caballo
Ajedrez a crochet – Parte 5: Reina
Imágenes tomadas con dispositivo Samsung A12.
Pictures taken with Samsung A12 device.
Invítenme un Café/Support Me on Ko-Fi

https://ko-fi.com/irenenavarroart
If you want to support my art you can also make donations for the value of a coffee (Ko-Fi)

Espero les haya gustado. Les invito a leer mis próximas publicaciones y siempre estaré dispuesta a responder sus preguntas y comentarios, también pueden seguirme y contactarme en cualquiera de mis redes sociales. ¡Muchas gracias!
I hope you liked it. I invite you to read my next publications and I will always be willing to answer your questions and comments, you can also follow me and contact me on any of my social networks. Thank you!
¡Felicidades por completar las piezas del ajedrez!. No me imagino tejer las 32 piezas, a las justas a la reina creo, jaja. Un abrazo.
Muchas gracias, ya están solo esperando por el tablero 😊
https://twitter.com/IreneNavarroArt/status/1570087686559662080
https://twitter.com/leidimar011319/status/1570200604525338624
The rewards earned on this comment will go directly to the people( @irenenavarroart, @leidimarc ) sharing the post on Twitter as long as they are registered with @poshtoken. Sign up at https://hiveposh.com.
Excelente trabajo que merece admiración. Te felicito!
Muchas gracias @giocondina 🥰
Wow, @irenenavarroart I love how those chess pieces are turning out.
Thank you 😁
Que bello 😍😍😍😍😍amiga, excelente, felicitaciones! un aplauso..👏🏼👏🏼👏🏼👏🏼
Muchas gracias 🤗
It’s no longer a new thing have come to the conclusion that you’re just too good when it’s comes to crocheting, have not doubt you’re surly a pro, looking at your illustrations on how to make this am like
(what’s going on here am so lost), looking at your illustrations, your just too good, it’s simply means that just like me crocheting had really sowed deeply into you...😳 you’re just too good and al super excited to have you at round such an amazing person with such a great gifting 🙌🙌
thank you very much for your comment, crochet is a great passion for me 😊
You’re absolutely right @irenenavarroart and you’re so passionate about what you do that’s why you’re so good at it
Es un trabajo bien elaborado y son muchas piezas, me encanta. Saludos.
Muchas gracias señora Jessi 🥰
se ven muy bien, me gusta la idea y la determinacion para todo el trabajo
Muchas gracias 🤗
Admiro tu trabajo amiga @irenenavarroart, ya he visto varias de tus piezas y son realmente hermosas.
32 uff que trabajon, tanto esfuerzo seguro tiene su recompensa.
Ahora por el tablero, que será de las piezas más grandes.
Saludos y bendiciones.
Muchas gracias, espero que no me tome tanto tiempo hacer el tablero, pero ya es lo único que me falta y eso me motiva. Saludos 🤗
Si será muy lindo ver el trabajo completo.
Thank you for sharing this amazing post on HIVE!
Your content got selected by our fellow curator @stevenson7 & you just received a little thank you via an upvote from our non-profit curation initiative!
You will be featured in one of our recurring curation compilations and on our pinterest boards! Both are aiming to offer you a stage to widen your audience within and outside of the DIY scene of hive.
Join the official DIYHub community on HIVE and show us more of your amazing work and feel free to connect with us and other DIYers via our discord server: https://discord.gg/mY5uCfQ !
If you want to support our goal to motivate other DIY/art/music/homesteading/... creators just delegate to us and earn 100% of your curation rewards!
Stay creative & hive on!
Thank you 😊
¡Enhorabuena!
✅ Has hecho un buen trabajo, por lo cual tu publicación ha sido valorada y ha recibido el apoyo de parte de CHESS BROTHERS ♔ 💪
♟ Te invitamos a usar nuestra etiqueta #chessbrothers y a que aprendas más sobre nosotros.
♟♟ También puedes contactarnos en nuestro servidor de Discord y promocionar allí tus publicaciones.
♟♟♟ Considera unirte a nuestro trail de curación para que trabajemos en equipo y recibas recompensas automáticamente.
♞♟ Echa un vistazo a nuestra cuenta @chessbrotherspro para que te informes sobre el proceso de curación llevado a diario por nuestro equipo.
Cordialmente
El equipo de CHESS BROTHERS
Muchas gracias por el apoyo 🤗
Se ve que te gusta lo que haces porque cada pieza esta quedando hermosa y prolija.
Mucha gracias @carolinacardoza siempre trato de hacer lo mejor que puedo . Abrazo 🤗
Amiga que espectacular quedaron tus reyes estan hermosos .
Saludos (ʘᴗʘ✿)
Muchas gracias bella 🥰
Pero que emoción.!!!! Solamente queda el tablero 😍😘💞.... Benditas tus manos creadoras Irene. Estoy muy contenta por tu trabajo ♟️♟️♟️ ya quiero ver el post final.
🎆🎇🎉🎊🌧️💐✨🌾🌱🌹🌙🌿🍃🥀⚡🌺☘️🍀🌈🌷⭐🪴🌵🌸🌟💮🌴🌳💫☀️💮☔🌲🌳🌍🌌🌠☄️🏵️🐝🌻🌼🍄🐞🦋💙☕💜🍍🎆🎇🎉🎊🎆🎇🎉🎊🌧️💐✨🌾🌱🌹🌙🌿🍃🥀⚡🌺☘️🍀🌈🌷⭐🪴🌵🌸🌟💮🌴🌳💫☀️💮☔🌲🌳🌍🌌🌠☄️🏵️🐝🌻🌼🍄🐞🦋💙☕💜🍍🎆🎇🎉🎊🎆🎇🎉🎊🌧️💐✨🌾🌱🌹🌙🌿🍃🥀⚡🌺☘️🍀🌈🌷⭐🪴🌵🌸🌟💮🌴🌳💫☀️💮☔🌲🌳🌍🌌🌠☄️🏵️🐝🌻🌼🍄🐞🦋💙☕💜🍍🎆🎇🎉🎊
!PIZZA
!LADY
View or trade
LOHtokens.@chacald.dcymt, you successfully shared 0.1000 LOH with @irenenavarroart and you earned 0.1000 LOH as tips. (3/3 calls)
Use !LADY command to share LOH! More details available in this post.
PIZZA Holders sent $PIZZA tips in this post's comments:
@chacald.dcymt(3/5) tipped @irenenavarroart (x1)
Please vote for pizza.witness!
Cada pieza de ajedrez te ha quedado muy hermoso. Te quedará como el ajedrez más creativo y original. Te felicito 😊❤️
Muchas gracias @ivycrafts 🤗
Pretty amazing @irenenavarroart! Bravo!
Thank you 🥰
Cómo siempre un hermoso trabajo amiga, muy bien explicado.
Felicidades 😁.
Muchas gracias 😀 Saludos