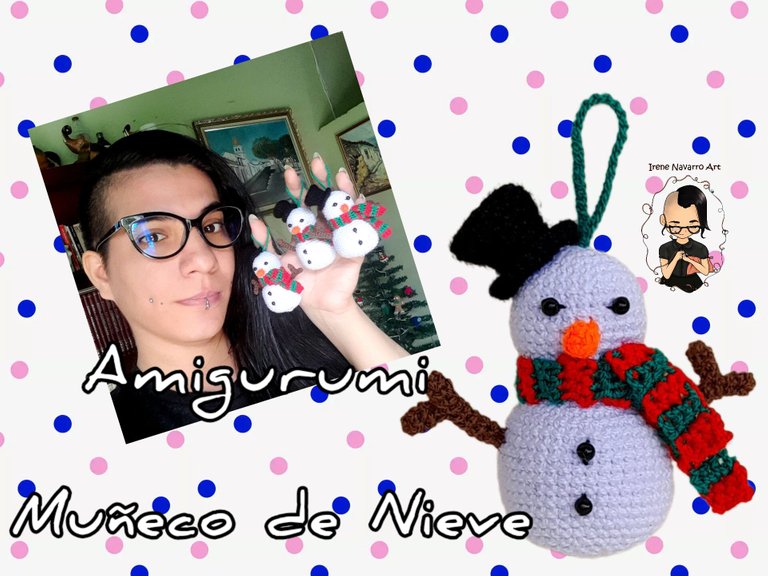
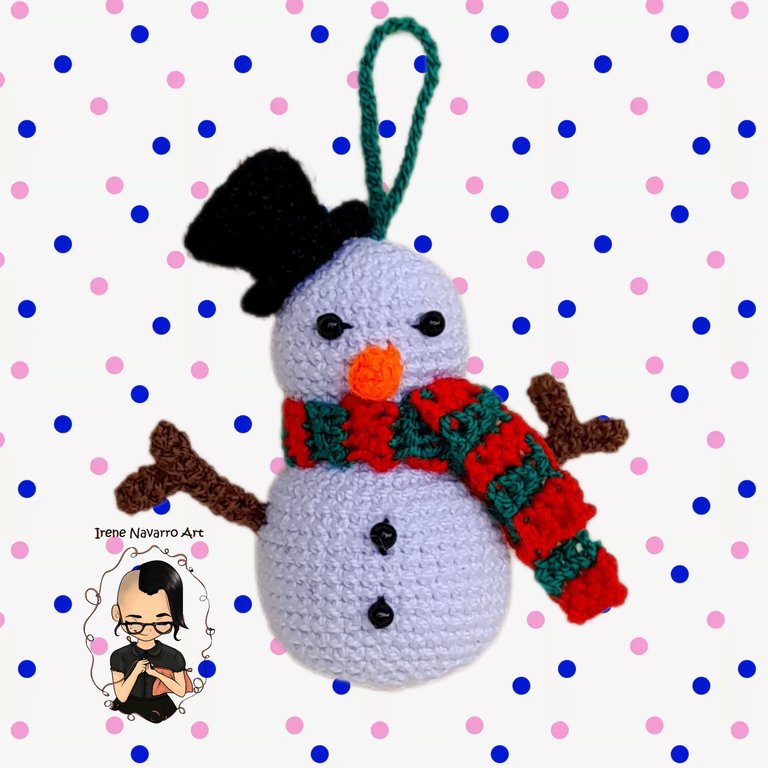
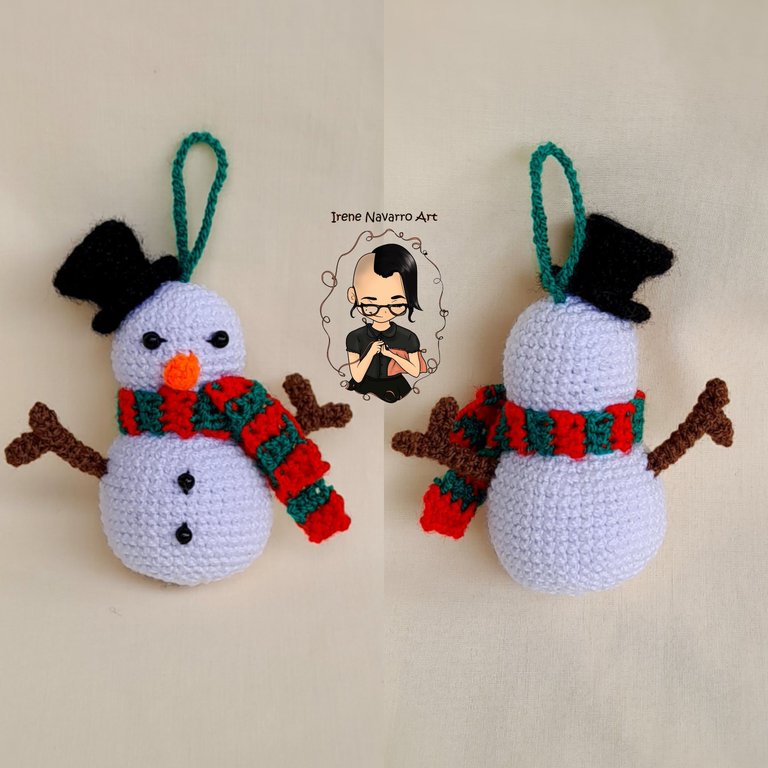
Amigurumi Muñeco de Nieve // Decorando el Árbol de Navidad Parte 3
Greetings dear community, I continue making amigurumis to decorate the Christmas tree, little by little things are taking shape and I feel more excited, although it seems like a race against the clock, and next week the month of December will be starting, so I feel the pressure, although I know that my son does not mind waiting, the ideal would be to have the tree completely decorated before the 24th or before. For now I share how to make the Snowman and I hope you like it.

Materiales / Materials
- Hilo acrílico para crochet: blanco, negro, marrón, verde, rojo y naranja.
- Ganchillo # 4 (1.25mm)
- Relleno
- Aguja de ojal grande
- 4 perlas negras de plástico para cada muñeco de Nieve.
- Hilo y aguja de coser.
- Acrylic yarn for crochet: white, black, brown, green, red and orange.
- Hook # 4 (1.25mm)
- filler
- Large buttonhole needle
- 4 black plastic pearls for each Snowman.
- Thread and sewing needle.
Proceso / Process
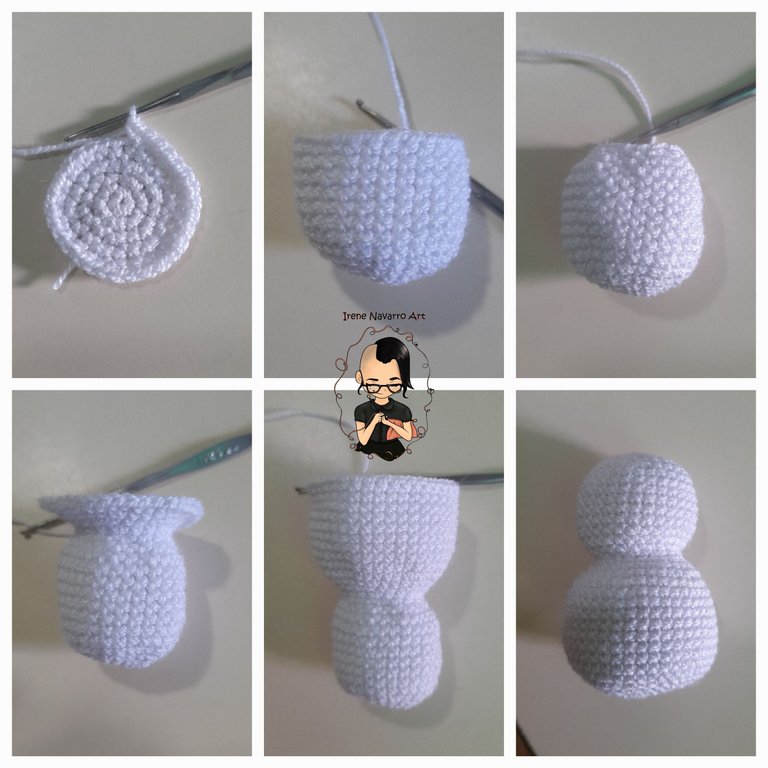
Con hilo blanco hacer 6 puntos bajos en un anillo.
Hilera 1: 6 aumentos. Total de puntadas: 12
Hilera 2: (1 punto bajo, 1 aumento) X 6. Total de puntadas: 18
Hilera 3: (1 punto bajo, 1 aumento, 1 punto bajo) X 6. Total de puntadas: 24
Hilera 4: (3 puntos bajos, 1 aumento) X 6. Total de puntadas: 30
Hileras 5 - 12: 30 puntos bajos.
Hilera 13: (3 puntos bajos, 1 disminución) X 6. Total de puntadas: 24
Hilera 14: (1 punto bajo, 1 disminución, 1 punto bajo) X 6. Total de puntadas: 18
Hilera 15: (1 punto bajo, 1 aumento, 1 punto bajo) X 6. Total de puntadas: 24
Hilera 16: (3 puntos bajos, 1 aumento) X 6. Total de puntadas: 30
Hilera 17: (2 puntos bajos, 1 aumento, 2 puntos bajos) X 6. Total de puntadas: 36
Hilera 18: (5 puntos bajos, 1 aumento) X 6. Total de puntadas: 42
Hileras 19 - 27: 42 puntos bajos
Hilera 20: (5 puntos bajos, 1 disminución) X 6. Total de puntadas: 36
Hilera 21: (2 puntos bajos, 1 disminución, 2 puntos bajos) X 6. Total de puntadas: 30
Hilera 22: (4 puntos bajos, 1 disminución) X 6. Total de puntadas: 24
Hilera 23: (1 puntos bajo, 1 disminución, 1 punto bajo) X 6. Total de puntadas: 18
Hilera 24: (1 punto bajo, 1 disminución) X 6. Total de puntadas: 12
Hilera 25: 6 disminuciones.
Rellenar antes de cerrar. Esconder la hebra por dentro.
With white thread make 6 single crochets in a ring.
Row 1: 6 increases. Total stitches: 12
Row 2: (1 single crochet, 1 increase) X 6. Total stitches: 18
Row 3: (1 single crochet, 1 increase, 1 single crochet) X 6. Total stitches: 24
Row 4: (3 single crochets, 1 increase) X 6. Total stitches: 30
Rows 5 - 12: 30 single crochet.
Row 13: (3 single crochets, 1 decrease) X 6. Total stitches: 24
Row 14: (1 single crochet, 1 decrease, 1 single crochet) X 6. Total stitches: 18
Row 15: (1 single crochet, 1 increase, 1 single crochet) X 6. Total stitches: 24
Row 16: (3 single crochets, 1 increase) X 6. Total stitches: 30
Row 17: (2 single crochets, 1 increase, 2 single crochets) X 6. Total stitches: 36
Row 18: (5 single crochets, 1 increase) X 6. Total stitches: 42
Rows 19 - 27: 42 single crochet
Row 20: (5 single crochets, 1 decrease) X 6. Total stitches: 36
Row 21: (2 single crochets, 1 decrease, 2 single crochets) X 6. Total stitches: 30
Row 22: (4 single crochets, 1 decrease) X 6. Total stitches: 24
Row 23: (1 single crochet, 1 decrease, 1 single crochet) X 6. Total stitches: 18
Row 24: (1 single crochet, 1 decrease) X 6. Total stitches: 12
Row 25: 6 decreases.
Fill before closing. Hide the strand inside.
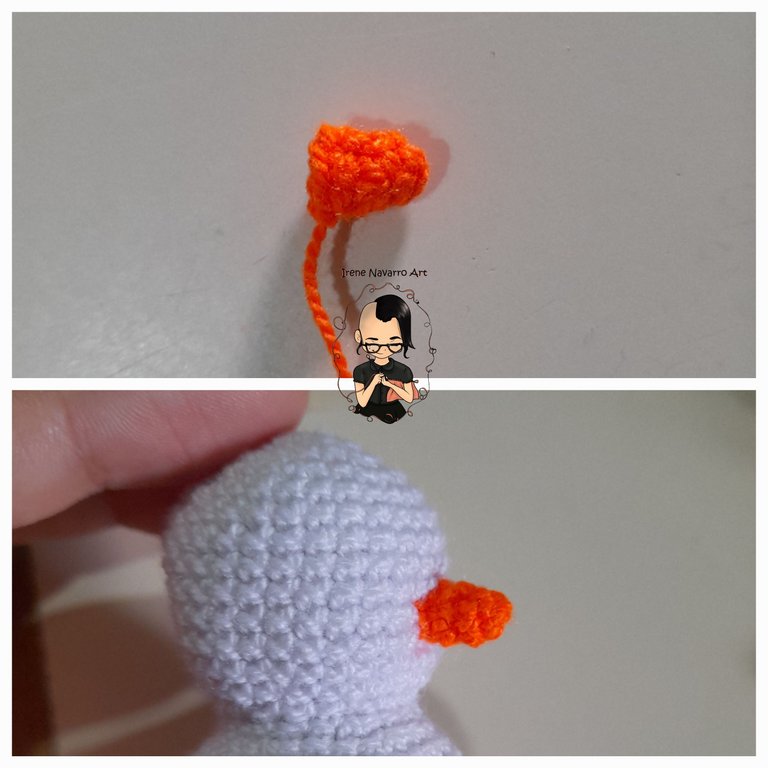
Con hilo naranja hacer 4 puntos en un anillo.
Hilera 1: 3 puntos bajos, 1 aumento. Total de puntadas: 5
Hilera 2: 2 puntos bajos, 1 aumento, 2 puntos bajos. Total de puntadas: 6
Cerrar con 1 punto deslizado y dejar una hebra larga para coser a la cabeza.
With orange yarn make 4 stitches in a ring.
Row 1: 3 single crochet, 1 increase. Total stitches: 5
Row 2: 2 single crochets, 1 increase, 2 single crochets. Total stitches: 6
Close with 1 slip stitch and leave a long tail to sew to the head.
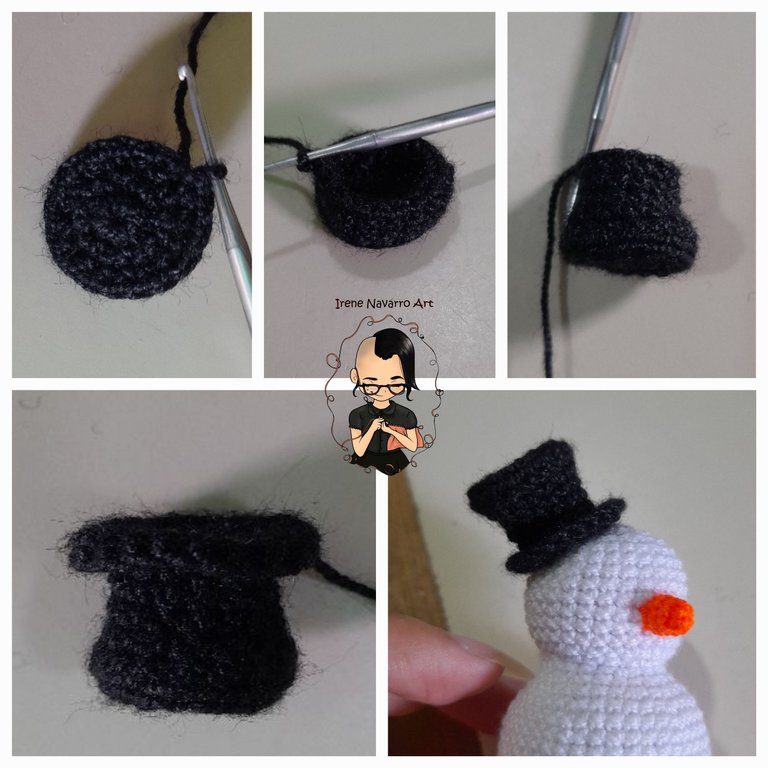
Con hilo negro hacer 8 puntos bajos en un anillo.
Hilera 1: 8 aumentos. Total de puntadas: 16
Hilera 2: 16 puntos bajos.
Hilera 3: Tomando solo el lado de atrás hacer 16 puntos deslizados.
Hilera 4: Tomando solo el lado de atrás hacer 16 puntos bajos.
Hilera 5: 16 puntos bajos.
Hilera 6: (6 puntos bajos, 1 disminución) X 2. Total de puntadas: 14
Hileras 7 y 8: 14 puntos bajos.
Hilera 9: Tomando solo el lado frontal (1 punto bajo, 1 aumento) X 7. Total de puntadas: 21
Hilera 10: 21 puntos bajos.
Cerrar con 1 puntos deslizados y dejar una hebra larga para coser a la cabeza.
With black thread make 8 single crochets in a ring.
Row 1: 8 increases. Total stitches: 16
Row 2: 16 single crochet.
Row 3: Taking only the back side make 16 slip stitches.
Row 4: Taking only the back side make 16 single crochets.
Row 5: 16 single crochet.
Row 6: (6 single crochets, 1 decrease) X 2. Total stitches: 14
Rows 7 and 8: 14 single crochet.
Row 9: Taking only the front side (1 single crochet, 1 increase) X 7. Total stitches: 21
Row 10: 21 single crochet.
Close with 1 slip stitch and leave a long tail to sew to the head.
Con hilo marrón hacer 4 puntos bajos en un anillo, hacer 8 hileras. Dejar una hebra larga para coser al cuerpo. Hacer dos iguales.
Hacer 4 puntos bajos en un anillo , hacer 3 hileras. Dejar una hebra larga para coser a la primera parte. Hacer dos iguales.
With brown thread make 4 single crochets in a ring, make 8 rows. Leave a long tail to sew to the body. Make two alike.
Make 4 single crochets in a ring, make 3 rows. Leave a long tail to sew to the first part. Make two alike.

Con hilo rojo hacer 3 cadenas de inicio.
Hacer 2 hileras de puntos bajos y luego cambiar a hilo verde y hacer 2 hileras más. Intercalar los colores hasta obtener 27 franjas.
With red yarn make 3 starting chains.
Crochet 2 rows of single crochet then change to green yarn and crochet 2 more rows. Intercalate the colors until you get 27 stripes.

Resultado / Result
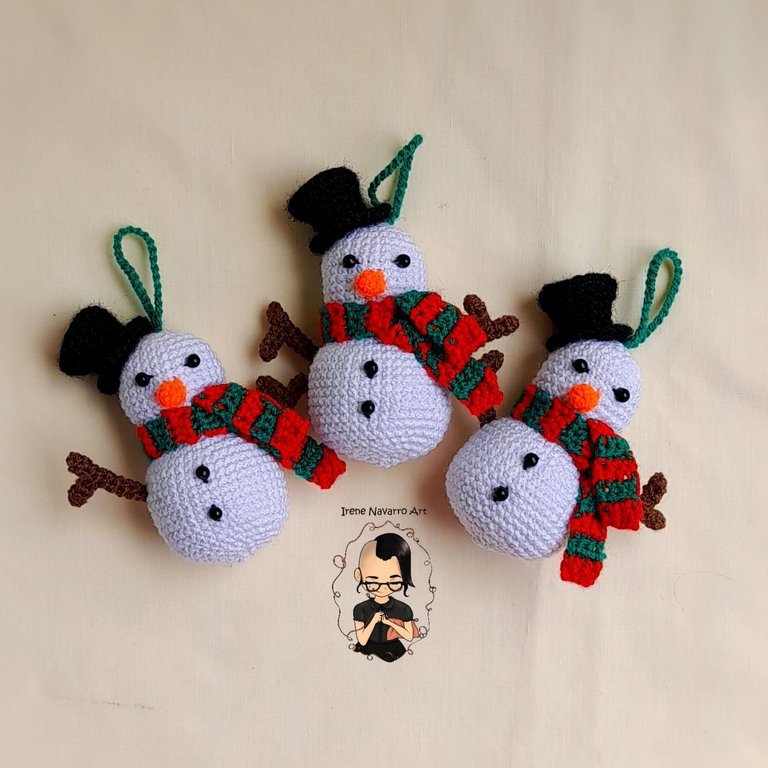
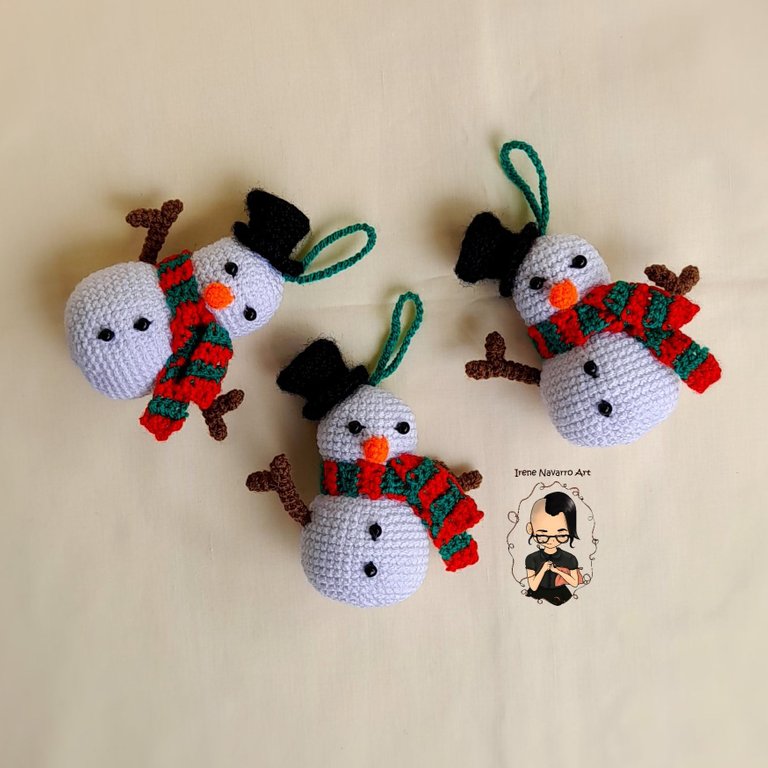
To finish, you only have to sew the pearls for the eyes and the buttons, in addition to making the handle with 30 chains. I only did three. The result seems very beautiful to me, besides that the white color will stand out in the green tree 🥰
Imágenes tomadas con dispositivo Samsung A12. Portada editada en InShot
Pictures taken with Samsung A12 device. Cover edited in InShot
Espero les haya gustado. Les invito a leer mis próximas publicaciones y siempre estaré dispuesta a responder sus preguntas y comentarios, también pueden seguirme y contactarme en cualquiera de mis redes sociales. ¡Muchas gracias!
I hope you liked it. I invite you to read my next publications and I will always be willing to answer your questions and comments, you can also follow me and contact me on any of my social networks. Thank you!
Awww... I love the designs of the snowman. So beautiful with those combination of colors. It shows the color of Christmas indeed.
I still can't believe we are entering the month of December next week and before we know what is happening, we are celebrating Christmas already.
Guaooo que belleza!! Me encantaría tener mi árbol de Navidad con cada personaje! Te felicito amiga, realmente bellos!
Muchas gracias 🤗 Saludos
https://twitter.com/1571281090756624384/status/1595496950111035393
https://twitter.com/2471487180/status/1595497211311362062
The rewards earned on this comment will go directly to the people( @rlathulerie, @irenenavarroart ) sharing the post on Twitter as long as they are registered with @poshtoken. Sign up at https://hiveposh.com.
This is a good work you have shared friend kudos to you
Thank you 🤗
You are very welcome
Muy lindo tus amigurumis. Saludos 🌹 😘
Muchas gracias 😊
Wooow que hermoso se ve el muñeco de nieve, que proyecto tan lindo estás haciendo para tu árbol navideño, se que te quedará espectacular, me gustaría verlo cuando lo termines de decorar.☃️🌲
Muchas gracias 🥰 también estoy a la expectativa de ver todo junto
Te quedaron muy tiernos los muñecos de nieve Irene, tu hijo debe estar muy feliz con cada detalle que vas agregando al arbolito.
Saludos!
Ay siii el los va poniendo de una vez jijiji pero a ustedes se los muestro cuando ya este lleno de muñequitos 😁
Hermosas piezas muy originales 👌
Gracias 🤗
Hermoso y perfecto!!
Gracias 😁
Oh my goodness your work looks so neat. Can I have one for myself?? Thanks for sharing this beautiful work with us.
Thank you very much
You are welcome
You are really good on this. You Christmas ⛄ tree looks so beautiful
Thank you 😊
Sabes mi hija está comenzando a aprender amigurumi y le acabo de decir que quiero que me haga unos lindos muñequitos de nieve como el tuyo, te quedó realmente hermoso, gracias por compartir tu paso a paso, tienes un talento maravilloso, te felicito 🤗❤️
Muchas gracias, espero le queden muy bien 🤗
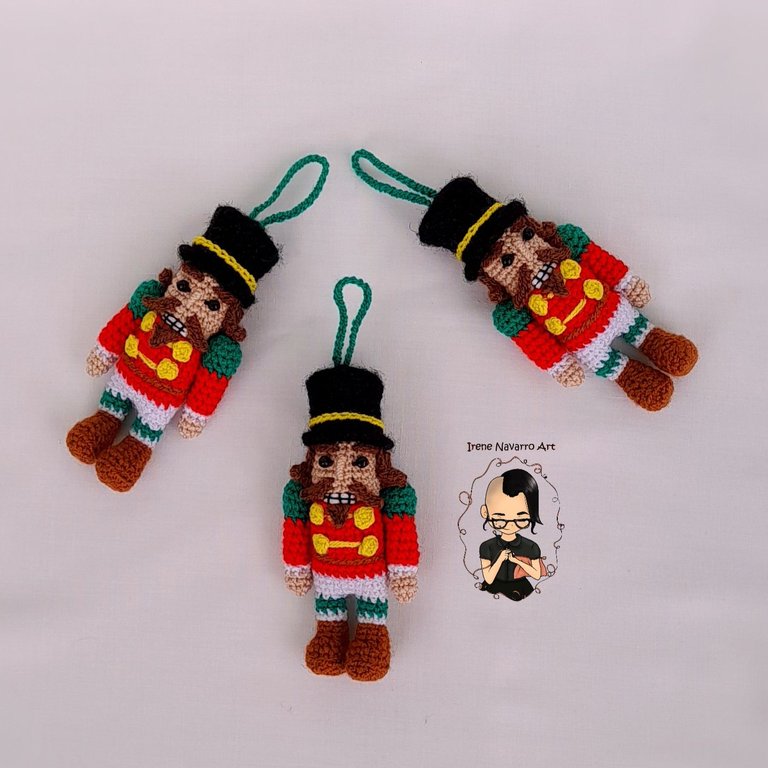
¡Qué belleza! Cuando los vi, los amé de inmediato, pero enloquecí cuando al final me di cuenta de que también hiciste unos cascanueces. Me encanta tejer y bordar, aunque no soy experta, lo disfruto mucho. Desde hace rato quiero aprender a hacer amigurumis, ya estoy buscando dónde hacer un curso para aprender a los patrones. Todo te está quedando bello, es un trabajo impecable, te felicito, querida Irene, un abrazo.
Muchas gracias, busca videos donde te enseñen a hacer esferas, con eso de práctica puedes hacer figuras. Saludos 🤗
Congratulations, your post has been upvoted by @dsc-r2cornell, which is the curating account for @R2cornell's Discord Community.
Enhorabuena, su "post" ha sido "up-voted" por @dsc-r2cornell, que es la "cuenta curating" de la Comunidad de la Discordia de @R2cornell.
Gracias por el apoyo 🤗
MUY BONITO, ME ENCANTO. SEGURO ESE ARBOL LUCIRA HERMOSO. SALUDOS.
Muchas gracias 🤗
Hermoso proyecto, te quedo muy lindo.
Oh por Dios, su naricita y las bufandas, que delicadez, admiro tu arte y a ti. Gracias por ser inspiración.
Muchas gracias bella 🤗