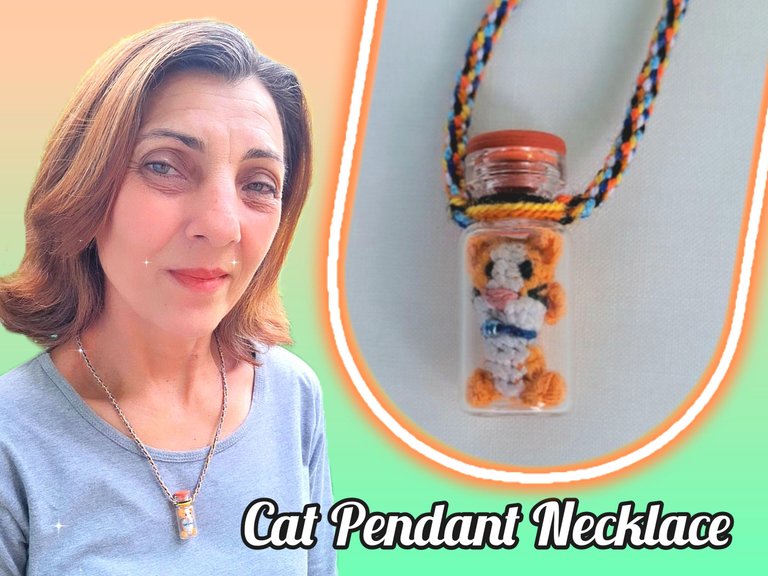
Collar con colgante de gato
Saludos a todos los amantes de las manualidades, el octavo concurso de DIYHub nos invita a expresar nuestra imaginación con el tema de gatos, son mis animales favoritos y por eso he decidió hacer un collar con dije de gato en homenaje a mi gato Yellow que falleció en abril, este gato fue muy especial para mi familia y para mi, hace unos dos meses adopté nuevamente un gato, es una hembra a la que llamamos Linda, hace poco fue su vacunación y conservé los frascos que contenía la vacuna con la finalidad de hacer una manualidad con estos, así que se me ocurrió usar ese recipiente como un dije de collar metiendo dentro de este un amigurumi de un gato del mismo color de mi adorado Yellow al cual extrañamos mucho, este collar es un homenaje a mi gato fallecido pero al mismo tiempo por la procedencia del frasco utilizado es un recordatorio de que la vida continúa y que mi nueva gata Linda recibirá todo el amor y cuidado que podemos darle para que tenga una vida feliz a nuestro lado, deseando que ella viva muchos más años. Invito a participar en el concurso a @Yetsimar @suezoe @yaslenysofia
Greetings to all lovers of crafts, the eighth DIYHub contest invites us to express our imagination with the theme of cats, they are my favorite animals and that is why I decided to make a necklace with a cat pendant in honor of my cat Yellow who passed away in April, this cat was very special for my family and for me, about two months ago I adopted a cat again, it is a female we call Linda, she was recently vaccinated and I kept the vials containing the vaccine in order to make a craft with these, so it occurred to me to use that container as a necklace pendant, putting inside it an amigurumi of a cat the same color as my beloved Yellow, who we miss a lot, this necklace is a tribute to my deceased cat but At the same time, due to the origin of the bottle used, it is a reminder that life goes on and that my new cat Linda will receive all the love and care that we can give her so that she has a happy life by our side, wishing that she lives many more years. I invite @Yetsimar @suezoe @yaslenysofia to participate in the contest

Materiales / Materials
- Hilo de coser: amarillo, blanco, negro, rosado y azul.
- 1 mostacilla pequeña
- Ganchillo de 0.90mm
- Aguja de coser
- Relleno de fibra acrílica antialérgica
- Frasco de vacuna
- Hilo acrílico para crochet de siete colores variados.
- Tijeras
- Cartón
- lápiz, regla y compás.
- Sewing thread: yellow, white, black, pink and blue.
- 1 small bead
- 0.90mm crochet hook
- sewing needle
- Filling with antiallergic acrylic fiber
- Vaccine vial
- Acrylic yarn for crochet in seven varied colors.
- scissors
- cardboard
- pencil, ruler and compass.
Proceso / Process
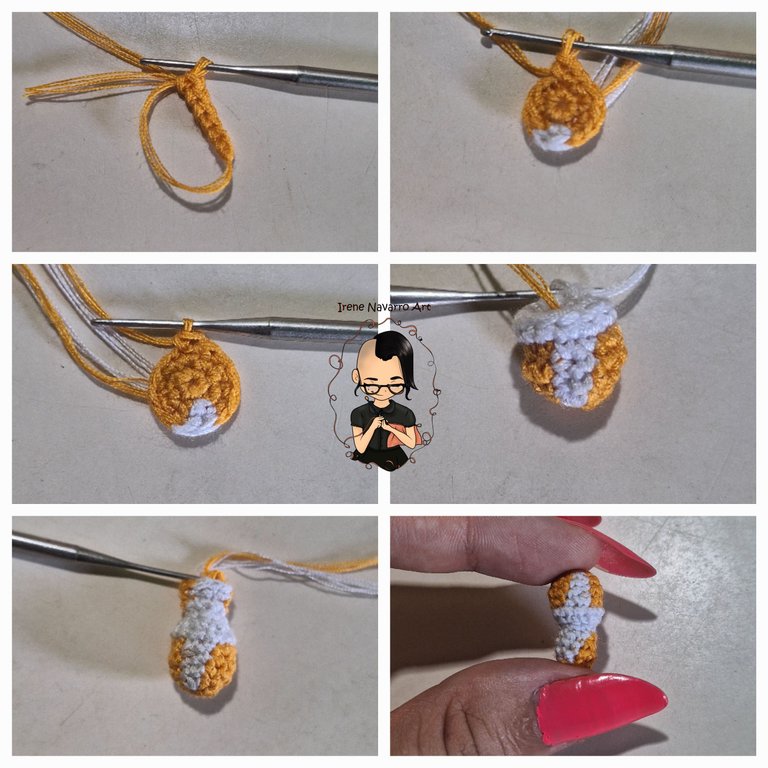
Para hacer el amigurumi miniatura del gato, trabajar con 4 hebras de hilo de coser y ganchillo de 0.90mm.
Cuerpo
Para el cuerpo, con hilo amarillo hacer 6 puntos bajos en un anillo.
Hilera 1: 5 aumentos con hilo amarillo, 1 aumento con hilo blanco. Total de puntadas: 12
Hileras 2-4: 10 puntos bajos amarillos y 2 puntos bajos blancos.
Hilera 5: 12 puntos blancos
Hilera 6: 6 disminuciones
Hilera 7: (1 punto bajo, 1 aumento) X 3. Total de puntadas: 9
Hileras 8-10: 6 puntos bajos amarillos, 3 puntos bajos blancos.
Rellenar
Hilera 11: (1 punto bajo, 1 disminución) X 3. Cerrar con la hebra final y la aguja de coser.
To make the miniature cat amigurumi, work with 4 strands of 0.90mm sewing thread and crochet hook.
Body
For the body, with yellow thread make 6 single crochets in a ring.
Row 1: 5 increases with yellow thread, 1 increase with white thread. Total stitches: 12
Rows 2-4: 10 yellow single crochets and 2 white single crochets.
Row 5: 12 white stitches
Row 6: 6 decreases
Row 7: (1 single crochet, 1 increase) X 3. Total stitches: 9
Rows 8-10: 6 yellow single crochets, 3 white single crochets.
Fill out
Row 11: (1 single crochet, 1 decrease) X 3. Close with the final loop and the sewing needle.
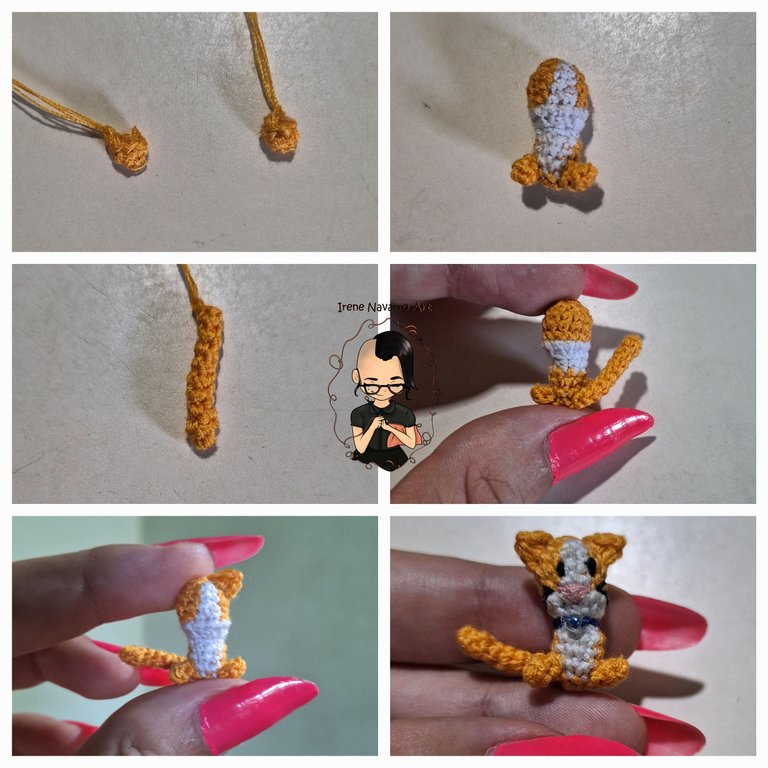
Patas
Para las patas con hilo amarillo hacer 4 puntos bajos en un anillo y hacer una Hilera de 4 puntos bajos. Cerrar con punto deslizado. Dejar una hebra larga para coser al cuerpo. Hacer dos iguales.
Cola
Para la cola hacer con amarillo 4 puntos bajos en un anillo y hacer 9 hileras de 4 puntos bajos. Cerrar con punto deslizado, dejar una hebra larga para coser al cuerpo.
Orejas
Con hilo amarillo de cada lado de la cabeza hacer las orejas de la siguiente manera:
Levantar una puntada
Hacer juntos 1 punto bajo y 1 punto medio alto
Hacer dos cadenas
Hacer juntos 1 puntos medio alto y un punto bajo en el mismo lugar donde se hicieron los puntadas anteriores.
Terminar con 1 punto deslizado y esconder la hebra por dentro de la cabeza.
Detalles
Con la aguja de coser bordar los detalles del rostro, los ojos y bigotes con hilo negro, la nariz con hilo rosado, con azul bordar el collar y coser la mostacilla.
Paws
For the legs with yellow yarn make 4 single crochets in a ring and make a Row of 4 single crochets. Close with slip stitch. Leave a long tail to sew to the body. Make two alike.
Tail
For the tail make 4 single crochets in a ring with yellow and make 9 rows of 4 single crochets. Close with slip stitch, leave a long tail to sew to the body.
Ears
With yellow yarn on each side of the head make the ears as follows:
pick up a stitch
Make together 1 single crochet and 1 half double crochet
make two chains
Make together 1 half double crochet and one single crochet in the same place where the previous stitches were made.
Finish with 1 slip stitch and tuck the yarn over inside the head.
Details
With the sewing needle embroider the details of the face, the eyes and mustaches with black thread, the nose with pink thread, with blue embroider the collar and sew the beads.
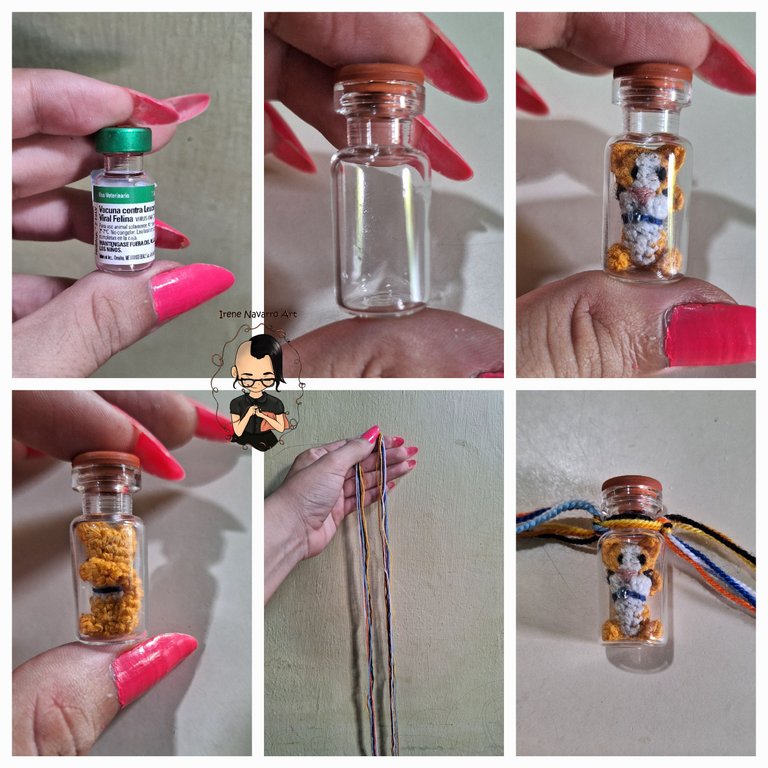
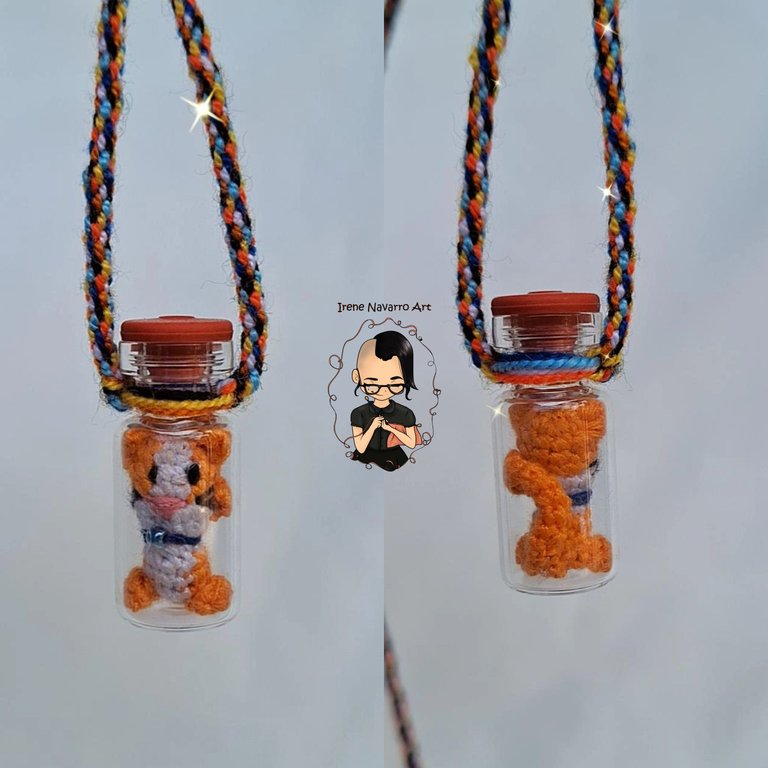
Tomar el frasco de vacuna, quitar las etiquetas y el protector de metal de la tapa, lavar bien el frasco y dejarlo secar, introducir el amigurumi dentro del frasco y tapar. Medir 7 hebras de hilo para crochet de 1.60 m de longitud, a los 80 cm es decir a la mitad del largo dividir las hebras en dos grupos y hacer dos nudos a para asegurar el frasco en el centro.
Take the vaccine container, remove the labels and the metal protector from the lid, wash the bottle well and let it dry, put the amigurumi inside the bottle and cover it. Measure 7 strands of crochet thread 1.60 m long, at 80 cm, that is, at half the length, divide the strands into two groups and tie two knots to secure the jar in the center.
Collar
El collar se hace con la técnica de telar redondo llamada Kumihimo, les muestro como hacer dicho telar y el procedimiento para hacer el cordón.
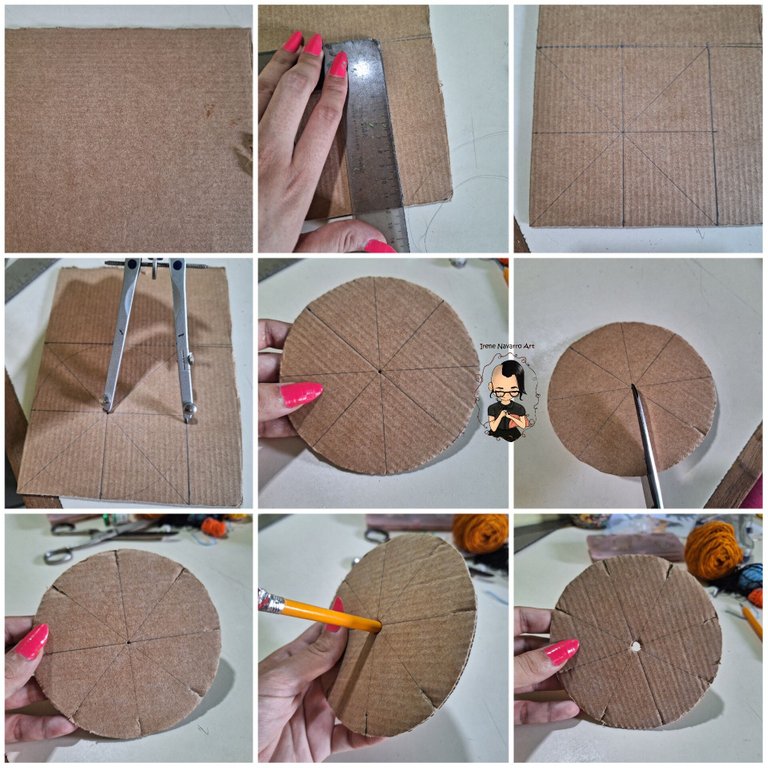
Con el lápiz y regla sobre el cartón dibujar un cuadro de 12x12cm. Trazar líneas por el centro en forma de cruz y equis, en el punto medio ubicar la punta de compás y trazar un círculo.
Con la tijeras cortar el círculo y cortar 1 cm en cada una de las líneas marcadas. Con un lápiz abrir un agujero en el centro del círculo.
Necklace
The necklace is made with the round loom technique called Kumihimo, I show you how to make the loom and the procedure to make the cord.
With the pencil and ruler on the cardboard draw a square of 12x12cm. Draw lines through the center in the form of a cross and an X, at the midpoint locate the point of the compass and draw a circle.
With the scissors cut the circle and cut 1 cm in each of the marked lines. With a pencil, poke a hole in the center of the circle.
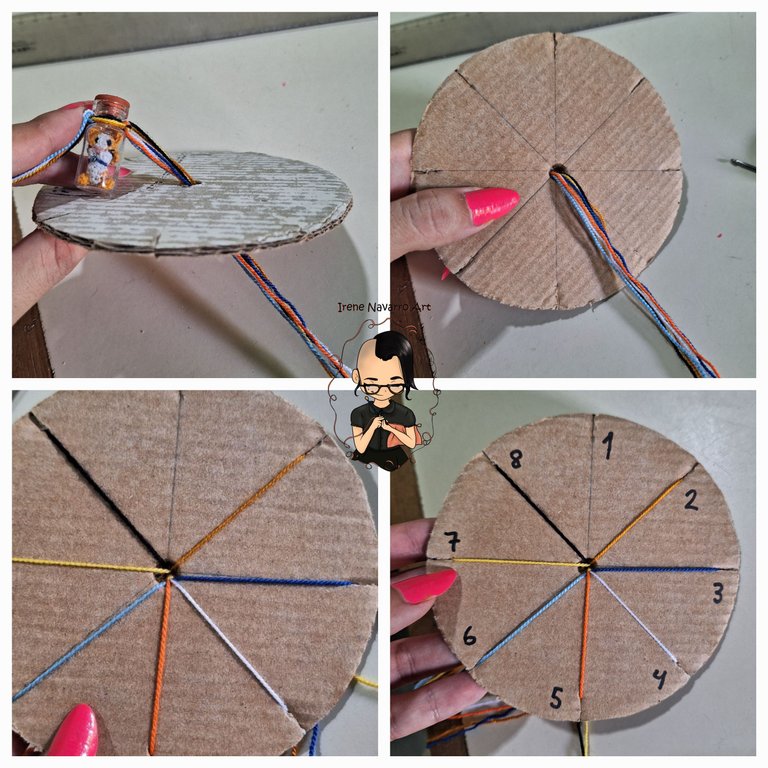
Tomar las 7 hebras de hilo de un lado del frasco y pasarlas por el agujero del centro del telar, para mayor comodidad puede sujetar las hebras que quedan en suspenso del otro lado con un gancho. Del lado del frente ubicar cada hebra del hilo en cada una de las ranuras creadas en el círculo , con un marcador hacer los números, quedando la ranura número 1 sin hilo.
Take the 7 strands of thread from one side of the jar and pass them through the hole in the center of the loom, for greater comfort you can hold the strands that remain in suspense on the other side with a hook. On the front side, place each strand of thread in each of the grooves created in the circle, with a marker make the numbers, leaving groove number 1 without thread.
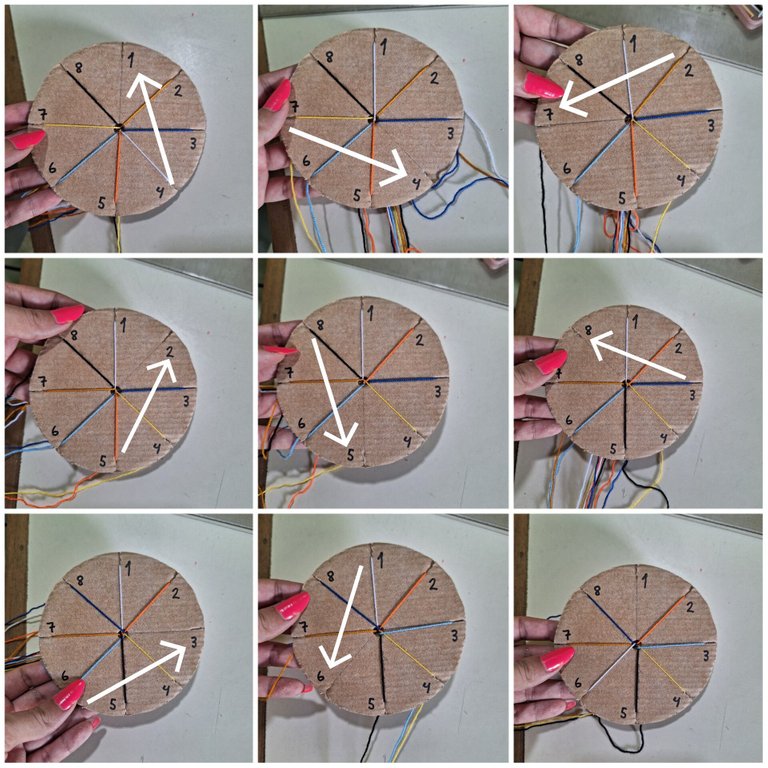
Para hacer el cordón el procedimiento es el siguiente: tomando como referencia la ranura vacía, la tercera hebra debe llenar la ranura vacía, volver a contar y la tercera hebra siempre debe llenar la ranura vacía, como pueden ver en las imágenes:
La hebra ubicada en la ranura 4 pasa a la ranura 1
La hebra ubicada en la ranura 7 llena el vacío dejado en la ranura 4
La hebra ubicada en la ranura 2 llena el vacío dejado en la ranura 7
La hebra ubicada en la ranura 5 llena el vacío dejado en la ranura 2
La hebra ubicada en la ranura 8 llena el vacío dejado en la ranura 5
La hebra ubicada en la ranura 3 llena el vacío dejado en la ranura 8
La hebra ubicada en la ranura 6 llena el vacío dejado en la ranura 3
La hebra ubicada en la ranura 1 llena el vacío dejado en la ranura 6
De este modo quedan vacía de nuevo la ranura 1, repetir continuamente el ciclo, es muy fácil, siempre la hebra que sustituye el vacío es la tercera, es decir esta hebra debe saltar por así decirlo dos casillas para llenar nuevamente en el vacío.
To make the cord, the procedure is as follows: taking the empty slot as a reference, the third thread must fill the empty slot, count again and the third thread must always fill the empty slot, as you can see in the images:
The strand located in slot 4 goes to slot 1
The strand located in slot 7 fills the gap left in slot 4
The strand located in slot 2 fills the gap left in slot 7
The strand located in slot 5 fills the gap left in slot 2
The strand located in slot 8 fills the gap left in slot 5
The strand located in slot 3 fills the gap left in slot 8
The strand located in slot 6 fills the gap left in slot 3
The strand located in slot 1 fills the gap left in slot 6
In this way, slot 1 is empty again, continuously repeating the cycle, it is very easy, the thread that replaces the void is always the third, that is, this thread must jump, so to speak, two squares to fill the void again.
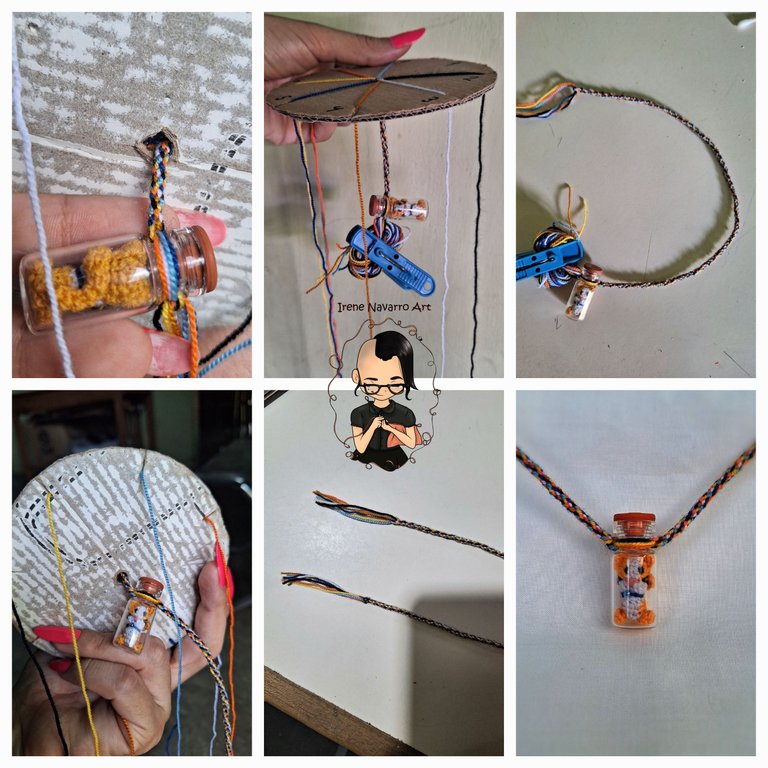
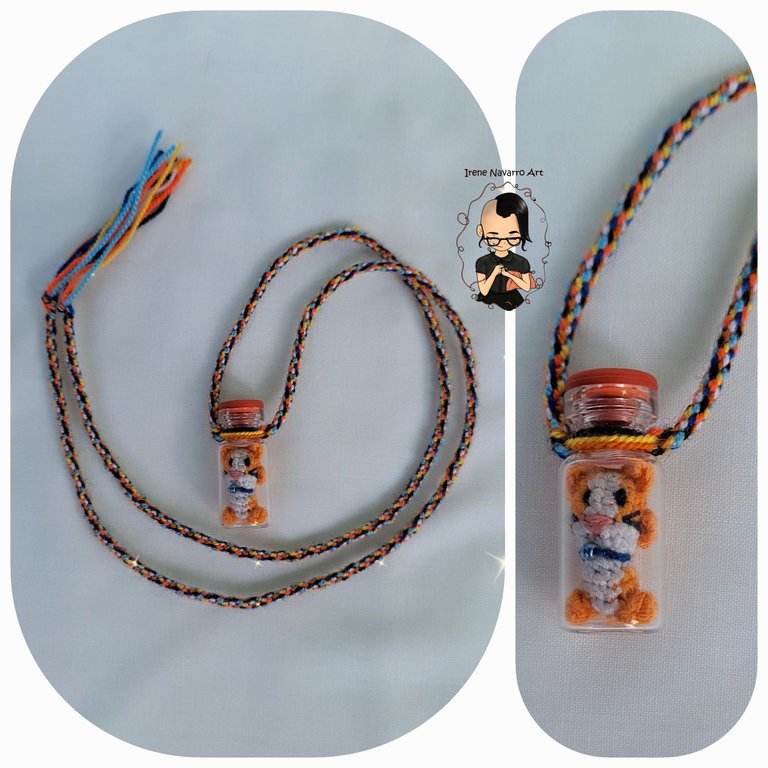
Al continuar la secuencia del cambio de hebra en las ranuras del telar circular, por el agujero del centro va saliendo el cordón tejido con los colores usados, es una técnica muy emocionante, al obtener el largo deseado para uno de los lados del collar, se sacan los hilos del telar y se hacen un nudo. Se toma las hebras del otro lado del dije y se colocan en telar en el mismo orden y se hace el cordón del otro lado, cuando el largo se igual se saca del telar y se hace un nudo.
By continuing the sequence of changing the thread in the slots of the circular loom, the woven cord with the colors used comes out through the hole in the center, it is a very exciting technique, by obtaining the desired length for one of the sides of the necklace, it is They take the threads out of the loom and tie a knot. The threads are taken from the other side of the pendant and they are placed on the loom in the same order and the cord is made on the other side, when the length is the same, it is removed from the loom and a knot is tied.
Resultado / Result
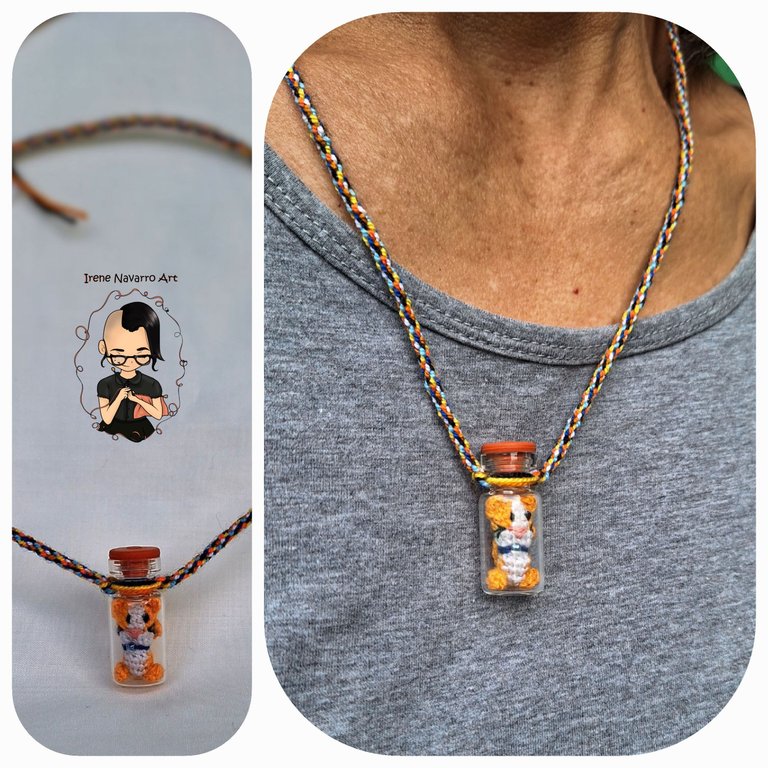
Este collar es mi favorito que haya hecho hasta el momento, no sólo por la técnica sino también por el significado tan especial de mi gato que ya no se encuentra con nosotros. Espero les guste y les sea de utilidad el tutorial. 😽
This necklace is my favorite that I have made so far, not only because of the technique but also because of the very special meaning of my cat that is no longer with us. I hope you like it and find the tutorial useful. 😽
Imágenes tomadas con dispositivo Samsung A54. Portada editada en Inshot
Pictures taken with Samsung A54 device. Cover edited in Inshot
Invítenme un Café/Support Me on Ko-Fi

https://ko-fi.com/irenenavarroart
If you want to support my art you can also make donations for the value of a coffee (Ko-Fi)
Espero les haya gustado. Les invito a leer mis próximas publicaciones y siempre estaré dispuesta a responder sus preguntas y comentarios, también pueden seguirme y contactarme en cualquiera de mis redes sociales. ¡Muchas gracias!
I hope you liked it. I invite you to read my next publications and I will always be willing to answer your questions and comments, you can also follow me and contact me on any of my social networks. Thank you!
https://leofinance.io/threads/irenenavarroart/re-leothreads-nx9vnryp
The rewards earned on this comment will go directly to the people ( irenenavarroart ) sharing the post on LeoThreads,LikeTu,dBuzz.
Muy lindo el collar de Kumihimo, el gatico quedo muy bonito😁
Muchas gracias 😊 a mi encantó hacerlo. Saludos
Hola @irenenavarroart me encantó este collar, el gatito mini es una lindura. Merecido homenaje para tu gatito ausente.
El cordón te quedó muy bonito, yo hice dos intentos con el telar y aún no me sale 😁 seguiré intentando después.
¡Saludos!
Muchas gracias @creacioneslelys Yellow siempre será recordado con mucho amor y ya para la familia todas las representaciones de gatos de ese color nos lo recuerda. Saludos 😊 🤗
¡Felicidades! Esta publicación obtuvo upvote y fue compartido por @la-colmena, un proyecto de Curación Manual para la comunidad hispana de Hive que cuenta con el respaldo de @curie.
Si te gusta el trabajo que hacemos, te invitamos a darle tu voto a este comentario y a votar como testigo por La Colmena.
Si quieres saber más sobre nuestro proyecto, te invitamos a acompañarnos en nuestro servidor de Discord.
Muchas gracias por el apoyo 🥰
Que proyecto más bonito, me encantó totalmente! Gracias por explicar también el proceso para la realización del collar usando el telar circular, es un bonito recuerdo para conmemorar la vida y la alegría aportada por tu querido gato Yellow y la nueva alegría del hogar Linda también.
Muchas gracias Yetsi, me encantó y conmovió mucho cuando ya estaba listo el collar, puse a mi mamá de modelo y a ella también le conmovió. Abrazo 🤗
Sinceramente seré muy coloquial.
Te la comiste con ese collar, a mi hija menor le gusto mucho, ella me dijo cuando lo vio, papá, eso está genial.
Ay que linda, muchas gracias 🥰 me le das un abrazo de mi parte
Con todo gusto, igualmente me saludas a mi pana Rafael.
Pero que bellezo esto que hiciste, te quedó bellísimo! Es una miniatura, una cuchitura y es prrdorable jajaja
Me encantó!
Ay muchas gracias 🙈 🥰 saludos
Gracias por el apoyo 🥰
Siempre a su orden amiga, feliz.noche 🍻🫂🐝 @irenenavarroart
Que hermoso quedó y que lindo homenaje para ese fiel amiguito que siempre estará com ustedes😊 Gracias por la invitación
Muchas gracias 🥰 espero ver tu entrada
¡Hola, @irenenavarroart! Me parece muy lindo que hagas algo así en honor y conmemoración de tu gatito. 🥺 Un abrazo. 🫂
Oh man, this is awesome. The idea of using it as a necklace locket is really great. I hope you had a lot of good moments with Yellow, I understand how hard it is to lose a pet.
Thank you very much for the support. this month's theme is great 🥰
Qué preciosidad de collar, tanto por la creatividad de aprovechar el frasco de la vacuna, como por la delicadeza del gatito, y sobre todo por lo que representa para ti a nivel emocional. ❤️
Post reviewed and approved for an Ecency boost. 😊
Muchas gracias se unieron las cosas, yo guardé el frasco antes de tener la idea y todo surgió apenas vi el anuncio del tema del mes en al comunidad. Abrazos y gracias por el apoyo
Beautiful work :) @tipu curate 8
Upvoted 👌 (Mana: 0/75) Liquid rewards.
Thank you very much 🤗🥰
Interesante el post y muy bonito el collar, se ve en el mucha creatividad, un saludo.
Muchas gracias 😊
quedo hermoso, pienso que esas piezas tan chiquitas requieren mayor esfuerzo
Si entre más pequeño sea el ganchillo y el hilo es más trabajo. Saludos 😊
¡Pero qué collar más hermoso! De verdad me encantó como quedó y todo el proceso.
De los trabajos más bonitos que he visto por aquí ✨
!DIY
Ay muchas gracias vale. Saludos 😊 🤗
You can query your personal balance by
!DIYSTATSQue cosita tan linda, un trabajo digno de admirar y por supuesto un gran homenaje para Yellow. Lo ame @irenenavarroart 😻
!DIY
Muchas gracias bella ♥️
You can query your personal balance by
!DIYSTATSExcelente, es una belleza lo que creaste, te felicito por las buenas habilidades que posees. Saludos
Muchas gracias 😊 Saludos
Que hermoso colgante, el gatito me recuerda a Tigger de Winnie pooh 🤭 Considero que es un bellísimo homenaje dedicado a tu gatito Yellow, un abrazo 💕