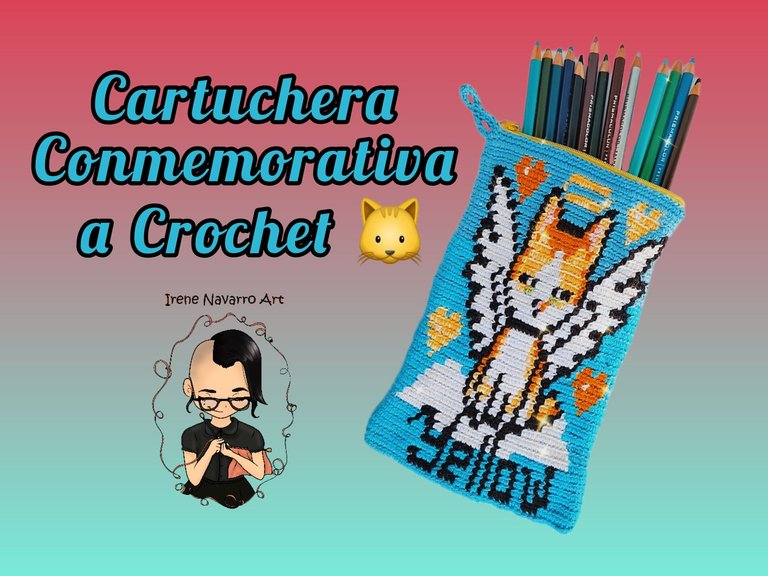
Crochet Commemorative Pencil Case / HiveDiy Contest
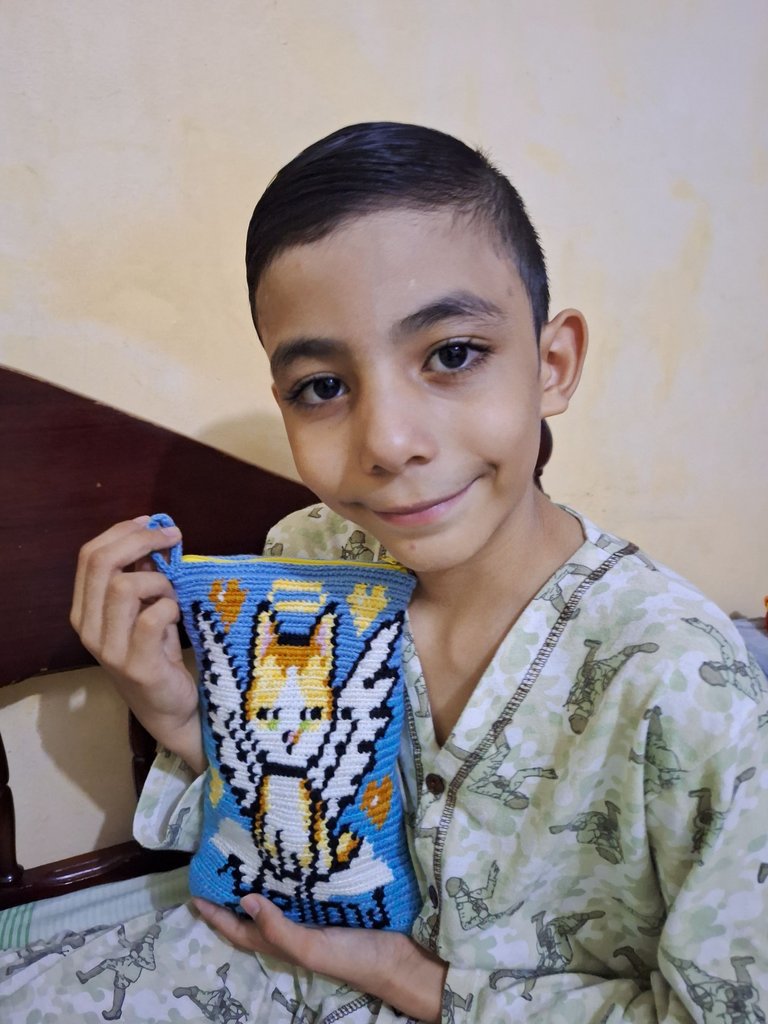
Saludos a todos los amantes de las manualidades, hoy estoy muy feliz de compartir mi participación en el Concurso de la Comunidad Hive Diy con motivo del regreso a clases, para esto he elaborado una cartuchera conmemorativa muy especial para mi hijo y les comparto el paso a paso. La razón detrás del motivo de la cartuchera es que en el mes de abril lamentablemente falleció nuestro querido gato Yellow, actualmente tenemos a otra gatita, pero el recuerdo de Yellow siempre está presente sobre todo para mi hijo quien lo extraña mucho y siempre ve sus fotografías, yo particularmente no soy creyente religiosa y a mi hijo no le impongo ninguna creencia, pero dentro del contexto en que vivimos es normal que el escuche hablar que las personas o animales van al cielo cuando mueren. Yo le he explicado que yo no creo en eso pero que hay personas que si lo creen. El como todo niño se reconforta con esa idea y yo respeto su pensamiento, así que cuando a él le preguntan por su anterior gato el dice que se fue al cielo así que pensé que hacer una cartuchera con la imagen de Yellow como un angelito que está en el cielo haría muy feliz a mi niño, mi hijo formó parte activa del proceso observando como yo hacía el diseño. Así que estuvo muy entusiasmado con el concepto de Yellow como un ángel.
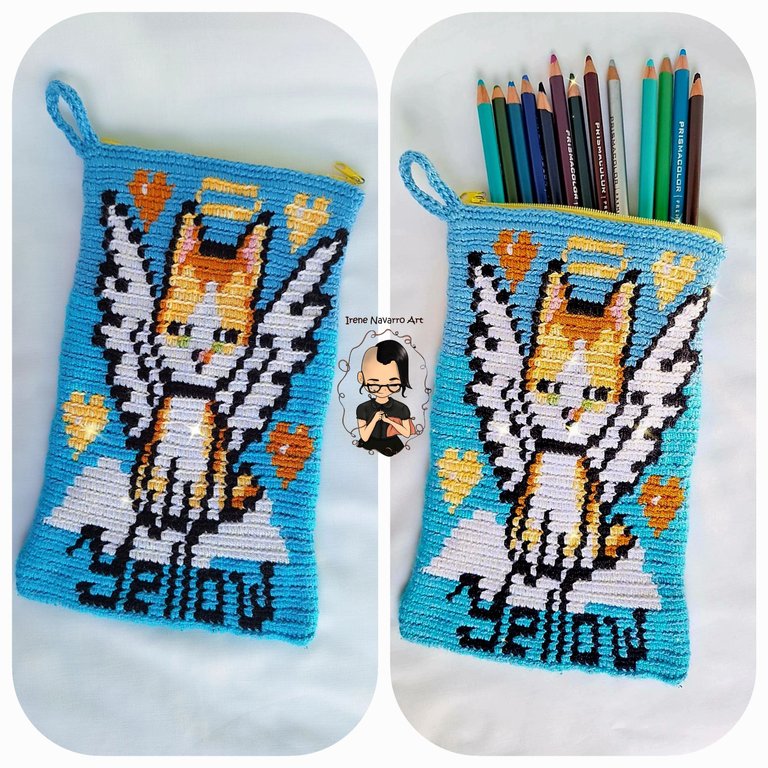
Se que a muchos amantes de las mascotas han pasado por la pérdida de uno de sus peludos amigos, así que les comparto el patrón que hice de manera que si quieren hacer una cartuchera de un gatito angelito pueden hacerlo solo modificando los colores del gato y agregando el nombre o si prefieren pueden hacerlo sin el nombre.
Otro motivo por el cual me animé a hacer esta cartuchera es la técnica. No se trata de una técnica cualquiera a crochet, esta técnica es llamada Técnica Wayuu, pues son los miembros de esta etnia quienes dieron a conocer las mochilas hechas a crochet donde se trabajaba con muchos colores a la vez y se van llevando los hilos por dentro de las puntadas mientras se trabaja con un color, es decir los hilos de otro color van escondiéndose por dentro y a estos hilos se les llama hilos alma, según he aprendido de una gran creadora de contenido en youtube llamada Mary Crochet Colombia es que la técnica es Wayuu siempre se escondan los hilos por dentro, así que si se usa un cordón para engrosar por dentro deja de ser Wayuu y podría llamarse tapestry o simplemente crochet, yo estuve muy atenta a sus palabras y me pareció muy interesante su forma de expresarse al respecto de la técnica Wayuu que en su mayoría usa patrones de figuras geométricas, pero que puede adaptarse a casi cualquier figura que nos alcance la imaginación, así que podría también decir que la cartuchera que hice esta hecha con la técnica Wayuu que desde hace mucho tiempo quería poner en práctica. Espero les guste. Invito a participar en este concurso a @yetsimar @suezoe
Greetings to all craft lovers, today I am very happy to share my participation in the Hive Diy Community Contest on the occasion of back to school, for this I have made a very special commemorative pencil case for my son and I share with you the step to passed. The reason behind the pencil case is that in the month of April, unfortunately, our beloved cat Yellow passed away. We currently have another kitten, but the memory of Yellow is always present, especially for my son, who misses him very much and always sees his photographs. , I am not particularly a religious believer and I do not impose any beliefs on my son, but within the context in which we live it is normal for him to hear that people or animals go to heaven when they die. I have explained to him that I don't believe in that but that there are people who do. Like every child, he is comforted by that idea and I respect his thoughts, so when they ask him about his previous cat he says that he went to heaven so I thought I would make a pencil case with the image of Yellow as a little angel who is in heaven it would make my child very happy, my son was an active part of the process watching how I made the design. So he was very excited about the concept of Yellow as an angel.
I know that many pet lovers have gone through the loss of one of their furry friends, so I am sharing the pattern I made so that if you want to make a pencil case of an angel kitten you can do it just by modifying the colors of the cat and adding the name or if you prefer you can do it without the name.
Another reason why I decided to make this holster is the technique. This is not just any crochet technique, this technique is called the Wayuu Technique, since it is the members of this ethnic group who introduced the crocheted backpacks where they worked with many colors at the same time and carried the threads inside. of the stitches while working with one color, that is, the threads of another color are hidden inside and these threads are called soul threads, what I have learned from a great YouTube content creator called Mary Crochet Colombia is that the technique is Wayuu always hide the threads inside, so if a cord is used to thicken the inside, it is no longer Wayuu and could be called tapestry or simply crochet. I was very attentive to their words and I found their way of expressing themselves on the matter very interesting. of the Wayuu technique that mostly uses patterns of geometric figures, but that can be adapted to almost any figure that our imagination can reach, so I could also say that the pencil case I made is made with the Wayuu technique that I have wanted for a long time. put into practice. I hope you like it. I invite @yetsimar @suezoe to participate in this contest

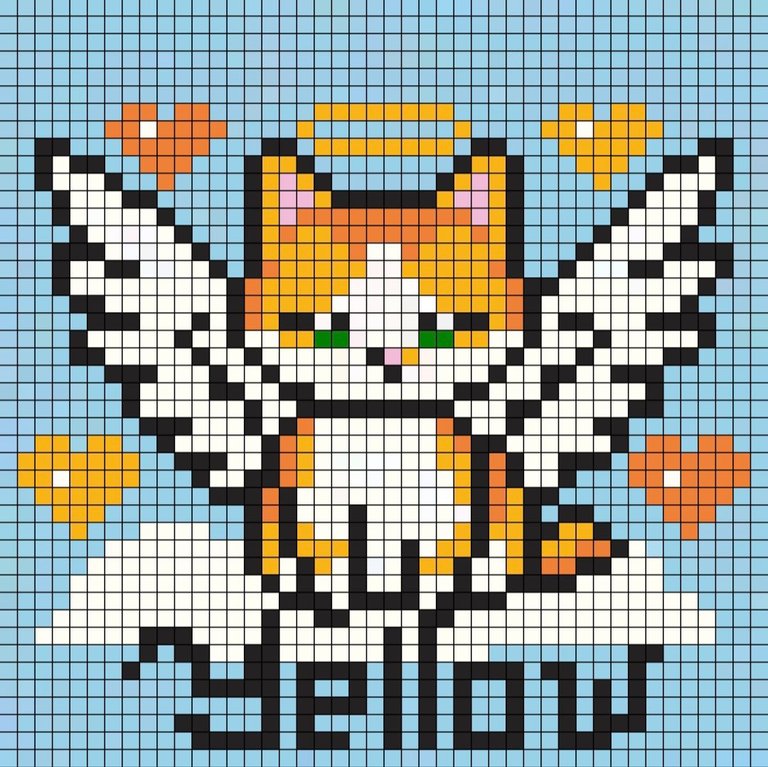
Patrón / Pattern
Lo primero que hice fue hacer el patrón, este lo dibujé en la App llamada Pixel Station la cual permite dibujar por cuadritos, lo único que hay que tener en cuenta es que en la técnica Wayuu de crochet, las puntadas ocupan un espacio rectangular vertical y no cuadrado, por lo que todo diseño dibujado en esta app al hacerlo en esta técnica quedará alargado, así que hay que tener en cuenta dibujar las figuras un poco achatadas para que al trabajar con el crochet se vean más alargadas y proporcionadas.
Este patrón tiene 44 cuadros de ancho solo para ocupar la parte del frente de la cartuchera, así que la parte de atrás tiene igualmente 44 cuadros, lo que da un total de 88 puntadas de circunferencia. Yo hice la parte de atrás de un solo color pero si ustedes quieren pueden repetir el mismo diseño por ambas caras de la cartuchera.
The first thing I did was make the pattern, I drew it in the App called Pixel Station which allows you to draw in squares, the only thing to keep in mind is that in the Wayuu crochet technique, the stitches occupy a vertical rectangular space and not square, so every design drawn in this app when done in this technique will be elongated, so you have to take into account drawing the figures a little flattened so that when working with crochet they look more elongated and proportional.
This pattern is 44 squares wide just to fill the front of the holster, so the back is also 44 squares, giving a total of 88 stitches in circumference. I made the back in a single color but if you want you can repeat the same design on both sides of the pencil case.
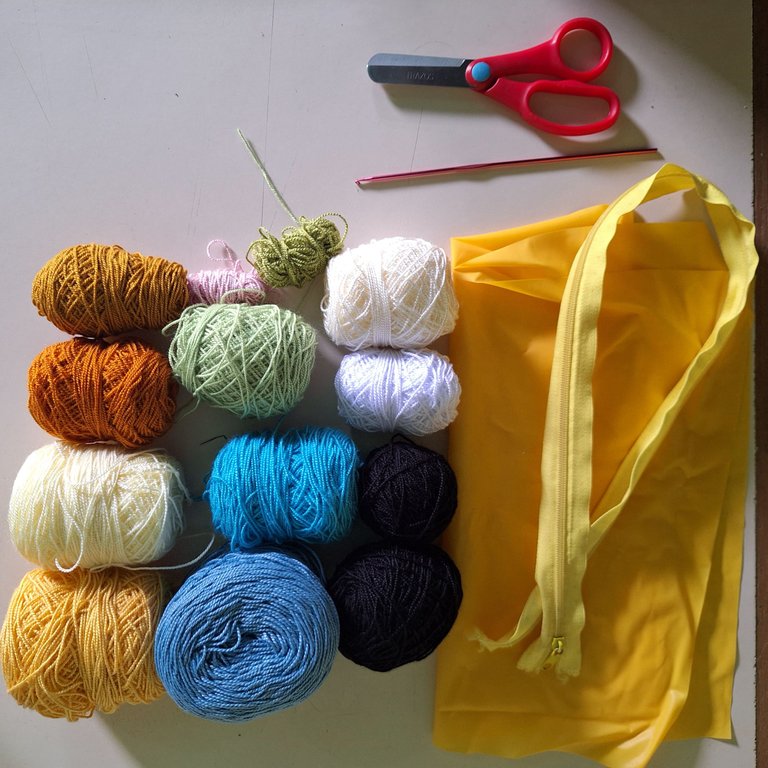
Materiales / Materials
Los materiales son hilo acrílico de 2mm, como yo solo tenía de 1mm usé hebra doble , esto me permitió hacer combinación de tonos por color, es decir que por ejemplo para el amarillo combiné un hilo amarillo oscuro uno amarillo claro, en total los colores son: azul para el fondo, amarillo, naranja, blanco, negro, solo un poco de verde para los ojos y un poco de rosado para la nariz y orejas.
Trabajé con ganchillo de 2.5mm porque yo quería la cartuchera gruesa y apretada para que sea mucho más firme. Pero ustedes si desean pueden usar ganchillo de 3mm.
Tijeras, un cierre, hilo y aguja de coser.
The materials are 2mm acrylic thread, since I only had 1mm I used double strand, this allowed me to combine tones by color, that is, for example for yellow I combined a dark yellow thread with a light yellow thread, in total the colors are : blue for the background, yellow, orange, white, black, just a little green for the eyes and a little pink for the nose and ears.
I worked with a 2.5mm crochet hook because I wanted the holster thick and tight to make it much firmer. But if you want you can use 3mm crochet hook.
Scissors, a zipper, thread and sewing needle.
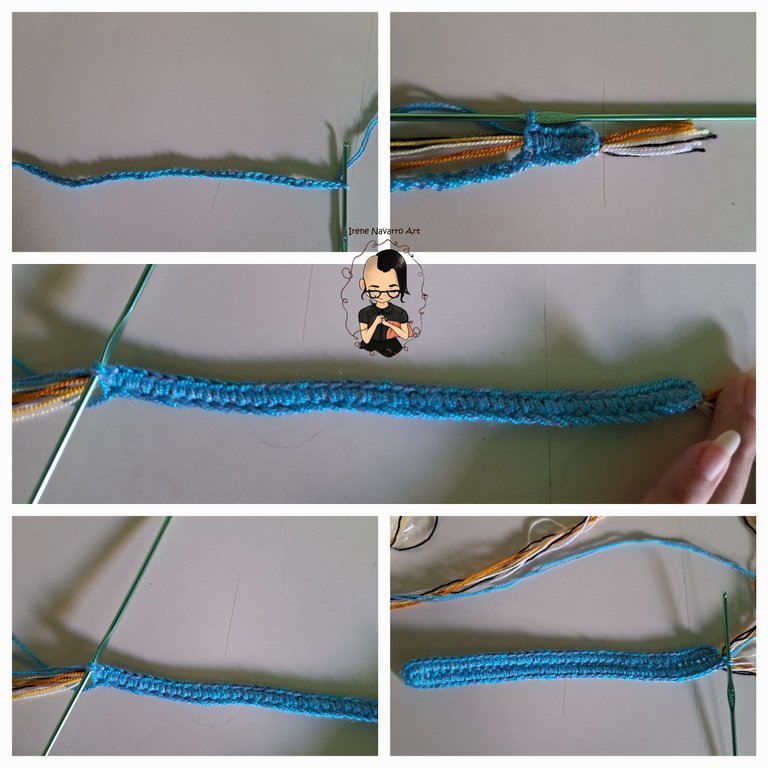
Proceso / Process
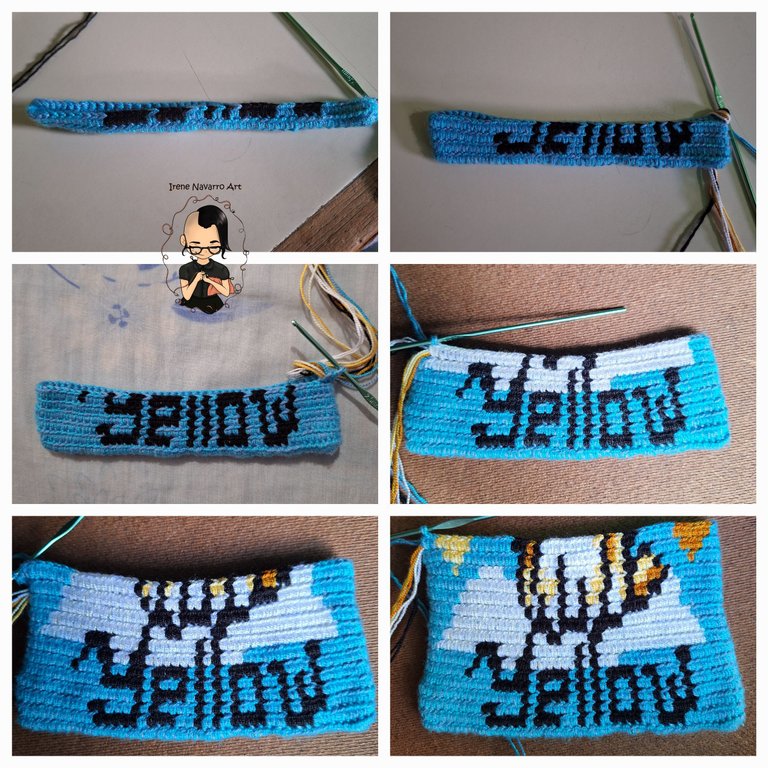
Con el hilo azul hacer 40 cadenas, tomando solo un lado de las cadenas hice 1 aumento de puntos bajos, aprovechando de introducir los hilos por dentro (negro, blanco, naranja, amarillo), continuar haciendo 38 puntos bajos y luego 1 aumento. Del otro lado de las cadenas repetir el procedimiento haciendo 1 aumento, 38 puntos bajos, 1 aumento, para así obtener 88 puntadas, en esta técnica siempre se trabaja tomando el lado de atrás de las puntadas y haciendo puntos bajos.
With the blue thread make 40 chains, taking only one side of the chains I made 1 increase in single crochets, taking advantage of introducing the threads inside (black, white, orange, yellow), continue making 38 single crochets and then 1 increase. On the other side of the chains, repeat the procedure making 1 increase, 38 single crochets, 1 increase, in order to obtain 88 stitches. In this technique you always work by taking the back side of the stitches and making single crochets.
En la segunda hilera hacer 1 aumento, 40 puntos bajos pero cambiando el color según corresponde en el patrón gráfico (el primer punto negro se hace en el numero 10) , luego hacer 2 aumentos, 40 puntos bajos y 1 aumento. Hasta esta hilera se obtienen 88 puntadas y no se volverán a hacer aumentos en la cartuchera.
Continuar haciendo los cambios de color según corresponde el patrón, siempre tomando la hebra de atrás haciendo un punto bajo escondiendo el resto de los colores por dentro.
In the second row make 1 increase, 40 single crochets but changing the color as appropriate in the graphic pattern (the first black stitch is made at number 10), then make 2 increases, 40 single crochets and 1 increase. Up to this row, 88 stitches are obtained and no further increases will be made in the holster.
Continue making color changes as the pattern corresponds, always taking the back strand making a single crochet hiding the rest of the colors inside.
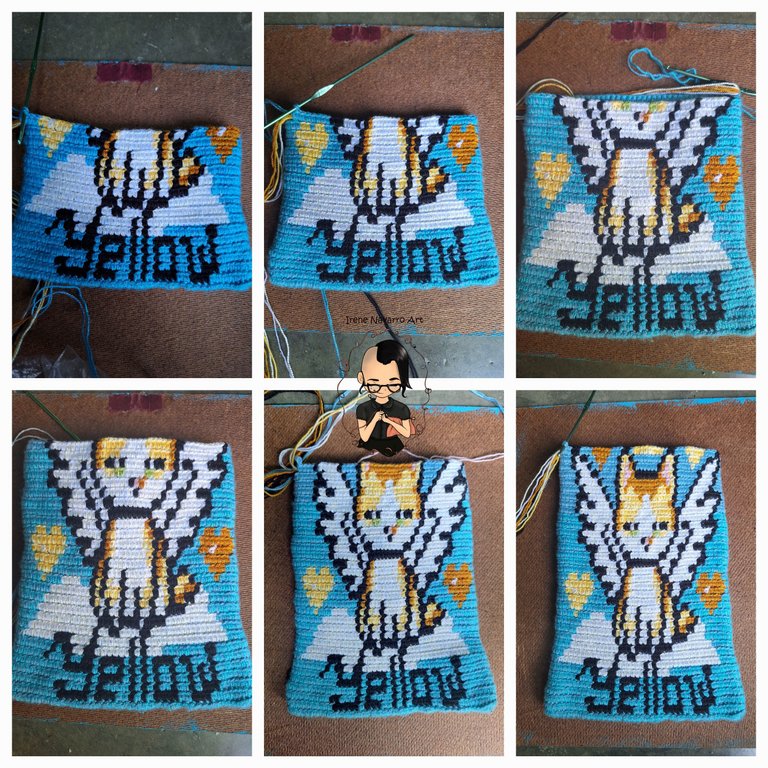
En el caso de los hilo verde y rosado por solo usarse para pocas puntadas, se deben introducir unas cuantas puntadas antes para que queden escondidos y cortarlos cuando no se vayan a usar de nuevo unas cuantas puntadas después de usarse.
Al alcanzar el alto total cortar los hilos que van por dentro. El patrón que les comparto tiene 44 cuadros ancho y 44 de alto. Es decir que corresponden a 44 hileras. Pero yo trabajé escondiendo los hilos hasta la hilera 38, dependerá de ustedes si quieren hacer esas dos hileras adicionales de color azul.
In the case of the green and pink thread, because it is only used for a few stitches, you should introduce a few stitches before so that they are hidden and cut them when they are not going to be used again a few stitches after being used.
When reaching the total height, cut the threads that go inside. The pattern I share with you is 44 squares wide and 44 squares high. That is, they correspond to 44 rows. But I worked hiding the threads until row 38, it will be up to you if you want to make those two additional rows of blue.
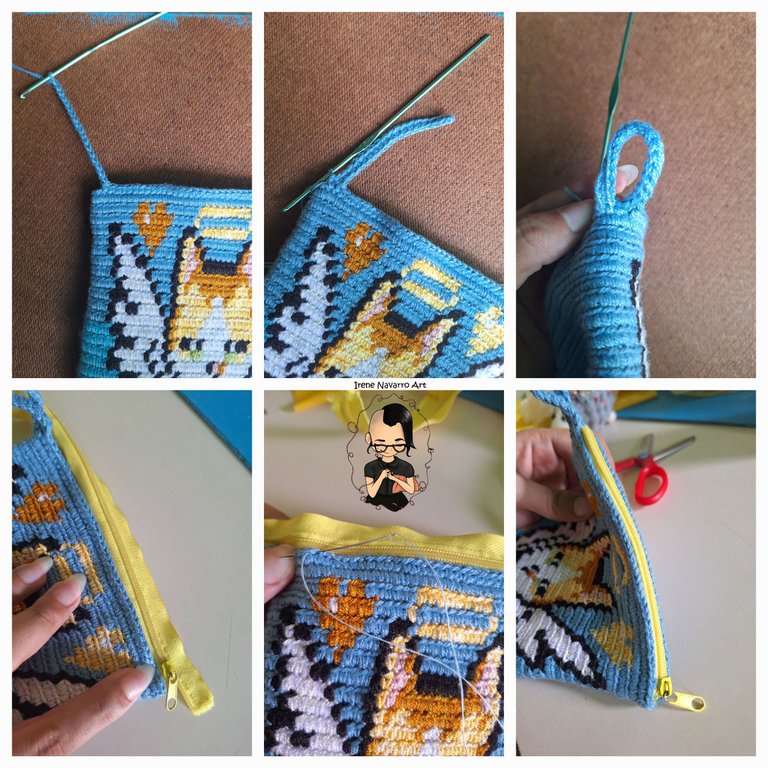
Hacer una hilera de puntos bajos solo con el color azul y tomando ambos lados de las puntadas anteriores, pero al llegar a la esquina hacer 20 cadenas, hacer 30 puntos bajos en las cadenas, continuar con 1 puntos bajo y luego hacer dos puntos bajos uniendo la tira que se formó con las cadenas, de ese modo se hace el asa de la cartuchera, continuar haciendo puntos bajos hasta terminar la hilera.
Medir el cierre y cortar, asegurar con alfileres si es necesario por todo el borde, coser con hilo y aguja.
Make a row of single crochets only with the blue color and taking both sides of the previous stitches, but when you reach the corner make 20 chains, make 30 single crochets in the chains, continue with 1 single crochet and then make two single crochets joining the strip that was formed with the chains, in this way the handle of the pencil case is made, continue making single crochets until the row is finished.
Measure the zipper and cut, secure with pins if necessary along the entire edge, sew with thread and needle.
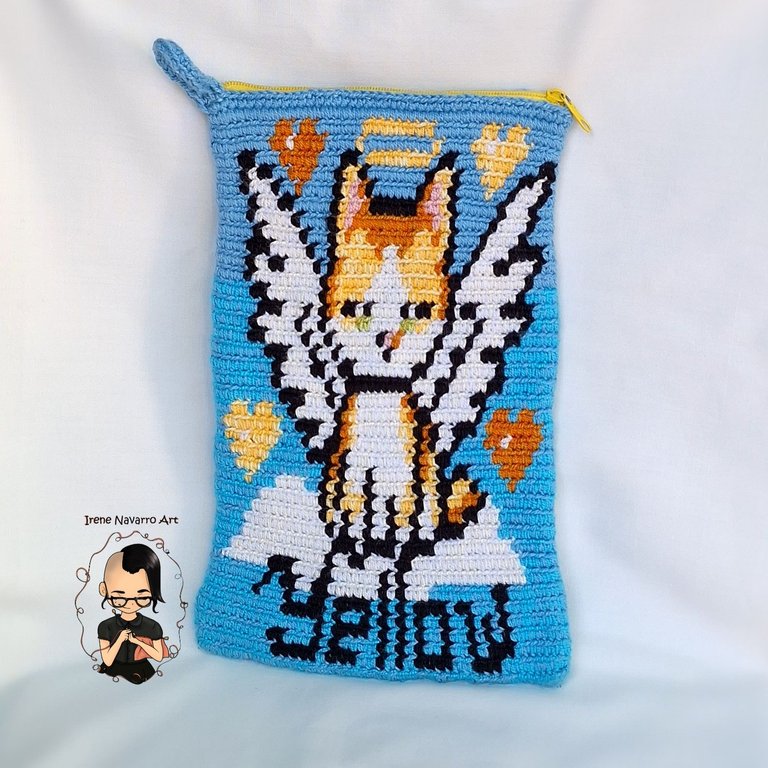
Resultado / Result
Espero les haya gustado la cartuchera y el tutorial haya sido de utilidad para ustedes, me despido por hoy recordándonos que no hay nada mejor para un niño que tener una mascota, porque no sólo les da alegría, sino también aprendizajes de vida incluso cuando tenemos que pasar por el duro momento de las despedida. Abrazos 🤗
I hope you liked the pencil case and the tutorial was useful to you. I say goodbye for today, reminding us that there is nothing better for a child than having a pet, because it not only gives them joy, but also life lessons even when we have to go through the hard moment of saying goodbye. Hugs 🤗
Imágenes tomadas con dispositivo Samsung A54. Portada editada en Inshot
Pictures taken with Samsung A54 device. Cover edited in Inshot
Invítenme un Café/Support Me on Ko-Fi

https://ko-fi.com/irenenavarroart
If you want to support my art you can also make donations for the value of a coffee (Ko-Fi)
Espero les haya gustado. Les invito a leer mis próximas publicaciones y siempre estaré dispuesta a responder sus preguntas y comentarios, también pueden seguirme y contactarme en cualquiera de mis redes sociales. ¡Muchas gracias!
I hope you liked it. I invite you to read my next publications and I will always be willing to answer your questions and comments, you can also follow me and contact me on any of my social networks. Thank you!
https://inleo.io/threads/irenenavarroart/re-leothreads-3bnsyjtdh
The rewards earned on this comment will go directly to the people ( irenenavarroart ) sharing the post on LeoThreads,LikeTu,dBuzz.
Que brutal te quedó 😱😱
Muchas gracias 🤗
@irenenavarroart
https://inleo.io/threads/view/hive-130560/re-leothreads-33k9ytpcw
https://twitter.com/hivediy47901/status/1712980472345591887
Wow, que hermosa Irene. Tienes una gran destreza para realizar un trabajo tan delicado y cuidando que quede pulcro.
Saludos a tu mami.
Muchas gracias, soy un poco obsesiva y por eso intento darle el mejor acabado que puedo. Saludos 😊 🤗
Gracias por el apoyo 💚
Waoo Que trabajo tan hermosisimo amiga bellísimoo me encanto. Saludos 🤗💞
Muchas gracias 😁 Saludos
Gracias por el apoyo 🤗
¡Realmente preciosa tu cartuchera! 😍 Desde el concept hasta la elaboración, tienes unas manos mágicas para el tejido porque todo lo que confeccionas te queda maravilloso 😳 Es una pena lo de Yellow, pero es un lindo gesto que lo recuerden con tanto cariño y mantengan su memoria de un modo tan encantador 🤗 ¡Lo amé! ¡Muchísimas suerte en el concurso! Y gracias por la invitación 💚
Muchas gracias, tratamos de recordarlo siempre en sus mejores momentos. Abrazos 🤗
This is super beautiful. And I'm sure your son will love it and have a way to remember his beloved Yellow. Thank you for explaining each step.
Thank you. My son loves his new pencil case 😁
Yay! 🤗
Your content has been boosted with Ecency Points, by @irenenavarroart.
Use Ecency daily to boost your growth on platform!
Support Ecency
Vote for new Proposal
Delegate HP and earn more
Awww, sweet Yellow. That's a great tribute. <3
!LUV
@irenenavarroart, @faeriestories(1/1) sent LUV. | connect | community | HiveWiki | NFT | <>< daily
! help(no space) to get help on Hive. InfoThank you 🤗
Saludos @irenenavaroart, bello trabajo en el diseño, quedo precioso esta técnica del tejido, la cartuchera quedo excelente, te felicito.
Muchas gracias, disfruté mucho el proceso. Saludos 😊
Estupendo trabajo amiga, tienes un don en tus manos con el tejido, me recordó a mi madre. Gracias por participar.
Muchas gracias 😁 estaba un poco presionada por el tiempo porque pensé que era una semana, después leí que era hasta el final de mes el concurso, aunque fue mejor así porque mi niño ya tiene cartuchera para este lunes llevarla a clase. Saludos 🤗
Que bonito gato angelito!
Muchas gracias 🐱
Huy hijita, esto está simplemente increíble, excelente trabajo, te felicito bien realizado
Muchísimas gracias 😊
It's heartwarming to see the importance of pets in children's lives and the valuable lessons they bring, even when dealing with the loss of a beloved animal companion. Well done.
Pets are part of the family and always occupy an important place in our hearts. Thanks for the support 🤗
Hermosoo, quedó muy linda la cartuchera, de verdad admiro tu trabajo.
Gracias por compartirlo.
Muchas gracias 😁
Waooo espectacular te quedó amiga un trabajo bien elaborado te felicito y tu niño muy contento éxitos feliz noche.
Hola @irenenavarroart , que trabajo más hermoso y ese gatito es una cuchitura.
Te quedo preciosa la acartuchera. Felicitaciones y suerte ene l concurso.
Saludos @yetsimar
Muchas gracias 😁