Tips y Rutina para Back Lever Principiante-Intermedio [ESP🇻🇪-ENG🇺🇸]
Estos tips te ayudaran a dominar el Back Lever [ESP🇻🇪/ENG🇺🇸]
These tips will help you master the Back Lever [ESP🇻🇪/ENG🇺🇸]

Saludos a toda la comunidad de #HIVE y a mis colegas de #SWC. En esta oportunidad quiero compartir con ustedes una rutina y dos tips que serán clave en nuestro entrenamiento para conseguir el BACK LEVER. Primeo que nada el BACK LEVER es un elemento de tensión nivel PRINCIPIANTE-INTERMEDIO el cual se puede lograr en unas semanas teniendo ya una base de fuerza aceptable en los músculos implicados, los cuales serían: antebrazos, pectoral, hombros, abdomen, tríceps, lumbares y glúteos (este último para ayudar el lumbar y que no se vea tan cargado). Cabe acotar que esta rutina es para quienes están muy cerca de hacer el BACK LEVER, tienen buena movilidad en los hombros, sobre todo, ya que se les exigirá bastante trabajo y tienen ya interiorizado lo que es la postura correcta del elemento.
Greetings to the entire #HIVE community and my colleagues at #SWC. In this opportunity I want to share with you a routine and two tips that will be key in our training to achieve the BACK LEVER. First of all the BACK LEVER is an element of tension BEGINNER-INTERMEDIATE level which can be achieved in a few weeks already having a base of acceptable strength in the muscles involved, which would be: forearms, pectoral, shoulders, abdomen, triceps, lumbar and glutes (the latter to help the lumbar and not look so loaded). It should be noted that this routine is for those who are very close to doing the BACK LEVER, have good mobility in the shoulders, above all, since it will require a lot of work and have already internalized what is the correct posture of the element.
Esta progresión nos ayudara a seguir desarrollando fuerza en nuestro abdomen, desarrollar mucha movilidad y flexibilidad en nuestros hombros y aún más importante, a la hora de regresar, en nuestro lumbar, que suele ser un poco olvidado en la calistenia. En toda rutina de Back Lever, esta progresión tiene que estar sí o sí. Si tu entrenador no implementa esta progresión en tu entrenamiento de BACK LEVER, ¡¡HUYE!! ya que este es el ejercicio base clave.
This progression will help us to continue developing strength in our abdomen, develop a lot of mobility and flexibility in our shoulders and even more important, at the time of return, in our lower back, which is usually a little forgotten in calisthenics. In any Back Lever routine, this progression has to be there. If your coach does not implement this progression in your BACK LEVER training, HUYE!!! as this is the key base exercise.
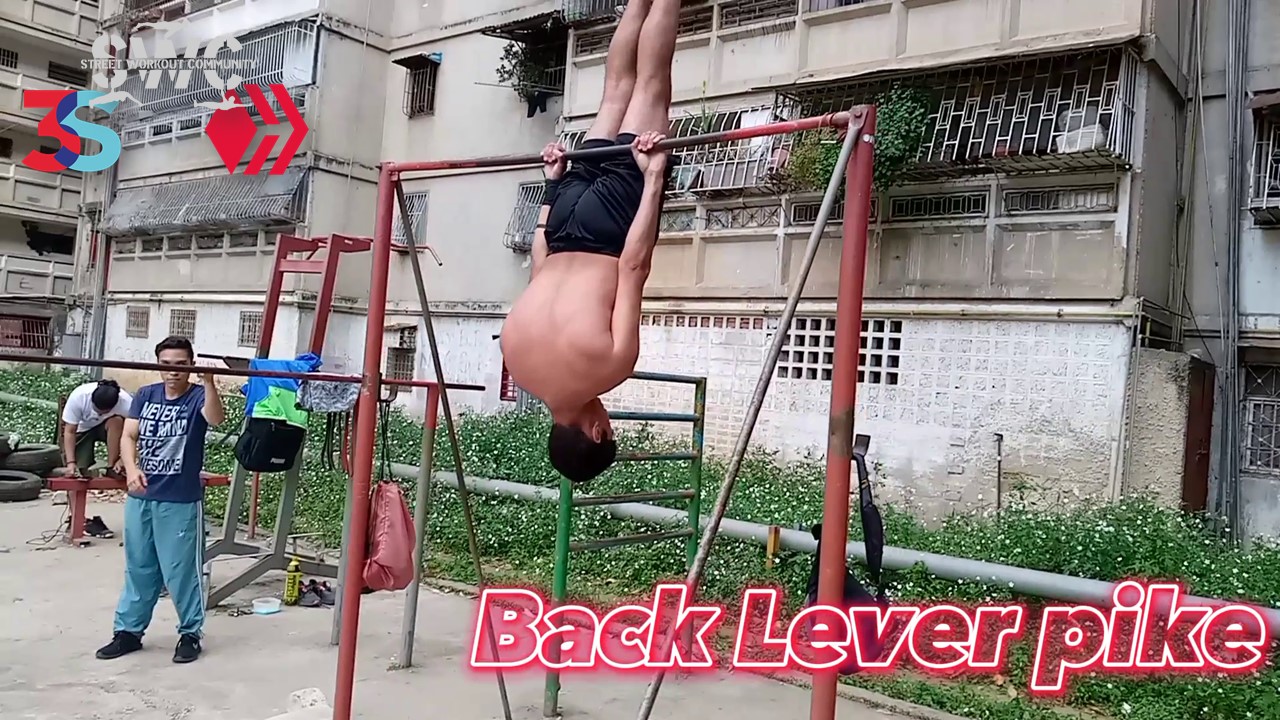
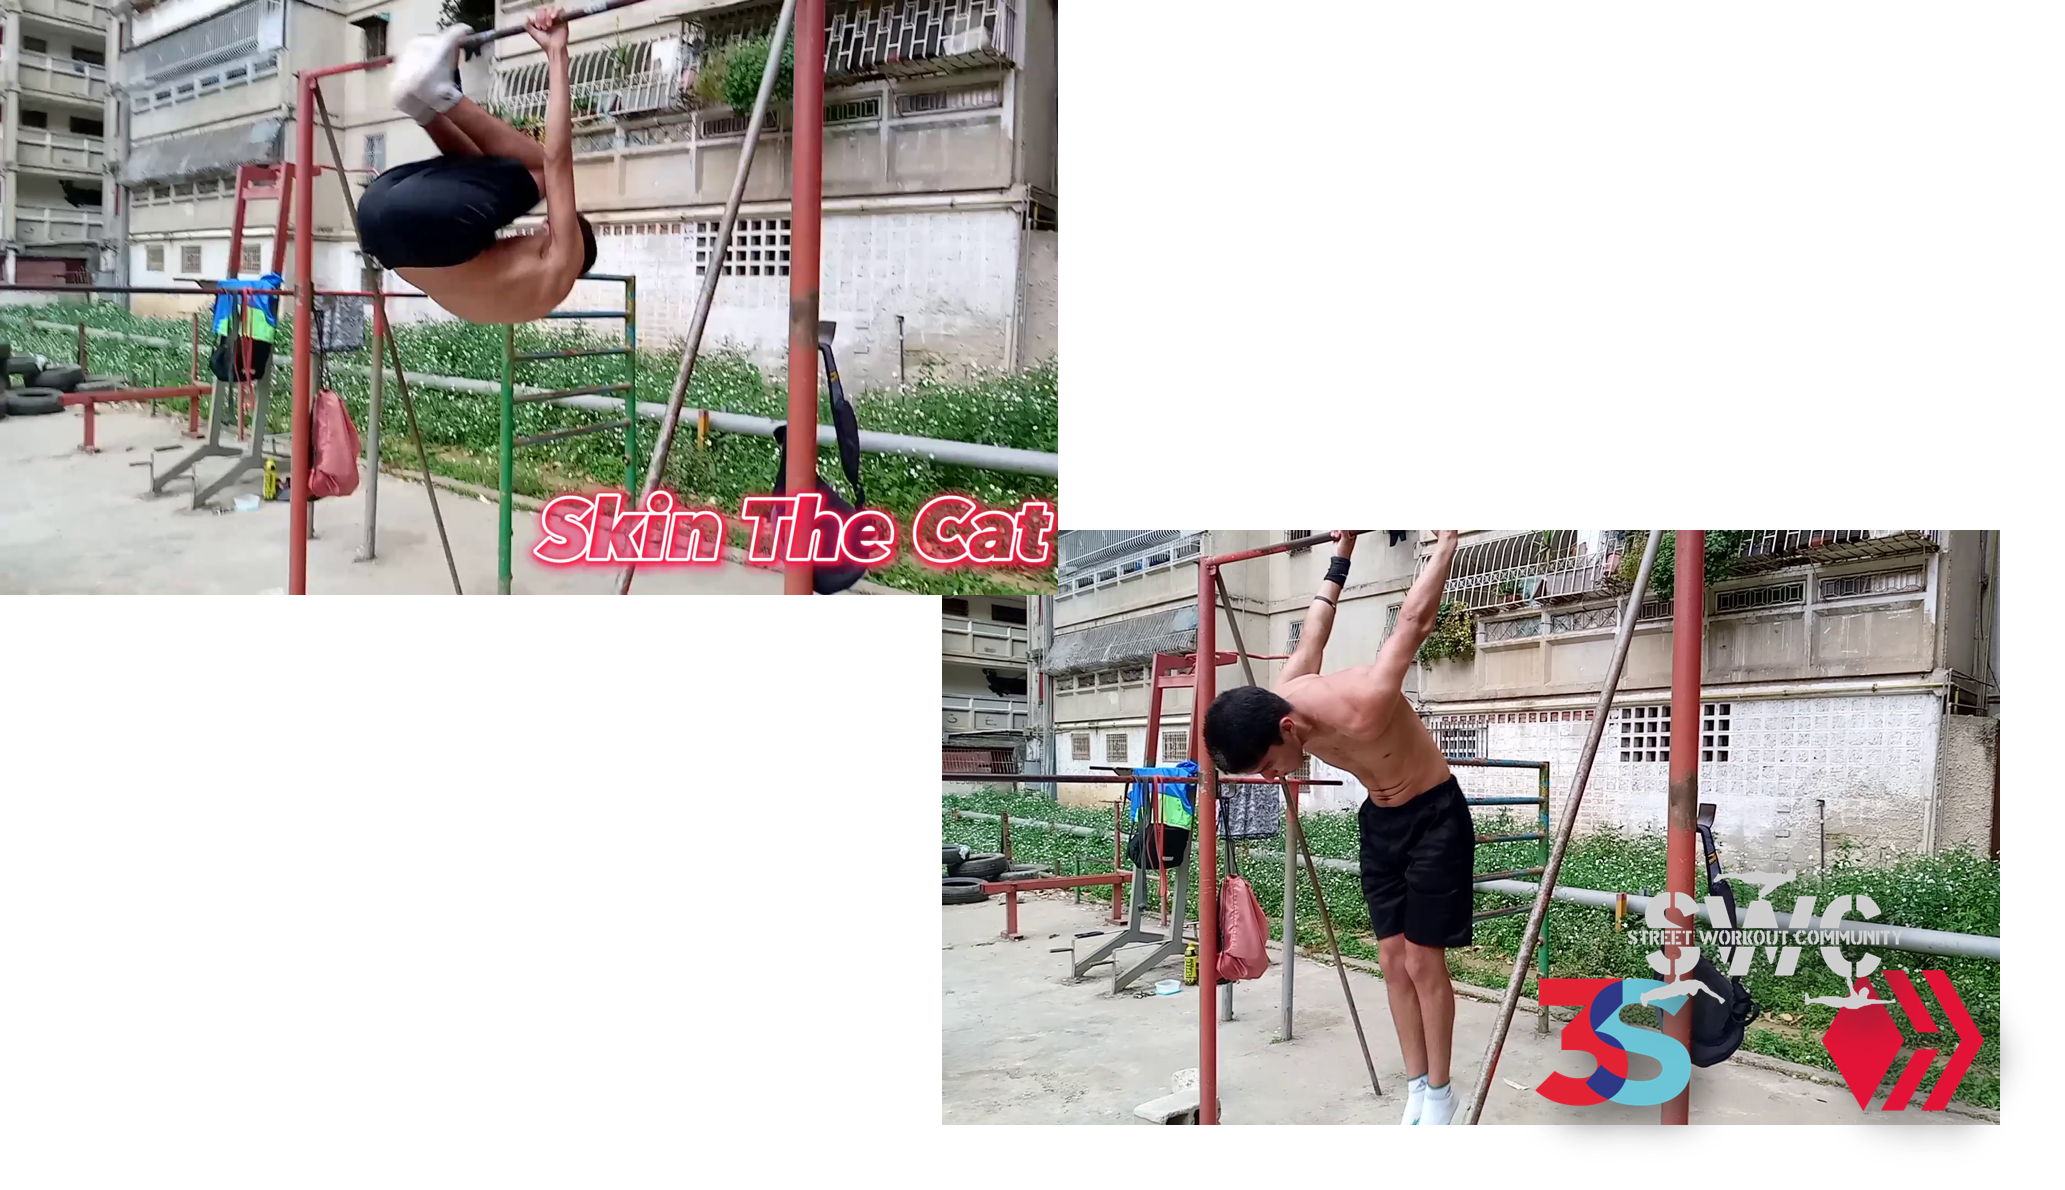
Con esta progresión lo que haremos será desarrollar esa fuerza que luego será transferida a la postura final del back lever. Consiste solo en colgarse y agarrase fuerte de la barra estando de cabeza como se ve en la IMAGEN, y es realmente sencillo, lo que si puede jugarnos en contra es el temor a estar de cabeza. Para resolver eso sencillamente podemos realizar la progresión en una barra más baja, pedirle a un compañero que nos asista o tener unas colchonetas. Una recomendación que desde mi experiencia como atleta y entrenador puedo darles es que “SE HAGAN UN BLOQUE” ¿a qué me refiero con esto? Simplemente apretar todo el cuerpo o tensionarlo. Créanme que no se sentirá demasiado peso.
With this progression what we will do is to develop the strength that will be transferred to the final position of the back lever. It consists only of hanging and holding on to the bar while being upside down as shown in the IMAGE, and it is really simple, what can play against us is the fear of being upside down. To solve that we can simply perform the progression on a lower bar, ask a partner to assist us or have some mats. One recommendation I can give you from my experience as an athlete and coach is to "GET A BLOCK" what do I mean by this? Simply tighten your whole body or tense it up. Believe me it won't feel too heavy.
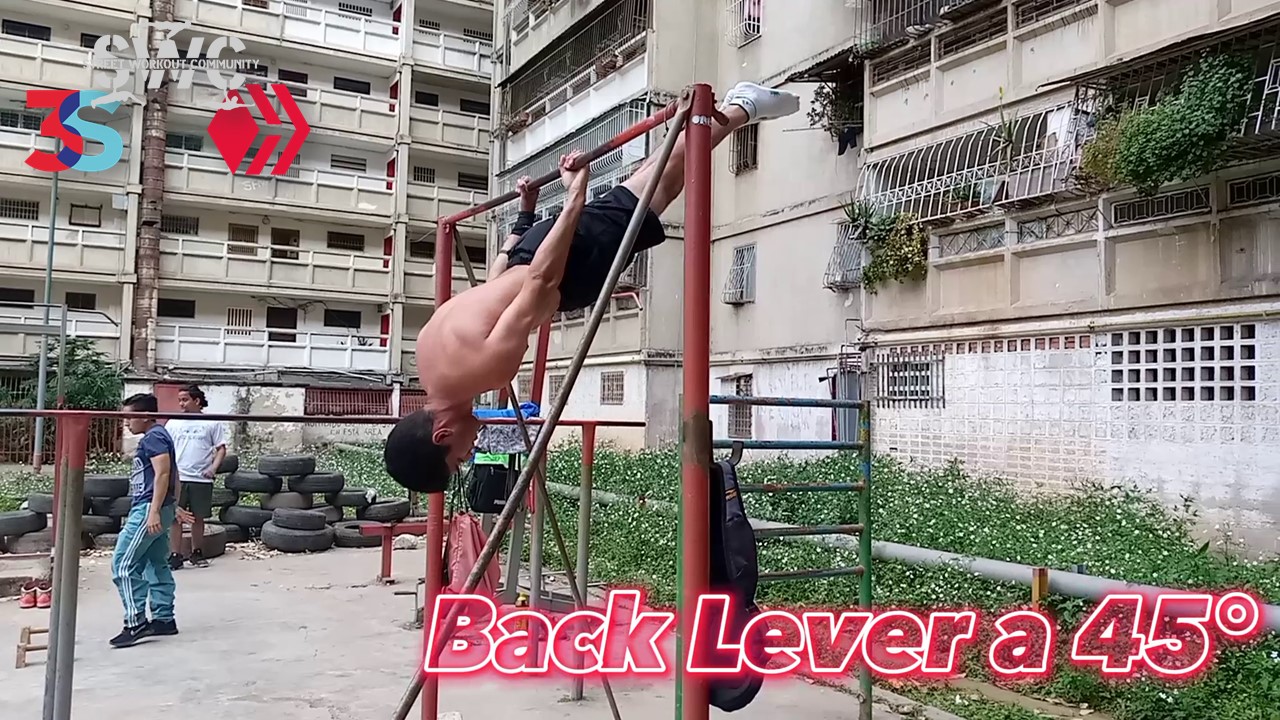
La misma filosofía que la progresión anterior, solo que, en esta ocasión, nuestro cuerpo debe marcar 45º en la simulación de una escuadra. ¿Cómo sabes que estas marcando esos 45º? Puedes pedir a un compañero que te avise cuando estés en la postura indicada o lo que todos los atletas hacemos, grabarnos. Esto nos ayudará a la hora de mejorar las posturas.
The same philosophy as the previous progression, only this time, our body must mark 45º in the simulation of a square. How do you know that you are marking those 45º? You can ask a partner to let you know when you are in the indicated position or what all athletes do, record us. This will help us to improve our postures.
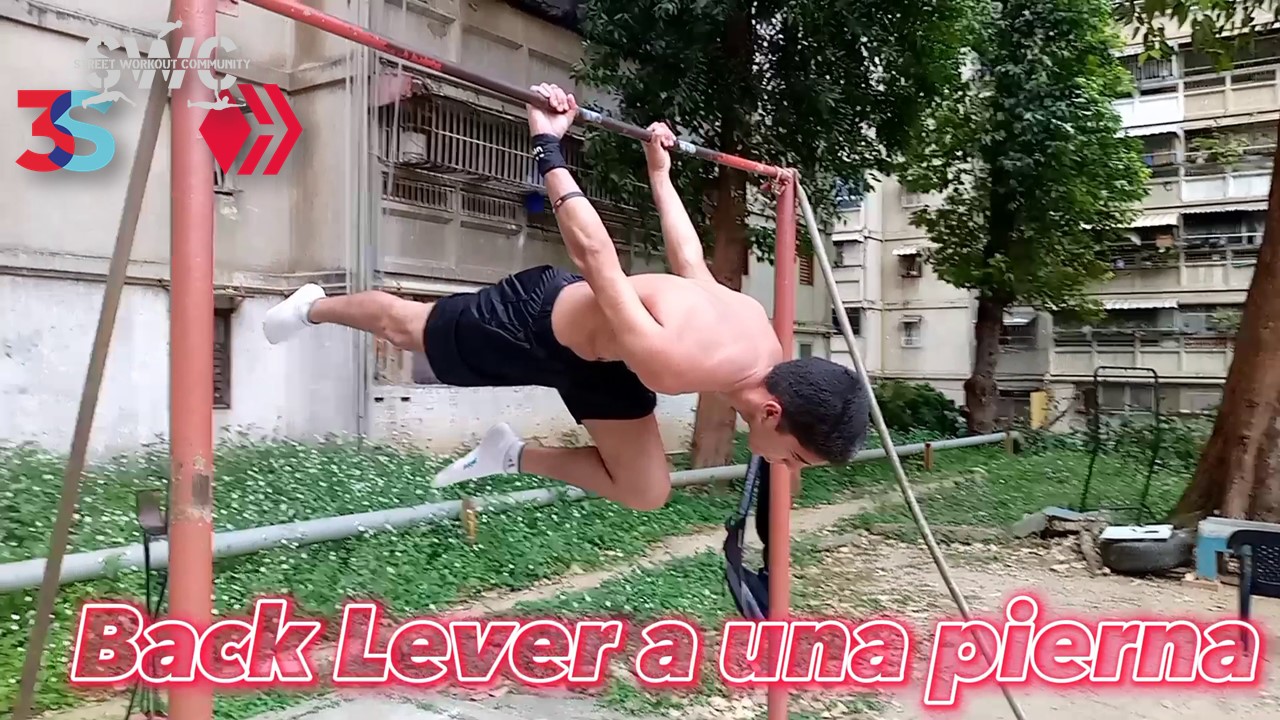
Aquí subimos un poco más el nivel. Esta será la progresión final y la que te dirá si ya estás listo para el Back Lever. Lo que haremos como el nombre del ejercicio lo dice, será adoptar la postura del Back Lever con una pierna flexionada. Teniendo una pierna completamente estirada la tensión aumentará notablemente, ya que se alejará de nuestro centro de masa. Teniendo unos 15 segundos de esta progresión estaremos listos para el BACK LEVER. Aplicando lo antes mencionado será solo cuestión de tiempo para lograr el BACK LEVER.
Here we take it up a notch. This will be the final progression and the one that will tell you if you are ready for the Back Lever. What we will do, as the name of the exercise says, will be to adopt the Back Lever posture with one leg bent. Having one leg completely stretched the tension will increase significantly, as it will move away from our center of mass. Having about 15 seconds of this progression we will be ready for the BACK LEVER. Applying the above mentioned will be just a matter of time to achieve the BACK LEVER.
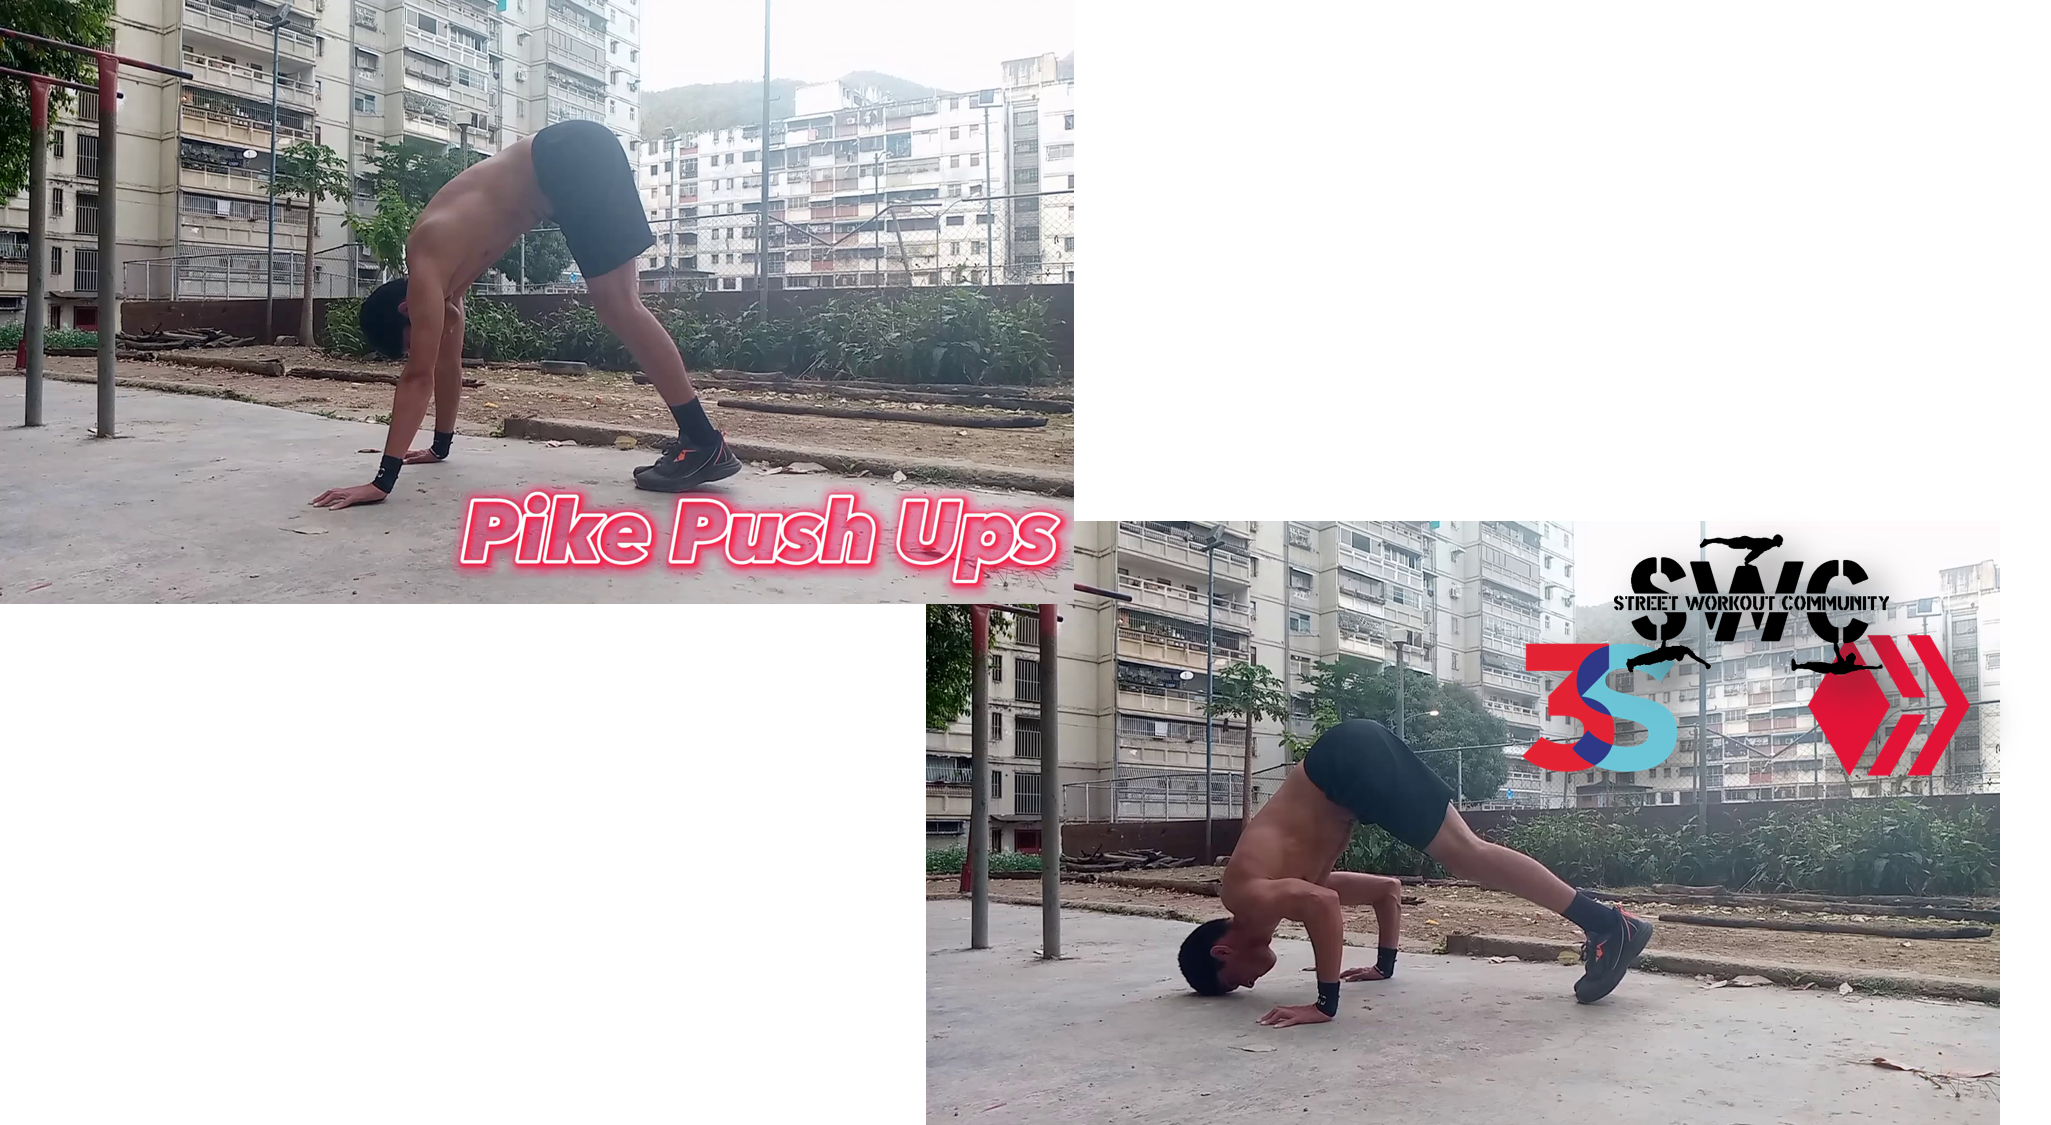
Uno de los ejercicios TOP para el desarrollo de fuerza en Deltoides (hombros). Para realizarlo debemos adoptar un Postura de A y aplicamos los principios de la Flexión común, bajamos hasta que los codos marquen un angulo de 90º. Al subir es #IMPORTANTE que realicemos un mini press o sencillamente llevemos nuestra cabeza hacia dentro de nuestros hombros.
One of the TOP exercises for the development of strength in Deltoids (shoulders). To perform it we must adopt an A Posture and apply the principles of the common Flexion, we go down until the elbows mark an angle of 90º. On the way up it is #IMPORTANT that we perform a mini press or simply bring our head into our shoulders.
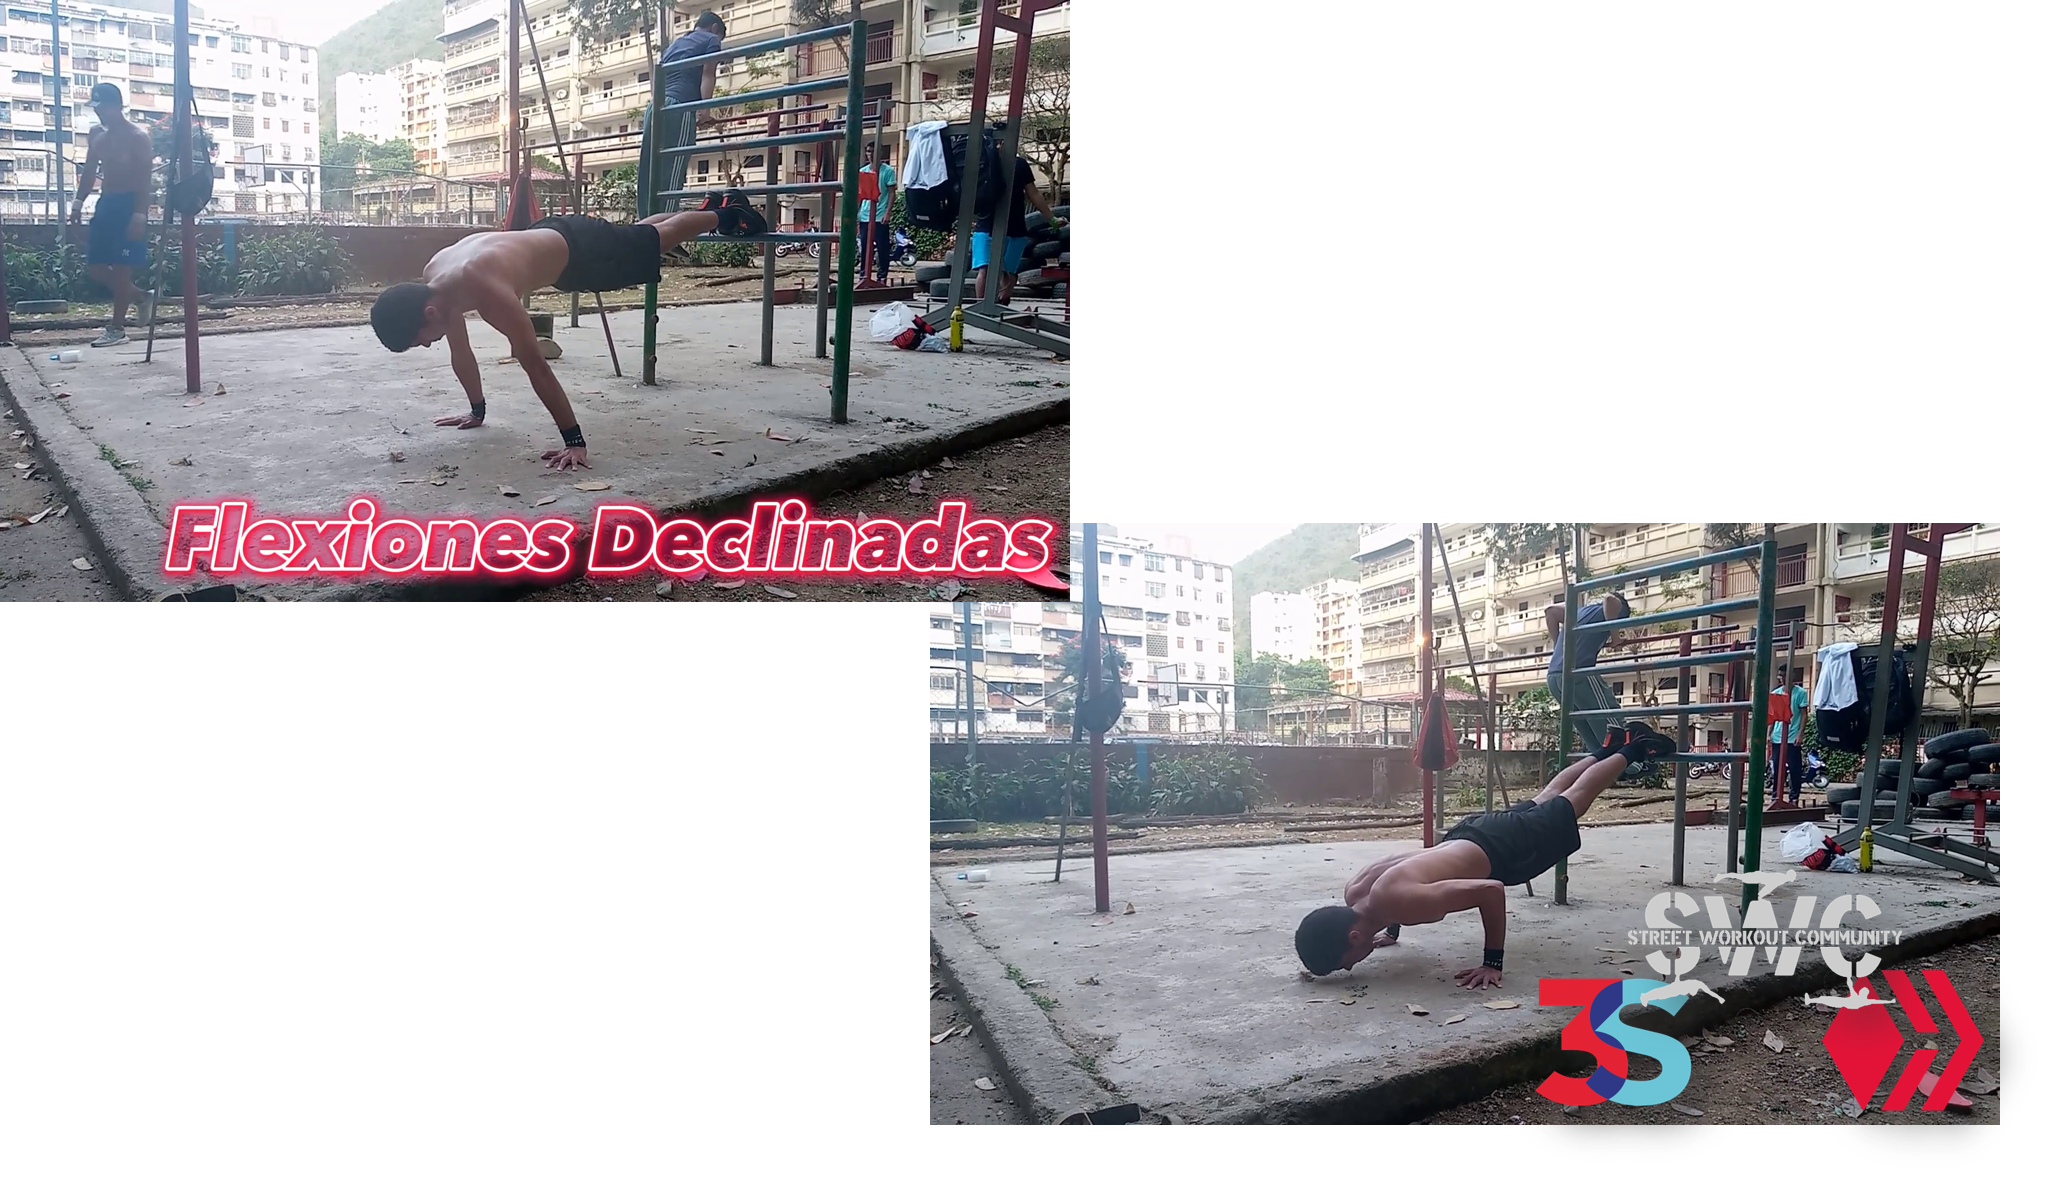
Para esta progresión vamos a colocar nuestros pies en alguna superficie un poco alta, como se ve en la imagen. Aplicamos los mismos principios, bajar hasta que los codos marquen un ángulo de 90 grados y que estén siempre viendo hacia atrás.
For this progression we are going to place our feet on some slightly high surface, as seen in the picture. We apply the same principles, lower until the elbows are at a 90-degree angle and are always facing backwards.
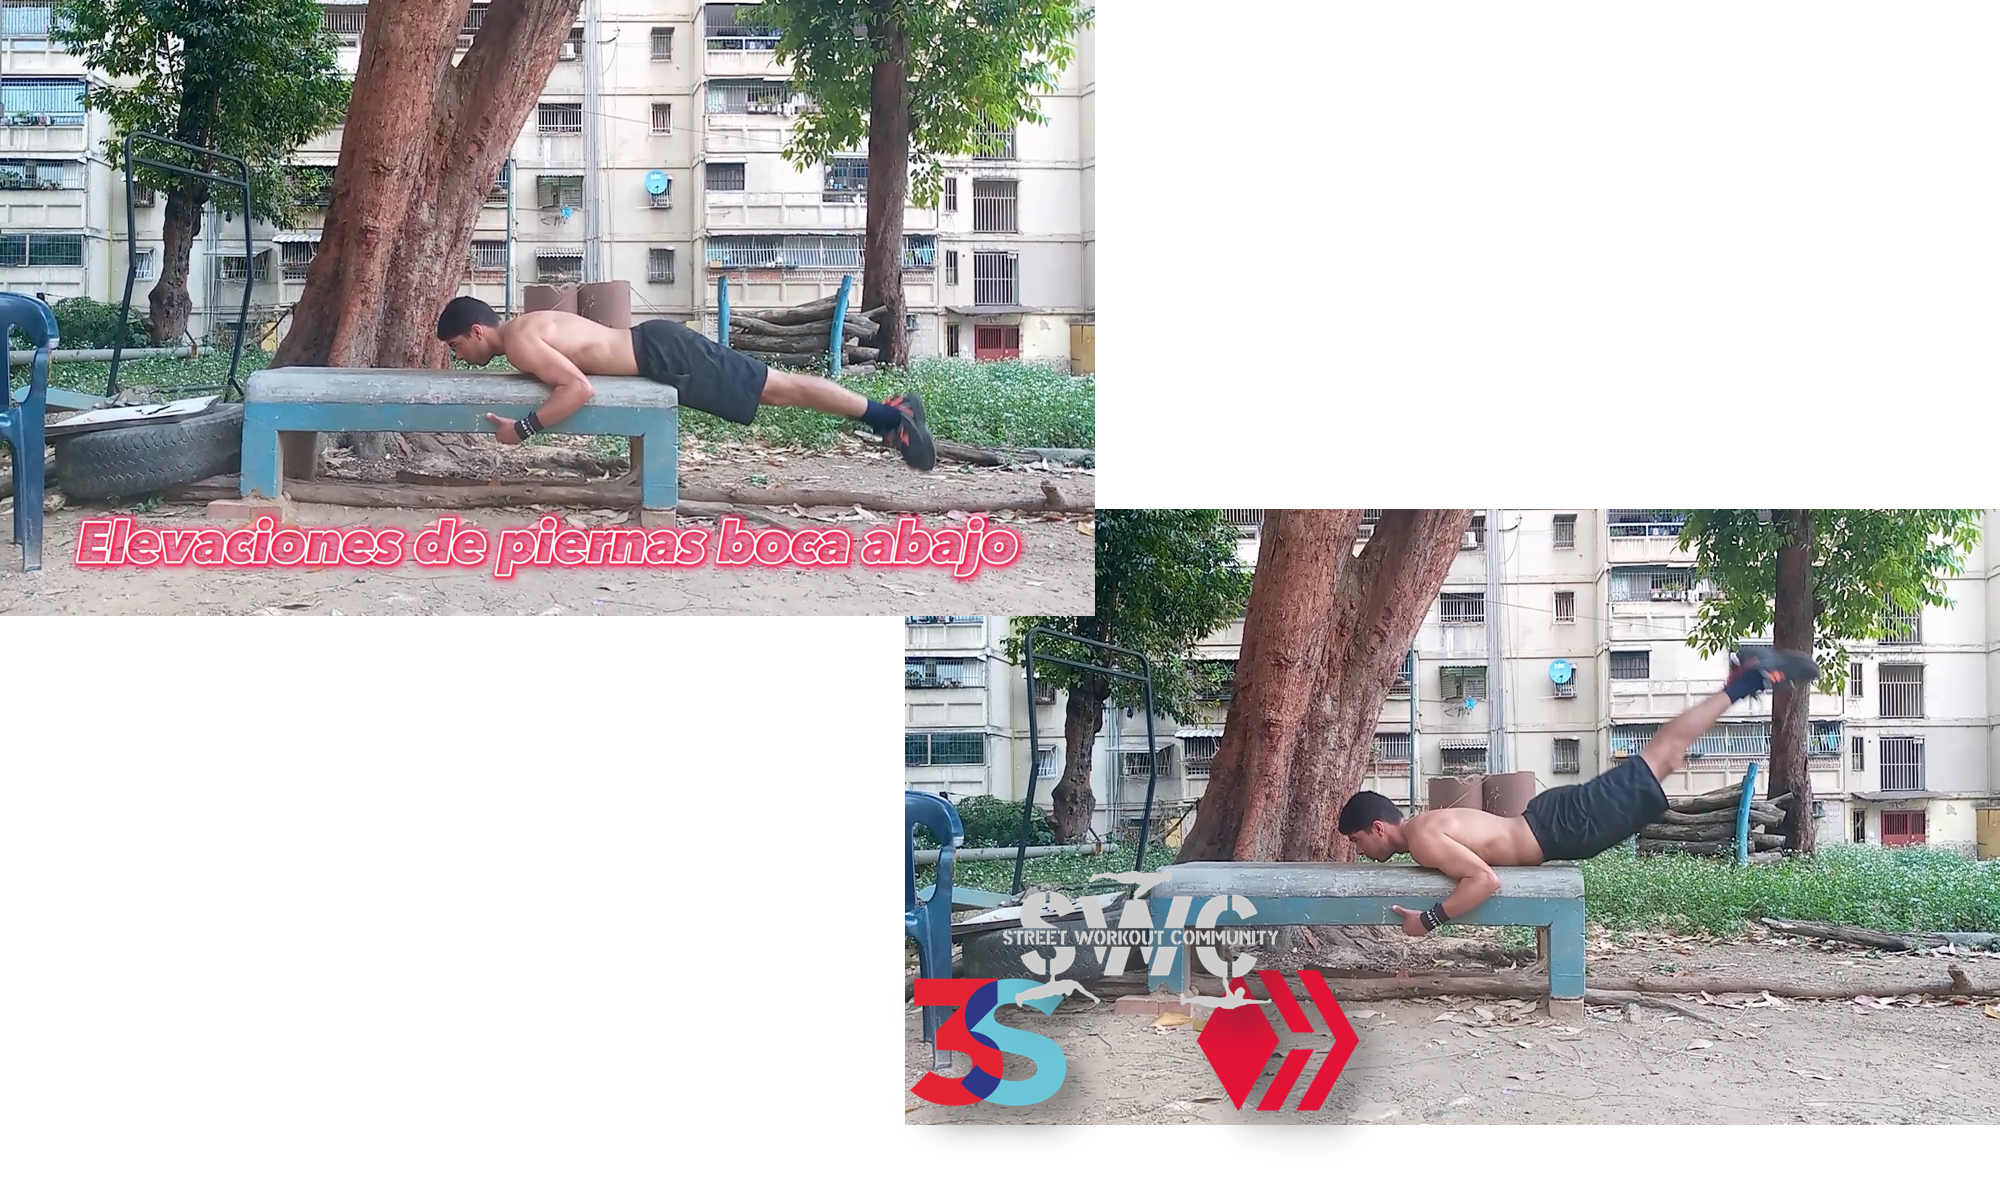
Este ejercicio nos ayudara a desarrollar esa fuerza que necesitamos en el lumbar y glúteos para para no sentir molestias a la hora de realizar el Back Lever. Consiste solamente en acostarnos boca abajo y hacer una elevación de nuestras piernas.
This exercise will help us to develop the strength we need in the lumbar and gluteus muscles to avoid discomfort when performing the Back Lever. It only consists of lying face down and making an elevation of our legs.

Sin más que agregar, espero les haya gustado el post y la rutina también. Queda de más recordar que antes de cada entrenamiento es imprescindible realizar un calentamiento de unos 20 minutos como mínimo, ya que así rendiremos aún más en cada entrenamiento. Nos vemos en un próximo post.
Without more to add, I hope you liked the post and the routine too. It remains to remember that before each training session it is essential to warm up for at least 20 minutes, since this way we will perform even better in each training session. See you in a next post.

▶️ 3Speak
0
0
0.000
Gracias por los tips, personalmente este es un movimiento que se me complica muy por el tema de la presión y el tranque
A la orden hermano. Pon en practica esos tips y dominaras rápido el Back, además de eso practica bastante el Tuck Back Lever, te ayudará con la presión que sientes a la hora de realizarlo, estando en Tuck puedes entrenar la respiración . Fue lo que me ayudo a mi al principio y luego a mis compañeros de equipo. Espero te ayude bro, saludos.
Bro también e llegado a sentir algún tipo de molestia en los codos a la hora de hacerlo en agarre supino
Entiendo bro, eso es normal, ya que nuestro cuerpo no esta acostumbrado a esa presión. Lo que te recomiendo para eso, es que entrenes las progresiones de Back Lever básicas con agarre Supino tuck, tuck adv, skin the cat, pica, de esa manera los Tendones, articulaciones y ligamentos irán agarrando la fuerza y movilidad necesarias.
Muchas gracias bro, pondré todos tus consejos en práctica 👌🏋️♀️
Saludos @isaaccrsw
Greetings @isaaccrsw
Muchas gracias familia #vamospormas
Muy buenos ejercicios!
Gracias bro.
Excelentes tips, aporte y puntos de suma importancia que tomas en cuenta bro, la verdad se ve que has dedicado el tiempo y la pasión de investigar, excelente postura y además de los entrenamientos que tomas en cuenta para la postura y los músculos que se entrenan! Saludos.