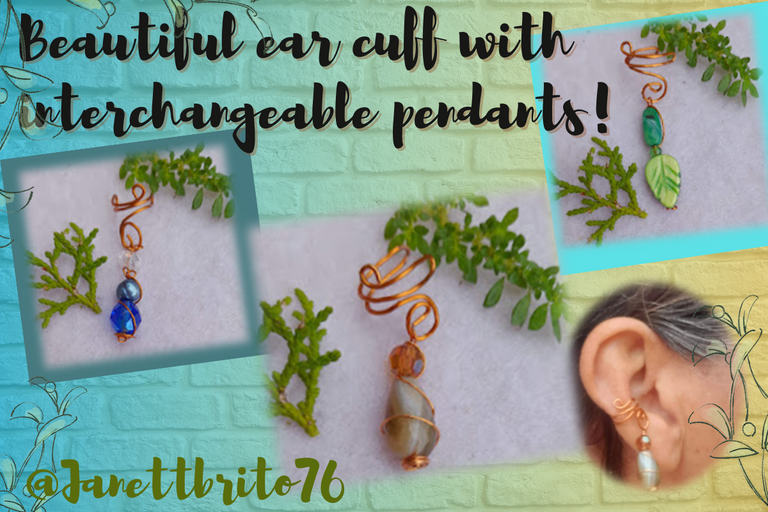
[ENG-ESP] Beautiful ear cuff with interchangeable pendants // Preciosos manguitos para la oreja con colgantes intercambiables

Greetings and blessed evening to all my crafty and creative friends of this beautiful #Jewelry community, I hope you had a fabulous weekend.
Welcome back to my blog, tonight I want to share with you the step by step how to make these lovely ear cuffs with beautiful dangling details, which have some brown, green, blue crystals and a small pearl. These cute ear cuffs are ideal to give as a gift to a friend, sister, to the beautiful ones at home or simply to sell them or to wear them at work, you can also use them in both ears if you like or simply in the ear that you feel more comfortable.
Well creative and artisans, this little piece of jewelry is quick and inexpensive to make and best of all is that you can customize it with the pendants you want or with the colors of crystals that you need or you like. Follow me and I will show you step by step how to make them. Let's get to work with love and affection, let's get to work!

Saludos y bendecida noche para todas mis amigas artesanas y creativas de esta hermosa comunidad de #Jewelry, espero que hayan tenido un fabuloso fin de semana.
Bienvenidos nuevamente a mi blog, en esta noche les quiero compartir el paso a paso para realizar estos preciosos manguitos para la oreja con bellos detalles colgantes, los cuales tienen algunos cristales marrones, verdes, azules y una pequeña perla. Estos lindos manguito para las orejas son ideales para obsequiar a una amiga, hermana, a las bellas de la casa o simplemente para venderlos o para lucirlos en el trabajo,ademas puedes usarlos en las dos orejas si es tu gusto o simplemente en la oreja que mas te sientas a gusto.
Bueno creativas y artesanas, este detallito de bisutería es rápida y económica de realizar y lo mejor de todo es que la puedes personalizar con los colgantes que tu quieras o con los colores de cristales que necesites o te gusten. Pues entonces Sígueme y te enseñare paso a paso como los elabore. Amigas a trabajar con mucho cariño y amor. ¡¡Manos a la obra!!.


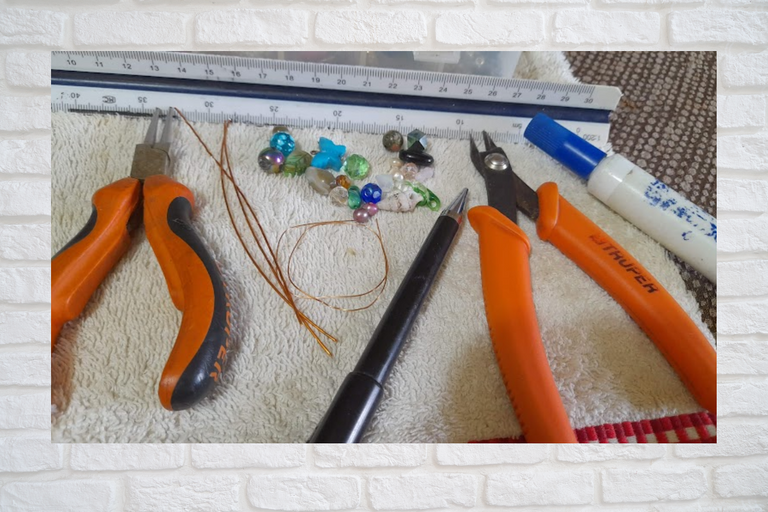
- Wire #20 and #22 gauge
- Assorted crystals (blue, brown, clear, green)
- Small green crystal
- Pearls, teardrop
- Round nose pliers
- Cutting tweezers
- Ruler
- Marker and pen

- Alambre calibre #20 y #22
- Cristales variados (azul, marrón, transparente, verde)
- Cristal pequeño verde
- Perlas, lagrima
- Pinza punta redonda
- Pinza de corte
- Regla
- Marcador y bolígrafo

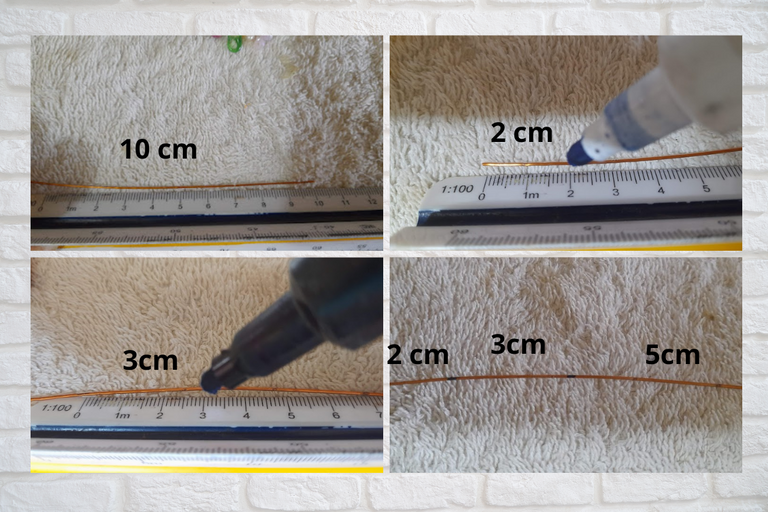
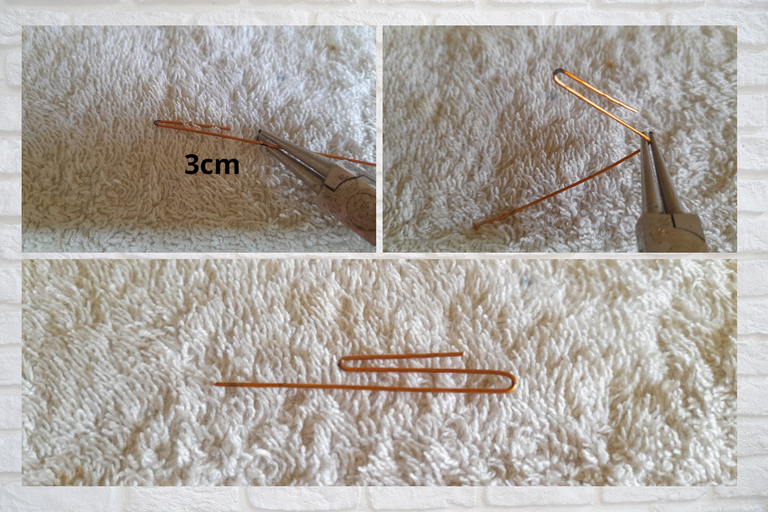
1:To make our sleeves, we need a 10 centimeter piece of #20 wire, then with the marker we make two marks, one of two centimeters and the other of three centimeters, which we will use to know exactly where we are going to bend.
1: Para la elaboración de nuestros manguitos, necesitamos un trozo de 10 centímetros de alambre #20, seguidamente con el marcador realizamos dos marcas una de dos centímetros y otra de tres centímetros, las cuales las usaremos para saber exactamente donde vamos a doblar.
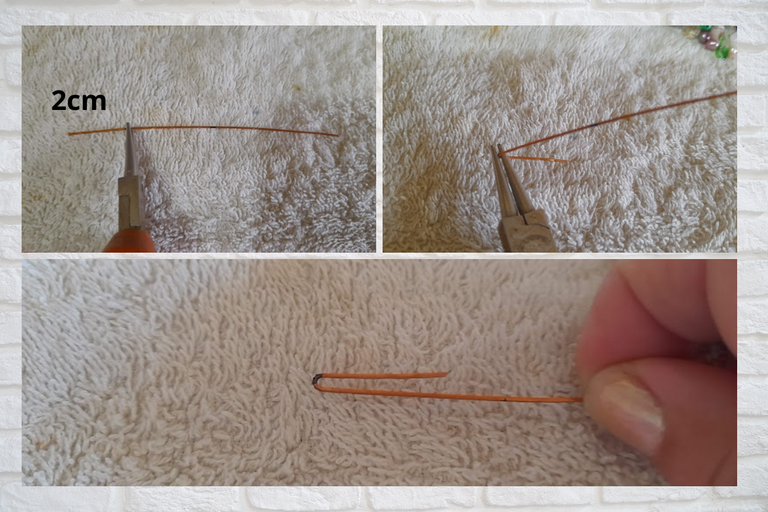
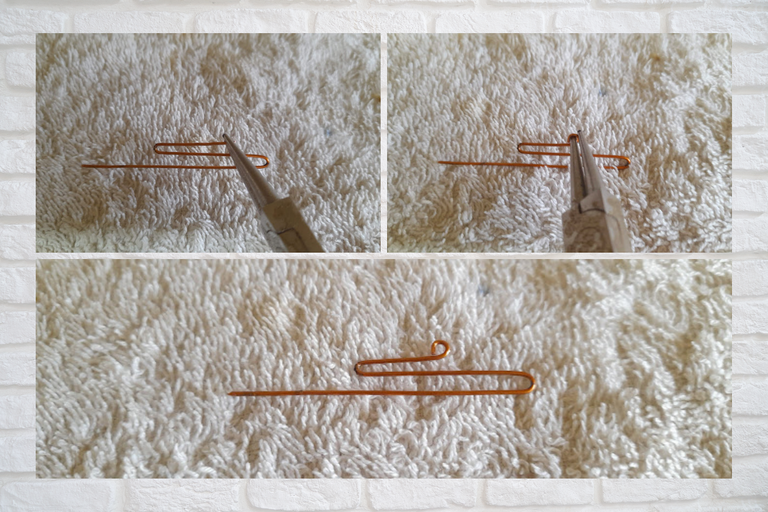
2: Now we are going to bend the wire in the two marks that we made in the previous step, then with the help of the round tip pliers we hold the wire in the first mark, then we bend both ends of the wire downwards, then we hold the wire again with the pliers in the second mark also bending both sides of the wire downwards, as you can see in the images.
2: Ahora vamos a doblar el alambre en las dos marcar que realizamos en el paso anterior, luego con la ayuda de la pinza punta redonda sujetamos el alambre en la primera marca, seguidamente doblamos ambos extremos del alambre hacia abajo. después volvemos a sujetar el alambre con la pinza en la segunda marca doblando también ambos lados del alambre hacia abajo, como pueden observar en las imágenes.
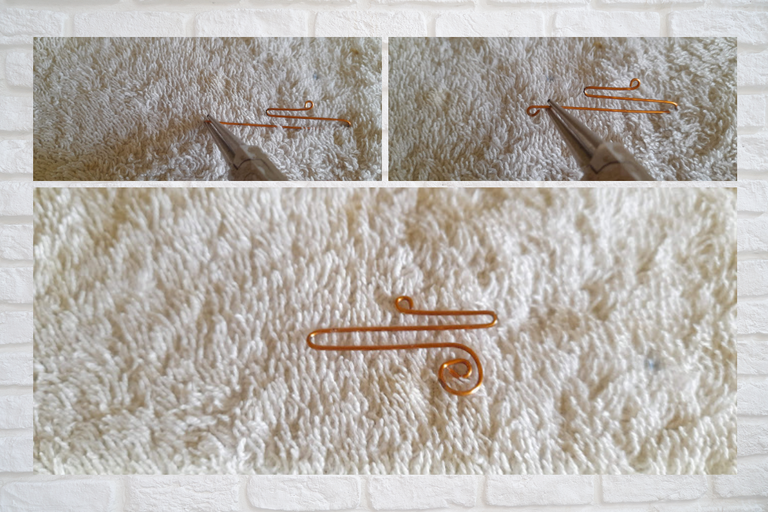
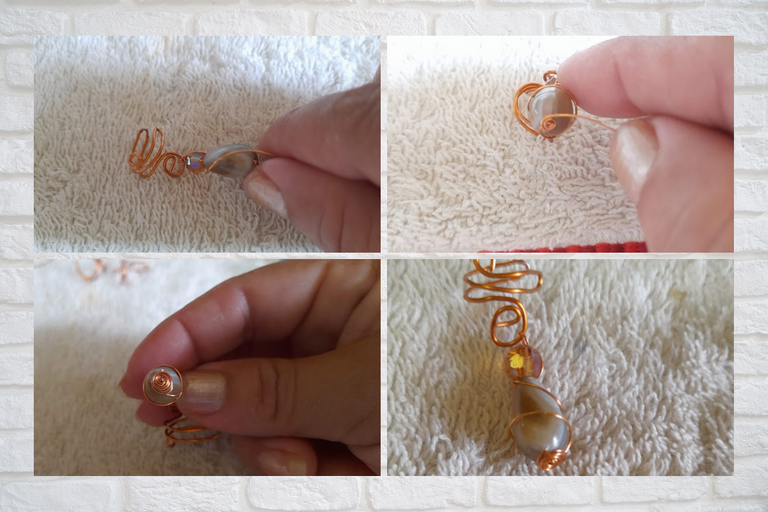
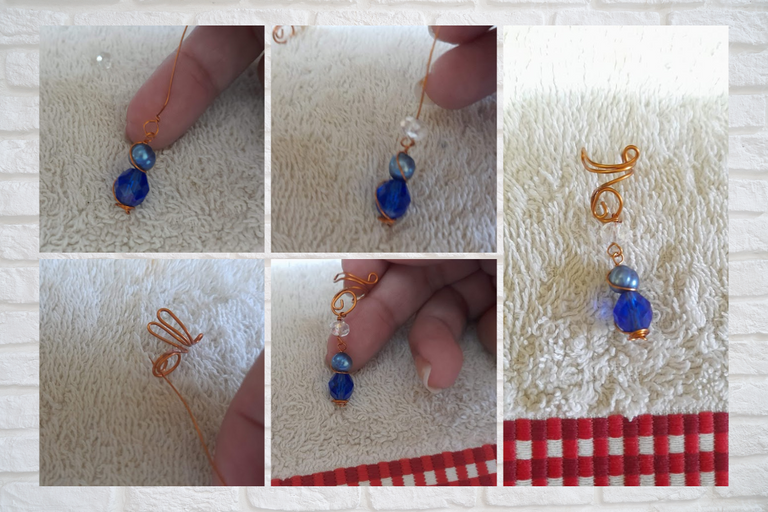
3: With the round tip pliers, we take the short end of the wire and make a small turn, then we make an open spiral at the other end, which you can get by moving the pliers a little along the straight wire, as you can see in the pictures.
3: Con la pinza punta redonda, tomamos el extremo corto del alambre y le realizamos una pequeña vuelta, luego al otro extremo le realizamos un espiral abierto, el cual lo puedes obtener moviendo la pinza un poco a lo largo del alambre recto. como puedes ver en las imágenes.
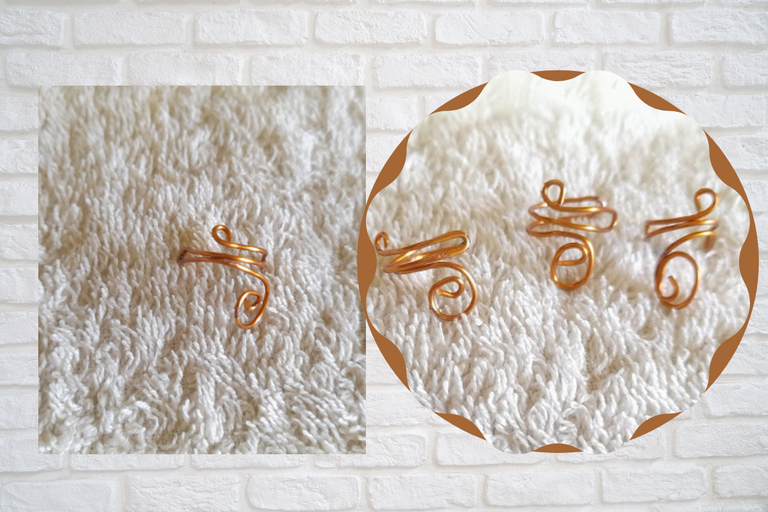
4: Now with the pliers we adjust the wire a little bit, so that the small loop and the spiral touch each other the center of the wire. Then we are going to bend our wire with the help of the pen. First you must decide on which side we are going to use the cuff, because if you are going to use it on the left ear then you must place the short wing on the left and if you are going to use it on the right ear you place the short wing on the right, once decided just place your finger on the wire to hold it and with the other finger bend it around the pen.
4: Ahora con la pinza ajustamos un poco el alambre, para que la pequeña vuelta y el espiral toquen cada uno el centro del alambre. Luego vamos a doblar nuestro alambre con la ayuda del bolígrafo. primero debes decidir de que lado vamos a usar el manguito, porque si lo vas a usar en la oreja izquierda entonces debes de colocar el ala corta a su izquierda y si lo vas usar en la oreja derecha colocas el ala corta a la derecha, una vez decidido solo queda colocar el dedo encima del alambre para sujetarlo y con el otro dedo doblar alrededor del bolígrafo.

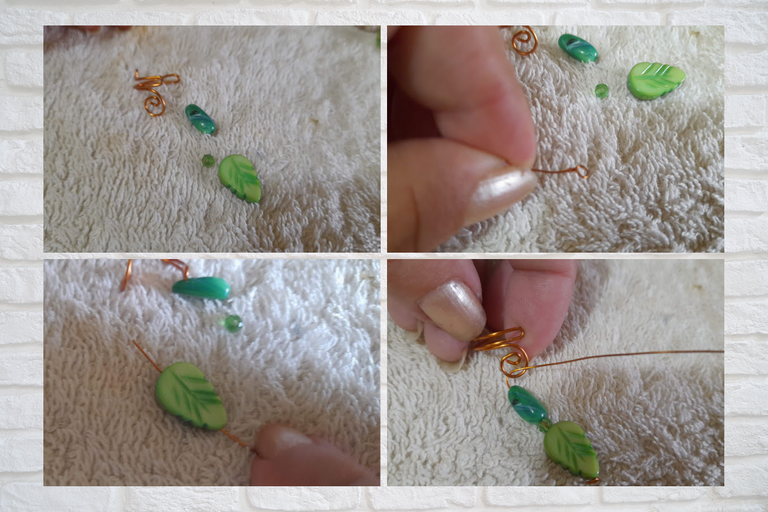
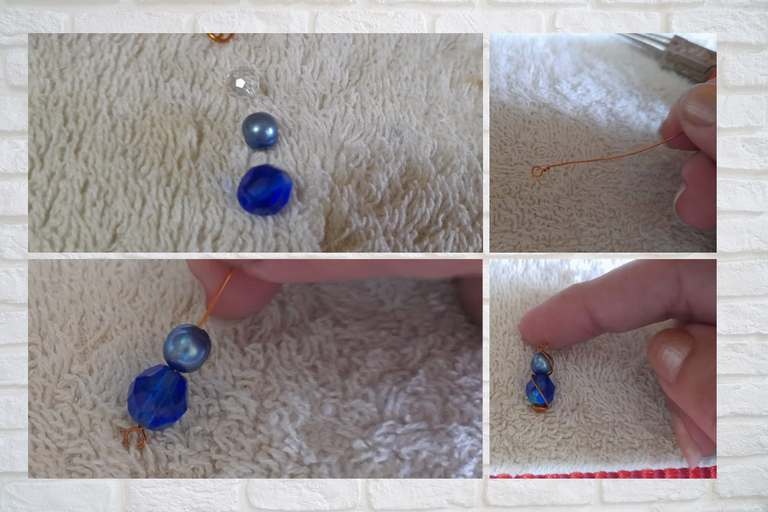
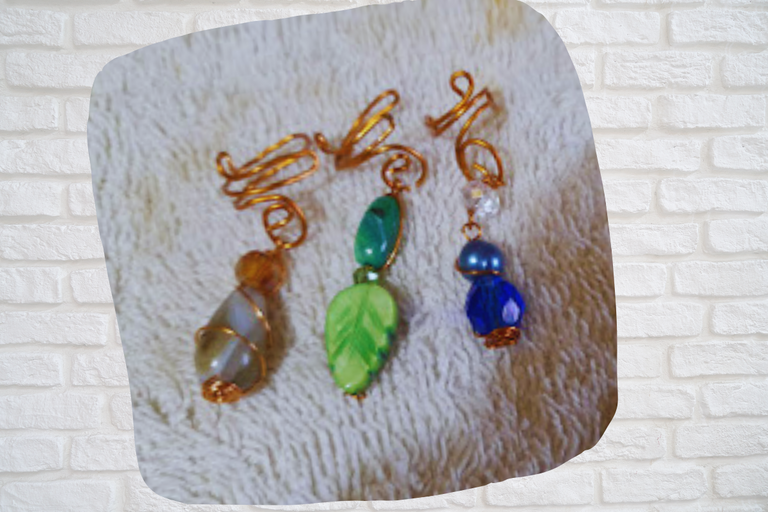
5: Now to decorate our first cuff we proceed to twist our brown teardrop with a brown crystal, then we twist it to the cuff, then we repeat the same procedure with each one of our cuffs decorating each one with the selected crystals and beads.
5: Ahora para decorar nuestro primer manguito procedemos a entorchar nuestra lagrima marrón con un cristal morrón, seguidamente lo entorchamos al manguito, luego repetimos el mismo procedimiento con cada uno de nuestros manguitos decorándolos cada uno con los cristales y perlitas seleccionadas.

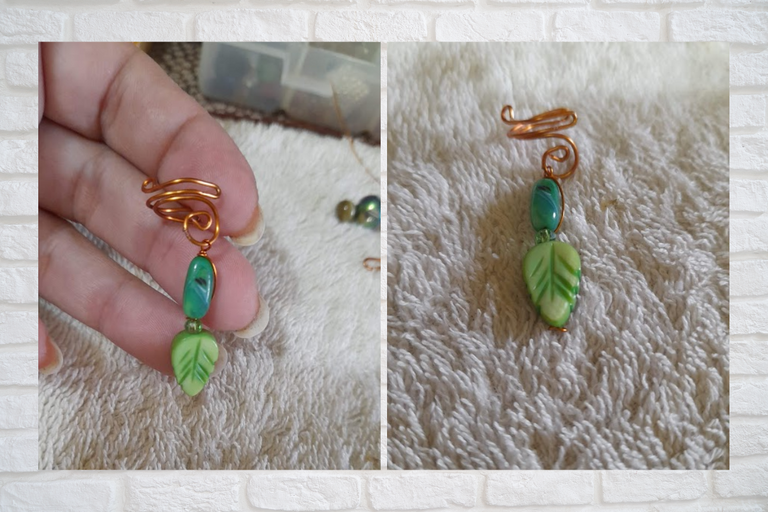
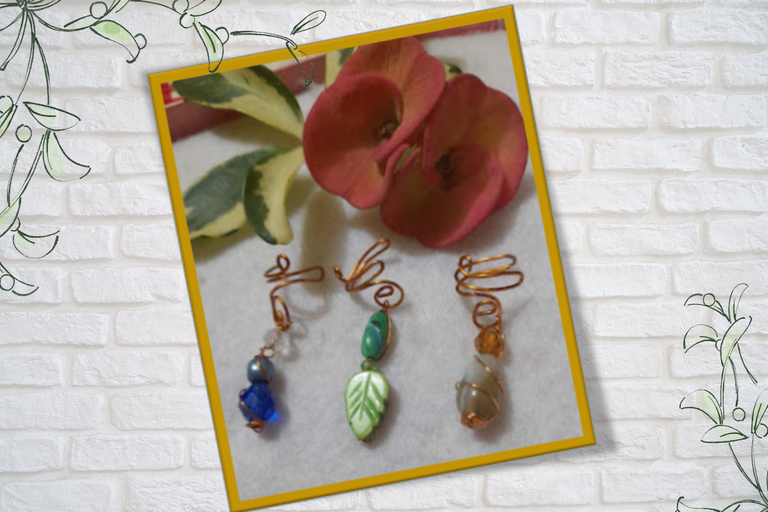
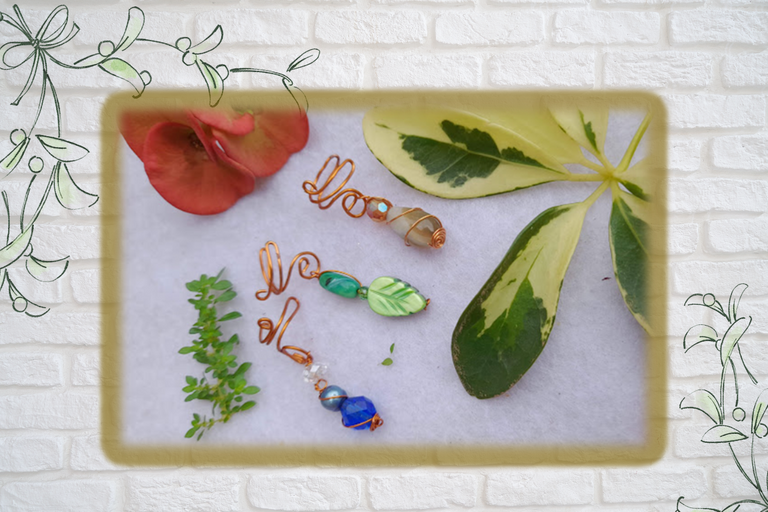
My dear artisan friends, here is the final result of these beautiful ear cuffs decorated with beautiful details, although you can also use them without pendants. I am sure you will love them, I hope this idea will be very useful for you!
**See you next time for a creative post!
Mis apreciadas amigas artesanas aquí les dejo el resultado final de estos preciosos manguitos para las orejas decorados con bellos detalles aunque también los pueden usar sin colgantes. Estoy segura que les van a encantar.¡ Espero que esta idea les sirva mucho!
¡Hasta una próxima publicación creativa!

Portada y plantillas elaboradas en canva
Fuente Separador

The photographs were taken with a Samsung A12 smartphone, the text was translated into English with the Deepl translator.link
The banner was designed on canvas link
Las fotografías fueron tomadas con un teléfono inteligente Samsung A12, el texto fue traducido al ingles con el traductor Deepl.link
El banner fue diseñado en canvas link
Que bonito trabajo, el diseño del maqueteado ha quedado muy hermoso. Saludos!
Gracias amiga @divergente1 por tu visita y comentario
Que lindo zarcillos @janettbrito76
Hola gracias, que chevere que te gustaron 😊
Están bellísimos y muy originales. Gracias por compartir este paso a paso 👍
Hola amiga @andreamtovar19,gracias por tu visita y me alegra mucho que te gustaran los manguitos. Saludos 🤗
I can't even imagine constructing the same sizes of wires for earrings. This is awesome work dear @janettbrito76.
Thank you friend @apunawu for your visit and for your comment these muffs are super cute. greetings
@janettbrito76 hermoso proyecto y muy versátil, gracias por compartir tu creación, Saludos 🤗
Hola @anamariag gracias por visitar mi blog y por dejar un hermoso comentario 🙂
Muy hermosa creación, se le nota el cariño y esfuerzo💕💖
Gracias amiga @sylregne 🤗