Un Algodón de Azúcar Kawaii a crochet // A Kawaii Crochet Cotton Candy (Esp/Eng)
¡Hola a todos! Hoy estoy emocionada de hablarles sobre un proyecto DIY que descubrí en Pinterest y que capturó completamente mi atención. Siempre he sido una gran admiradora del estilo kawaii por su ternura y encanto, así que cuando me topé con un patrón de crochet para crear un algodón de azúcar en este adorable estilo, supe que tenía que intentarlo. El estilo kawaii, originario de Japón, se caracteriza por sus colores vibrantes y figuras encantadoras, añadiendo un toque de alegría y fantasía a cualquier objeto. Este proyecto en particular es perfecto para principiantes y entusiastas del crochet que buscan algo simple pero gratificante para crear. Al seguir el patrón, no solo pude disfrutar del proceso creativo, sino que también terminé con una pieza decorativa única que añade un toque de dulzura kawaii a mi espacio.
Hello everyone! Today, I'm excited to talk to you about a DIY project that I discovered on Pinterest and that completely captured my attention. I have always been a huge fan of the kawaii style for its cuteness and charm, so when I came across a crochet pattern to create a cotton candy in this adorable style, I knew I had to try it. The kawaii style, originating from Japan, is characterized by its vibrant colors and charming figures, adding a touch of joy and fantasy to any object. This particular project is perfect for beginners and crochet enthusiasts looking for something simple yet rewarding to create. By following the pattern, I not only enjoyed the creative process but also ended up with a unique decorative piece that adds a touch of kawaii sweetness to my space.
Materiales / Materials
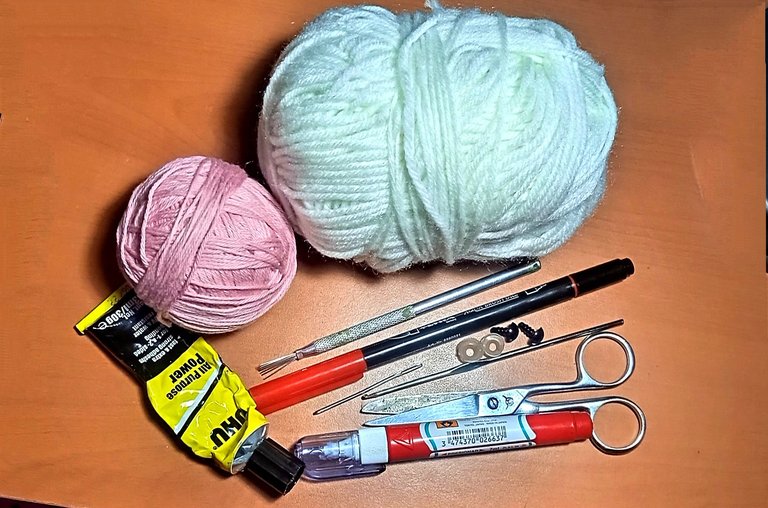
- lana acrílica blanca
- hilo de algodón rosado
- Crochet de 2 mm
- algodón sintético
- Tijeras
- aguja
- Ojos de seguridad
- raspador para lana
- pegamento
- lápiz color rojo
- pintura blanca o esmalte blanco
- trozo de género rosado, blanco y negro
- 1 palito de brocheta
- White acrylic yarn
- Pink cotton thread
- 2mm crochet hook
- Synthetic cotton
- Scissors
- Needle
- Safety eyes
- Wool carder
- Glue
- Red colored pencil
- White paint or white nail polish
- Pieces of pink, white, and black fabric
- 1 skewer stick
Elaboración / Elaboration

|

|

|

|
Para comenzar el cuerpo, hice 1 anillo mágico con 6 puntos bajos. Para la segunda vuelta, hice aumentos quedando 12 puntos en total. En la tercera vuelta, seguí una secuencia de 1 punto bajo y 1 aumento, terminando con 18 puntos. En la cuarta vuelta, la secuencia fue de 2 puntos bajos y 1 aumento, para un total de 24 puntos. En la quinta vuelta, hice 3 puntos bajos y 1 aumento, alcanzando 30 puntos. En la sexta vuelta, continué con 4 puntos bajos y 1 aumento, llegando a 36 puntos. Para la séptima vuelta, hice 5 puntos bajos y 1 aumento, logrando 42 puntos. Luego, en la octava vuelta, la secuencia fue de 6 puntos bajos y 1 aumento, sumando un total de 48 puntos. Después tejí 15 rondas sin aumentos. Para empezar a cerrar, alterné entre una secuencia de puntos bajos y disminuciones: 6 puntos bajos y 1 disminución para reducir a 42 puntos; y continué disminuyendo en cada vuelta hasta terminar con 6 disminuciones.
Luego rellené con algodón sintético, y por último puse los ojos de seguridad.
To start the body, I made 1 magic ring with 6 single crochets. For the second round, I made increases to end up with 12 stitches in total. In the third round, I followed a sequence of 1 single crochet and 1 increase, finishing with 18 stitches. In the fourth round, the sequence was 2 single crochets and 1 increase, for a total of 24 stitches. In the fifth round, I made 3 single crochets and 1 increase, reaching 30 stitches. In the sixth round, I continued with 4 single crochets and 1 increase, getting to 36 stitches. For the seventh round, I made 5 single crochets and 1 increase, achieving 42 stitches. Then, in the eighth round, the sequence was 6 single crochets and 1 increase, adding up to a total of 48 stitches. After that, I knitted 15 rounds without increases. To start closing, I alternated between a sequence of single crochets and decreases: 6 single crochets and 1 decrease to reduce to 42 stitches; and I continued decreasing in each round until finishing with 6 decreases.
Then, I filled it with synthetic cotton, and finally, I placed the safety eyes.

|

|

|

|

|

|
Antes de empezar con el moño, corté lanas para hacer el pelo en el que coloqué el moño. Utilicé el crochet para introducir estas lanas en la parte superior de mi amigurumi de algodón de azúcar. Luego, con el hilo rosado, tejí 23 cadenas y proseguí a seguir una secuencia de:
- 1 punto bajo,
- 1 punto medio alto,
- 2 puntos altos,
- 3 puntos altos dobles,
- 2 puntos altos,
- 1 punto medio alto,
- 3 puntos bajos,
- 1 punto medio alto,
- 2 puntos altos,
- 3 puntos altos dobles,
- 2 puntos altos,
- 1 punto medio alto,
- 3 puntos bajos en el mismo punto.
Esta secuencia la repetí en el otro lado hasta el final. Para unir el moño, cosí las dos puntas, dándole la forma final y así completar mi amigurumi.
Before starting with the bow, I cut yarns to make the hair where I placed the bow. I used crochet to insert these yarns at the top of my cotton candy amigurumi. Then, with the pink thread, I crocheted 23 chains and proceeded to follow a sequence of:
- 1 single crochet,
- 1 half double crochet,
- 2 double crochets,
- 3 double treble crochets,
- 2 double crochets,
- 1 half double crochet,
- 3 single crochets,
- 1 half double crochet,
- 2 double crochets,
- 3 double treble crochets,
- 2 double crochets,
- 1 half double crochet,
- 3 single crochets in the same stitch.
I repeated this sequence on the other side until the end. To join the bow, I sewed the two ends together, giving it the final shape and thus completing my amigurumi.

|

|

|

|
Ahora solo me faltan los detalles para darle el toque final a este tierno algodón de azúcar. Lo primero que hice fue tomar los trozos de tela para crear una boca con su respectiva lengüita, esa boca kawaii que todos reconocemos y adoramos. Con mucho cuidado, la pegué en mi amigurumi, asegurándome de que quedara justo donde quería.
Pero antes de colocar la boca, tuve una tarea importante: usar el raspador de lana. Como su nombre lo indica, lo utilicé para raspar cuidadosamente la lana. Este paso era crucial porque quería que mi algodón de azúcar tuviera ese aspecto esponjoso y suave que tanto nos gusta. Con paciencia y un poco de esfuerzo, logré darle a la lana ese efecto deseado, haciéndola parecer aún más un algodón de azúcar real. ¡Y no puedo evitar sentirme tentada de darle un mordisco! 😋
También al palo de brocheta lo forre con hilo rosado.
Now I only have the details left to add the final touch to this tender cotton candy. The first thing I did was take pieces of fabric to create a mouth with its respective little tongue, that kawaii mouth we all recognize and love. Carefully, I glued it onto my amigurumi, making sure it was exactly where I wanted it.
But before attaching the mouth, I had an important task: using the wool carder. As its name suggests, I used it to carefully scrape the yarn. This step was crucial because I wanted my cotton candy to have that fluffy and soft appearance we all like so much. With patience and a bit of effort, I managed to give the yarn the desired effect, making it look even more like real cotton candy. And I can't help feeling tempted to take a bite! 😋
I also wrapped the skewer stick with pink thread.

|

|
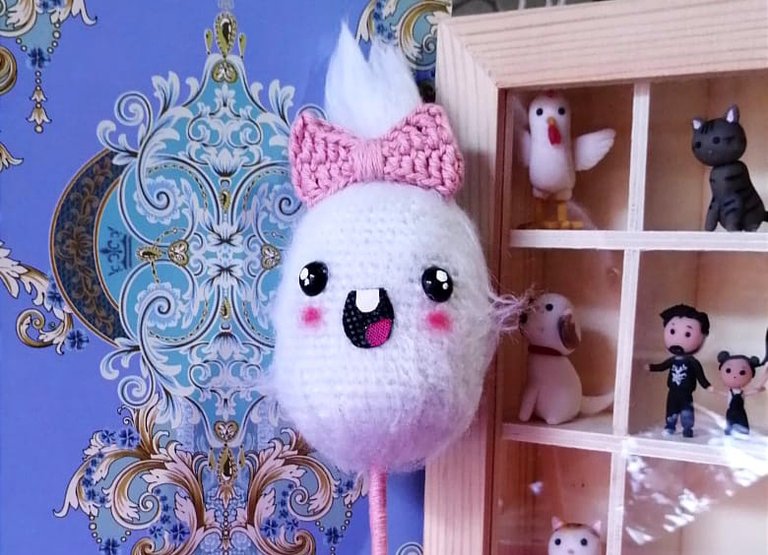
Finalmente, aquí está, mi pequeño proyecto terminado: un amigurumi de algodón de azúcar kawaii, todo blanquito y esponjoso. Lo he hecho con tanto cariño, prestando atención a cada detalle, desde su textura hasta esa carita que invita a sonreír. 😊
Finally, here it is, my little finished project: a kawaii cotton candy amigurumi, all white and fluffy. I've made it with so much love, paying attention to every detail, from its texture to that little face that makes you want to smile. 😊

Amigaa que hermoso 😍 muy buen trabajo, felicidades ☺️😉
Gracias, que bueno que le gustó ☺️
Que bonito adoro las elaboraciones tejidas , muy lindo tu algodón de azúcar ❤️
Muchas gracias por su visita y su bello comentario. Después de estar muy triste porque las votaciones que me dan con tanto aprecio se destruyen por el no voto que me dió @neoxian injustamente. Me siento contenta de que mi talento es apreciado por personas como usted. 😊
No te preocupes querida , siempre contribuye con tu mejor trabajo y dando lo mejor de ti , así nos fortalecemos , tu trabajo es muy bueno 💪🏽😘
Una ternura!