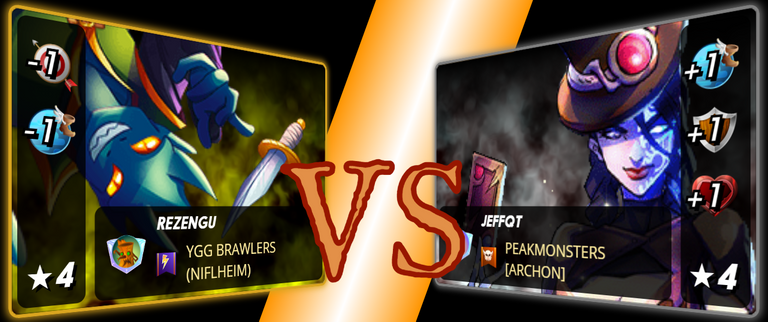
"Battle Mage Secrets with Close Range Battle with Melee Monsters"

Hello everyone, I would like to share my recent Battle Mage Secrets battle that included the "close range" ruleset. Despite the ruleset, I chose to use a lineup of all melee monsters because of other factors in the battle. I hope you enjoy watching it. Also, I want to highlight the legendary reward card, Jared Scar, as he proved to be a powerful addition to my team.

Challenge Rules:

Close Range
Ranged attacks may be used in the first position in battles.
Recommended Monsters For Close Range Ruleset:
 |  |  |  |  |  |
Recommended Summoners For Close Range Ruleset:
 |  |  |  |  |  |

| Battle Ruleset: | Description | |
|---|---|---|
| Super Sneak | All Melee attack Monsters have the Sneak ability. |  |
| Close Range | Ranged attacks may be used in the first position in battles. |  |
| Ferocity | All Monsters have the Fury ability. |
The Line Up
The Line Up| Summoner | First Position | Second Position | Third Position | Fouth Position | Fifth Position | Sixth Position |
|---|---|---|---|---|---|---|
 |  |  |  |  |  |  |
| Position | Strategy/Description |
|---|---|
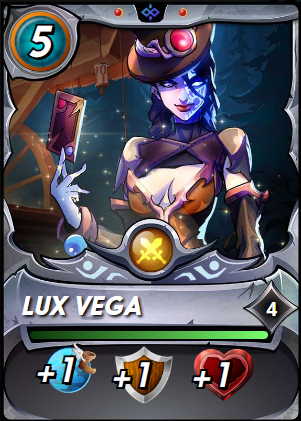
| Summoner: Lux Vega | The summoner I have chosen for my team is highly effective due to its unique armor abilities that it provides. In addition, this summoner also has the ability to increase the speed and health of all monsters on the team, making it a highly valuable asset in battles. This summoner is currently considered to be a top pick in the meta due to its exceptional abilities and has been seen to be highly effective in a variety of different battle scenarios. Furthermore, this summoner is a promotional card, which means that its availability is always present. The fact that it is a neutral monster also adds to its versatility as it can be used in conjunction with a variety of different monster types. This further adds to its value and makes it a highly sought-after summoner in the game. |
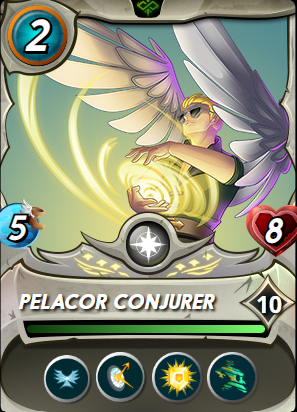
| 1st Position: Pelacor Conjurer | For my team lineup, I have strategically placed the Pelacor Conjurer in the first position due to its unique ability to dodge all kinds of attacks, whether it be melee, ranged, or magic damage. This monster serves as an excellent tank for magic damage, making it a highly valuable asset in battles where magic attacks are prevalent. Moreover, placing the Pelacor Conjurer in the first position serves as a protective measure for my melee monsters, as it shields them from any incoming magic damage. This, in turn, allows my melee monsters to focus on dealing damage to the enemy team without the worry of being taken down by magic attacks. The Pelacor Conjurer's ability to dodge all kinds of attacks makes it a highly versatile monster, capable of withstanding a variety of different attacks. |
| 2nd Position: Corsair Bosun | I have strategically placed the Corsair Bosun in the second position due to its high melee damage output. This monster serves as an excellent asset in dismantling the opponent team with its ability to deal 5 melee damage, which is considered to be a high amount of damage. The Corsair Bosun's high melee damage output makes it a highly valuable asset in battles where taking down opponents quickly is crucial. Moreover, the Corsair Bosun's high melee damage output makes it particularly effective in battles where the Super Sneaks ruleset is active, as it can help the team to quickly and efficiently take down opponents. |
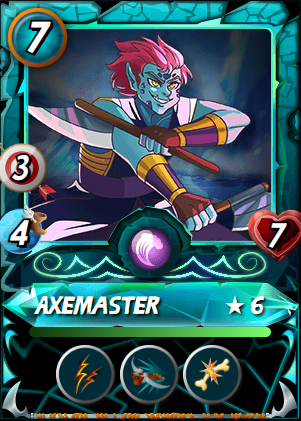
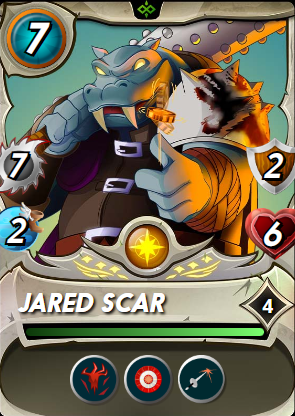
| 3rd Position: Jared Scar | I have chosen to place Jared Scar in the third position. This strategic placement serves to protect him from being easily taken down by the opponent team. Jared Scar is a crucial asset to my team due to his ability to deal high melee damage. Jared Scar's unique ability, Bloodlust, is a powerful tool in battles. Every time he successfully takes down an opponent monster, he gains a significant boost to all of his stats, including armor, speed, health, and melee damage. This boost makes him an even more potent melee damage dealer, making him a highly valuable asset to my team. By placing Jared Scar in the third position, I am ensuring that he is protected and has a greater chance of surviving for longer periods in battles. If he is able to survive the first few rounds, his Bloodlust ability can truly shine and make him a formidable opponent to face. |
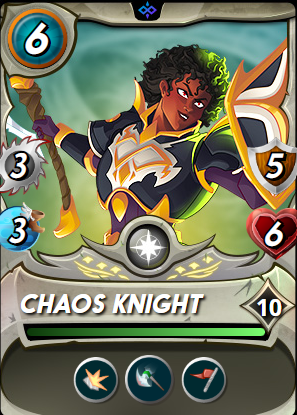
| 4th Position: Chaos Knight | I selected this monster primarily because of its high melee damage output and the Piercing ability it possesses. With this ability, Jared Scar is able to bypass opponents' armor and deal damage directly, making him a potent force in battles. To complement Jared Scar's melee prowess, I also chose the Chaos Knight for its unique ability to provide additional melee damage to all of my melee monsters. This bonus damage allows my team to deal significant damage to the opponent team, further enhancing Jared Scar's effectiveness in battles. Additionally, the Chaos Knight's shield ability makes him an excellent protector for Jared Scar, particularly against backline damages. With this ability, the Chaos Knight is able to absorb a significant amount of damage and increase his durability, allowing him to shield Jared Scar and other melee monsters from harm. |
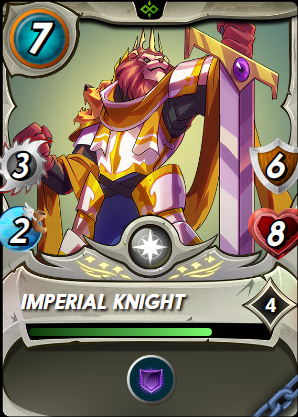
| 5th Position: Imperial Knight | One of the monsters I have chosen for my team is the Imperial Knight, primarily because of its versatility as a backline damage protector and a melee damage dealer. This monster is a soulbound reward card and is particularly powerful at maximum level. The Imperial Knight's strength lies in its ability to absorb significant amounts of damage from magic attacks, making it an excellent tank against opponents who rely on magical damage. Additionally, its melee damage output makes it an effective combatant in melee battles, particularly in rulesets like super sneak where melee attacks are emphasized. As a soulbound reward card, the Imperial Knight is not only powerful, but also rare. Its combination of defensive and offensive capabilities makes it a valuable asset to my team, enabling it to withstand attacks and deal significant damage to opponents. |
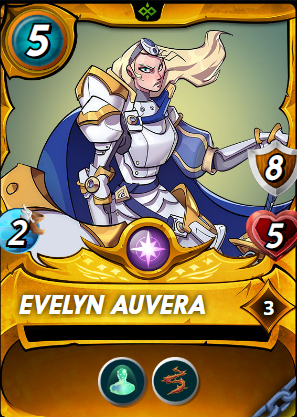
| 6th Position: Evelyn Auvera | Given that the ruleset for this battle includes super sneak, I have opted to include Evelyn Auvera in my team. This monster is best suited for the backline position, as its thorn ability is particularly effective against melee damage dealers. While Evelyn Auvera may not be able to survive for more than one or two rounds due to its relatively low health, its ability to reduce the health of opposing melee damage dealers can still have a significant impact on the outcome of the battle. By weakening the enemy team's melee attackers, Evelyn Auvera can help to level the playing field and increase the chances of victory for my team. |
Did my Strategy Work?
My strategy was well-executed, as evidenced by the fact that Jared Scar managed to survive the battle and emerge as a formidable melee damage dealer. I am pleased with the outcome of the battle, and feel that my team performed admirably given the ruleset and opposing lineup.
In particular, Jared Scar's performance was a key factor in my team's success. By keeping him alive and allowing him to build up his bloodlust ability, I was able to transform him into a highly dangerous melee damage attacker who could wreak havoc on the opposing team.
Short Summary:
In summary, I've successfully executed a strategy in a battle with the "close range" ruleset, using a lineup of melee monsters. I used Pelacor Conjurer as a tank for magic damage, Corsair Bosun for high melee damage, Jared Scar as their main melee damage dealer, Chaos Knight for additional melee damage and protection, Imperial Knight as a backline damage protector and melee damage dealer, and Evelyn Auvera as a damage reducer. My strategy paid off, with Jared Scar surviving the battle and becoming a highly dangerous melee damage attacker, leading to the team's victory.

Thank you to everyone who took the time to read through this. I hope you found it informative and interesting.


https://twitter.com/1459701258890055681/status/1650055203201372160
The rewards earned on this comment will go directly to the people( @jeffqt ) sharing the post on Twitter as long as they are registered with @poshtoken. Sign up at https://hiveposh.com.
Congratulations @jeffqt! You have completed the following achievement on the Hive blockchain And have been rewarded with New badge(s)
Your next target is to reach 3750 upvotes.
You can view your badges on your board and compare yourself to others in the Ranking
If you no longer want to receive notifications, reply to this comment with the word
STOPCheck out our last posts:
Support the HiveBuzz project. Vote for our proposal!
Do you know you can win a Chaos Legion pack and many other things just by following some simple steps ?? Check out our Latest Daily Showcase and Participate our latest Giveaway. Thanks
Thanks for sharing! - @yonilkar
