Eye blending in blue tones - Step by step [Eng-Esp]
English

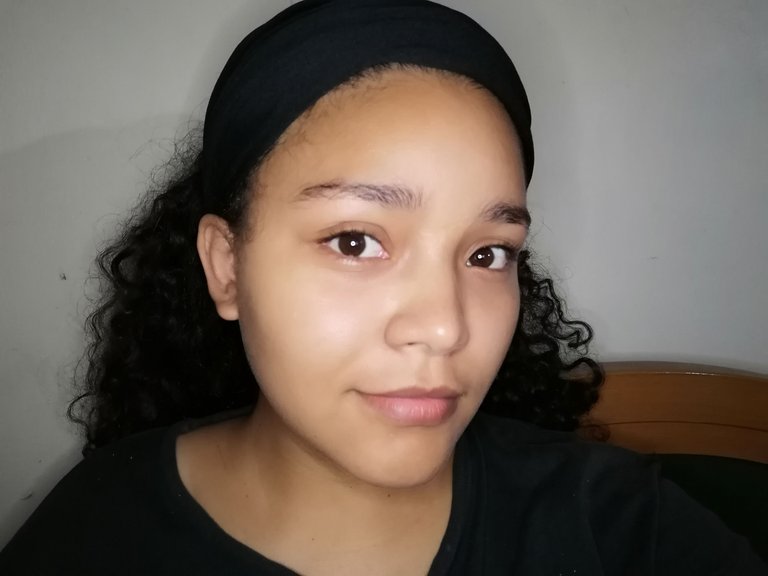
Greetings to all my friends in this beautiful community, you have no idea how happy I am to be able to share with you again something that I love to do, how is my makeup. It's been a while since I've shared anything here, but I plan to do it again often. Today I want to share with you a makeup in blue tones totally improvised, but I loved it and I hope you like it.
When I started doing my makeup I was planning to do something simple as I have been doing lately, but I have been giving a lot of importance to my skin care lately and I have seen many good results, so after washing my face well I applied a spectacular serum that I have been using which is multivitamin, contains hyaluronic acid, vitamin e and of course niacinamide, too important for me, since my skin is oily and usually my pores are very noticeable.
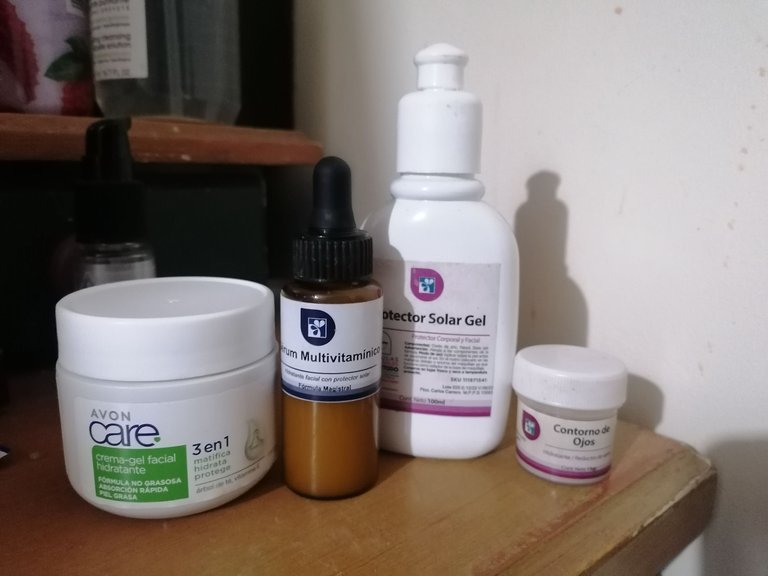
After letting the serum dry I switched to a new moisturizing cream-gel that is especially for oily skin and is mattifying so it's very useful when I'm going to put on my makeup. Lastly, I added a bit of sunscreen since I was going to expose myself to the sun. After a few minutes my face was ready to start applying makeup.
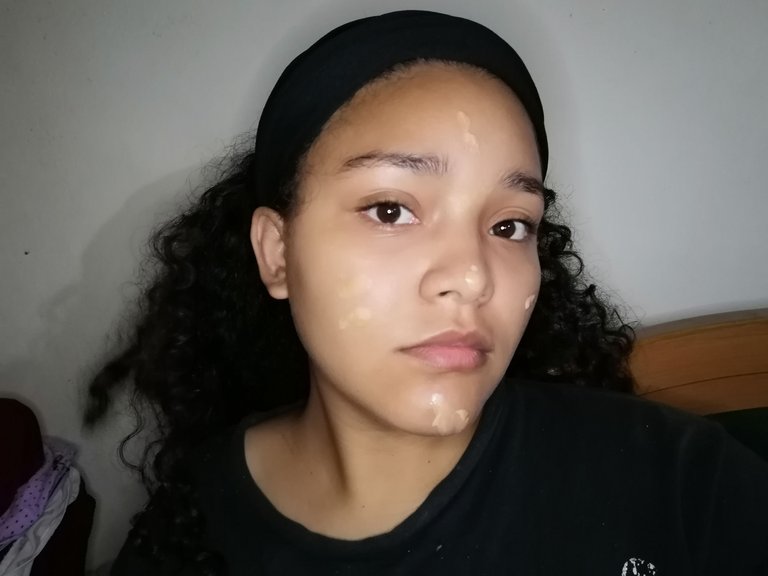
I started by applying my foundation, as I have told you in previous posts I use two different foundations because for some reason I never get one that goes well with my skin tone, so I mix these two foundations together so I get the shade I need, after mixing I apply it on some specific spots on my face and quickly use my Beauty Blender to spread it over the rest of my face.
They say that a brush is much better for a better finish, but in my case I prefer to use the Beauty Blender because I feel that it doesn't leave an excessive amount of product on my face, I like the makeup to feel light and although it is true that with a brush I can cover all the imperfections better, for now I haven't had the opportunity to use it.
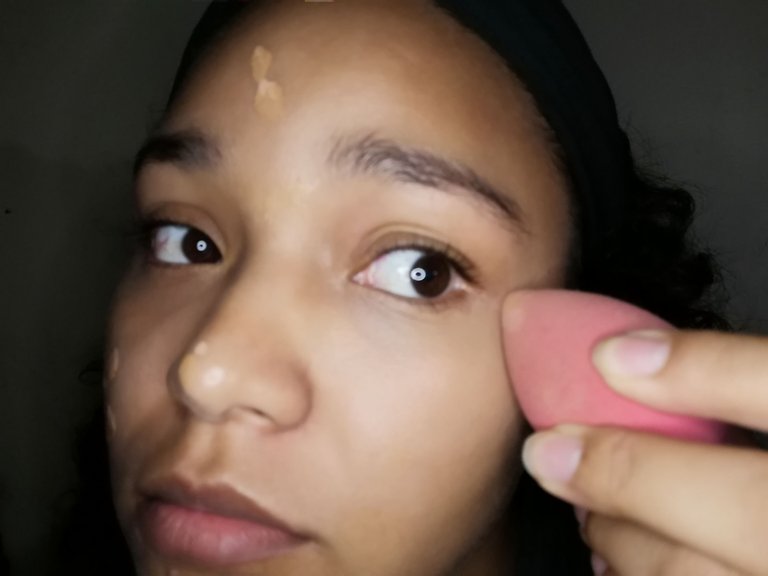
Previously I had The Bad Habit of using my Beauty Blender dry and while we can say it did its job, I also recently learned the importance of moisturizing it before use. I don't know exactly how it works but I have seen a much, much better finish after I started wetting it. The makeup absorbs much better on the face and it also doesn't crack after a while.
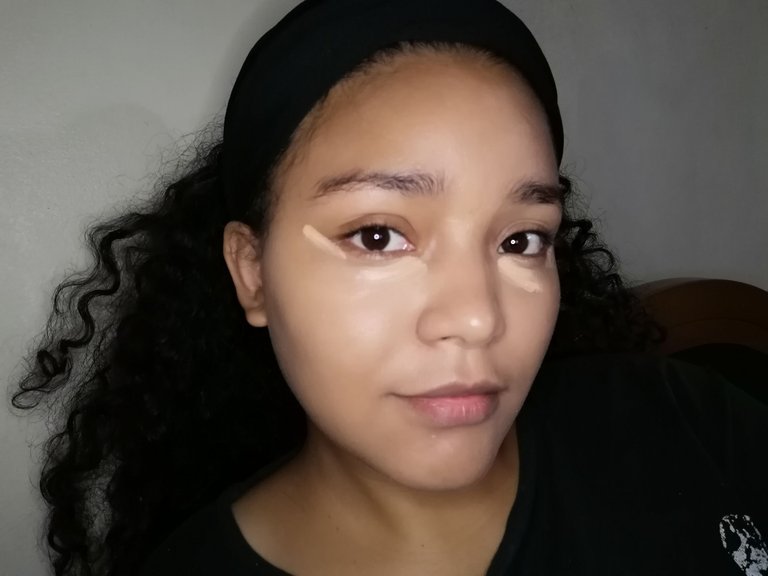
I have some dark circles under my eyes so it is necessary to cover them, for that I put some coffee based eye contour to moisturize the area very well and thus avoid that the part of the dark circles is crumpled, then I put my concealer cream and leave it a few minutes for the skin to absorb it, after waiting a moment I also spread it and blend it with a Beauty Blender, when I do this I start to notice the difference in my face.

We move on to the next step which is, sealing the makeup with powder in my case compact because that's the one I have, although loose powder works better. I add at once my powder blush as well and proceed to move on to my eyebrows, no matter how much I do it this is always going to be the hardest part for me, especially when I have to take pictures of the process, although lately I have been using eyebrow pencil for this makeup I used pomade, because the truth is I like much better how they look like this.
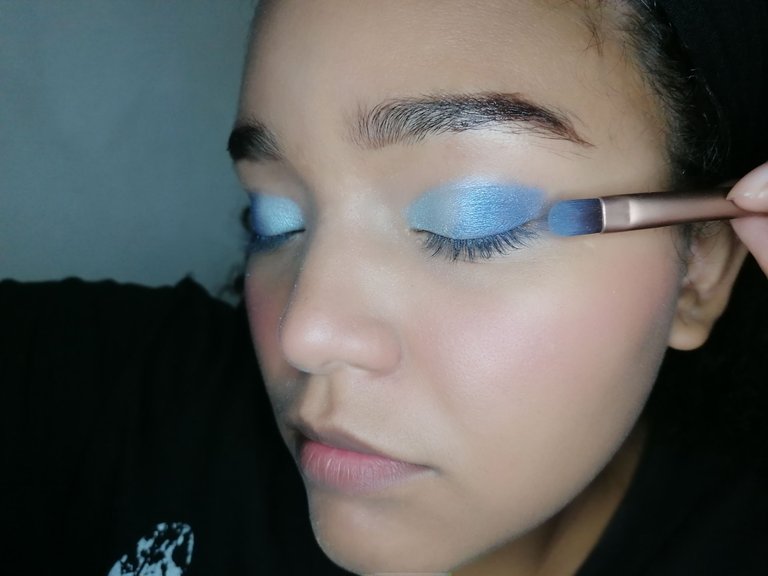
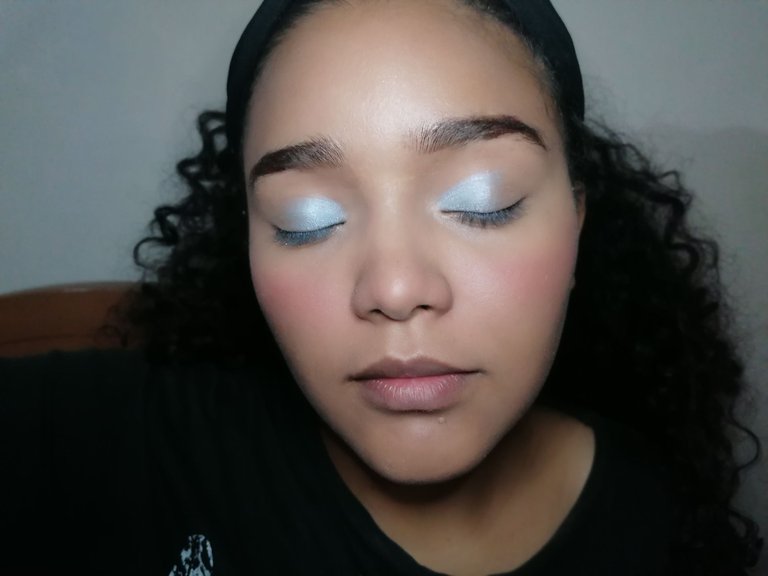
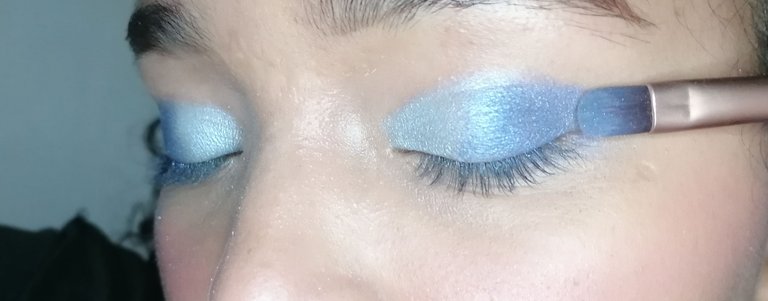
I went on to make up my eyes, as I was running a little late and I had several things to do I didn't use plastic tape or anything like that Although I still need it, I tried to do it as carefully as possible and I started using a light blue shade to place it at the beginning of my eye, as I mentioned at the beginning I planned to do a super simple makeup but I got carried away, then I added a slightly darker shade and with a brush I blurred, finishing the end of my eye with the darker shade.
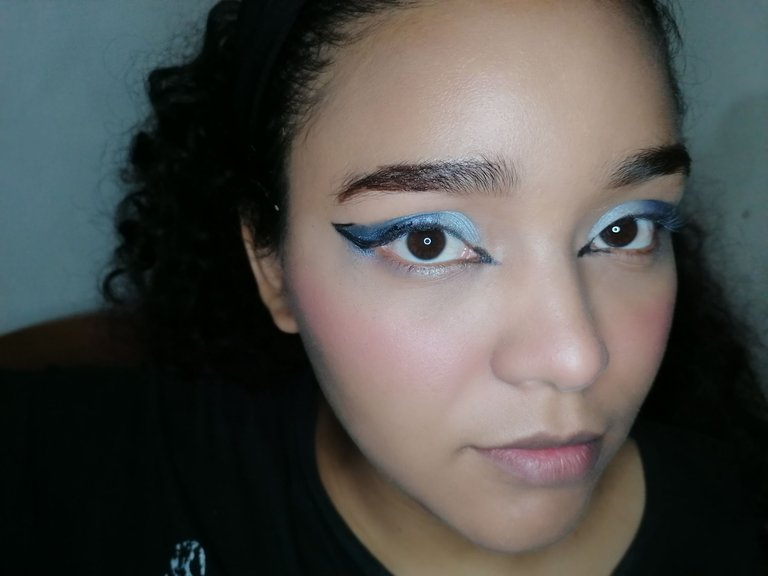
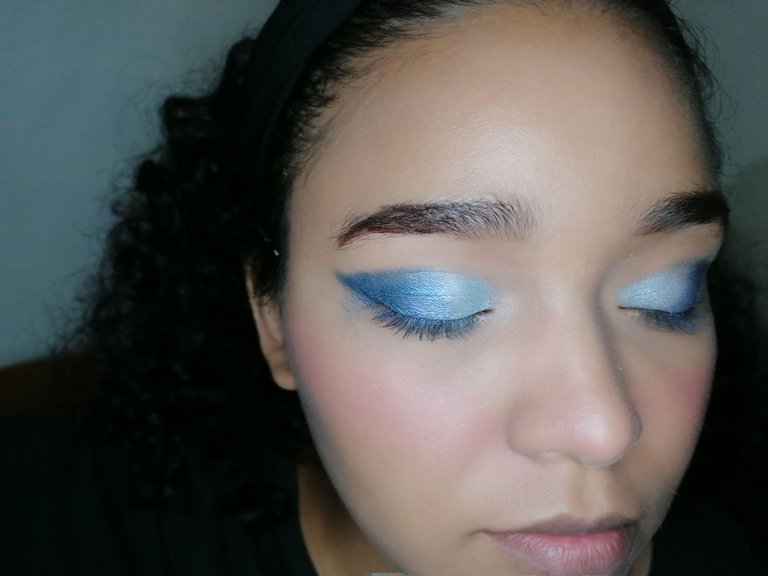
After this I simply topped it off by placing a bit of eyeliner, to make my eye look more elongated since my eye is small and I used black pencil to also line the tear trough of my eye, this gives it a ragged effect and makes my eye look a tiny bit bigger than it actually is. I like how it looks although I don't use it too much because it makes my eye look too different and I'm still not used to it.
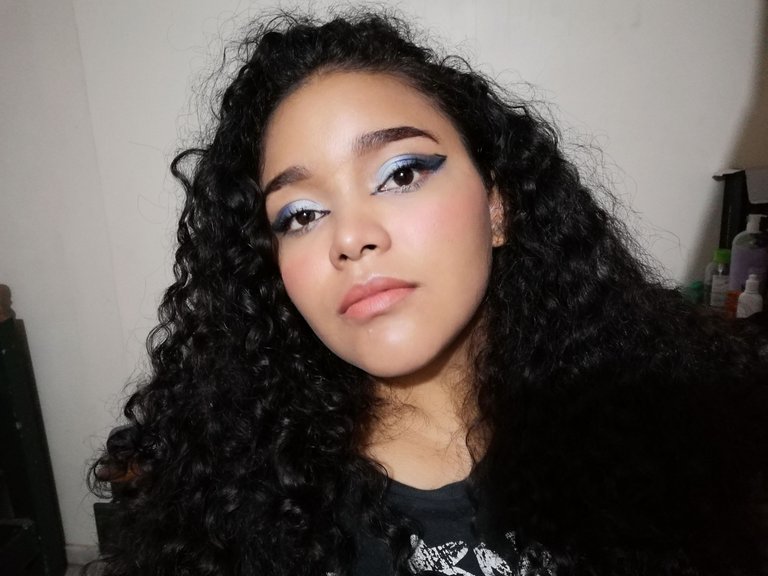
I finished this makeup by adding mascara to my lashes because I didn't feel like putting false lashes on and applying a nude tone lipstick so I wouldn't look too heavy, because I wanted the makeup to not be so extravagant. I really loved the result. I thought the skin looked great and the tones gave depth to my look without making me look overdone. I hope you liked my post but most of all I hope you found it useful, see you soon friends, we will read each other next time.
Español
Saludos a todos mis amigos que está bella comunidad, no tienen idea de lo feliz que me siento de poder volver a compartir con ustedes algo que amo hacer, cómo lo es mi maquillaje. Hace algún tiempo que no compartía nada por aquí, pero tengo planeado volver a hacerlo seguido. El día de hoy quiero compartir con ustedes un maquillaje en tonos azules totalmente improvisado, pero que me encantó y que espero que a ustedes les guste.
Cuando comencé a maquillarme planeaba hacerme algo sencillo como últimamente he estado haciendo, pero le he estado dando últimamente mucha importancia al cuidado de mi piel y he visto muchos buenos resultados, por eso luego de lavar bien mi rostro apliqué un serum espectacular que he estado utilizando que es multivitamínico, contiene ácido hialurónico, vitamina e y por supuesto niacinamida, demasiado importante para mí, ya que mi piel es grasa y por lo general se notan mucho mis poros.
Luego de dejar secar el serum pase a utilizar una nueva crema-gel hidratante que es especialmente para pieles grasas y es matificante así que me sirve mucho cuando voy a maquillarme. Por último agregué un poco de protector solar ya que iba a exponerme al sol. Después de unos minutos ya mi rostro estuvo listo para comenzar a maquillar.
Comencé aplicando mi base, como ya les he contado en publicaciones anteriores utilizo dos distintas porque por alguna razón nunca consigo una que vaya bien con mi tono de piel, así que mezclo estas dos bases y así consigo el tono que necesito, luego de mezclarlo lo aplico en algunos puntos específicos de mi rostro y rápidamente utilizo mi Beauty Blender para esparcirlo por el resto de mi rostro.
Dicen que es mucho mejor una brocha para un mejor acabado, pero en mi caso prefiero utilizar la Beauty Blender porque siento que no deja una cantidad excesiva de producto en mi cara, me gusta que el maquillaje se sienta ligero Y aunque Es cierto que con una brocha puedo cubrir mejor todas las imperfecciones, por ahora no se ha presentado la oportunidad en que desea utilizarla.
Anteriormente tenía La mala costumbre de utilizar mi Beauty Blender seca y aunque podemos decir que hacía su trabajo, también aprendí hace poco la importancia de humedecerla antes de usarla. No sé exactamente cómo funciona pero sí que he visto un acabado muchísimo mejor luego de que comencé a humedecerla. El maquillaje se absorbe mucho mejor en el rostro y además no se cuarteta después de un rato.
Tengo algo de ojeras así que es necesario cubrirlas, para eso coloqué un poco de contorno de ojos a base de café para hidratar muy bien la zona y así evitar que la parte de la ojera queda acartonada, luego coloco mi corrector en crema y lo dejo unos minutos para que la piel lo vaya absorbiendo, después de esperar un momento también lo esparzo y difumino con una Beauty Blender, al momento que hago esto ya comienzo a notar la diferencia en mi cara.
Pasamos al siguiente paso que es, sellar el maquillaje con polvo en mi caso compacto porque es el que tengo, aunque el polvo suelto funciona mejor. Agrego de una vez mi rubor en polvo también y procedo a pasar a mis cejas, no importa cuánto lo haga está siempre va a ser la parte más difícil para mí, sobre todo cuando tengo que tomar fotos del proceso, aunque últimamente he utilizado lápiz para cejas para este maquillaje utilicé pomada, porque la verdad me gusta mucho más como se ven así.
Pasé a maquillar mis ojos, como se me hacía algo tarde y tenía varias cosas que hacer no utilicé cinta plástica ni nada por el estilo Aunque todavía lo necesito, traté de hacerlo más cuidadosa posible y comencé utilizando una sombra en un tono azul claro para colocarla al principio de mi ojo, como mencioné al principio planeaba hacer un maquillaje súper sencillo pero me dejé llevar, luego agregué un tono un poco más oscuro y con una brocha difumino, terminando el final de mi ojo con el tono más oscuro.
Después de esto simplemente culminé colocando un poco de delineador, para que mi ojo se viera más alargado ya que mi ojo es pequeño y utilicé lápiz negro para delinear también el lagrimal de mi ojo, esto le da un efecto rasgado y hace que mi ojo se vea un poquito más grande de lo que en realidad es. Me gusta cómo queda aunque no lo uso demasiado porque hace que mi mirada se vea demasiado diferente y aún no me acostumbro.
Terminé este maquillaje agregando rímel en mis pestañas porque no tenía ganas de colocarme pestañas postizas y colocando un labial en tono nude para no verme demasiado cargada, pues quería que el maquillaje no fuera tan extravagante. A mí me encantó mucho el resultado Me parece que la piel se veía muy bien y los tonos le dieron profundidad a mi mirada sin hacer que me viera exagerada. Espero que les haya gustado mi publicación pero más que nada que les haya sido útil, hasta pronto amigos, nos leeremos la próxima ocasión.
Congratulations, your post has been upvoted by @dsc-r2cornell, which is a curating account for @R2cornell's Discord Community. We can also be found on our hive community & peakd as well as on my Discord Server
Felicitaciones, su publication ha sido votado por @dsc-r2cornell. También puedo ser encontrado en nuestra comunidad de colmena y Peakd así como en mi servidor de discordia
Lovely 😝🌹