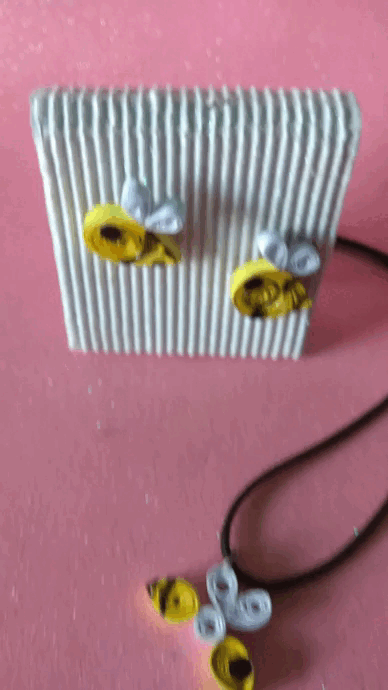
Set de accesorios hechos en filigrana, segunda practica. || Set of accessories made in filigree, second practice.
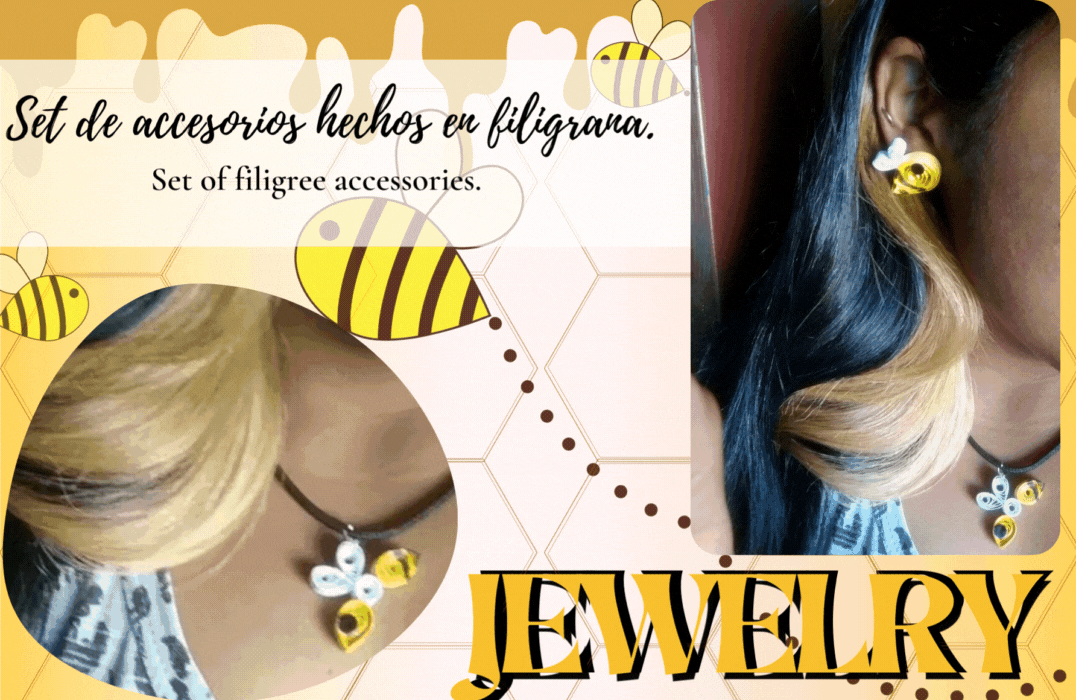
Segunda practica en filigrana, este arte me parece realmente hermoso en la plataforma tenemos a una gran exponente del filigrana, que semana tras semana nos entrega hermosas creaciones, gracias a sus posts tomé la valentía de crear mis propios accesorios hechos en papel, hablo de @dayadam en mi primer intento ella me dio tips valiosos para seguir mejorando y que cada vez las piezas me queden mejor, en este intento apliqué uno de sus tips el cual fue plastificar la obra al terminarla, es un consejo muy útil porque aumenta la durabilidad del accesorio.
Second practice in filigree, this art seems to me really beautiful on the platform we have a great exponent of filigree, which week after week gives us beautiful creations, thanks to her posts I took the courage to create my own accessories made of paper, I speak of @dayadam in my first attempt she gave me valuable tips to keep improving and each time the pieces are better, in this attempt I applied one of her tips which was to seal the work to finish it, it is a very useful tip because it increases the durability of the accessory.
Siento que aun debo mejorar muchísimo e ir comprando herramientas que me ayuden en el enrollado del papel, considerando que apenas es mi segunda practica el resultado es decente, y las formas pueden distinguirse el cual era una de mis principales preocupaciones, lograr reflejar lo que deseaba crear, admito que es una actividad increíblemente relajante, hay hermosura en enrollar cuidadosamente cada tira ir uniendo hasta terminar la manualidad, así que seguiré creando en filigrana.
I feel that I still have to improve a lot and buy tools to help me in the rolling of the paper, considering that it is only my second practice the result is decent, and the shapes can be distinguished which was one of my main concerns, to reflect what I wanted to create, I admit that it is an incredibly relaxing activity, there is beauty in carefully rolling each strip and joining until finishing the craft, so I will continue creating in filigree.


Materiales: || Materials:
▪️ Papel en color amarillo y blanco, tijeras, regla geométrica, pegamento escolar blanco, collar para el dije, aretes circulares, silicón líquido y 1 marcador negro.
▪️ Yellow and white paper, scissors, geometric ruler, white school glue, necklace for the charm, circular earrings, liquid silicone and 1 black marker.


Paso a paso: || Step by step:
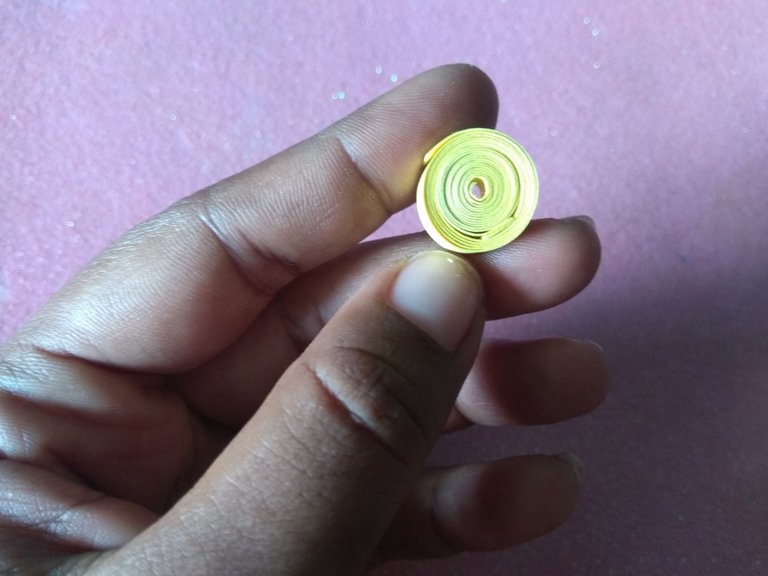
Para crear los aretes necesitaremos 2 tiras de 0,5 cm x 50 cm, 4 tiras blancas de 0,5 cm x 9 cm, iniciamos enrollando apretado la tira una de las tiras de mayor tamaño.
To create the earrings we will need 2 strips of 0.5 cm x 50 cm, 4 white strips of 0.5 cm x 9 cm, we start by winding the strip tightly around one of the larger strips.

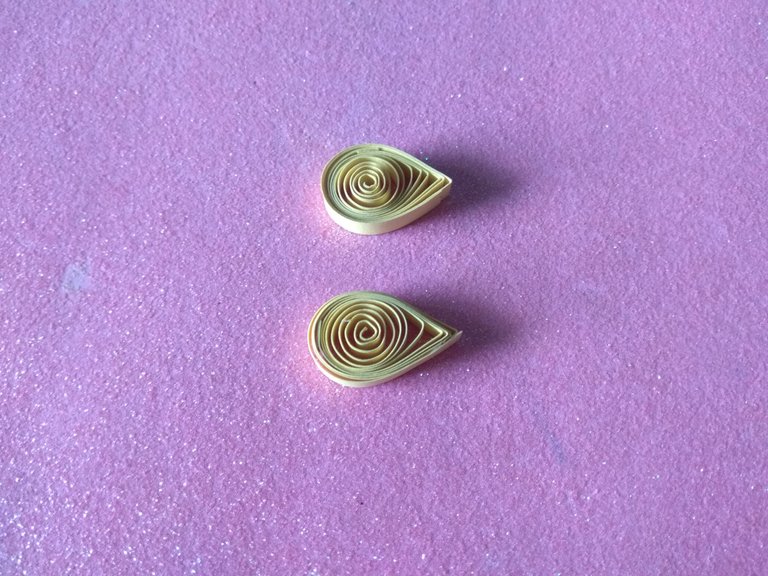
Solté un poco la tira y di forma de gota, aseguren la pieza con pegamento para que no se suelte, deben repetir el proceso con la otra tira de 50 cm, con las tiras pequeñas haremos los mismo sin embargo, soltaremos menos el enrollado, estas piezas serán las alas de la abeja.
I loosen the strip a little and shape it as a drop, secure the piece with glue so that it does not come loose, repeat the process with the other 50 cm strip, with the small strips we will do the same, however we will loosen less the winding, these pieces will be the wings of the bee.

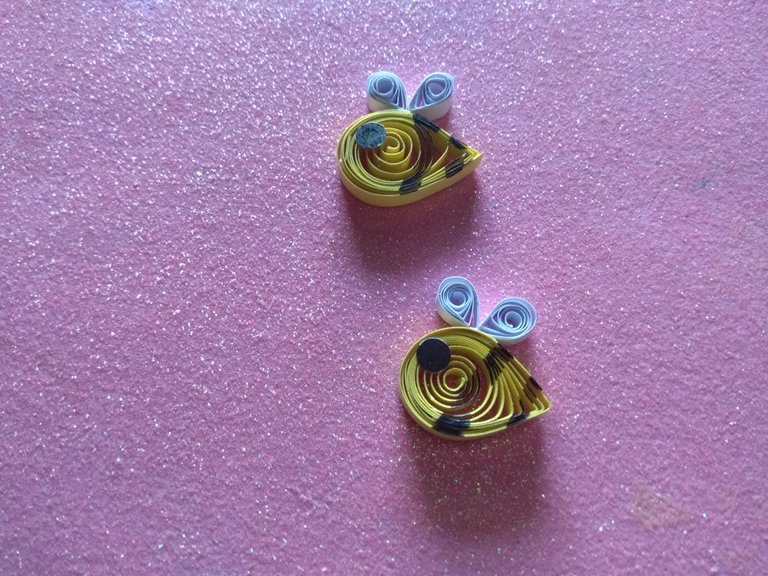
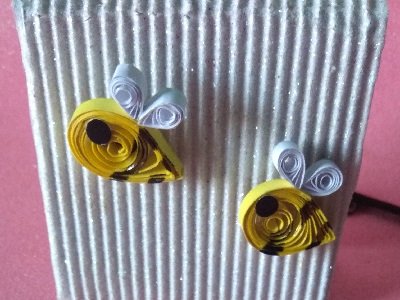
Como paso final le coloqué un ojo hecho en papel y pintado con marcador, también marqué líneas negras en el cuerpo de la abeja, pegué las abejas a los aretes y al secar apliqué una capa de pegamento escolar por todo la pieza.
As a final step I placed an eye made of paper and painted it with marker, I also marked black lines on the body of the bee, glued the bees to the earrings and when dry I applied a layer of school glue all over the piece.
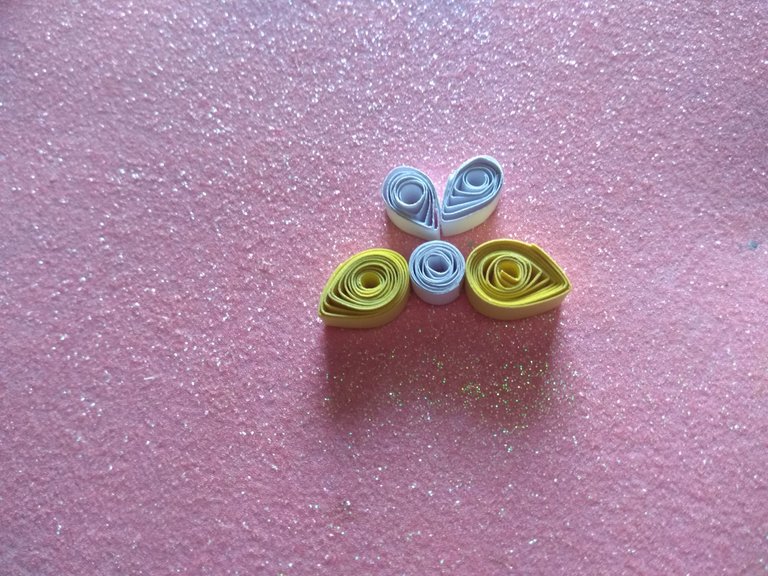
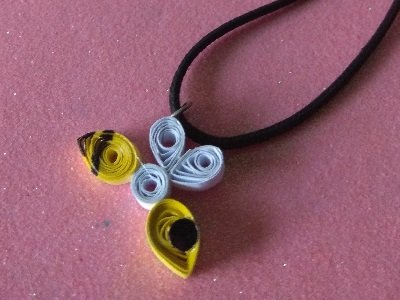
Para hacer dije se necesitan 2 tiras amarillas de 0,5 cm x 25 cm, también 3 tiras blancas, 2 de ellas de 0,5 cm x 12 cm, y 1 de 0,5 cm x 20 cm, con las tiras amarillas repetiremos los pasos anteriores de formar gotas, con la tira de 20 cm enrollaremos con firmeza y pegaremos, para alas también se repite el proceso de crear gotas, finalmente unan las piezas y agreguen los detalles, recuerden plastificar el dije con pegamento.
To make the charm you need 2 yellow strips of 0.5 cm x 25 cm, also 3 white strips, 2 of them of 0.5 cm x 12 cm, and 1 of 0.5 cm x 20 cm, with the yellow strips we will repeat the previous steps to form drops, with the 20 cm strip we will roll firmly and glue, for the wings we will also repeat the process of creating drops, finally join the pieces and add the details, remember to laminate the charm with glue.
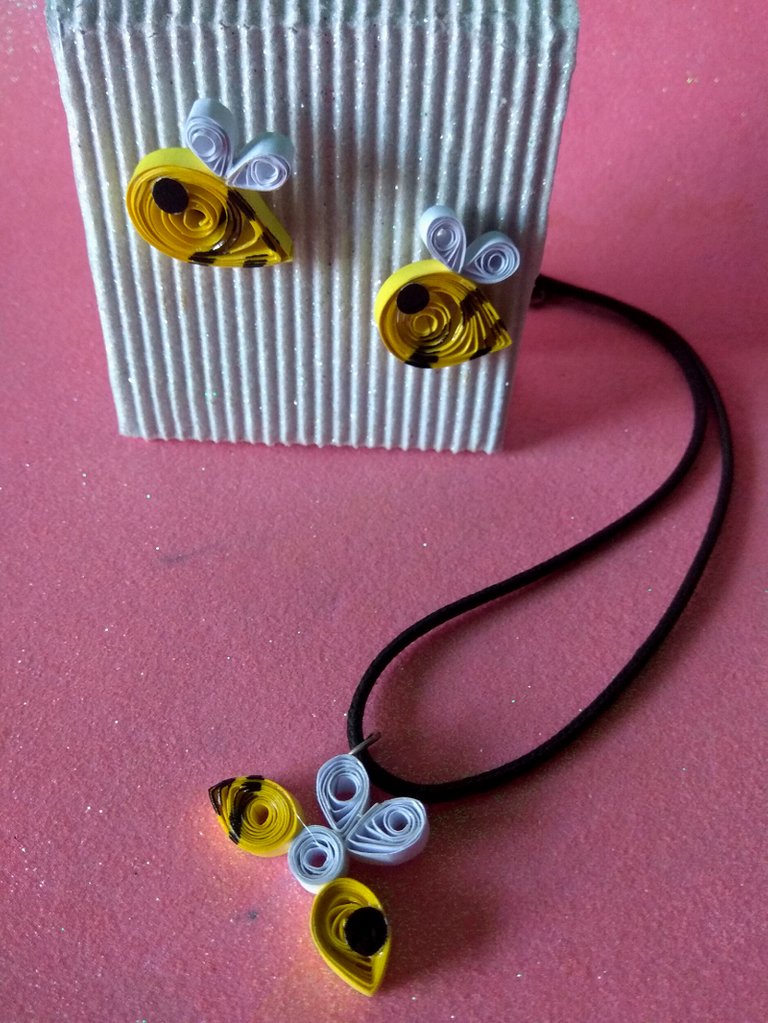

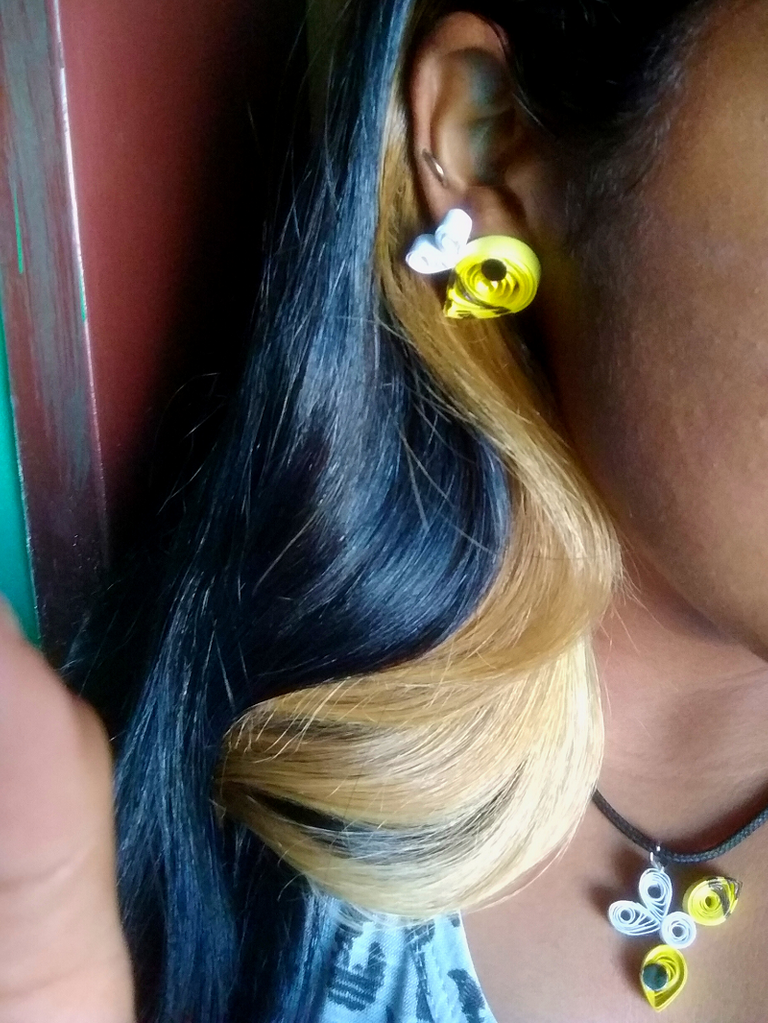
Quiero pensar que voy bien en mis prácticas como dije debo mejorar mucho, pero lo importante es que estoy disfrutando del proceso, no pueden negar que son muy tiernas estas abejitas hechas en filigrana, plastificar no solo les otorga durabilidad a las piezas, además le da un brillo hermoso que las hace resaltar más, cuéntame en los comentarios que opinas de este tutorial, gracias por llegar hasta aquí.
I want to think that I'm doing well in my practices as I said I must improve a lot, but the important thing is that I'm enjoying the process, you can not deny that these filigree bees are very tender, laminating not only gives durability to the pieces, it also gives them a beautiful shine that makes them stand out more, tell me in the comments what you think of this tutorial, thanks for coming here.

Imágenes tomadas desde mi Xiaomi Redmi Note 4. || Images taken from my Xiaomi Redmi Note 4.
Separadores hechos en Canva. || Dividers made in Canva.
Ediciones hechas en Canva. || Editions made in Canva.
Vídeos convertidos en gif || Videos converted to gif IMG2GO
Translator Deepl.
0
0
0.000
Se parecen a unas abejitas así que vas muy bien...Dicen que la práctica hace al maestro amiga, sigue adelante...Éxitos.
Jajajjaja lo importante es que se parece a lo que quería crear ajaja, gracias por comentar amiga.
https://twitter.com/316102314/status/1637241535375855617
https://twitter.com/3152522968/status/1637528364016623616
The rewards earned on this comment will go directly to the people( @ramisey ) sharing the post on Twitter as long as they are registered with @poshtoken. Sign up at https://hiveposh.com.
Oh wow!!! Great jewelry set out of papers. Thanks for sharing.
Thank you for your support.
@tipu curate 3
Upvoted 👌 (Mana: 25/55) Liquid rewards.
Thank you for your support.
Gracias por el constante apoyo.
A su orden bella, saludos y feliz martes 😘😋☕
La práctica hace al maestro. Aquí en la comunidad hay varias exponentes de esta técnica que te pueden orientar en todo lo que necesites.
Es un trabajo bien delicado y de mucha paciencia me parece.
Espero ver nuevas cositas por aquí!
Ya tengo mi mentora no oficial amiga ajajaja siempre la menciono en mis post sobre este arte, gracias por el comentario.
Ay pero que lindos y cuchis te quedaron 😍 me dieron ganas de aprender sobre esa técnica, se ve muy lindo lo que haces amiga
Tienes manos hábiles amiga seguro aprendes super rápido, gracias por el comentario.
Te quedo muy lindo el diseño y la combinación de colores, que esta inspirado en abejitas, el marcador le dio realce a este creativo juego de accesorios, viendo tu tutorial se me ocurrieron otros animalitos, ideas que inspiran, gracias por compartir @jennyzer Saludos 💮✨💮
El marcador es de esos detalles que ayudan a complementar las piezas, gracias por tu comentario.
Te quedaron muy lindos amiga. Hace unos meses hice una abejitas también jajaja. Ya le estas agarrando la vuelta, es divino trabajar con esas cintas. Ya veré que otras hermosuras nos traes. Mil éxitos, agradecida por la mención y tus palabras.
Que tengas bello domingo @jennyzer 🐝💕
Tengo varias ideas amiga, cualquier cosa consultaré contigo ajajaj eres mi mentora no oficial, gracias por el apoyo.
Excelente, que linda. Puedo ser oficial jajaja, estoy a la orden. Muchos éxitos, eres una excelente artista. Abrazos @jennyzer 💓
Te quedaron hermosos estos accesorios, nunca he intentado esta técnica, pero se ve muy delicada y de mucha paciencia. Saludos, amiga.
Es muy entretenida y ayuda a la concentración deberías intentarla algún día, gracias por comentar.
Creo que sí lo haré.
#posh
https://twitter.com/miuriel2015/status/1637528364016623616
Congratulations, your post has been upvoted by @dsc-r2cornell, which is the curating account for @R2cornell's Discord Community.
Enhorabuena, su "post" ha sido "up-voted" por @dsc-r2cornell, que es la "cuenta curating" de la Comunidad de la Discordia de @R2cornell.
Gracias por el apoyo.
Que lindo @jennyzer paso a paso vas mejorando!
Muchísimas gracias aprecio tus palabras.