(Esp/Eng) Hermoso choker en macramé con nudo Switch, adornado con dije de concha marina // Hermosa gargantilla en macramé con nudo Switch, adornada con dije de concha marina
¡Bienvenidos a mi blog!

Buenos días queridos amigos de esta comunidad , mi favorita @jewelry, deseo que hayan amanecido bien, junto a toda su familia, que el Espíritu Santo siga guiando sus vidas.
Hoy les muestro , como realizar , una hermosa gargantilla en macramé con nudo SWITCH, adornada con dije de concha marina.
Para aquellos amigos que piensan que el nudo es difícil, no es la realidad , es un nudo sumamente fácil, es cuestión de ponerlo en práctica y verán lo lindo que queda, pueden realizarlo con los colores e hilos que deseen.En mi caso lo realicé con hilo encerado de color rojo y marrón. Quería un collar de ese color.
¡Sin más nada que decir , manos a los hilos!

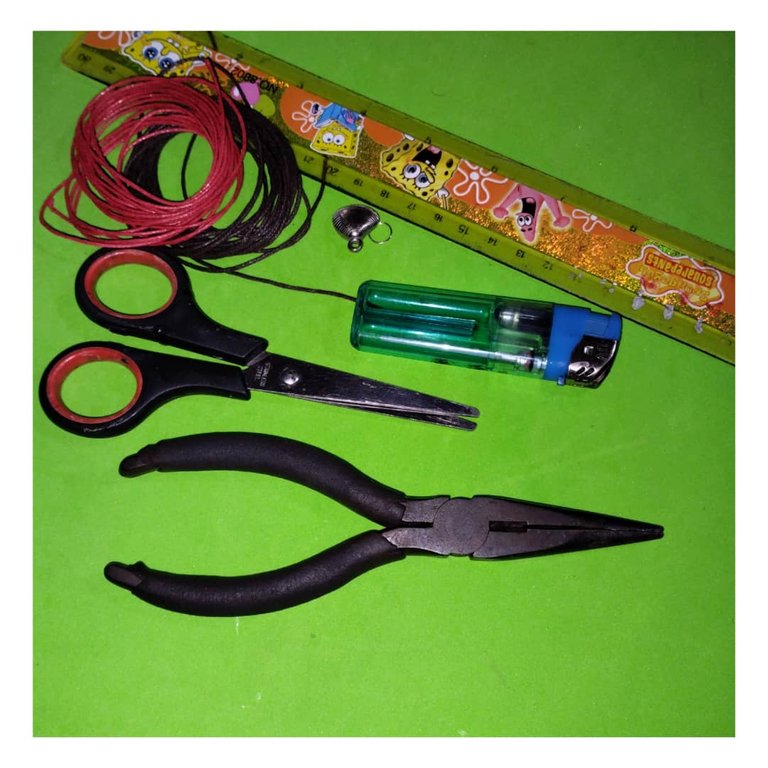
Materiales para la realización de la hermosa gargantilla con nudo llamado Switch y adornado con dije de concha marina:
- 2 pedazos de hilo encerado de 150 centímetros cada uno , color marrón.
- 1 pedazo de hilo encerado de 25 centímetros color marrón.
- 1 pedazo de hilo encerado de 2,5 metros, color rojo.
- Yesquero.
- Pinza.
- Regla.
- Dije de concha marina.
- 1 aro.
Paso a paso para la realización de la hermosa gargantilla con nudo macramé:
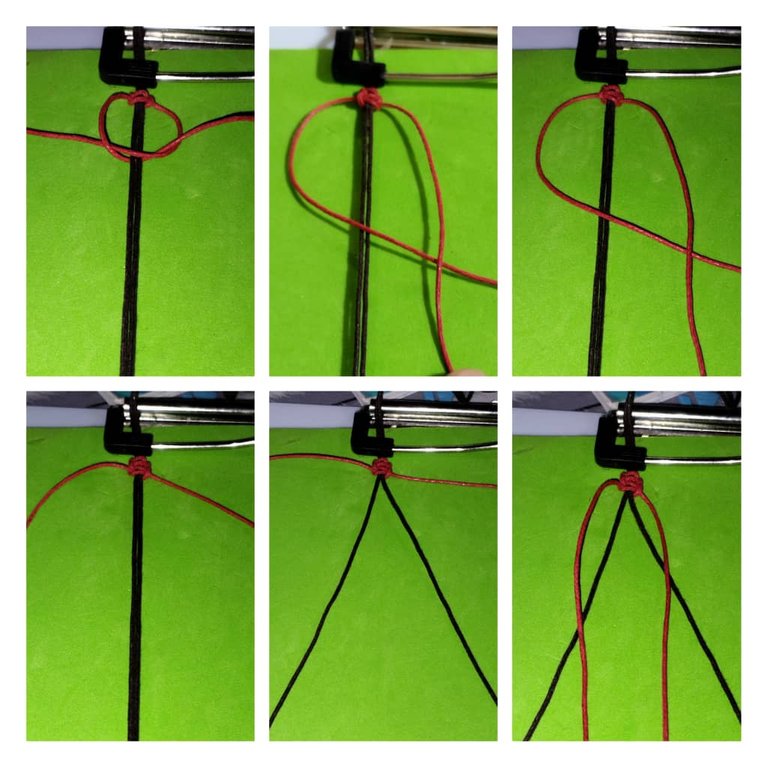
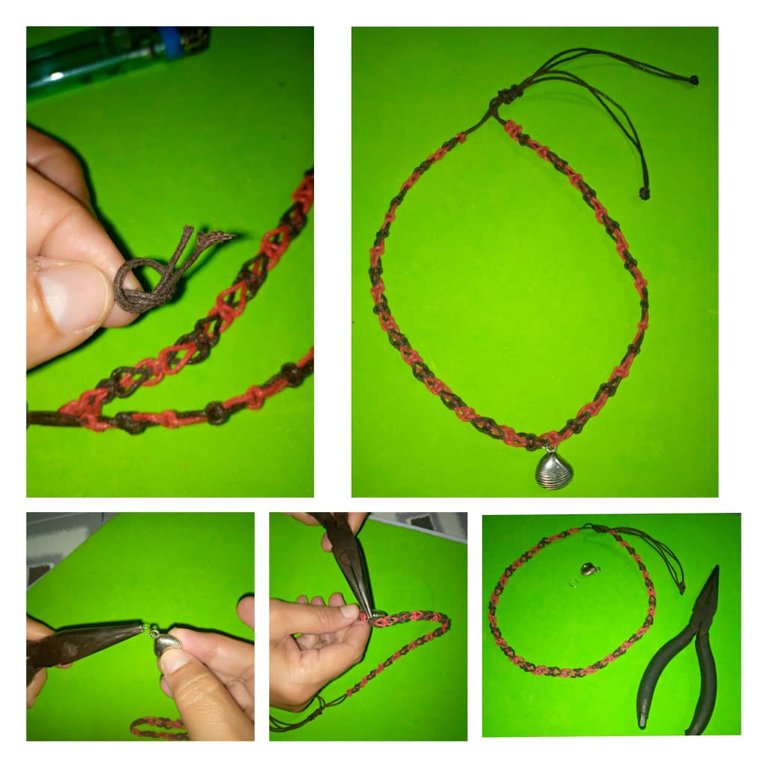
- Lo primero que haremos es medir con una regla, el hilo encerado de color marrón, 150 centímetros,Lo cortamos con las tijeras, de ese mismo tamaño cortamos otro también de color negro.
- Cuando tengamos los dos pedazos de hilos cortados, hacemos un nudo en la punta para sujetar los dos.Luego quemamos con el yesquero.
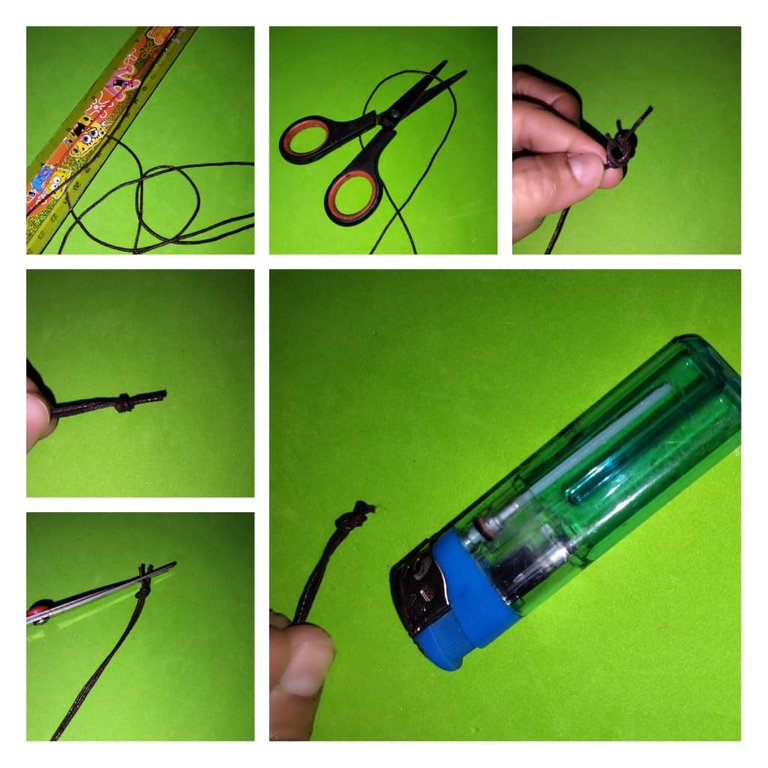
- Además medimos otro pedazo de hilo encerado de 2,5 metros, color rojo y otro pedazo color marrón de 25 centímetros.
- Teniendo los hilos cortados ,colocamos sobre una carpeta con gancho los dos hilos que amarramos en la punta, lo sujetamos bien, en la parte de arriba como de abajo, para que no se salga.
- Ahora tomamos el hilo rojo de 2,5 metros y lo colocamos en todo el medio, es decir un pedazo de un lado y otro del otro lado, comenzamos a realizar el primer nudo, tomamos el hilo rojo de la derecha lo pasamos por los dos hilos del centro y hacemos como una letra P con la barriga hacia la derecha.
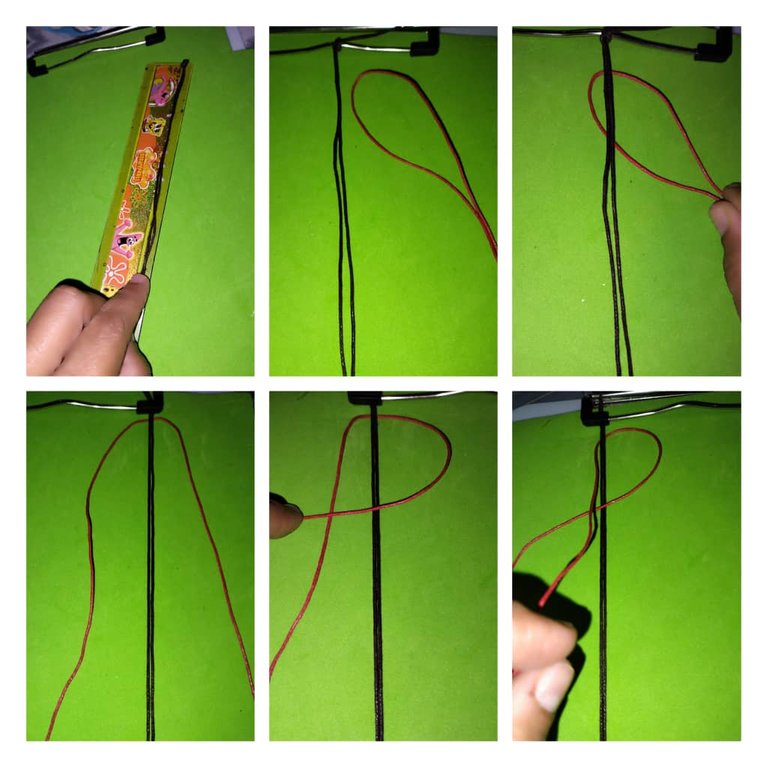
- Tomamos el hilo de la izquierda lo pasamos por arriba del hilo de la derecha y lo metemos por debajo de los dos hilos, luego lo sacamos por la barriga de la P que formamos.Jalar el hilo e ir apretando el nudo.
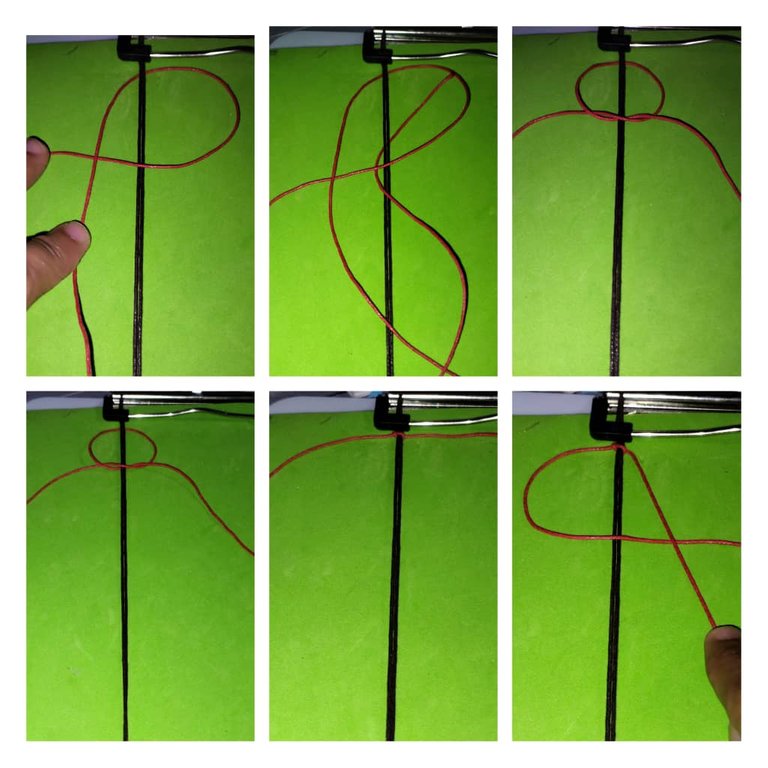
- Ahora tomamos el hilo rojo de la izquierda lo pasamos por los dos hilos del centro y hacemos como una letra P con la barriga hacia la izquierda. Pasamos el hilo de la derecha sobre el hilo de la izquierda, metemos la punta por debajo de los dos hilo y sacamos sobre la barriga de la P,jalamos el hilo y apretamos, tenemos listo el segundo nudo .
- Tomamos los hilos centrales y los abrimos, ahora agarramos los hilos anudadores en este caso los rojos y se colocan en el centro. Los hilos rojos deben sujetarse en la parte de abajo tambien para que facilite el nudo.
- Ahora continuamos como hicimos el primer nudo, vamos jalando los hilos,pero dejamos un espacio de 3 centímetros, luego hacemos el segundo nudo nudo,halamos y apretamos.
- Nuevamente colocamos los hilos rojos hacia un lado y los hilos negros lo pasamos hacia el centro, lo sujetamos y volvemos a realizar el mismo procedimiento del primer nudo, jalamos y dejamos el espacio de 3 centímetros, pueden guiarse por la imágen.
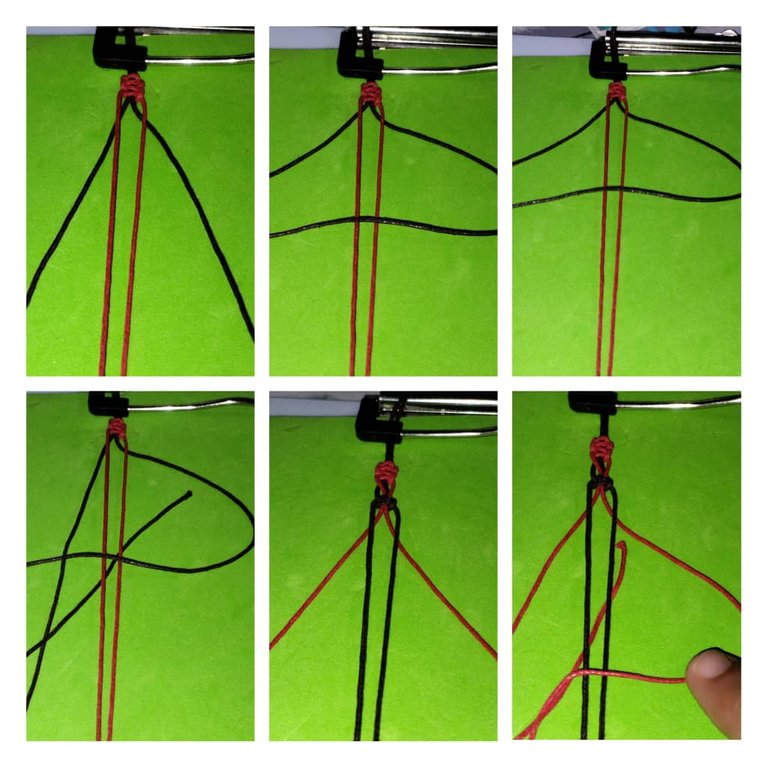
- Así van a repetir este procedimientos por varias veces hasta que hagan el largo de la gargantilla, cuando hayan terminado de hacer el largo, recortar con la tijera los pedazos de hilo sobrante y quemar las puntas con el yesquero.
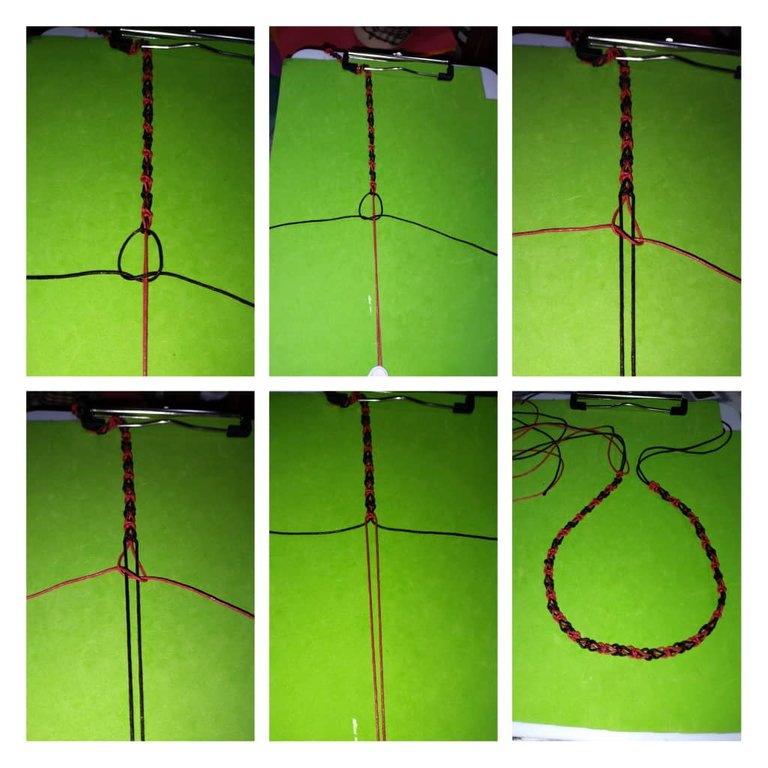
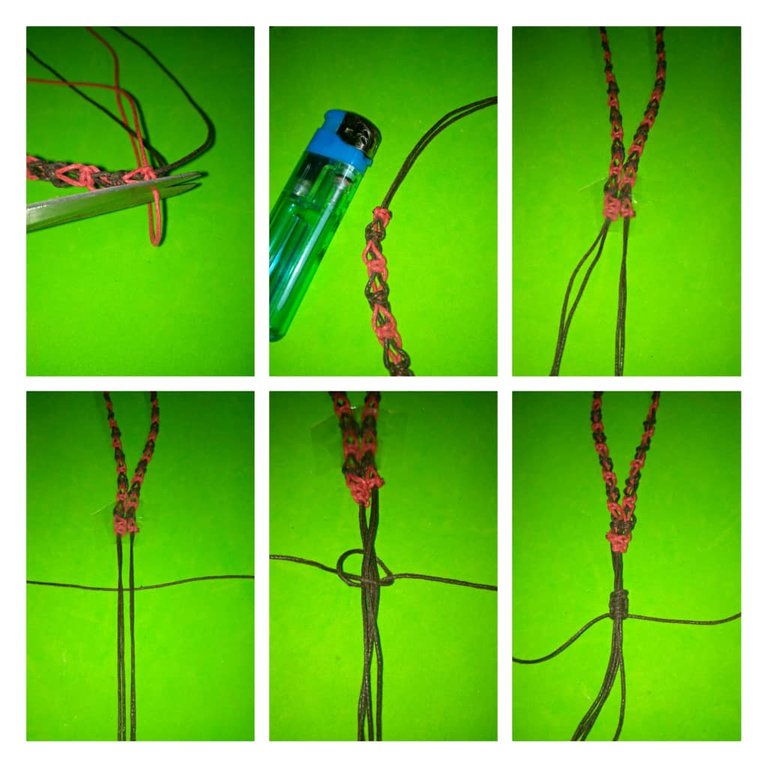
- Para hacer la tranca, pegamos las dos puntas, tomamos el pedazo de hilo de 25 centímetros, hacemos un nudo sencillo, colocamos el hilo por la mitad debajo de los dos hilos, una punta lo pasamos para la derecha y la otra punta sobre el hilo de la derecha dentro de los 4 hilos apretamos y viceversa, así hacemos 4 nudo, cortamos el excedente y quemamos con el yesquero.
- Hacemos un nudo en las puntas.
- Colocamos el dije de concha marina dentro del aro en el centro de la gargantilla.Lo apretamos con la pinza.
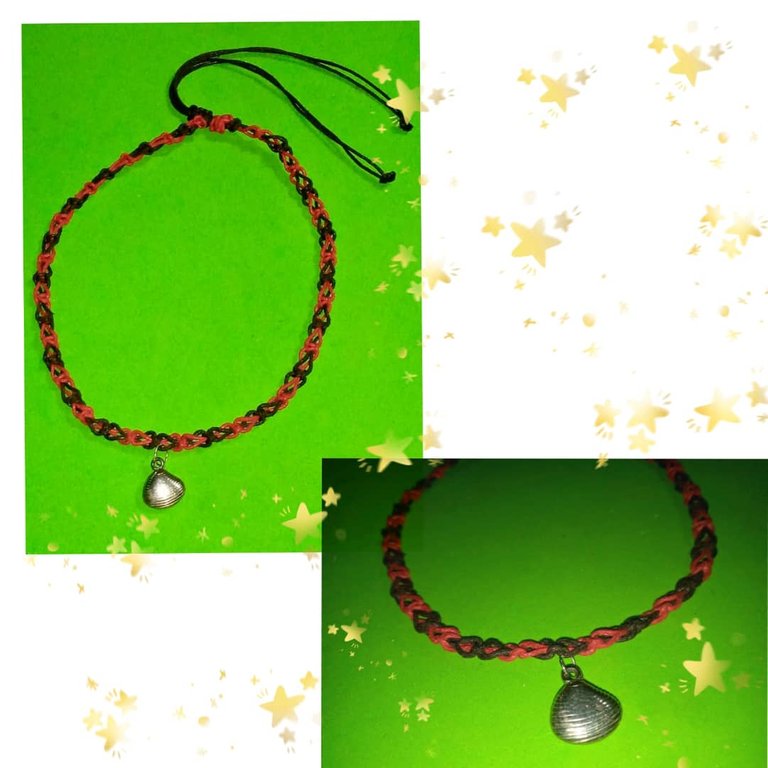
Aquí podemos ver el resultado final, la hermosa gargantilla con nudo Switch y dije de concha marina.
Espero que les haya gustado, hasta la próxima, muchas bendiciones.

Las fotos son mías tomadas con teléfono Infinix, editada con incollage y traducida con DEEPL.
ESPAÑOL
Welcome to my blog!
Good morning dear friends of this community , my favorite @jewelry , I wish you have dawned well , along with all your family , may the Holy Spirit continue to guide your lives.
Today I show you how to make a beautiful macrame choker with SWITCH knot, adorned with a seashell charm.
For those friends who think that the knot is difficult, it is not the reality, it is an extremely easy knot, it is a matter of putting it into practice and you will see how beautiful it is, you can make it with the colors and threads you want, in my case I made it with red and brown waxed thread. I wanted a necklace in that color.
Without further ado, let's get to the threads!
Materials for the realization of the beautiful choker with knot called Switch and adorned with seashell charm:
- 2 pieces of waxed thread of 150 centimeters each , brown color.
- 1 piece of waxed thread of 25 centimeters each, brown color.
- 1 piece of waxed thread of 2.5 meters, red color.
- Tinder.
- Tweezers.
- Ruler.
- Seashell pendant.
- 1 ring.
Step by step for the realization of the beautiful choker with macrame knot:
- The first thing we will do is to measure with a ruler, the waxed thread of brown color, 150 centimeters,We cut it with the scissors, of that same size we cut another one also of black color.
- When we have the two pieces of thread cut, we make a knot at the tip to hold the two.Then we burn with the tinder.
- In addition we measure another piece of waxed thread of 2.5 meters, red color and another piece of brown color of 25 centimeters.
- Having the threads cut, we place on a folder with a hook the two threads that we tied at the end, we hold it well, at the top and at the bottom, so that it does not come off.
- Now we take the red thread of 2.5 meters and we place it in the middle, that is to say a piece on one side and another on the other side, we begin to make the first knot, we take the red thread on the right we pass it through the two threads of the center and we make like a letter P with the belly to the right.
- Take the thread on the left and pass it over the thread on the right and put it under the two threads, then pull it out through the belly of the P that we formed.
- Now we take the red thread on the left we pass it through the two threads in the center and make like a letter P with the belly to the left. We pass the thread on the right over the thread on the left, we put the tip under the two threads and pull it over the belly of the P, pull the thread and tighten it, we have the second knot ready.
- We take the central threads and open them, now we take the knotting threads, in this case the red ones, and place them in the center. The red threads should also be fastened at the bottom to facilitate the knot.
- Now we continue as we did the first knot, we pull the threads, but we leave a space of 3 centimeters, then we make the second knot knot, pull and tighten.
- Again we place the red threads to one side and the black threads we pass it to the center, we hold it and we return to perform the same procedure of the first knot, pull and leave the space of 3 centimeters, you can be guided by the image.
- Repeat this procedure several times until you make the length of the choker, when you have finished making the length, cut with the scissors the pieces of excess thread and burn the ends with the tinder.
- To make the lock, we glue the two ends, we take the piece of thread of 25 centimeters, we make a simple knot, we place the thread in half under the two threads, one end we pass it to the right and the other end on the thread of the right inside the 4 threads we tighten and vice versa, thus we make 4 knot, we cut the excess and burn with the tinder.
- We make a knot at the ends.
- We place the seashell pendant inside the ring in the center of the choker.We tighten it with the pliers.
Here we can see the final result, the beautiful choker with Switch knot and seashell charm.
Hope you liked it, until next time, many blessings.
The photos are mine taken with Infinix phone, edited with incollage and translated with DEEPL.
0
0
0.000
https://twitter.com/1203813081526284291/status/1620392199493124099
The rewards earned on this comment will go directly to the people( @daysiselena ) sharing the post on Twitter as long as they are registered with @poshtoken. Sign up at https://hiveposh.com.
Gracias @poshtoken
Una técnica preciosa la que nos enseñas hoy amiga @josdelmi el nudo bien explica detalladamente, nos encantó la explicación a detalle, un gran trabajo 👏
Me encanta, esta muy lindo la combinación del negro y el rojo es una de las mejores y el dije de concha marita lo hace ver más fabuloso.