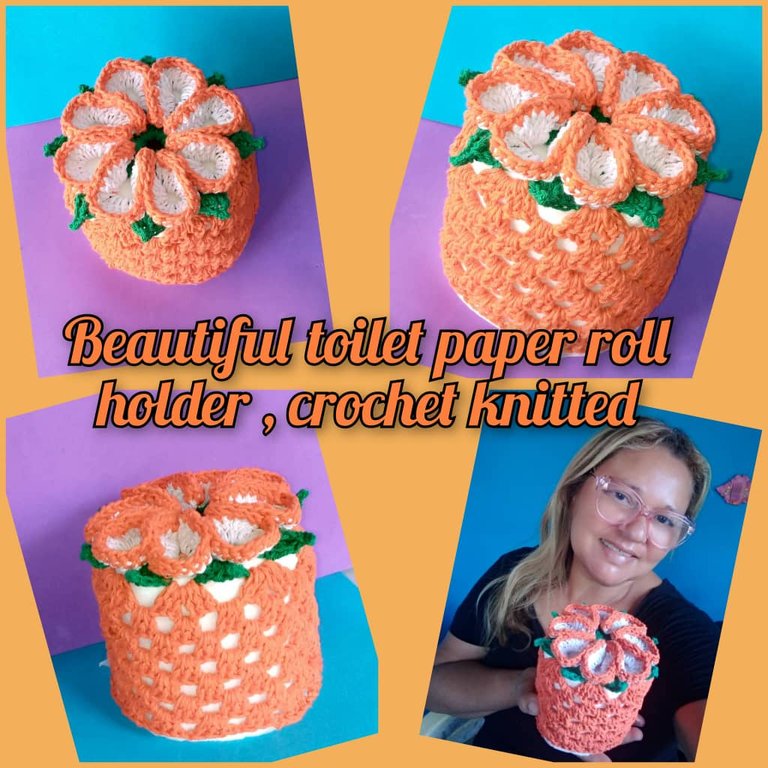
(Esp/Eng) Tutorial: Cómo hacer un lindo porta rollo de papel higiénico tejido a crochet / Tutorial: How to make a cute crocheted toilet paper roll holder
¡Bienvenidos a mi blog!
Welcome to my blog!
Hola a todos los que forman parte de esta linda comunidad #needleworkmonday y los que encanta el arte del tejido a crochet, feliz noche del Lunes, iniciando la Semana Mayor , deseo que la estén pasando bien, Dios les bendiga en estos días que son peligrosos ya que algunas personas se van a los ríos y playas , toman demasiado licor y despues vienen en sus carros corriendo demasiado y eso es lo que ha provocado muchos accidentes. Así que Dios nos cuide y libre de todo mal.
Hello to all who are part of this beautiful community #needleworkmonday and those who love the art of crochet knitting, happy Monday night, starting the week, I hope you are having a good time, God bless you in these days that are dangerous because some people go to the rivers and beaches, drink too much liquor and then come in their cars running too much and that is what has caused many accidents. So may God watch over us and deliver us from all evil.

Hoy quiero mostrar a través de un tutorial , como elaborar un bello y encantador porta rollos de papel higiénicos , tejido a crochet, para adornar los baños , oficina o cocina.
Si lo quieren para la cocina deben hacerlo más largo, es un diseño muy lindo en forma de flor , además puede servir para hacer un regalo y colocar una crema para cabellos.
Sin más nada que decir ¡manos a la aguja!
Today I want to show through a tutorial, how to make a beautiful and charming toilet paper roll holder, crocheted, to decorate bathrooms, office or kitchen.
If you want it for the kitchen you should make it longer, it is a very nice design in the shape of a flower, it can also serve to make a gift and place a hair cream.
Without further ado, let's get to work!
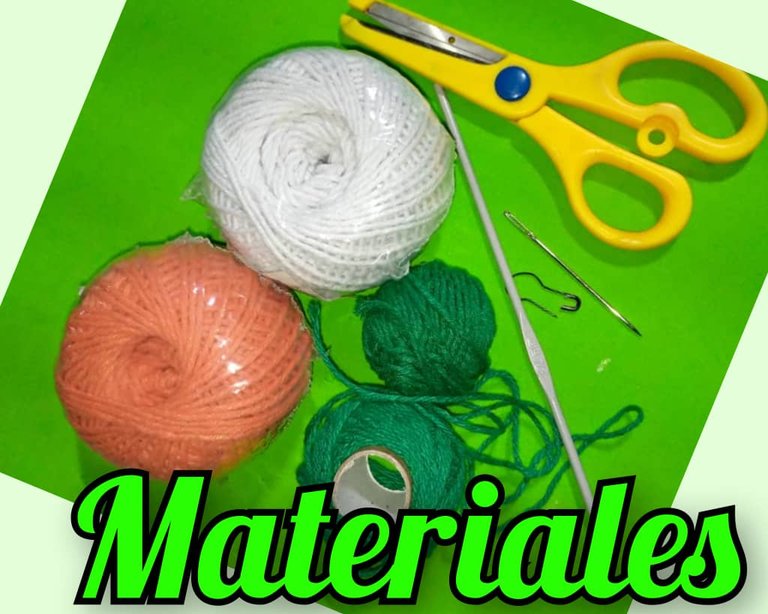
Materiales que se necesitan para la realización del hermoso porta rollos de papel higiénico tejido a crochet:
- Hilo de tejer, colores: blanco, verde y anaranjado.
- Aguja de crochet.
- Tijera.
- Aguja lanera.
Materials needed for the realization of the beautiful crocheted toilet paper roll holder:
- Knitting yarn, colors: white, green and orange.
- Crochet needle.
- Scissors.
- Wool needle.
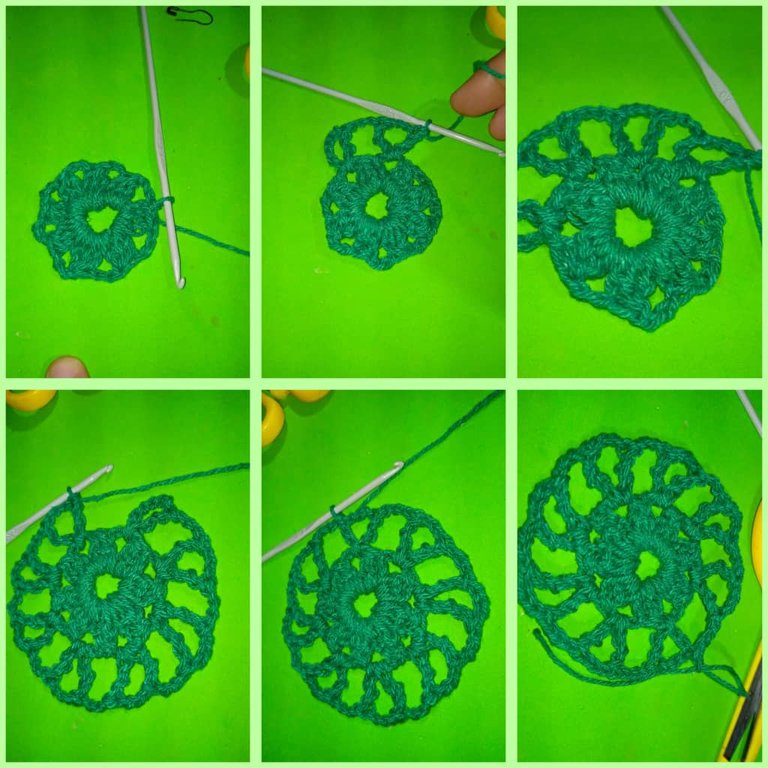
Pasos para realizar el porta rollo tejido:
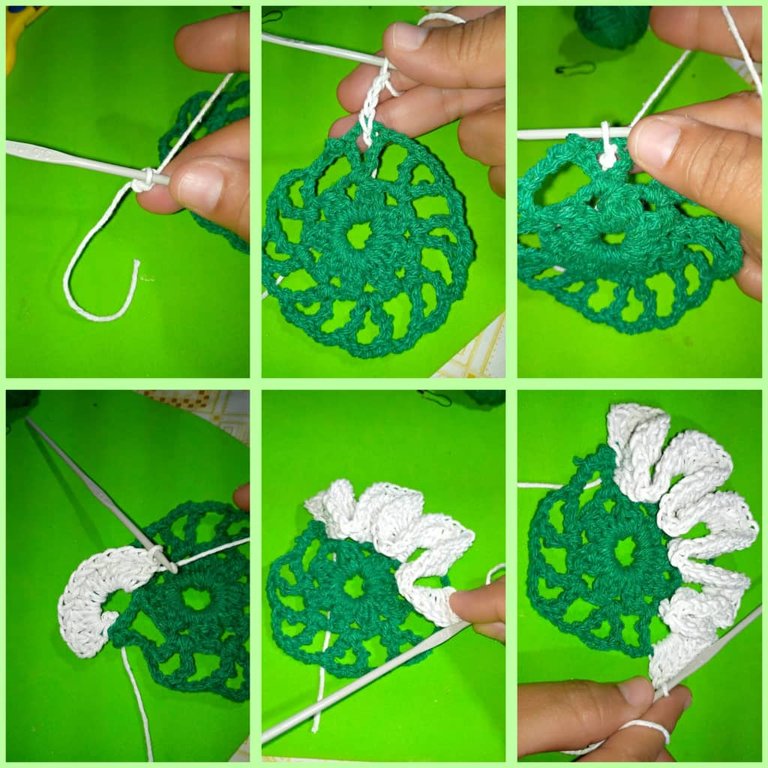
- Lo primero que vamos a hacer es , tomar el hilo de color verde con la aguja , hacer un nudo de inicio y levantar 8 cadenetas .
- Luego cerrar en el primer punto con punto deslizado.Levantar una cadena de 3 puntos, vamos a trabajar dentro del aro de las 8 cadenas.
- Debemos hacer puntos ramillete, 8 motivos.
- Son como punto alto pero queda incompleto y se cierran al final cuando tengamos los tres puntos.
- Debemos separar cada punto ramillete con tres cadenas.
Steps to make the woven roll holder:
- The first thing we are going to do is , take the green color yarn with the needle , make a starting knot and raise 8 chains .
- Then close in the first stitch with slipped stitch.lift a chain of 3 stitches, we are going to work inside the ring of the 8 chains.
- We must make bunch stitches, 8 motifs.
- They are like high stitch but it is incomplete and are closed at the end when we have the three stitches.
- We must separate each bunch stitch with three chains.

- Recordemos cerrar cada vuelta con punto deslizado.
- Para la vuelta 2, vamos a subir 7 cadenas en el hueco del primer motivo, hacer un punto triple en el mismo hueco.
- Así vamos a realizar lo mismo en toda esta vuelta.Terminamos con un punto deslizado.
- Recortamos el hilo con la tijera
- Remember to close each row with a slip stitch.
- For row 2, we are going to go up 7 chains in the hole of the first motif, knit a triple stitch in the same hole.
- We will do the same for this whole row, finishing with a slip stitch.
- Cut the yarn with the scissors
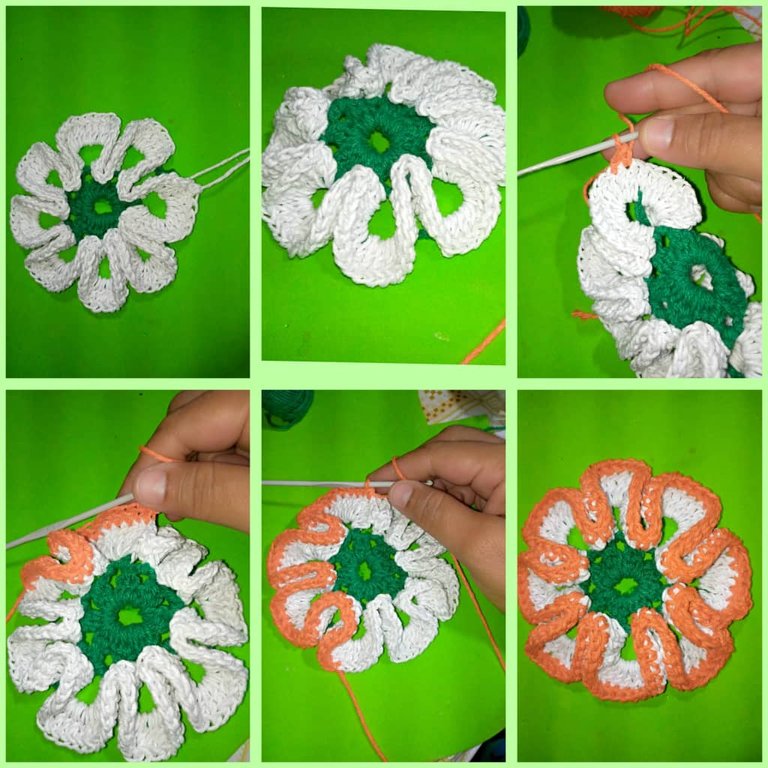
- Ahora para la tercera vuelta colocamos el hilo de color blanco, comenzamos a realizar en cualquier espacio o en donde haya hueco. Hacemos un nudo de inicio, levantamos 3 cadenas , hacemos 5 puntos altos (parte arriba de la V), ahora parte de lado de la V, hacemos 6 puntos altos y en el otro la V, pueden guiarse por la imagen y verán la V.
- Van a cubrirla toda tejida. Así van a realizar toda la vuelta.
- Now for the third round we place the white yarn, we begin to perform in any space or where there is a gap. We make a starting knot, we raise 3 chains, we make 5 high stitches (part above the V), now part of the side of the V, we make 6 high stitches and in the other one the V, you can be guided by the image and you will see the V.
- You are going to cover it all knitted. This is how you are going to do the whole round.
- Cambiar el color del hilo, anaranjado y hacer en toda la vuelta puntos bajos.
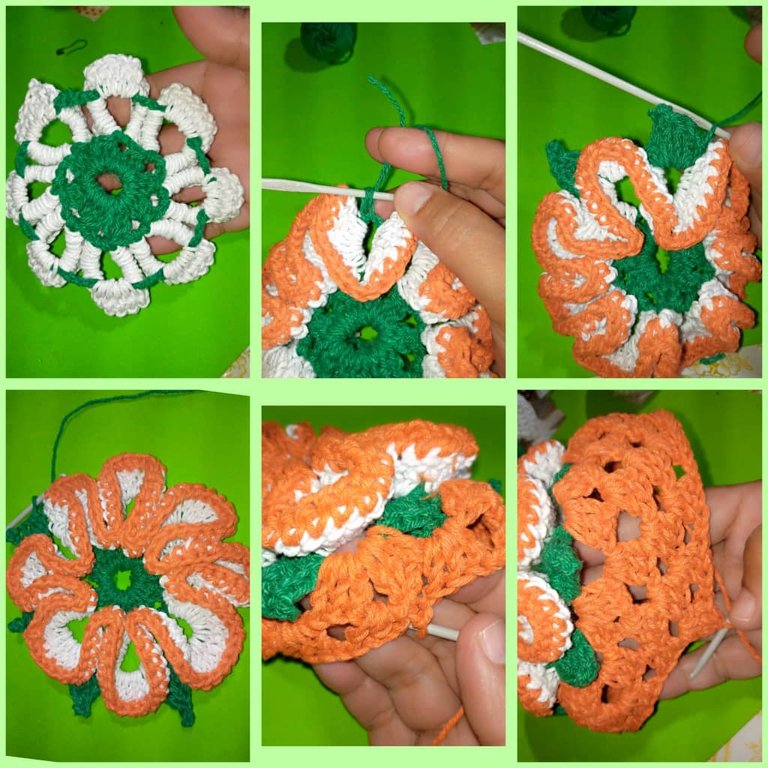
- Para hacer las hojas , volteamos el motivo y nos damos cuenta que está una parte de color verde , en esa parte tejemos la hoja, subimos una cadena , punto medio alto, punto alto, dos lazada y tejemos un punto triple. Subimos tres cadenas , hacemos un picot, punto triple, punto alto, punto medio alto y finalizar la hoja un punto bajo, separar con tres cadena, de esta manera hacemos todas las hojas para un total de 8 .
- Change the color of the yarn, orange, and knit the whole round in single crochet.
- To make the leaves, we turn the motif and we realize that there is a part of green color, in that part we knit the leaf, we go up a chain, medium high stitch, high stitch, two loops and we knit a triple stitch. We go up three chains, knit a picot, triple stitch, double crochet, double crochet, double crochet and finish the leaf with a single crochet, separate with three chains, in this way we knit all the leaves for a total of 8.
- Volvemos a cambiar de color anaranjado para hacer la parte final del motivo, volteamos y en donde están las tres cadenas que hicimos , en ese lugar metemos el hilo anaranjado, subimos tres cadenas , 3 puntos altos con dos cadenas de separación, 3 puntos altos más en el mismo lugar ,así vamos a realizar en toda la vuelta.
- Después que hayamos tejido toda la vuelta en donde hicimos dos cadenas , allí colocamos tres puntos altos con una cadena de separación. Así vamos a realizar toda la vuelta .
- Como esta hacemos las vueltas que se quiera para el largo del porta rollo. En mi caso 5 vueltas y ya está listo.
- We change the color back to orange to make the final part of the motif, we turn over and where the three chains we made are, in that place we put the orange thread, we go up three chains, 3 high stitches with two separating chains, 3 more high stitches in the same place, this is how we are going to knit the whole round.
- After we have knitted the whole row where we made two chains, there we place three high stitches with a separating chain. This is how we are going to knit the whole row.
- Like this we make as many rows as we want for the length of the roll holder. In my case 5 rows and it is ready.
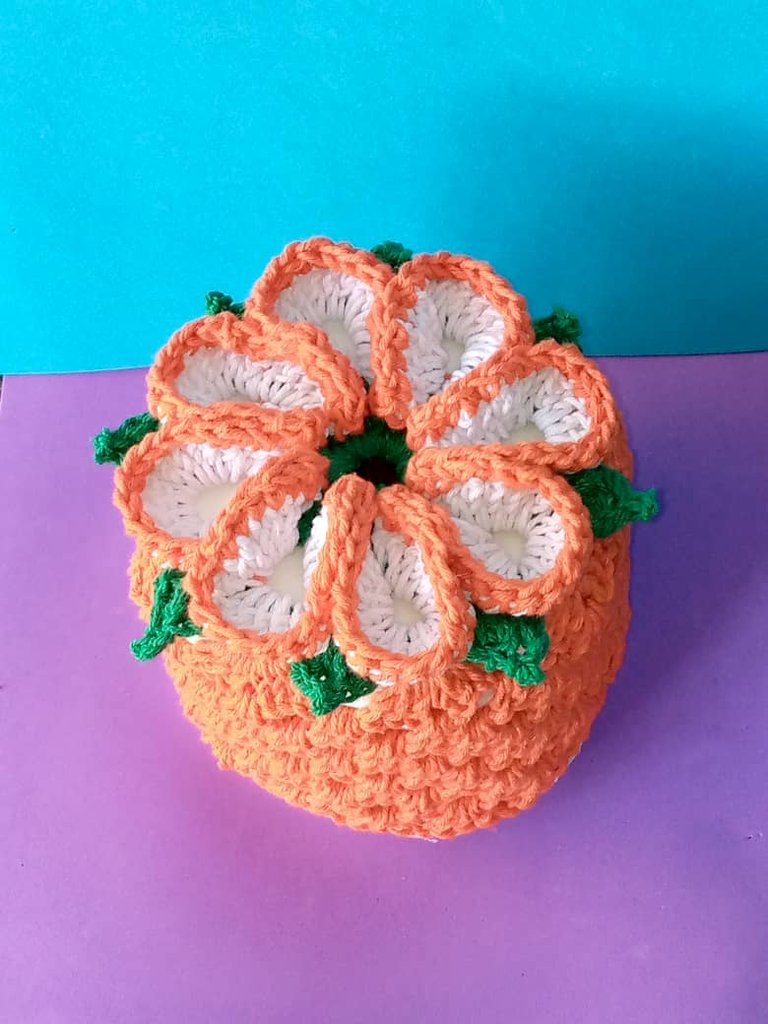
Aquí el resultado final del hermoso porta rollos de papel higiénico tejido a crochet.
Here is the final result of the beautiful crocheted toilet paper roll holder.
Vieron lo lindo que quedó.
You saw how nice it looked.

Gracias por leer mi post y comentar, espero que sea de su agrado. Hasta la próxima.Muchas bendiciones.
Las fotos son mías , tomada con teléfono Infinix, editadas con incollage y traducidas con DEEPL.
Thank you for reading my post and commenting, I hope you like it. Until next time, many blessings.
The photos are mine, taken with Infinix phone, edited with incollage and translated with DEEPL.

Hermoso adorno para decoración del baño, me encantó su diseño y color, feliz noche.
Me alegra mucho que te guste @lismar21 ,saludos . Muchas bendiciones.
!discovery 40
Gracias por el apoyo @esther-emmanuel , bendiciones y saludos.
This post was shared and voted inside the discord by the curators team of discovery-it
Join our Community and follow our Curation Trail
Discovery-it is also a Witness, vote for us here
Delegate to us for passive income. Check our 80% fee-back Program
Gracias por votar mi post, bendiciones.
wow that looks so amazing, you are so talented. thanks a lot for sharing keep the good work.
Gracias @diyhub por el apoyo, muchas gracias.Saludos.
This even passes for interior decor
It looks so pretty and I like the colours you used
Great job
Gracias por esas bellas palabras. Bendiciones.
You’re welcome
Que bonito trabajo, no se me habría ocurrido. Saludos
I don't know but it looks like a cake though. Nice work 👏🏾
Totalmente. Conducir bajo los efectos del alcohol es un riesgo que no se debe tomar. Muchas veces terminan en fatalidad. Se ha perdido el concepto verdadero de lo que significa la Semana Santa.
Amiga, este proyecto me pareció fantástico. Es perfecto. Me encantó todo pero especialmente la tapa en forma floral. Has hecho un excelente trabajo.
Es un proyecto muy práctico y original, te quedó muy bonito. felicidades. Gracias por compartir. Saludos!