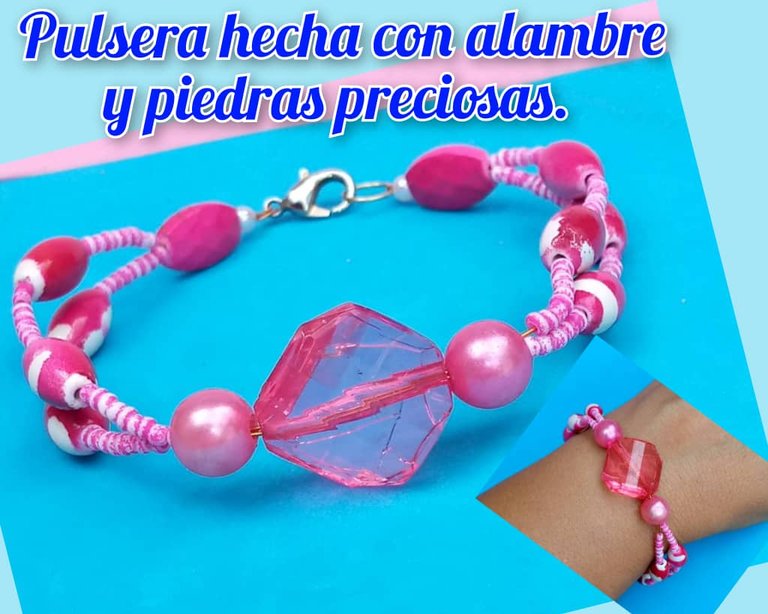
(Esp/Eng) Tutorial: Cómo hacer una pulsera con alambre y piedras preciosas para mujer / Tutorial: How to make a bracelet with wire and precious stones for women
¡Bienvenidos a mi blog!
Welcome to my blog!
Hola, buenas noches a todos los hivers de la comunidad #jewelry , feliz Domingo, deseo que estén bien, juntos a su familia, que hayan pasado un fin de semana excelente, aquí con calor fuertemente , los árboles ni se mueven, lo que fue el día de ayer y yo ha sido con demasiado calor , no se si les pasa lo mismo pero veo a todo el mundo negrito, como si hubiese soleado todo el día, hoy en la iglesia a todos que veía, tenían como insolación, Dios nos ayude y cuide nuestra piel.
Hello, good evening to all the hivers of the #jewelry community, happy Sunday, I hope you are well, together with your family, you had an excellent weekend, here with heat strongly, the trees do not move, what was yesterday and I have been too hot, I do not know if the same thing happens to you but I see everyone black, as if it had been sunny all day, today in church everyone I saw, had as sunstroke, God help us and take care of our skin.
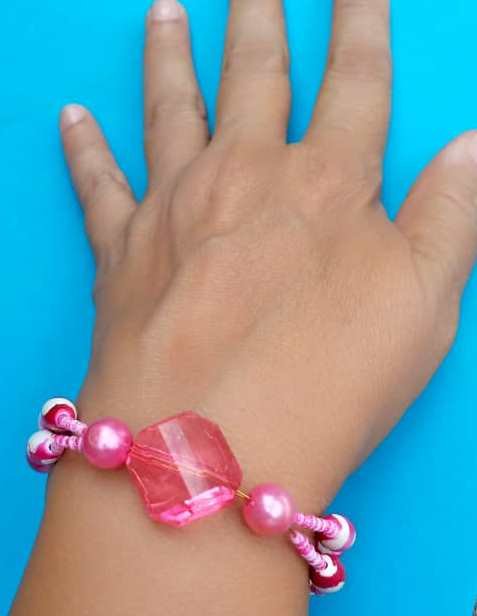
El día de hoy quiero mostrar a través de un tutorial , como realizar una hermosa pulsera hecha con alambre y piedras preciosas (perlas y mostacillas)
Esta pulsera la realicé para regalar a mi amiga Karla, el Viernes: 8 de Marzo,que se celebró , el día Internacional de la Mujer, desde hace mucho tiempo , mi amiga Karla y yo nos hicimos amiga , desde ese momento ya sabíamos que ibamos a ser buenas amigas. Nos parecemos mucho , nos gusta hacer el bien, somos dadivosas y eso me agrada de ella. Por lo tanto siempre nos regalamos algo , así sea que no estemos de cumpleaños. Cada vez que podamos reunirnos lo hacemos , pasamos horas conversando y no nos cansamos.
El día Miércoles , salí a comprar materiales para hacer mis proyectos,vi estas piedras rosadas, con perlas, mostacillas y de una vez dije : pulsera para mi amiga Karla. Cuando se la regalé se sintió muy emocionada , pues igual yo por lo que me regaló , una colonia, ella sabe que eso me gusta mucho , a mi me puede faltar todo , pero una colonia nunca jajajaja.
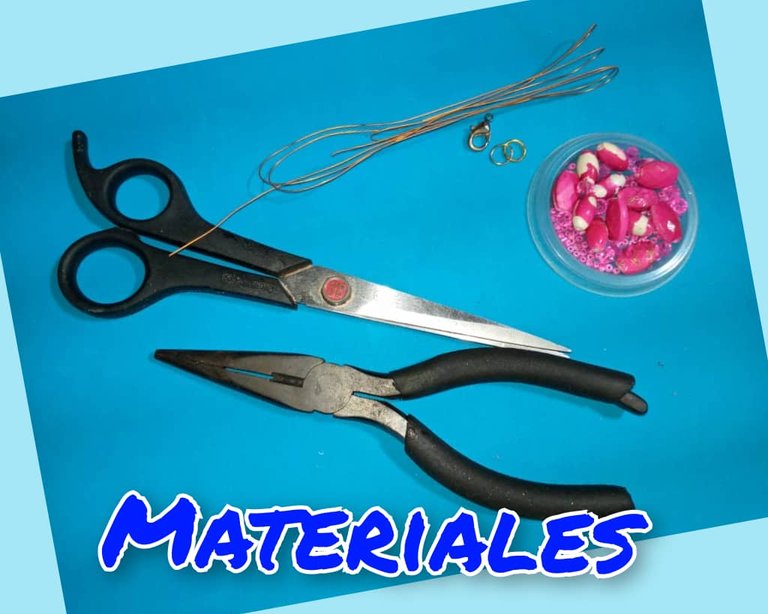
Ahora vamos a ver los materiales para la realización de la pulsera.
Today I want to show through a tutorial, how to make a beautiful bracelet made with wire and precious stones (pearls and beads).
I made this bracelet to give to my friend Karla, on Friday: March 8, which was celebrated, the International Women's Day, for a long time, my friend Karla and I became friends, from that moment we already knew that we were going to be good friends. We are very much alike, we like to do good, we are giving and I like that about her. So we always give each other presents, even if it's not our birthdays. Whenever we can get together we do, we spend hours talking and we never get tired of it.
On Wednesday, I went out to buy materials to make my projects, I saw these pink stones, with pearls, beads and beads and at once I said: bracelet for my friend Karla. When I gave it to her, she was very excited, and so was I for what she gave me, a cologne, she knows that I like that very much, I can miss everything, but never a cologne hahahaha.
Now let's see the materials for the realization of the bracelet.
Materiales que se necesitan para la realización de la linda pulsera hecha con alambre , piedras , mostacillas y perlas, son los siguientes:
- Piedra cuadrada de color rosado.
- Perlas rosadas.
- Mostacillas de colores rosadas con blancos .
- Piedras rosadas con forma de barril
- Tranca.
- 70 centímetros de alambre.
- 2 aros,
- 2 perlas pequeñas blancas.
- Tijera.
- Pinza
Materials needed for the realization of the beautiful bracelet made with wire, stones, beads and pearls, are the following:
- Pink square stone.
- Pink pearls.
- Pink and white beads.
- Barrel-shaped pink stones.
- Tightrope.
- 70 centimeters of wire.
- 2 earrings,
- 2 small white pearls.
- Scissors.
- Clamp
Pasos para la realización de la pulsera hecha con alambre y piedras preciosas:
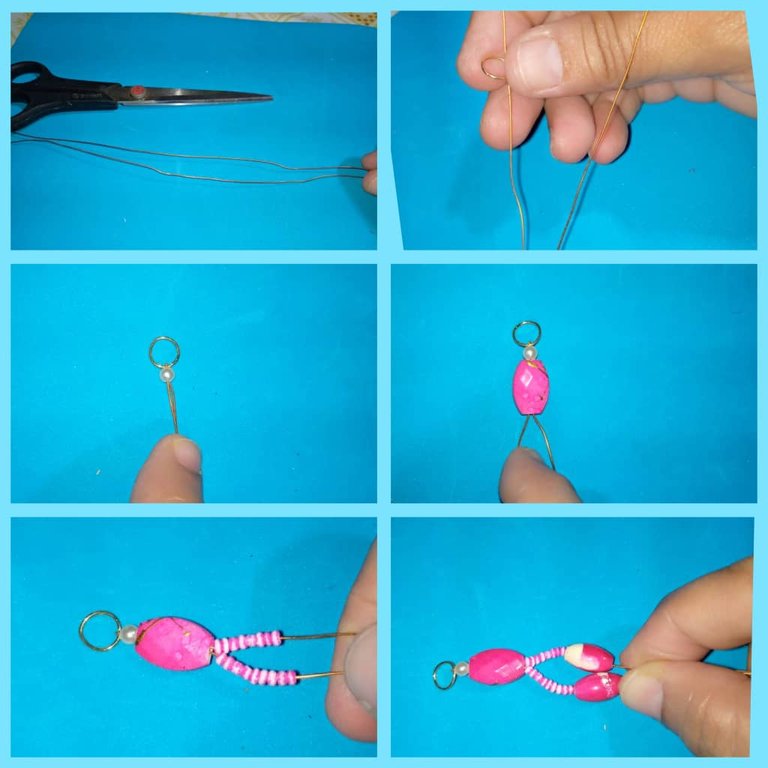
- Lo primero que debemos hacer , es tomar el alambre y medir el grueso de la mano (muñeca), en mi caso mide 25 centímetros , ahora recortamos con las tijeras .
- Ya teniendo el alambre cortado, metemos dentro un aro , lo sujetamos , luego metemos dentro del alambre , una perla pequeña de color blanca, este la metemos por las dos puntas del alambre para que quede apretado y se sostenga .
- Ahora metemos por los dos alambres la piedra chata rosada.
- Colocamos en cada punta de alambre 9 mostacillas de colores rojo con blanco.
- Continuamos con la pulsera, metemos dentro las dos piedras en forma de barril, pueden guiarse por la imagen.
Steps for the realization of the bracelet made with wire and precious stones:
- The first thing to do is to take the wire and measure the thickness of the hand (wrist), in my case it measures 25 centimeters, now cut it with scissors.
- Already having the wire cut, we put inside a ring, we hold it, then we put inside the wire, a small white pearl, this we put it through the two ends of the wire so that it is tight and holds.
- Now we put the flat pink stone through the two wires.
- Place 9 red and white beads on each end of the wire.
- We continue with the bracelet, we put inside the two stones in the shape of a barrel, you can be guided by the image.
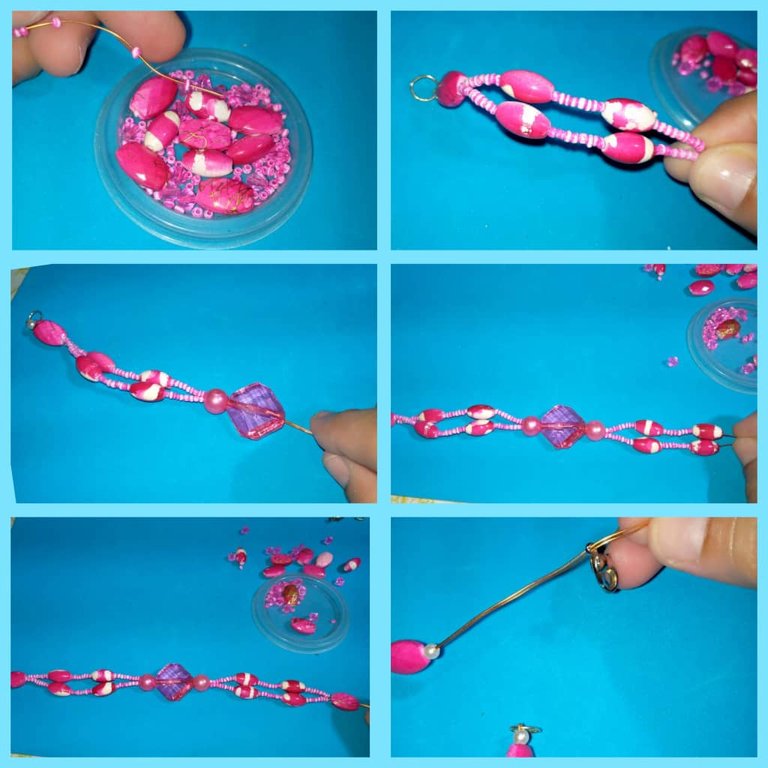
- Luego volvemos a meter dentro de cada punta del alambre 9 mostacillas, dos piedras en forma de barril, Ya llegamos al centro de la pulsera, metemos la perla rosada , la piedra grande cuadrada rosada , otra perla rosada.
- Continuamos con las mostacillas , las piedra en forma de barril , las mostacillas , piedras en forma de barril y por último la piedra chata.
- Ahora para finalizar en la punta colocamos la perla blanca y la tranca con ayuda de la pinza , de esta manera terminamos la linda pulsera.
- Then we put back into each end of the wire 9 beads, two barrel-shaped stones, then we get to the center of the bracelet, we put the pink pearl, the big pink square stone, another pink pearl.
- We continue with the beads, the barrel-shaped stone, the beads, the barrel-shaped stones and finally the flat stone.
- Now to finish we place the white pearl and the lock with the help of the clamp at the end, in this way we finish the beautiful bracelet.
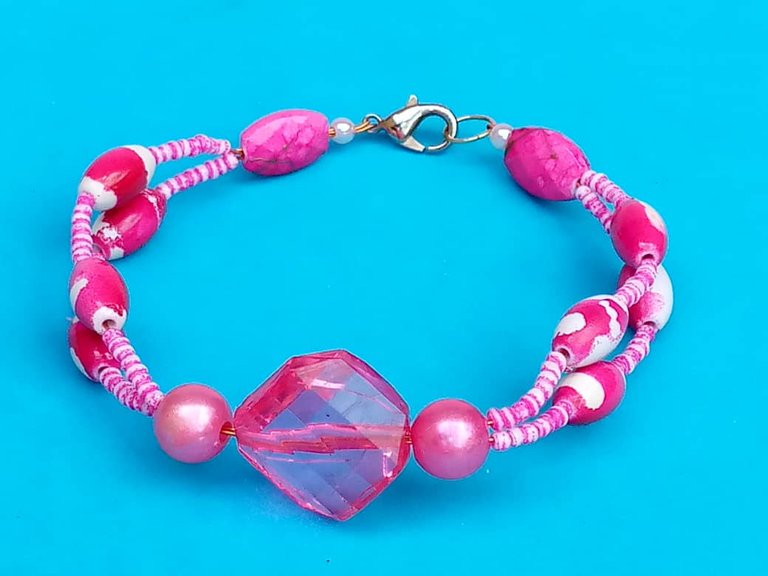
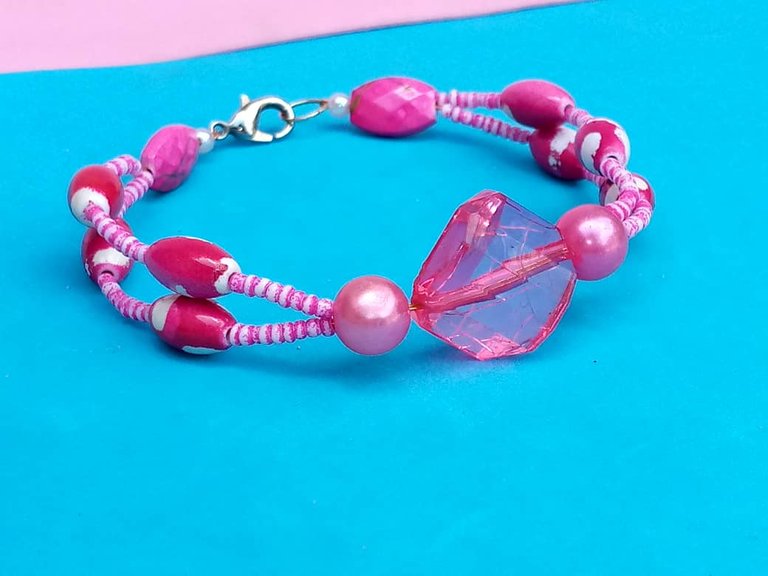
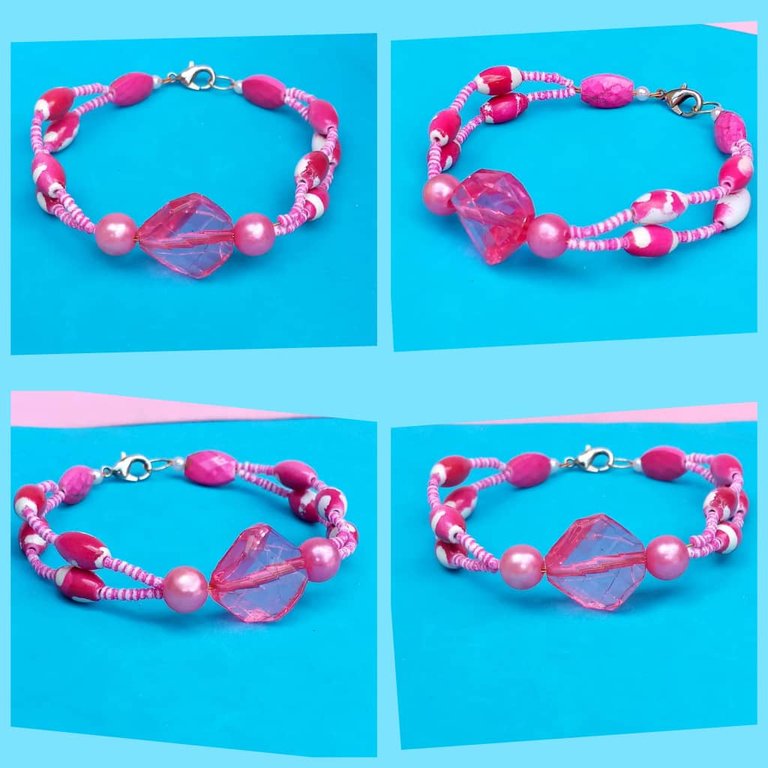
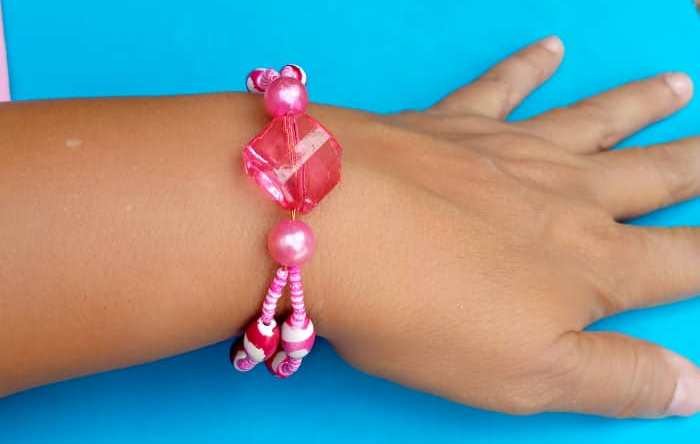
Resultado final de la linda pulsera
Final result of the beautiful bracelet
Gracias por leer y comentar mi post, muchas bendiciones.
Las fotos son mías , tomadas con teléfono Infinix, editadas con incollage y traducidas con DEEPL.
Thank you for reading and commenting on my post, many blessings.
The photos are mine, taken with Infinix phone, edited with incollage and translated with DEEPL.
Me gustó mucho el color de tu elección, la piedra del medio quedó fabulosa. Gracias por compartir 🤗❤️.
Hola @bayondalways1 ,me alegra mucho que te haya gustado. Muchas bendiciones. Saludos.
Hermosa Pulsera @josdelmi muy delicada me encantó. Saluditos 🌹
Hola amiga @nhaydu , si muy linda quedó, saluditos.
Hermoso mi linda amiga... Felicidades
Gracias, mi amiga @katiuskamata , besitos.
Te quedó hermosa tu pulsera amiga feliz día.