(Esp/Eng) Tutorial: Hermosa pulsera en macramé con nudos planos y flores // Tutorial: Beautiful macramé bracelet with flat knots and flowers
¡Bienvenidos a mi blog!
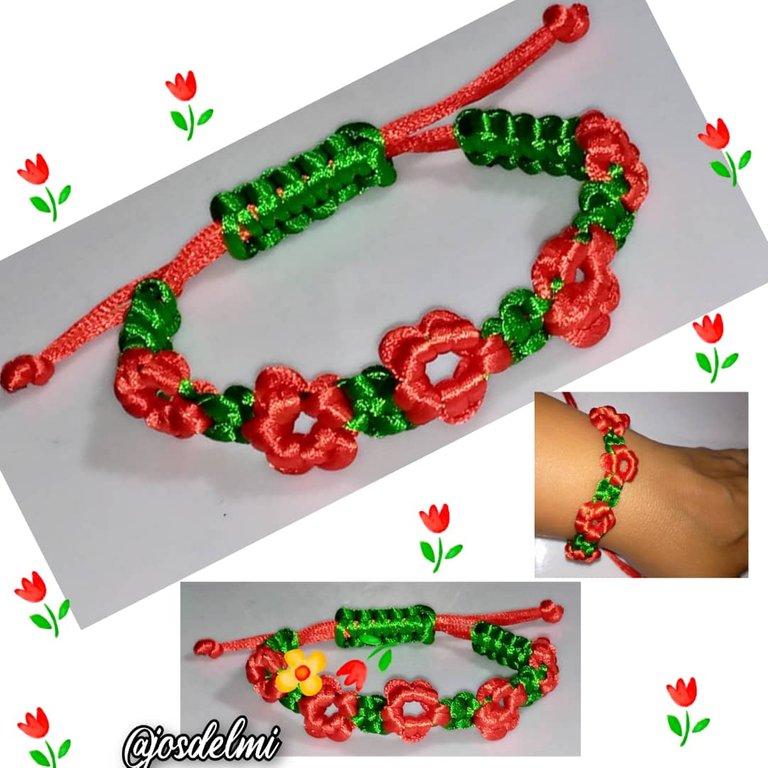
Hola a todos los amantes del arte de la joyería hecho a mano. Dios les bendiga a todos.
El día de hoy les traigo un tutorial, en donde explico el paso a paso de como realizar una hermosa pulsera en macramé con nudo planos y de flores , es fácil de hacer, lo que tenemos que combinar la imaginación y las ganas de trabajar.
Esta pulsera es muy colorida , en mi caso la realicé con colores: rojo y verde, pueden hacerla del color de su preferencia,
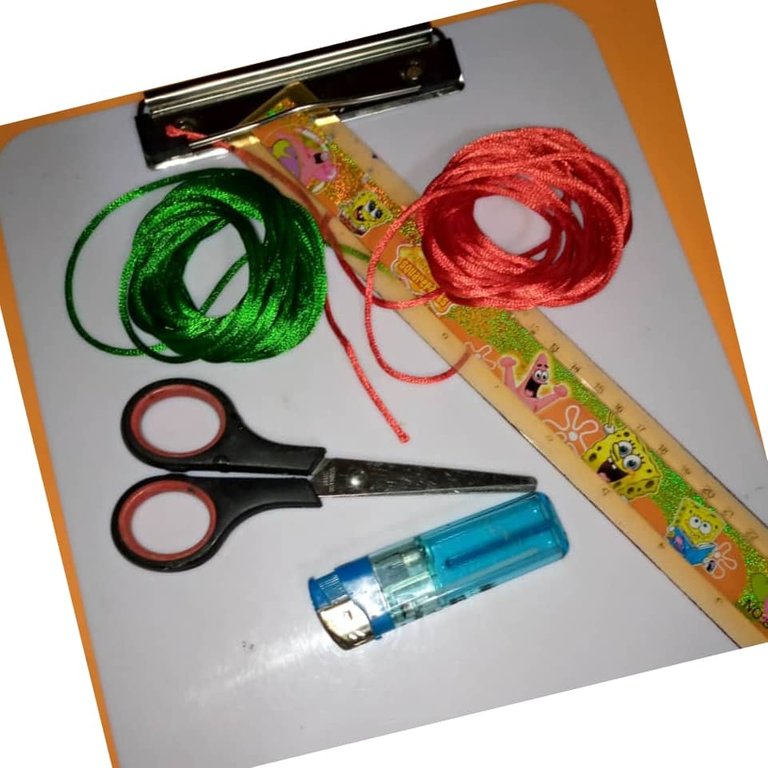
Materiales a utilizar para la realización de la hermosa y colorida pulsera en macramé con nudos `planos y de flores:
- 2 metros de hilo cola de ratón, color verde.
- 2 metros de hilo cola de ratón, color rojo.Para las flores.
- Regla.
- Tijera.
- Yesquero.
- Carpeta con gancho para sujetar los hilos.
- 1 pedazo de hilo cola de ratón de 25 centímetros, color verde.
Paso a paso para la realización de la hermosa pulsera en macrame:
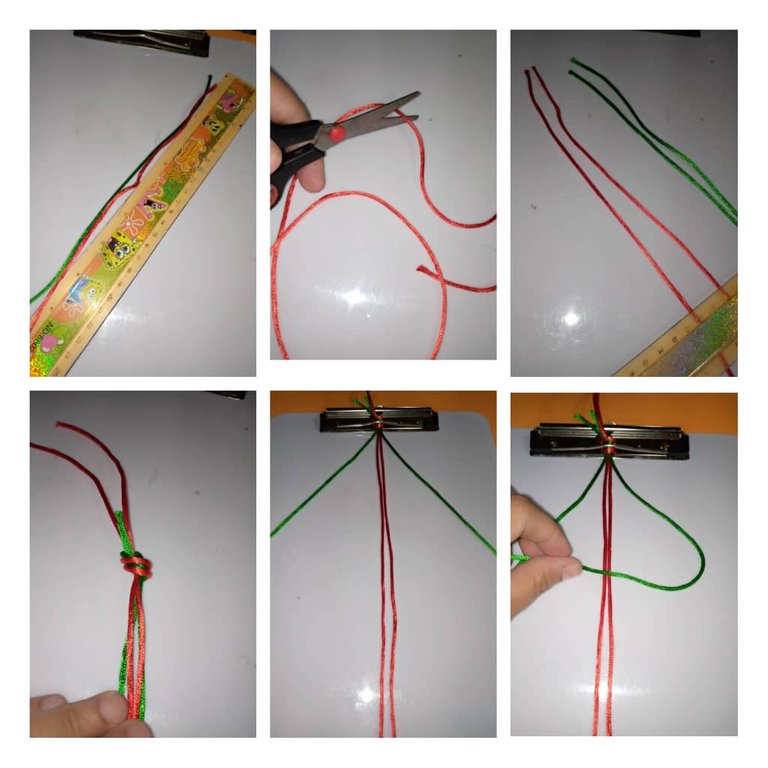
- Lo primero que se hace , medir con la regla los hilos de cola de ratón , verde y rojo, de un metro cada uno, en este caso serían 4 pedazos , 2 rojos y 2 verdes.Recortar con las tijeras.
- Además medir un pedazo de hilo verde de 25 centímetros.Este servirá para la parte de la tranca.
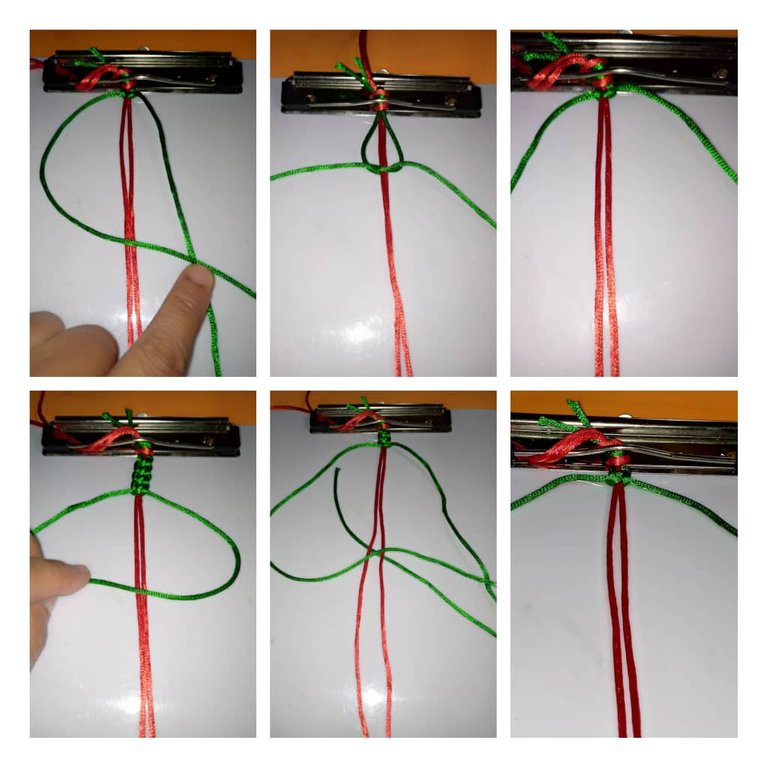
Tomar los cuatros hilos de diferentes colores , Hacer un nudo sencillo no tan apretado en el comienzo de la pulsera, colocando los rojos más altos que los verdes, - En la carpeta con gancho sujetarlo para comenzar a realizar los nudos.
- Los hilos de cola de ratón rojo (flores) lo estiramos hasta abajos
- y colocamos hacia los lados los hilos de color verde
- Tomamos el hilo de color verde desde el lado derecho lo pasamos sobre los dos hilos centrales rojos y el hilo del lado izquierdo lo pasamos sobre el hilo verde y ese hilo verde lo pasamos por dentro de los hilos centrales rojos y lo sacamos por la parte de arriba.Vamos halando poco a poco y lo pegamos del cordón.Este sería nuestro primer punto plano
- Ahora hacemos lo mismo pero del otro lado, tomamos el hilo verde de la derecha , lo pasamos sobre los hilos centrales y el hilo verde de la derecha lo pasamos sobre el hilo verde que viene del lado izquierdo, ahora metemos el hilo verde la izquierda dentro del la barriga que se ve y sacamos el hilo por encima, este sería el segundo nudo plano.
- Hacemos de este 9 nudos planos.
- Para comenzar a hacer el nudo de las flores, tomaremos el hilo verde de la derecha y lo pasaremos para la izquierda y el hilo verde la derecha lo pasamos para la izquierda, hacemos como un círculo, luego el hilo rojo de la derecha lo metemos dentro del círculo y sacamos por arriba, igualmente el hilo rojo de la izquierda lo metemos dentro del círculo y sacamos por arriba, halar con cuidado los cuatro hilos al mismo tiempo y este sería el primer pétalo de la flor.
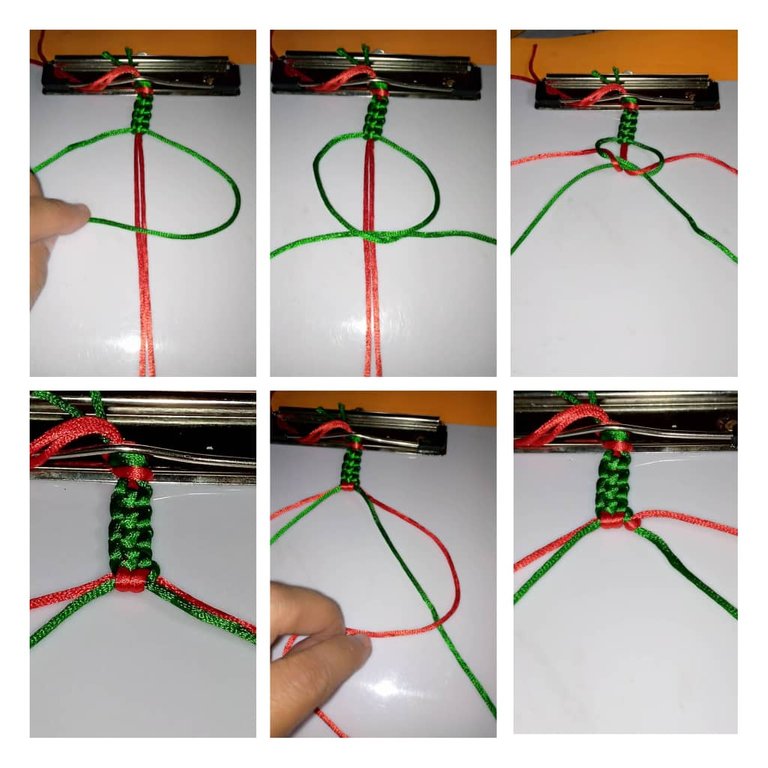
- En este paso colocamos los dos hilos verdes como centrales
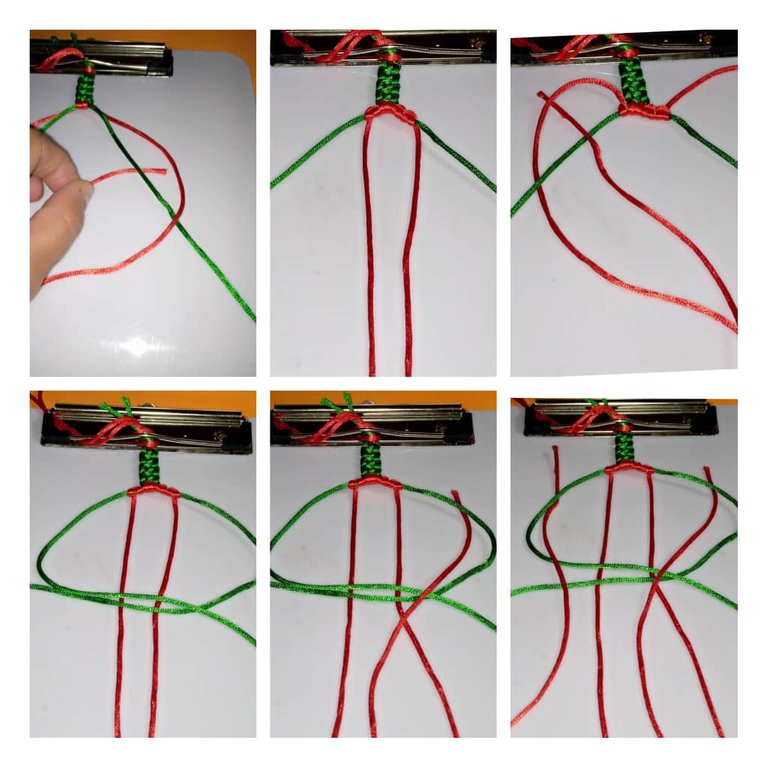
- y trabajamos con los rojos, comenzando por el lado derecho , tomamos el hilo rojo lo pasamos sobre el verde y lo metemos por el espacio que se hizo y lo sacamos por arriba.
- Hacemos el mismo procedimiento pero pasando el verde pero por debajo del rojo y lo sacamos por el hueco ,hacemos el mismo procedimiento hasta completar 4 pétalos.
- Del lado izquierdo hacemos lo mismo pero dos veces.
- Para cerrar la flor cambiamos los hilos centrales, pasamos los rojos nuevamente hacia abajo.
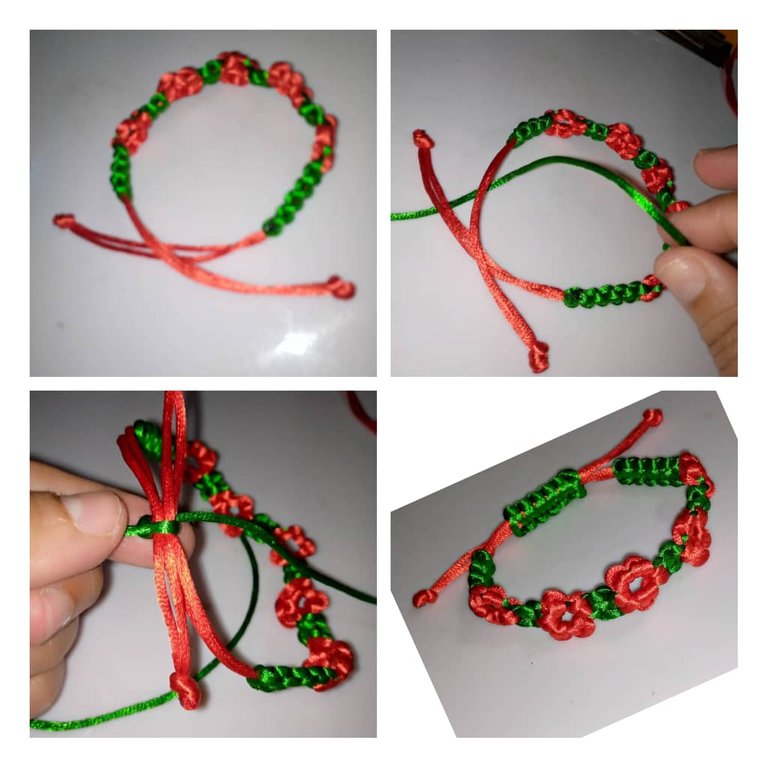
- Colocar ahora los hilos verde , el de la derecha hacia la izquierda y el de la izquierda hacia la derecha , podemos guiarnos por la imagen, luego introducir el rojo en el espacio que quedó y sacarlo por arriba , igual hacemos del otro lado. Halar con cuidado y apretar , esta sería la primera flor.
- Podemos ver la primera flor, ahora hacemos dos nudos planos, como lo expliqué anteriormente.
- Ahora continuamos con el mismo procedimiento para realizar todas las flores y los nudos planos
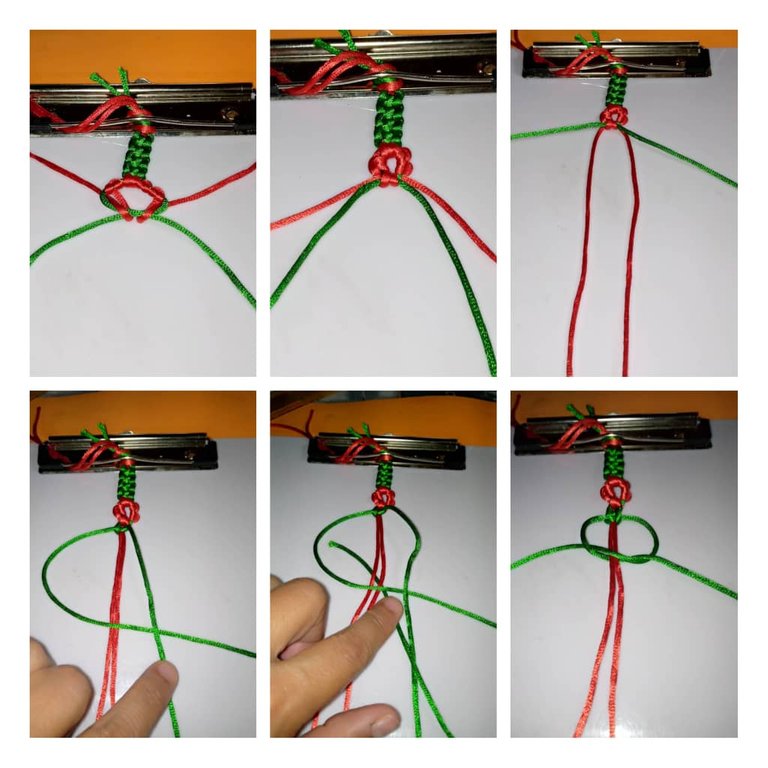
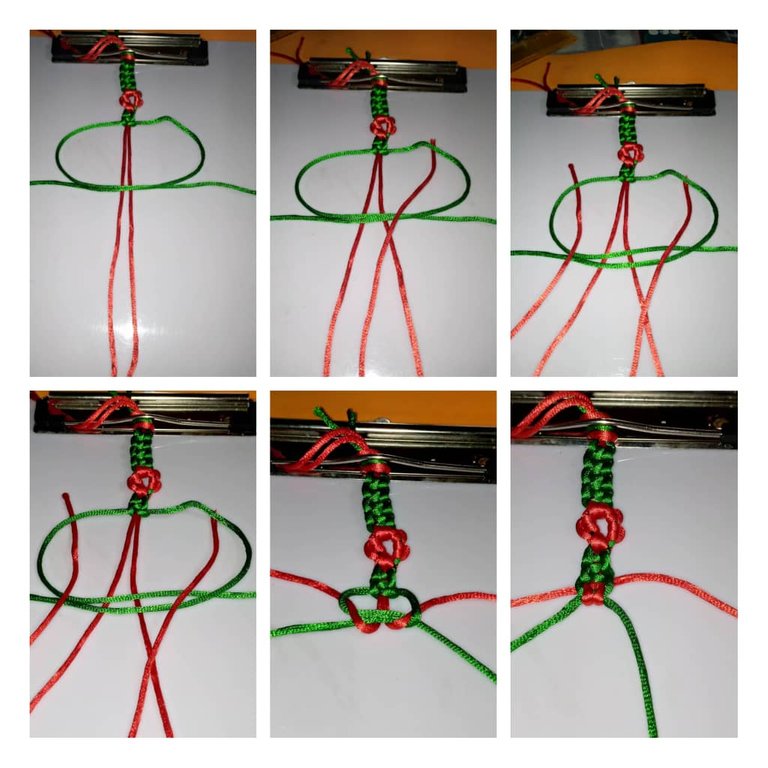
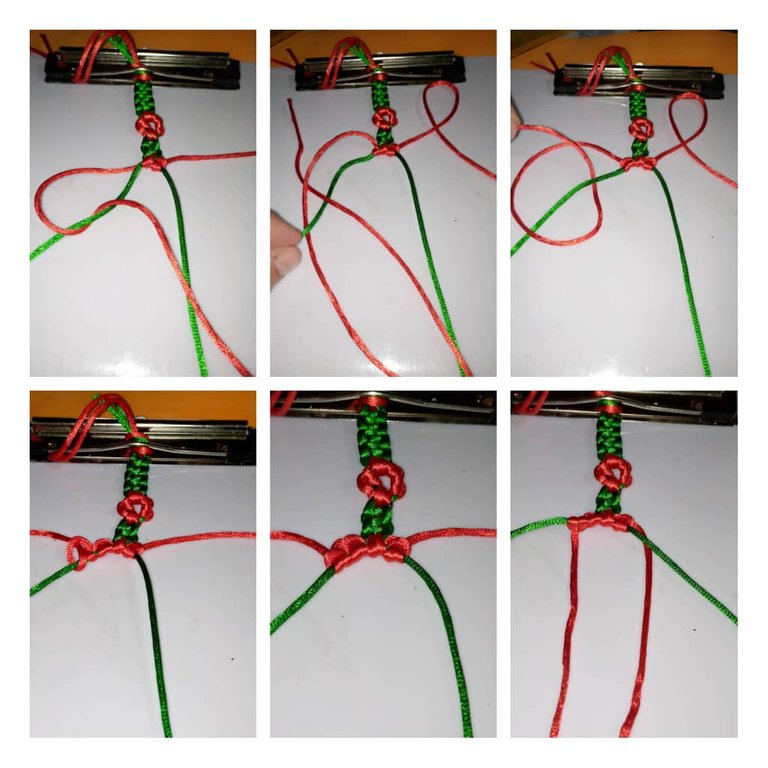
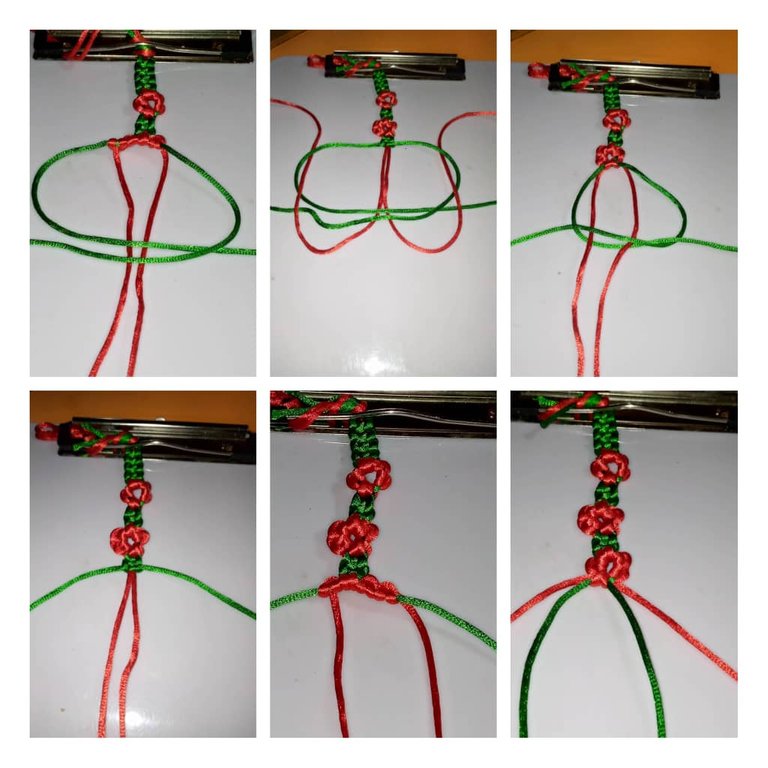
- En total se hicieron 5 flores con sus respectivos nudo planos.
- Para terminar se hizo 9 nudos planos.
- Cortar el excedente de hilo con las tijeras y quemar las puntas con el yesquero.
- Nota: Las flores llevan de un lado cuatro nudos y del otro dos nudos , para realizar la siguiente flor deben intercambiar , osea si la del lado derecha lleva cuatro nudos y la dos para hacer la otra flor la izquierda debe llevar 4 nudos y la derecha dos nudos.
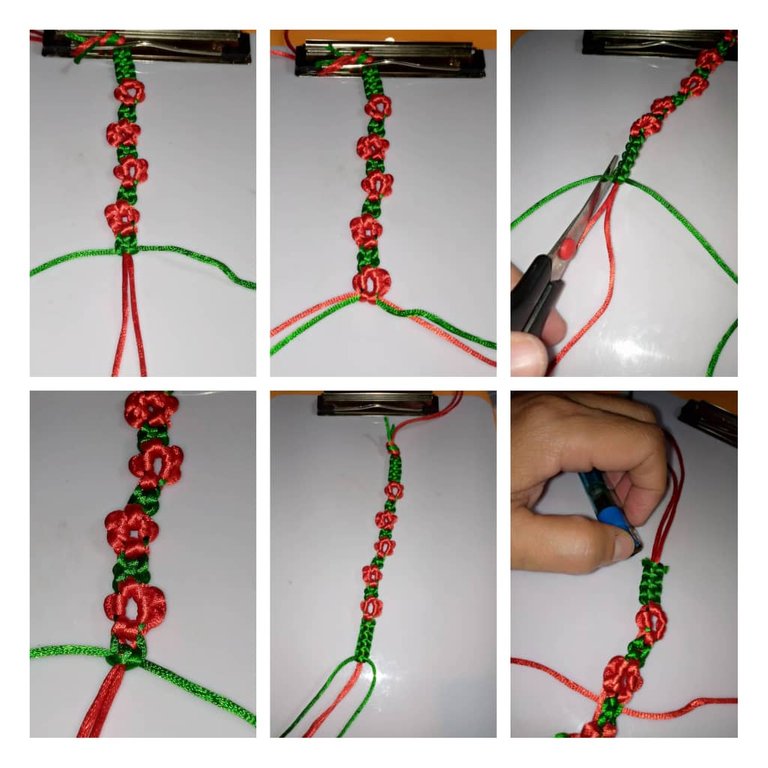
Para hacer la tranca tomamos la pulsera colocamos las puntas, juntamos de un lado y del otro lado , con un pedazo de 25 centímetros e hilo verde hacemos 8 nudos planos y en la punta de cada hilo hacemos un nudo sencillo y quemamos con el yesquero.Miren lo hermoso que quedó.
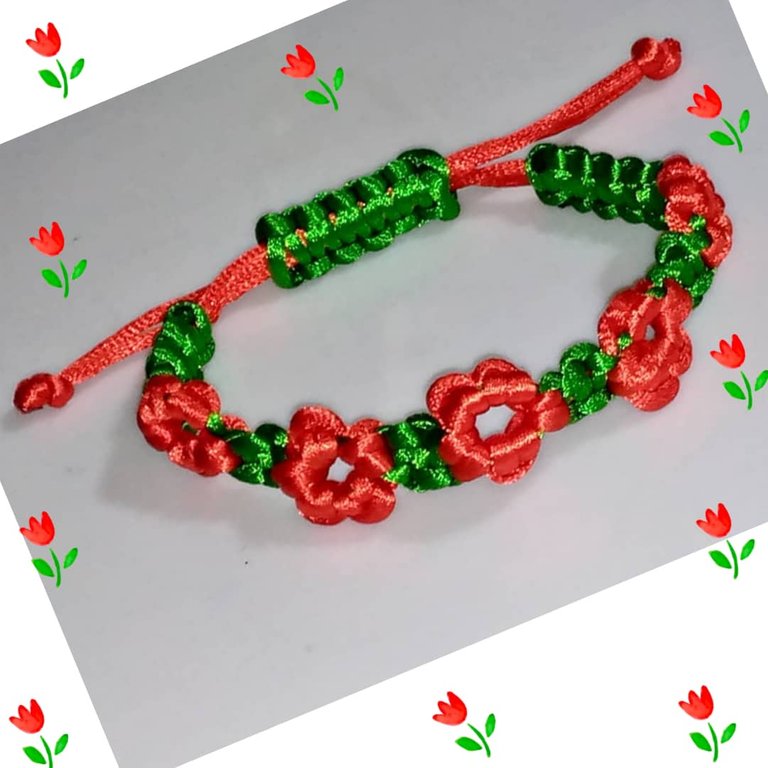
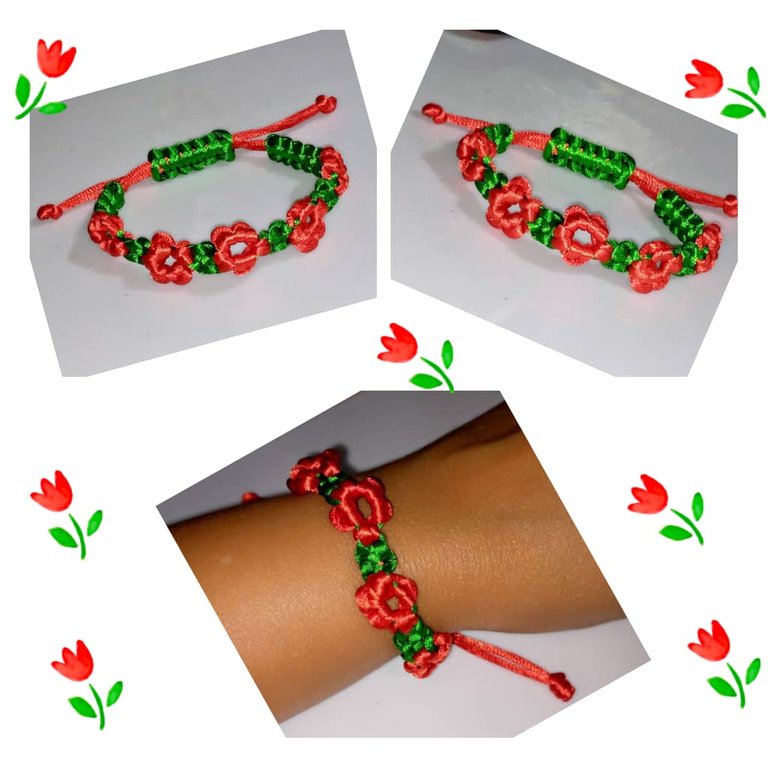
Resultado final de la hermosa pulsera en macramé con hilo cola de ratón y nudos planos y de flores.
Espero les haya gustado, hasta la próxima, muchas bendiciones.
Las fotos son mías tomadas con teléfono Infinix, editadas con incollage y traducida con DEEPL.
ESPAÑOL
Welcome to my blog!

Hello to all lovers of the art of handmade jewelry. God bless you all.
Today I bring you a tutorial, where I explain the step by step of how to make a beautiful macrame bracelet with flat and flower knot, it is easy to do, what we have to combine imagination and desire to work.
This bracelet is very colorful , in my case I made it with colors: red and green, you can make it in the color of your preference,

Materials to use for the realization of the beautiful and colorful macrame bracelet with flat and flower knots:
- 2 meters of mouse tail thread, green color.
- 2 meters of mouse tail thread, red color for the flowers.
- Ruler.
- Scissors.
- Tinder.
- Folder with hook to hold the threads.
- 1 piece of mouse tail thread of 25 centimeters, green color.

Step by step for the realization of the beautiful bracelet in macrame:
- The first thing to do , measure with the ruler the mouse tail threads , green and red, of one meter each, in this case would be 4 pieces , 2 red and 2 green.Cut with the scissors.
- Also measure a piece of green thread of 25 centimeters, this will be used for the part of the stringer.
Take the four threads of different colors, make a simple knot not so tight at the beginning of the bracelet, placing the red ones higher than the green ones, - On the hook binder hold it to start tying the knots.
- The red mouse tail threads (flowers) are stretched down to the bottom of the bracelet
- and place the green threads to the sides.
- We take the green thread from the right side we pass it over the two central red threads and the thread from the left side we pass it over the green thread and that green thread we pass it inside the central red threads and we pull it out from the top.we pull it little by little and we glue it to the cord.this would be our first flat stitch.

- Now we do the same but on the other side, we take the green thread on the right, we pass it over the central threads and the green thread on the right we pass it over the green thread that comes from the left side, now we put the green thread on the left inside the belly that you can see and we pull the thread over it, this would be the second flat knot.
- We make from this 9 flat knots.

- To begin to make the knot of the flowers, we will take the green thread of the right and we will pass it to the left and the green thread of the right we pass it to the left, we make like a circle, then the red thread of the right we put it inside the circle and we take it out from above, likewise the red thread of the left we put it inside the circle and we take it out from above, pull carefully the four threads at the same time and this would be the first petal of the flower.

- In this step we place the two green yarns as the central ones
- and we work with the red ones, starting from the right side, we take the red thread we pass it over the green one and we put it through the space that was made and we take it out from the top.
- We do the same procedure but passing the green thread under the red one and we pull it out through the hole, we do the same procedure until we complete 4 petals.
- On the left side we do the same but twice.
- To close the flower we change the central threads, we pass the red ones again downwards.
- Now place the green threads, the one on the right to the left and the one on the left to the right, we can be guided by the image, then introduce the red one in the space left and take it out from the top, we do the same on the other side. Pull carefully and squeeze , this would be the first flower.

- We can see the first flower, now we make two flat knots, as I explained before.
- Now we continue with the same procedure to make all the flowers and the flat knots.


- A total of 5 flowers were made with their respective flat knots.
- To finish, 9 flat knots were made.
- Cut the excess thread with the scissors and burn the ends with the tinder.
- Note: The flowers have four knots on one side and two knots on the other, to make the next flower should be exchanged, ie if the right side has four knots and two to make the other flower the left should have 4 knots and the right two knots.

To make the tranca we take the bracelet we place the ends, we put together on one side and the other side , with a piece of 25 centimeters and green thread we make 8 flat knots and at the tip of each thread we make a simple knot and burn with the tinder.Look how beautiful it was.

Final result of the beautiful macramé bracelet with mouse tail thread and flat and flower knots.

I hope you liked it, until next time, many blessings.

The photos are mine taken with Infinix phone, edited with incollage and translated with DEEPL.
https://twitter.com/1422413915275812864/status/1621134640303181826
https://twitter.com/1260211375881814016/status/1621325733451931648
The rewards earned on this comment will go directly to the people( @mariajcastro28, @madushanka ) sharing the post on Twitter as long as they are registered with @poshtoken. Sign up at https://hiveposh.com.
Gracias @poshtoken .
Te quedó linda amiga, los colores que utilizaste son muy llamativos y el diseño es muy bonito 🤗
Ay gracias amiga @mariajcastro28 .Me alegra que te guste 🤗
Quedó muy linda tu pulsera con este hilo que usaste. Además de las flores y la combinación de los colores, el tejido se ve precioso.
Gracias por compartir 😊
Gracias amiga @creacioneslelys , si, quedó muy hermosa
Que diseño tan hermoso, quiero probar crear pulseras de este tipo, aunque me pone algo nerviosa veo que se debe tener practica para lograr esas formas tan perfectas, excelente tu tutorial.
Gracias @jennyzer Si , es un diseño demasiado lindo y es fácil de hacer.
Esta pulsera quedó demasiado hermoso ¡Felicidades por su creatividad!👍💖😃😁😄😊🌷
Gracias @anaarevalo01 🤗😘
Hermosos colores.
Mis preferidos navideños.
Un hermoso trabajo.
Saludos
Si, amiga @mercmarg esos colores resaltan bastante. 🤗😘
Hola! @josdelmi, preciosa te quedó esa pulsera elegistes unos colores preciosos además de combinables, maravilloso trabajo, saluditos.
Hola, @nhaydu Si,muy linda. Gracias 🤗