Arte kawaii para niños: Dibujando una Tortuga Baby│Arte kawaii para niños: Dibujando una Tortuga Baby [ING - SPA]
English
¡Hola amigos de Hive!
feliz domingo a todos. Y bienvenidos una vez más a este humilde rincón del arte, donde día a día te comparto diseños creativos y divertidos para grandes y chicos. En esta oportunidad compartiendo con todos ustedes un dibujo estilo stiker de una Tortuga Baby.
About design:
He realizado este dibujo de una Tortuga Baby hecho con el software de adobe illustrator.
Español
¡Hola amigos de Hive!
Feliz Domingo a todos. Y bienvenidos una vez más a este humilde rincón del arte, donde día a día te comparto diseños creativos y divertidos para grande y chicos. En esta oportunidad compartiendo con todos ustedes un dibujo estilo stiker de una Tortuga Baby.
Acerca del diseño:
He realizado este dibujo de una Tortuga Baby hecho con el software de adobe illustrator.

PROCESO / PROCESS
Paso 1 (Boceto y Line arte) / Step 1 (Sketch and Line art)
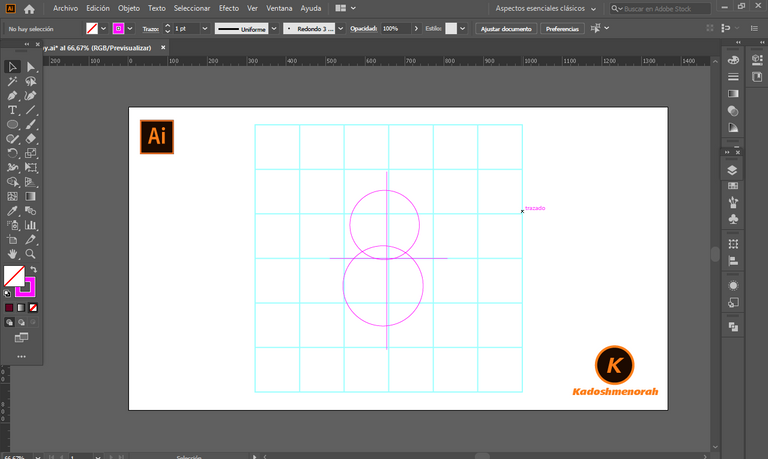
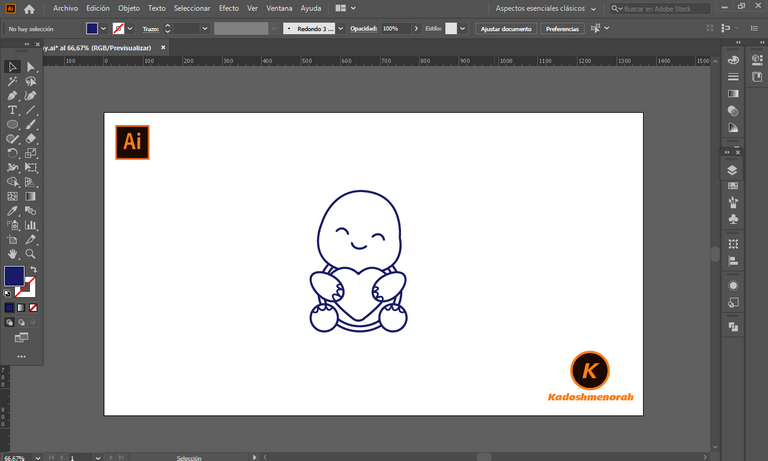
Lo primero que hice, fue dibujar una cuadricula 6x6 y luego el boceto a mano alzada de una Tortuga Baby. Después delinee el boceto ayudándome con la herramienta plumas; luego pase a seleccionarlo todo y segmentar con la herramienta forma, teniendo así listo el line art.
Lo primero que hice, fue dibujar una cuadricula 6x6 y luego el boceto a mano alzada de una Tortuga Baby. Después delinee el boceto ayudándome con la herramienta plumas; luego pase a seleccionarlo todo y segmentar con la herramienta forma, teniendo así listo el line art.
Paso 2 (Segmentación) / Step 2 (Segmentation)
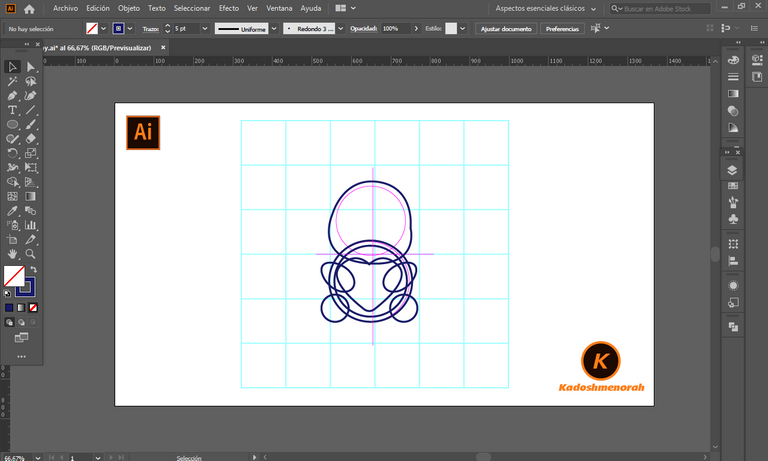
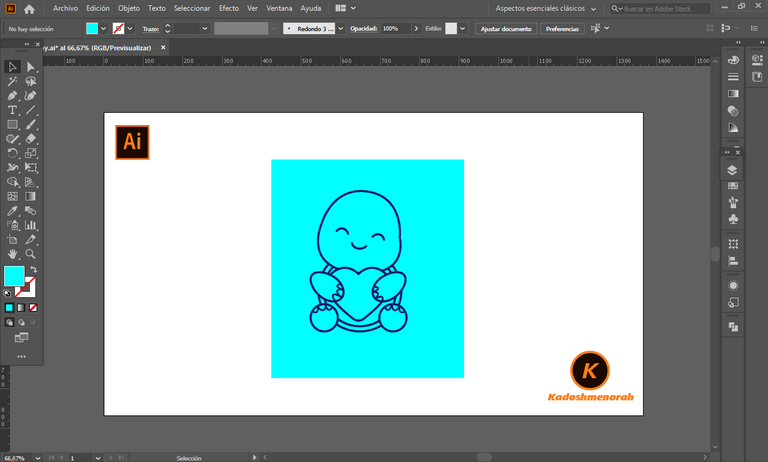
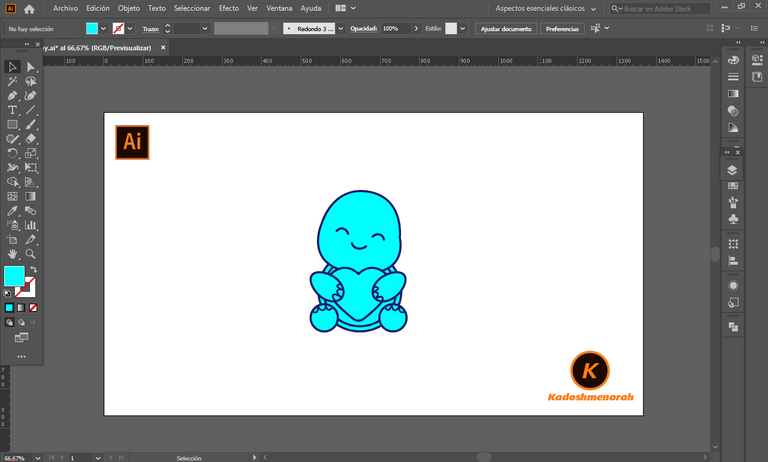
Dibuje un rectángulo y lo envié atrás. El rectángulo puede tener de relleno cualquier color, pues lo que buscamos es fusionar el trazado con el color de relleno. Seleccionamos todo y lo dividimos con el busca trazo para tener por separado el área de color y el trazo como formas independientes y así facilitar el coloreado.
I drew a rectangle and sent it to the back. The rectangle can have any color as fill, because what we are looking for is to merge the stroke with the fill color. Select everything and divide it with the stroke finder to have the color area and the stroke as separate independent shapes to facilitate the coloring.
Paso 3 (Color) / Step 3 (Colour)
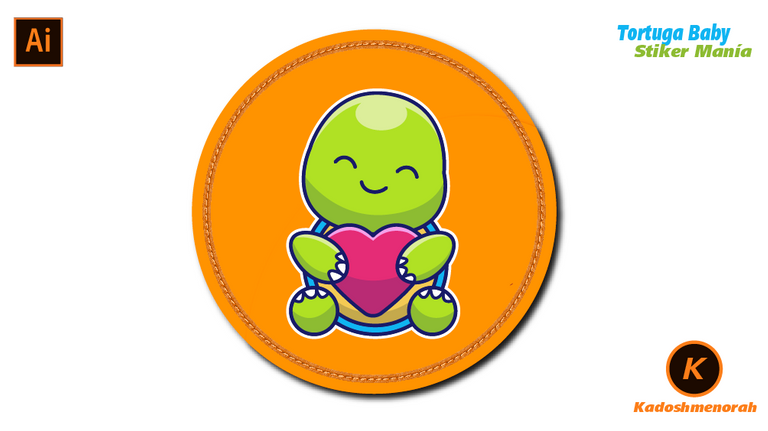
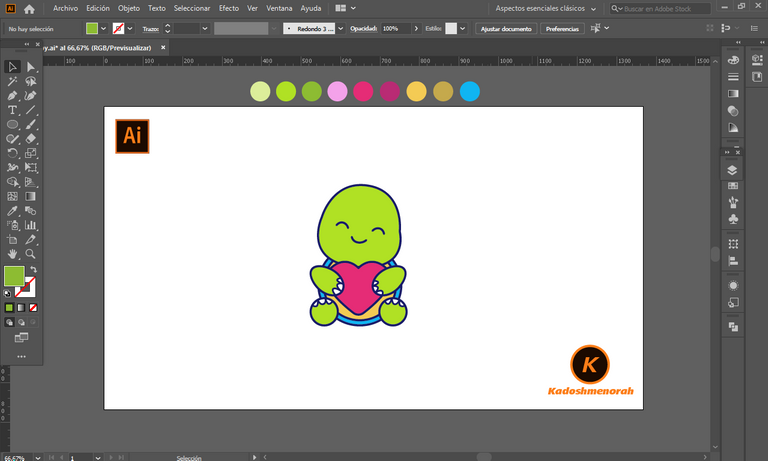
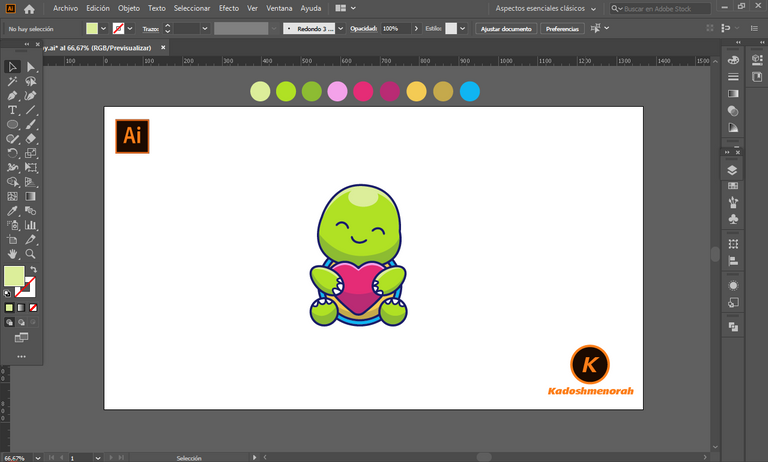
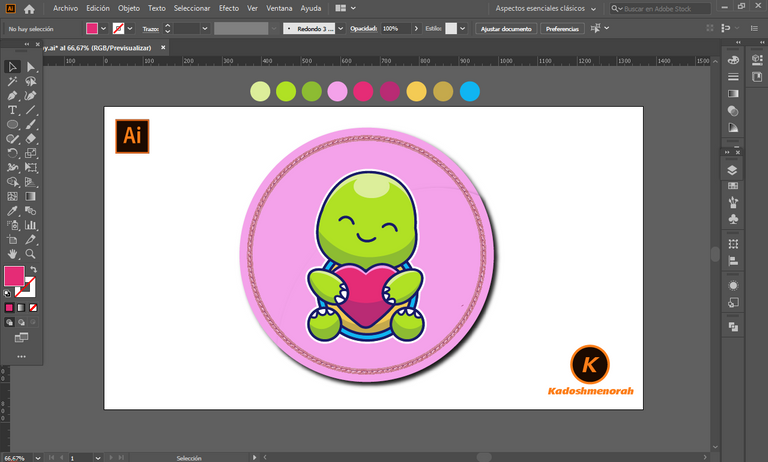
Aplique color base. Luego agregue zonas de sombras y detalles de luces. Y aplique una silueta y un diseño de dos círculos para darle el estilo de pegatina.
Apply base color. Then add shadow areas and highlight details. And apply a silhouette and a two-circle design to give it the sticker look.
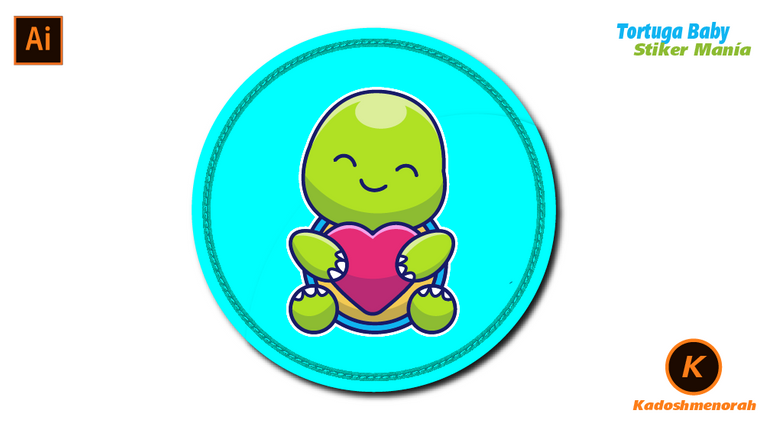
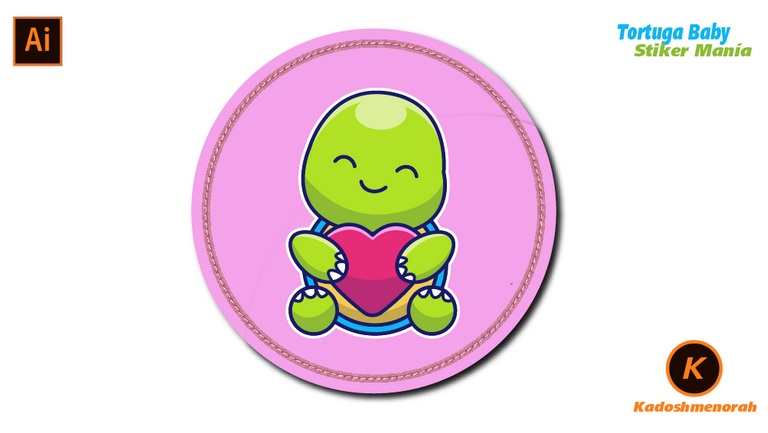
Arte Final/ Final Art
Resources:
Image: Source
Banner: Of my authorship
Adobe Illustrator: Descargar
Translator: DeepL Web Site
Recursos:
Imagen: Fuente
Banner: De mi autoria
Adobe Illustrator: Descargar
Traductor: DeepL Sitio Web
Soy kadoshmenorah y hasta una próxima oportunidad y no olvides dejar tus comentarios acá abajo.
Me pueden encontrar en las redes sociales:
 --- Abrazos ---
English
¡Hola amigos de Hive!
feliz domingo a todos. Y bienvenidos una vez más a este humilde rincón del arte, donde día a día te comparto diseños creativos y divertidos para grandes y chicos. En esta oportunidad compartiendo con todos ustedes un dibujo estilo stiker de una Tortuga Baby.
He realizado este dibujo de una Tortuga Baby hecho con el software de adobe illustrator.
Español
¡Hola amigos de Hive!
Feliz Domingo a todos. Y bienvenidos una vez más a este humilde rincón del arte, donde día a día te comparto diseños creativos y divertidos para grande y chicos. En esta oportunidad compartiendo con todos ustedes un dibujo estilo stiker de una Tortuga Baby.
He realizado este dibujo de una Tortuga Baby hecho con el software de adobe illustrator.
PROCESO / PROCESS
Paso 1 (Boceto y Line arte) / Step 1 (Sketch and Line art)
Lo primero que hice, fue dibujar una cuadricula 6x6 y luego el boceto a mano alzada de una Tortuga Baby. Después delinee el boceto ayudándome con la herramienta plumas; luego pase a seleccionarlo todo y segmentar con la herramienta forma, teniendo así listo el line art.
Lo primero que hice, fue dibujar una cuadricula 6x6 y luego el boceto a mano alzada de una Tortuga Baby. Después delinee el boceto ayudándome con la herramienta plumas; luego pase a seleccionarlo todo y segmentar con la herramienta forma, teniendo así listo el line art.
Paso 2 (Segmentación) / Step 2 (Segmentation)
Dibuje un rectángulo y lo envié atrás. El rectángulo puede tener de relleno cualquier color, pues lo que buscamos es fusionar el trazado con el color de relleno. Seleccionamos todo y lo dividimos con el busca trazo para tener por separado el área de color y el trazo como formas independientes y así facilitar el coloreado.
I drew a rectangle and sent it to the back. The rectangle can have any color as fill, because what we are looking for is to merge the stroke with the fill color. Select everything and divide it with the stroke finder to have the color area and the stroke as separate independent shapes to facilitate the coloring.
Paso 3 (Color) / Step 3 (Colour)
Aplique color base. Luego agregue zonas de sombras y detalles de luces. Y aplique una silueta y un diseño de dos círculos para darle el estilo de pegatina.
Apply base color. Then add shadow areas and highlight details. And apply a silhouette and a two-circle design to give it the sticker look.
Arte Final/ Final Art
Resources:
Image: Source
Banner: Of my authorship
Adobe Illustrator: Descargar
Translator: DeepL Web Site
Recursos:
Imagen: Fuente
Banner: De mi autoria
Adobe Illustrator: Descargar
Traductor: DeepL Sitio Web
Soy kadoshmenorah y hasta una próxima oportunidad y no olvides dejar tus comentarios acá abajo.
Me pueden encontrar en las redes sociales:
--- Abrazos ---
PROCESO / PROCESS
Lo primero que hice, fue dibujar una cuadricula 6x6 y luego el boceto a mano alzada de una Tortuga Baby. Después delinee el boceto ayudándome con la herramienta plumas; luego pase a seleccionarlo todo y segmentar con la herramienta forma, teniendo así listo el line art.
Lo primero que hice, fue dibujar una cuadricula 6x6 y luego el boceto a mano alzada de una Tortuga Baby. Después delinee el boceto ayudándome con la herramienta plumas; luego pase a seleccionarlo todo y segmentar con la herramienta forma, teniendo así listo el line art.
Dibuje un rectángulo y lo envié atrás. El rectángulo puede tener de relleno cualquier color, pues lo que buscamos es fusionar el trazado con el color de relleno. Seleccionamos todo y lo dividimos con el busca trazo para tener por separado el área de color y el trazo como formas independientes y así facilitar el coloreado.
I drew a rectangle and sent it to the back. The rectangle can have any color as fill, because what we are looking for is to merge the stroke with the fill color. Select everything and divide it with the stroke finder to have the color area and the stroke as separate independent shapes to facilitate the coloring.
Aplique color base. Luego agregue zonas de sombras y detalles de luces. Y aplique una silueta y un diseño de dos círculos para darle el estilo de pegatina.
Apply base color. Then add shadow areas and highlight details. And apply a silhouette and a two-circle design to give it the sticker look.
Resources:
Image: Source
Banner: Of my authorship
Adobe Illustrator: Descargar
Translator: DeepL Web Site
Recursos:
Imagen: Fuente
Banner: De mi autoria
Adobe Illustrator: Descargar
Traductor: DeepL Sitio Web
Soy kadoshmenorah y hasta una próxima oportunidad y no olvides dejar tus comentarios acá abajo.
--- Abrazos ---
https://twitter.com/kadoshmenorah/status/1556254060919013380
The rewards earned on this comment will go directly to the people( @kadoshmenorah ) sharing the post on Twitter as long as they are registered with @poshtoken. Sign up at https://hiveposh.com.
Quedó muy tierna y linda @kadoshmenorah
Me recordó a las tortugas ninjas jajaja, me imagino que así eran cuando splinter las encontró...
Muy buen trabajo amigo
Gracias @josemoises, saludos
Que tortuguita tan tierna 💖💖
Gracias @yetsimar, que bueno que te haya encantado.Un abrazo
Congratulations @kadoshmenorah! You have completed the following achievement on the Hive blockchain and have been rewarded with new badge(s):
You can view your badges on your board and compare yourself to others in the Ranking
If you no longer want to receive notifications, reply to this comment with the word
STOPCheck out the last post from @hivebuzz:
Support the HiveBuzz project. Vote for our proposal!
Owww que Cuchi tortuguita✨ gran trabajo amigo