Kawaii Art for Kids: Drawing Pokemon Chancey│Arte kawaii para niños: Dibujando a Pokemon Chancey [ING - SPA]
English
Hello friends of Hive!
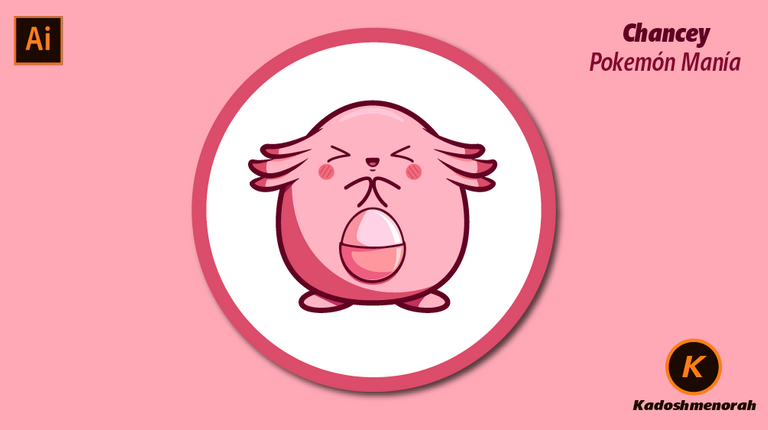
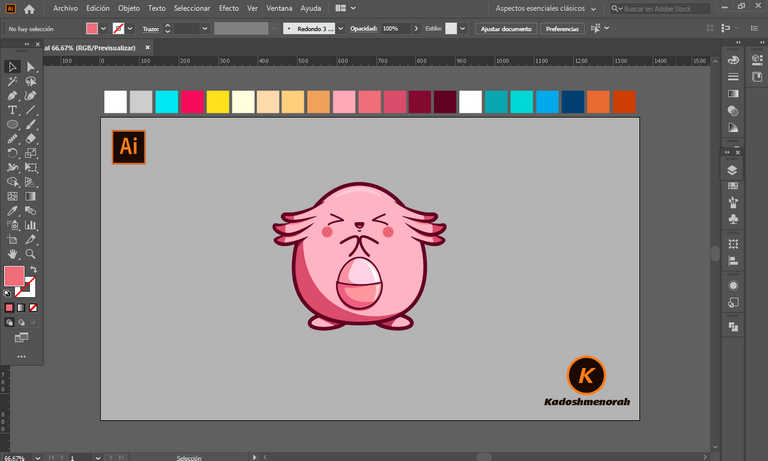
Happy monday to everyone. And welcome once again to this humble corner of art, where every day I share creative and fun designs for adults and children. This time I have prepared a new series of Pokemon mania drawings for the little ones in the house. Today I present to you Pokemon Chancey. Their eggs have a very high nutritional value and an exquisite flavor. They are considered a delicacy.
About design:
I have made this drawing of Pokemon Chancey, an egg-shaped pokemon. Design made with Adobe Illustrator software.
Español
¡Hola amigos de Hive!
Feliz lunes a todos. Y bienvenidos una vez más a este humilde rincón del arte, donde día a día te comparto diseños creativos y divertidos para grande y chicos. En esta oportunidad he preparado una nueva serie de dibujos de Pokemon manía para los más pequeños de la casa. Hoy te presento a Pokemon Chancey. Sus huevos tienen un valor nutritivo altísimo y un sabor exquisito. Se consideran un manjar.
Acerca del diseño:
He realizado este dibujo de Pokemon Chancey, un pokemon en forma de huevo. Diseño hecho con el software de adobe illustrator.

PROCESO / PROCESS
Paso 1 (Boceto y Line arte) / Step 1 (Sketch and Line art)
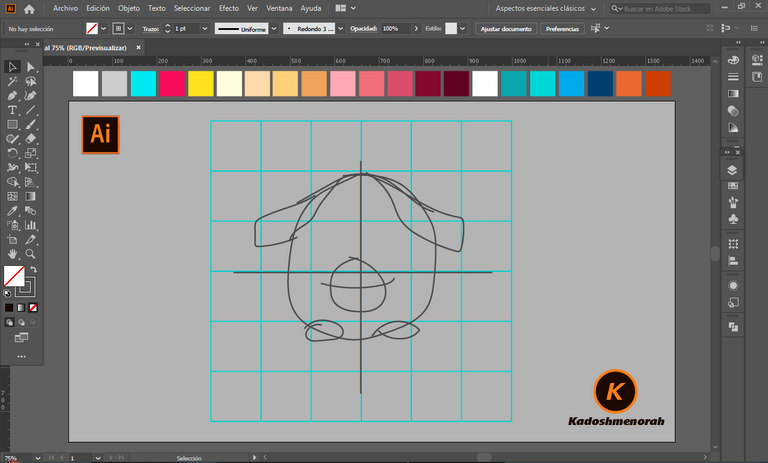
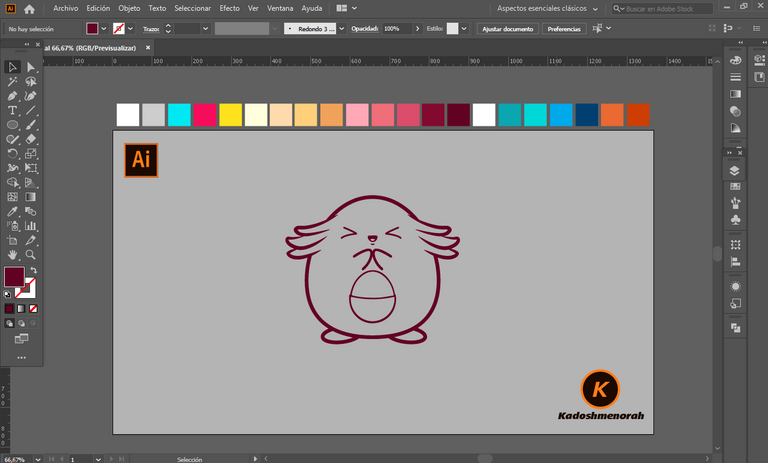
Lo primero que hice, fue dibujar una cuadricula 6x6 y luego el boceto a mano alzada de este Pokemon Chancey. Después delinee el boceto ayudándome con ovalos; luego pase a seleccionarlo todo y segmentar con la herramienta forma, teniendo así listo el line art.
The first thing I did was draw a 6x6 grid and then the freehand sketch of this Pokemon Chancey. Then I outlined the sketch helping me with ovals; then go on to select everything and segment with the shape tool, thus having the line art ready.
Paso 2 (Segmentación) / Step 2 (Segmentation)
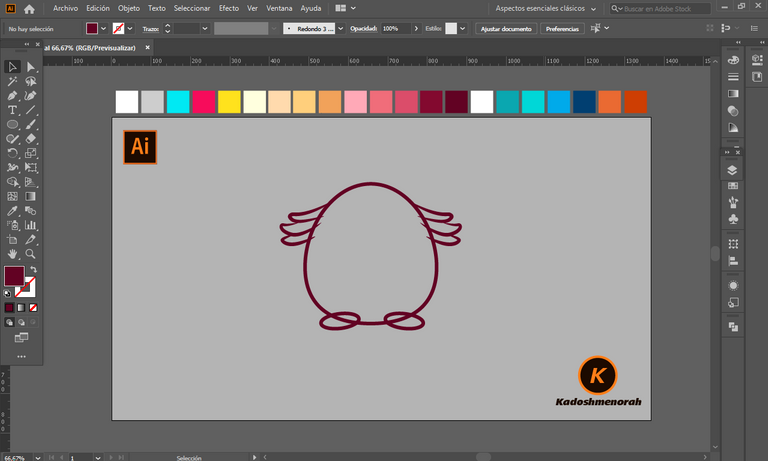
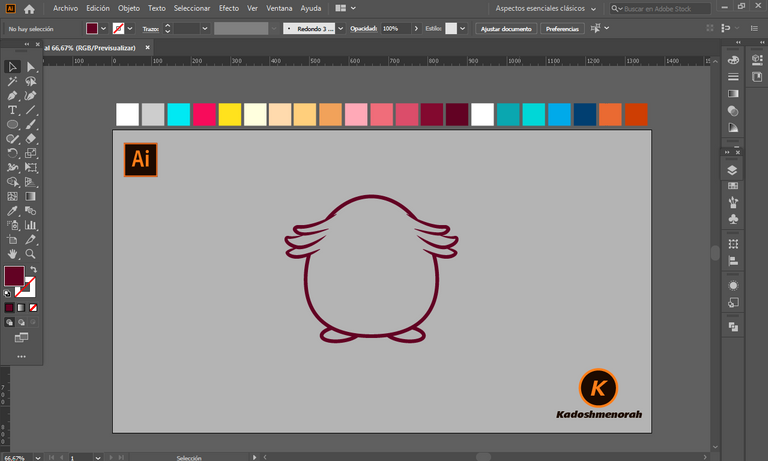
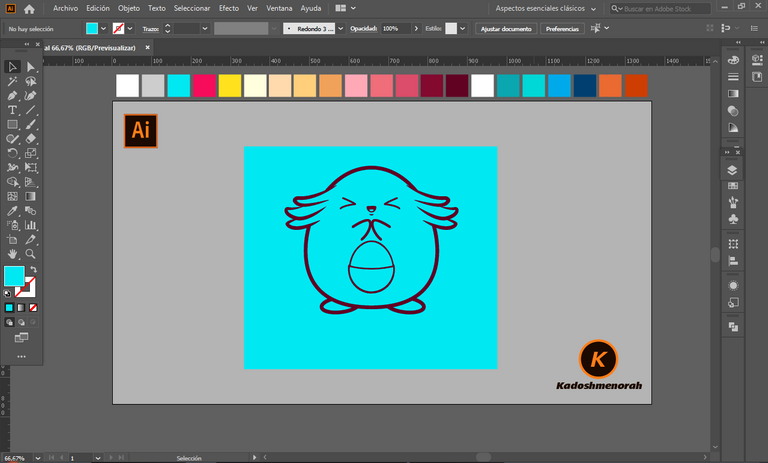
Dibuje un rectángulo y lo envié atrás. El rectángulo puede tener de relleno cualquier color, pues lo que buscamos es fusionar el trazado con el color de relleno. Seleccionamos todo y lo dividimos con el busca trazo para tener por separado el área de color y el trazo como formas independientes y así facilitar el coloreado.
I drew a rectangle and sent it to the back. The rectangle can have any color as fill, because what we are looking for is to merge the stroke with the fill color. Select everything and divide it with the stroke finder to have the color area and the stroke as separate independent shapes to facilitate the coloring.
Paso 3 (Color) / Step 3 (Colour)
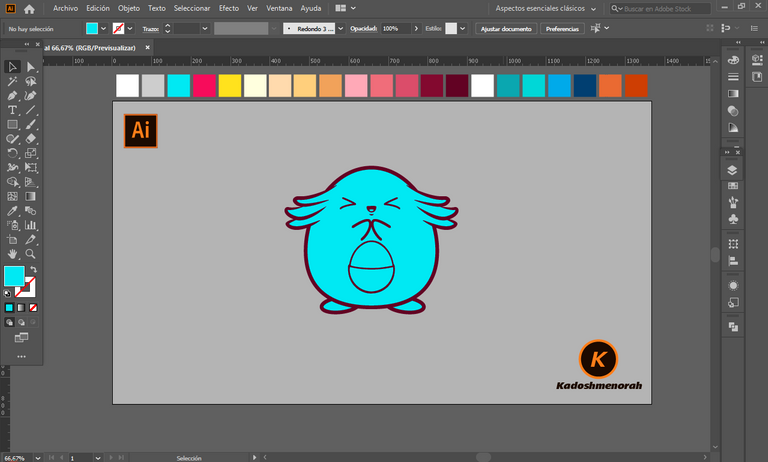
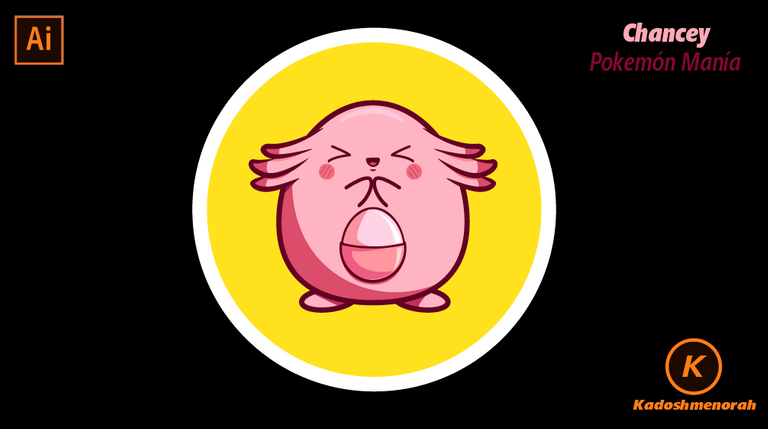
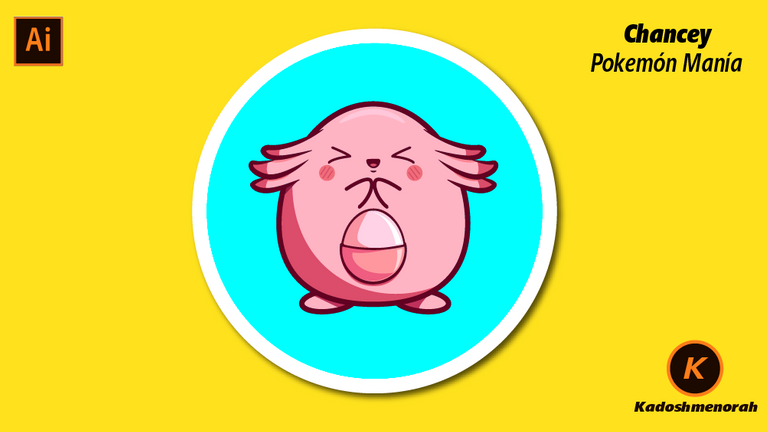
Aplique color base. Luego agregue zonas de sombras y detalles de luces. Y aplique una silueta y un diseño de dos círculos para darle el estilo de pegatina.
Apply base color. Then add shadow areas and highlight details. And apply a silhouette and a two-circle design to give it the sticker look.
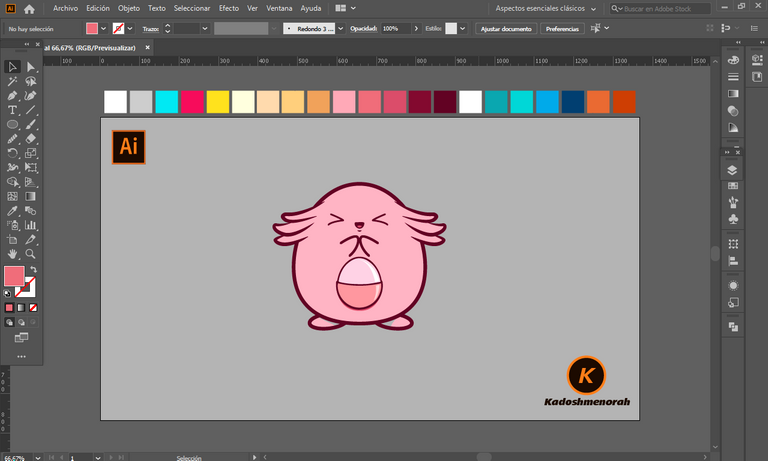
Arte Final/ Final Art
Resources:
Image: Source
Banner: Of my authorship
Adobe Illustrator: Descargar
Translator: DeepL Web Site
Recursos:
Imagen: Fuente
Banner: De mi autoria
Adobe Illustrator: Descargar
Traductor: DeepL Sitio Web
Soy kadoshmenorah y hasta una próxima oportunidad y no olvides dejar tus comentarios acá abajo.
Me pueden encontrar en las redes sociales:
 --- Abrazos ---
English
Hello friends of Hive!
Happy monday to everyone. And welcome once again to this humble corner of art, where every day I share creative and fun designs for adults and children. This time I have prepared a new series of Pokemon mania drawings for the little ones in the house. Today I present to you Pokemon Chancey. Their eggs have a very high nutritional value and an exquisite flavor. They are considered a delicacy.
I have made this drawing of Pokemon Chancey, an egg-shaped pokemon. Design made with Adobe Illustrator software.
Español
¡Hola amigos de Hive!
Feliz lunes a todos. Y bienvenidos una vez más a este humilde rincón del arte, donde día a día te comparto diseños creativos y divertidos para grande y chicos. En esta oportunidad he preparado una nueva serie de dibujos de Pokemon manía para los más pequeños de la casa. Hoy te presento a Pokemon Chancey. Sus huevos tienen un valor nutritivo altísimo y un sabor exquisito. Se consideran un manjar.
He realizado este dibujo de Pokemon Chancey, un pokemon en forma de huevo. Diseño hecho con el software de adobe illustrator.
PROCESO / PROCESS
Paso 1 (Boceto y Line arte) / Step 1 (Sketch and Line art)
Lo primero que hice, fue dibujar una cuadricula 6x6 y luego el boceto a mano alzada de este Pokemon Chancey. Después delinee el boceto ayudándome con ovalos; luego pase a seleccionarlo todo y segmentar con la herramienta forma, teniendo así listo el line art.
The first thing I did was draw a 6x6 grid and then the freehand sketch of this Pokemon Chancey. Then I outlined the sketch helping me with ovals; then go on to select everything and segment with the shape tool, thus having the line art ready.
Paso 2 (Segmentación) / Step 2 (Segmentation)
Dibuje un rectángulo y lo envié atrás. El rectángulo puede tener de relleno cualquier color, pues lo que buscamos es fusionar el trazado con el color de relleno. Seleccionamos todo y lo dividimos con el busca trazo para tener por separado el área de color y el trazo como formas independientes y así facilitar el coloreado.
I drew a rectangle and sent it to the back. The rectangle can have any color as fill, because what we are looking for is to merge the stroke with the fill color. Select everything and divide it with the stroke finder to have the color area and the stroke as separate independent shapes to facilitate the coloring.
Paso 3 (Color) / Step 3 (Colour)
Aplique color base. Luego agregue zonas de sombras y detalles de luces. Y aplique una silueta y un diseño de dos círculos para darle el estilo de pegatina.
Apply base color. Then add shadow areas and highlight details. And apply a silhouette and a two-circle design to give it the sticker look.
Arte Final/ Final Art
Resources:
Image: Source
Banner: Of my authorship
Adobe Illustrator: Descargar
Translator: DeepL Web Site
Recursos:
Imagen: Fuente
Banner: De mi autoria
Adobe Illustrator: Descargar
Traductor: DeepL Sitio Web
Soy kadoshmenorah y hasta una próxima oportunidad y no olvides dejar tus comentarios acá abajo.
Me pueden encontrar en las redes sociales:
--- Abrazos ---
PROCESO / PROCESS
Lo primero que hice, fue dibujar una cuadricula 6x6 y luego el boceto a mano alzada de este Pokemon Chancey. Después delinee el boceto ayudándome con ovalos; luego pase a seleccionarlo todo y segmentar con la herramienta forma, teniendo así listo el line art.
The first thing I did was draw a 6x6 grid and then the freehand sketch of this Pokemon Chancey. Then I outlined the sketch helping me with ovals; then go on to select everything and segment with the shape tool, thus having the line art ready.
Dibuje un rectángulo y lo envié atrás. El rectángulo puede tener de relleno cualquier color, pues lo que buscamos es fusionar el trazado con el color de relleno. Seleccionamos todo y lo dividimos con el busca trazo para tener por separado el área de color y el trazo como formas independientes y así facilitar el coloreado.
I drew a rectangle and sent it to the back. The rectangle can have any color as fill, because what we are looking for is to merge the stroke with the fill color. Select everything and divide it with the stroke finder to have the color area and the stroke as separate independent shapes to facilitate the coloring.
Aplique color base. Luego agregue zonas de sombras y detalles de luces. Y aplique una silueta y un diseño de dos círculos para darle el estilo de pegatina.
Apply base color. Then add shadow areas and highlight details. And apply a silhouette and a two-circle design to give it the sticker look.
Resources:
Image: Source
Banner: Of my authorship
Adobe Illustrator: Descargar
Translator: DeepL Web Site
Recursos:
Imagen: Fuente
Banner: De mi autoria
Adobe Illustrator: Descargar
Traductor: DeepL Sitio Web
Soy kadoshmenorah y hasta una próxima oportunidad y no olvides dejar tus comentarios acá abajo.
--- Abrazos ---
Hola @kadoshmenorah, agradezco mucho tu paso a paso es muy sencillo y tu dibujo también pero a la vez genial. Estoy iniciándome con Photoshop y me gustaría intentar algo similar, a ver si lo logro, voy a seguir tus instrucciones a ver que resulta. Mucho éxito y espero sigas compartición tu arte con todos, es muy motivador 🌸
Gracias @marbrym que bueno que te haya gustado.Bueno anímate y comparte con nosotros de tu maravilloso mundo.Un abrazote
https://twitter.com/kadoshmenorah/status/1536433336134008838
The rewards earned on this comment will go directly to the people(@kadoshmenorah) sharing the post on Twitter as long as they are registered with @poshtoken. Sign up at https://hiveposh.com.