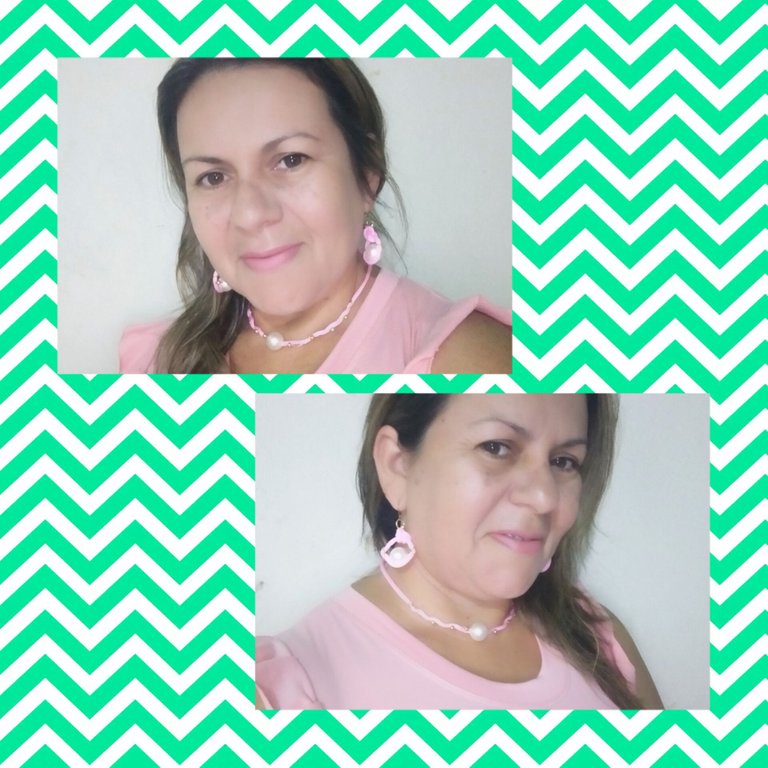
(ENG/ESP) TUTORIAL:. YOUTH AND CASUAL ACCESSORIES SET. JUEGO DE ACCESORIOS JUVENILES Y CASUAL.
Welcome everyone, tonight to my blog, greetings to all my dear friends, artists who make life within this great Community @jewelry, today I am going to show you my most recent manual creation, in garments and accessories for ladies, in this opportunity, I'm talking about a very simple and practical tutorial, to make a nice set of accessories with braids, the steps are very easy, and the time invested is very little. A set of accessories that makes you look very comfortable on a casual and sporty occasion. Needless to say, how beautiful you will look when wearing it. Follow me to the end and I will show you how practical to make them, without further ado.//
Bienvenidos sean todos, en esta noche a mí blog, saludos a todos mis queridos amigos, artistas que hacen vida dentro de esta gran Comunidad @jewelry, hoy paso a mostrarles, mi más reciente creación manual, en prendas y accesorios para damas, en esta oportunidad, les hablo acerca de un muy sencillo y práctico tutorial, para hacer un lindo juego de accesorios con trenzas, los pasos son muy fáciles, y el tiempo invertido es muy poco. Un juego de accesorios, que te hace lucir muy cómoda en una ocasión casual y deportiva. Por demás está a decir lo linda que lucirás al llevarlo puesto. Sígueme hasta el final y le mostraré lo practico de hacerlos, sin más continúo.
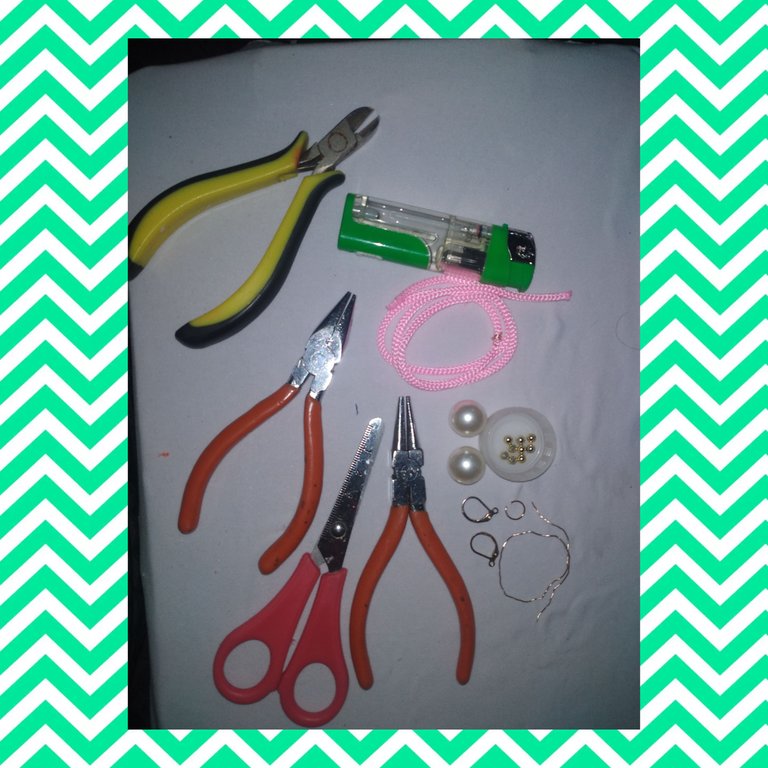
Materials/ Materiales.
. Pink braid cord.
. Large white enameled beads.
. Bases for earrings
. jewelery earrings
Tweezers
. wire #16
. golden pearls
. Scissors.
. Yeskero.
. Cordón tipo trenza color rosado.
. Cuentas grandes esmaltadas color blanco.
. Bases para aretes
. Aritos de bisutería
. Pinzas de bisutería
. Alambre n24
Steps/Pasos
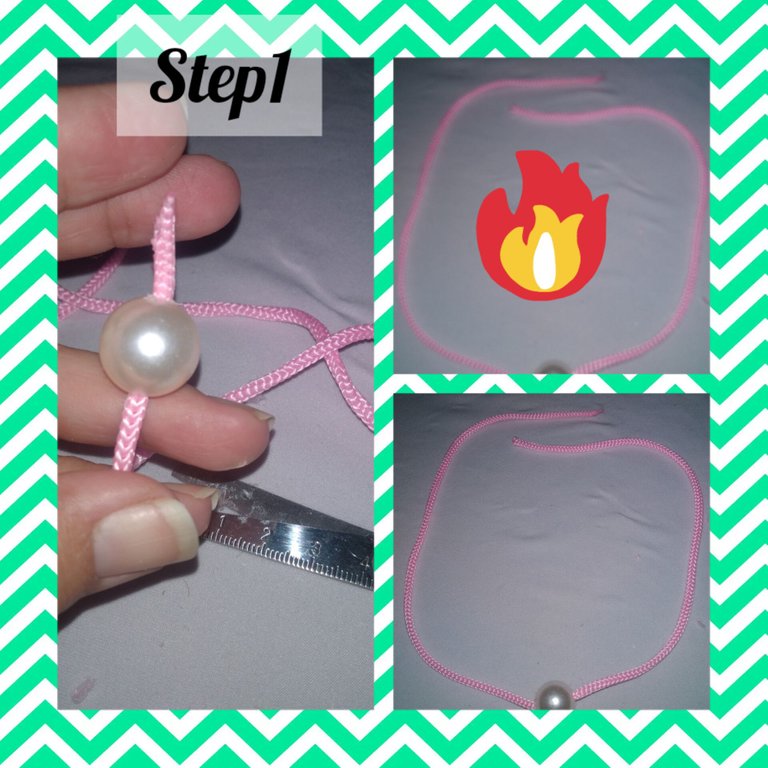
1.) I start by cutting 45cm of pink braid, I put some fire with the yeskero in the ends and I introduce a large white bead, center the bead.
1.) Inicio cortando 45cm de trenza color rosado, pongo algo de fuego con el yeskero en los extremos e Introduzco una cuenta grande color blanca, centro la cuenta.
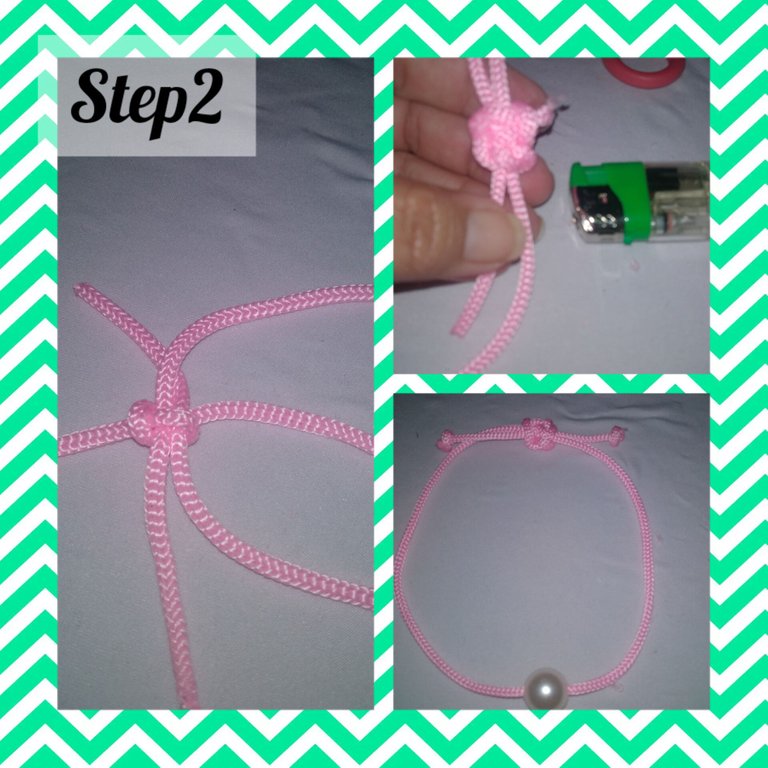
2.) Using the scissors, I cut a little piece of pink braid and make a small flat four-turn knot, in the same way I put fire at the ends to fix and prevent any side of the braid cord from escaping.
2.) Corto usando las tijeras, un pedacito de trenza color rosado y hago un pequeño nudo corrido plano de cuatro vueltas, de igual manera pongo fuego en los puntas para fijar y evitar se escape algún lado de el cordón de trenza.
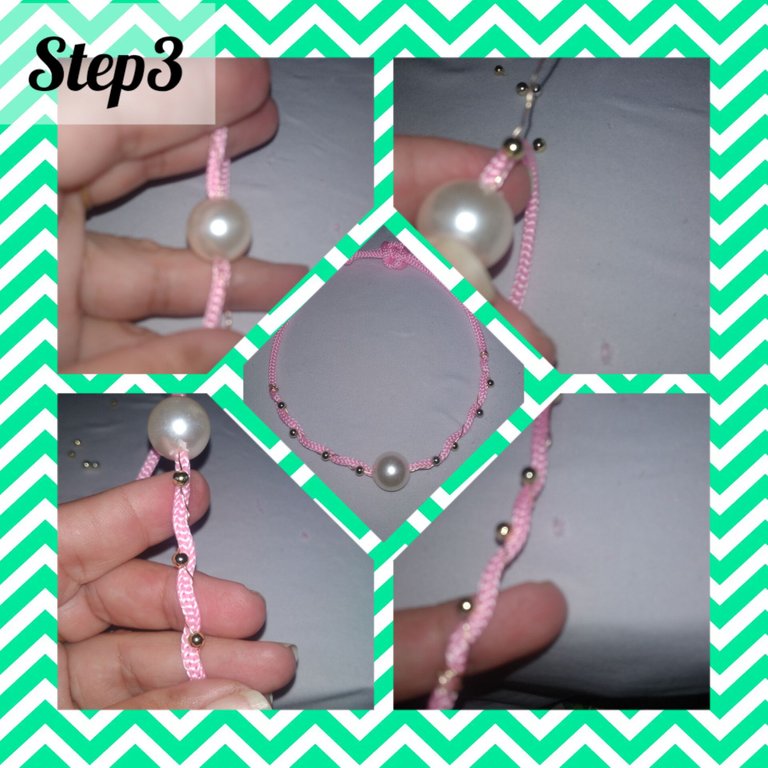
3.) I introduce the wire passing through the bead and leaving the wire on both sides of the same measure, I continue introducing a golden pearl and I go around the braid so I will go through the first side of the pendant, I repeat three more times, until almost run out of wire, then I turn the residue around the braid, adjusting and giving a little pressure with flat pliers. I repeat the procedure on the other side, they should be in the same direction.
3.) Introduzco el alambre traspasando la cuenta y dejando el alambre de ambos lados de igual medida, continuo introduciendo, un aperlita dorada y doy vueltas al alrededor de la trenza así iré recorriendo un primer lado de el colgante, repito tres veces más, hasta casi agotar el alambre, luego doy vueltas con el residuos al alrededor de la trenza, ajustando y dando un poco de presión con lnapinza plana. Repito el procedimiento en el otro lado, estos deben quedar en la misma dirección.
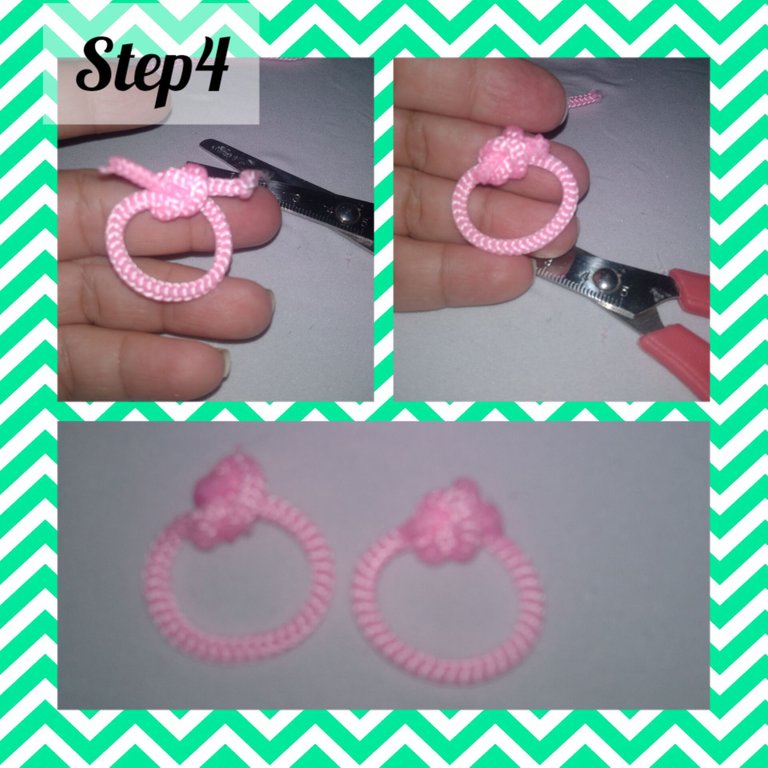
4.) I cut two little pieces of braid of the same size, and I will join each one with a simple knot, which I will also put on fire at the ends or end to secure. Thus leaving me a nice circle of pink braid.
4.) Corto dos pedacitos de trenza de igual tamaño, y unire a cada una con un nudo sencillo, a quien además pondré fuego en las puntas o extremo para asegurar. Quedándome así un lindo círculo de trenza color rosa.
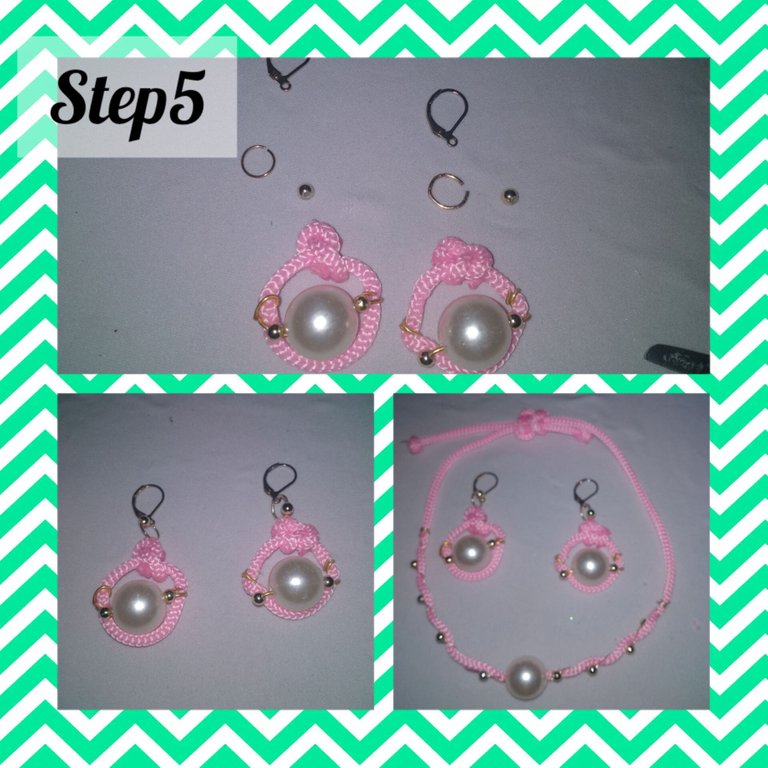
5.) I transfer a bead with wire and tie on each side of the circle made in the previous step, for this I twist the wire in the braid and apply a little pressure with the silver tip pliers. Both sides must face the same direction. Next I will place in the upper part, that is to say in the upper part that forms the double of the knot, I introduce the earring, before I will place a small pearl, I continue with the base and close the earring with the jewelry pliers.
5.) Traspaso con alambre una cuenta y ato en cada lado de el círculo hecho en paso anterior, para ello doy vueltas a el alambre en la trenza y hago un poco de presión con la pinza punta plata. Ambos lados deben quedar en la misma dirección. Seguidamente colocare en la parte superior, es decir en la parteas alta que forma el doblé de el nudo, Introduzco el arito, antes colocare un a pequeña perlita, sigo con la base y cierro con la pinza de bisutería el arito.
In this way, I conclude today's project. Very happy with the final result, ready to go out and show them off, so I invite them to do theirs, and look very cute and casual.//
De esta forma, concluyo el proyecto de hoy. Muy alegre con el resultado final, lista ya para salir a lucirlos, así que los invitándolos a hacer el suyo,y lucir muy lindas y casuales.
The contents of this publication, wording and photography are my own.
. Use InShot to show step by step.
. Use Google translate.
Thank you for visiting my blog, I hope you enjoyed it. It will be until a soon opportunity dear friends.//
Los contenidos de esta publicación, redacción y fotografía son de mí autoría.
. Use InShot para mostrar el paso a paso.
. Use traductor Google.
Agradecida hayas visistado mí blog, espero lo hayas disfrutado. Será hasta una pronta oportunidad queridos amigos.
Ay que bellos @katiuskamata , quisiera uno para mi.
Gracias cariño, bueno manos a la obra, sigue los pasos jjj. Abrazos @josdelmi.
Congratulations @katiuskamata! You have completed the following achievement on the Hive blockchain And have been rewarded with New badge(s)
Your next target is to reach 1000 comments.
You can view your badges on your board and compare yourself to others in the Ranking
If you no longer want to receive notifications, reply to this comment with the word
STOPTo support your work, I also upvoted your post!
Check out our last posts:
Support the HiveBuzz project. Vote for our proposal!
Has sido votado por
PROYECTO ENLACE
'Conectando Ideas y Comunidades'
PROYECTO ENLACE es un proyecto de curación de habla hispana enfocado en recompensar contenido de calidad y apoyar autores en su proceso de crecimiento en HIVE.
Creemos y apostamos por el futuro de esta gran plataforma, y estamos muy emocionados de poder hacerla crecer junto a esta comunidad. Así que te invitamos a publicar en nuestra COMUNIDAD y estar atento a todas las actividades que tenemos preparadas y que estaremos publicando en breve.
¿QUIERES AUTOMATIZAR TUS GANANCIAS DE CURACIÓN? SE PARTE DEL PROYECTO ENLACE APOYANDO A NUESTRO TRAIL EN HIVE.VOTE INGRESA AQUÍ PARA CONOCER LOS DETALLES.
¿QUIERES INVERTIR ENLACE? DESCUBRE COMO HACERLO Y GENERAR INGRESOS DE FORMA SEMANAL MEDIANTE TU DELEGACIÓN DE HP AQUÍ TE EXPLICAMOS COMO.
Te invitamos a participar en nuestro servidor de Discord: https://discord.gg/3S9y7BbWfS
Atentamente
EQUIPO ENLACE 2023