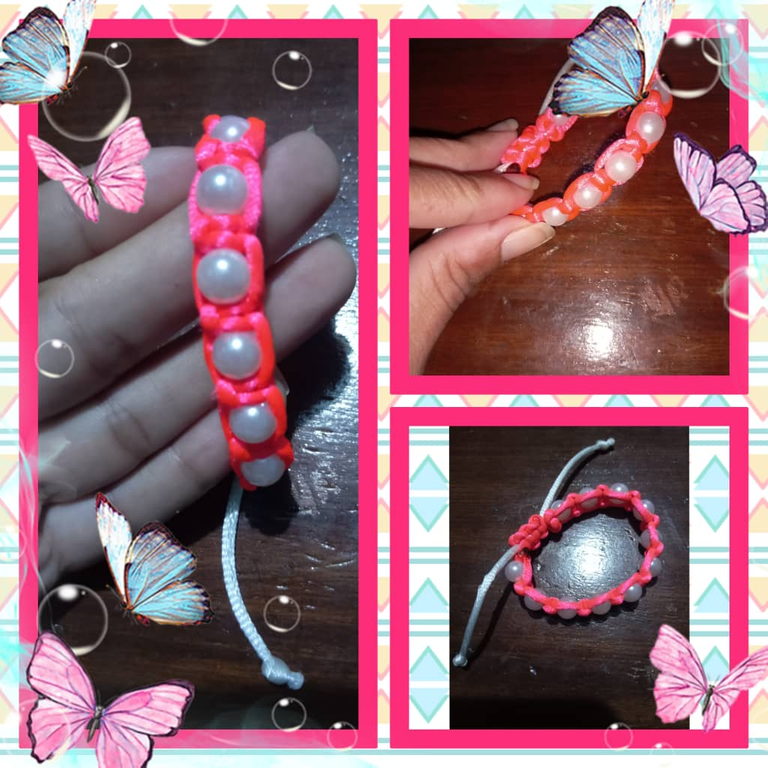
(ESP/ ENG) Brazalete o tobillera elaborada con cola de ratón y perlas // Bracelet or anklet made with mouse tail and pearls
ESPAÑOL
Hola amigos, espero estén bien,felíz día miércoles 19 de Abril, día de la Independencia.De celebración mi país
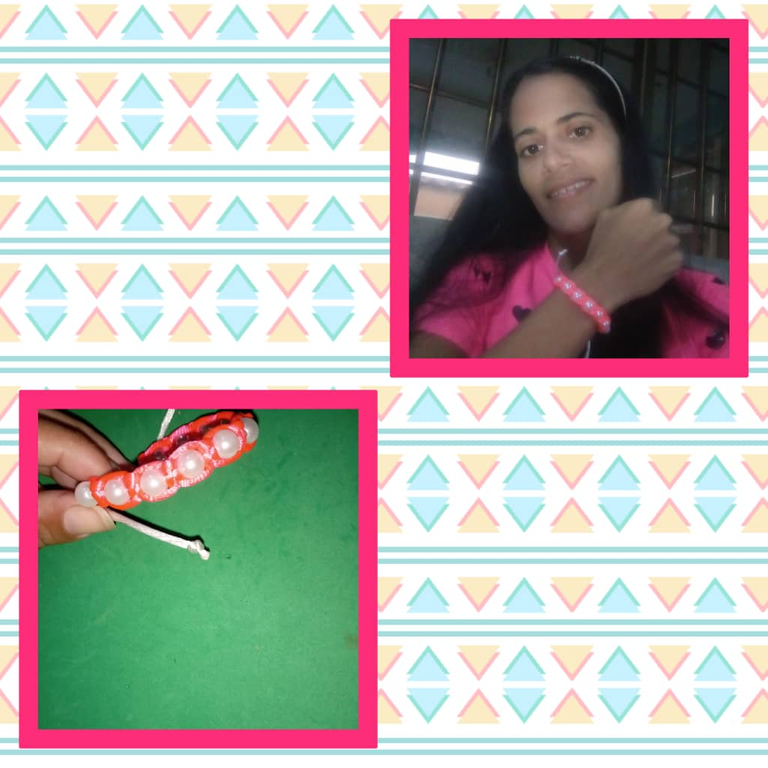
Hoy quise mostrarles los pasos del cómo elaborar esta hermosa pulsera, la pueden usar tanto nosotras las mujeres, como las pequeñas de la casa y ¿por qué no? También los hombres si usamos un color más varonil; este tipo de pulseras salen muy económicas y hacen realzar tus atuendos, no pasan de moda; también podemos hacerlas un poco más grandes para usarlas como tobilleras podemos llevarlas a diario, para ir al parque, playa te harán lucir muy bien.
Para su elaboración usaremos lo siguiente:
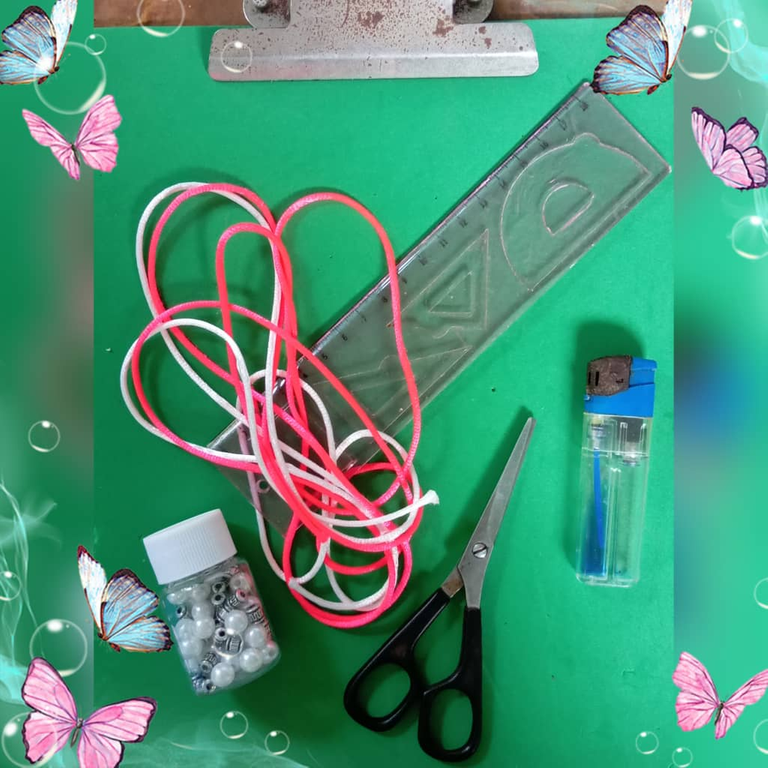
Materiales para la realización de esta hermosa pulsera o tobillera:
- 1 metro de cola de ratón rosada.
- 30 cm de cola de ratón blanca.
- Perlas blancas
- Tijera
- Encendedor
- Carpeta de gancho
- Regla
Paso a paso para la elaboración de la pulsera o tobillera, muy fácil de hacer , sin ningún grado de dificultad, solo hay que tener ganas de emprender:
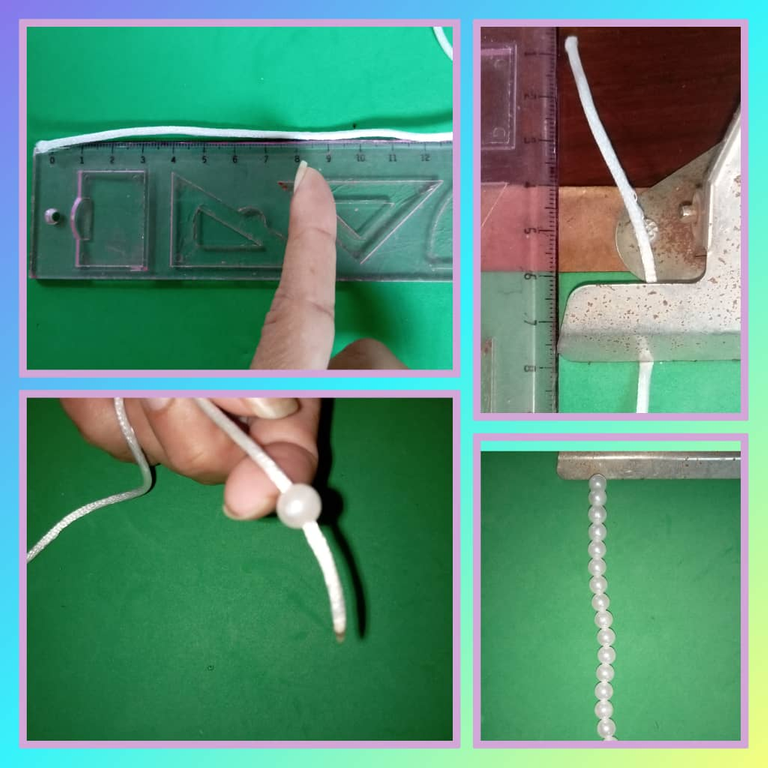
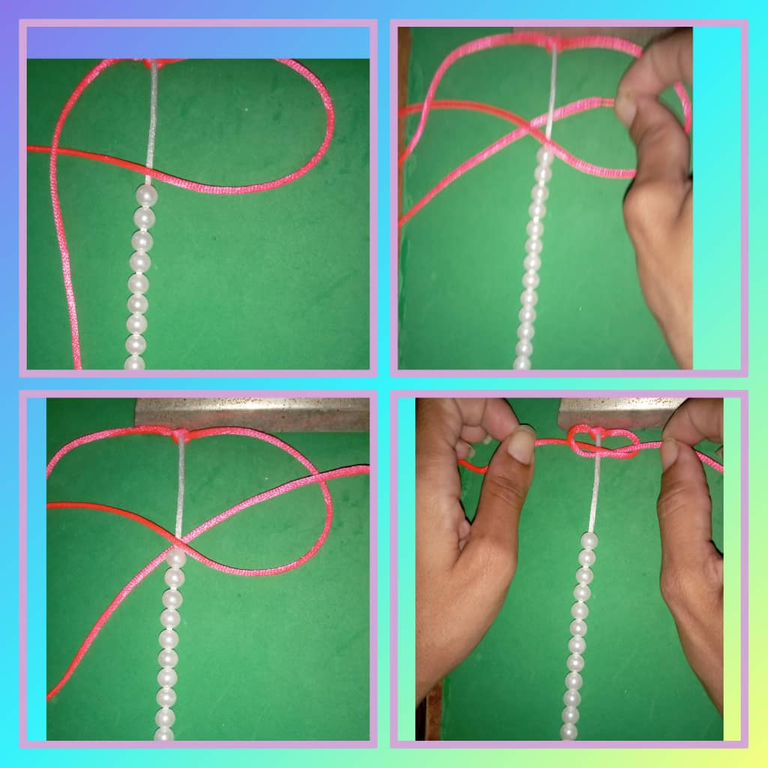
Paso 1:
Tomamos los 30 cm de cola de ratón, ajustamos con el gancho de la carpeta y dejamos 8cm ; rellenamos el resto de perlas al final dejamos 10 cm
Paso 2
En la parte de arriba ubicamos el gancho y antes de la primera perla colocamos la cola de ratón ubicando la mitad para proceder a hacer el primer nudo de izquierda a derecha.
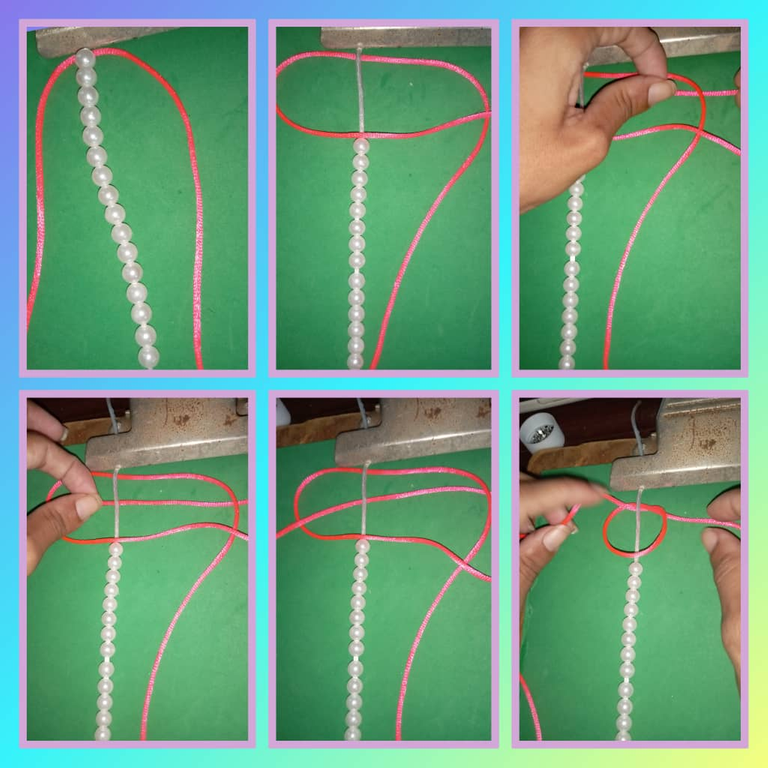
Paso 3:
De igual forma hacemos el siguiente nudo pero en sentido contrario ( de derecha a izquierda).
Paso 4:
Unimos una de las perlas para hacer nuevamente los dos nudos de la misma forma que hicimos al inicio, este paso lo haremos hasta tener un tamaño de aproximadamente 16cm. (El tamaño puede variarlo al de su preferencia).
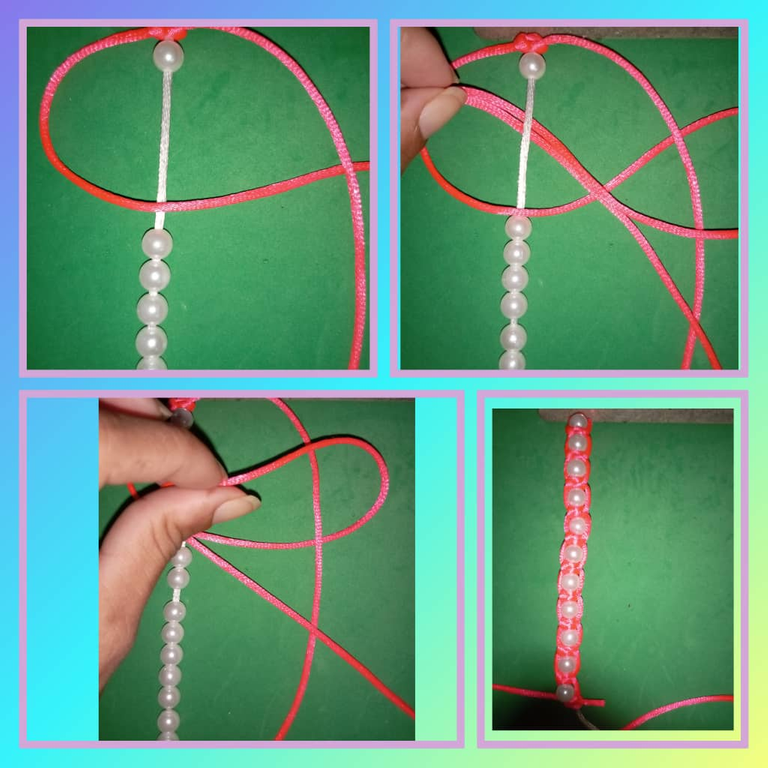
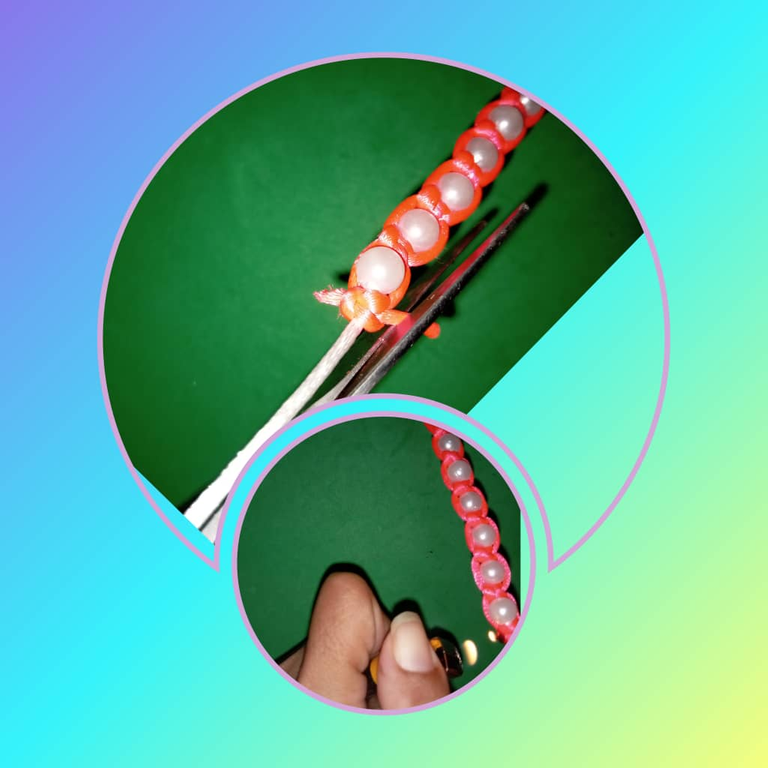
Paso 5:
Con la tijera cortamos el sobrante y quemamos para sellar nuestro nudo final.
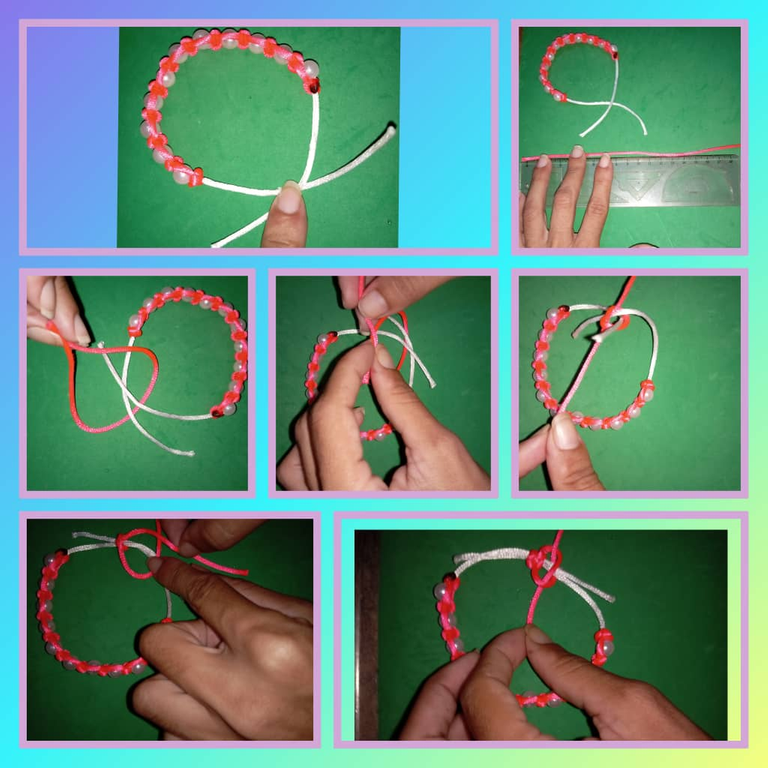
Paso 6:
Unimos las dos puntas, cortamos 18 cm de hilo hacemos un nudo simple para luego proceder a hacer el nudo que hicimos al inicio para de esta manera cerrar nuestra pulsera.
Bueno amigos espero les haya gustado esta pulsera y se animen a elaborarlas son muy sencillas de hacer y se ven geniales, pueden hacerlas para toda la familia, o para parejas, como desee.En fin en donde sea lucen lindas.
Así finalizamos espero les haya gustado este post, y se animen a hacer estas bellas pulseras.Espero que les haya gustado como a mi, hasta la próxima.
Las fotos son de mi propiedad tomada con mi teléfono INFINIX HOT PLAY 11, modificando las fotos con el programa Foto Collage Grid Art y traducido con el programa Deelp traductor versión gratis.
ENGLISH
Hello friends, I hope you are well, happy 19th April, Independence Day.
Hello friends, I hope you are well, happy day Wednesday April 19, Independence Day.
Today I wanted to show you the steps of how to make this beautiful bracelet, it can be used both by us women, as the little girls of the house and why not? Also men if we use a more manly color; this type of bracelets are very economical and make enhance your outfits, do not go out of fashion; we can also make them a little bigger to use them as anklets can wear them daily, to go to the park, beach will make you look great.
For its elaboration we will use the following:
Materials for the realization of this beautiful bracelet or anklet:.
- 1 meter of pink mouse tail.
- 30 cm of white mouse tail.
- White beads
- Scissors
- Lighter
- Hook binder
- Ruler
Step by step for the elaboration of the bracelet or anklet, very easy to make, without any degree of difficulty, you just have to be willing to undertake:
Step 1:
We take the 30 cm of mouse tail, we adjust with the hook of the folder and leave 8cm ; we fill the rest of pearls at the end we leave 10 cm.
Step 2
At the top we place the hook and before the first bead we place the mouse tail locating the middle to proceed to make the first knot from left to right.
Step 3:
In the same way we make the next knot but in the opposite direction ( from right to left).
Step 4:
We join one of the beads to make again the two knots in the same way that we did at the beginning, this step we will do until we have a size of approximately 16cm. (The size can vary it to the one of your preference).
Step 5:
With the scissors we cut off the excess and burn to seal our final knot.
Step 6:.
We join the two ends, cut 18 cm of thread we make a simple knot and then proceed to make the knot we made at the beginning to thus close our bracelet.
Well friends I hope you liked this bracelet and are encouraged to develop them are very simple to make and look great, you can make them for the whole family, or for couples, as you wish.anyway anywhere look cute.
So we end I hope you liked this post, and are encouraged to make these beautiful bracelets.I hope you liked it as I did, until next time.
The photos are my own taken with my phone INFINIX HOT PLAY 11, modifying the photos with the program Foto Collage Grid Art and translated with the program Deelp translator free version.
Has sido votado por
PROYECTO ENLACE
'Conectando Ideas y Comunidades'
PROYECTO ENLACE es un proyecto de curación de habla hispana enfocado en recompensar contenido de calidad y apoyar autores en su proceso de crecimiento en HIVE.
Creemos y apostamos por el futuro de esta gran plataforma, y estamos muy emocionados de poder hacerla crecer junto a esta comunidad. Así que te invitamos a publicar en nuestra COMUNIDAD y estar atento a todas las actividades que tenemos preparadas y que estaremos publicando en breve.
¿QUIERES AUTOMATIZAR TUS GANANCIAS DE CURACIÓN? SE PARTE DEL PROYECTO ENLACE APOYANDO A NUESTRO TRAIL EN HIVE.VOTE INGRESA AQUÍ PARA CONOCER LOS DETALLES.
¿QUIERES INVERTIR ENLACE? DESCUBRE COMO HACERLO Y GENERAR INGRESOS DE FORMA SEMANAL MEDIANTE TU DELEGACIÓN DE HP AQUÍ TE EXPLICAMOS COMO.
Te invitamos a participar en nuestro servidor de Discord: https://discord.gg/3S9y7BbWfS
Atentamente
EQUIPO ENLACE 2023
Te damos la bienvenida a nuestra comunidad de #Jewelry comunidad que aloja grandes artesanos, nos encanta tenerte con nosotros amiga @kelvimari2023 , realizaste un lindo proyecto y tejido, tienes razón una pulsera que puen utilizar todos en casa, muy bueno el paso a paso que nos muestras para ver que se puede hacer de manera sencilla, gran trabajo.
Por otro lado te pedimos que leas las reglas de la comunidad, los post deben ser mayores de 1000 palabras en dos idiomas, para que por favor tengas esta norma en cuenta, pr ser tu primera vez lo pasaremos por alto, esperamos verte pronto nuevamente con otro hermoso proyecto 😉 y te invitamos también a participar en nuestro concurso de aniversario, no te lo pierdas.
Congratulations @kelvimari2023! You have completed the following achievement on the Hive blockchain And have been rewarded with New badge(s)
Your next target is to reach 800 upvotes.
You can view your badges on your board and compare yourself to others in the Ranking
If you no longer want to receive notifications, reply to this comment with the word
STOPCheck out our last posts:
Support the HiveBuzz project. Vote for our proposal!
Muy linda tu pulsera
Hermosa pulsera! 😊 gran trabajo👏
Gracias me alegra que les haya gustado es muy satisfactorio.