DIY - How to Replace the Battery of a G-Shock Watch
Not An Easy Task for Unsteady Hands
Using a wristwatch is my preferred way of knowing the time, as opposed to pulling out my phone from my pocket or bag when I need to. With a watch all I have to do is raise my left arm a bit and look down at wrist. So, yeah, it's a lot easier and also safer, especially if you're in a place where you don't feel comfortable with the idea of using your phone in public, even if it's just for a few seconds.
All it takes is a few seconds for it to be snatched from your hands by an expert snatcher. Or worse, have it divested from you at knife or gunpoint. I've already experienced the latter a few times while riding a bus on my way home from work, and I tell you it's the most terrifying thing to go through while in public. One wrong move or word and it could all be over for me. Glad I'm still alive to write about it here right now.
So, anyway, two weeks ago my uncle who was vacationing from Melbourne visited us for a get-together at another uncle's house just a few blocks from ours in this same gated suburban village we live in. And as I was about to leave, I grabbed my watch from my computer table and checked the time and found out that it was dead.
No surprise, as I had bought this thing back in August 2016. Six years is a damn long time for a battery, I thought to myself. I put the watch back on the table and proceeded to my uncle's party, and made a mental note to order a battery online the next day.
Things Needed for This Task

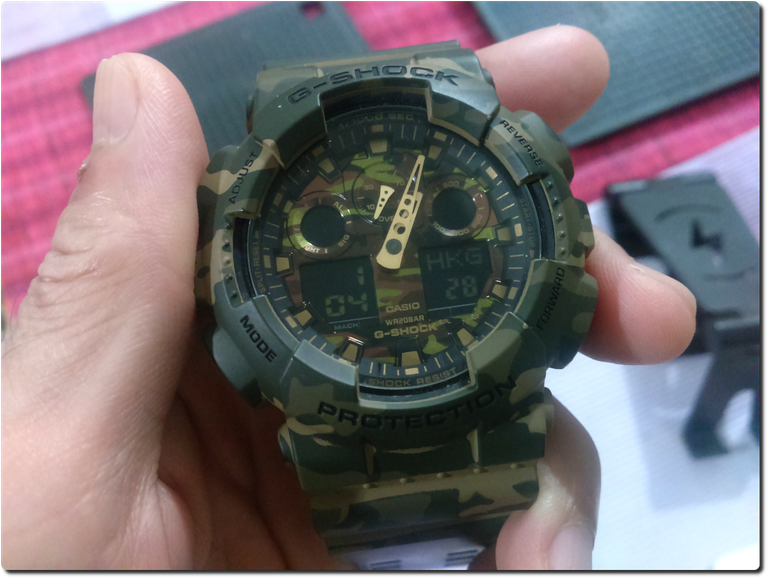
My watch is a Casio G-Shock GA-100CM-5A and the battery replacement steps in this blog is for the GA-100 series and related watches.
It is powered by a CR1220 3v battery. The one I bought is made by Maxell, but other brands are available too.
I've you live here in the Philippines or in other parts of S.E. Asia, you can order a G-Shock battery kit from Lazada, a popular online store here in Asia.
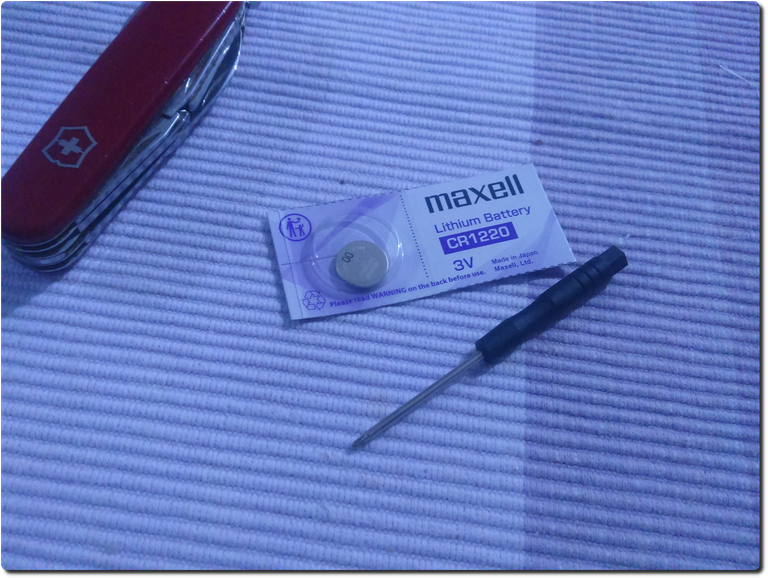
It comes with a free mini Philips screwdriver, in case you don't have one of those already. And you will also need needle-nose tweezers, good lighting, and a steady hand.
How to Do It
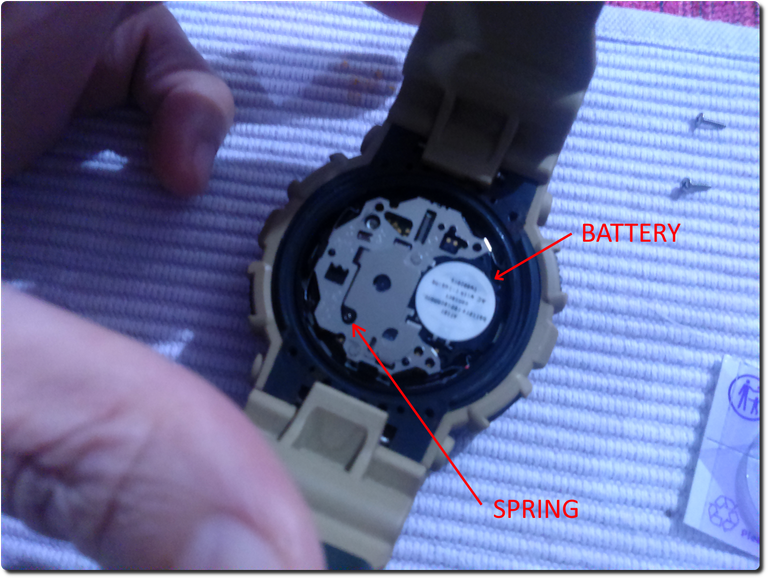
Set the watch down on the table on its face. And before you take it apart, take a good look at how things are oriented. Better yet, take a picture of it before you open it, and also of its insides when the back plate is off. There is a small spring sticking out near the battery socket. Be careful when handling the watch so as not to lose this tiny spring. Refer to picture [4] for its location.

1. Take off the back plate by removing the four screws. These screws are tiny, so take care not to lose them.
2. Once the back plate is off, lift off the rubber gasket gently with your tweezers and set it down on a safe place. Then remove the white plastic cover carefully with your tweezers.
3. The battery socket is covered by a sticker which you will have to peel off. The battery is secured to its socket with a metal clamp. Then you unhook the battery clamp very carefully. This, for me, was the hardest part of the operation. Glad I've got nerves of steel, the patience of a saint, and the steady hand of an artist. I forgot to take a picture of the clamp, so to know what it looks like, just refer to the YouTube video posted below at the bottom of this blog.
4. With the clamp removed, pry out the dead battery and stick in the new one.
5. Press down on the clamp until you hear it snap back into its locked position. This ensures that it is locked and the battery won't pop out.
6. Then flip it over and look at the watch if it's already powered up and working. If it is flashing and displaying the letters "TYO", it is an error code. You will have to press your tweezers against the battery for three seconds. This will hard reset your watch and put it back into normal operation. Again, be mindful of the presence of the small spring sticking out.
7. Place the plastic cover back on and make sure that it is positioned correctly. If it is not seated correctly, some of the buttons won’t work.
8. Put back the gasket by gently placing it into its groove. Check and make sure it is in place before you screw on the back plate.
9. And finally, put the back plate back on and secure it with its four screws. Make sure you have tightened them enough to ensure the water-resistent seal has been restored.
So, there you go, folks. Your watch is working again! Give yourself a pat on the back for a job well done. Not only have you learned something new, you have also saved yourself some money by doing things yourself.
Now for a demonstration of the steps listed above, here is the video I found in YouTube that emboldened me to do this myself. I watched it several times before I did the actual process. I have the same watch model as in the video, but mine is in green camouflage.
The video is from a YouTube channel owned by a guy from Bangladesh, named Solim Ullah. He has dozens of videos there of him working on many different brands of watches. And if your G-Shock is a different model from mine, or a different brand of watch at all, go check his channel and see if he has a video of it. I'm betting there is.
And that's it for this blog. Thank you for taking the time to read it, and if you found it helpful, please give it a like, comment, and share it with others. See you again on the next one.
This blog was created with Ecency and GIMP
Thank you for sharing this post on HIVE!
Your content got selected by our fellow curator ashikstd & you just received a little thank you upvote from us for your great work! Your post will be featured in one of our recurring compilations which are aiming to offer you a stage to widen your audience within the DIY scene of Hive. Next time make sure to post / cross-post your creation within the DIYHub community on HIVE and you will receive a higher upvote ;) Stay creative & HIVE ON!
Please vote for our hive witness <3
Thanks for the heads-up! I wasn't aware of the existence of your community. I will post or cross-post there too next time.
When I was a kid, my watch and my dad used to change it often in case the battery died. you reminded me of those days
I'm glad this post was able to make you feel good, by reminding you of your good days with your father. Mine passed away seven years ago, four days after my 45th birthday.
Congratulations @kryptik.tigrrr3d! You have completed the following achievement on the Hive blockchain And have been rewarded with New badge(s)
Your next target is to reach 20000 upvotes.
You can view your badges on your board and compare yourself to others in the Ranking
If you no longer want to receive notifications, reply to this comment with the word
STOPCheck out the last post from @hivebuzz:
I like it when someone take time to share an idea for free cause many people hardly do it
Thanks for your appreciation. I'm glad we live in a time where we have the means to document and share these things easily. And also get compensated for it. 🙂
Dear @kryptik.tigrrr3d,
May I ask you to review and support the new HiveSQL Proposal so we can keep it free to use for the community?
You can do it on Peakd, ecency, Hive.blog or using HiveSigner
Thank you!
Dear @kryptik.tigrrr3d,
Your support for the current HiveBuzz proposal (#199) is much appreciated but the proposal will expire soon!
May we ask you to review and support the new proposal so our team can continue its work?
You can support the new proposal (#248) on Peakd, Ecency, Hive.blog or using HiveSigner.
Thank you!