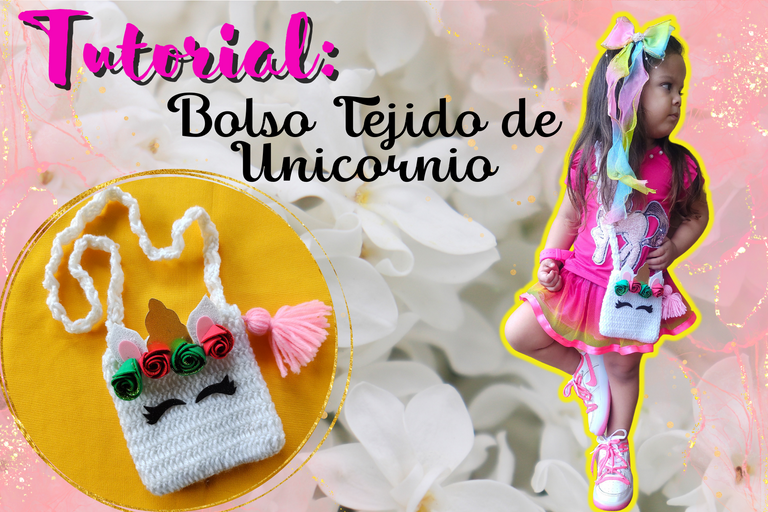
Tutorial: Bolso Tejido de Unicornio 🦄. ¡Simplemente Hermoso! / Tutorial: Unicorn Woven Bag 🦄. Simply beautiful!
Cecilia es una niña super tierna de casi 4 años de edad, le encanta lucir accesorios temáticos en diversos personajes que habitualmente suele ver en videos. Uno de sus muñecos favoritos son los unicornios y con ellos todos los tipos de equinos como los pequeños ponis, grandes caballos y los imponentes pegasos. El año antepasado, su papá le había obsequiado de cumpleaños un lindo morral de unicornio, sin dudarlo la niña lo cargaba como dicen "para arriba y para abajo". Pero, hace poco los tirantes se dañaron, los accesorios de ajustes eran de material plástico y se partieron. La Señorita C estaba triste, y ya saben como somos las madres en este contexto, donde daríamos todo por ver una sonrisa en el rostro de nuestros hijos. Por ello, me comprometí con ella a hacerle un bolso nuevo, no exactamente un morral, pero sí un pequeño bolso que pudiera usar al momento de salir.
Les cuento que la Señorita C hace un rebobinado de lo que acontece en el día justamente antes de dormir, y volviendo a lo del bolso nuevo, debí repetirle que yo le haría un bolso pequeño en cuanto pudiera sacar un poco de tiempo. Quedó algo extrañada y me dijo: ¿lo vas a comprar?. A lo que yo respondí: No, usaré hilo para hacerlo. Por su cara, noté que no entendía, pero ya luego ella podría ver el proceso y sería más sencillo de comprender para ella.
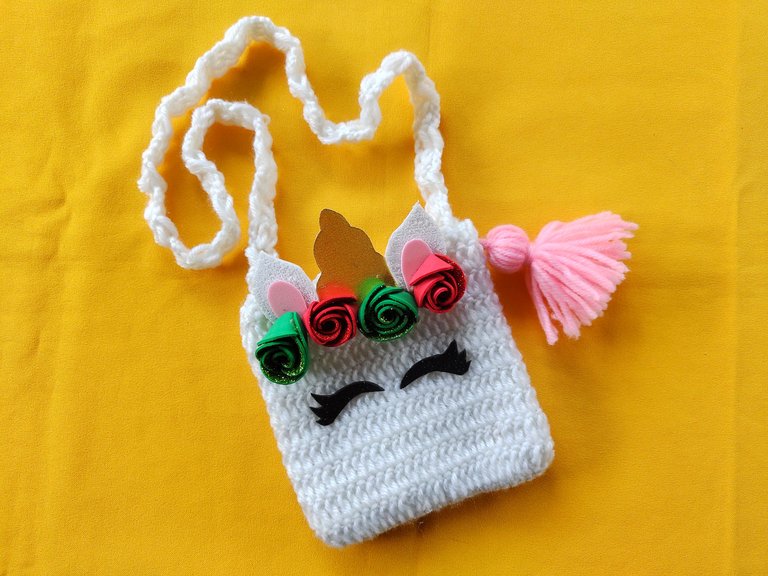
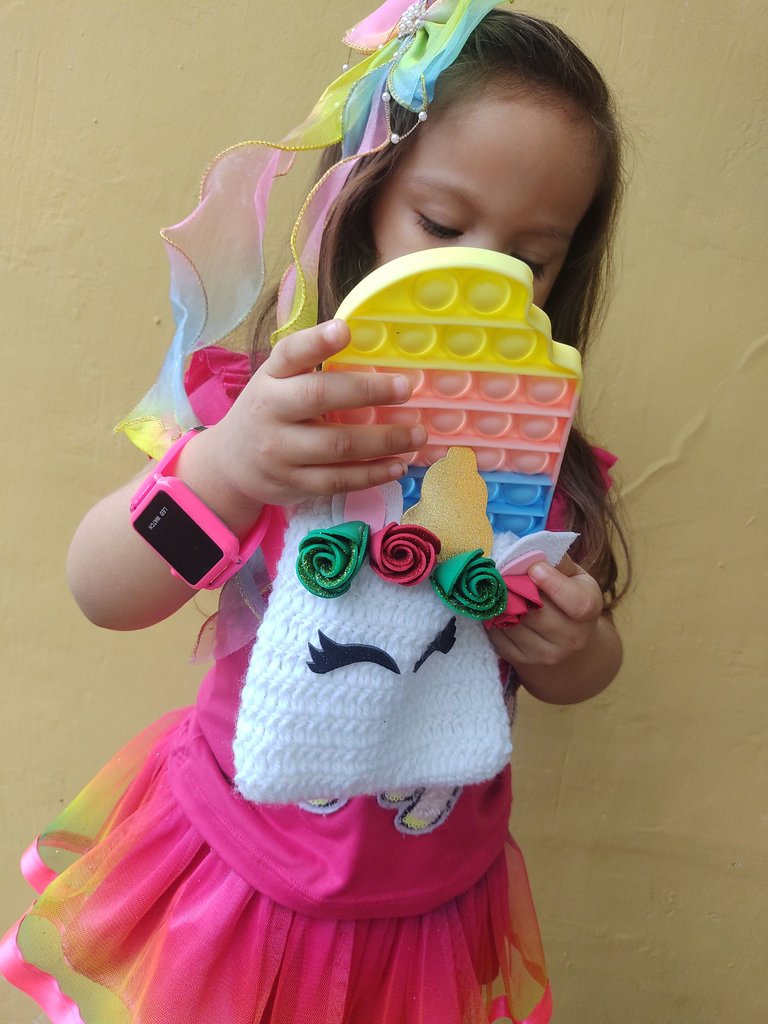
Hace unos años atrás aprendí a tejer, tenía las agujas guardadas entre algunas cosas y me decidí a buscarlas para cumplir el compromiso con la Señorita C. Ella por su lado, se sentó a mi lado a observar lo que haría, siempre anda pendiente de lo que hago y a partir de allí inicia la ronda de preguntas. Para tejer este bolsito, he usado estambre de tipo escolar, me pareció más ideal porque mantiene firme la pieza. Para la decoración del mismo, he usado rosas pequeñas hechas en foami, orejitas en foami texturizado y unos hermosos ojos en foami escarchado. Ohh, no podemos olvidar mencionar el lindo cuerno dorado, hecho en foami y una super linda borla de estambre.
Materiales
- 40 gr de estambre escolar, color blanco.
- Estambre rosa para la borla.
- Foami de colores: Rojo, verde, rosa, dorado, blanco y negro.
- Silicon/pistola.
- Tijera.
- Aguja para tejer.
- Cartón, un rectangulo pequeño

Pasos de Elaboración
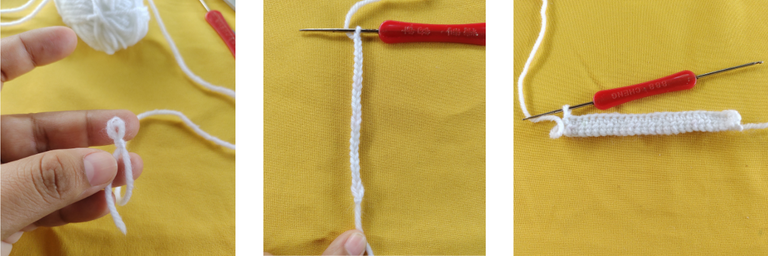
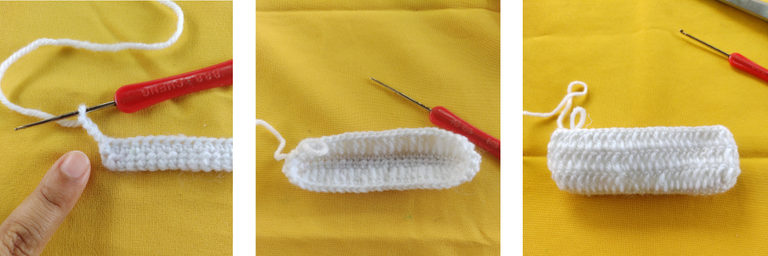
- Iniciamos haciendo un lazo cerrado, algunos hacen un lazo mágico, pero en mi caso me acostumbre a hacerlo cerrado y fijo. Allí montamos unas 25 cadenetas. Al realizar las 25 cadenetas, montamos dos hileras de punto medio. Estos serán lo que llamamos base del bolso, si gustan, pueden hacerle más ancho.
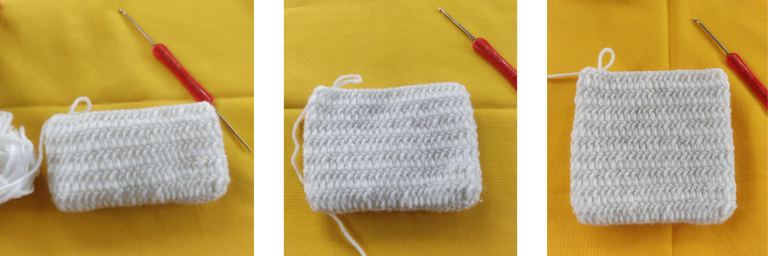
- Montamos 4 cadenetas de altura, seguidas de varetas por todo el contorno. Estos pasos los repetiremos para darle altura al bolso. La altura es completamente a gusto, pero en mi caso he hecho 9 hileras de varetas.
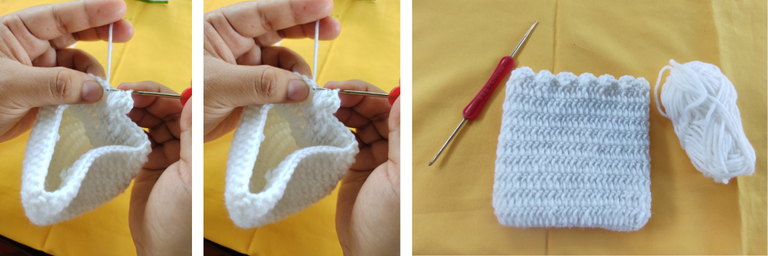
- Después montamos una hilera de lomitos, así les recuerdo yo, sinceramente no recuerdo el nombre oficial. Consiste en darle 4 o 3 puntos de cadeneta, dependiendo de que tan alto le deseemos. Seguido de dos o tres varetas unidas que cerrammos luego de correr 3 espacios, hacemos el cierre con un medio punto. Repetiremos el proceso por todo el borde, este punto le dará un acabado mucho más lindo.
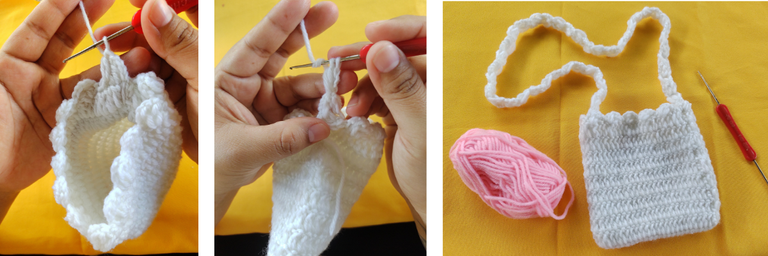
- Ahora, haremos lo que sería la trenza del bosito. Es bastante larga, debido a que es tipo bandolero, para tener una mejor noción de lo largo, la he medido con la Señorita C. Para la trenza, tomamos como referencia de altura 4 cadenetas, seguida de dos varetas y cerramos. Giramos la pieza y repetimos el proceso dependiendo de que tan largo lo deseamos. Al terminar el largo, lo que haremos es cerrar y ya estaría listo lo que es el cuerpo y el bolsito en sí.
Elaborando la Borla
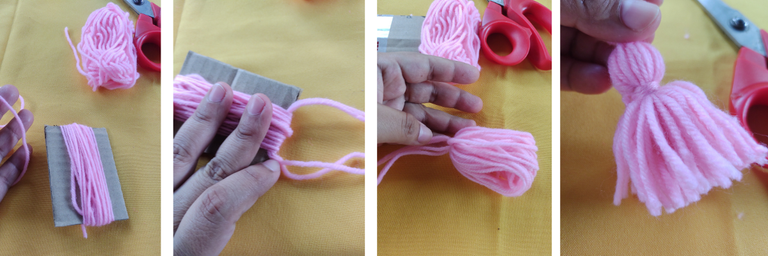
- Tendremos a la mano un trozo de cartón rectangular que será proporcional al tamaño de la borla que deseemos. Enrollamos estambre rosa en el mismo, varias veces. Aparte, cortamos un trozo de estambre que usaremos para atar la parte superior. Extraemos del cartón y luego cortamos en el extremo contrario de donde hemos atado. Por último, tomamos otro trozo de estambre y a un par de centímetros del nudo superior, daremos un par de vuelta y haremos un pequeño nudo, para fijar. Lo que nos resta es emparejar con la tijera la parte inferior.
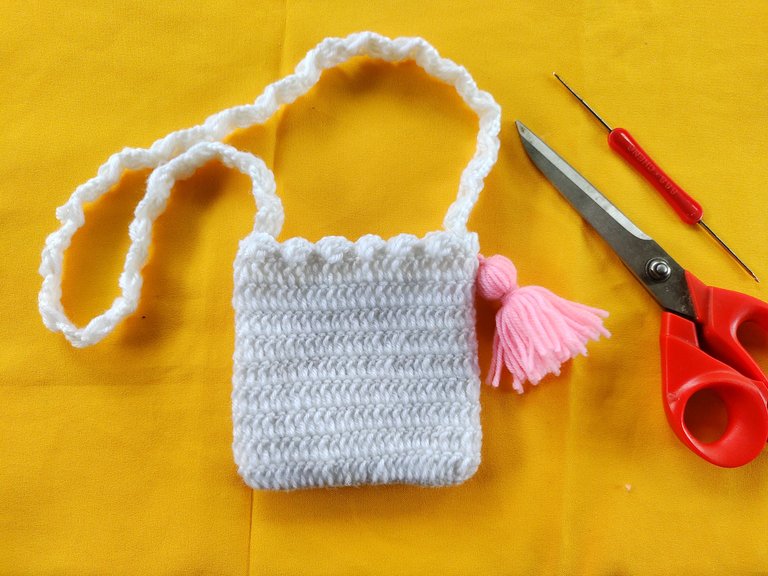
- Unimos la borla al bolso. Para ello usaremos el restante del trozo de estambre de la parte superior de la borla.
Decorando el bolso con la temática de Unicornio
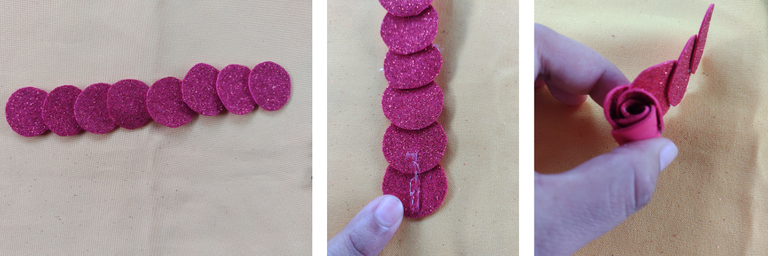
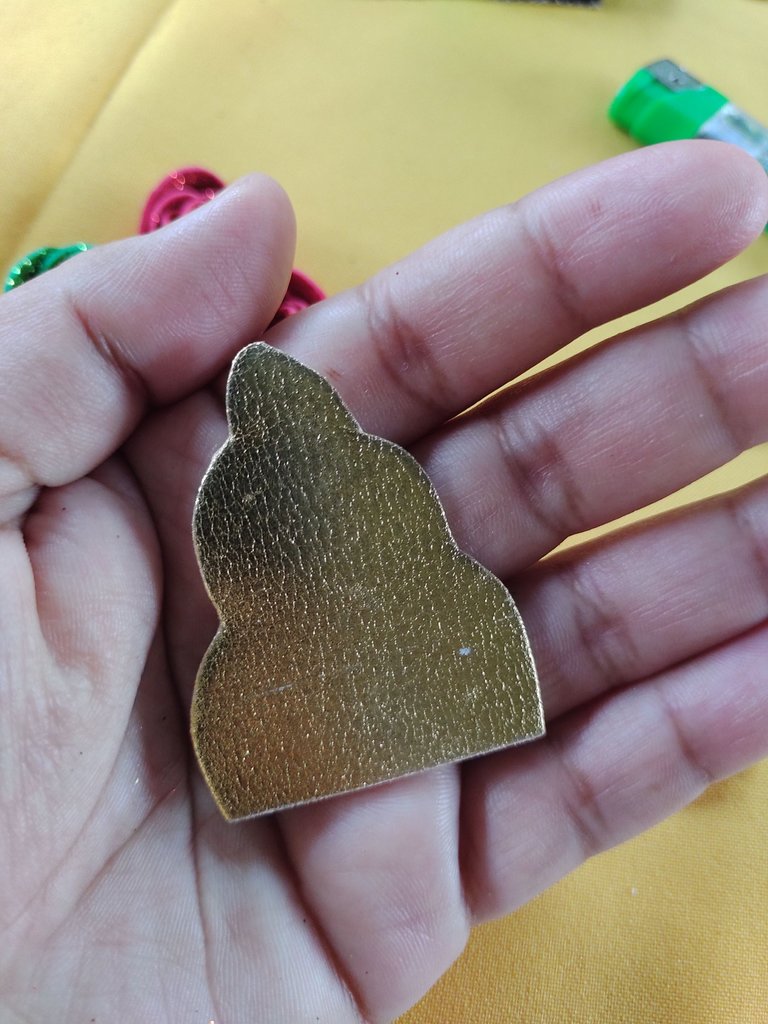
- En Foami mate o escarchado, dibujamos las piezas y cortamos. En el caso de las rosas o flores, las elaboré en base a círculos. He usado por cada rosa 8 círculos pequeños que he unido uno a otro desde la parte media y derecha. En el centro colocamos silicon formando una hilera céntrica y desde allí, enrrollamos. Después de secar, cortamos a mitad y obtendremos dos rosas. Repetimos el proceso cuantas veces deseemos. Yo he hecho en rojo y verde. En cuanto a las piezas, he cortado los ojos, un par de orejitas con detalles en rosa y un cuerno en foami dorado.

- Por último he fijado con silicon las piezas decorativas en el frente del bolso.

Fotos Finales (resultado)
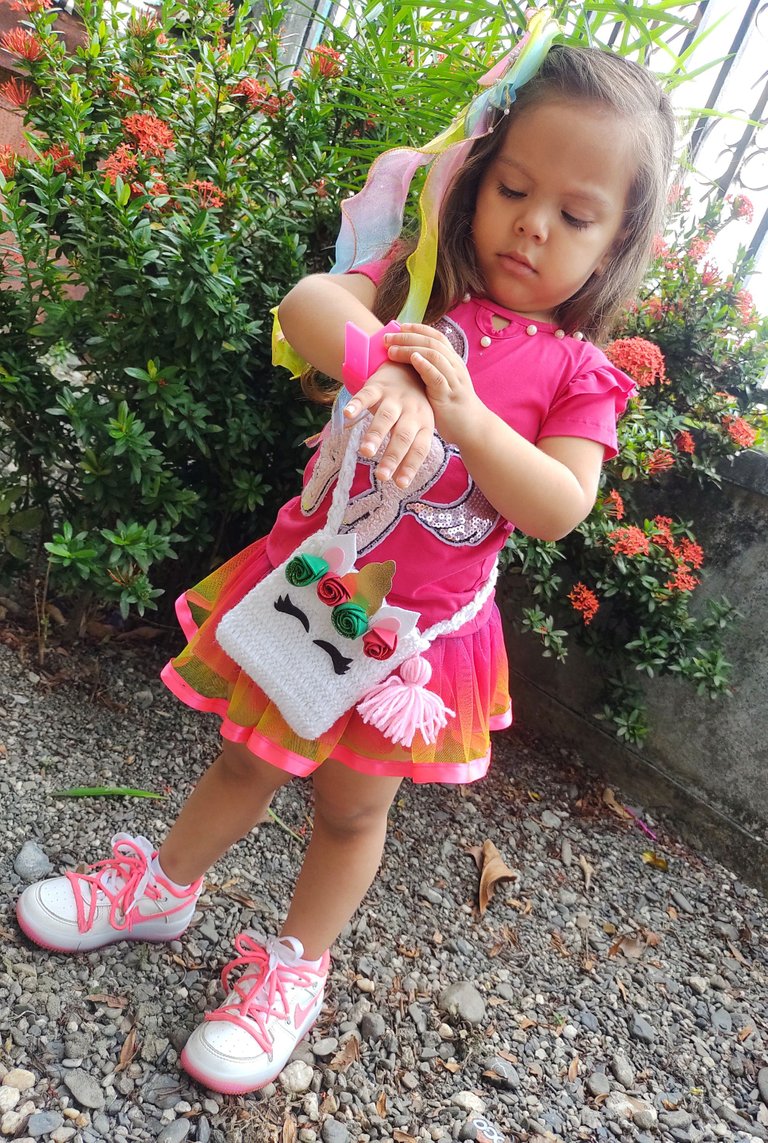
La sesión de Fotos de la Señorita C:
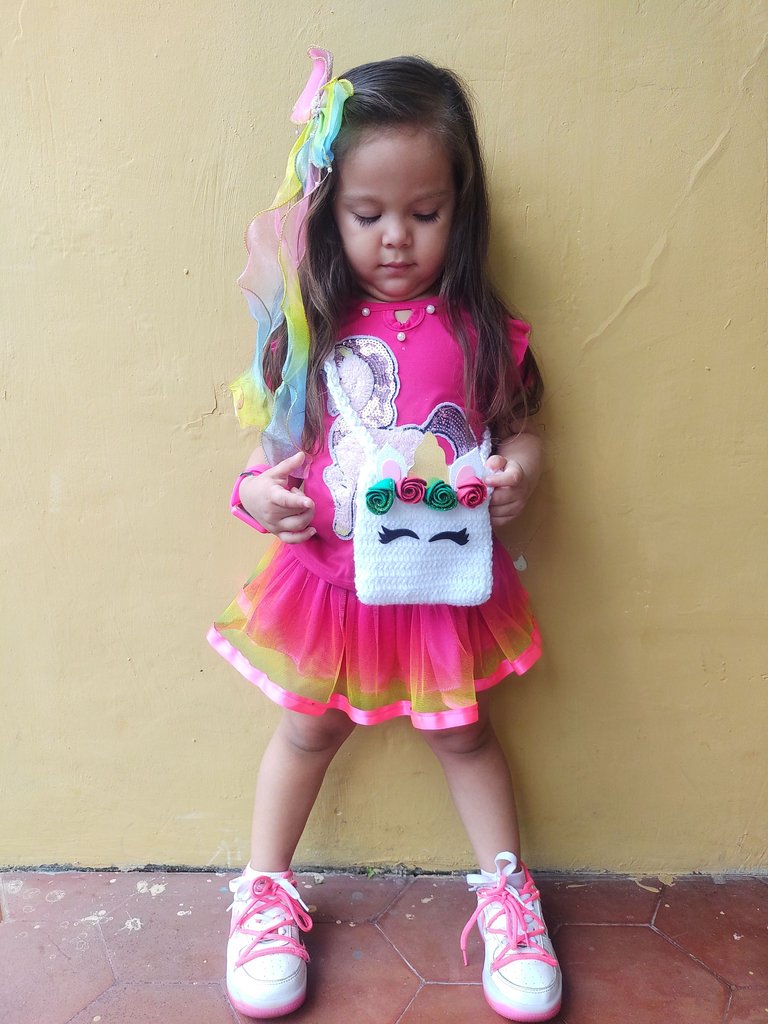
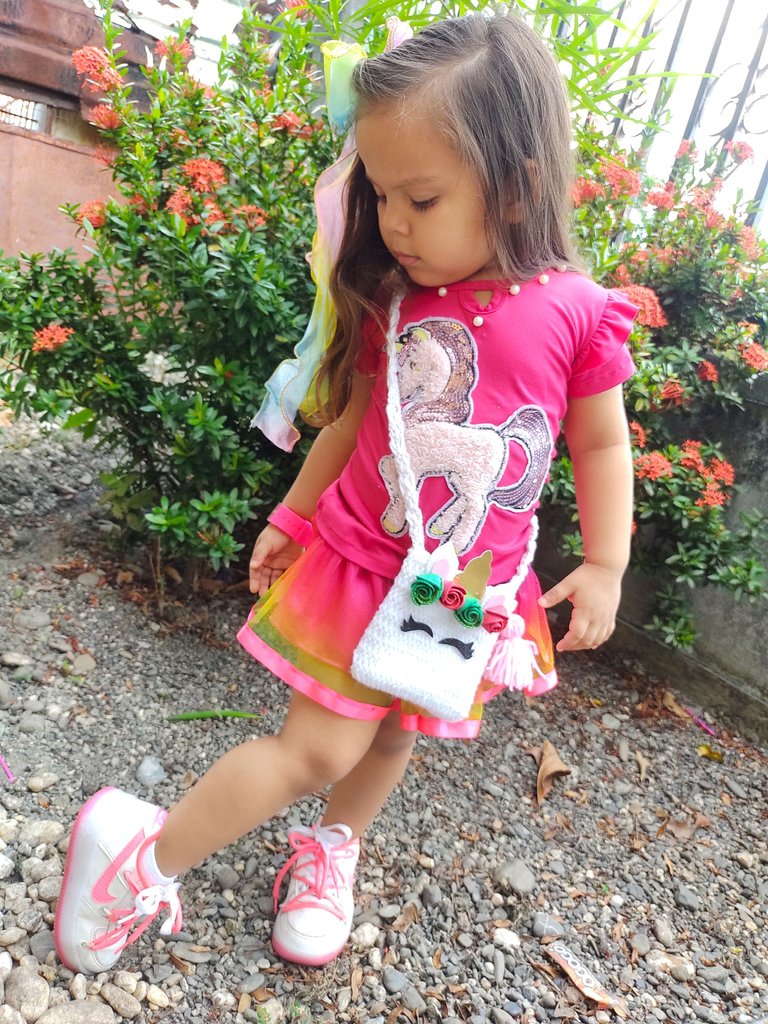
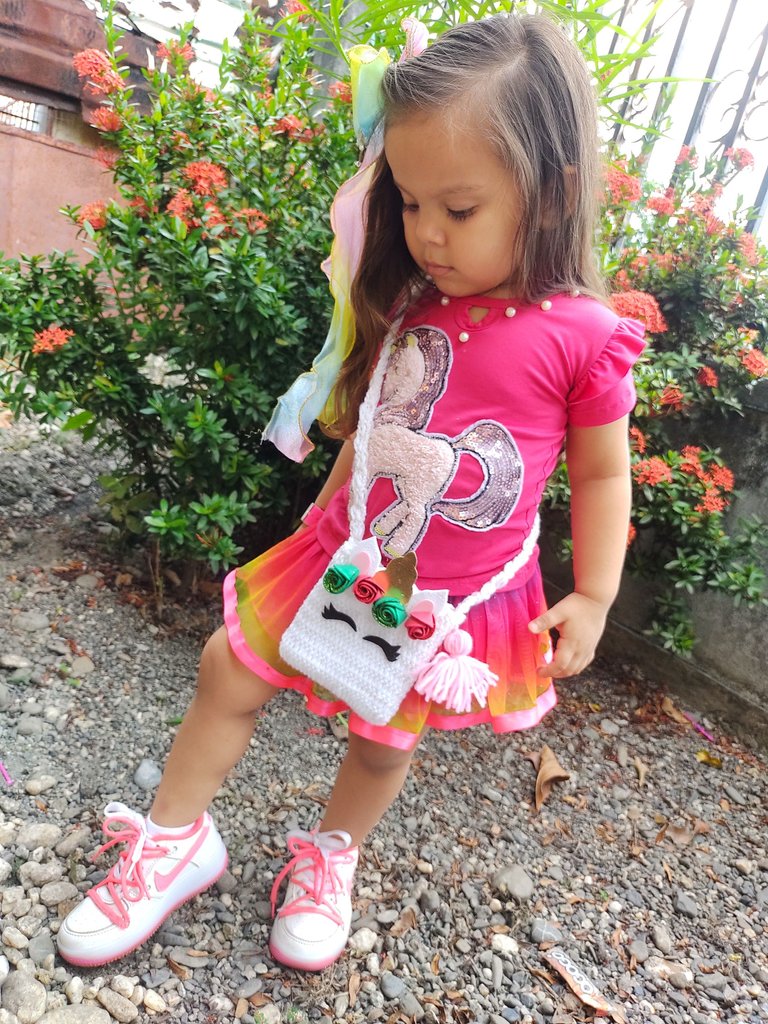
¡La Señorita C quedó monisima con su bolso de unicornio!. Les cuento que elaborar este bolsito tejido me tomó aproximadamente 4 horas, puesto que estoy algo fuera de práctica en el tejido. Además, al día siguiente me dolían un poco los dedos, jaja supongo que la edad no perdona. Por otro lado, una de las cosas más complicadas que se presentaron al realizar la publicación fue la toma de fotografías al paso a paso, porque tuve que decirle a mi esposo que me ayudará en eso, puesto que yo tenía ambas manos ocupadas. En cuanto a las fotos de la Señorita C luciendo la pieza, les cuento que estuvo de lo más contenta y colaborativa haciendo poses.
Imágenes de las instrucciones editadas en Canva Pro.
Traducción: Google Traductor.
[English]
Cecilia is a super cute girl of almost 4 years old, she loves to wear themed accessories in various characters that she usually sees in videos. One of her favorite dolls of hers are unicorns and with them all kinds of equines like little ponies, big horses and the mighty pegasi. The year before hers, her father had given her a cute unicorn backpack for her birthday, without hesitation the girl carried it as they say "up and down". But, recently the suspenders were damaged, the adjustment accessories were made of plastic material and they broke. Miss C was sad, and you know how mothers are in this context, where we would give everything to see a smile on our children's faces. For this reason, I promised to make her a new bag, not exactly a backpack, but a small bag that she could use when she got out of it.
I tell you that Miss C rewinds what happens during the day just before going to sleep, and going back to the new bag, I should have repeated to her that I would make her a small bag as soon as she could spare a bit of time. She was somewhat surprised and she told me: are you going to buy it?. To which I replied: No, I'll use thread to do it From her face, I noticed that she didn't understand, but then she could see the process and it would be easier for her to understand.
A few years ago I learned to knit, I had the needles saved among some things and I decided to look for them to fulfill the commitment with Miss C. She by her side, sat next to me to observe what she would do, she is always aware of what I do and from there she begins the round of questions. To knit this bag, I used school-type yarn, it seemed more ideal to me because it keeps the piece firm. For its decoration, I used small foam roses, textured foam ears and beautiful frosted foam eyes. Ohh, we can't forget to mention the cute golden foami horn and super cute yarn tassel.
Materials
- 40 gr of white school yarn.
- Pink yarn for the tassel.
- Colored foami: Red, green, pink, gold, white and black.
- Silicon/gun.
- Scissors.
- Knitting needle.
- Cardboard, a small rectangle
Crafting Steps
- We started by making a closed loop, some make a magic loop, but in my case I got used to doing it closed and fixed. There we assemble about 25 chains. When making the 25 chains, we mount two rows of half point. These will be what we call the base of the bag, if you like, you can make it wider.
- We assemble 4 chains in height, followed by double crochet all around. We will repeat these steps to give the bag height. The height is completely to your liking, but in my case I have made 9 rows of double crochet.
- Later we assembled a row of ** loins **, that's how I remind them, honestly I don't remember the official name. It consists of giving it 4 or 3 chain stitches, depending on how high we want it to be. Followed by two or three joined double crochet that we close after running 3 spaces, we close with a half point. We will repeat the process around the entire edge, this point will give it a much nicer finish.
- Now, we will do what would be the braid of the bosito. It is quite long, because it is bandit type, to have a better idea of the length, I have measured it with Miss C. For the braid, we take 4 chains as a height reference, followed by two double crochet and we close. We turn the piece and repeat the process depending on how long we want it. At the end of the length, what we will do is close and the body and the bag itself would be ready.
Making the Tassel
- We will have at hand a rectangular piece of cardboard that will be proportional to the size of the tassel that we want. We wind pink yarn in it, several times. Separately, we cut a piece of yarn that we will use to tie the upper part. We extract from the cardboard and then cut at the opposite end of where we have tied. Finally, we take another piece of yarn and a couple of centimeters from the upper knot, we will turn a couple of them and we will make a small knot, to fix. What remains is to match the lower part with the scissors.
- We attached the tassel to the bag. For this we will use the remaining piece of yarn from the upper part of the tassel.
Decorating the bag with the Unicorn theme
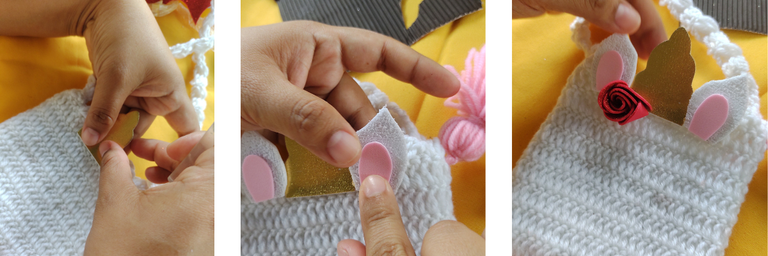
- In matt or frosted Foami, we draw the pieces and cut them. In the case of roses or flowers, I made them based on circles. I have used for each rose 8 small circles that I have joined one to another from the middle and right part. In the center we place silicone forming a central row and from there, we roll up. After drying, we cut in half and we will get two roses. We repeat the process as many times as we want. I have done in red and green. As for the pieces, I have cut out the eyes, a pair of ears with pink details and a golden foami horn.
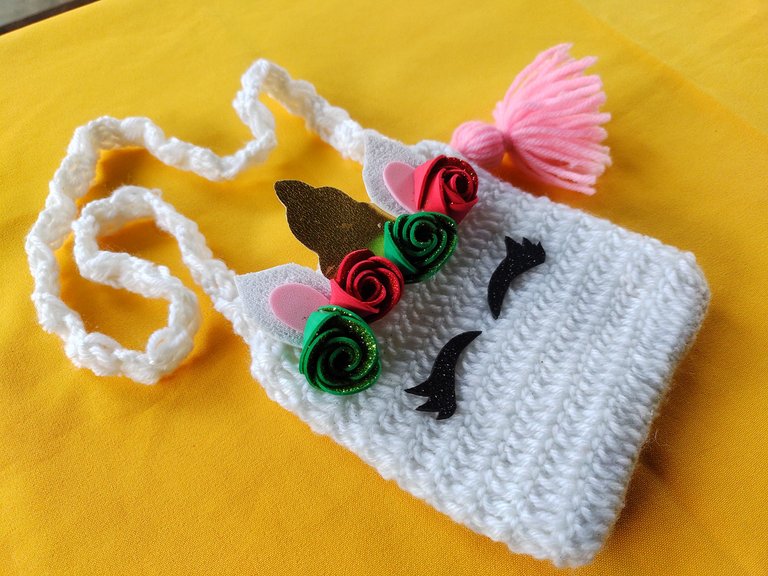
- Finally I fixed the decorative pieces on the front of the bag with silicone.
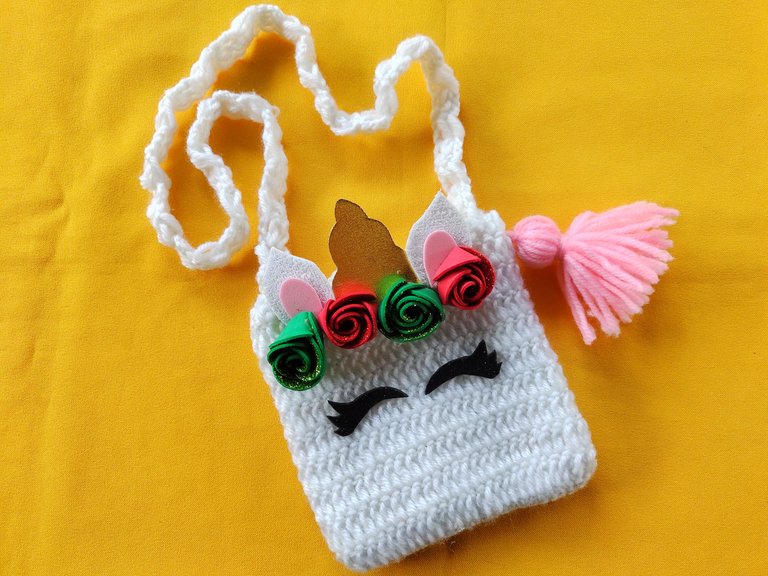
Final Photos (result)
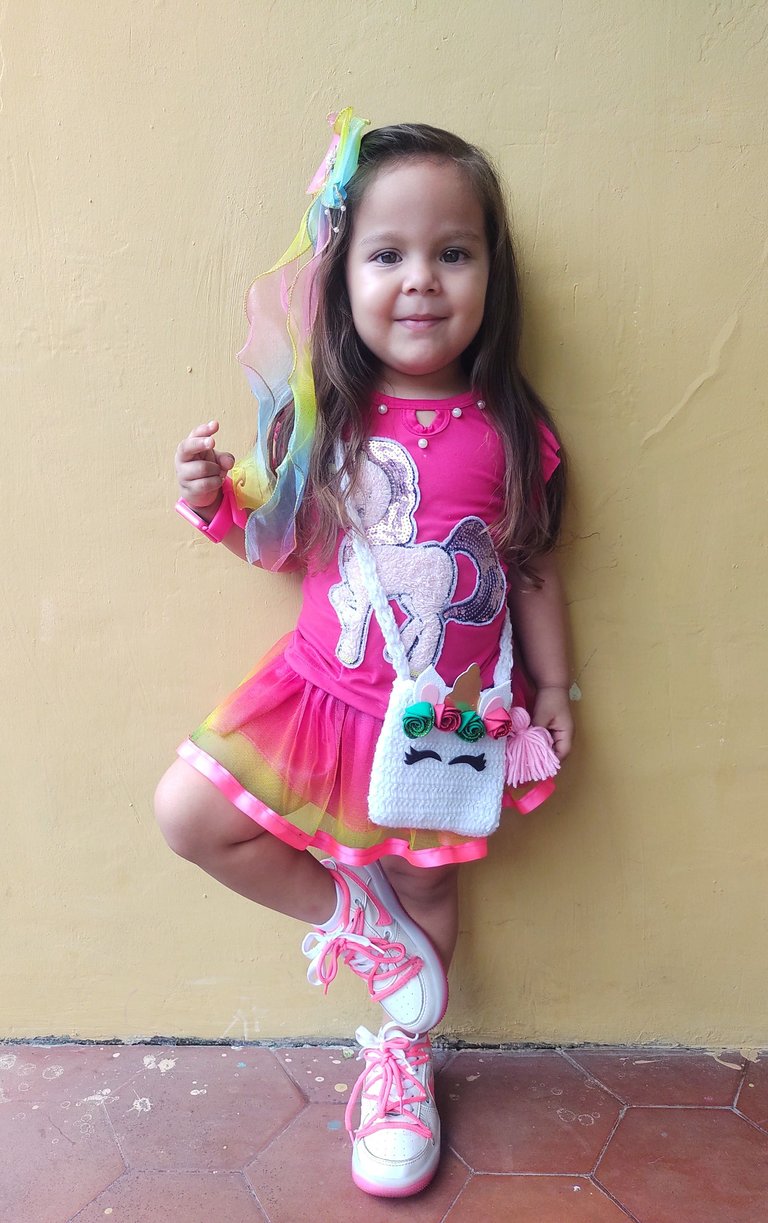
Miss C:'s Photo Session
Miss C was so cute with her unicorn bag!. I tell you that making this woven bag took me approximately 4 hours, since I am somewhat out of practice in knitting. Also, the next day my fingers hurt a bit, haha I guess age is unforgiving. On the other hand, one of the most complicated things that arose when making the publication was taking pictures step by step, because I had to tell my husband that he will help me with that, since I had both hands full. As for the photos of Miss C wearing the piece, I tell you that she was very happy and collaborative doing poses.
Instruction Images edited in Canva Pro.
Translation: Google Translator.
https://twitter.com/1583574951981994002/status/1615073982176174081
https://twitter.com/144659833/status/1615138642435133440
The rewards earned on this comment will go directly to the people( @lacochinaensalsa, @lisbethseijas ) sharing the post on Twitter as long as they are registered with @poshtoken. Sign up at https://hiveposh.com.
Congratulations @lacochinaensalsa! You have completed the following achievement on the Hive blockchain And have been rewarded with New badge(s)
Your next target is to reach 90 posts.
You can view your badges on your board and compare yourself to others in the Ranking
If you no longer want to receive notifications, reply to this comment with the word
STOPTo support your work, I also upvoted your post!
Check out our last posts:
Support the HiveBuzz project. Vote for our proposal!
Este bolsito tejido luce realmente hermoso y tierno.
Gracias por compartir este lindo proyecto con nosotros.
Muchas gracias. Y lo lindo es que como tiene varios colores, es posible combinar con varios conjuntos de salida para la Señorita C. 😊
Gracias por pasar, saludos.
Wow these bags looks so gorgeous and cute, you did an excellent job to make these exceptional, the finishing is awesome and looks cool on your kid.
Thank you. I did it little by little, almost remembering the necessary stitches. She had not knitted for many years. Thanks for stopping by, regards 😌
Saludos @lacochinaensalsa, te quedó muy lindo el bolso, la señorita C se ve muy feliz con su nuevo accesorio.
Feliz inicio de semana!
Hola @belkyscabrera ! Muchas gracias 😊.
Y si, estaba muy contenta gracias a Dios. Muy hiper coqueta!😊
Feliz inicio de semana para ti también, éxitos y bendiciones ✨.
Chamaaaa. También tejes. Eso te quedó precioso. Quiero hacer una para mí nena ya que su papá también le compro un bolso de unicornio pero es más grande que ella. Pero es el que nos compartes hoy es del tamaño perfecto.
Que buena idea.
Gracias por compartirla.
Si, tejo un poco. jeje. Siempre me ha gustado la artesanía y todo lo que incluya manualidades y creatividad. Y entiendo eso, los bolsos ahora son muy grandes, el de la Señorita C también era grande, era más de la mitad del cuerpo de ella y cuando lo cargaba parecía "maneada". Gracias a ti por pasar y por apreciar mi trabajo 😊. Saludos, feliz inicio de semana.
Pero que niña mas coqueta 😍😍, el bolso ha quedado hermoso y ella se ve que está demasiado feliz con el resultado, gran trabajo 💋💋
😄 Eso mismo pensaba yo al tomarle las fotos. De verdad estaba de lo mero contenta. Últimamente disfruta tomarse fotos... Gracias, gracias por apreciar mi trabajo 😊
How beautiful!!!, and it is totally woven, I don't want to imagine the hours of work that you have dedicated to this bag, I made a tail and it took me two days to do it, of course it was the first time, I guess you have already mastered this weaving technique, my congratulations for such a great job.
It took me 4 hours to do it, it was quite fun. I learned to knit when I was 17 years old, currently I was not very practical, but with patience and care you can go a long way. Well, with practice everything gets better. Greetings, thank you very much for stopping by.😊
Hola @lacochinaensalsa me encantó como quedando tu bolso, quedó muy bonito y que bueno que a Cecilia les encanten los unicornio son muy bonitos mi hermana es muy fan de ellos tiene muchos peluches en su cama.
Hola @nasasalazar muchas gracias. Y si, son super lindos, y lo mejor es que estos pueden ser tan coloridos tanto en cabellera, decorados del frente y similares. Los peluches de unicornio son hermosos..😊
Que trabajo tan tierno y muy bien realizado!! 😍 Voy a tomar esta idea porque tengo una sobrina a la que le encantan los unicornios también. Muchas gracias por compartir este tutorial 🌼🌼
Muchas gracias 😊, que amable eres. Y si? estoy contenta, espero te sea super funcional el tutorial y que sorprendas pronto a tu sobrina con un bolsito de unicornio. Saludos ✨
Que hermoso trabajo, que bueno que tu esposo te ayudo con las fotos, a veces un poco complicado, yo siempre las saco sola pero si hace falta ayuda. Abrazos