(ESP/ENG) ACCESORIO PARA TRENZAR EL CABELLO TEJIDO A CROCHET / CROCHETED HAIR BRAIDING ACCESSORY
¡Hola, hola! Hivers y hermosa comunidad de NeedleWorkMonday, espero todos se encuentren súper bien, animados e inspirados 💟
Ya paso casi un mes desde mi ultima publicación, y es que he estado muy ocupada en cosas de la casa y cuidando de mi mama ya que le sacaron una cordal y la ha pasado bastante mal, pero estos últimos días ha estado bastante mejor así que aquí estoy nuevamente 😊
Hoy quiero mostrarles como realice un muy lindo accesorio para adornar las trenzas del cabello de las niñas tejido a crochet.
Hello, hello! Hivers and beautiful NeedleWorkMonday community, I hope you all are super well, encouraged and inspired 💟.
It's been almost a month since my last post, and I've been very busy with things around the house and taking care of my mom since she had a wisdom tooth removed and has been having a hard time, but these last few days she's been feeling much better so here I am again 😊.
Today I want to show you how I made a very cute accessory to embellish girls' crocheted hair braids.
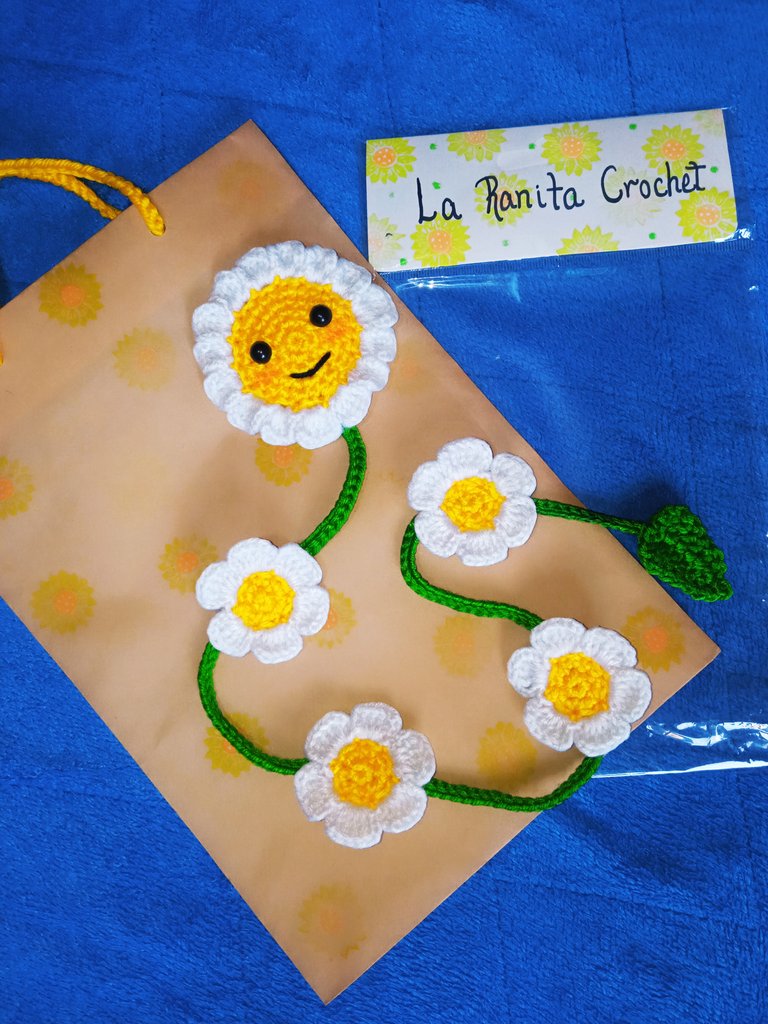
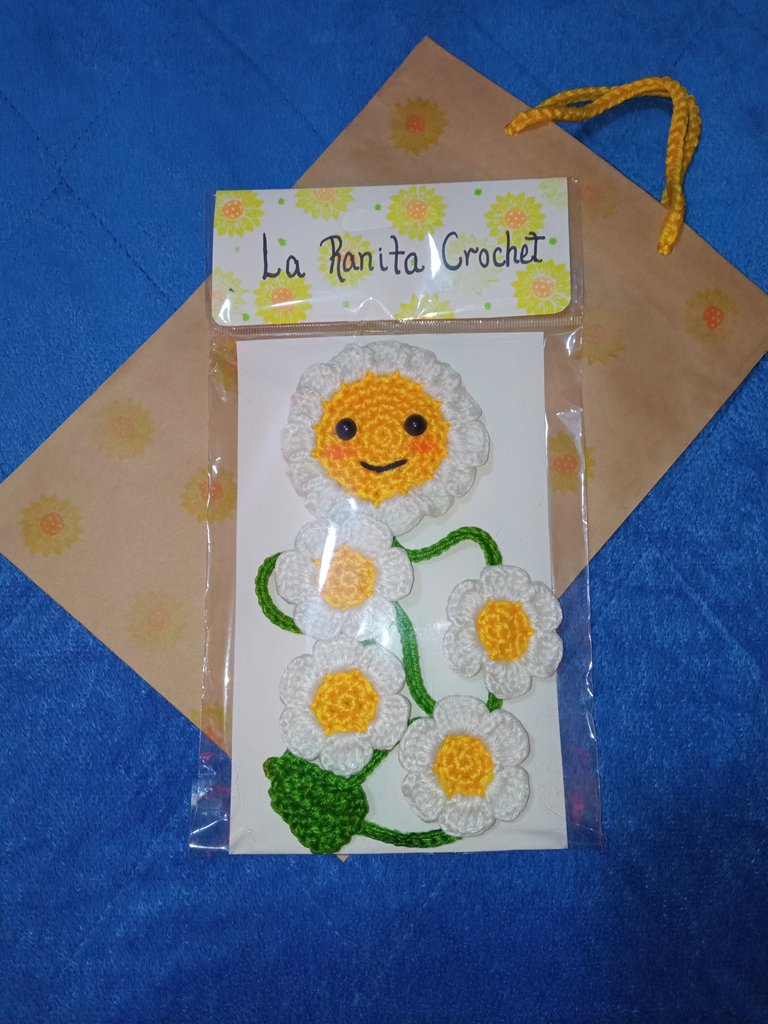
Es muy rápido y fácil de tejer y queda realmente hermoso en el cabello, este lo realice por petición de mi esposo ya que es un regalo para su ahijada por su cumpleaños, así que, además del tejido también realice una bolsa de papel Kraft y el aza se la hice con una cadeneta de estambre en color amarillo, también le realice un bonito estampado de girasoles a la bolsa con un pequeño sello de girasol que realice yo misma de manera casera.
Resulto ser un regalo muy original y a la ahijada de mi esposo le encanto su regalo, tanto que al siguiente día se lo estreno jajaja… pero su mama olvido tomarle una foto para enviármela.
Bueno amigos a continuación les presento los materiales que use para realizar el tejido de este bonito accesorio para el cabello y también el proceso de tejido.
MATERIALES:
-Estambres de color blanco, amarillo, negro y verde.
-Aguja de crochet #000.
-Marcadores de puntos.
-Una pinza para cabello tipo tic- tac.
-Aguja lanera.
-Silicón o pegamento.
-Ojos de 6mm.
-Tijera.
ABREVIATURAS DE LOS PUNTOS A UTILIZAR:
-Pa: punto alto.
-Mpa: medio punto alto.
-Pb: punto bajo.
-Cad: cadeneta.
-Pd: punto deslizado.
-Aum: aumento.
-Am: anillo mágico.
PASO A PASO:
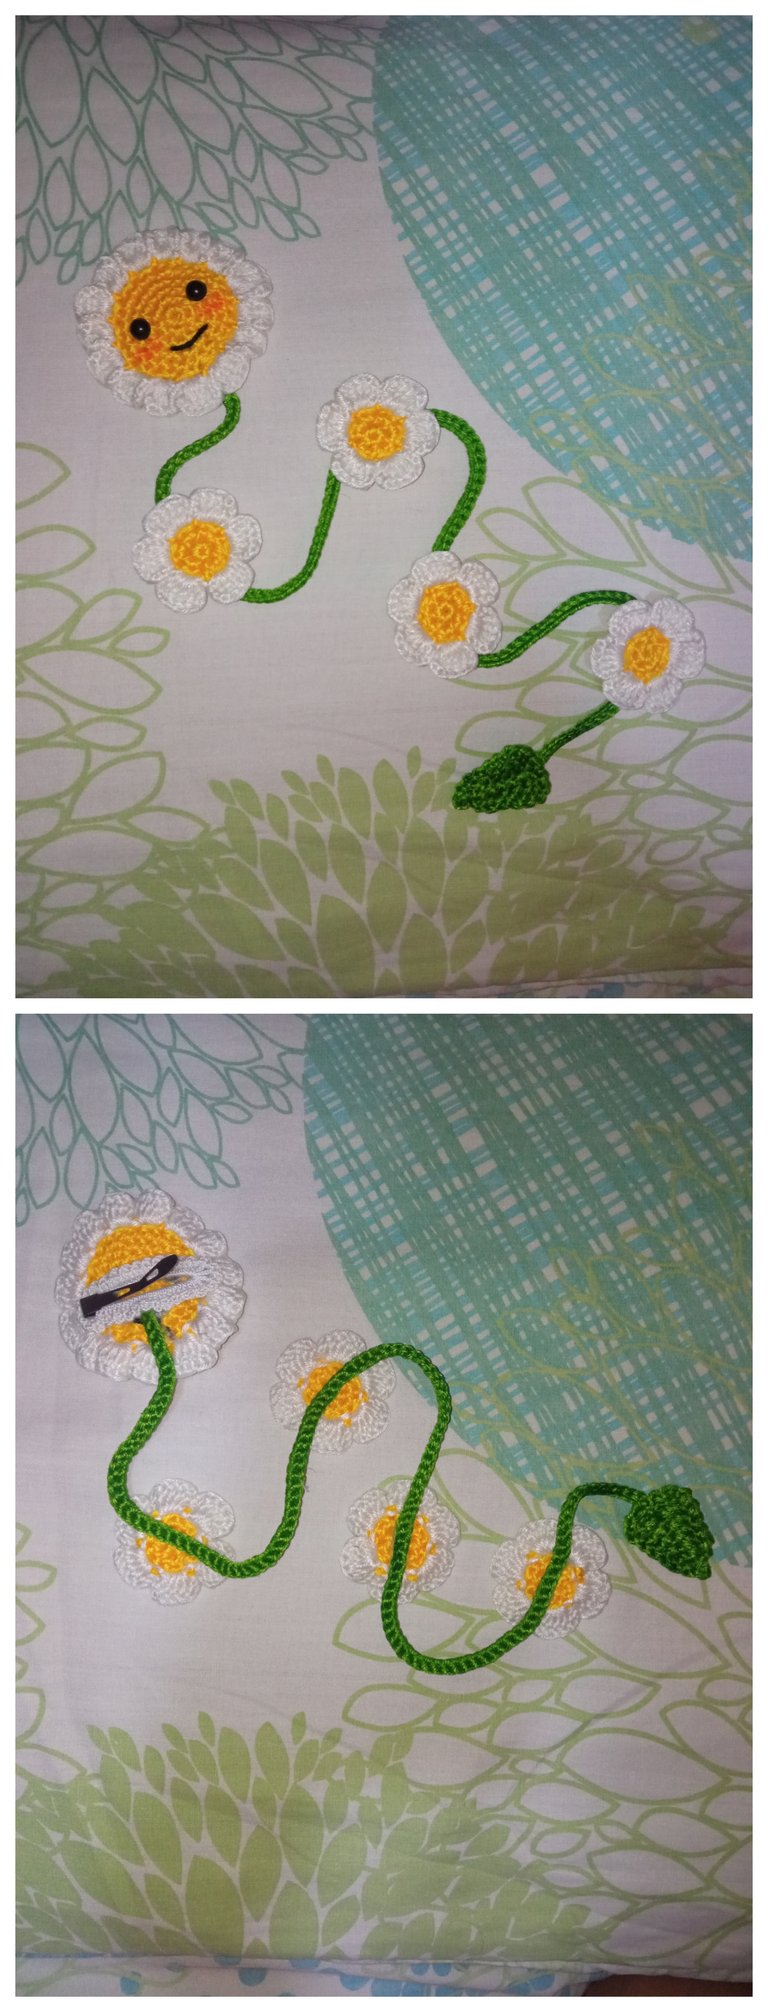
El accesorio lo realice con una margarita de tamaño mediano a la cual le coloque una carita feliz para hacerla un poco más tierna, y también 4 margaritas más pequeñas que son las que adornaran la trenza como tal.
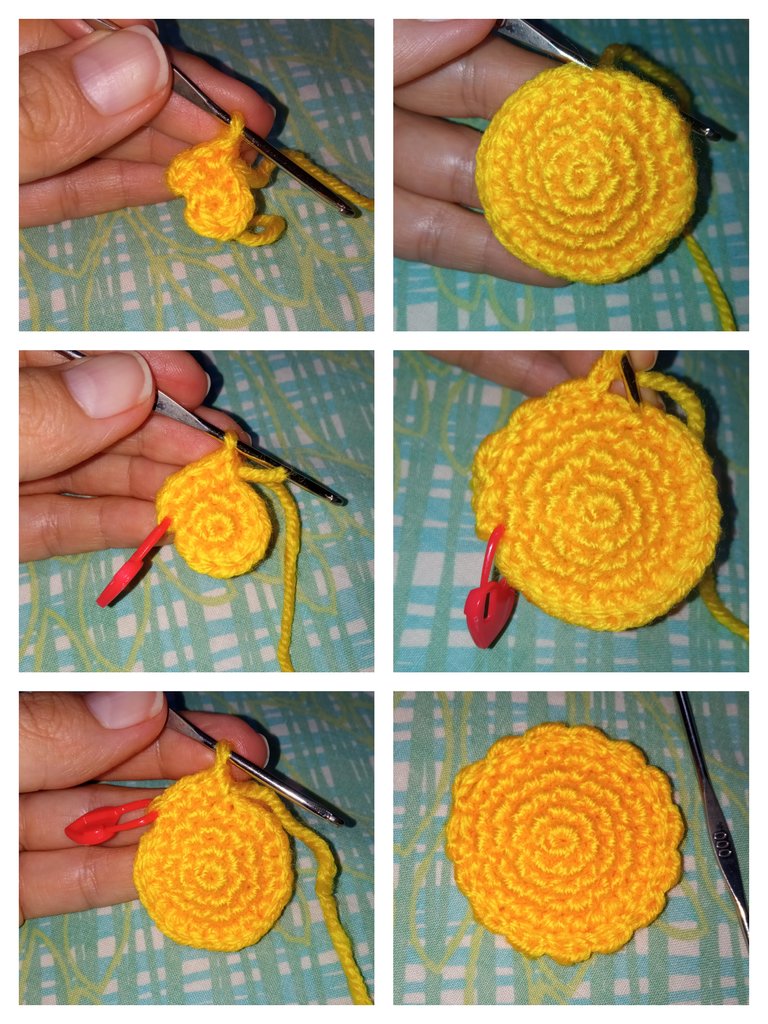
Yo decidí realizar primero todos los centros de las flores, como si trabajara en serie; para luego proceder con el tejido de los pétalos.
Y la pinza que use la tenía forrada o tejida de unas que realice hace un tiempo.
Margarita grande:
V1: Am con 6 Pb. (6)
V2: 6 Aum. (12)
V3: (1 Pb, Aum) x 6 (18)
V4: (2 Pb, Aum) x 6 (24)
V5: (3 Pb, Aum) x 6 (30)
V6: (2 cad, salto un punto, Pd) repetir la secuencia hasta cubrir todo el borde del círculo, al finalizar deben ser 15 arquitos, que es donde se tejerán los 15 pétalos de la flor, terminar con 1 Pd cortar y asegurar la hebra.
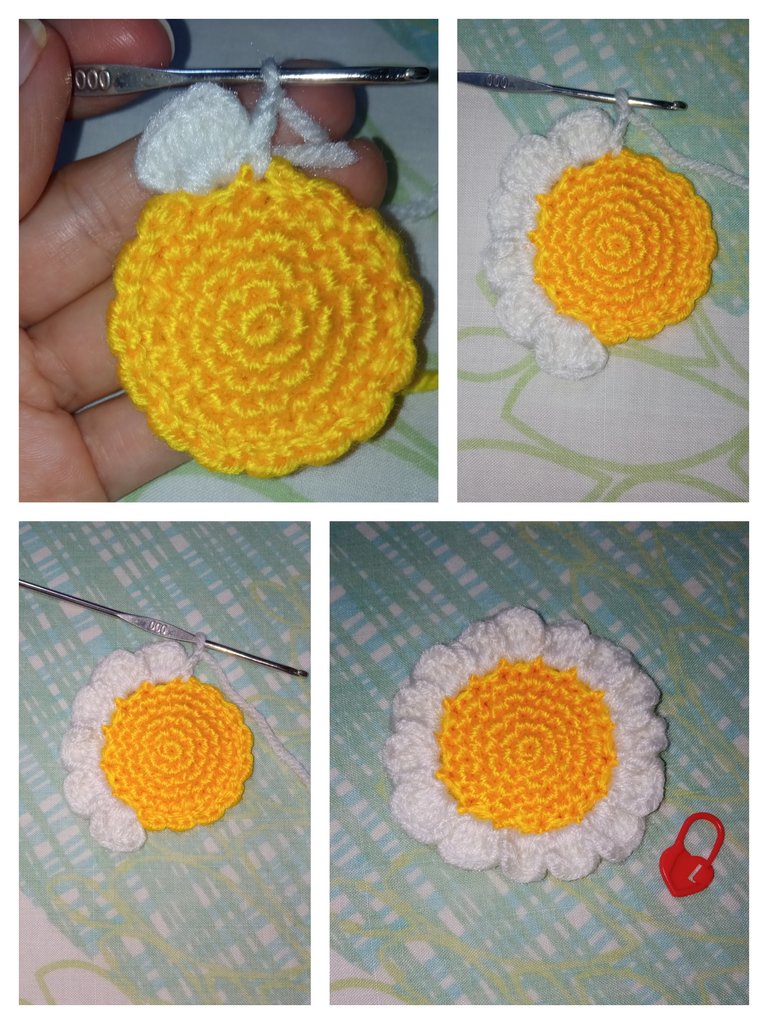
V7: (pétalos) (color blanco o a elección) se inicia en cualquier arco de la vuelta anterior, insertamos la hebra y realizamos la siguiente secuencia dentro de 1 mismo arco para realizar cada pétalo, (Pd, 3cad, 4 Pa, 3 cad, Pd), y repetimos la misma secuencia dentro de cada arco hasta tener los 15 pétalos.
It is very quick and easy to weave and it is really beautiful in the hair, I made this one by request of my husband since it is a gift for his goddaughter for her birthday, so, besides the weaving I also made a Kraft paper bag and the loop I made it with a yellow worsted chain, I also made a nice sunflower print to the bag with a small sunflower stamp that I made by myself in a homemade way.
It turned out to be a very original gift and my husband's goddaughter loved her gift, so much so that the next day she used it for the first time hahaha... but her mom forgot to take a picture to send it to me.
Well friends here are the materials I used to weave this beautiful hair accessory and also the weaving process.
MATERIALS:
- White, yellow, black and green stamens.
- Crochet needle #000.
- Stitch markers.
- A tic-tac hair clip.
- Wool needle.
- Silicone or glue.
- 6mm eyes.
- Scissors.
ABBREVIATIONS OF THE STITCHES TO BE USED:
dc : double crochet.
Hdc: half high stitch.
sc: single crochet.
Ch: chain stitch.
sl st: slipped stitch.
inc: increase.
Mr: magic ring.
STEP BY STEP:
I made the accessory with a medium size daisy to which I put a happy face to make it a little more tender, and also 4 smaller daisies that will adorn the braid as such.
I decided to make all the flower centers first, as if I were working in series, and then proceed with the weaving of the petals.
And the clip I used I had it lined or woven from ones I made some time ago.
Large daisy:
R1: Mr with 6 Sc. (6)
R2: 6 inc (12)
R3: (1 sc, inc) x 6 (18)
R4: (2 sc, inc) x 6 (24)
R5: (3 sc, inc) x 6 (30)
R6: (2 ch, skip a stitch, sl st) repeat the sequence until the entire edge of the circle is covered, at the end there should be 15 arches, which is where the 15 petals of the flower will be woven, finish with 1 sl st cut and secure the loop.
R7: (petals) (white color or your choice) start in any of the bows of the previous round, insert the loop and make the following sequence within 1 same bow to make each petal, (sl st, 3ch, 4 dc, 3 ch, sl st), and repeat the same sequence within each bow until you have the 15 petals.
Margaritas pequeñas (x4):
Los centros de las flores se hacen con estambre amarillo y los pétalos con color blanco.
V1: Am con 6 Pb. (6)
V2: 6 Aum. (12)
V3: (2 cad, salto un punto, Pd) X 6 (arcos para los pétalos)
V4: en esta vuelta cambiamos a color blanco y tejemos los pétalos de la misma forma como tejimos los de la flor grande.
Small daisies (x4):
Flower centers are made with yellow stamen and petals with white color.
R1: Mr with 6 Sc. (6)
R2: 6 inc (12)
R3: (2 ch, skip a stitch, sl st) X 6 (bows for the petals)
R4: in this round we change to white and we knit the petals in the same way as we knit the petals of the big flower.


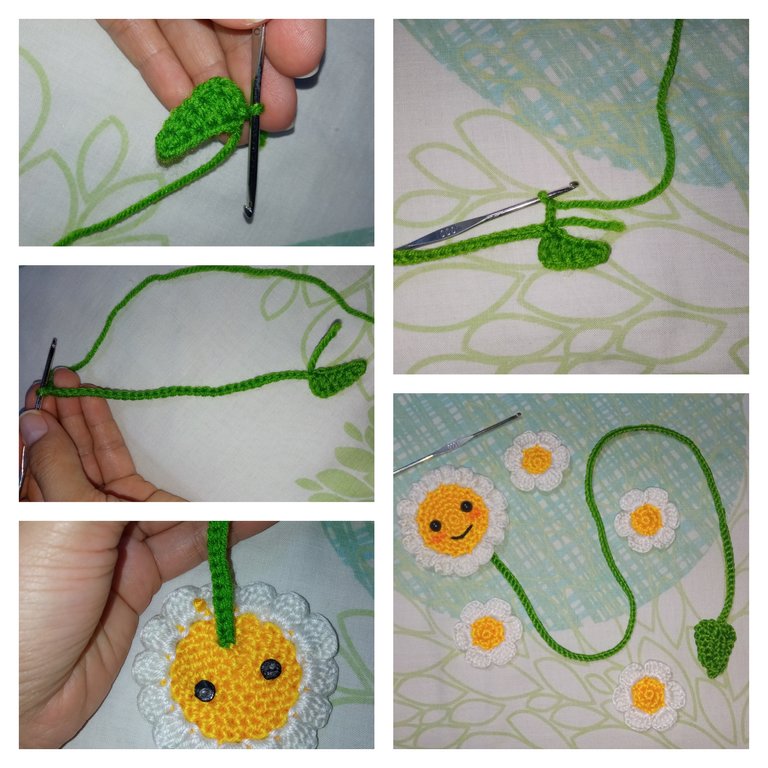
Hoja y cordón base (verde):
Tejer una cadeneta de 12 puntos, y en el cuarto punto desde la aguja realizar la siguiente secuencia 3 Pa, 4 mpa, 1 Pb, 1 Punto Picot de 2 cad y comenzar a tejer una cadeneta de 50 cm de largo, y luego en el centro de la flor grande por la parte de atrás se tejen 2 Pd para enganchar el cordón de la flor, y regresamos tejiendo puntos deslizados por toda la cadeneta hasta llegar a donde inicia la hoja y comenzamos a tejer el otro lado de la hoja con 1 Pb, 4 mpa, 4 Pa, y cerrar con Pd sobre el primer Pa, y luego le hice un borde a toda la hoja tejiendo 1cad, 1 Pd, para darle un bonito acabado a la hoja.
Leaf and base cord (green):
Knit a chain of 12 stitches, and in the fourth stitch from the needle make the following sequence 3 dc, 4 hdc, 1 sc, 1 Picot stitch of 2 ch and begin to knit a chain 50 cm long, and then in the center of the large flower on the back side knit 2 sl st to hook the flower cord, and we go back knitting slipped stitches through the whole chain until we get to where the leaf starts and we start knitting the other side of the leaf with 1 sc, 4 hdc, 4 sl st, and close with sl st over the first dc, and then I made a border to the whole leaf knitting 1 sc, 1 sl st, to give a nice finish to the leaf.
Armado:
-Ubicar los ojos y bordar la boca para formar la carita de la flor, esto lo hice para darle un toque más tierno e infantil, y marcar las mejillas con un toque de rubor.
-Pegar en la parte trasera de la flor grande la pinza, ya sea pegada o cocida.
-Y para finalizar pegue las flores pequeñas a lo largo del cordón con silicón caliente, procurando que queden más o menos a la misma distancia.
-También realice una linda bolsa con papel Kraft a la que le hice un estampado de flores amarillas con un sellito casero que realice hace pocos días, y las azas de la bolsa las hice tejidas con punto cadena.
Assembled:
- Place the eyes and embroider the mouth to form the little face of the flower, this I did to give it a more tender and childish touch, and mark the cheeks with a touch of blush.
- Glue on the back of the big flower the clip, either glued or baked.
- And finally, glue the small flowers along the cord with hot silicone, making sure they are more or less at the same distance.
- I also made a nice bag with Kraft paper to which I stamped yellow flowers with a homemade stamp that I made a few days ago, and I knitted the handles of the bag with chain stitch.
BUENO AMIGOS DESEO LES HAYA GUSTADO TANTO COMO A MÍ EL RESULTADO FINAL DE ESTE HERMOSO ACCESORIO PARA EL CABELLO CON MARGARITAS TEJIDO A CROCHET Y ESPERO SUS BONITOS COMENTARIOS Y/O VOTOS, ASÍ ME MOTIVAN PARA SEGUIR COMPARTIENDO MIS CREACIONES CON USTEDES, YO ESTARÉ FELIZ DE RESPONDER TODOS SUS COMENTARIOS, SEAN FELICES Y QUE LA MUSA DE LA CREATIVIDAD NUNCA LOS ABANDONE!
¡GRACIAS POR VISITAR MI BLOG!
Se despide de ustedes con mucho cariño su amiga Nathalie @laranitacrochet
WELL FRIENDS I HOPE YOU LIKED AS MUCH AS I DID THE FINAL RESULT OF THIS BEAUTIFUL CROCHET HAIR ACCESSORY WITH DAISIES AND I HOPE YOUR NICE COMMENTS AND / OR VOTES, SO YOU MOTIVATE ME TO CONTINUE SHARING MY CREATIONS WITH YOU, I WILL BE HAPPY TO ANSWER ALL YOUR COMMENTS, BE HAPPY AND MAY THE MUSE OF CREATIVITY NEVER LEAVE YOU!
THANK YOU FOR VISITING MY BLOG!
Your friend Nathalie @laranitacrochet bids you a fond farewell.
*Todas las fotografías utilizadas en la publicación son propiedad de la autora.
*Las fotografías fueron tomadas y editadas con mi REDMI 9 y con la App FotoRoom.
*La traducción la hice en https://www.deepl.com/es/translator
*All photographs used in this publication are property of the author.
*The pictures were taken and edited with my REDMI 9 and the FotoRoom App.
*The translation was done at https://www.deepl.com/es/translator
Thank you very much for your support 😊
Muy lindo, felicitaciones por tan bonito trabajo.
Gracias por compartir.
Muchas gracias 😊 yo feliz de compartir mi trabajo 😁 gracias por visitar mi blog
Qué bonito te quedo es un trabajo impecable, muchas felicitaciones.
Muchas gracias 😊🤗
Omg, this is so pretty and the colors are perfect 😍
Thank you very much 😊🤗
Hermosas florecitas para las niñas, me encanta este diseño, feliz día.
Muchas gracias ☺️ feliz día para ti también!
Congratulations @laranitacrochet! You have completed the following achievement on the Hive blockchain And have been rewarded with New badge(s)
Your next target is to reach 9000 upvotes.
You can view your badges on your board and compare yourself to others in the Ranking
If you no longer want to receive notifications, reply to this comment with the word
STOPCheck out our last posts:
wow that looks so cute you are amazing, keep up the good work. have great day and week ahead.
Muchas gracias ☺️
Hola @laranitacrochet. Todo te quedó muy lindo😍. Deseo que tú mamá siga mejorando su salud. Feliz día 🌷🪡
Muchas gracias por leer mi post y por tus buenos deseos 😌🤗
@laranitacrochet que hermosura 😍, es un diseño muy original, de seguro la niña que lo use, marcará la diferencia, Saludos 🤗
Muchas gracias @anamariag aprecio mucho tu comentario y bueno espero que sí destaque xq esa fue mi intención al tenerlo.
Congratulations, your post has been upvoted by @dsc-r2cornell, which is the curating account for @R2cornell's Discord Community.
Enhorabuena, su "post" ha sido "up-voted" por @dsc-r2cornell, que es la "cuenta curating" de la Comunidad de la Discordia de @R2cornell.
que bello esta tu adorno para el cabello, ya veré algunas chicas por allí usando uno de esos, te felicito.
Sip 😁 quiero hacer uno para mí y que sea para cabello corto 😊
Excelente
Following closely you really did and amazing job explaining everything step by step.
Well done with the result. It looks really good
Thank you very much indeed 😊
You’re welcome
Que bonito trabajas el crochet 😍
saludos amiga, que lindo accesorio para el caballo, la flor está hermosa, una idea muy original, gracias por compartir.
Feliz jueves!
Muchas gracias amiga 😊 a mi también me encantó la flor 😁🌼
Hermoso accesorio, sin duda alguna el crochet luce genial en cualquier proyecto.
Gracias por compartir.
Gracias a ti por leer mi post @kattycrochet 😊🤗
¡Qué hermoso, @laranitacrochet! Me encantó, es un regalo muy bonito. El empaquetado también me gustó mucho, el conjunto se ve impecable y de buen gusto. Te felicito. Saludos, un abrazo.
Muchas gracias Bella ☺️🤗 El empaquetado a mi me encantó también, me encanta hacer los regalos lo más personalizados posible 😁