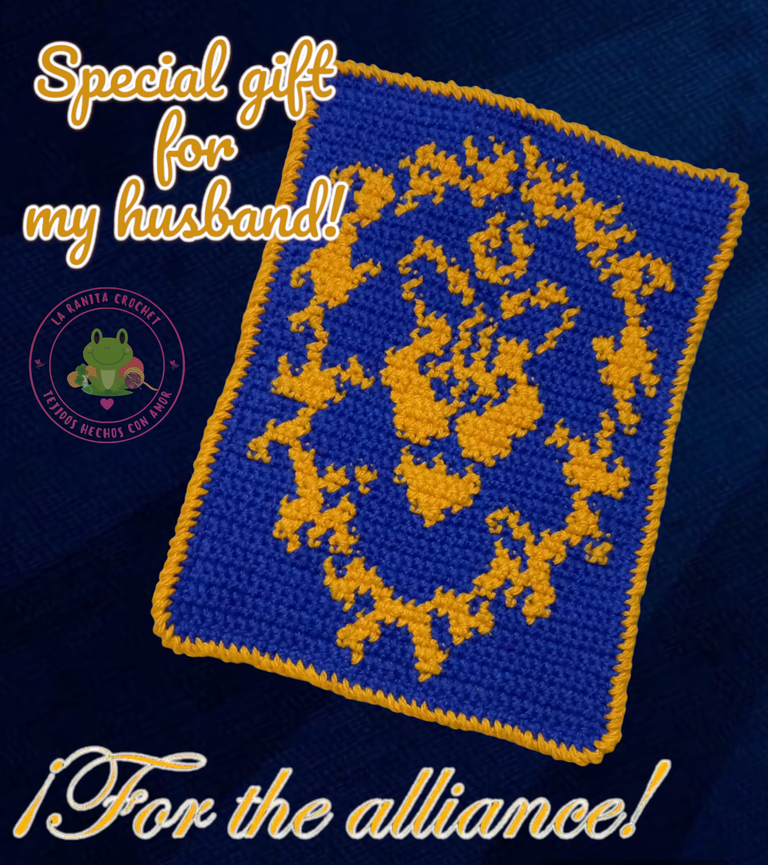
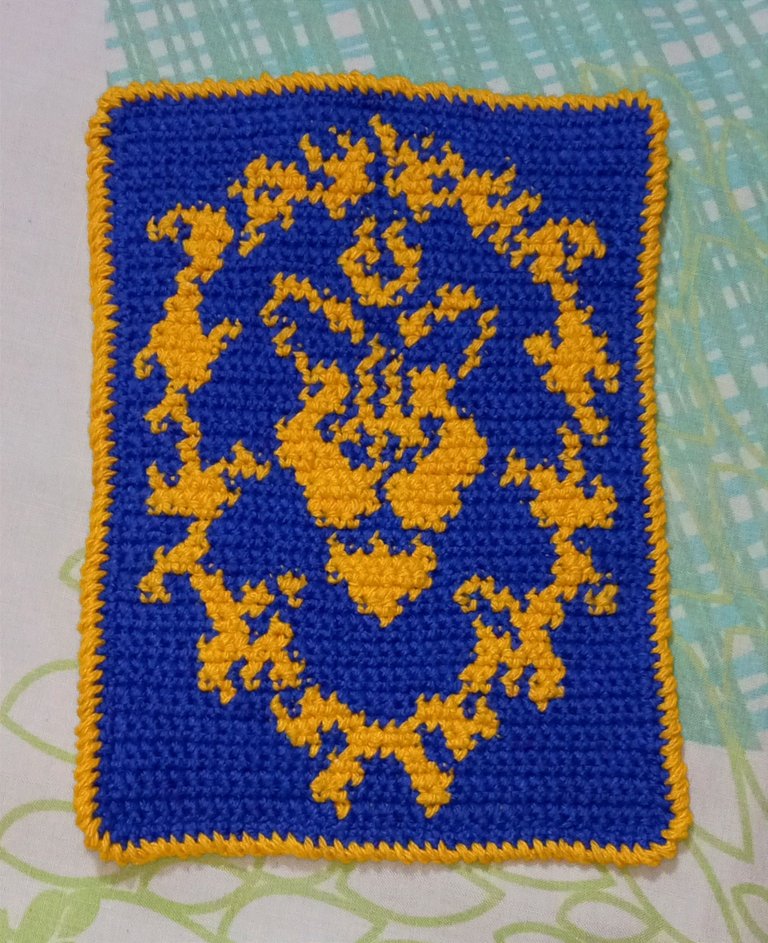
REGALO ESPECIAL PARA MI ESPOSO, tapetito posa vaso inspirado en el estandarte de guerra de la alianza de W.O.W. / SPECIAL GIFT FOR MY HUSBAND, a cup holder inspired by the W.O.W. alliance war banner.
¡Hola, hola! Mi gente de Hive y linda comunidad de DIYHub, espero todos se encuentren súper bien, animados e inspirados. 😊 💟 🐸
En esta oportunidad les quiero presentar un tapetito posa vaso inspirado en el estandarte de guerra de la alianza de World of Warcraft, y es que mi esposo es súper fan de este juego y siempre juega en la alianza.💛 💙
Hello, hello! My people of Hive and the beautiful community of DIYHub , I hope you are all super well, encouraged and inspired.😊 💟 🐸
This time I want to present a cup holder inspired by the war banner of the World of Warcraft alliance, and my husband is a super fan of this game and always plays in the alliance. 💛 💙
Les cuento que mi esposo se me quejo porque he tejido cosas para medio mundo y a él nada jajaja… y le dije bueno te voy a tejer un posa vaso para que lo tengas en tu mesa de la PC, y a él le gustó la idea, y se me ocurrió preguntarle de que lo quería, y me dice no amor de lo que me gustaría es muy difícil no vas a poder tejerlo, y yo… ¿COMO DE QUE NO VOY A PODER? Dime de que lo quieres que yo te lo hago, y me salió que lo quería del estandarte de guerra de la alianza, y yo… NO SE DIGA MAS YA BUSCO FOTOS A VER COMO ES Y TE PROMETO QUE TE LO HAGO.
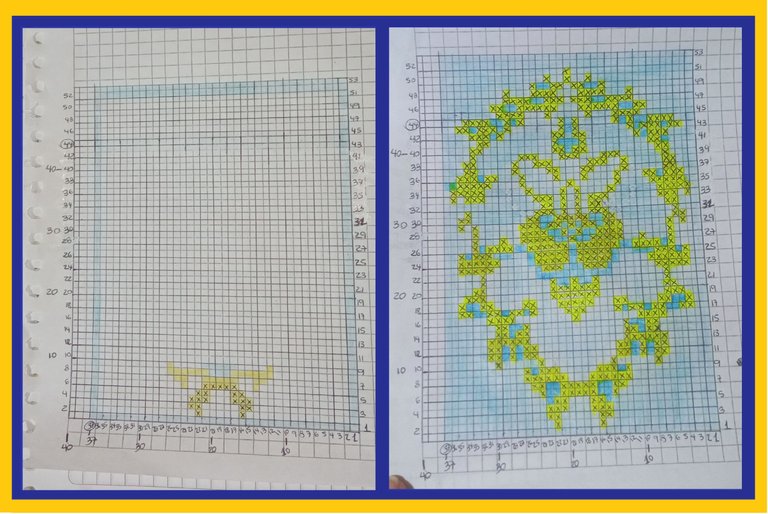
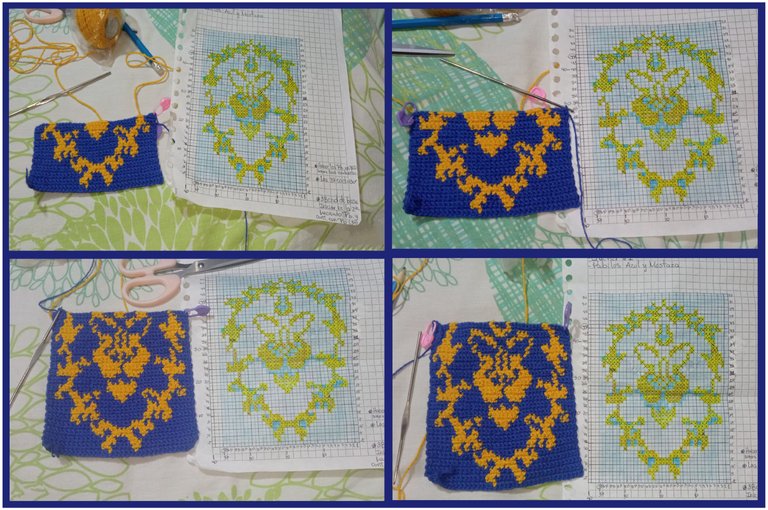
Pues nada lo tome como un reto, así que luego de tener la imagen, me puse a pensar cómo podía hacerlo y me decidí por la técnica de intarsia en crochet, la verdad es la primera vez que tejo con esta técnica pero no se me hiso nada difícil. Esta técnica se usa para hacer dibujos en los tejidos, y consiste en ir haciendo cambios de color y tener un ovillo para cada color en distintas secciones del tejido, y de seguir el patrón de un diagrama.
Antes que todo hice el diagrama de lo que iba a tejer, estos diagramas a veces los conseguimos listos para imprimir, pero decidí hacerlo a mano, y lo que hice fue conseguir una imagen pixelada del estandarte de la alianza, y luego en una hoja cuadriculada hice unas cuantas líneas horizontales y verticales, para dividir los cuadritos de la hoja en 4 cuadrados más pequeños, y así lograr dibujar el diagrama en una sola hoja.
Luego de tener lista la hoja con los cuadritos, comencé a enumerarlos tanto vertical como horizontalmente para tener la misma cantidad de cuadros que la imagen y luego con color azul y amarillo fui marcando el color correspondiente a cada cuadradito y así fui formando el grafico.
I tell you that my husband complained to me because I have knitted things for half the world and nothing for him hahaha... and I told him well I am going to knit you a cup holder so you can have it on your PC table, and he liked the idea, and it occurred to me to ask him what he wanted it for, and he said no love what I would like it is very difficult you will not be able to knit it, and I... HOW CAN I NOT BE ABLE TO? Tell me what you want and I'll make it for you, and it came out that I wanted it of the war banner of the alliance, and I... DON'T SAY ANY MORE I'LL LOOK FOR PICTURES TO SEE HOW IT IS AND I PROMISE TO MAKE IT FOR YOU.
Well, I took it as a challenge, so after I had the image, I started to think about how I could do it and I decided to use the intarsia crochet technique, the truth is the first time I knit with this technique but it wasn't difficult at all. This technique is used to make drawings in the fabrics, and consists of making color changes and having a ball for each color in different sections of the fabric, and follow the pattern of a diagram.
First of all I made the diagram of what I was going to weave, these diagrams sometimes we get them ready to print, but I decided to do it by hand, and what I did was to get a pixelated image of the banner of the alliance, and then on a grid sheet I made a few horizontal and vertical lines, to divide the squares of the sheet into 4 smaller squares, and thus manage to draw the diagram on a single sheet.
After having the sheet with the squares ready, I began to number them both vertically and horizontally to have the same amount of squares as the image and then with blue and yellow color I marked the color corresponding to each square and thus I was forming the graph.
Ahora si está todo listo para iniciar a tejer el tapetito, así que a continuación le dejo los materiales y el paso a paso.
Materiales:
- Diagrama con la imagen a tejer.
- Hilos de algodón en color azul rey y mostaza.
- Ganchillo o aguja de crochet # 1.
- Marcadores de puntos y tijera.
Now everything is ready to start knitting the tapetito, so here are the materials and the step by step instructions.
Materials:
- Diagram with the image to be knitted.
- King blue and mustard colored cotton yarns.
- Crochet hook or crochet needle # 1.
- Stitch markers and scissors.
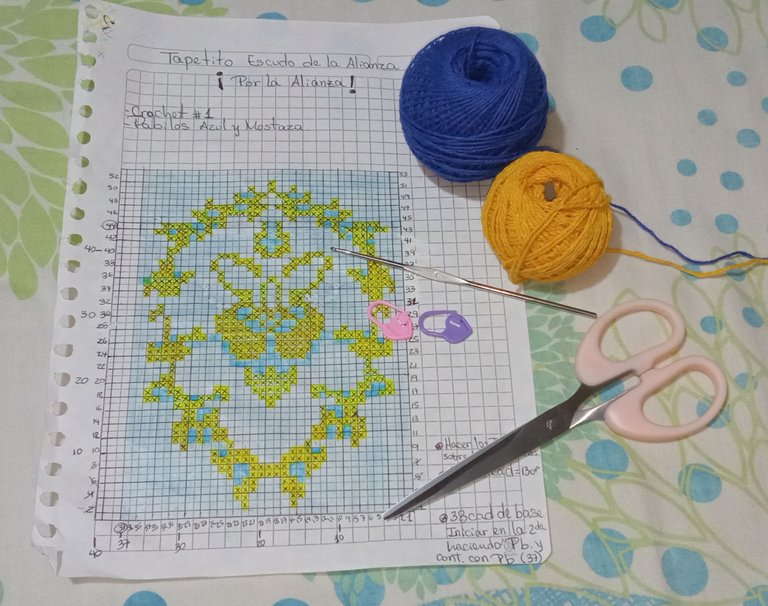
Para realizar este trabajo emplearemos los siguientes puntos: cadenetas (cad), punto alto (Pa) y Punto cangrejo.
Proceso de tejido:
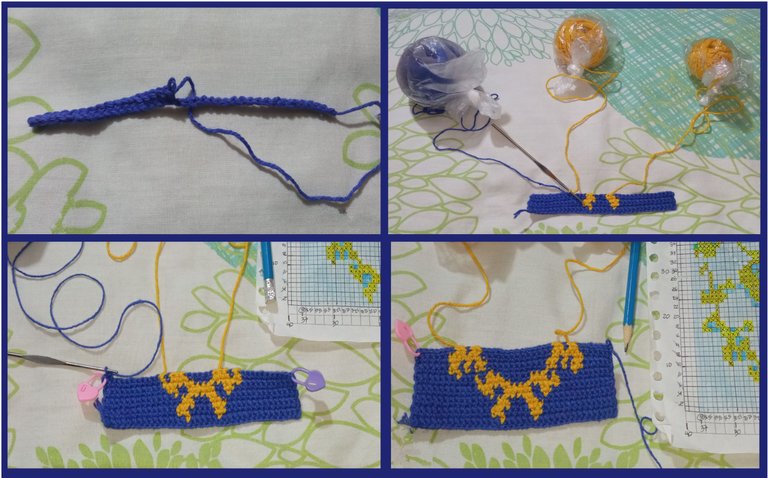
1. Seguir el patrón del diagrama:
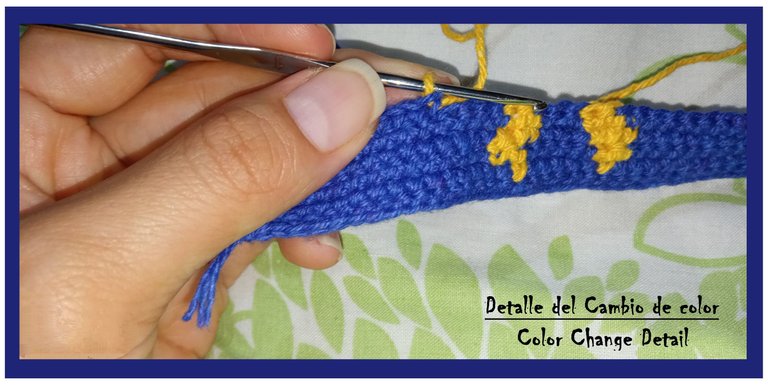
Con color azul iniciaremos tejiendo una cadeneta de 38 puntos, y en la segunda cadena contando desde la aguja empezaremos a tejer puntos bajos, en total haremos 37 puntos bajos. Luego damos vuelta al tejido y para iniciar la siguiente hilara como estoy tejiendo solo con puntos bajos lo que hago es iniciar de una vez con un punto bajo y no hago cadenetas de altura.
Si detallamos el diagrama, los cambios de color inician en la segunda hilera así que como cada cuadrito del diagrama corresponde a un punto bajo, lo que haremos es contar detenidamente cuantos puntos corresponden en color azul y en mostaza a medida que vamos avanzando en el tejido, y según lo que indica el diagrama iremos tejiendo los puntos.
To make this work we will use the following stitches: chain stitch (cad), double crochet (dc) and crab stitch.
Knitting process:
1. Follow the pattern of the diagram:
With blue color we will start by knitting a chain of 38 stitches, and in the second chain counting from the needle we will start knitting single crochet, in total we will knit 37 single crochet stitches. Then we turn the fabric and to start the next row, as I am knitting only with single crochet stitches, what I do is to start at once with a single crochet stitch and I don't knit chains of height.
If we detail the diagram, the color changes begin in the second row so as each square of the diagram corresponds to a single crochet, what we will do is to count carefully how many stitches correspond to blue and mustard as we go along the knitting, and according to what the diagram indicates we will knit the stitches.
2. Una vez tejidas todas las hileras que indica el diagrama, lo que hice fue hacer puntos bajos en todos los bordes con hilo de color azul, para preparar el tejido para el siguiente paso.
2. Once all the rows indicated in the diagram were knitted, what I did was to make low stitches on all the edges with blue yarn, to prepare the fabric for the next step.
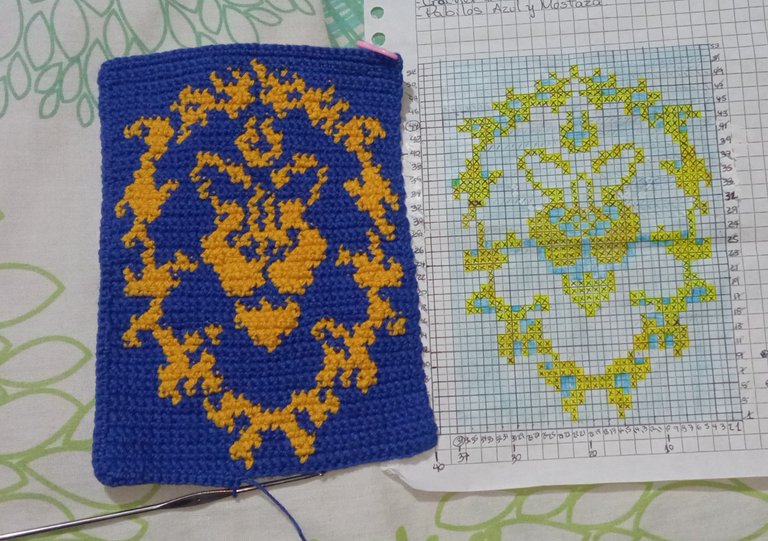
3. Para finalizar quise darle un detalle bonito al borde y opte por hacer una hilera de puntos cangrejo en todo el borde del tapete en color mostaza.
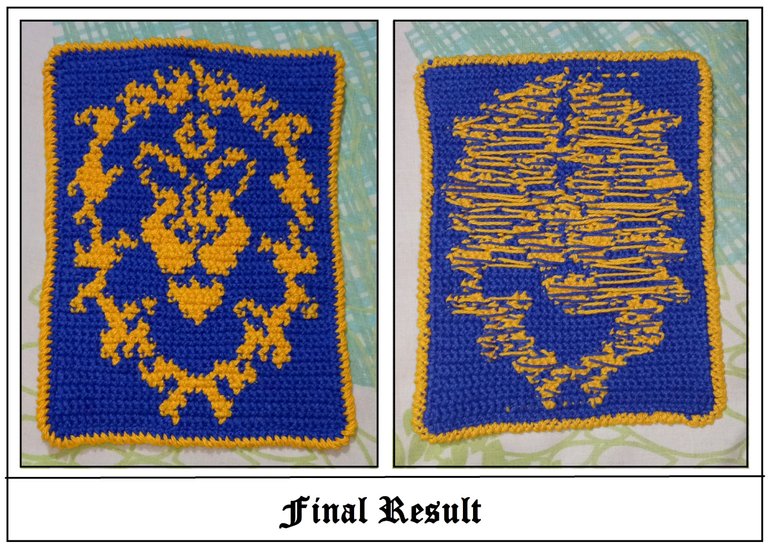
Y así logre cumplir con lo prometido a mi esposo, y hacerle este espectacular tapetito posa vaso inspirado en el estandarte de guerra de la alianza de World of Warcraft, la cara de felicidad de mi esposo al ver su nuevo posa vaso tejido no tiene precio, y lo mejor es que cuando se lo entregue estaba emocionado y empezó a presumirlo con sus amigos y también con unos primos y ahora uno de mis primos que también es súper fan del juego quiere uno igual jajaja….
3. To finish I wanted to give a nice detail to the edge and I chose to make a row of crab stitches around the edge of the mat in mustard color.
And so I managed to fulfill my promise to my husband, and make him this spectacular cup holder inspired by the banner of war of the alliance of World of Warcraft, the face of happiness of my husband to see his new posa glass fabric is priceless, and the best thing is that when I gave it to him he was excited and began to show it off to his friends and also with some cousins and now one of my cousins who is also super fan of the game wants one like hahaha....
Deseo les haya gustado tanto como a mi este post y también el resultado de regalo especial para mi amado esposo. ESPERO SUS BONITOS COMENTARIOS Y/O VOTOS, ASÍ ME MOTIVAN PARA SEGUIR COMPARTIEDO MIS CREACIONES CON USTEDES.
Se despide de ustedes con mucho cariño su amiga Nathalie @laranitacrochet
I hope you liked as much as I did this post and also the result of the special gift for my beloved husband. I HOPE YOUR NICE COMMENTS AND / OR VOTES, SO MOTIVATE ME TO CONTINUE SHARING MY CREATIONS WITH YOU.
Your friend Nathalie @laranitacrochet bids you a fond farewell.
*Todas las fotografías utilizadas en la publicación son propiedad de la autora.
*Las fotografías fueron tomadas y editadas con mi REDMI 9.
*La traducción la hice en https://www.deepl.com/es/translator
*All photographs used in the publication are property of the author.
*The photographs were taken and edited with my REDMI 9.
*Translation was done at https://www.deepl.com/es/translator
Wow. I think we are all your husband here, haha. This is amazing.
Hahahahaha.... 🤣
Thank you! 😁🤗
Congratulations @laranitacrochet! You have completed the following achievement on the Hive blockchain And have been rewarded with New badge(s)
Your next target is to reach 2750 upvotes.
You can view your badges on your board and compare yourself to others in the Ranking
If you no longer want to receive notifications, reply to this comment with the word
STOPCheck out our last posts:
Wow this is such a thoughtful idea for you to come up with something to gift your husband.
The cup holder looks cute and I'm sure I'll appreciate it.
Well, I did give it a lot of thought, since I wanted to give him something he could use and be useful 😁.
And well he is happy with his gift ☺️
Thank you very much!
Hermoso trabajo amiga 😚
Gracias amiga ☺️🤗
Wow this is really beautiful. I love your pattern of work
Thank you very much! ❤️😊
Wow, you're so sweet. I wish I had the same skills as yours so that I could give the same unique and beautiful gift to him. Your act to your husband is worth emulating.
Thank you very much! 😌😊
And well it's a matter of knowing what our loved one really likes, and give them something specially made for them, it will always be appreciated the gift if it comes from the heart ❤️😊