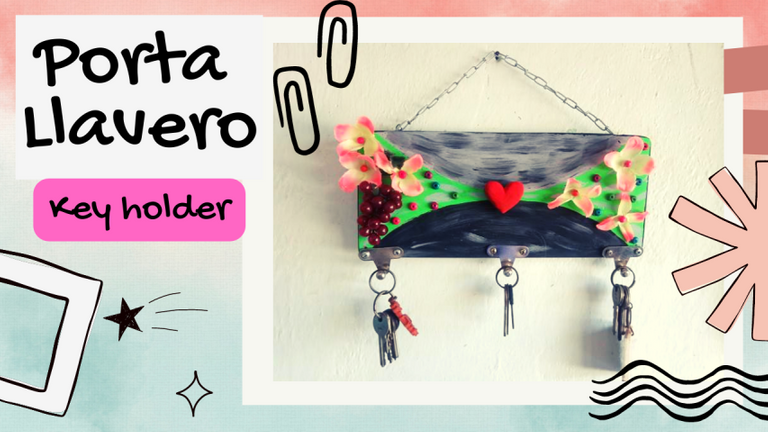
Creating a beautiful key holder from scrap materials / (ENG/ESP)

Sean todos bienvenidos a mi publicación.
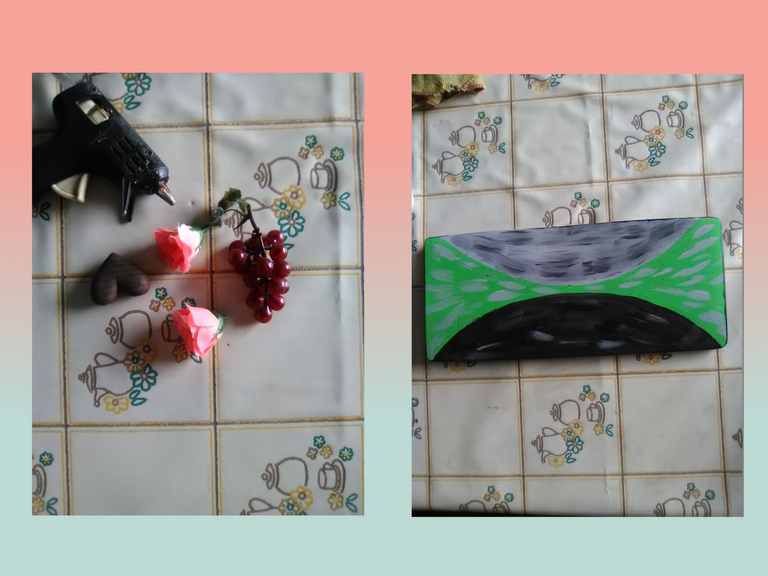
El día de hoy te presento una manualidad que he realizado con materiales de desecho, un día estuve acomodando algunas cosas en mi casa, por lo que siempre cuando salgo de la casa y vuelvo coloco las llaves sobre la mesa de la sala, por lo que un día se me perdieron dentro de la casa por no tener un lugar para colocarlo, así que cuando encontré una tabla que no estaba usando, así que se me ocurrió la brillante idea de hacer un porta llaves para así colocarlas en ese lugar para que así no se me pierdan las llaves.
Hacer esta manualidad me tomo un poco de tiempo, tenía que esperar a que la pintura se me secara, luego tenía que aplicar un poco de fuerza para poder colocar algunos tornillos tirafondo, hay miles de ideas que podemos hacer para crear un porta llavero, a mi esposo y a mí nos suele pasar mucho que se nos olvida donde colocamos las llaves de la casa, por lo que he querido hacer uno y así decorar un poco más mi casa con esta hermosa manualidad.
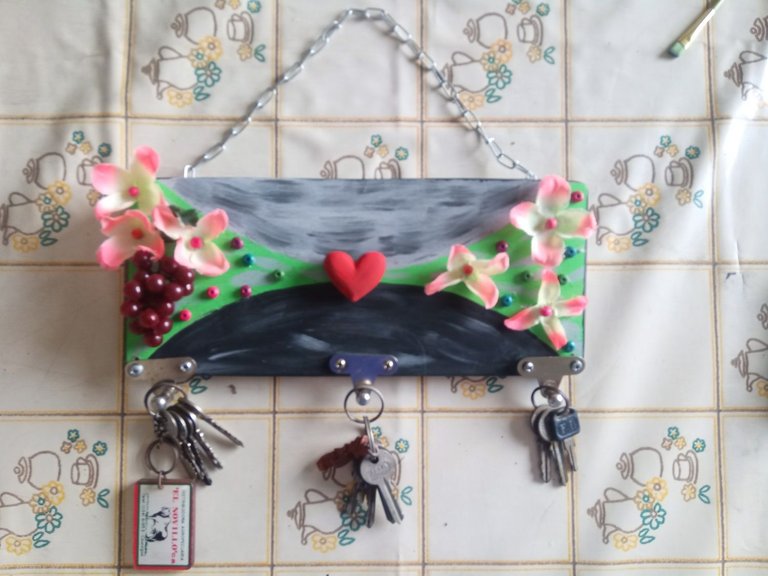
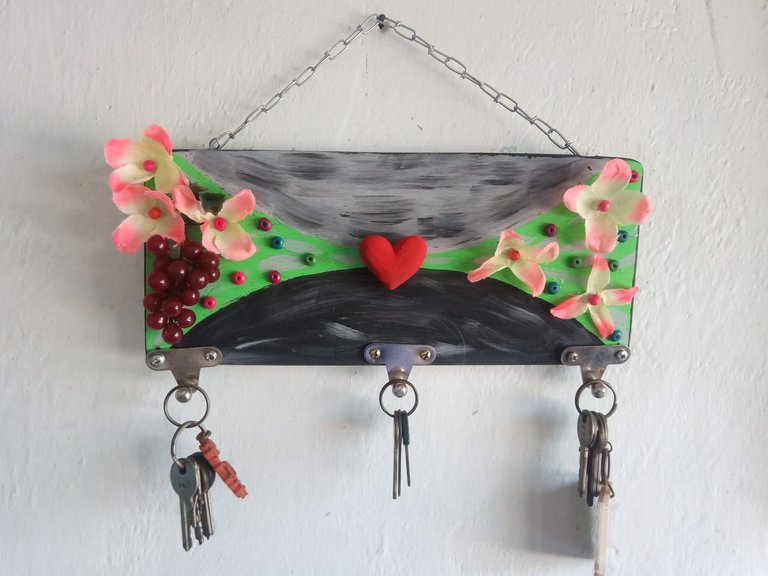
Esta decoración de colores para el porta llaves crea una formación de fantasía de naturaleza, el blanco simboliza el día, el negro la noche y el corazón simboliza la paz.
Al final de la publicación les estaré mencionando los materiales que utilice para poder crear este hermoso dibujo.
Las fotografías que verán a continuación, fueron tomadas con mi teléfono modelo Alcatel_5044R.
A continuación, les presentaré el proceso de elaboración que implemente para realizar este dibujo.

Welcome to my publication.
Today I present you a craft that I made with scrap materials, one day I was arranging some things in my house, so always when I leave the house and return I place the keys on the table in the living room, so one day I lost them inside the house for not having a place to place it, so when I found a table that I was not using, so I came up with the brilliant idea of making a key holder to place them in that place so I do not lose my keys.
Making this craft took me a little time, I had to wait for the paint to dry, then I had to apply a little force to place some lag screws, there are thousands of ideas that we can do to create a key holder, my husband and I often forget where we put the keys of the house, so I wanted to make one and decorate my house a little more with this beautiful craft.
This colorful decoration for the key holder creates a fantasy formation of nature, the white symbolizes the day, the black symbolizes the night and the heart symbolizes peace.
At the end of the publication I will be mentioning the materials I used to create this beautiful drawing.
The pictures you will see below were taken with my Alcatel_5044R phone.
Next, I will show you the elaboration process that I implemented to make this drawing.

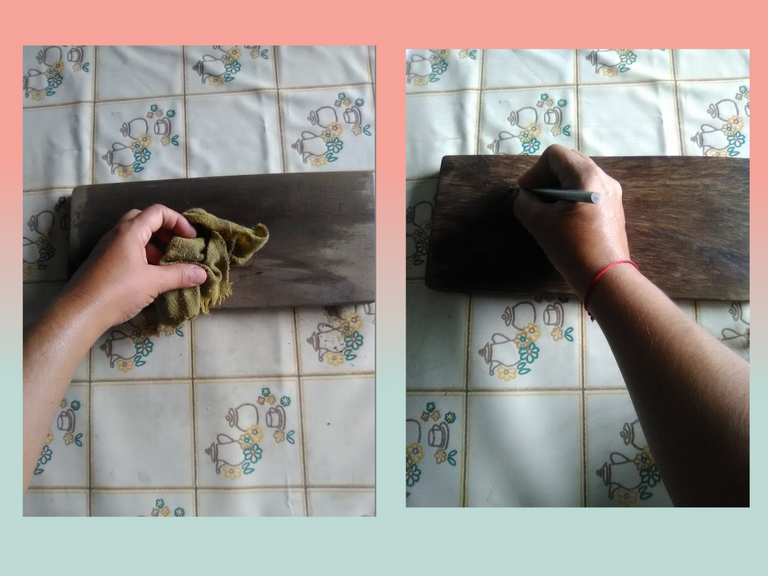
Paso 1
Para comenzar a realizar esta manualidad, primero limpié los residuos de polvo que tenía la tabla en la que voy a hacer él porta llavero, como la tabla la tenía guardado en mi almacén de material desechable, tenía un poco de polvo, por lo que tome un paño humedecido con agua y comencé a frotarlo suavemente por la tabla.
Después, con la ayuda de un lápiz comencé a marcar las áreas en la que voy a comenzar a pintar, en la parte superior trace una línea de media luna y en la parte inferior también.
Step 1
To start making this craft, first I cleaned the dust residue that had the board on which I will make the key holder, as the board was stored in my disposable material store, it had a little dust, so I took a cloth dampened with water and began to rub it gently by the board.
Then, with the help of a pencil I started to mark the areas where I am going to start painting, at the top I drew a crescent line and at the bottom as well.
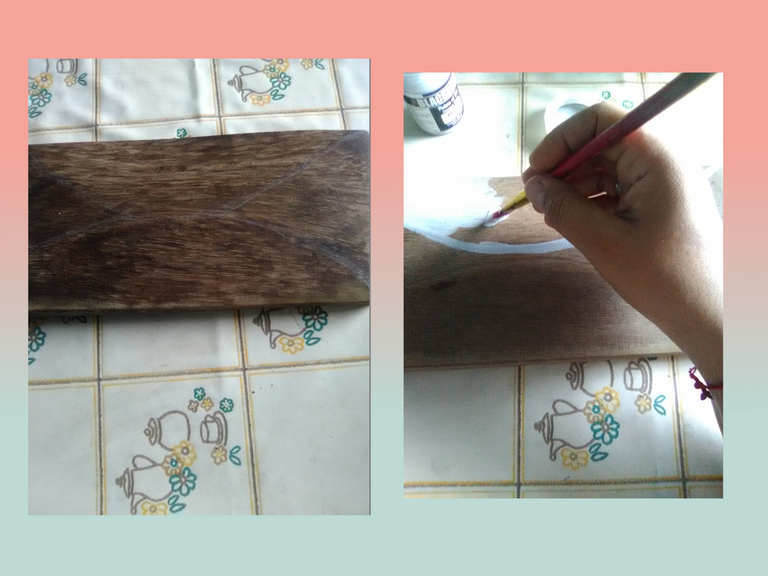
PASO 2
Podemos notar como me quedo la línea que use como guía de media luna.
Al tener las líneas marcadas comencé a pintarlas con pintura al frío, en la parte superior usé el color blanco con la ayuda de un pincel un poco grueso, en este proceso procuré no sobresalirme de las líneas para que me quedara perfecto.
STEP 2.
We can see how the line I used as a guide for the half moon was.
When I had the lines marked I started to paint them with cold paint, in the upper part I used the white color with the help of a thick brush, in this process I tried not to go beyond the lines so that it would be perfect.
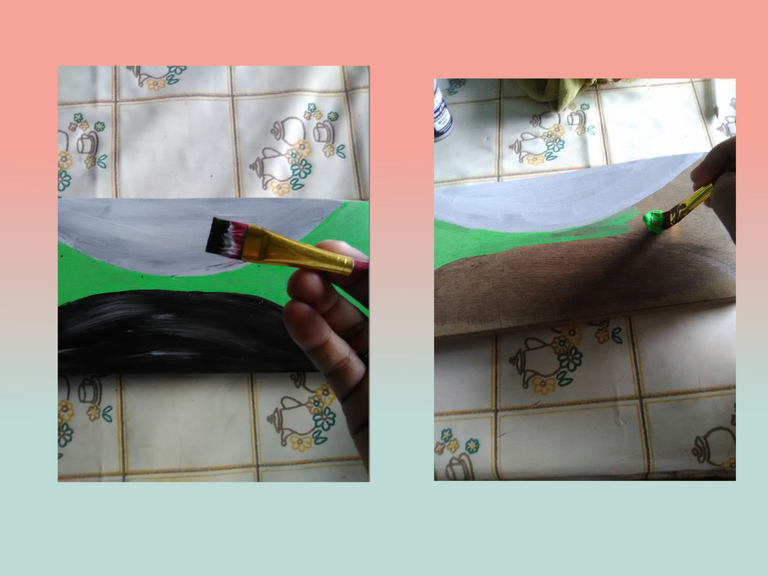
PASO 3
Después comencé a pintar la parte de en medio de la tabla con el color verde manzana, como mencione anteriormente, lo pinte de la forma más cuidadosa posible para no sobresalirme de las líneas.
Y para parte inferior use la pintura negra, después de pintar toda la tabla, lo deje secar para comenzar con la decoración.
STEP 3
Then I started to paint the middle part of the board with the apple green color, as I mentioned before, I painted it as carefully as possible so as not to go over the lines.
And for the lower part I used the black paint, after painting the whole board, I let it dry to start with the decoration.
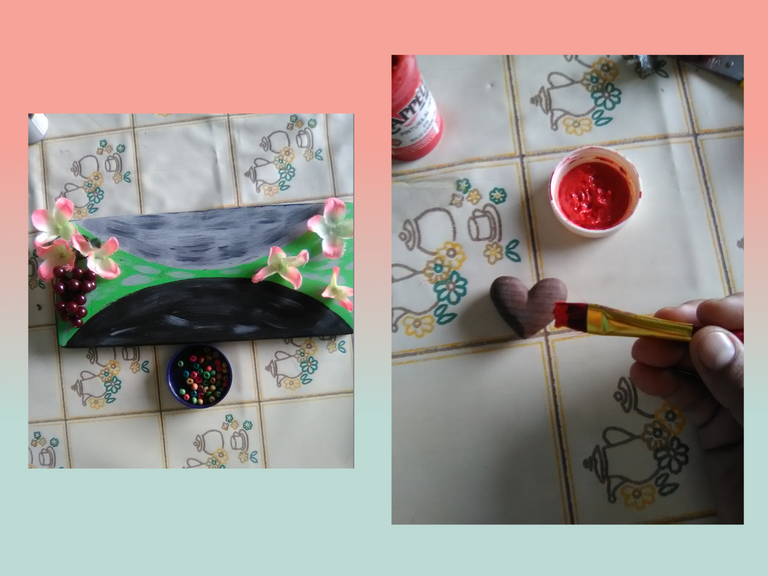
PASO 4
Las decoraciones que voy a usar a continuación son unas uvas de plástico de las que se suelen usar en la época de diciembre como decoración, también tome algunas flores artificiales, las cuales con la ayuda de unas tijeras pique la parte inferior de ellas, donde se encuentra el tallo que sostiene la flor, para que al momento de pegarlos a la tabla se pueda apreciar mejor.
Luego de esperar a que la pintura de la tabla se secara, con el color gris comencé a crear algunos diseños por toda la tabla, en la parte blanca use el color negro, en la verde el color gris, y en el negro el color blanco, esto lo hice para que quedara hermoso.
También usaré un viejo corazón de madera que luego la voy a usar para pintarla de color rojo con pintura al frío.
STEP 4
The decorations that I will use next are some plastic grapes that are usually used in December as decoration, also take some artificial flowers, which with the help of scissors I cut the bottom of them, where is the stem that holds the flower, so that when I glue them to the board can be better appreciated.
After waiting for the paint on the board to dry, with the gray color I started to create some designs all over the board, in the white part I used the black color, in the green part the gray color, and in the black part the white color, I did this to make it look beautiful.
I will also use an old wooden heart that I will later use to paint it red with cold paint.
PASO 5
Luego, con la ayuda de una pistola de silicona y una barra de silicona, comencé a pegar todas las decoraciones como las uvas y las flores.
También voy a usar algunas esferas de plástico para decorar un poco más este hermoso porta llaves.
Más adelante, con la ayuda de un pincel con la punta fina, pinte el corazón de madera con el color rojo.
STEP 5
Then, with the help of a silicone gun and a silicone stick, I started gluing all the decorations like the grapes and flowers.
I am also going to use some plastic spheres to decorate a little more this beautiful key holder.
Later, with the help of a paintbrush with a fine tip, I painted the wooden heart with the red color.
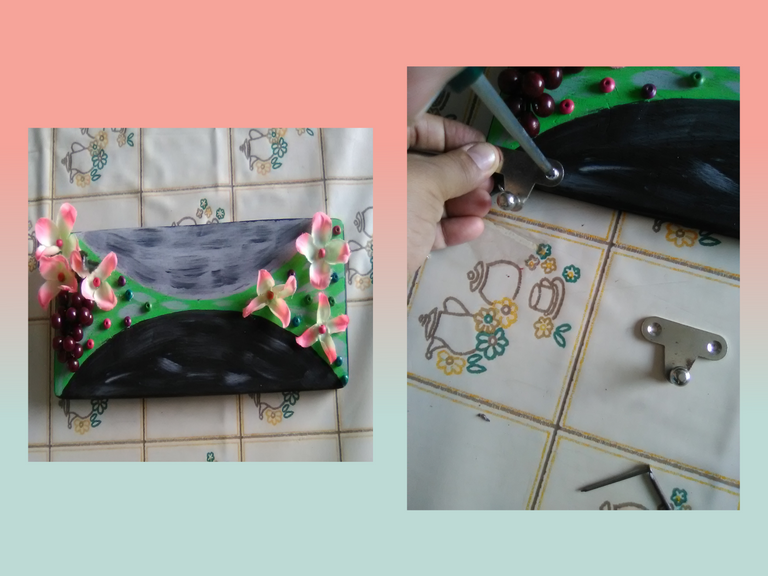
PASO 6
Luego de pegar todas las esferas de plástico, mi siguiente paso es pegar los soportes donde estarán guindadas las llaves.
Con la ayuda de un destornillador y aplicando un poco de fuerza para pegar los tornillos, comencé a pegar cada uno de los soportes que usaré para guindar las llaves.
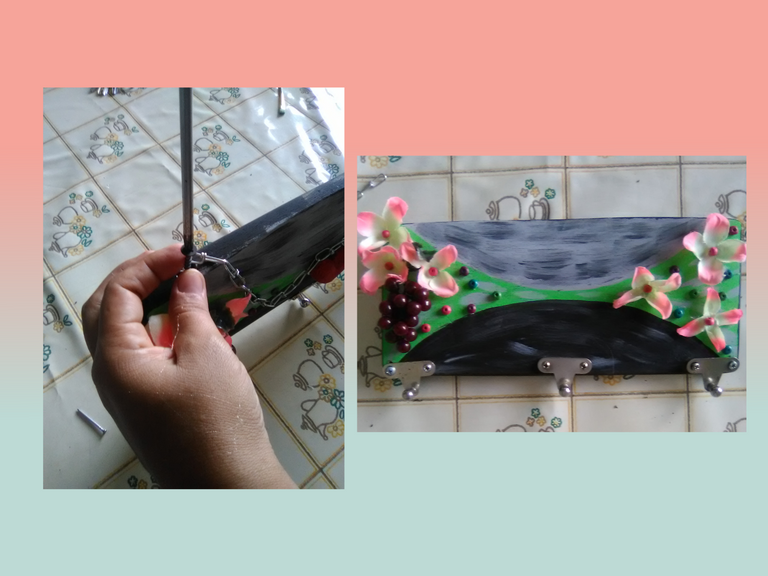
Más adelante, en la parte superior de la tabla, comencé a pegar una pequeña cadena de aluminio para guindarla de la pared, para esto use un tornillo tirafondo para pegar la cadena, en este paso sube que aplicar un poco de fuerza, así que le pedí la ayuda de mi esposo que me ayudara para colocar y apretar los tornillos, luego de esperar a que el corazón de madera se halla secado, comencé a pegarlo con silicona en la tabla de madera.
Por último, ya tendremos listo nuestro porta llavero, ahora podemos guindarlo en cualquier parte de nuestro hogar para que así no se nos pierdan nuestras llaves.
Materiales:
Pistola de silicona.
Barra de silicona.
Flores artificiales.
Uvas artificiales.
Corazón de madera.
Cadena de aluminio.
Lápiz.
Tijera.
Pinceles.
Pintura al frío como verde manzana, negro, blanco, gris y rojo.
Tornillos tirafondo.
Soportes de aluminio.
Destornillador de estrías.
Tabla de madera.
De esta manera concluyo la publicación de hoy amigos, espero que te haya gustado esta manualidad y disfrutes el momento realizando muchas cosas aplicando estas técnicas con utensilios de provecho.
Nos veremos en otra publicación basada en el hermoso mundo del arte y manualidades.
STEP 6
After gluing all the plastic spheres, my next step is to glue the brackets where the keys will be attached.
With the help of a screwdriver and applying a little force to glue the screws, I started to glue each of the brackets that I will use to hang the keys.
Later, in the upper part of the board, I began to glue a small aluminum chain to hang it to the wall, for this I used a lag screw to glue the chain, in this step I had to apply a little force, so I asked my husband to help me to place and tighten the screws, after waiting for the wooden heart to dry, I began to glue it with silicone on the wooden board.
Finally, we will have our key holder ready, now we can hang it anywhere in our home so we do not lose our keys.
Materials:
Silicone gun.
Silicone rod.
Artificial flowers.
Artificial grapes.
Wooden heart.
Aluminum chain.
Pencil.
Scissors.
Brushes.
Cold paint such as apple green, black, white, gray and red.
Lag screws.
Aluminum supports.
Spline screwdriver.
Wooden board.
This way I conclude today's publication friends, I hope you liked this craft and enjoy the moment doing many things applying these techniques with useful utensils.
See you in another publication based on the beautiful world of art and crafts.
social networks / redes sociales
![]()
![]()
Traductor Deepl
Translated Deepl
Ediciones Canva
Editions Canva

Congratulations @lauracraft! You have completed the following achievement on the Hive blockchain and have been rewarded with new badge(s):
Your next target is to reach 20000 upvotes.
You can view your badges on your board and compare yourself to others in the Ranking
If you no longer want to receive notifications, reply to this comment with the word
STOPSupport the HiveBuzz project. Vote for our proposal!
Es impresionante ver como un simple pedazo de madera puede convertirse en algo tan bonito y útil. ¡Excelente trabajo!
Asi es amiga, gracias por pasarte por mi post y por comentarlo, saludos
Un trabajo muy bien presentafo. Gracias por compartir. Saludos!
🎆🎇🎉🎊🌧️💐✨🌾🌱🌹🌙🌿🍃🥀⚡🌺☘️🍀🌈🌷⭐🪴🌵🌸🌟💮🌴🌳💫☀️💮☔🌲🌳🌍🌌🌠☄️🏵️🐝🌻🌼🍄🐞🦋💙☕💜🍍🎆🎇🎉🎊🎆🎇🎉🎊🌧️💐✨🌾🌱🌹🌙🌿🍃🥀⚡🌺☘️🍀🌈🌷⭐🪴🌵🌸🌟💮🌴🌳💫☀️💮☔🌲🌳🌍🌌🌠☄️🏵️🐝🌻🌼🍄🐞🦋💙☕💜🍍🎆🎇🎉🎊🎆🎇🎉🎊🌧️💐✨🌾🌱🌹🌙🌿🍃🥀⚡🌺☘️🍀🌈🌷⭐🪴🌵🌸🌟💮🌴🌳💫☀️💮☔🌲🌳🌍🌌🌠☄️🏵️🐝🌻🌼🍄🐞🦋💙☕💜🍍🎆🎇🎉🎊
Me alegro de que te haya gustado amiga, saludos para ti también.
¡Enhorabuena!
✅ Has hecho un buen trabajo, por lo cual tu publicación ha sido valorada y ha recibido el apoyo de parte de CHESS BROTHERS ♔ 💪
♟ Te invitamos a usar nuestra etiqueta #chessbrothers y a que aprendas más sobre nosotros.
♟♟ También puedes contactarnos en nuestro servidor de Discord y promocionar allí tus publicaciones.
♟♟♟ Considera unirte a nuestro trail de curación para que trabajemos en equipo y recibas recompensas automáticamente.
♞♟ Echa un vistazo a nuestra cuenta @chessbrotherspro para que te informes sobre el proceso de curación llevado a diario por nuestro equipo.
Cordialmente
El equipo de CHESS BROTHERS
En mi casa siempre las llaves están perdidas, me voy animar a realizar un porta llaves, Saludos.
Es muy sencillo y practico amiga, créeme que te ayudara mucho para que no se te pierdan tantos las llaves como ami.