Flor de tela, para un lindo Cintillo [Esp/Eng]
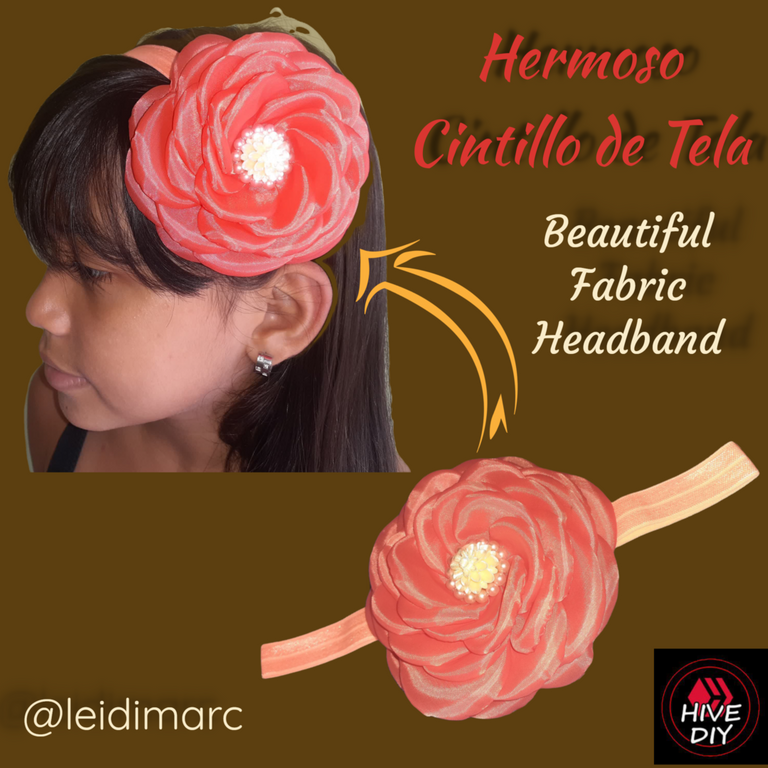

Flor de tela, para un lindo Cintillo
Feliz de estar aquí nuevamente en @needlework con este #DIY para realizar una linda flor de tela, en esta ocasión la usaré para decorar un cintillo; sin embargo, la puedes hacer para lo que te plazca, tiene usos muy versátiles, puede ser para decorar alguna prenda de vestir, collares, pulseras, hacer algún florero o para cualquier manualidad.
Mis niñas tienen varios accesorios para el cabello con este tipo de flores, una nueva amiga se las vio puesta y quiso que le hiciera una, así que no perdí tiempo de hacer un tutorial de su elaboración para compartirlo con ustedes.
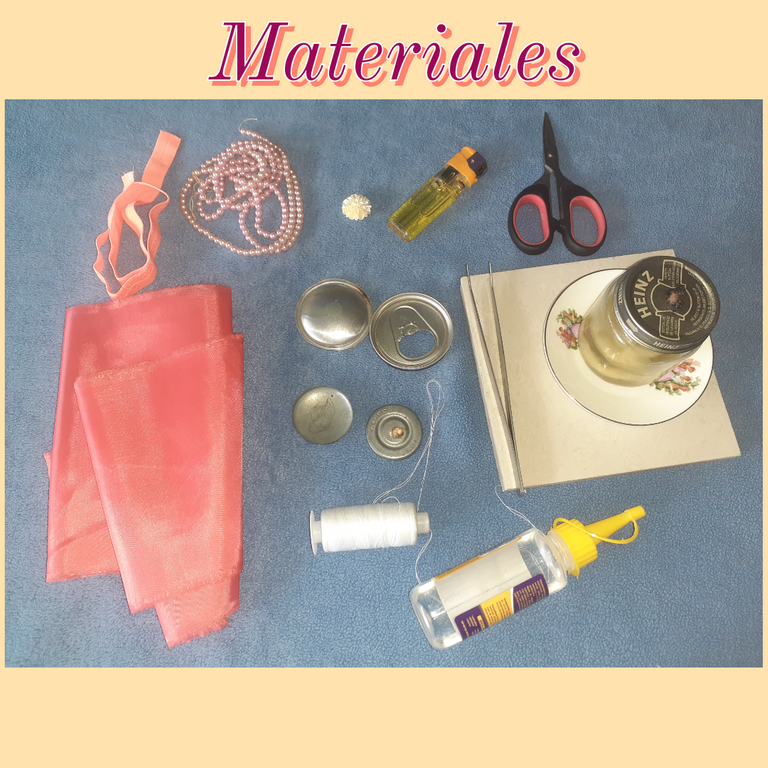
Vamos a ponernos manos a las telas y comencemos con este tutorial, para eso lo primero es mostrarle los materiales que utilice para este bello proyecto.
- Sesgo elástico (45 cm).
- Tela tafetán.
- Perlas plásticas.
- Flor sintética, para el centro.
- Botón para forrar.
- Botón de tapa de lata de refresco.
- Hilo y aguja.
- Tijera.
- Silicona.
- Yesquero.
- Mechero de aceite.
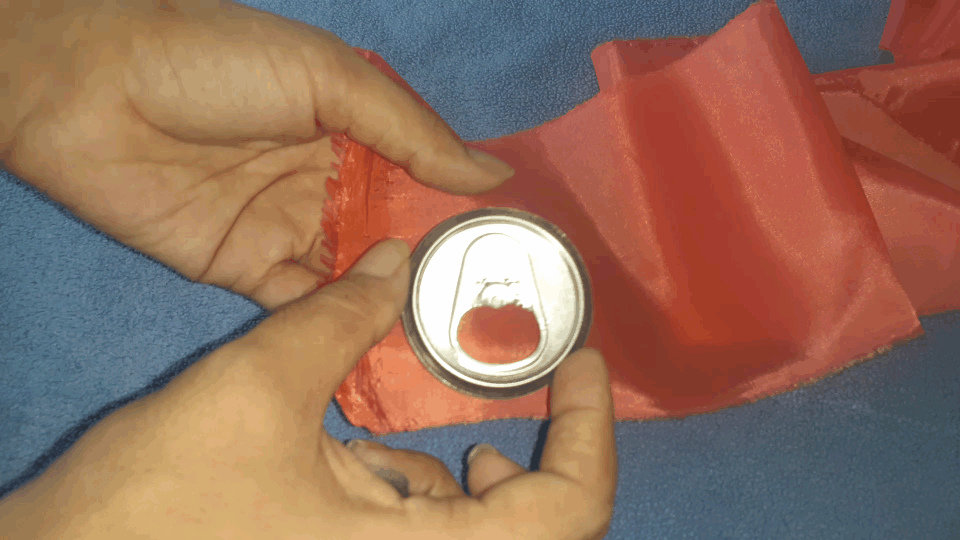

Para armar los pétalos de la flor, tomamos la tela y por la parte de arriba colocamos el botón hecho con la base de arriba de una lata de refresco, ya que esta es más grande que los botones normales y por la parte de abajo la otra parte, como se muestra en el GIF.
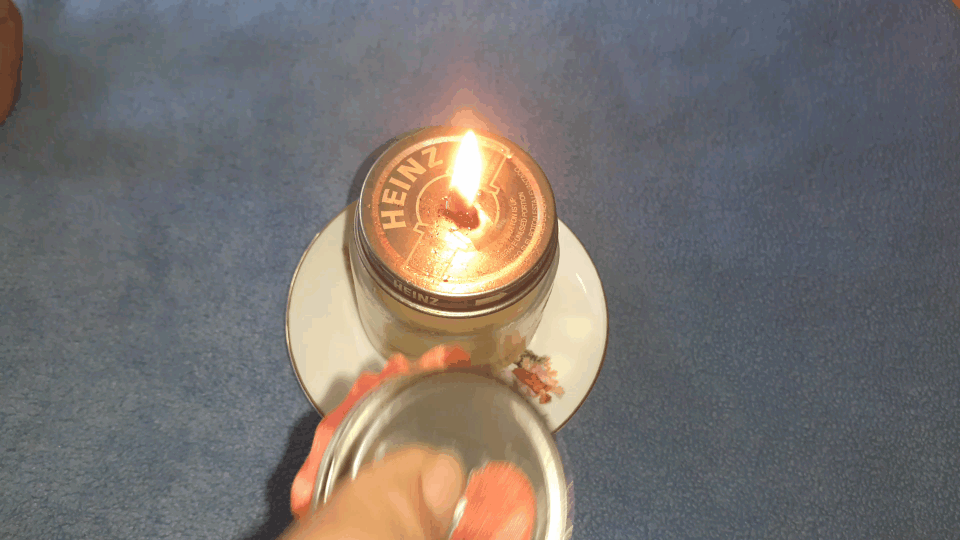
Luego se presionan las dos tapas, quedando la tela prensada y lista para cortar por el borde de la tela, a unos 3 milímetros. Ahora se prende con el yesquero el mechero y se comienza a quemar la tela por la parte azul de la llama, teniendo cuidado de no quemar demasiado la tela.
Después, se mete el dedo por el hueco de la tapa y se destapan ambas partes del botón, liberando la tela y dejando ver, como se ha formado el pétalo.

Ya que les mostré como se hace un pétalo, ahora tendremos que hacer muchos más. Yo hago esta flor de 4 capas. La primera y segunda capa, que son las de abajo, una de 10 pétalos y la otra de 9, con el botón hecho de lata de refresco.
La tercera y cuarta capa las hago con el otro botón para forrar, ese que ven en la imagen de los materiales. Una capa de 8 y la otra de 7 pétalos. Se hacen con el mismo procedimiento que les mostré en los GIF.
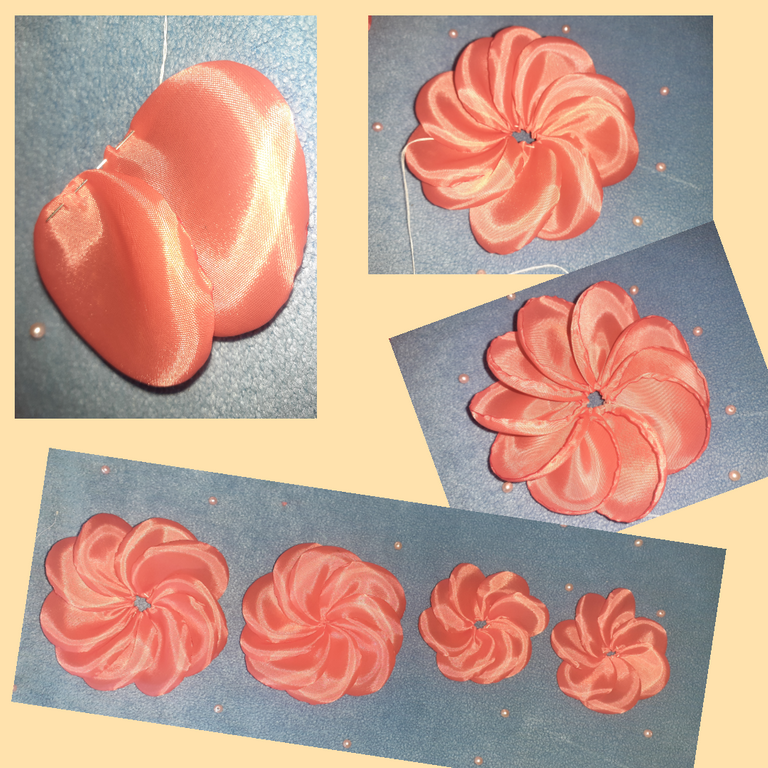
Aquí pueden ver como fui armando cada una de las capas, para ello, le puse hijo a la aguja, tome un pétalo y empecé introduciendo la aguja por la parte de atrás del pétalo, dándole 3 puntadas y luego de la misma forma fui sumándole la cantidad de pétalos, según la capa correspondiente.
Algo muy importante y que permite que el pétalo agarre forma, es que cuando introducimos la aguja en la tela, hay que cerciorarse de que agarre el borde de la tela que esté doblado.
Así fui cosiendo cada capa, asegurando bien en el centro, dejando un pequeño orificio, que al poner una capa sobre la otra, se vayan viendo una capa más pequeña que la otra de forma uniforme y se vea como una flor Natural.

Luego le coloque un trozo de fieltro en el centro de la flor más grande y la coloque en el sesgo elástico, que había cosido en el centro y colocado un trozo de fieltro también. Uni ambas piezas y fui pegando una capa sobre otra con la silicona.
Para finalizar le coloqué en el centro una flor y le cosí varias perlas para decorar. Con esto ya está listo este bello cintillo.
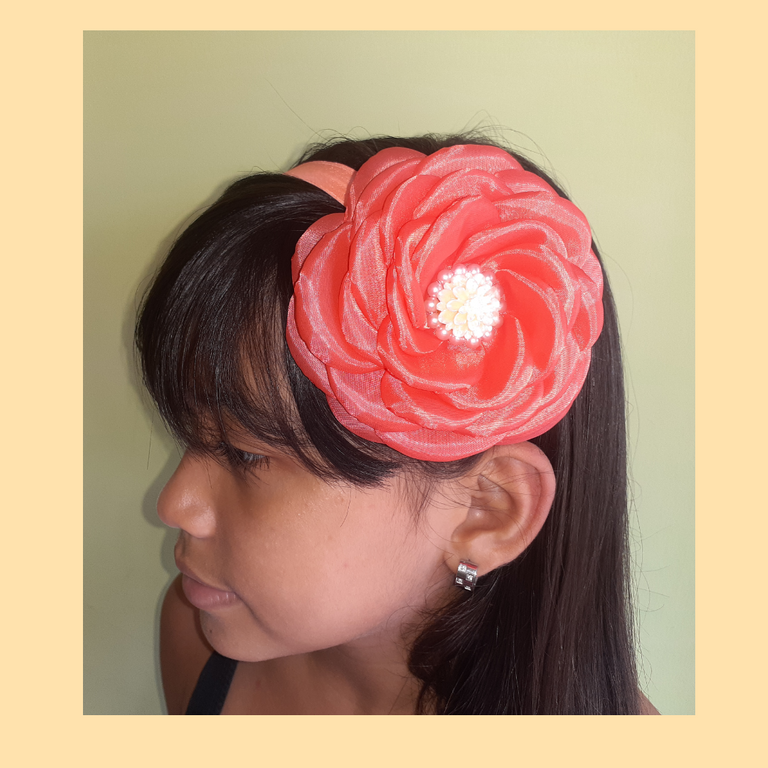
Así lo modeló en su cabellera mi hija Arianna, es un cintillo que se ve hermoso, vistoso, hasta elegante, según con la ropa que lo combiné.
Espero que les guste como les mostré el paso a paso y que lo pudieran realizar o recomendar a alguien que sepan que tenga a bien realizarlo.
Muchas gracias por su atención y la lectura a esta publicación que les hice con mucha dedicación y cariño. Dios le bendiga.

Happy to be here again in @needlework with this #DIY to make a cute fabric flower, this time I will use it to decorate a headband; however, you can make it for whatever you like, it has very versatile uses, it can be to decorate any garment, necklaces, bracelets, make a vase or for any craft.
My girls have several hair accessories with this type of flowers, a new friend saw them on and wanted me to make her one, so I wasted no time to make a tutorial of its elaboration to share it with you.
Let's get hands on the fabrics and let's start with this tutorial, for that the first thing is to show you the materials I used for this beautiful project.
- Elastic bias (45 cm).
- Taffeta fabric.
- Plastic beads.
- Synthetic flower, for the center.
- Button for lining.
- Soda can lid button.
- Thread and needle.
- Scissors.
- Silicone.
- Tinder.
- Oil burner.
To assemble the petals of the flower, we take the fabric and on the top we place the button made with the top base of a soda can, as this is larger than normal buttons and on the bottom the other part, as shown in the GIF.
Then the two lids are pressed together, leaving the fabric pressed and ready to cut along the edge of the fabric, about 3 millimeters. Now light the lighter with the tinder and start burning the fabric through the blue part of the flame, being careful not to burn the fabric too much.
Then, put your finger through the hole in the lid and uncover both parts of the button, releasing the fabric and letting you see how the petal has been formed.
Since I showed you how to make a petal, now we will have to make many more. I make this flower in 4 layers. The first and second layers, which are the bottom ones, one of 10 petals and the other of 9, with the button made of a soda can.
The third and fourth layers are made with the other button for lining, the one you see in the image of the materials. One layer of 8 and the other of 7 petals. They are made with the same procedure I showed you in the GIFs.
Here you can see how I was assembling each of the layers, for this, I put a child to the needle, took a petal and started introducing the needle through the back of the petal, giving it 3 stitches and then in the same way I was adding the number of petals, according to the corresponding layer.
Something very important that allows the petal to take shape, is that when we introduce the needle into the fabric, we must make sure that it grabs the edge of the fabric that is folded.
So I sewed each layer, making sure in the center, leaving a small hole, so that when you put one layer on top of the other, you can see a layer smaller than the other evenly and it looks like a natural flower.
Then I placed a piece of felt in the center of the larger flower and placed it on the elastic bias, which I had sewn in the center and placed a piece of felt as well. I joined both pieces and glued one layer on top of the other with the silicone.
To finish I placed a flower in the center and sewed several pearls to decorate. With this, this beautiful headband is ready.
This is how my daughter Arianna modeled it on her hair, it is a beautiful, colorful, even elegant headband, depending on the clothes I combined it with.
I hope you like how I showed you the step by step and that you can make it or recommend it to someone you know who would like to do it.
Thank you very much for your attention and for reading this publication that I made with much dedication and love. God bless you.
Fotos tomadas por | Photos taken by @leidimarc
Dispositivo | Device | Samsung Galaxy A20
Fotos editadas en: |Photos edited in | CC Express for Samsung
Fotos editadas en: |Photos edited in | App Blend
Separadores hechos en | Separators made in | CC Express for Samsung
Gif creado en | Gif created in | App Video Maker
Traducción con | Translation with| DeepL
https://twitter.com/leidimar011319/status/1564757116325330950
The rewards earned on this comment will go directly to the people( @leidimarc ) sharing the post on Twitter as long as they are registered with @poshtoken. Sign up at https://hiveposh.com.
Muy lindo y muy creativo accesorio. A mi me encantan cuando las niñas son coquetas. Aqui en Argentina son muy básicas tanto niñas como adultas, por eso es que las venezolanas arrasamos
Si, bueno a mi siempre me han gustado los accesorios.
Ahorita casi no uso, porque cuando uno tiene niños pequeños, le quieren arrancar todo de encima.
Pero si tengo guardado muchas cositas.
Así dicen, que las Venezolanas son muy llamativas en otros países, tanto como aquí jejeje.
Amigaaaa, wow, qué dedicación, hacer pétalo por pétalo, a veces doy gracias de que Leo es niño y que no lleva accesorios tan elaborados 🤣
Te quedó increíble, muchas felicidades por tener esa dedicación y sobretodo esa habilidad con las manos.
Un abrazo 🤗
Si amiga es un trabajo que lleva dedicación y mucho cuidado, para que la tela que es bastante sencilla no se queme toda.
Muchas gracias amiga, por apreciar lo que cariño les comparto.
Un abrazo lleno de bendiciones.
It always makes me happy to see how customers appreciate your efforts through your girl and then requested it. That means you're truly skillful.
Thanks friend @apunawu, it's also something I really appreciate.
My girls are my models, they are always matched between their clothes and hair accessories.
Many like them, but most of them are not the type to take care of those things. The ones that do ask me to make them for them.
I used to make a lot of these bows. Now not so much, I only make them for my girls.
So I was happy to be asked to make this one, it is to combine it with a swimsuit, for a photo shoot.
Greetings and blessings friend.
Es increíble esta flor tan bonita, parece real!!!🌹🌼🌺 además este tutorial es tan completo y bien explicado. Gracias por compartirlo!!
Me alegra que te haya gustado @imena, la idea de hacerlo tan detallado es para que lo puedan hacer en casa.
Muchas gracias por pasar por mi blog y dejar tan lindo comentario.
Saludos y bendiciones.
Hola amiga ❣️ Que hermosa que te quedó esta vincha, como decimos nosotros. Es una gran idea formar los pétalos con esa lata de gaseosa, nunca lo había visto. Tu proyecto quedó genial y le luce muy bien a la modelo.
Saludos y gracias por compartir 😃.
Que bueno que te haya gustado este proyecto que hice con mucho cariño.
Estaba indecisa si podía publicar por aquí mis accesorios para el cabello, son en su mayoría de tela o de cintas.
Pero además de coser, también llevan pegamentos, no se si era apto para esta comunidad.
Guao mi bella @leidimarc este cintillo te quedo precioso, cuanta dedicación para realizarlo, te quedo súper delicado. Felicidades mi corazón. Un abrazo, bendiciones y mil éxitos. 💖
Gracias amiga @dayadam, un gusto saludarte y enviarte muchas bendiciones.
Si lleva su trabajito, pero con amor se logra algo bonito.
Tu sabes muy bien eso, que haces bellezas.
Leidi, esa flor está demasiado hermosa, se ve espectacular de verdad y aunque tiene sus detalles explicaste los pasos muy bien.
Arianna se ve preciosa con ese cintillo. Excelente trabajo amiga!
Si amiga, quedan muy lindo puestos.
La idea es que lo puedan realizar siguiendo el paso a paso.
Muchas gracias amiga, siempre con algo lindo que decir, que me anima mucho a seguir creando.
Muchas bendiciones para ti amiga.
Para mi siempre ha sido un reto usar esa técnica para hacer flores de tela, aunque parezca sencilla tiene su truco tu lo has hecho perfecto, el resultado es limpio y muy hermoso.
Tal cual como les enseñé así lo hago es es el truco, seguir esos pequeños detalles, como pasar la tela por la parte azul de la llama para que no se se queme ni ahume la tela.
Las flores flacas quedan bellas, no a todos le quedan así de limpias, claro todo lo hace la pract6tam también.
Las que se me dañan, que son muy pocas las veces las desecho.
Gracias por pasar por mi blog @jennyzer