Esta es una de las mejores formas de utilizar el “Splinter de Vida” en la “Liga de Oro” [ES-EN]
Cover created in Canva

Ya hace un tiempo que escribí sobre las llamadas “Fortalezas” que tienen los “Splinters” y sobre como estas se enfocan en ciertos aspectos en el campo de batalla, aunque, antes de continuar, si aún no lees esta publicación tan importante para aprender sobre cada “Splinter”, has click Aquí para que puedas entender de que hablo, siguiendo el tema de esta publicación, algunos tienen la fortaleza de ser los mejores en el enfrentamiento físico con el tipo de ataque “Cuerpo a Cuerpo”, otros son muchos mejores atacando a distancia con “Rango y Magia”, por otro lado, algunos se centran en es defender y/o debilitar la formación del oponente y por último, están aquellos que pueden ser más equilibrados, aquellos equipos que podrían funcionar para varios estilos de batalla dependiendo de las condiciones que se presenten.
Basándome en esta investigación que publique hace meses y que por supuesto he comprobado personalmente, en esta oportunidad quiero compartir con ustedes una de las formas en que suelo utilizar el “Splinter de Vida” para obtener un equipo equilibrado que pueda protegerse, pero a su vez, tenga un poder bastante descente del lado ofensivo, todo con la finalidad de derrotar a nuestro adversario con el menor riesgos posible, debo aclarar que, a pesar de que los equipos tengan su propia fortaleza, no quiere decir que no podamos armar un equipo balanceado en un “Splinter de Fuego” por ejemplo, el cual es el mejor en el ataque físico, sin embargo, todo esto dependera de las reglas y el tipo de carta que elijamos, por otro parte, algo es seguro, el “Splinter de Vida”, es el mejor preservando a las cartas en el campo de batalla, para eso fue creado y de hecho su nombre sugiere que es bastante bueno protegiendo al equipo.
Teniendo en cuenta lo comentado anteriormente, aprovechare para compartir una de las mejores alineaciones que tengo en una combinación de reglas complicada, pero que, con el “Splinter de Vida”, se hace mas sencillo adaptarse debido a su naturaleza protectora, para esto, abarcare los siguientes puntos:
1. ¿Qué cualidades hacen que el “Splinter de Vida” sea uno de los mejores para “Defender”?

 2. Ejemplo de Batalla con las reglas “Briar Patch; Aim True y Fog of War”

 3. Consideraciones Finales

¿Qué cualidades hacen que el “Splinter de Vida” sea uno de los mejores para “Defender”?

Como comenté en la introducción, las fortalezas de los “Splinters” existen y son una realidad, sin embargo, algo que no tome en cuenta en esa publicación que realice hace meses, son las habilidades que por defecto son más “Protectoras y/o Defensivas” que el resto, por supuesto, hablando de este caso específico, puesto que en realidad podemos hacer comparaciones en muchas métricas, pero, me tome la libertad de realizar un cuadro comparativo, en el cual detallo las “Habilidades” que a mi criterio son las más “Defensivas” de todo el repertorio de habilidades que existen en “Splinterlands”, esto nos ayudara en corroborar, que equipo es el mas protector con respecto a su equipo, de esta forma, podre demostrarles que con el equipo de “Vida”, podrán armar una alienación bastante fuerte en defensa como en ataque, siendo uno de los equipos más “Equilibrados” de todo el juego:
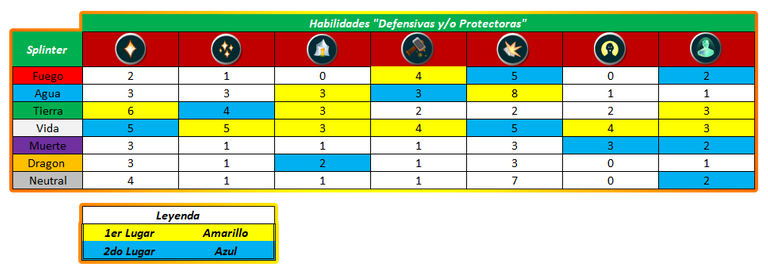
Como pueden ver en la imagen anterior, realice un cuadro comparativo en donde tome en cuenta las habilidades (Heal, Tank Heal, Triage, Repair, Shield, Resurrect y Immunity), luego lo que hice fue contar cada carta que tenía estas habilidades por “Splinter”, por supuesto saltando aquellas que se repetían en el caso de las ediciones “Beta y Alpha” respectivamente, luego, para identificar cuales eran los equipos con mayor presencia en estas habilidades, los marque de un color “Amarillo y Azul”, tomando en cuenta que, el color Amarrillo es el 1er lugar y el Azul el 2do lugar, si observan bien, el equipo con mas 1eros lugares es el de “Vida”, teniendo 5 en total, con esto podemos llegar a la conclusión de que el “Splinter de Vida”, es el mas protector y defensivo de todo el juego, quizás me hicieron falta ingresar una que otra habilidad, pero, estas son las primordiales para mí.

Ejemplo de Batalla con las reglas “Briar Patch; Aim True y Fog of War”
Para colocar un buen ejemplo de equilibrio utilizando el “Splinter de Vida”, realice una batalla con las condiciones comentadas en el “Subtitulo” de esta sección, ademas, si prestan mucha atención, estas reglas son relativamente ofensivas, ya que las cartas quieran o no, estarán recibiendo daño si es que jugamos con un equipo muy “Físico”, en pocas palabras con el tipo de ataque “Cuerpo a Cuerpo”, por otro lado, tomando en cuenta el cuadro que realice y las habilidades que tome en cuenta, uno de las mejores opciones que tenía era jugar con “Vida” y ya les explicare porque, pero antes, explicare el análisis de las reglas y como jugar con ellas:
Reglas y pensamientos de alienación
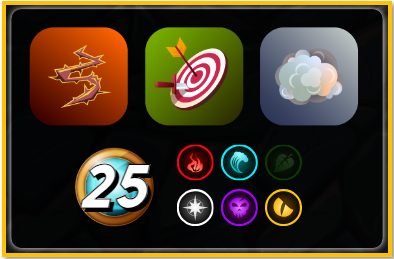
Briar Patch: Esta regla de batalla es bastante clara, lo unico que causa es brindarles a todas las cartas en el campo la habilidad “Thorns”, una regla bastante perjudicial para ataques “Cuerpo a Cuerpo, algo que debemos tomar en cuenta antes de elegir nuestras cartas.
Aim True: Esta en mi opinión es la regla en la que debemos tener más cuidado, ya que su efecto causa que ningun ataque en el campo, sea de quien sea, pueda fallar, por lo que, si no tenemos una buen a defensa, seguramente podríamos terminar perdiendo la partida, algo que por supuesto, no queremos.
Fog of War: Esta es la última regla de batalla y si conocen su efecto, practicamente esta anula en un 80% el efecto que podría causar “Briar Patch” con “Thorns” en el campo, ya que habilidades como “Sneak, Snipe y Opportunity”, no podrán ser utilizadas, en cambio, todo ese daño físico se transfiere solo al “Tanque”, si es que jugamos con “Cuerpo a Cuerpo” que, sinceramente es lo más recomendable para no perder la ventaja.
Pensamientos: Lo primero a tener en cuenta es que, la regla “Briar Patch” no tendrá el efecto deseado debido a “Fog of War”, en tal sentido, el daño básicamente lo recibirá nuestro tanque, por lo que, lo ideal, es que juguemos con una carta lo suficientemente resistente para soportar todo tipo de ataques a “Distancia” en la 1ra posición, por otro lado, “Aim True” permitirá que todos los ataque den en el blanco, así que, nuestro tanque no debe ir solo a la guerra, debe tener apoyo, así que, debemos aprovechar que tenemos al “Splinter” más protector y jugar con una carta con la habilidad de “Tank Heal”, esto le dará la suficiente protección como para soportar una cantidad de rondas decentes, tomando en cuenta que, la cantidad de mana máxima para invocar a nuestras cartas es de 25 puntos, por último, el resto de las cartas deben ser “Ofensivas”, y podemos utilizar básicamente cualquier carta fuerte, ya que con “Fog of War” activo, no tendremos peligro de daño en la línea de fondo.
Formación de cartas
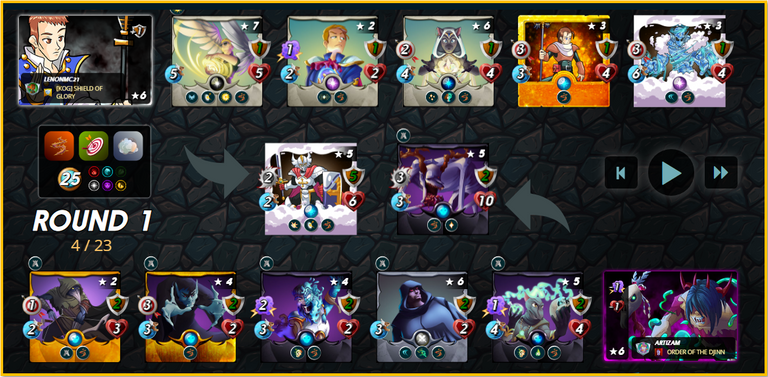
Tomando en cuenta que solo tenía 25 puntos de mana para poder invocar a mis monstruos al campo, mi elección de cartas debería ser más precisa de lo normal, puesto que, si utilizo una carta con muy alto de costo de mana, podría ser perjudicial para mí, ya que no tendría espacio para colocar más cartas, así que, observando mis cartas disponibles, mi mejor tanque con solo 5 puntos de mana es sin duda mi “Silvershield Paladin”, el cual tiene todas las características para poder proteger al resto de mis cartas, por otro lado, el resto de mis cartas, especialmente las que siguen después de mi “Tanque”, son cartas “Defensivas”, resaltando que “Dax Paragon” aumenta el daño que refleja con “Thorns” mi “Silvershield Paladin”.
Mi 4to monstruo es una de las piezas clave de mi victoria, ya que, es el que posee la habilidad de “Tank Heal” que le brinda soporte a mi “Tanque” de batalla “Silvershield Paladin”, mis ultimas 2 cartas son netamente “Ofensivas”, aprovechando que la regla de batalla “Fog of War” está presente y no puede atacarme con “Sneak, Snipe y/o Opportunity”, así que, teniendo en cuenta todas las condiciones expuestas, la protección al tanque fue la clave de la victoria, el resto de la alineación complemento todo lo que fue la estrategia.
Consideraciones Finales

Espero que esta publicación les ayude a entender primero que nada la “Fortaleza” del “Splinter de Vida”, demostrándoles que, es el equipo protector del juego por excelencia, ya que la cantidad de habilidades que posee de este tipo, lo demuestran como lo detalle en el cuadro comparativo de habilidades. Otra cosa interesante es el análisis que realice de las reglas de batalla, el cual, siempre es necesario para conocer bajo que condiciones estas jugando, lo que te ayudara a elegir de una forma más optima las cartas que necesitas. Espero estén a todo lo nuevo que publicare, ya que pienso hacer más contenido analítico desde el punto de vista de la jugabilidad y la toma de decisiones al momento de estar en la batalla.
No olviden consultar mi perfil y ver mis ultimas publicaciones, quizás puedan encontrar información de interés que te ayude a mejorar con respecto a “Splinterlands” en general.
Enlace directo a mi Perfil

It's been a while since I wrote about the so called "Strengths" that Splinters have and how they focus on certain aspects in the battlefield, although, before continuing, if you still don't read this publication so important to learn about each Splinter, click Here so you can understand what I'm talking about, following the theme of this post, some have the strength of being the best in physical confrontation with the "Melee" type of attack, others are much better at attacking from a distance with "Range and Magic", on the other hand, some focus on is defending and/or weakening the opponent's formation and lastly, there are those that can be more balanced, those teams that could work for various battle styles depending on the conditions at hand.
Based on this research that I published months ago and that of course I have personally verified, in this opportunity I want to share with you one of the ways in which I usually use the "Life Splinter" to obtain a balanced team that can protect itself, but at the same time, has a fairly decent power on the offensive side, all with the aim of defeating our opponent with the least possible risks, I must clarify that, although the teams have their own strength, it does not mean that we can not put together a balanced team in a "Fire Splinter" for example, which is the best in the physical attack, however, all this will depend on the rules and the type of card we choose, on the other hand, one thing is certain, the "Life Splinter" is the best at preserving the cards on the battlefield, for that was created and in fact its name suggests that it is quite good at protecting the team.
Taking into account the above, I will take the opportunity to share one of the best alignments I have in a complicated combination of rules, but that, with the "Splinter of Life", it becomes easier to adapt due to its protective nature, for this, I will cover the following points:
1. What qualities make the "Life Splinter" one of the best for "Defender"?

 2. Example of Battle with the rules "Briar Patch; Aim True and Fog of War".

 3. Final Considerations
What qualities make the "Life Splinter" one of the best for "Defender"?
As I mentioned in the introduction, the strengths of the "Splinters" exist and are a reality, however, something that I did not take into account in that publication that I made months ago, are the skills that by default are more "Protective and/or Defensive" than the rest, of course, speaking of this specific case, since in reality we can make comparisons in many metrics, but, I took the liberty of making a comparative table, in which I detail the "Skills" that in my opinion are the most "Defensive" of the entire repertoire of skills that exist in "Splinterlands", this will help us to corroborate, which team is the most protective with respect to your team, in this way, I can show you that with the "Life" team, you can put together a fairly strong alignment in defense and in attack, being one of the most "Balanced" teams of the game:
As you can see in the previous image, I made a comparative chart where I took into account the skills (Heal, Tank Heal, Triage, Repair, Shield, Resurrect and Immunity), then what I did was to count each card that had these skills by "Splinter", of course skipping those that were repeated in the case of the "Beta and Alpha" editions respectively, then, to identify which were the teams with greater presence in these skills, I marked them with a color "Yellow and Blue", taking into account, Yellow is 1st place and Blue 2nd place, I marked them of a color "Yellow and Blue", taking into account that, the Yellow color is the 1st place and the Blue the 2nd place, if you observe well, the team with more 1st places is the "Life", having 5 in total, with this we can reach the conclusion that the "Splinter of Life", is the most protective and defensive of all the game, maybe I had to enter one or another skill, but, these are the most important for me.
Example of Battle with the rules "Briar Patch; Aim True and Fog of War".
To place a good example of balance using the "Life Splinter", perform a battle with the conditions discussed in the "Subtitle" of this section, also, if you pay close attention, these rules are relatively offensive, as the cards will or not, will be receiving damage if we play with a very "Physical" team, on the other hand, taking into account the chart I made and the skills I took into account, one of the best options I had was to play with "Life" and I will explain why, but first, I will explain the analysis of the rules and how to play with them:
Alienation rules and thoughts
Briar Patch: This battle rule is quite clear, the only thing it causes is to give all cards on the field the "Thorns" ability, a very detrimental rule for "Melee" attacks, something we should take into account before choosing our cards.
Aim True: This in my opinion is the rule in which we must be more careful, since its effect causes that no attack in the field, whoever it is, can fail, so if we do not have a good defense, we could surely end up losing the game, something that of course, we do not want.
Fog of War: This is the last battle rule and if you know its effect, it practically cancels 80% of the effect that "Briar Patch" could cause with "Thorns" in the field, since skills such as "Sneak, Snipe and Opportunity" cannot be used, instead, all that physical damage is transferred only to the "Tank", if we play with "Melee" which, honestly, is the most advisable not to lose the advantage.
Thoughts: The first thing to keep in mind is that, the "Briar Patch" rule will not have the desired effect due to "Fog of War", in such sense, the damage will basically be received by our tank, so, ideally, we should play with a card resistant enough to withstand all kinds of "Ranged" attacks in the 1st position, on the other hand, "Aim True" will allow all attacks to hit the target, so, our tank should not go to war alone, it must have support, so, We must take advantage of the fact that we have the most protective "Splinter" and play a card with the "Tank Heal" ability, this will give him enough protection to support a decent amount of rounds, taking into account that the maximum amount of mana to summon our cards is 25 points, finally, the rest of the cards must be "Offensive", and we can use basically any strong card, since with "Fog of War" active, we will have no danger of damage in the back line.
Formation of cards
Taking into account that I only had 25 mana points to be able to summon my monsters to the field, my choice of cards should be more precise than usual, since, if I use a card with a very high mana cost, it could be detrimental to me, since I would not have space to place more cards, so, looking at my available cards, my best tank with only 5 mana points is undoubtedly my "Silvershield Paladin", which has all the features to protect the rest of my cards, my best tank with only 5 mana points is undoubtedly my "Silvershield Paladin", which has all the characteristics to protect the rest of my cards, on the other hand, the rest of my cards, especially those that follow after my "Tank", are "Defensive" cards, highlighting that "Dax Paragon" increases the damage that my "Silvershield Paladin" reflects with "Thorns".
My 4th monster is one of the key pieces of my victory, since it is the one with the "Tank Heal" ability that provides support to my "Tank" battle "Silvershield Paladin", my last 2 cards are purely "Offensive", taking advantage that the "Fog of War" battle rule is present and cannot attack me with "Sneak, Snipe and/or Opportunity", so, taking into account all the conditions exposed, the protection to the tank was the key to victory, the rest of the lineup complements everything that was the strategy.
Final Considerations
I hope that this publication will help you to understand first of all the "Fortress" of the "Life Splinter", showing you that it is the protective equipment of the game par excellence, since the amount of abilities that it has of this type, demonstrates it as I detail it in the comparative table of abilities. Another interesting thing is the analysis of the battle rules, which is always necessary to know under what conditions you are playing, which will help you to choose the cards you need in a more optimal way. I hope you will be interested in everything new that I will publish, since I plan to make more analytical content from the point of view of gameplay and decision making at the time of being in battle.
Don't forget to check my profile and see my latest publications, maybe you can find interesting information that will help you to improve with respect to "Splinterlands" in general.
Direct link to my profile


If you are new, I invite you to register in this LINK
![]()
Proud Member of "Shield of Glory".
!1UP Good work!
!PGM !PIZZA
$PIZZA slices delivered:
@curation-cartel(12/20) tipped @lenonmc21
underlock tipped lenonmc21
You have received a 1UP from @underlock!
@monster-curator, @oneup-curator, @ctp-curator, @thg-curator, @neoxag-curator, @fun-curator
And they will bring !PIZZA 🍕.
Learn more about our delegation service to earn daily rewards. Join the Cartel on Discord.
El detalle del análisis es muy útil. Muy agradecido por la ayuda.