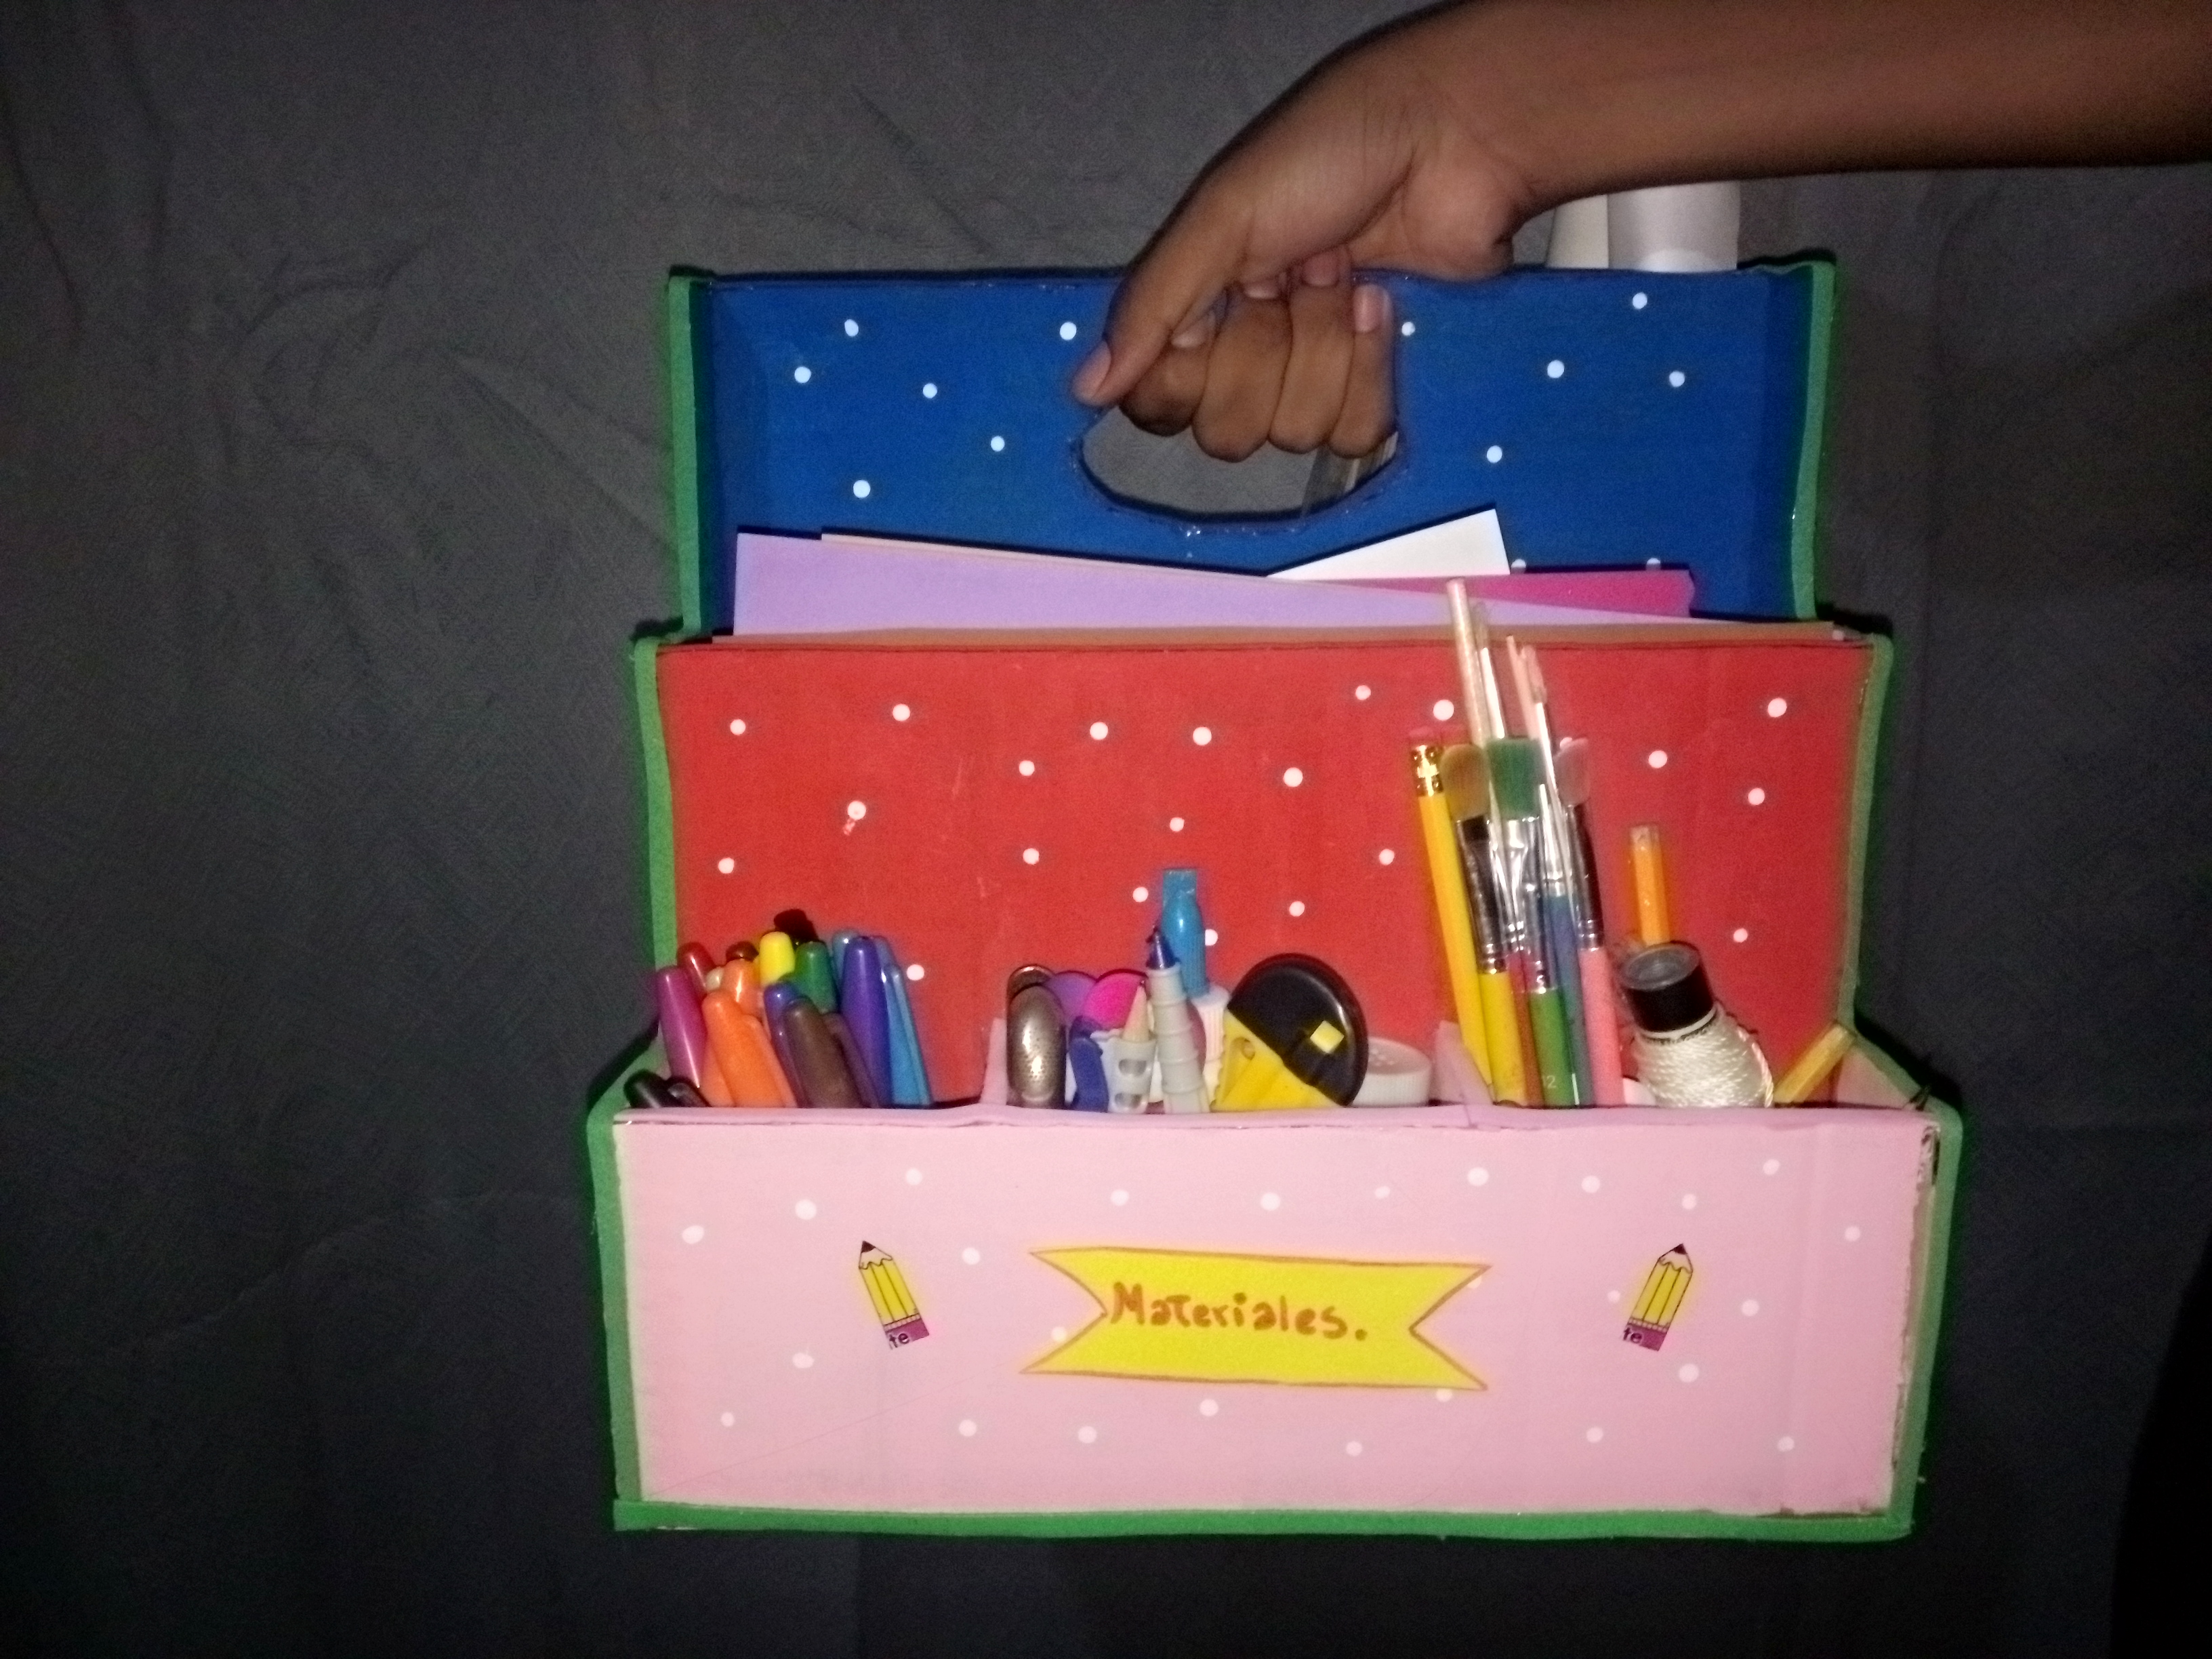
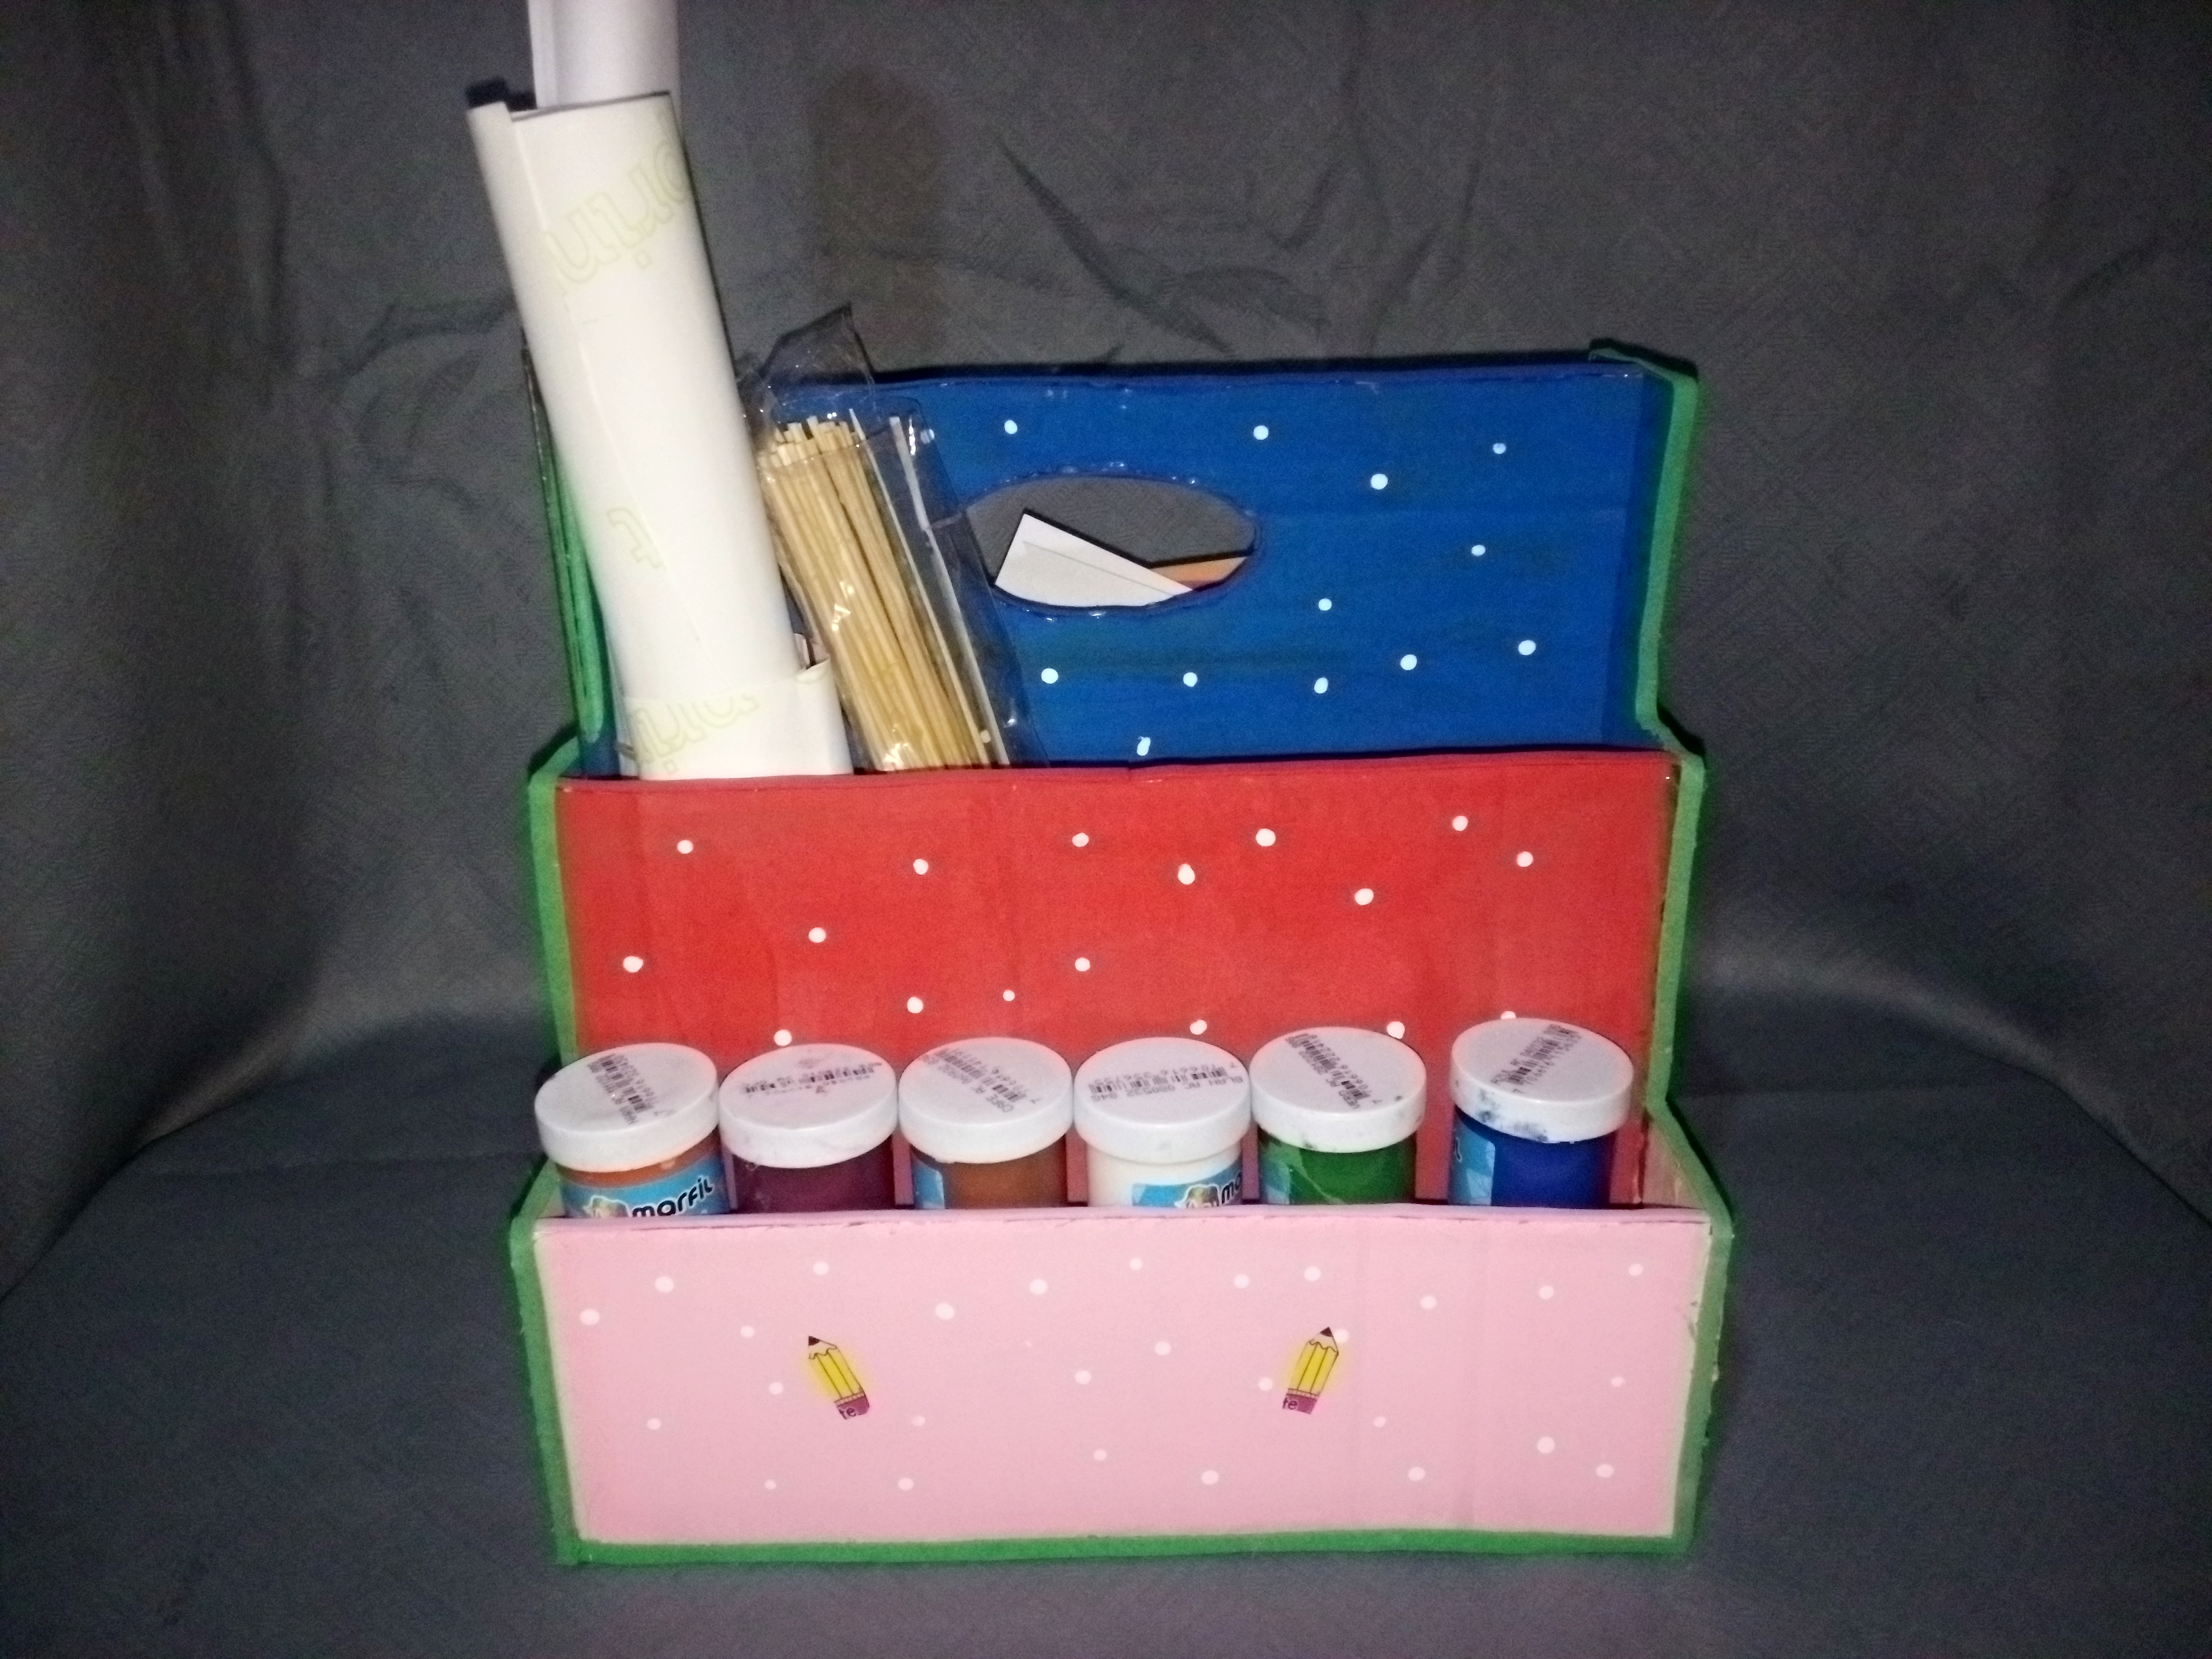
Organizer with recycled material. // Organizador con asa fabricado con material reciclado.
✨Bienvenidos. // Welcome. ✨
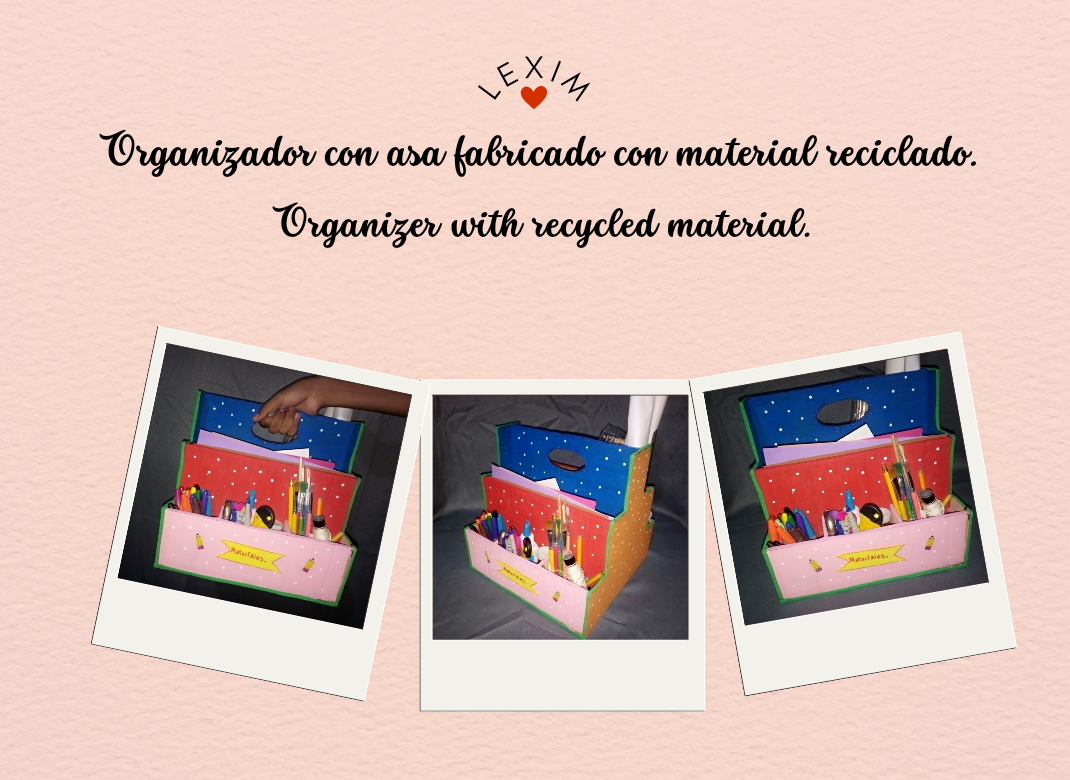
Hello everyone dear colleagues, it's a pleasure to greet you. Today I want to share with you one of my creative activities that I like to do with much affection for you a step by step in this occasion I share with you an organizer with handle made of recycled material. I like this organizer because I keep my materials in one place and it is easier to locate a material on our table. I made it for my daily use because the previous one is broken and can no longer hold the materials. This organizer in addition to its compartment has a handle to grab the organizer and move it from one place to another I hope you like it here I leave its elaboration.
Hola a todos queridos compañeros un gusto en saludarlos. Hoy les quiero compartir una de mis actividades creativas que me gusta hacer con mucho cariño para ustedes un paso a paso en esta ocasión les comparto un organizador con asa fabricado con material reciclado. Me gusta este organizador porque guardo mis materiales en un solo lugar y es más fácil de ubicar un material en nuestra mesa lo e realizado para mí uso diario ya que el anterior está roto y no aguanta más para guardar los materiales. Este organizador además de su compartimiento cuenta con un asa para agarrar el organizador y moverlo de un lugar a otro espero que les guste aca les dejo su elaboración.

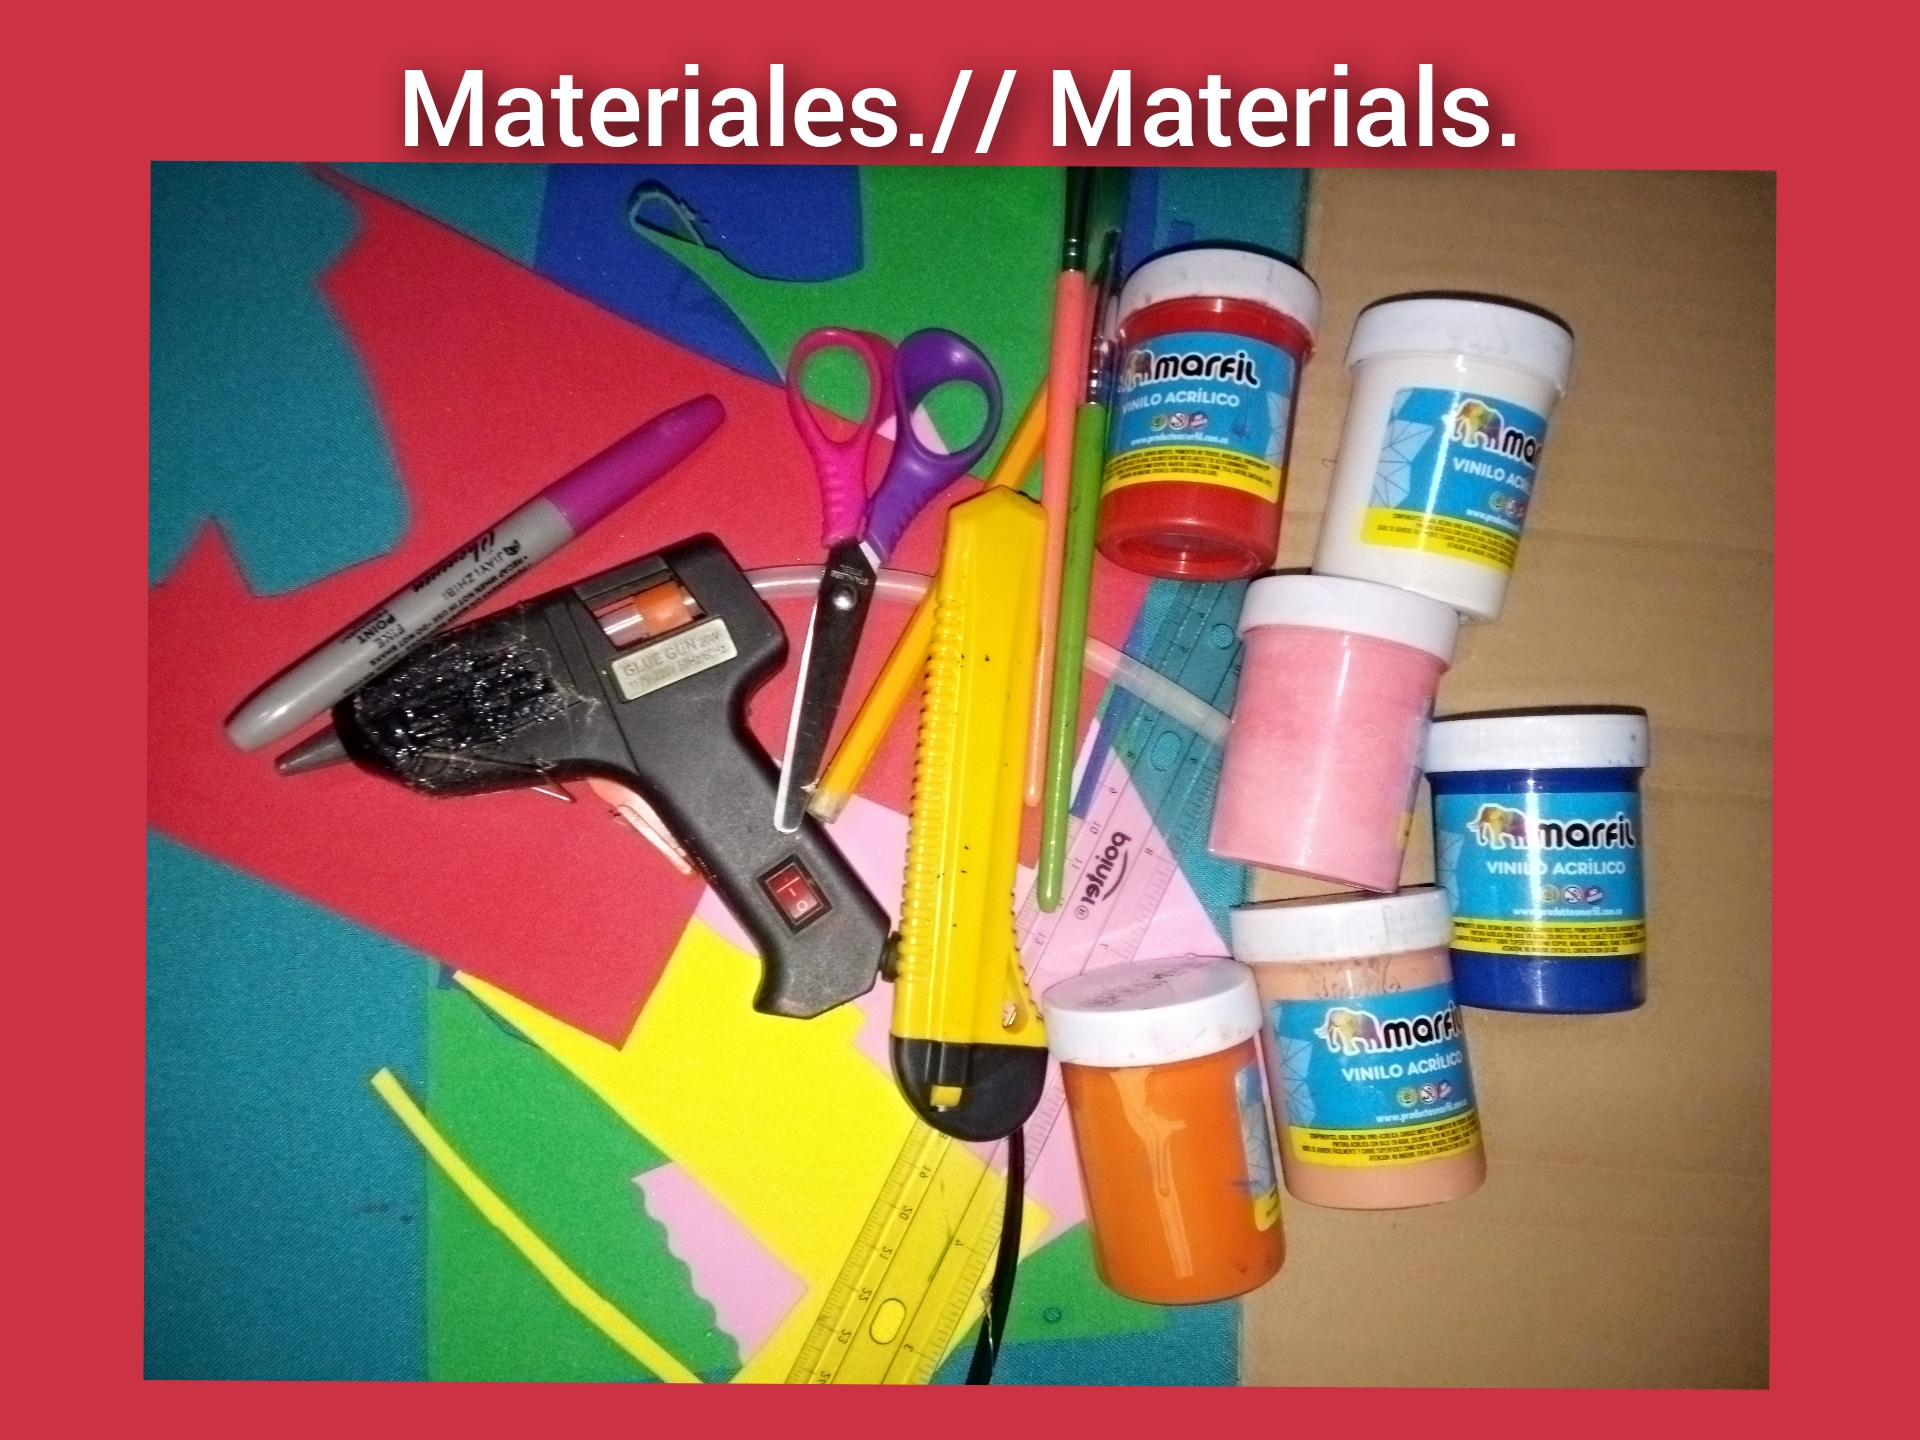
Materials.
Materiales.
- Cardboard.
- Scissors.
- Pencil.
- Ruler.
- Stickers.
- Fuscia marker.
- Silicone gun.
- Red, green, blue, pink and yellow eva glue.
- Acrylic paint pink, beige, red, blue, orange and white.
- Cartón.
- Tijera.
- Lápiz.
- Regla.
- Stickers.
- Rotulador fuscia.
- Pistola de silicón.
- Goma Eva rojo, verde, azul, rosado y amarillo.
- Pintura acrílica rosado, beis, rojo, azul, anaranjado y blanco.
Step by step.
Paso a paso.
Paso 1. // Step 1.
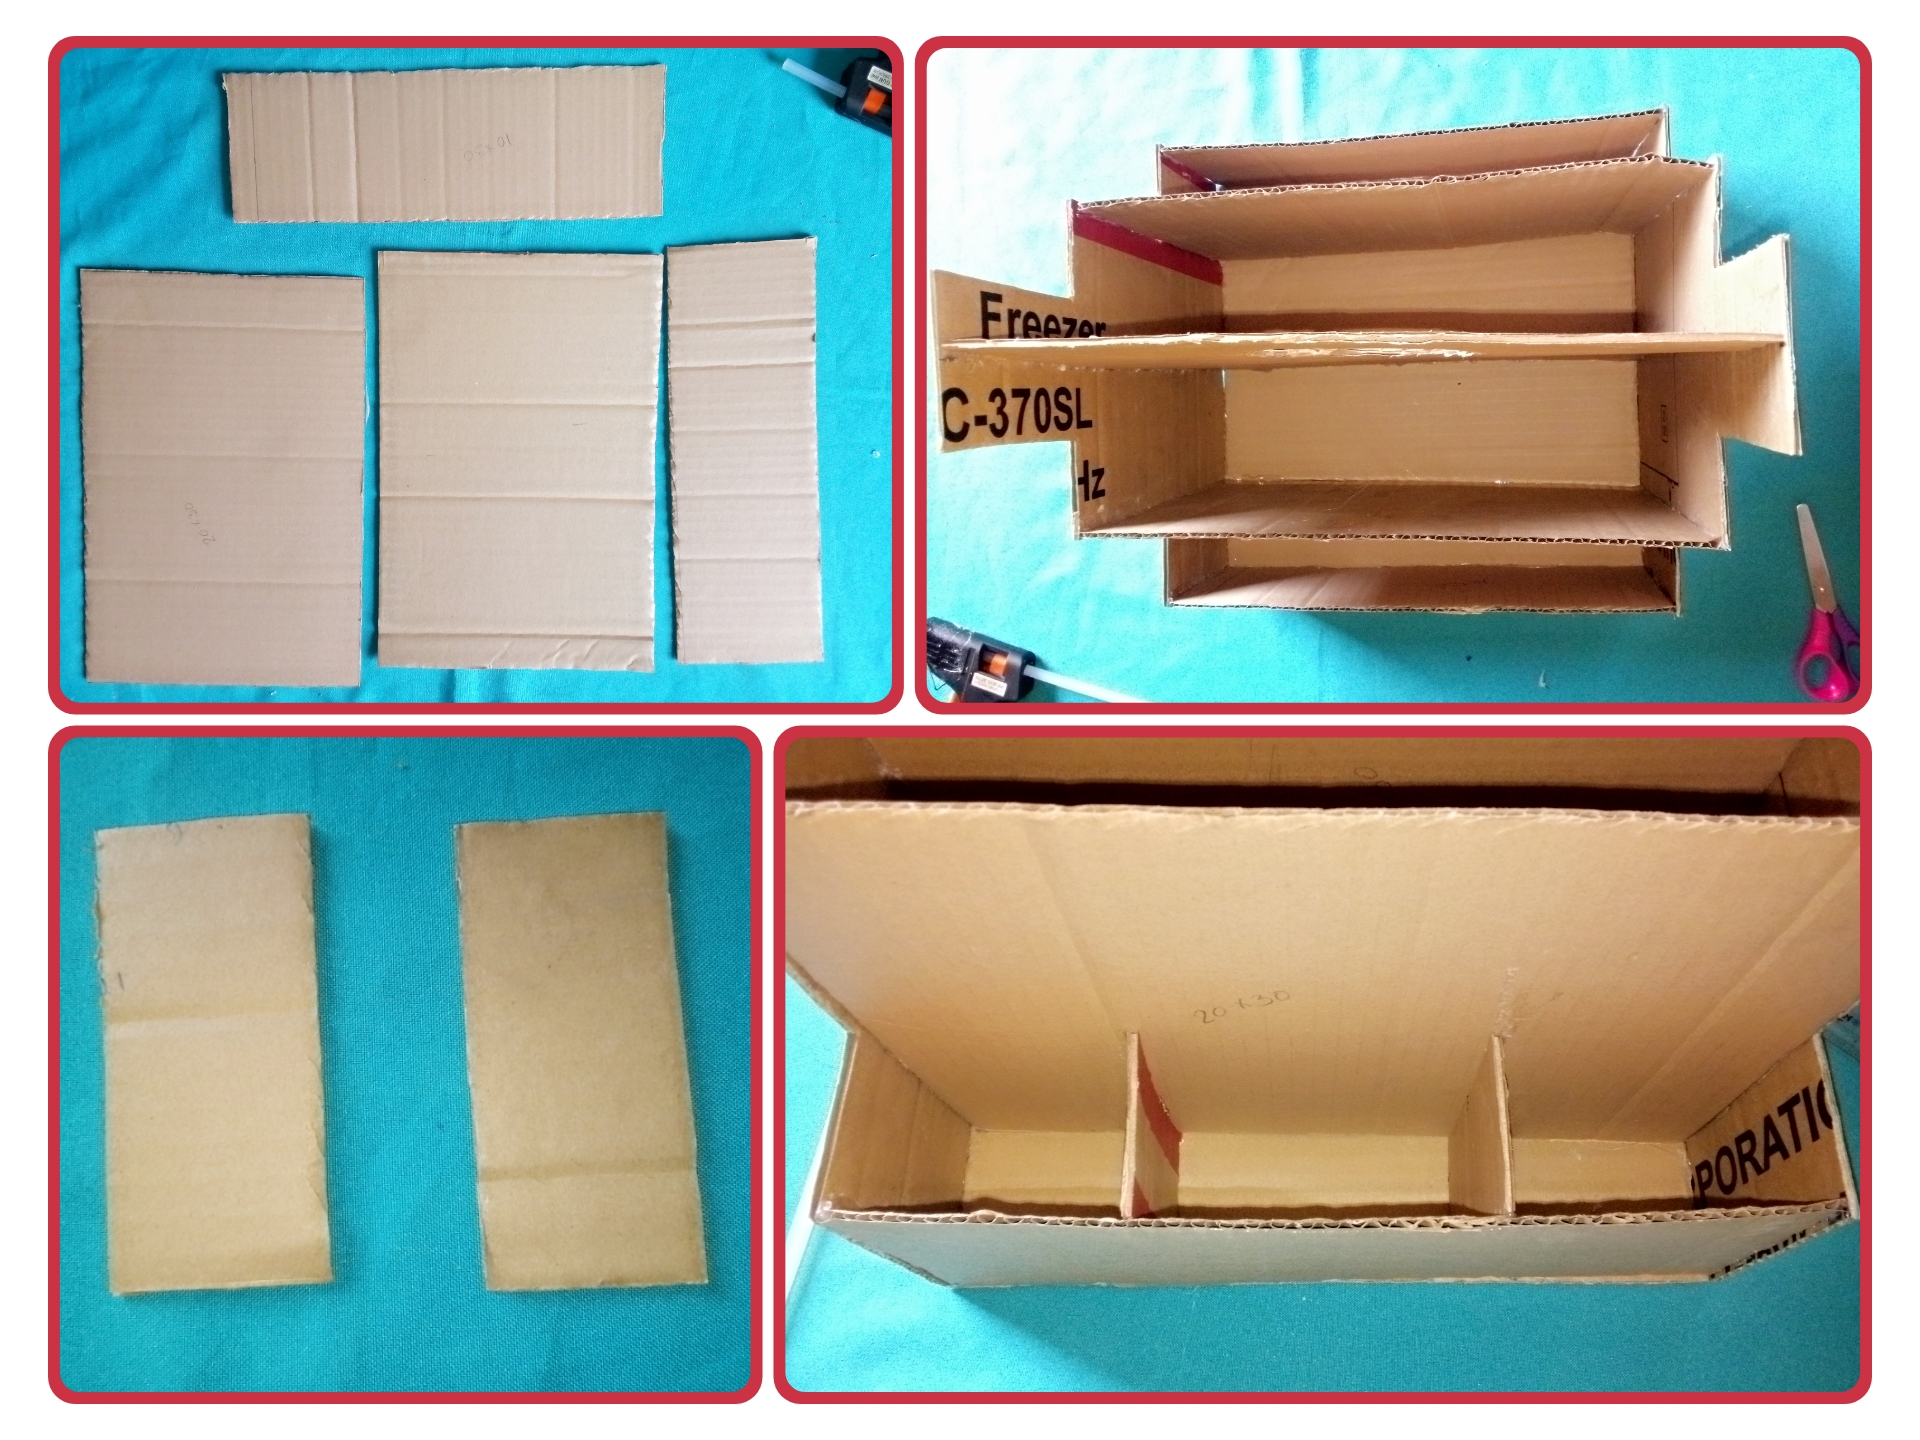
Take four pieces of cardboard of 29x30 centimeters, take two of them and draw on both sides a ladder with elongated steps height of 10 centimeters, the first steps of 6 centimeters and the second of 5 centimeters and the last step of 7 centimeters and cut the shape once the figure is ready, take the other cardboard for the base and glue with hot silicone the sides to the base.
Cojemos cuatro trozos de cartón de 29x30 centímetros, toma dos de eso y dibuja en ambos laterales una escalera con escalones alargados altura de 10 centímetros, los primeros escalón de 6 centímetros y los segundos de 5 centímetros y el último escalón de 7 centímetros y corta la forma una vez lista la figura coje el otro cartón para la base y pega con silicón caliente los laterales a la base.
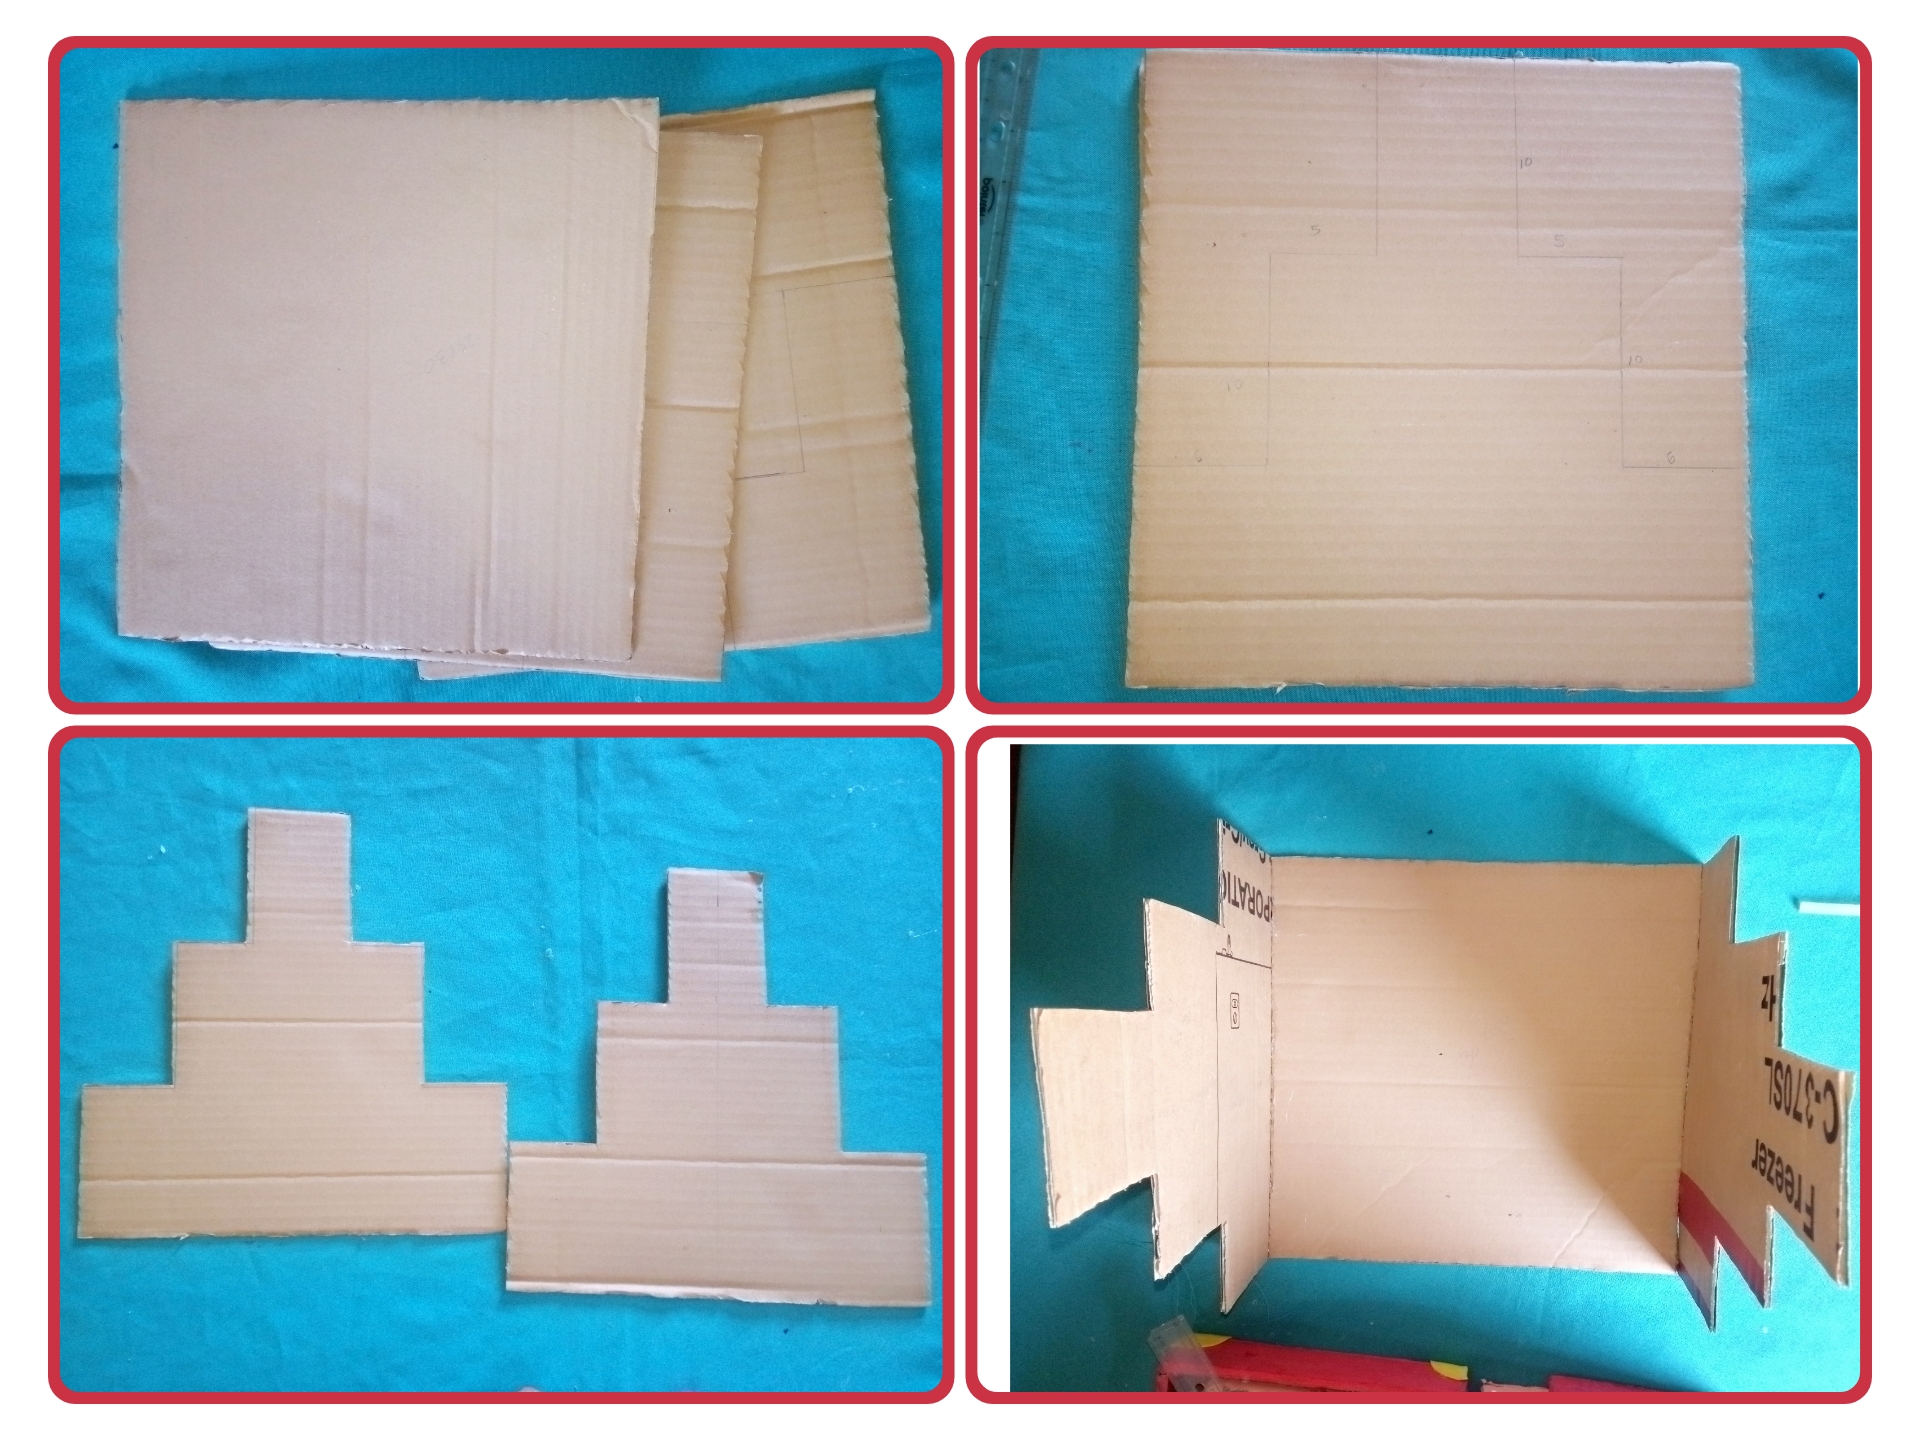
Paso 2. // Step 2
The fourth 29x30 centimeters cardboard we will make an oval on the surface leaving a space and cut the inside. Then glue with hot silicone in the center of the organizer.
El cuarto cartón de 29x30 centímetros le vamos hacer un óvalo en la superficie dejando un espacio y corta lo de adentro. Luego pega con silicón caliente en el centro del organizador.
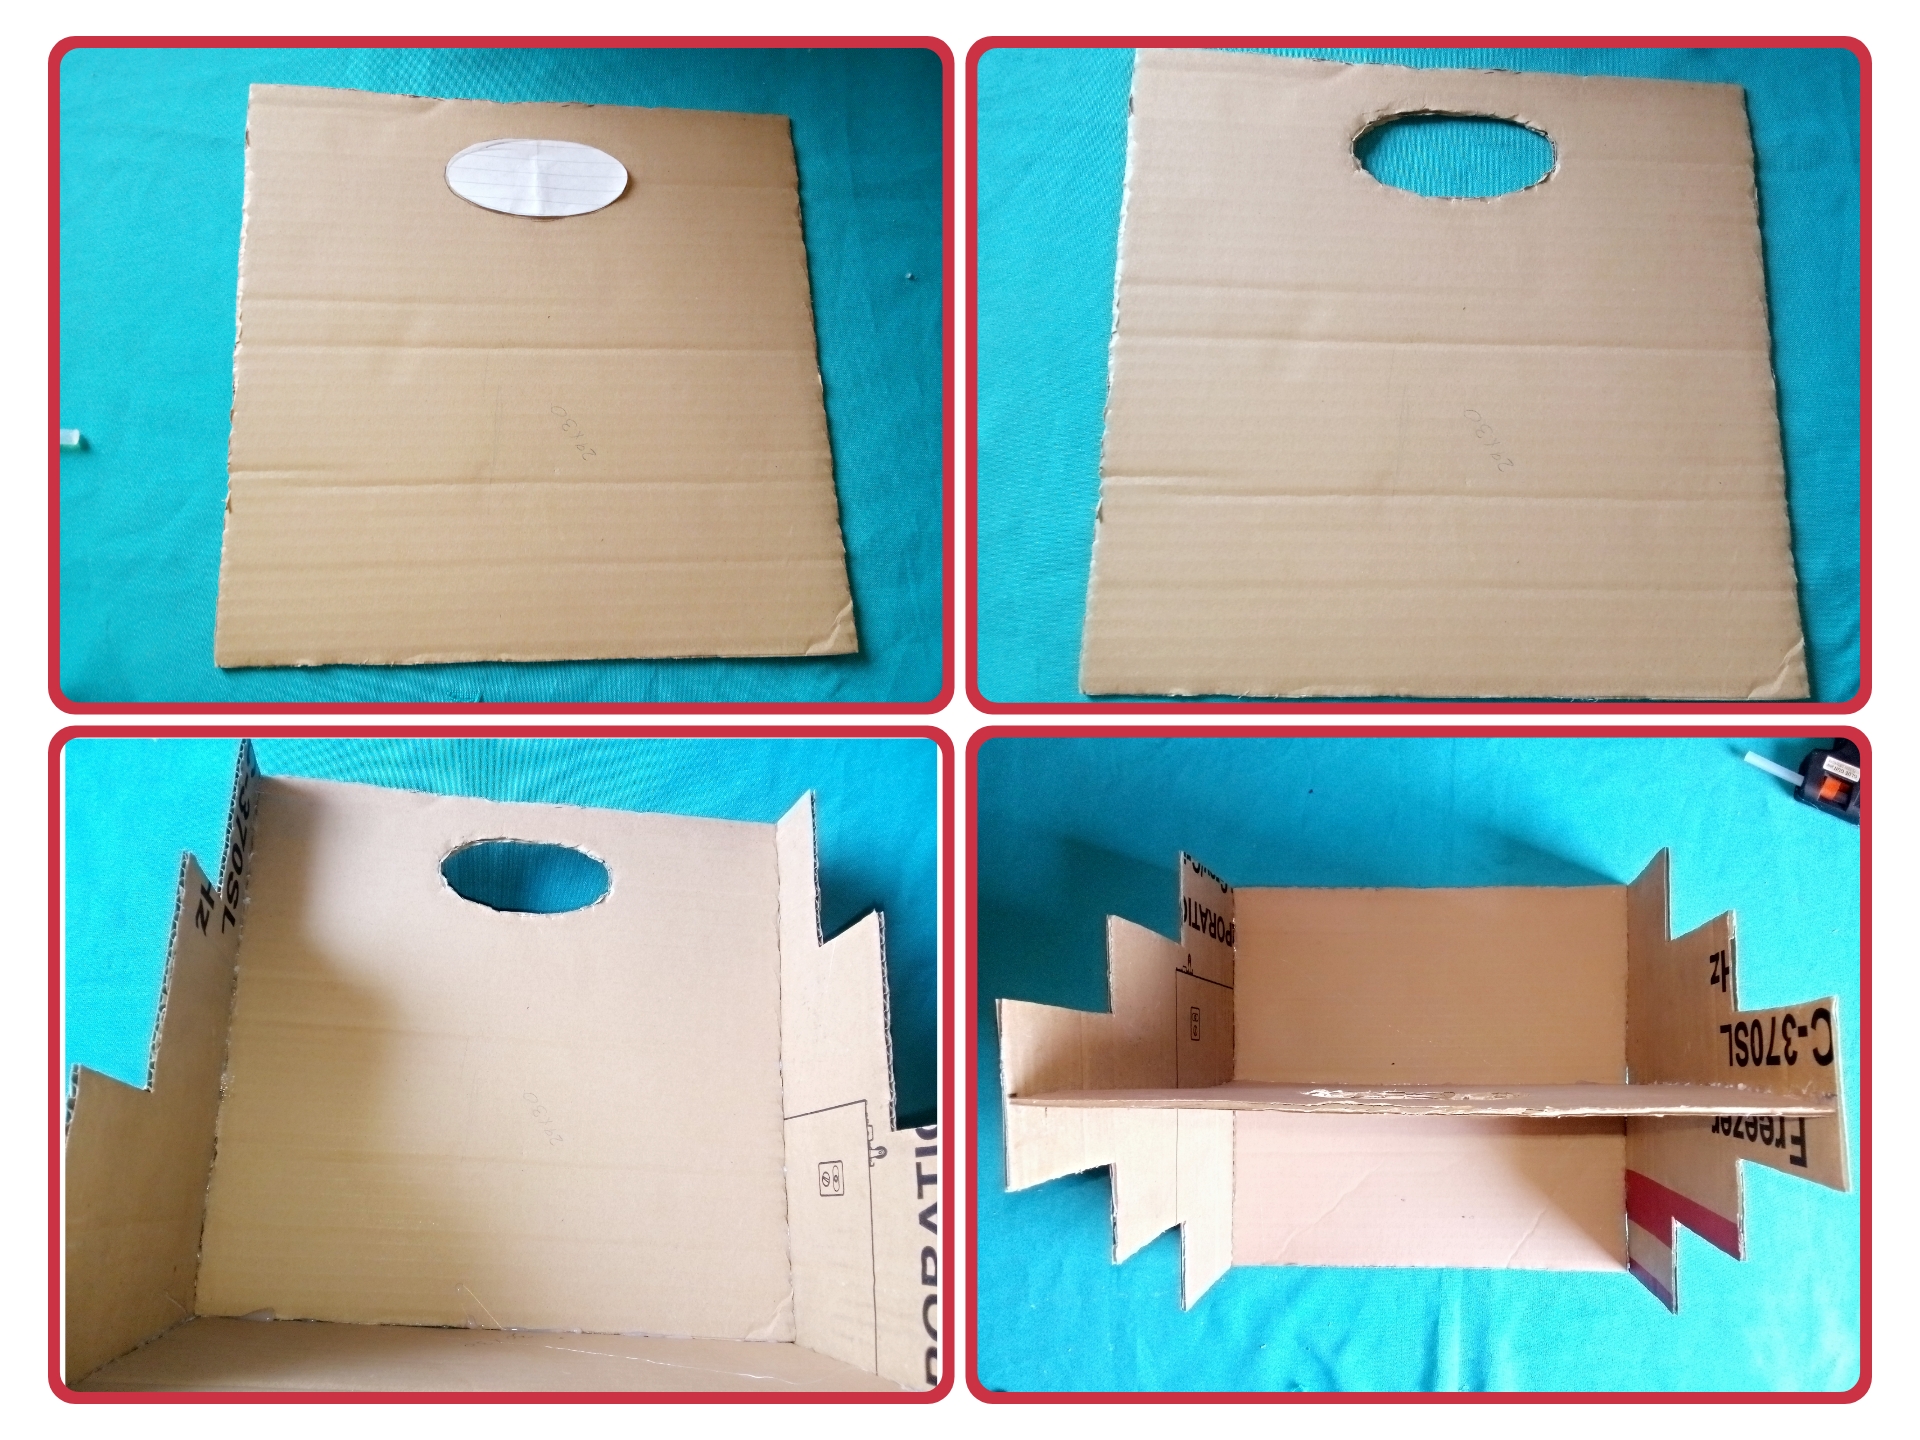
Paso 3. // Step 3.
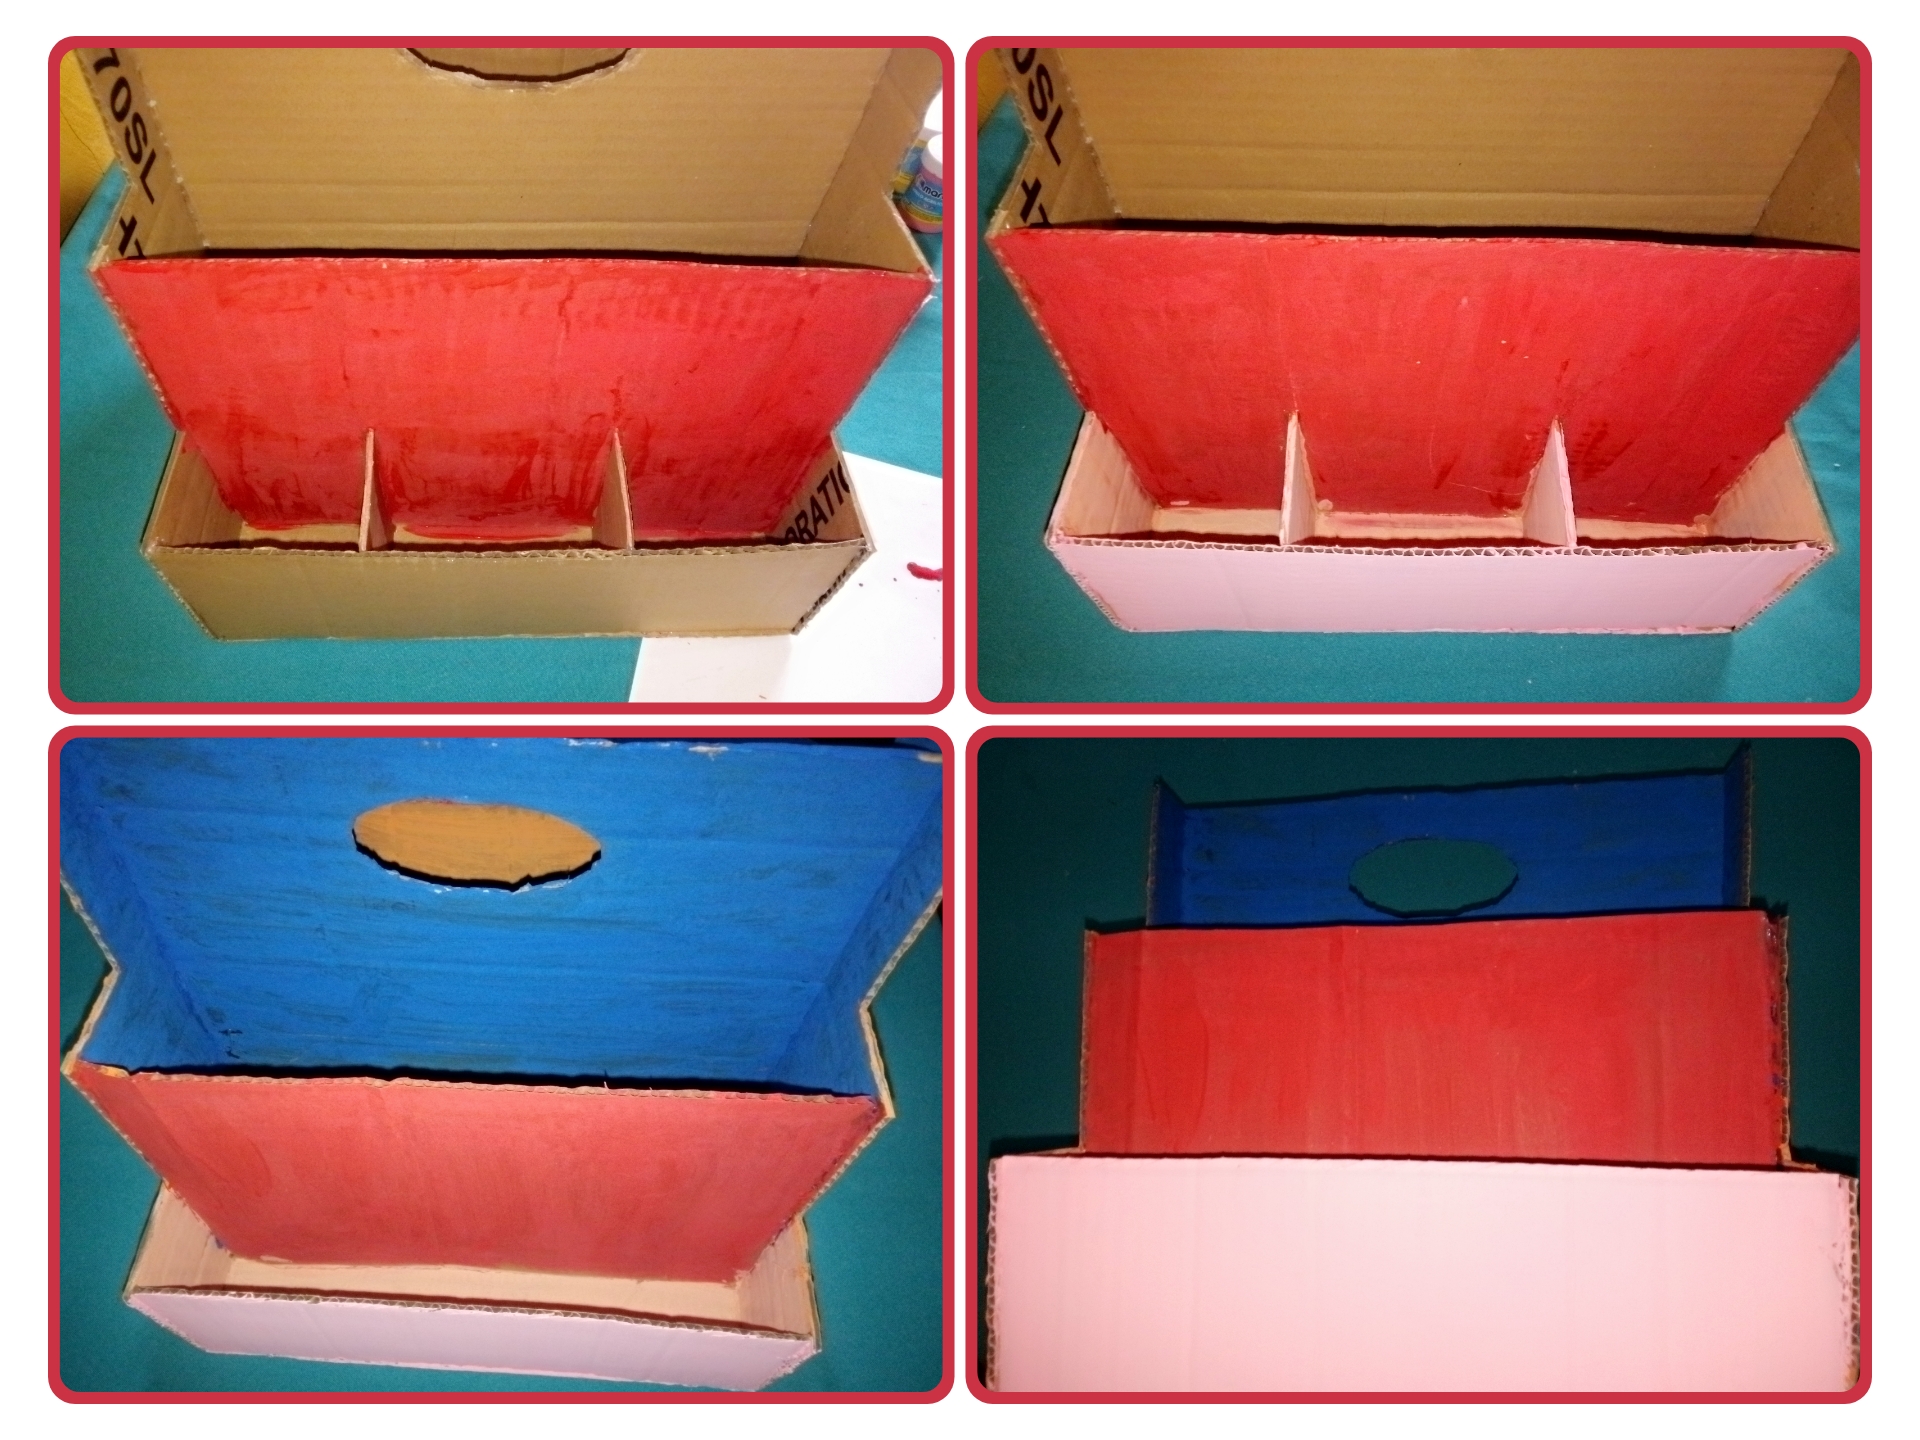
The fourth 29x30 centimeters cardboard we will make an oval on the surface leaving a space and cut the inside. Then glue with hot silicone in the center of the organizer.then we will cut two 10x30 centimeters cardboard, and two 20x30 centimeters glue the smaller cardboard in the front on both sides equally the two big ones for the second separation on both sides they will be equal. For the front of the organizer cut two cardboards of about 5x10 centimeters and glue inside the organizer in the first separation and thus we finish the organizer.
Después vamos a cortar dos cartones de 10x30 centímetros, y dos de 20x30 centímetros pega los cartones más pequeño en la parte delantera en ambos lados igualmente los dos grandes para la segunda separación en ambos lados van a quedar iguales. Para el frente del organizador corta dos cartones de unos 5x10 centímetros y pega dentro del organizador en la primera separación ya así culminamos el organizador.
Paso 4. // Step 4.
We are going to paint as we want or the available colors that we have, paint each part of a different color on both sides the same. In the first part I painted pink, in the second part red, in the third part blue and finally orange on the sides.
Vamos a pintar como queramos o los colores disponibles que tengamos pinte cada parte de un color diferente en ambos lados iguales. En la primera parte pinte de un rosado, en la segunda de rojo, y en la tercera de azúl y por último de anaranjado los laterales.
Paso 5. // Step 5.
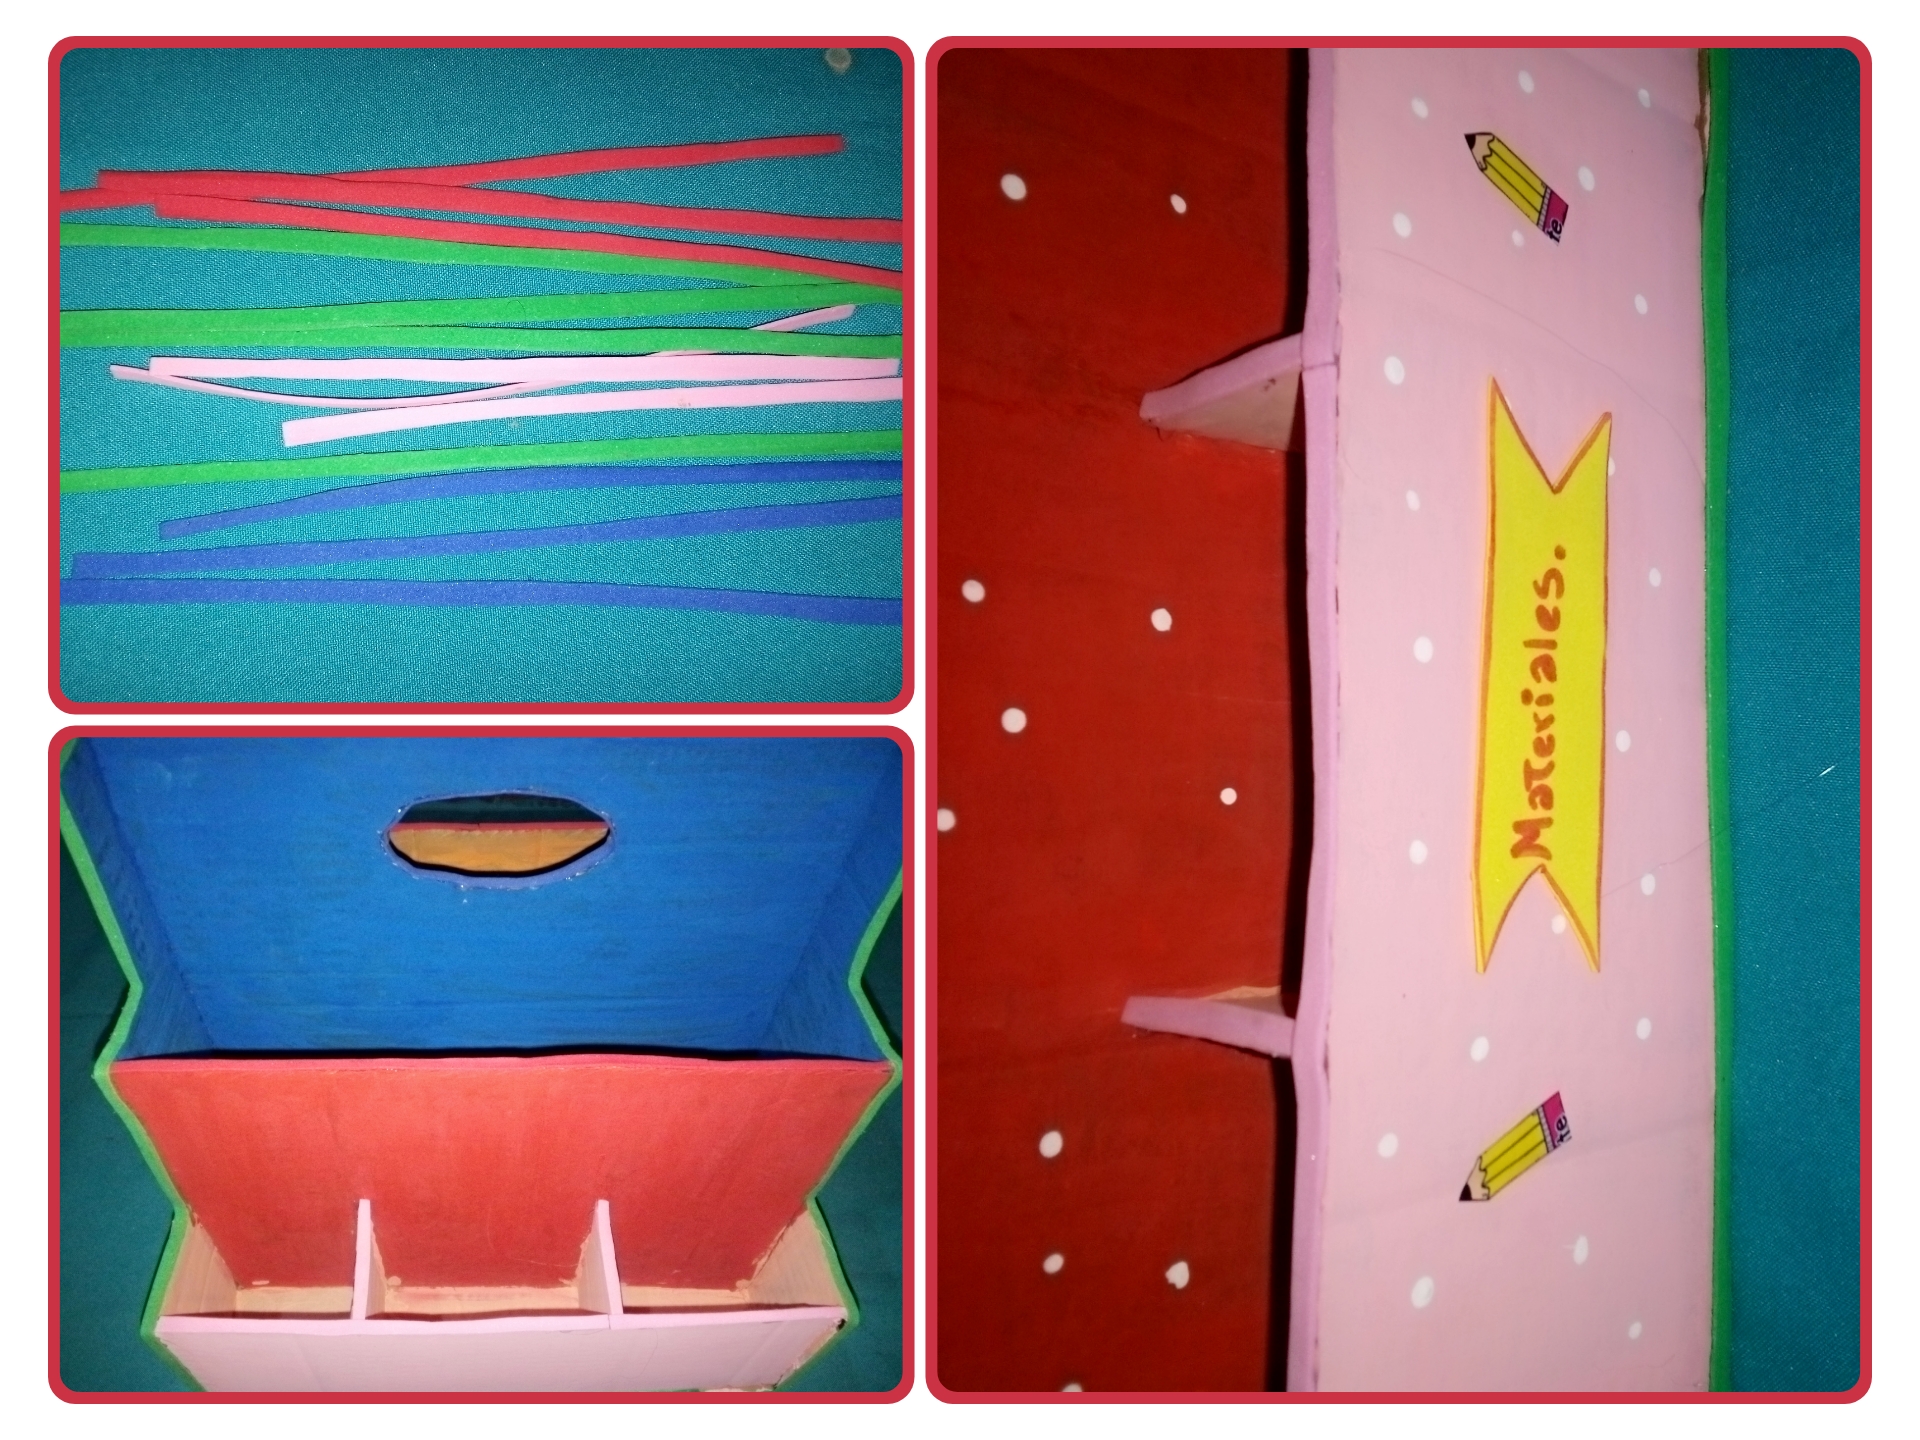
We are almost finished with strips of eva glue in the same color as the paint, glue through the holes and glue with green to highlight the organizer. To finish, make white dots and glue some pencil stickers and a yellow eva glue label that says materials.
Ya casi finalizamos con tiras de goma Eva del mismo color de la pintura pega por los orificios y alrededor pega con verde para resaltar el organizador. Ya para culminar haz puntos blanco y pega unos stickers de lápiz y una etiqueta de goma Eva amarilla que dice materiales.
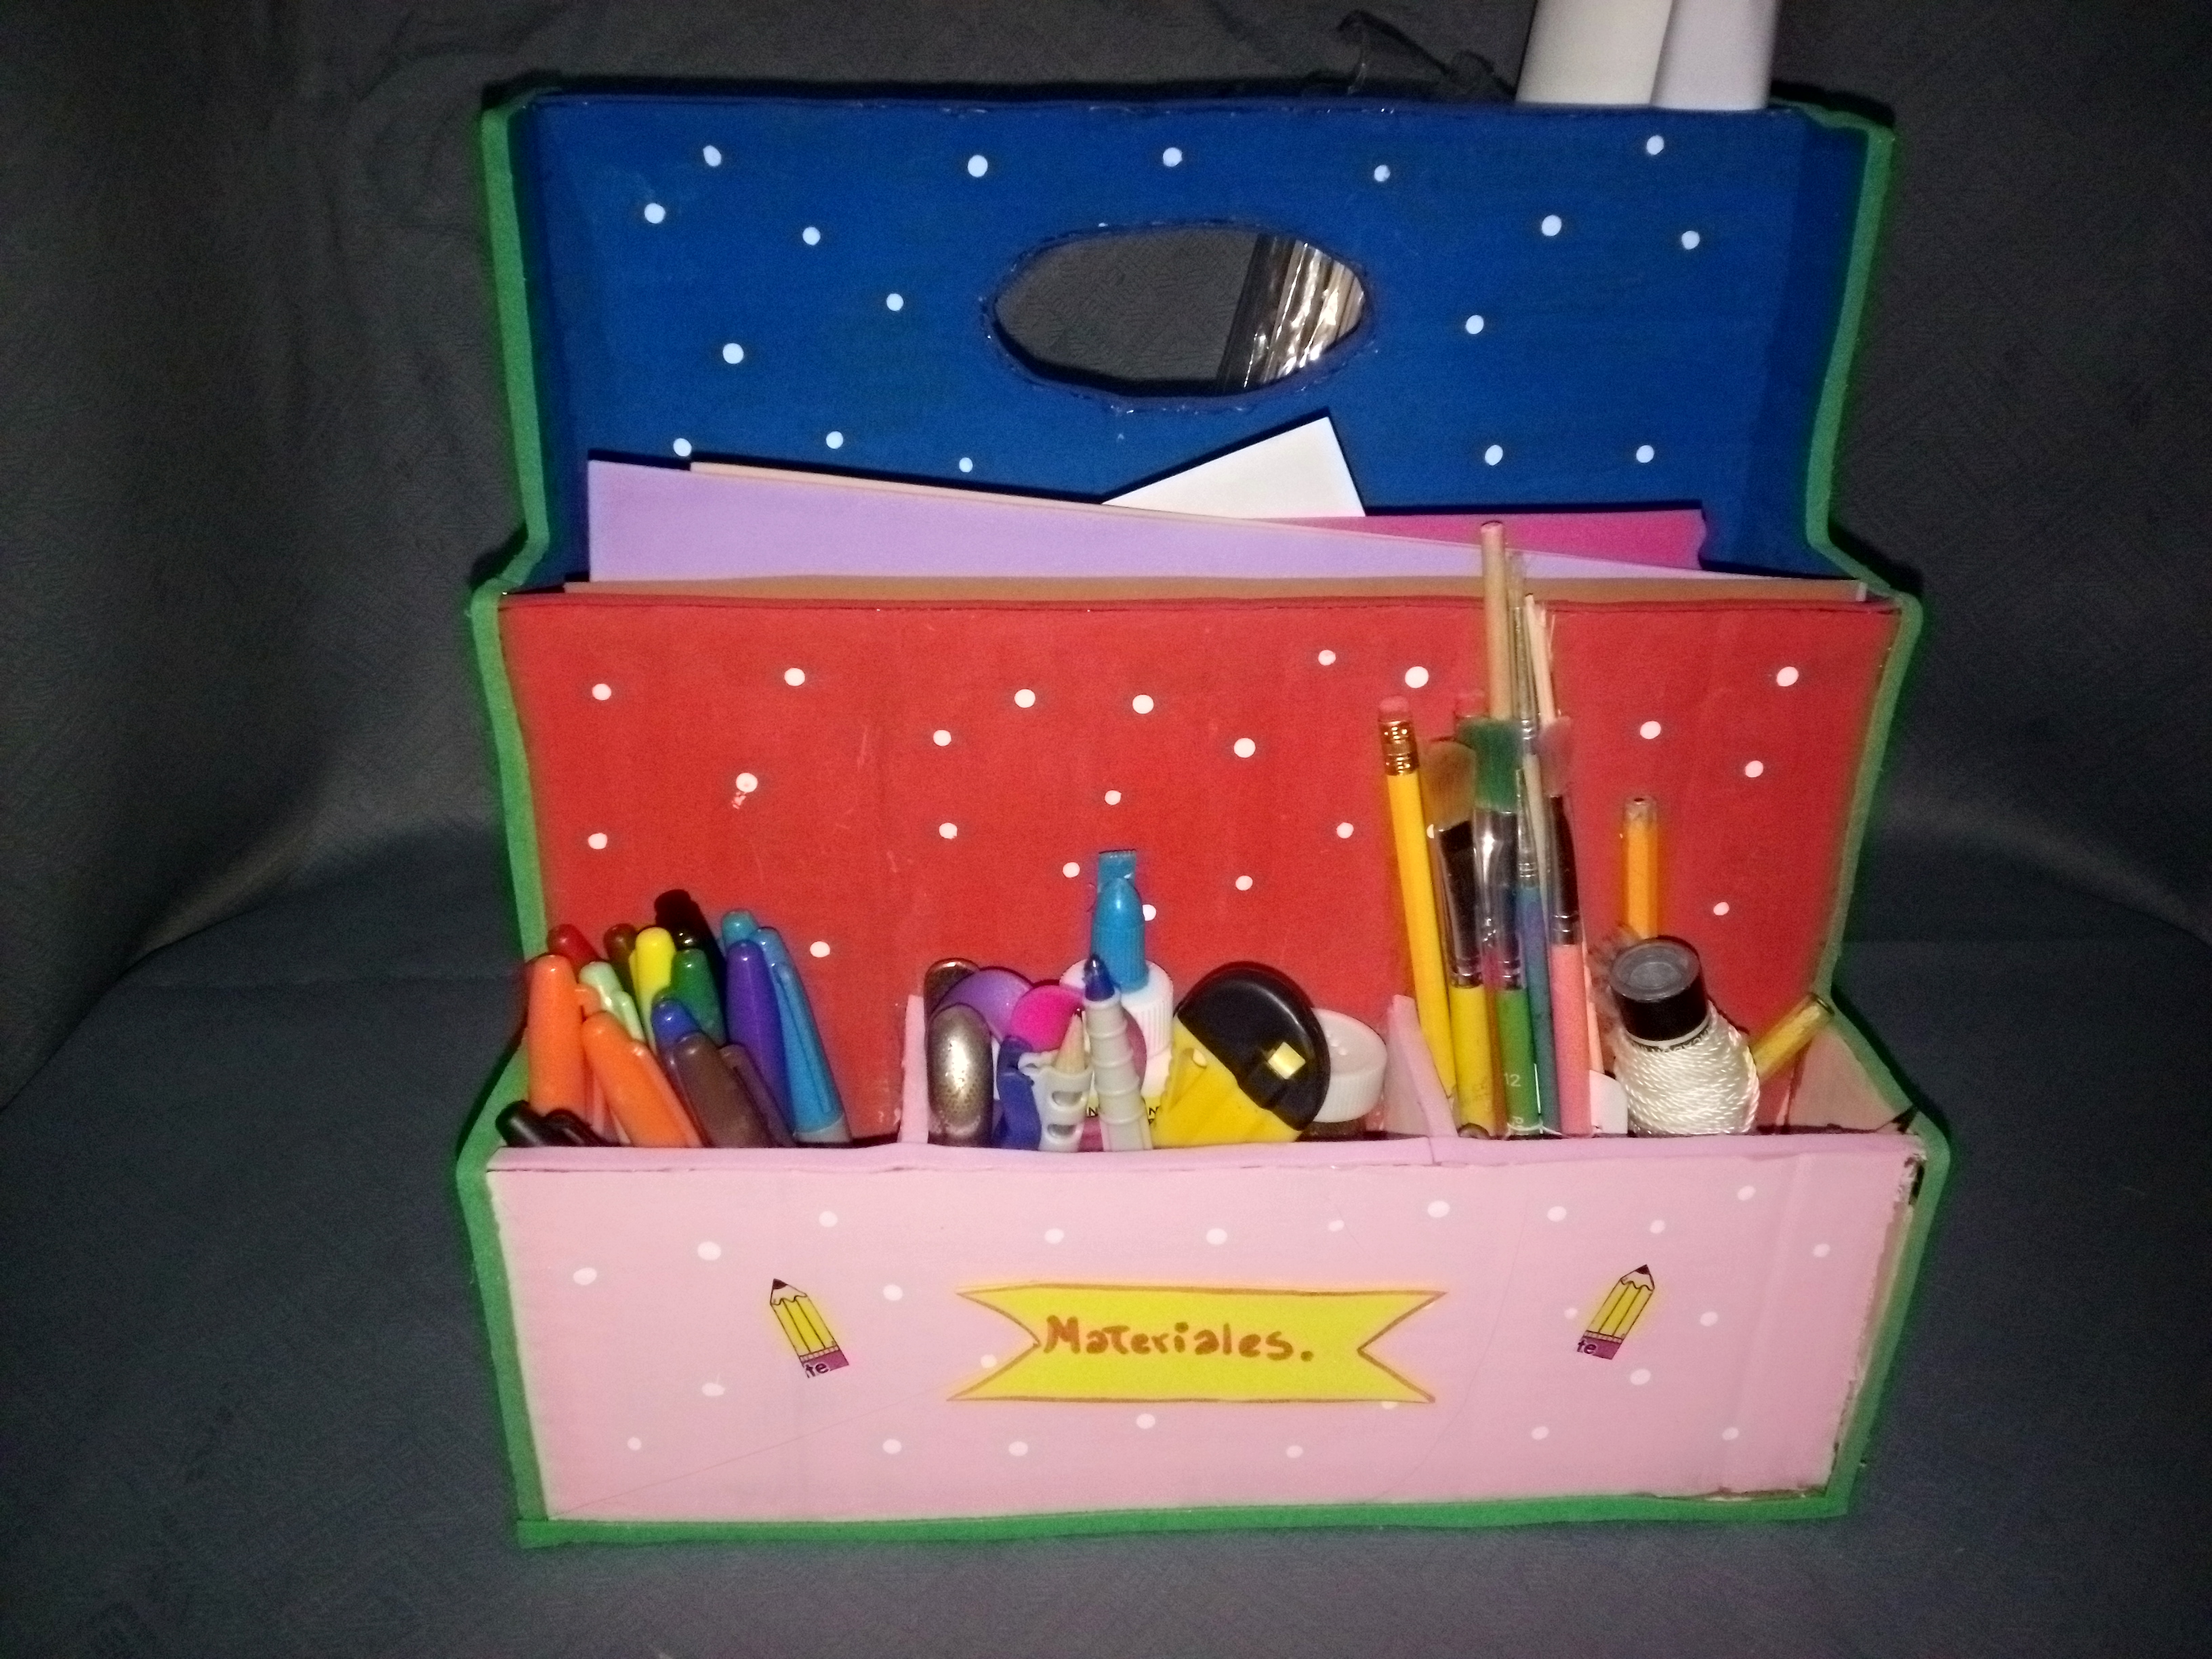
✨Final result. // Resultado final.✨

Gracias por visitar.
Todas las fotos y el contenido son originales que hago diariamente para mi blog. Para La traducción uso deepl los marcos y separadores es usado de canva .📷🖼️🤗
Thank you for visiting.
All photos and content are originals that I make daily for my blog. For translation I use deepl the frames and separators are used from canva .📷🖼️🤗
0
0
0.000
That's a nice looking organiser
Bravo
!DIY
!discovery 30
Thanks @stevenson7 yes I really liked the organizer I will use it for myself.
The organiser looks really sturdy and neat. That's a good job.
Greetings!!! @diyhub if it is sturdy it was made with thick cardboard and does not bend. To make it last a little longer I don't have to put very heavy stuff on it thanks.
You can query your personal balance by
!DIYSTATSQue hermosa forma de reciclar material 😊 me encantó está idea ✨
Gracias por comentar.
I love it. I like to recycle materials and make something new out of it. :D
Thank you friend.
Una gran idea para reciclar el cartón y mantener los materiales de trabajo organizados, te quedó muy bien y colorido.
Saludos!
Si así se mantiene todo ordenado. Gracias por pasarte.