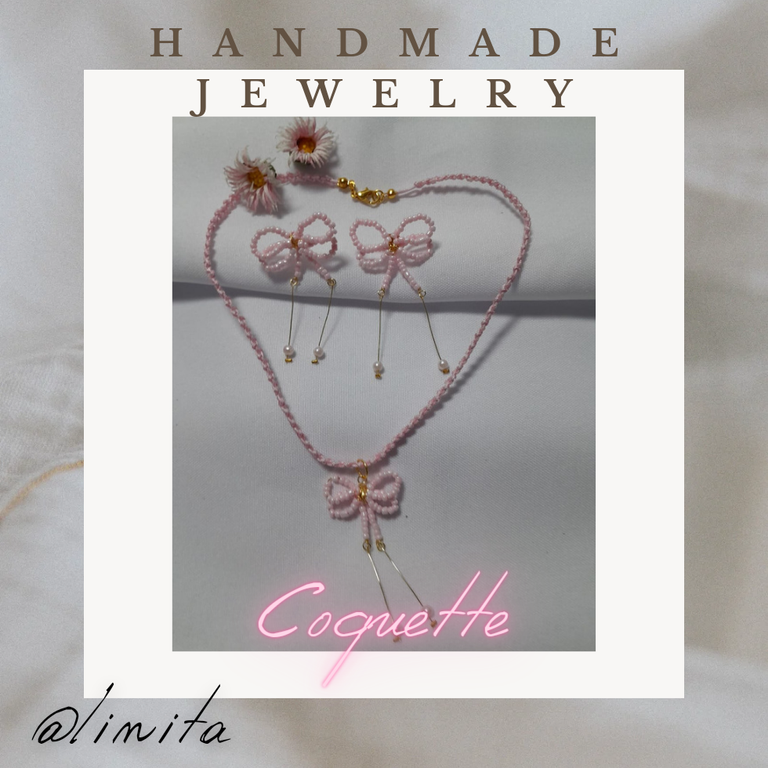
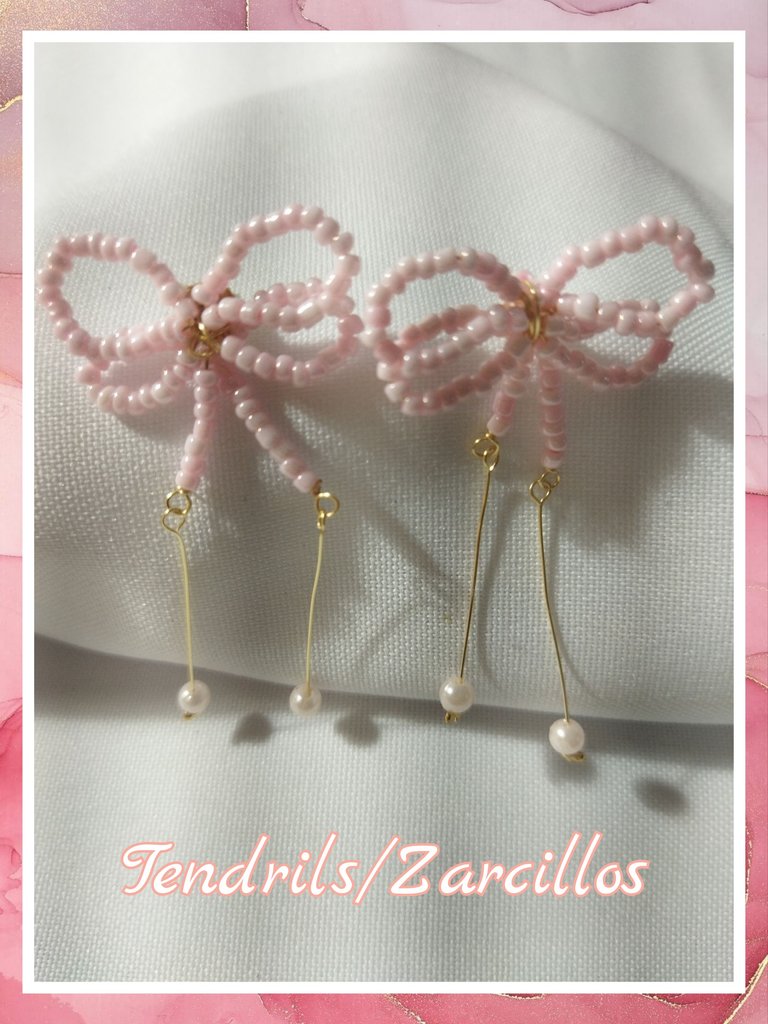
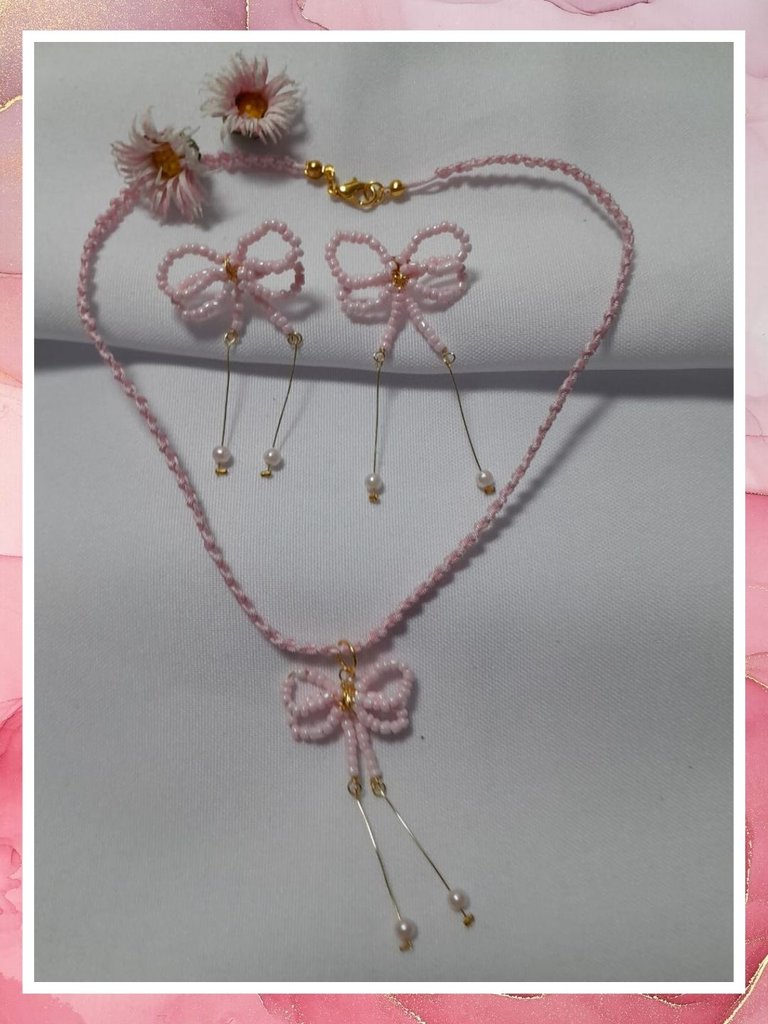
[ENG-ESP] "COQUETTE" NECKLACE AND EARRINGS
WELCOME TO MY BLOG
Hellooooo, helloooo! Greetings and my respect for jewelry creators. As we have already appreciated jewelery creators, ties are trends throughout their expression. The "Coquette" denomination refers to the French coquete term and translates into all that refined and feminine that they make of those who look for it to be the center of attraction wherever they are.
Due to this wave of "Coquette" I made a delicate collar and tendrils game, made with wire and shows, highlighting the pink pastel tone with the golden gold, giving it a touch of elegance and femininity. I hope you like it.
BIENVENIDOS A MI BLOG
¡Holaaaa, holaaaaa! Saludos y mis respetos a los creadores de bisutería. Como ya hemos apreciado los creadores de bisutería, está en tendencia los lazos en todo su expresión. La denominación "Coquette" hace referencia al término francés coqueta y se traduce en todo aquello refinado y femenino que hacen de las que lo lucen ser el centro de atracción donde quiera que estén.
Debido a esta ola de "Coquette" elaboré un delicado juego de collar y zarcillos, elaborados con alambre y mostacillas, resaltando el tono rosado pastel con el dorado del alambre, dándole un toque de elegancia y femineidad. Espero te guste.
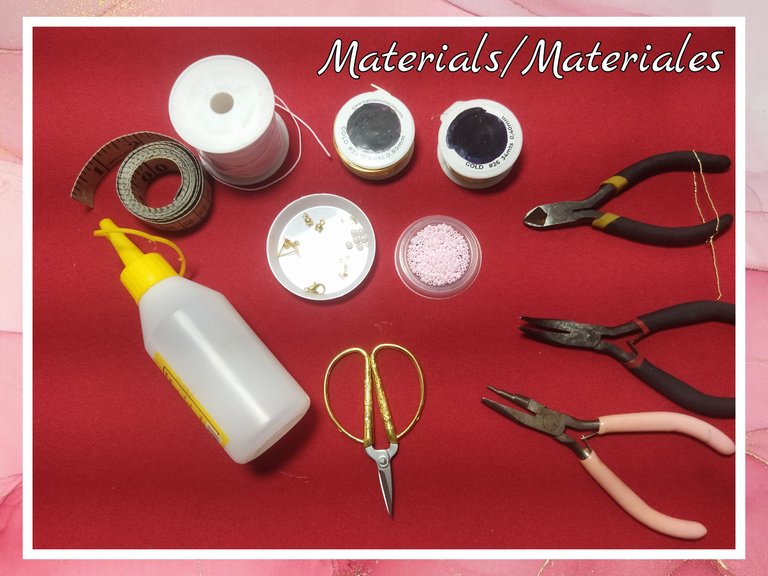
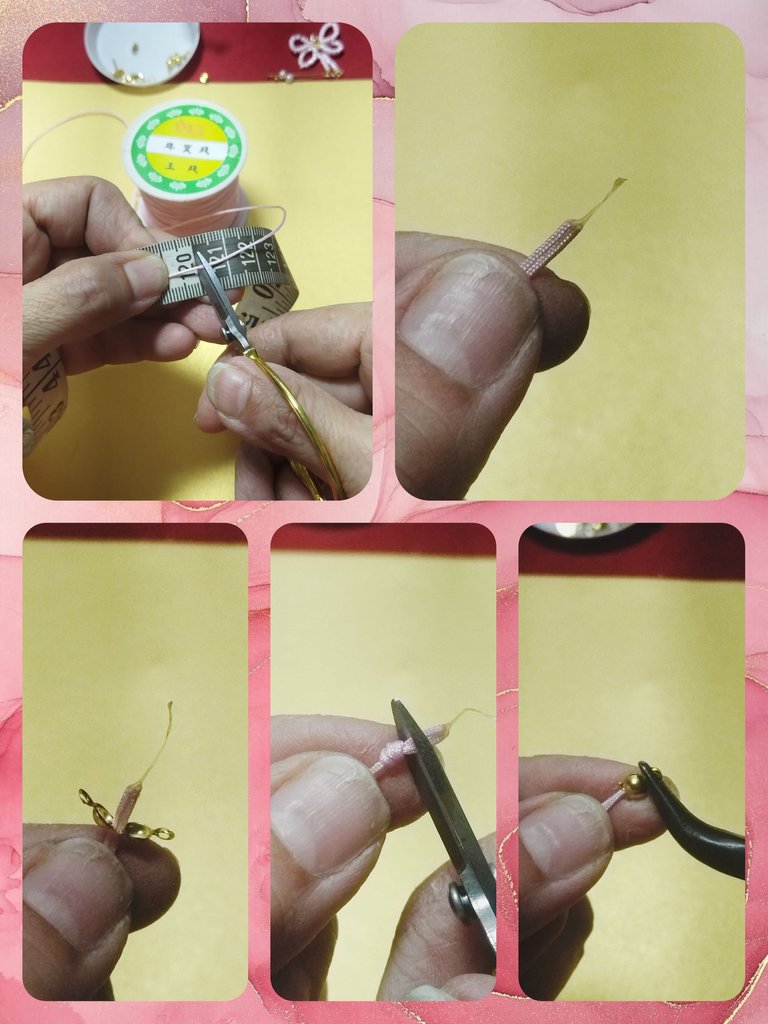
MATERIALS
- Pink Chinese thread
- Wire #20 and #26
- Pink Mostacillas
- Pink pearls
- Moles for tendrils
- Liquid silicone
- Cover knots
- Loro Pico Safe
- jewelery staples
- jewelery tweezers
- Scissors
- Measuring tape
- Lighter
MATERIALES
- Hilo chino rosado
- Alambre #20 y #26
- Mostacillas rosadas
- Perlas 3 mm rosadas
- Tapa nudos
- Seguro pico de loro
- Grapas de bisutería
- Topitos para zarcillos
- Silicón líquido
- Pinzas de bisutería
- Tijera
- Cinta métrica
- Encendedor
STEP BY STEP // PASO A PASO
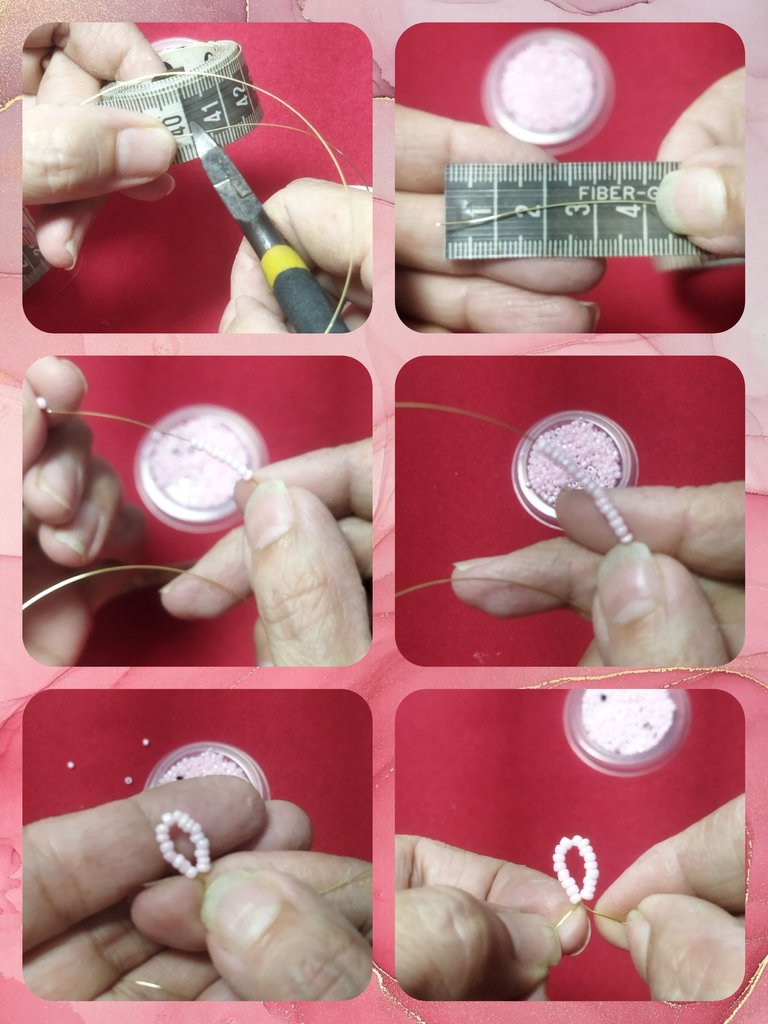
TENDRILS
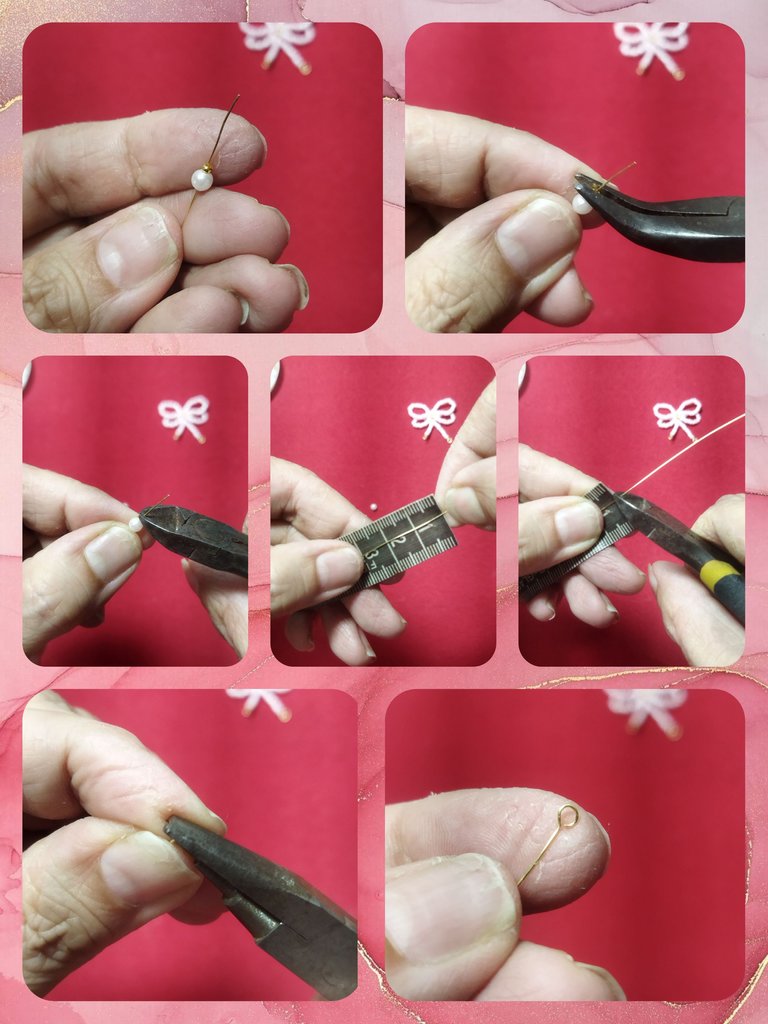
- To perform the ties we will need 40 cm wire of 26 mm.
- We measure 4 cm from the beginning of the wire and begin to introduce 16 Mostacillas.
- We perform a fold forming the first loop and with the excess wire we make two turns in the bond to adjust.
ZARCILLOS
- Para realizar los lazos vamos a necesitar 40 cm de alambre de 26 mm.
- Medimos 4 cm desde el inicio del alambre y comenzamos a introducir 16 mostacillas.
- Realizamos un doblez formando el primer lazo y con el alambre sobrante realizamos dos giros en la unión del lazo para ajustar.
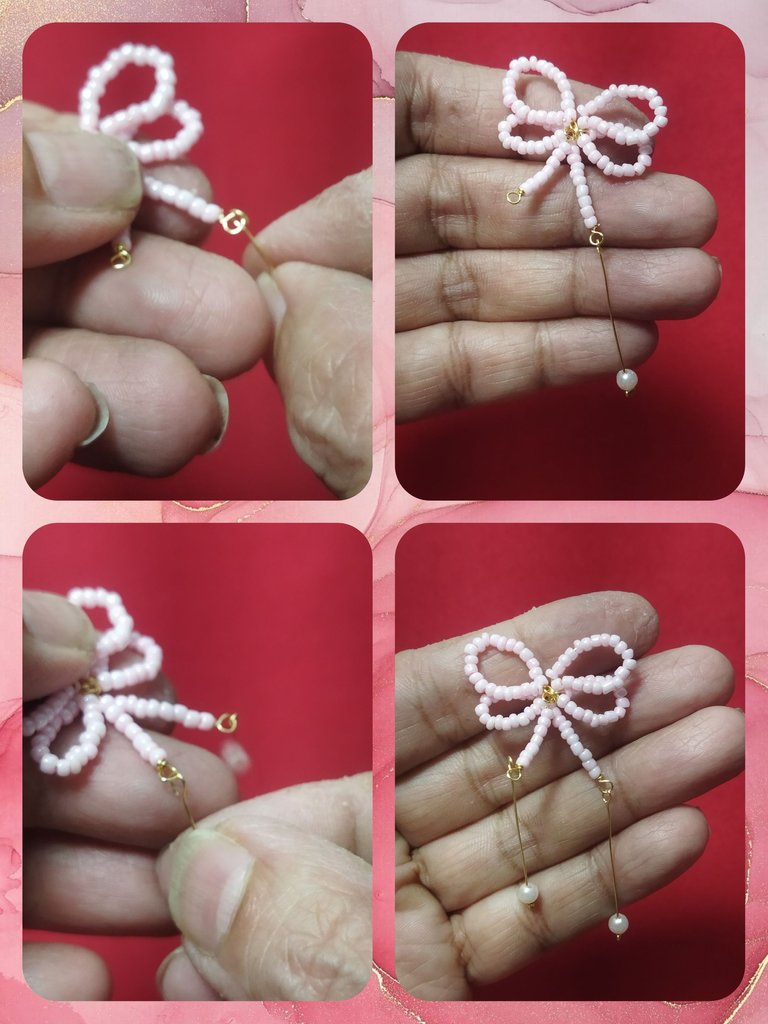
We take the same amount of Mostacilla and perform the second loop in the same shape of the previous one and also adjust performing two turns with the wire.
These ties will be the ones we will locate in the lower part of the full loop.
Tomamos la misma cantidad de mostacilla y realizamos el segundo lazo con la misma forma del anterior e igualmente ajustamos realizando dos giros con el alambre.
Estos lazos serán los que ubicaremos en la parte baja del lazo completo.
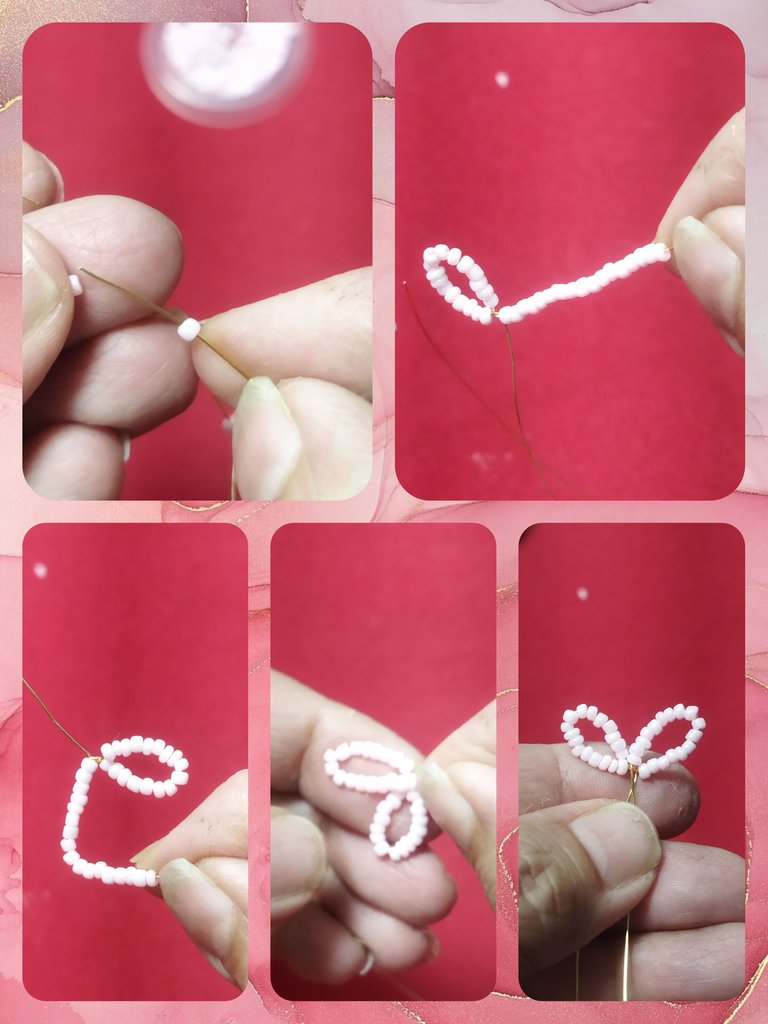
For the upper part we will use 20 Mostacillas, since these ties must be a bit larger than the lower ones. Once the mustacillas have been introduced, we pass the wire behind the loop and form the ear, we turn with the wire through the center of the loop and adjust.
Para la parte superior vamos a utilizar 20 mostacillas, ya que estos lazos deben ser un poco más grande que los inferiores. Una vez introducidas las mostacillas, pasamos el alambre por detrás del lazo y formamos la oreja, realizamos un giro con el alambre por el centro del lazo y ajustamos.
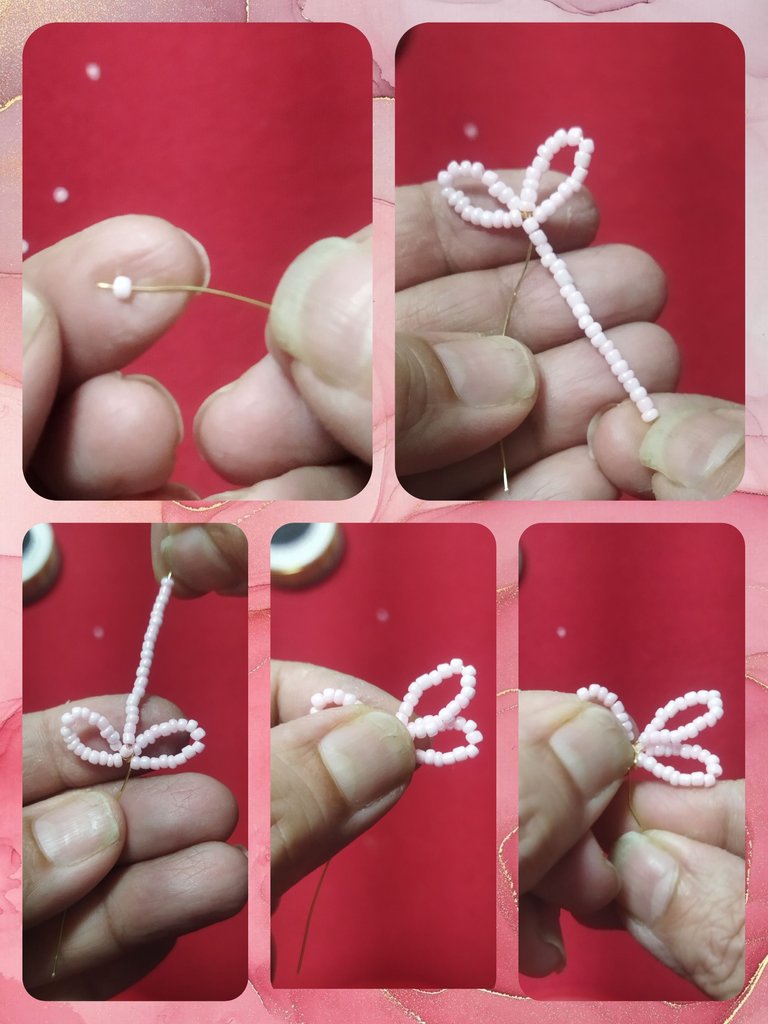
Then we introduce 20 more and more bows and made the last loop, we take two more turns with the wire to adjust, we mold the preferred shape of the loop and ensure that the excess wire is behind the loop.
Seguidamente introducimos 20 mostacillas más y realizamos el último lazo, damos dos giros más con el alambre para ajustar, moldeamos la forma preferida del lazo y nos aseguramos que el alambre sobrante quede detrás del lazo.
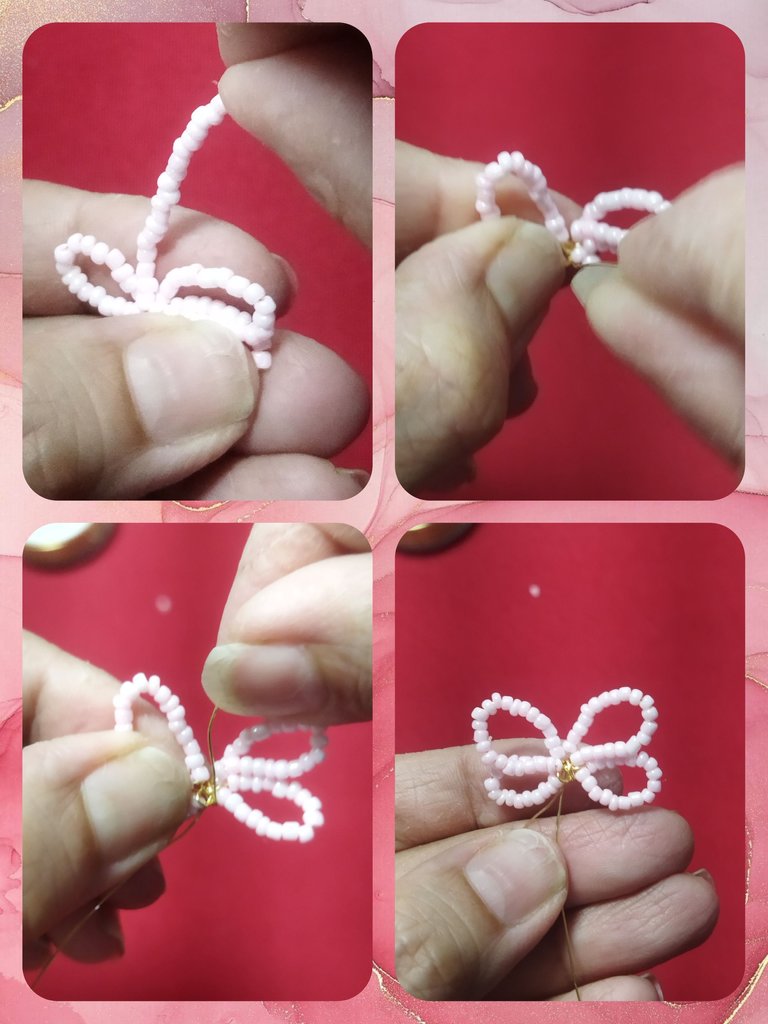
In the leftover wire, the longest, we are going to insert 10 beads and with the conical pliers we will make a small ring and close with a rosary knot with two twists, with the cutting pliers we chop the excess of the wire and reserve to finish the rest of the loop.
En el alambre sobrante, el más largo, vamos a introducir 10 mostacillas y con la pinza cónica realizaremos una argolla pequeña y cerramos con un nudo de rosario de dos giros, con la pinza de corte picamos el exceso del alambre y reservamos para culminar el resto del lazo.
Then we insert 7 beads into the shortest wire, the 4 cm one that we left at the beginning of the loop, and we also make a small ring and a rosary knot to close, we cut the excess of the wire and with the flat clamp we adjust. And now we have our first loop for the tendrils. We do the other one in the same way to have the pair.
Luego introducimos 7 mostacillas en el alambre más corto, el de 4 cm que dejamos al inicio del lazo, y realizamos igualmente una argolla pequeña y un nudo de rosario para cerrar, cortamos el exceso del alambre y con la pinza plana ajustamos. Y ya tenemos nuestro primer lazo para los zarcillos. Realizamos el otro de la misma forma para tener el par.
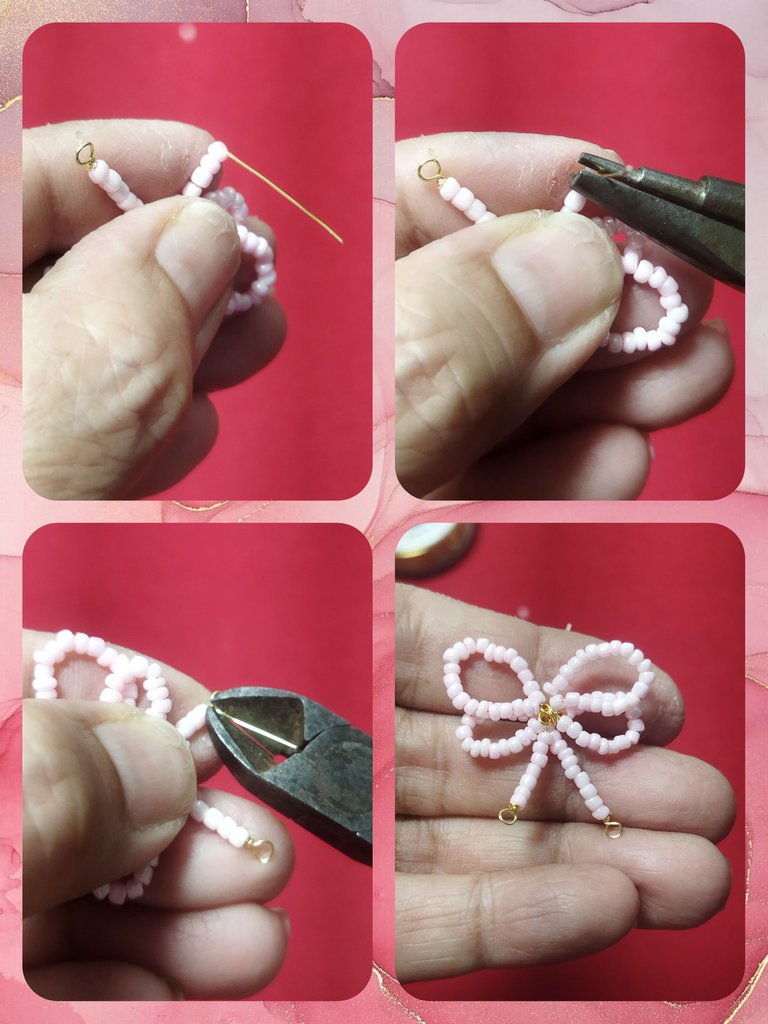
To give more flirtation to the tendrils with the leftover wire and the #3 pearls we are going to make some hanging wire strands. For this we are going to insert a bead into the wire and place a staple at the tip and tighten with the tweezers. We measure 3 cm from the pearl, cut the rest of the wire and make a small hoop.
Para darle más coquetería al los zarcillos con el alambre sobrante y las perlas #3 vamos a hacer unos hilos colgantes de alambre. Para esto vamos a introducir una perla en el alambre y en la punta colocamos una grapa y apretamos con la pinza. Medimos 3 cm a partir de la perla, cortamos el resto del alambre y realizamos un aro pequeño.
Then we attach it to the tendril loop on any of the rings and make an identical one for the other ring. And we repeat for the other loop.
Luego lo unimos al lazo del zarcillo en cualquiera de las argollas y realizamos uno idéntico para la otra argolla. Y repetimos para el otro lazo.
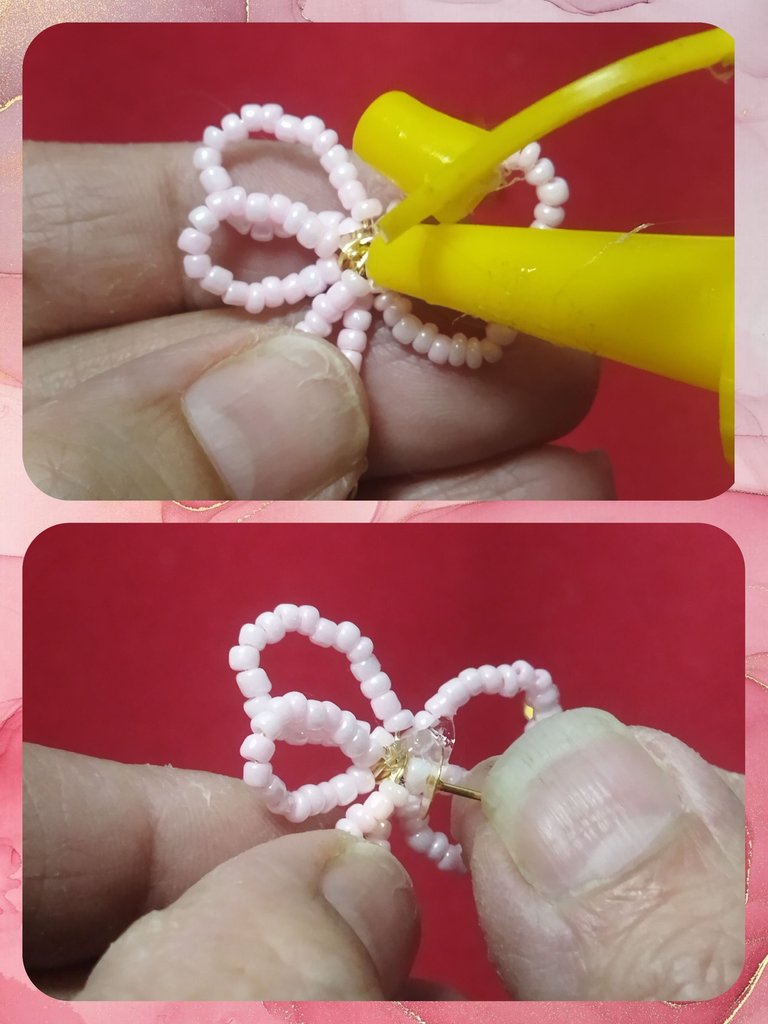
On the back of the bows we glue the little dots for tendrils with liquid silicone, letting them dry for approximately one hour. If you have instant jewelry glue it would be much better.
And in this way we finish the tendrils.
Por la parte trasera de los lazos pegamos con el silicón líquido los topitos para zarcillos, dejando secar por aproximadamente una hora. Si tienes pegamento instantáneo para bisutería sería mucho mejor.
Y de esta forma terminamos los zarcillos.
CHARM AND NECKLACE
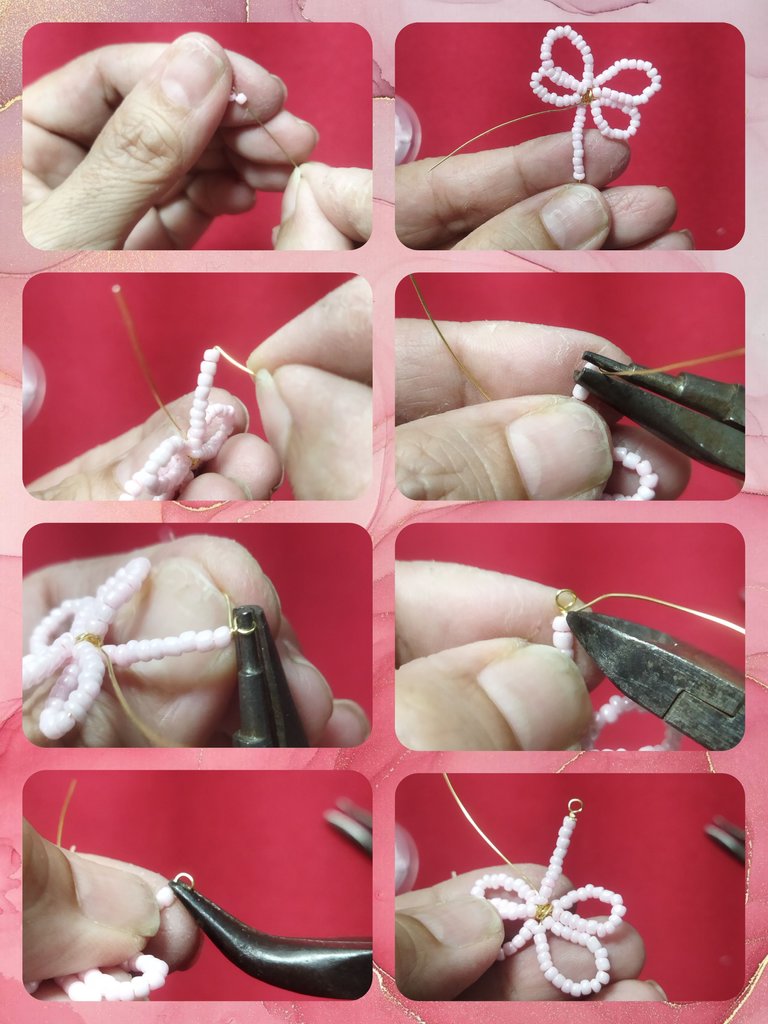
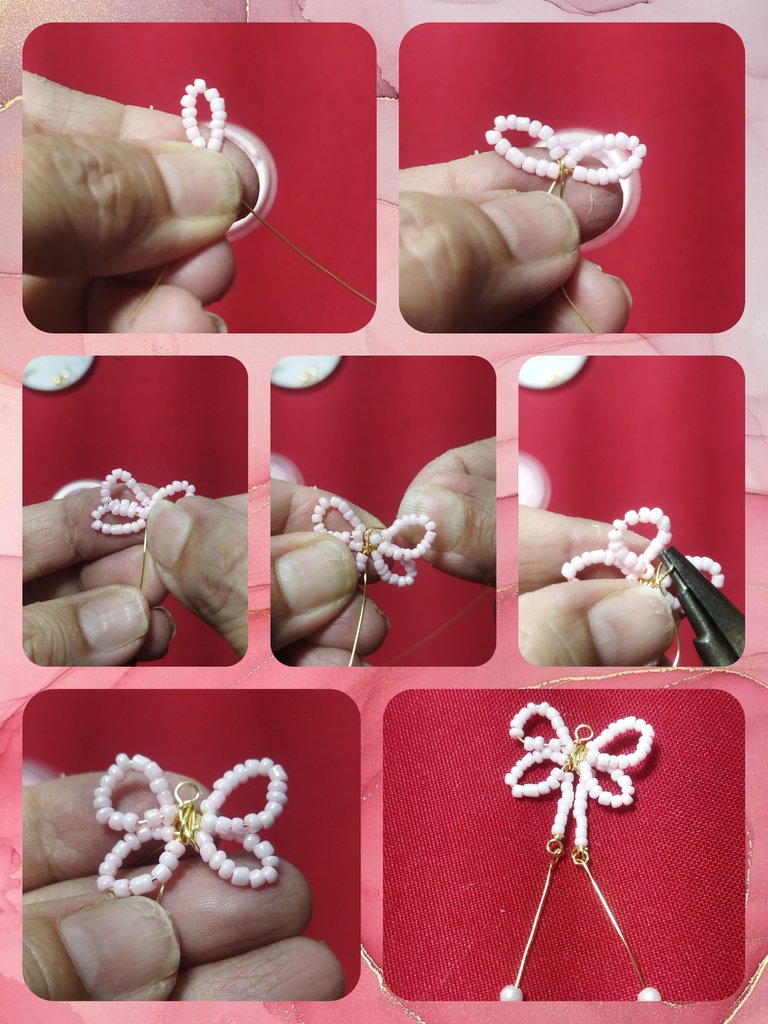
To make the pendant we will carry out the same procedure as the loops of the tendrils with the only difference that once we have formed the loop, with the same wire we are going to form the ring to insert the necklace.
We are going to carry out this process with the conical clamp and the size of the ring should be approximately 4 mm.
Then we make the pendants that carry the earrings with the #3 pearls and the wire.
DIJE Y COLLAR
Para realizar el dije realizaremos el mismo procedimiento de los lazos de los zarcillos con la única diferencia que una vez hemos formado el lazo, con el mismo alambre vamos a formar la argolla para introducir el collar.
Este proceso lo vamos a realizar con la pinza cónica y el tamaño de la argolla debe ser aproximadamente de 4 mm.
Luego realizamos los colgantes que llevan los zarcillos con las perlas #3 y el alambre.
MACRAMÉ FABRIC FOR THE NECKLACE
For the necklace I made a very simple weave but its knot forms a very delicate twist, ideal for this game.
Two 120 cm strands of 1 mm pink Chinese thread are cut.
We join both strands and make the needle point with the help of the lighter.
We introduce the knot cover, form a knot, cut the excess thread and close the knot cover.
TEJIDO MACRAMÉ PARA EL COLLAR
Para el collar realicé un tejido bien sencillo pero que su nudo va formando un entorchado muy delicado ideal para este juego.
Se cortan dos hebras de 120 cm de hilo chino de 1 mm de color rosado.
Unimos amabas hebras y realizamos la punta aguja con la ayuda del encendedor.
Introducimos el tapa nudos, formamos un nudo cortamos el exceso de hilo y cerramos el tapa nudos.
Then we place it on a board and secure it with a hook and begin to make the weaving, which consists of making a normal knot.
We take the strand on the left side and go over the strand on the right side and pull out through the center of the union. Then we pull the strand with which we made the knot, keeping the strand on the right side rigid. We bring the knot to the beginning of the hook and adjust it but without tightening it too much so that the fabric does not become tight.
Now we make the second knot but in the opposite way, that is, we take the strand on the right side and pass through the strand on the left side, we form the knot and bring the strand on the left side rigid to the beginning of the weaving and adjust it loosely.
We repeat the process, with both strands until we reach 36 or 38 cm of fabric, depending on how you like to wear the necklace.
Luego colocamos en una tabla y sujetamos con un gancho y comenzamos a realizar el tejido que consiste en realizar un nudo normal.
Tomamos la hebra del lado izquierdo y pasamos por encima de la hebra del lado derecho y sacamos por el centro de la unión. Luego halamos la hebra con la que realizamos el nudo, manteniendo rígida la hebra del lado derecho. Llevamos el nudo al inicio del gancho y ajustamos pero sin apretar demasiado para que el tejido no se vaya a tensar.
Ahora realizamos el segundo nudo pero al contrario, es decir, tomamos la hebra del lado derecho y pasamos por la hebra del lado izquierdo, formamos el nudo y llevamos al inicio del tejido mantenido rígida la hebra del lado izquierdo y ajustamos sin apretar.
Repetimos el proceso, con ambas hebras hasta alcanzar 36 o 38 cm de tejido, dependiendo de cómo te guste usar el collar.
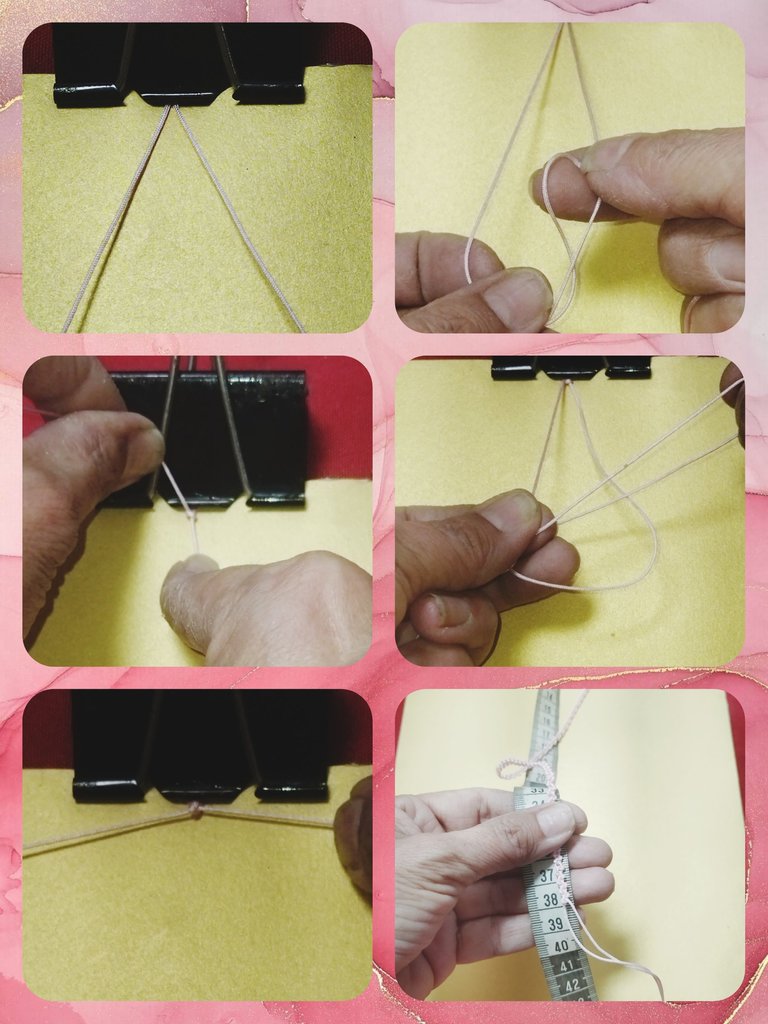
We make the needle point at the ends of the threads, we introduce the knot cover and carry it to the end of the fabric, we make a knot, we cut the excess and we close the knot cover.
With the #20 wire we make 3 rings of approximately 5 mm.
Realizamos la punta aguja en el extremos de los hilos, introducimos el tapa nudos y llevamos hasta el final del tejido, realizamos un nudo, cortamos el sobrante y cerramos el tapa nudos.
Con el alambre #20 realizamos 3 aros de 5 mm aproximadamente.
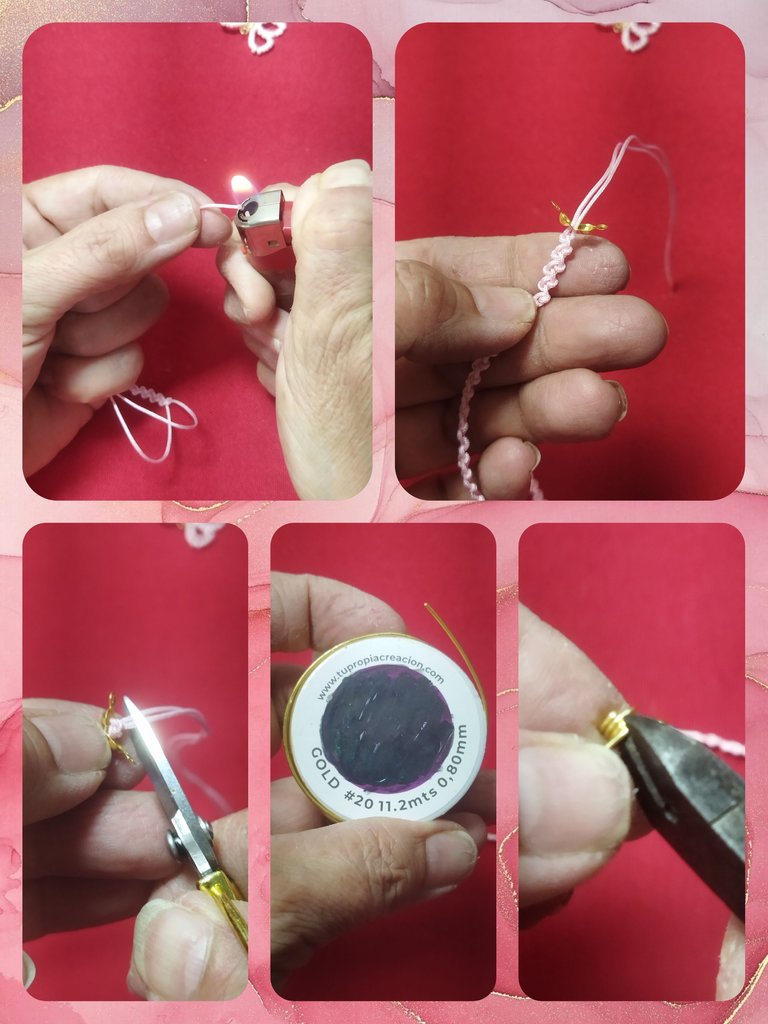
We place a ring in each of the knot caps and in one of them we insert the secure peak of the lo and close the ring.
And now we have the necklace formed.
Colocamos un aro en cada uno de los tapa nudos y en uno de ellos introducimos el seguro pico de lo y cerramos el aro.
Y ya tenemos el collar formado.

We finish the necklace by placing the pendant that we have previously placed in a 5 mm ring to facilitate the introduction of the necklace.
Finalizamos el collar colocando el dije que previamente hemos puesto un aro de 5 mm para facilitar la introducción del collar.
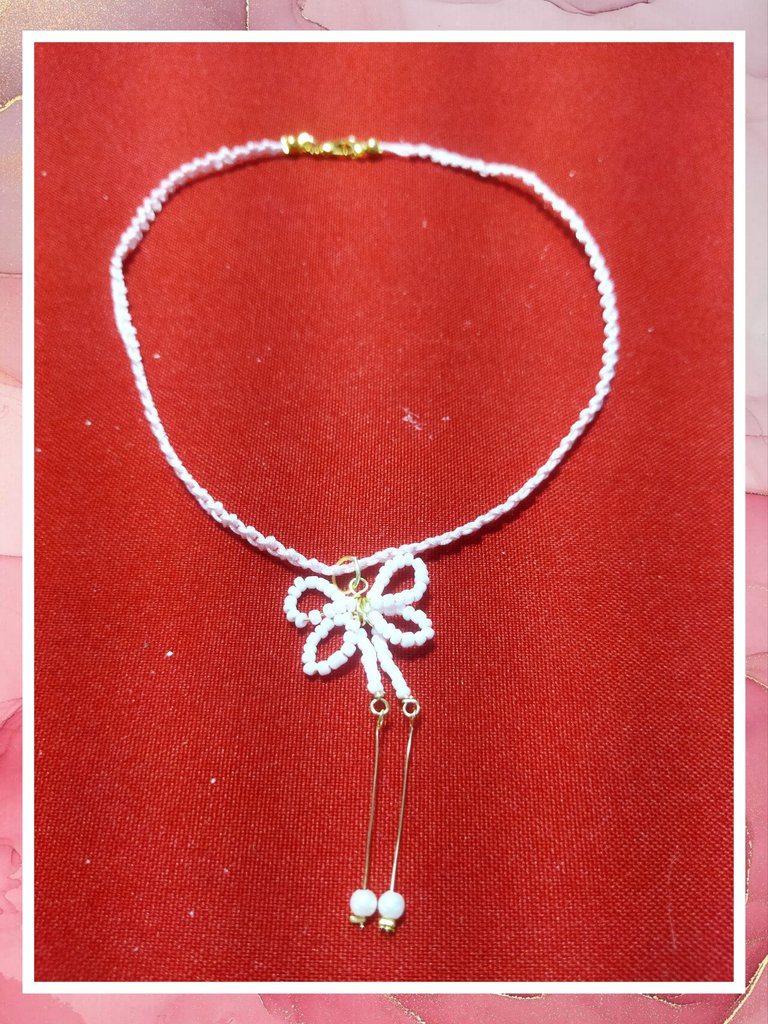
This is how I made this elegant, delicate, very feminine and very fashionable "COQUETTE" Set. I hope you like it. See you next time.
Es así como realicé este elegante, delicado, muy femenino y muy a la moda Set "COQUETTE". Espero te guste. Nos vemos en la próxima.
Te quedó hermoso, y que dulzura de color. Felicidades @linita.
the necklace design is so beautiful. Quite amazing
Muy lindo diseño amiga
Que lindos pendientes y a la moda , me gustan mucho.
Congratulations, your post has been upvoted by @dsc-r2cornell, which is the curating account for @R2cornell's Discord Community.
Enhorabuena, su "post" ha sido "up-voted" por @dsc-r2cornell, que es la "cuenta curating" de la Comunidad de la Discordia de @R2cornell.
Thank you
Este anudado es muy bonito amiga me encanta la combinacion de dorado con rosado.