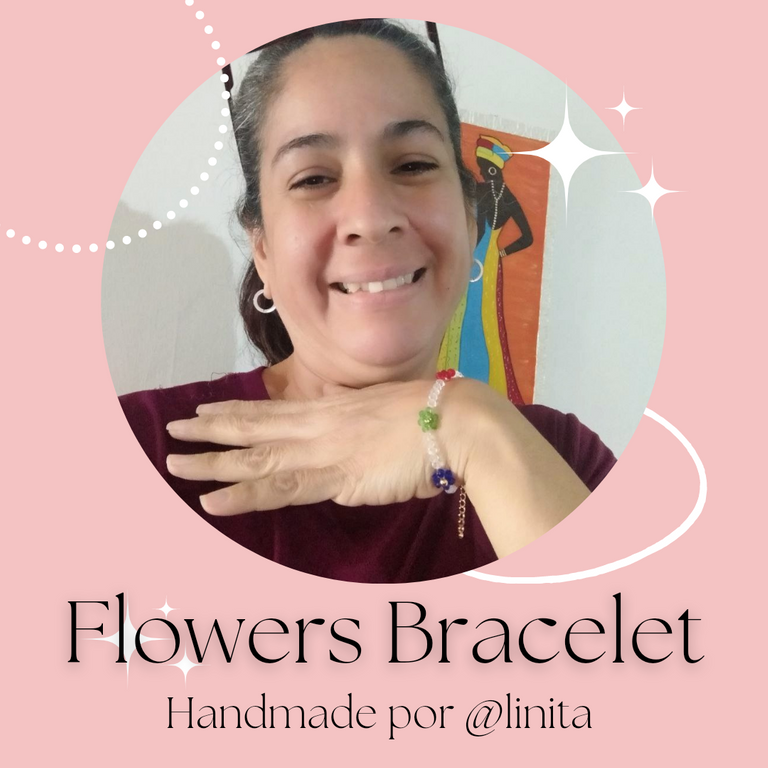
[ENG-ESP] FLOWERS BRACELET, HANDMADE BY @LINITA
WELCOME TO MY BLOG
Hellooooo, hellooooo! Today I bring you a beautiful bracelet that I made to wear on any occasion since it can be combined with any item of clothing, dresses, jeans, panties, with whatever you want, since selecting crystals of various colors to make the flowers is ideal to combine.
I think I have already mentioned what I like when the pieces are of many colors, I am fascinated to see that play of colors and even more so if we use gold. Gold highlights any glass or element that we use to make our pieces. It is for this reason that I decided to use the golden pellets for the center of the flower. I tried with white and black pearls, silver pellets and the difference between these and the gold ones is quite noticeable.
Now, without further ado. let's get started.
BIENVENIDOS A MI BLOG
¡Holaaaaaa, holaaaa! Hoy les traigo un lindo brazalete que realicé para lucir en cualquier ocasión ya que se puede combinar con cualquier prenda de vestir, vestidos, jeans, bragas, con lo que quieras ya que al seleccionar cristales de colores variados para realizar las flores es ideal para combinar.
Creo que ya les he mencionado lo que me gusta cuando las piezas son de muchos colores, me fascina ver ese juego de colores y más si utilizamos dorado. El dorado resalta cualquier cristal o elemento que utilicemos para realizar nuestras piezas. Es por esta razón que decidí utilizar los balines dorados para el centro de la flor. Probé con perlas blancas y negras, balines plateados y la diferencia entre éstas y las doradas es bien notable.
Ahora, sin más preámbulos. Comencemos.
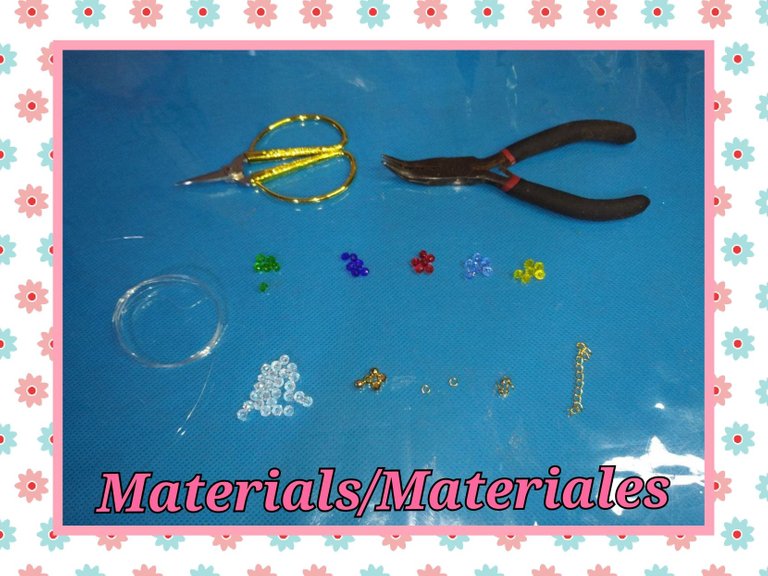
MATERIALS
- 30 cm of nylon thread
- 25 transparent crystals
- 6 blue crystals
- 6 green crystals
- 6 red crystals
- 6 yellow crystals
- 6 indigo blue crystals
- 5 golden pellets
- 2 cover knots
- 2 golden rings
- 1 secure beak of parrot
- Scissors
- Curved clamp
MATERIALES
- 30 cm de hilo nylon
- 25 cristales transparente
- 6 cristales azul
- 6 cristales verde
- 6 cristales rojo
- 6 cristales amarillo
- 6 cristales azul añil
- 5 balines dorados
- 2 tapa nudos
- 2 aros dorados
- 1 seguro pico de loro
- Tijera
- Pinza curva
- 3 cm de cadena
STEP BY STEP // PASO A PASO
We start by folding the 30 cm of nylon to obtain two 15 cm strands. Then we introduce both strands through the hole in the knot cover. We tie several knots to make sure it doesn't come loose. We cut the excess and with the help of the pliers we close the knot cover and tighten.
Comenzamos doblando los 30 cm de nylon para obtener dos hebras de 15 cm. Luego introducimos ambas hebras por el orificio del tapa nudos. Realizamos varios nudos para asegurarnos que no se suelte. cortamos el exceso y con la ayuda de la pinza cerramos el tapa nudos y apretamos.
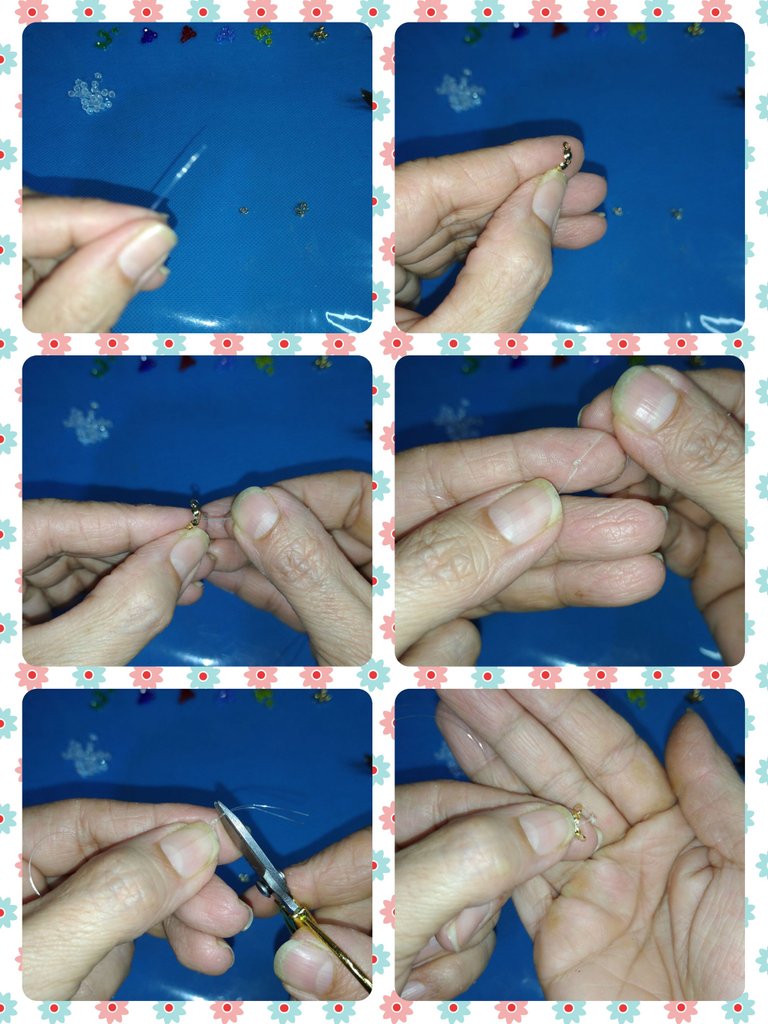
In the next step we take a ring and open it up a bit, we go through the holes of the knot cover and at once we place the safe beak of the loco and close.
We have already made one of the ends of our bracelet, where we can begin to insert the crystals without fear that they will come out.
En el siguiente paso tomamos un aro y abrimos un poco, pasamos por los agujeros del tapa nudos y de una vez colocamos el seguro pico de loco y cerramos.
Ya tenemos realizado uno de los extremos de nuestro brazalete, donde ya podremos comenzar a introducir los cristales sin temor a que se salgan.
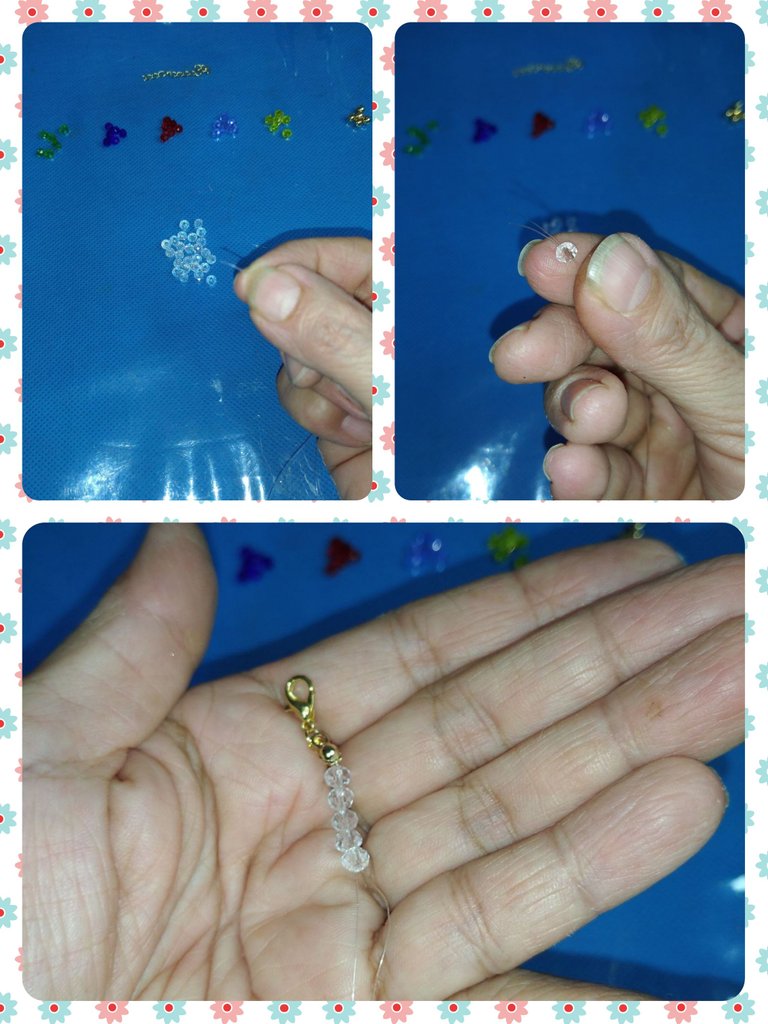
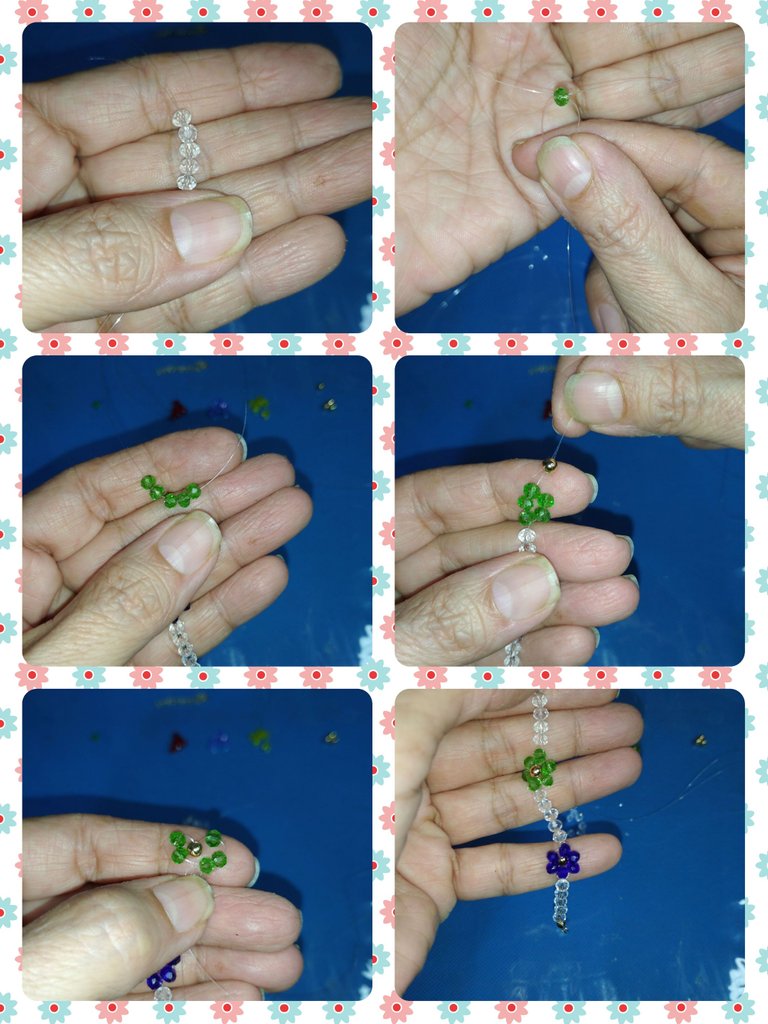
Now we begin to form the body of the bracelet. For this we will start with the other end of the nylon where we will also have the two threads. It is important to emphasize this, since to make the flowers we will use the two strands separately and then we will join them.
We begin by introducing 5 transparent crystals through the two nylon threads and we will carry them to the beginning.
Ahora comenzamos a formar el cuerpo del brazalete. Para esto comenzaremos con el otro extremo del nylon donde tendremos igualmente las dos hebras. Es importante recalcar esto, ya que para la realización de las flores utilizaremos las dos hebras por separado y luego las uniremos.
Comenzamos introduciendo 5 cristales transparentes por las dos hebras de nylon y llevaremos hasta el inicio.
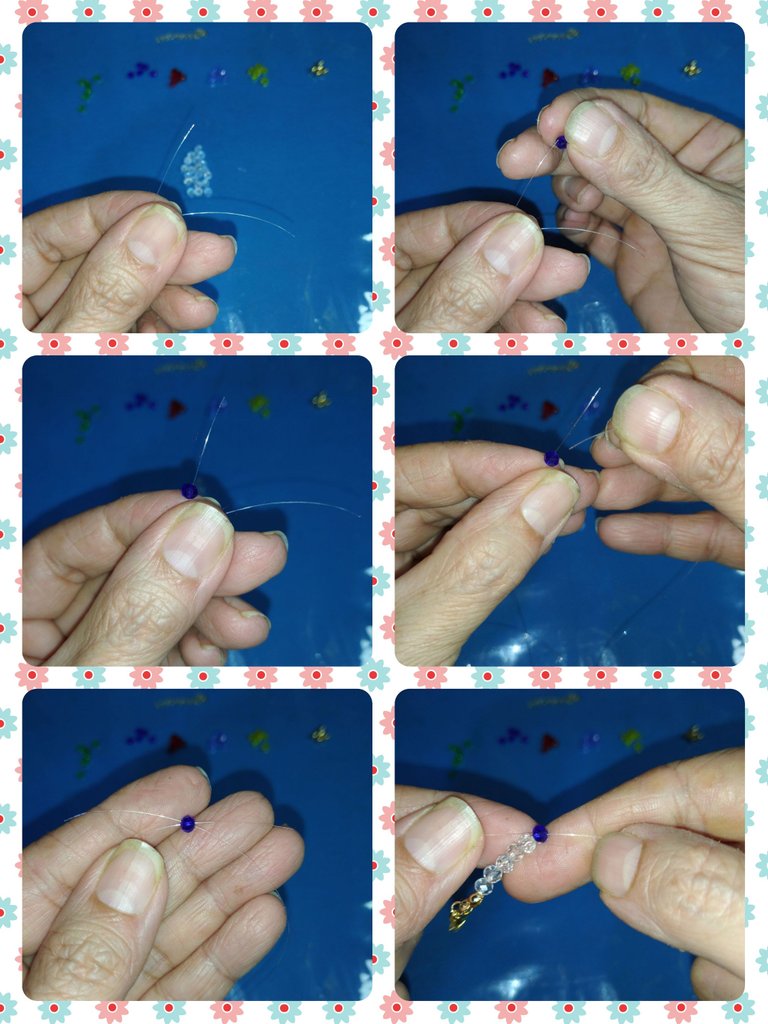
In this step we will build our first flower. We can start with the glass of the color that seems best to us. In my case I took an indigo blue crystal. It is introduced by a single strand. Then we introduce the other strand right through the hole where the first one came out. That is, we form an x with the crossing of both strands and the crystal in the center. We pull both threads and lead to the transparent crystals.
En este paso construiremos nuestra primera flor. Podemos comenzar con el cristal del color que mejor nos parezca. En mi caso tomé un cristal azul añil. Se introduce por una sola hebra. Luego introducimos la otra hebra justo por el orificio por donde salió la primera. Es decir, formamos una x con el cruce de ambas hebras y el cristal en el centro. Halamos ambos hilos y llevamos hasta los cristales transparentes.

We will take each strand and introduce two indigo blue crystals on each side. In this way we will obtain 5 crystals. We join the ends of the nylon and introduce a golden ball and go down to the crystals.
Tomaremos cada hebra e introducimos dos cristales azul añil en cada lado. De esta forma obtendremos 5 cristales. Unimos las puntas del nylon e introducimos un balín dorado y bajamos hasta los cristales.
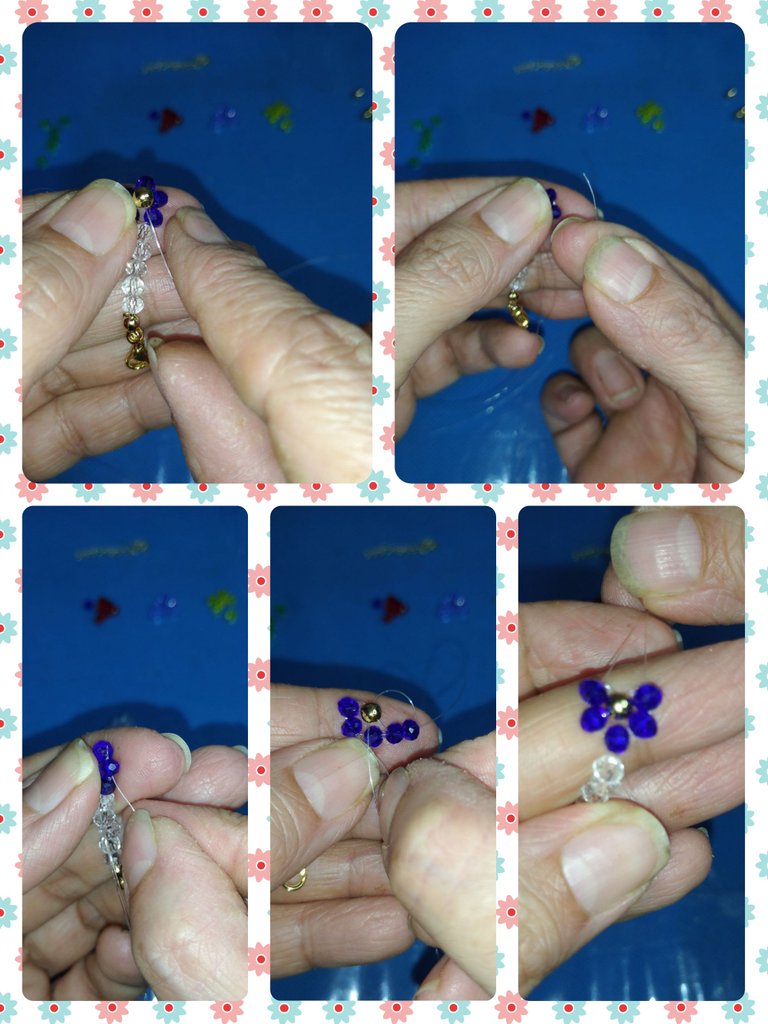
We place the pellet in the center and separate the strands again and introduce the strand on the right side inside the two crystals on that side. We do the same on the opposite side. We introduce the nylon through both crystals on the left side.
Colocamos el balin en el centro y separamos las hebras nuevamente e introducimos la hebra del lado derecho por dentro de los dos cristales de ese lado. De igual manera realizamos del lado opuesto. Introducimos el nylon por ambos cristales del lado izquierdo.
We can already see the flower formed with 5 petals. Now to close and complete the petals, we take a strand of nylon and pass through the glass and then we pass the other strand but on the opposite side to close the flower and adjust by squeezing the nylon strands well.
Ya podemos observar la flor formada con 5 pétalos. Ahora para cerrar y completar los pétalos, tomamos una hebra del nylon y pasamos por el cristal y luego pasamos la otra hebra pero del lado contrario para cerrar la flor y ajustar apretando bien las hebras de nylon.
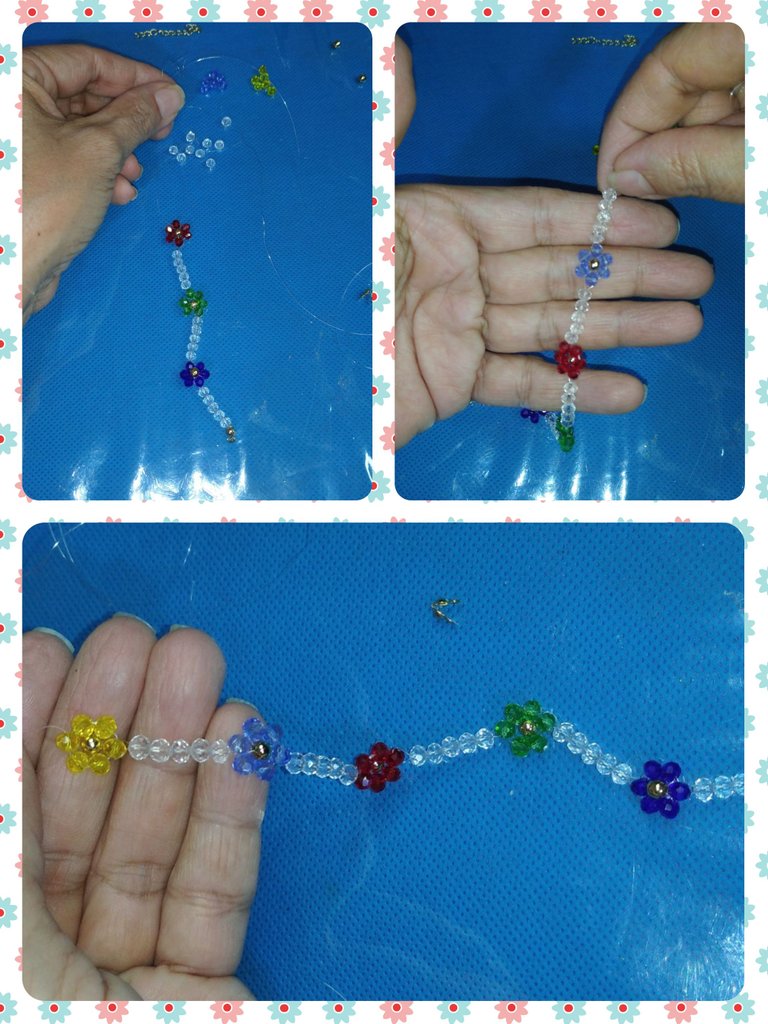
Now we join both strands again and introduce 5 transparent crystals and perform the same procedure to make the blue flower, we will only change to the green crystals.
Ahora unimos nuevamente ambas hebras e introducimos 5 cristales transparentes y realizamos el mismo procedimientos para realizar la flor azul, sólo cambiaremos a los cristales verdes.
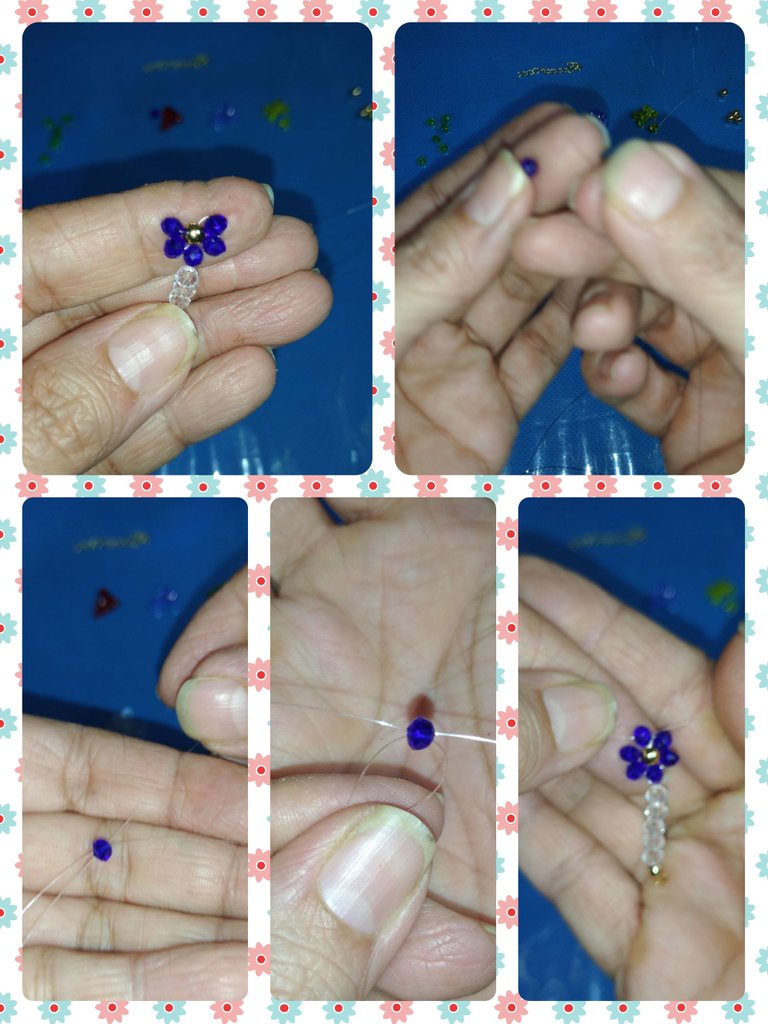
We continue in the same way to make the red, blue and yellow flowers. Placing 5 transparent crystals between each flower that we form.
We must take into account when we are going to make this type of bracelets, the size of the wrist and if we like it loose or tight. I like that it stays somewhat loose. Until this step, once the yellow flower is finished, it is the ideal size for my wrist, approximately 17 cm. If you want it longer or shorter, you can add or remove transparent crystals. Or if you want it with more flowers, you reduce a lot more transparent crystals and you can make another flower.
Continuamos del mismo modo para realizar las flores rojas, azules y amarillos. Colocando 5 cristales transparentes entre cada flor que formemos.
Debemos tomar en cuenta cuando vayamos a realizar este tipo de brazaletes, el tamaño de la muñeca y si nos gusta suelta o ajustada. A mi me gusta que me quede algo suelta. Hasta este paso, terminada la flor amarilla, es el tamaño ideal para mi muñeca, 17 cm aproximadamente. Si la deseas mas larga o más corta, puedes agregar o quitar cristales transparentes. O si la quieres con más flores, reduces mucho más cristales transparentes y puedes hacer otra flor.
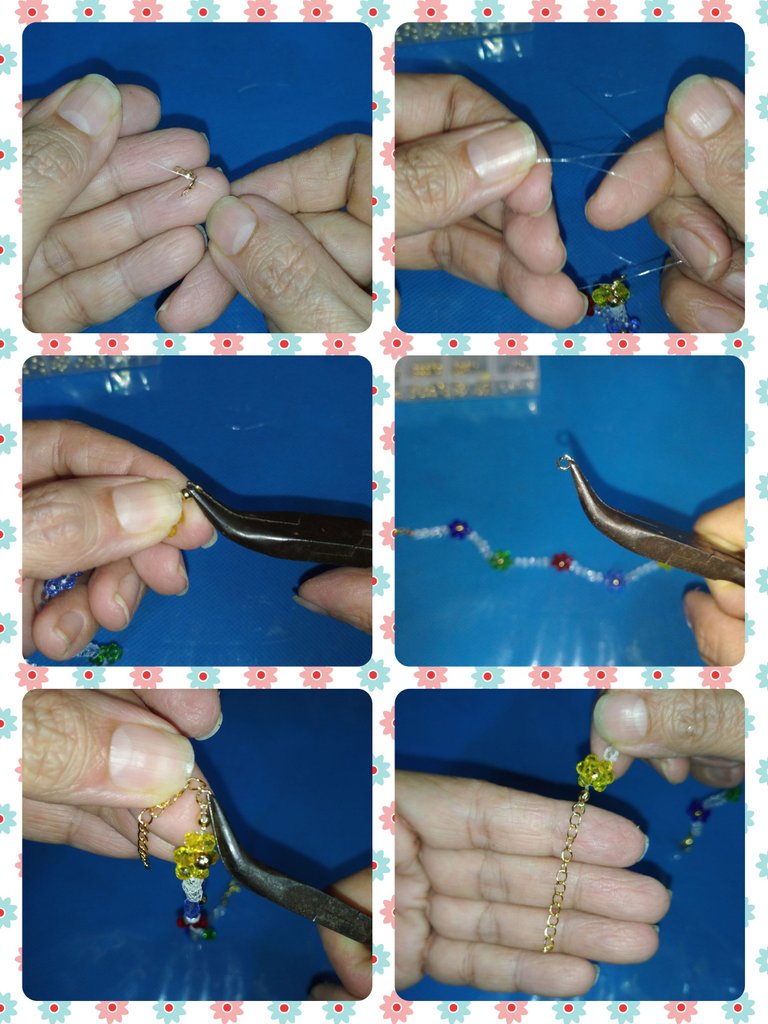
We close our bracelet using another knot cover. We introduce the two nylon threads and make several tight knots. Cut the excess nylon and close and adjust with the clamp.
Another way to adjust our bracelet is with the use of an extender that we can do with a bit of chain. We measure an estimate and cut, then place it in the hoop and join the knot cover.
Cerramos nuestro brazalete utilizando otro tapa nudos. Introducimos las dos hebras de nylon y realizamos varios nudos bien apretados. Cortamos el exceso de nylon y cerramos y ajustamos con la pinza.
Otra forma para ajustar nuestro brazalete es con la utilización de un extensor que lo podemos realizar con un poco de cadena. Medimos un estimado y cortamos, luego colocamos en el aro y unimos al tapa nudos.
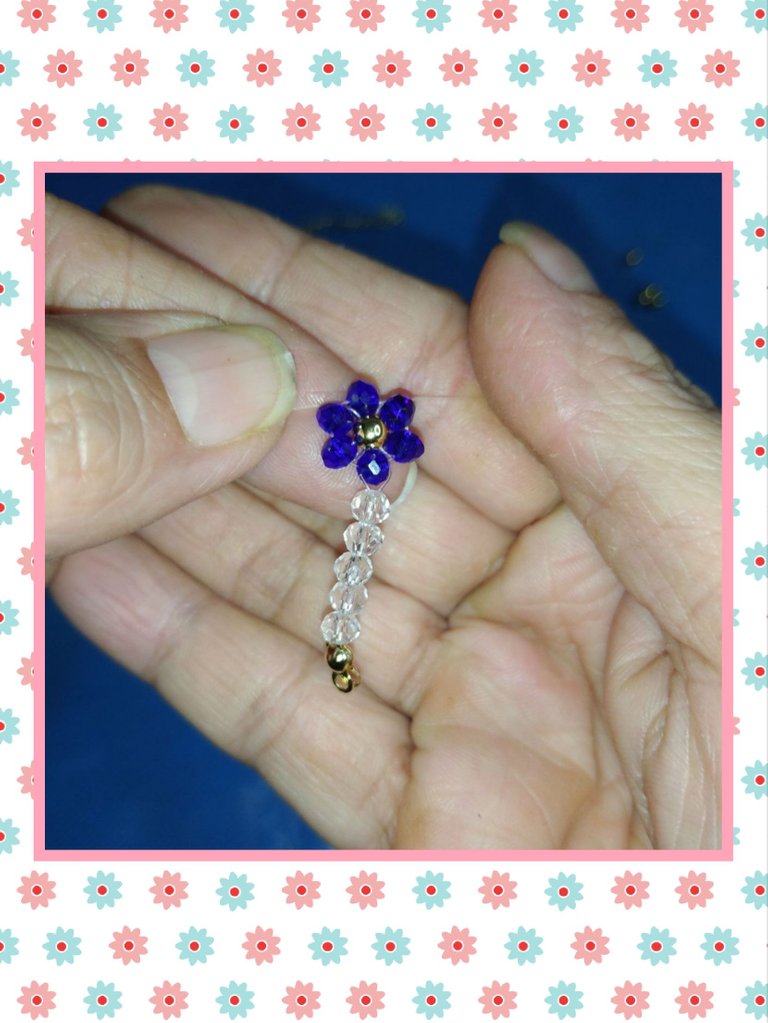
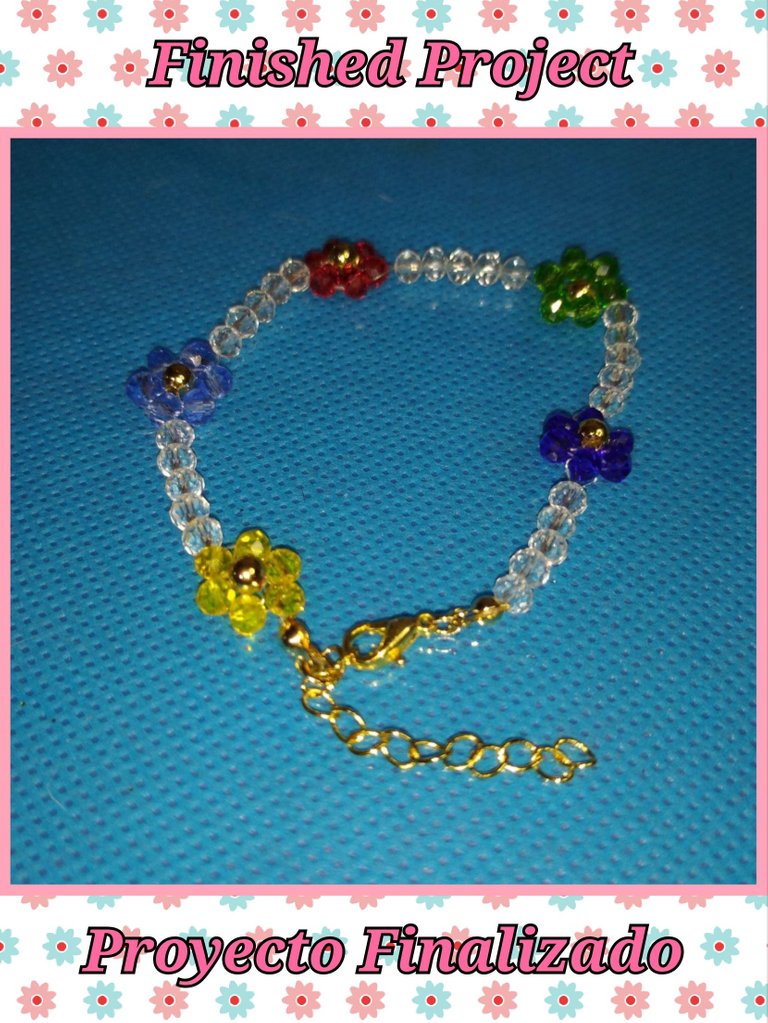
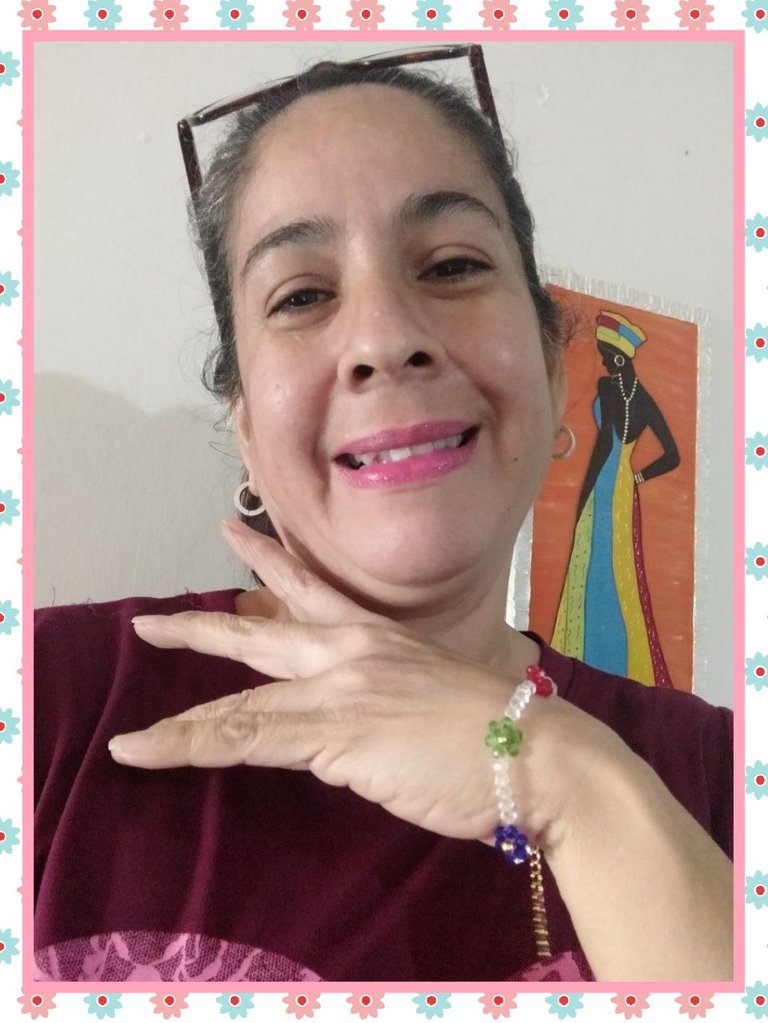
I love how it looks on my hands and the best thing is that I can select how tight or tight I am going to wear it with the extender that I put on it.
Me encanta cómo luce en mis manos y lo mejor es que puedo seleccionar que tan ajustado o apretado voy a usarlo con el extensor que le coloqué.

It turned out very nice, at least it seems so to me and I already have another accessory to wear with any of my dresses and for any occasion. So if you have the materials at home or want to make a similar one, here you already have the step by step on how to do it. I hope you liked it. See you next time.
Quedó muy lindo, por lo menos a mi me lo parece y ya tengo otro accesorio más para lucir con cualquiera de mis vestidos y para cualquier ocasión. Así que si tienes los materiales en casa o deseas realizar uno parecido, aquí ya tienes el paso a paso de cómo hacerlo. Espero que te haya gustado. Nos vemos en la próxima.
Todas las fotos son de mi autoría, tomadas con mi teléfono POCO M3
Para la edición de las fotos y separadores utilicé Polish
Utilicé https://translate.google.com para la traducción

Para la edición de las fotos y separadores utilicé Polish
Utilicé https://translate.google.com para la traducción
Hola 🙋
Los cristales se ven muy lindos uniendo todas esas flores. La verdad es que se te muy bonita. Me encanta que sea con colores variados porque es combinable con nuestra ropa.
Muy bien explicado el paso a paso. Gracias por compartir tu creación 👏👍✨🎉🙀😸😄🌼🤗😃😊👁️🙋
Muchas gracias. Me alegro que te haya gustado. Está a la orden 😁
https://twitter.com/131481196/status/1615439609386631169
The rewards earned on this comment will go directly to the people( @creacioneslelys ) sharing the post on Twitter as long as they are registered with @poshtoken. Sign up at https://hiveposh.com.
Thank you for sharing this post on HIVE!
Your content got selected by our fellow curator ashikstd & you just received a little thank you upvote from us for your great work! Your post will be featured in one of our recurring compilations which are aiming to offer you a stage to widen your audience within the DIY scene of Hive. Stay creative & HIVE ON!
Please vote for our hive witness <3
Los cristales ñe Dan un toque muy especial a cada pieza y está está muy bonita amiga, te felicito por la creatividad y el trabajo tan delicado.
Te quedó con un muy buen acabado.
Holaaaaa, muchas gracias. Si he mejorado mucho, jejejejeje. La práctica hace que vayas teniendo mas agilidad en las manos pero aún estoy en pañales. Poco a poco. Me alegro que te haya gustado. Gracias por comentar.
Una hermosa pulsera, nos encanta el diseño que le has dado a los cristales, sobre todo las flores de colores que nos haz realizado. Gran trabajo y buen paso a paso.