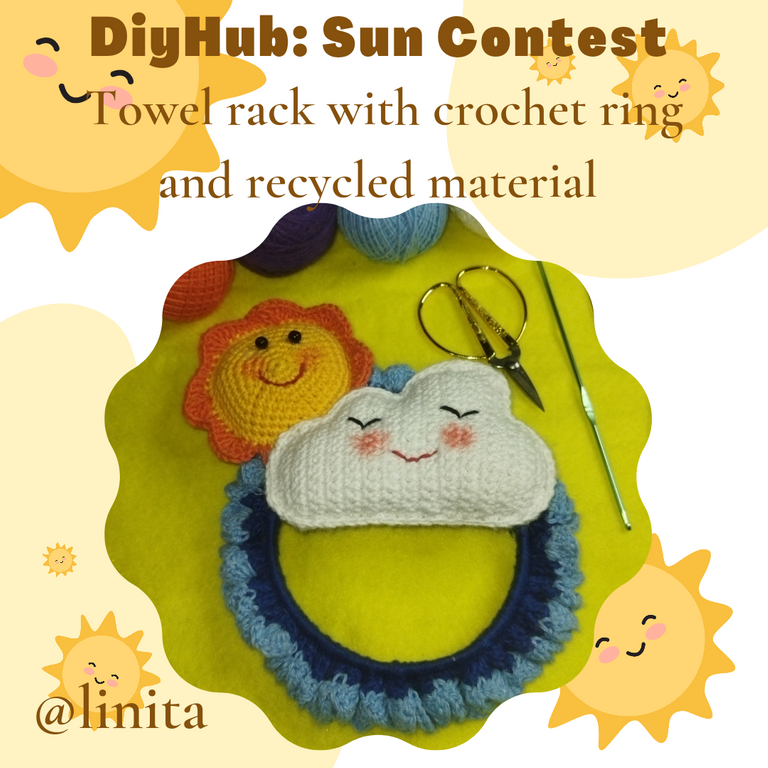
[ENG-ESP] Sun Contest: "Towel rack with crochet ring made of recycled material"
WELCOME TO MY BLOG
Helloaaa, helloaaaaaaa! Greetings to all. Again saying present in the 6th Contest DiyHub and with the pleasant collaboration #needleworkmonday. The protagonist of this contest is the Sun, the biggest star that exists in our system and that has been the inspiration for the creation of infinite things, from a simple craft to the biggest and most advanced solar technology.
My entry for this contest is a towel holder decorated with a sun made with cotton thread and a crochet needle. I also found recycling very useful because I used a detergent container to make the ring. I hope you like it. Without further ado, let's get started.
BIENVENIDOS A MI BLOG
¡Holaaaa, holaaaaa! Saludos a todos. Nuevamente diciendo presente en el 6to. Concurso DiyHub y con la grata colaboración #needleworkmonday. El protagonista de este concurso es el Sol, la estrella más grande que existe en nuestro sistema y que ha sido la inspiración para la creación de infinidades de cosas, desde una sencilla manualidad hasta la más grande y avanzada tecnología solar.
Mi entrada para este concurso, se trata de un porta toallas decorado con un sol elaborado con hilo de algodón y aguja de crochet, también me fue de gran utilidad el reciclaje ya que para la elaboración del anillo utilicé un envase de detergente. Espero que te guste. Sin más, comencemos.
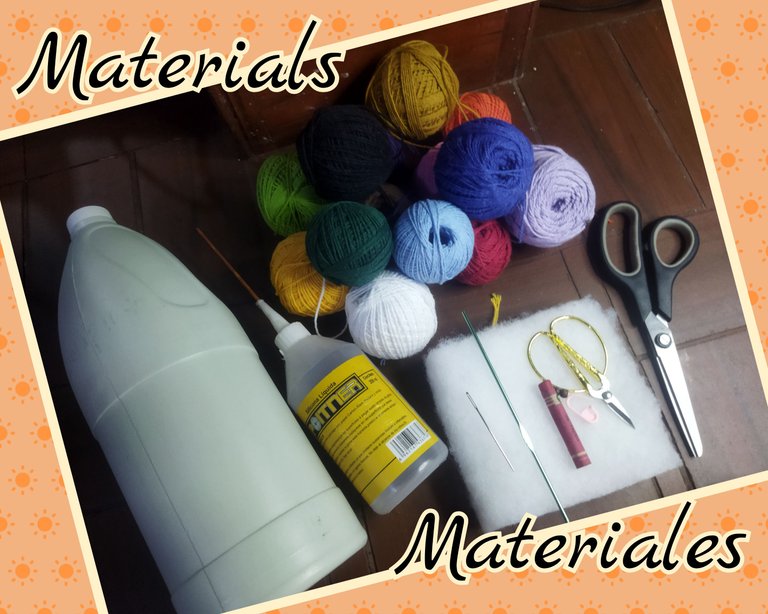
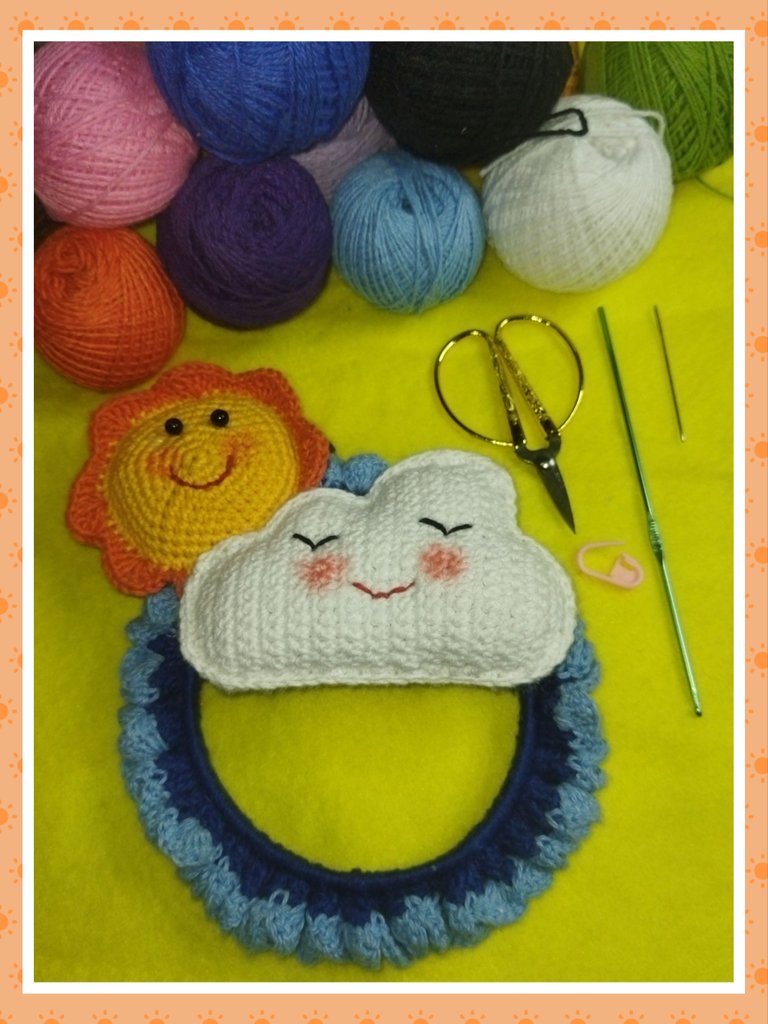
MATERIALS
- Cotton threads (assorted colors)
- Crochet needle 2,5 mm
- Wool needle or blunt needle
- 2 black costume jewelry beads #6
- Plastic container
- Liquid silicone
- Wadding (synthetic padding)
- Cutter
- Scissors
MATERIALES
- Hilos de algodón (colores variados)
- Aguja crochet 2,5 mm
- Aguja lanera o punta roma
- 2 cuentas negras de bisutería #6
- Un envase plástico
- Silicón líquido
- Guata (relleno sintético)
- Cortador
- Tijeras
STEP BY STEP // PASO A PASO
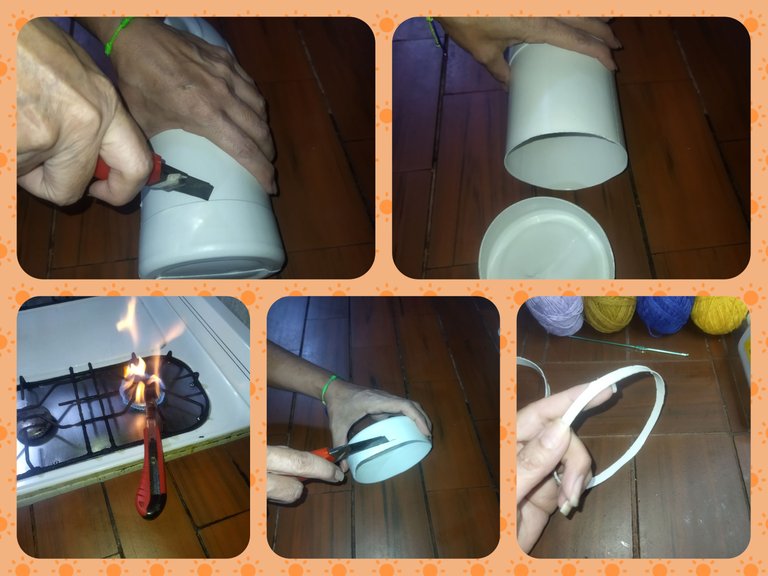
PLASTIC RING
To make the plastic ring we will take the disposable container and cut it circularly until divided into two parts. Then we will heat the cutter in the kitchen and make a cut of approximately 0.60 cm to form the hoop or ring. If we want the strongest ring we can make two equal pieces and place them one inside the other.
ANILLO PLÁSTICO
Para elaborar el anillo plástico tomaremos el envase desechable y cortaremos de forma circular hasta dividir en dos partes. Luego calentaremos el cortador en la cocina y realizaremos un corte de aproximadamente 0,60 cm para formar el aro o anillo. Si queremos el anillo más fuerte podemos realizar dos piezas iguales y colocarlas una dentro de la otra.
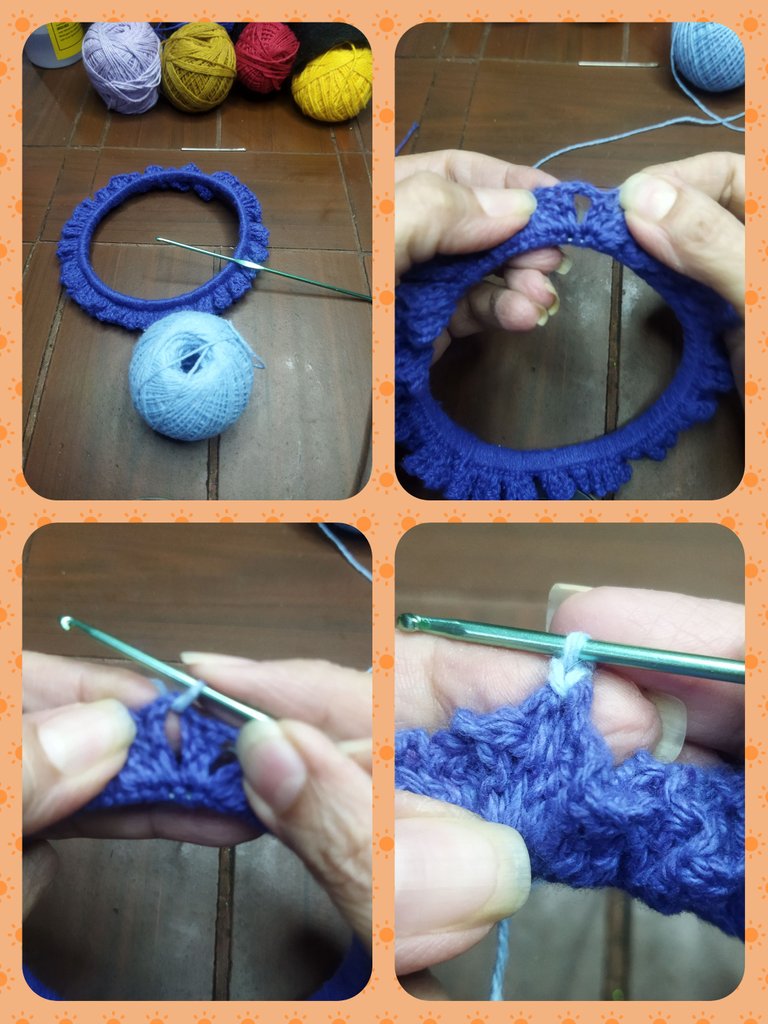
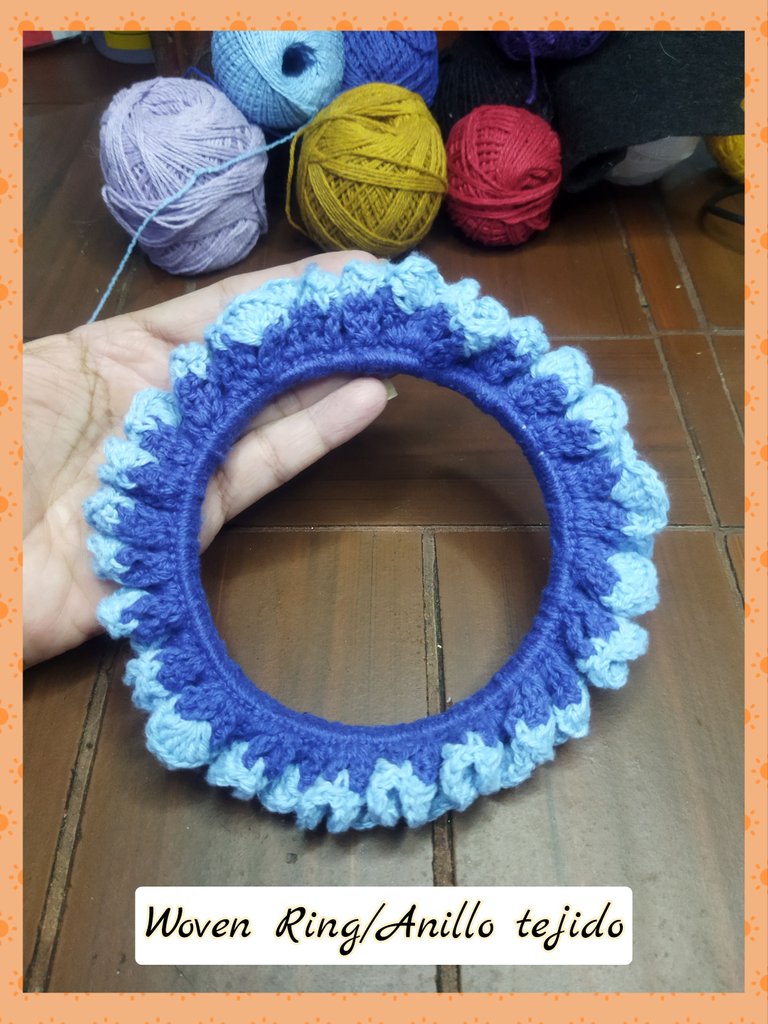
WEAVING THE RING
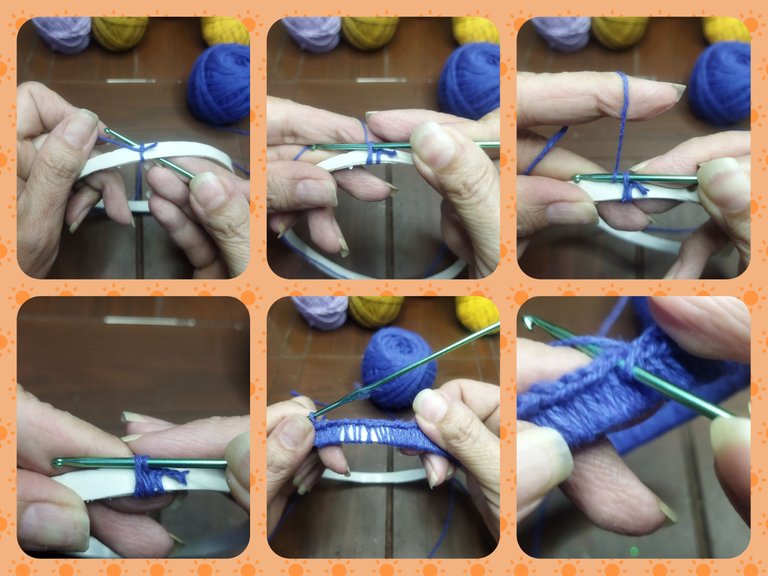
ROUND Nº 1: We begin the weaving of the ring by making a simple double knot, for this we will use the navy blue cotton thread and the 2.5 mm needle.
TEJIENDO EL ANILLO
Vuelta Nº 1: Comenzamos el tejido del anillo realizando un nudo doble sencillo, para esto utilizaremos el hilo de algodón azul marino y la aguja de 2,5 mm.
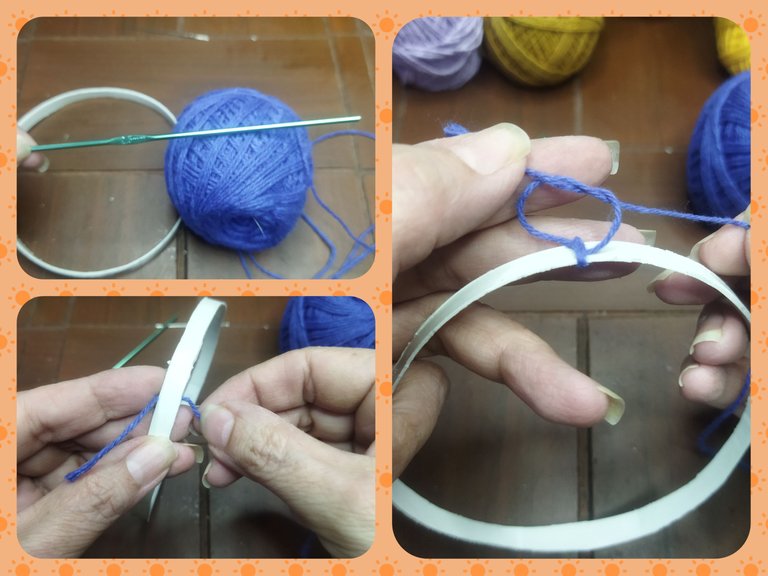
ROUND Nº 2: We introduce the needle between the thread and the ring and make a slip stitch to start weaving around the ring, making single crochets until the entire ring is covered. We must go adjusting the tissue until it is very copious. We finish the round with a slip stitch.
VUELTA Nº 2: Introducimos la aguja entre el hilo y el anillo y realizamos un punto deslizado para comenzar el tejido alrededor del anillo realizando puntos bajos hasta cubrir el aro en su totalidad. Debemos ir ajustando el tejido hasta que quede bien copioso. Terminamos la vuelta con un punto deslizado.
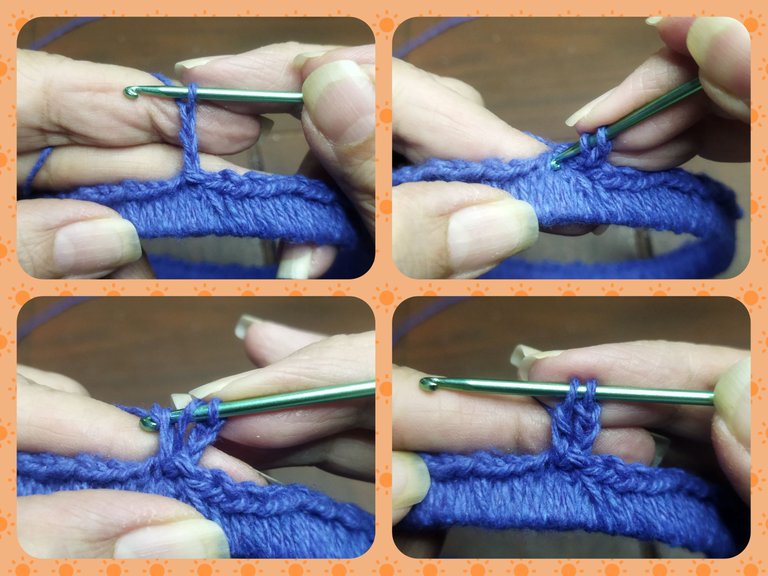
ROUND Nº 3: This round consists of making two double crochets in a row in each single crochet of the previous round, I play two chains and again two double crochets until the round is finished. At the beginning of the round we replace the first double crochet with three chains and at the end, we make a slip stitch in the last chain at the beginning of the round.
VUELTA Nº 3: Esta vuelta consiste en realizar dos puntos altos seguidos en cada punto bajo de l vuelta anterior, juego dos cadenas y nuevamente dos puntos altos hasta terminar la vuelta. Al inicio de la vuelta sustituimos el primer punto alto por tres cadenas y al finalizar, realizamos un punto deslizado en la última cadena del inicio de la vuelta.
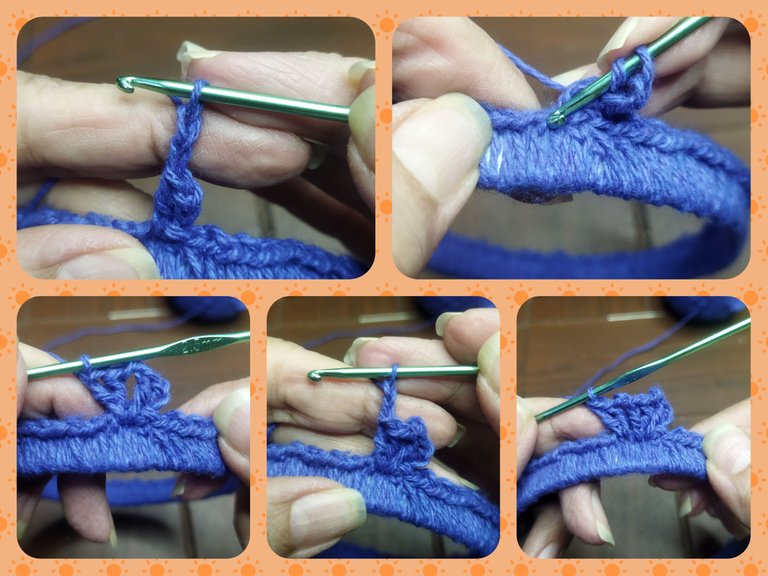
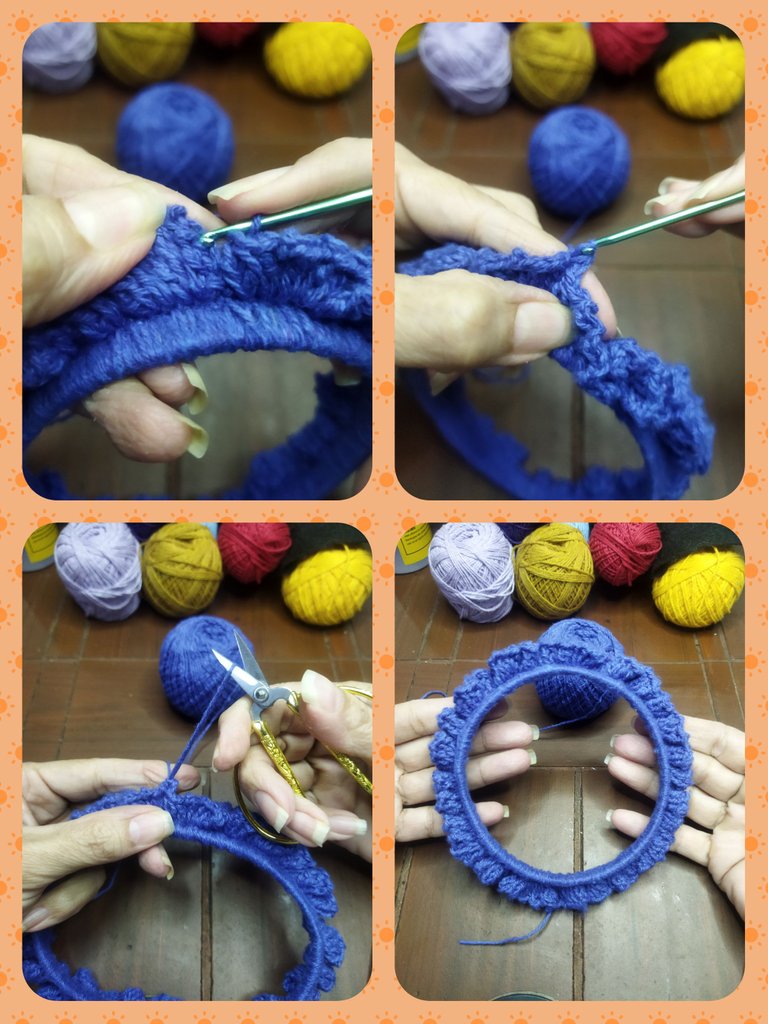
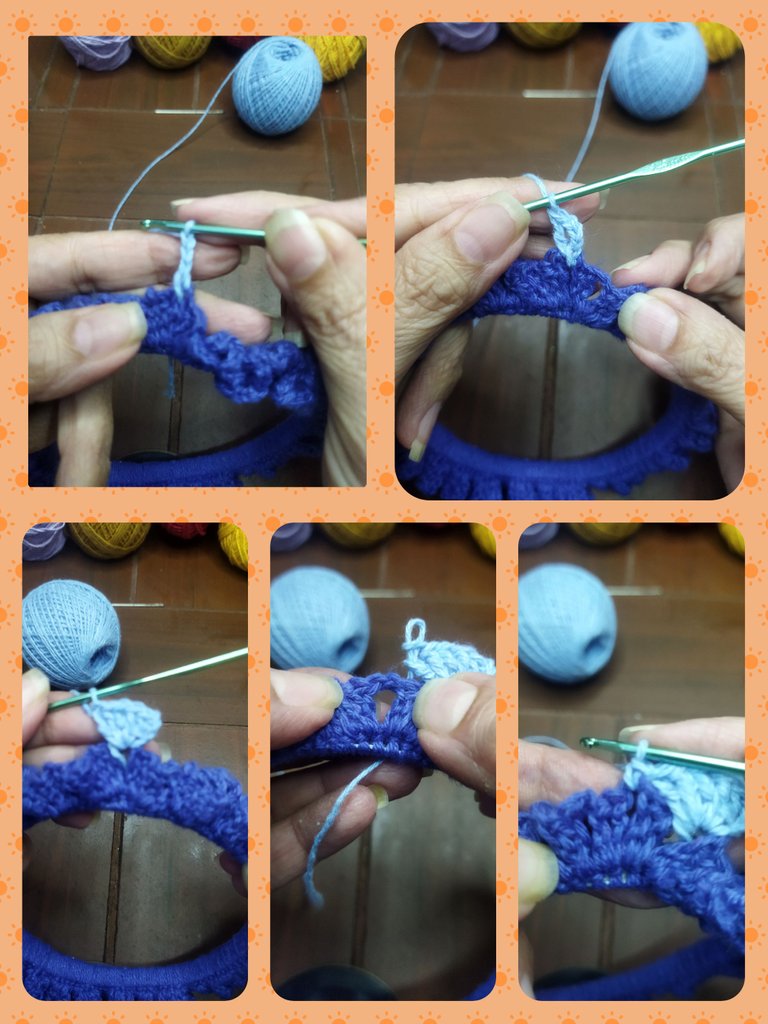
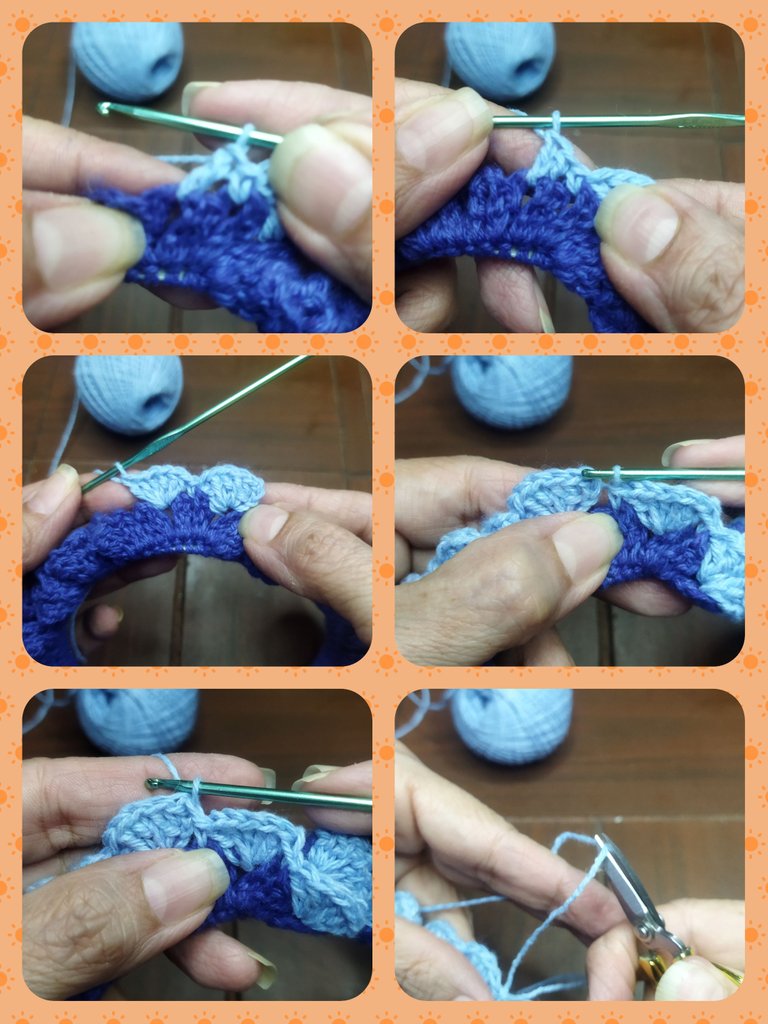
ROUND Nº 4: In this round we are going to make a fan of 6 treble crochets in the divisions of the double treble crochets from the previous row and for this we will use the sky blue thread. We begin by making a slipknot to insert the thread to the previous fabric in the space we made between the double crochets, then we make a chain of three stitches to replace the first double crochet and we make 4 more double crochets to complete the first fan. Then we make a single crochet in the next space of the previous row, that is, we will work this row only knitting in the separation chains of the previous row. 6 double crochets, then a single crochet and so on until the end of the round, obtaining a very dense fabric. We close by making a slip stitch and cut the thread.
VUELTA Nº 4: En esta vuelta vamos a realizar un abanico de 6 puntos altos en las divisiones de los puntos altos dobles de la vuelta anterior y para ello utilizaremos el hilo azul cielo. Comenzamos realizando un nudo corredizo para insertar el hilo al tejido anterior en el espacio que hicimos entre los puntos altos, luego realizamos una cadena de tres puntos para sustituir el primer punto alto y realizamos 4 puntos altos más para completar el primera abanico. Luego realizamos un punto bajo en el espacio siguiente de la vuela anterior, es decir, trabajaremos esta vuelta sólo tejiendo en las cadenas de separación de la vuelta anterior. 6 puntos altos, luego un punto bajo y así hasta culminar la vuelta, obteniendo un tejido bien tupido. Cerramos realizando un punto deslizado y cortamos el hilo.
SUN
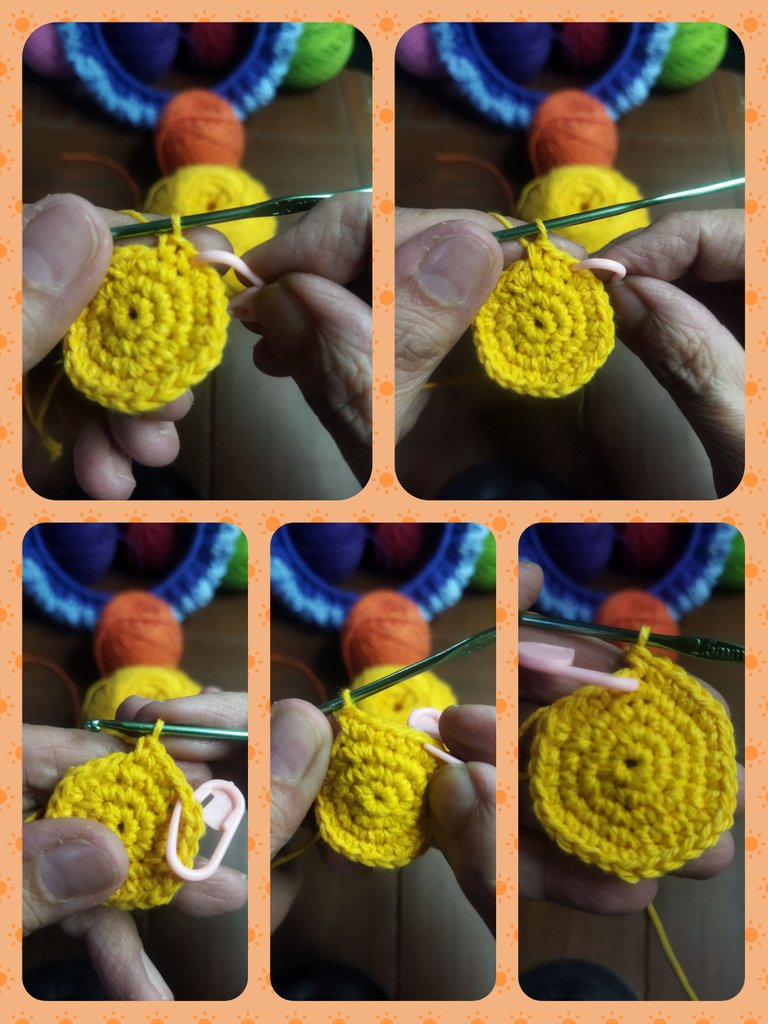
ROUND Nº 1: To make the sun we are going to use yellow and orange threads and a 2.5 mm needle. We start with the yellow thread making a magic ring, we make a slip knot and knit 6 low points. We close the ring.
SOL
VUELTA Nº 1: Para realizar el sol vamos a utilizar hilos de color amarillo y naranja y aguja 2,5 mm. Comenzamos con el hilo amarillo realizando un anillo mágico, realizamos un nudo corredizo y tejemos 6 puntos bajos. Cerramos el anillo.
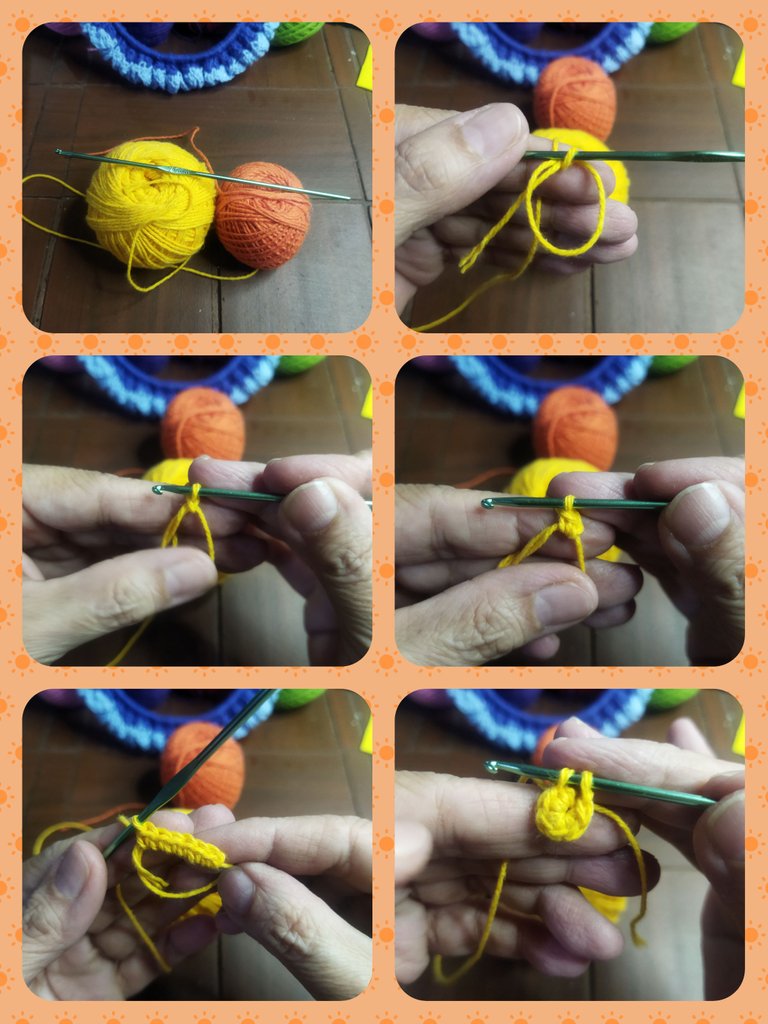
ROUND Nº 2: We will make an increase in each stitch of the previous round for a total of 12 low points.
VUELTA Nº 2: Realizaremos un aumento en cada punto de la vuelta antrior para un total de 12 puntos bajos.

ROUND Nº 3: We will make a single crochet in the first stitch, then an increase in the next stitch and we repeat until obtaining 18 single crochets.
VUELTA Nº 3: Realizaremos un punto bajo en el primer punto, luego un aumento en el siguiente punto y repetimos hasta obtener 18 puntos bajos.
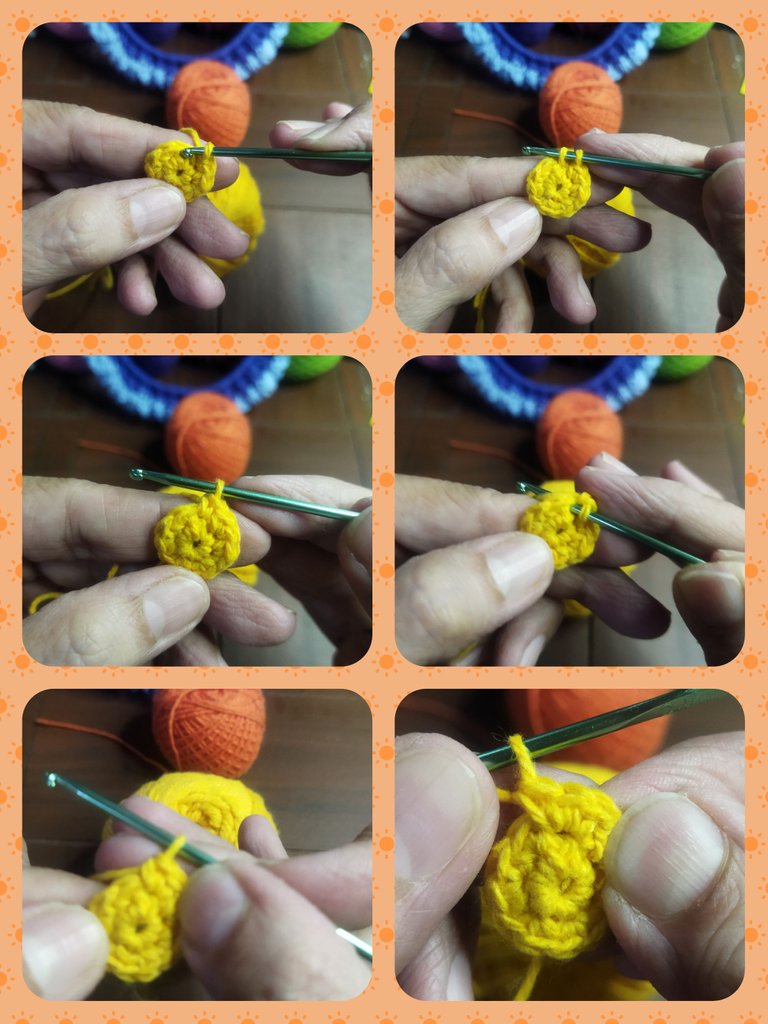
ROUND Nº 4: We will make two single crochets in the first stitch, then an increase in the next stitch and we repeat until obtaining 24 single crochets.
VUELTA Nº 4: Realizaremos dos punto bajo en el primer punto, luego un aumento en el siguiente punto y repetimos hasta obtener 24 puntos bajos.
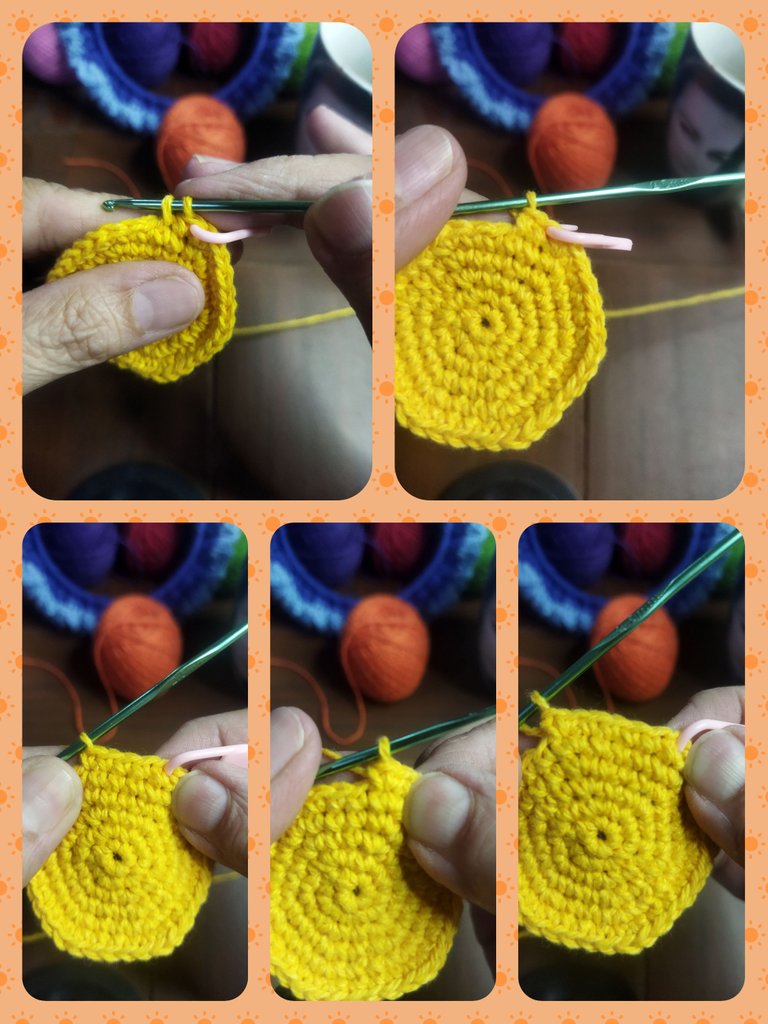
ROUND Nº 5: We will make three single crochets in the first stitch, then an increase in the next stitch and we repeat until obtaining 30 single crochets.
VUELTA Nº 5: Realizaremos tres punto bajo en el primer punto, luego un aumento en el siguiente punto y repetimos hasta obtener 30 puntos bajos.
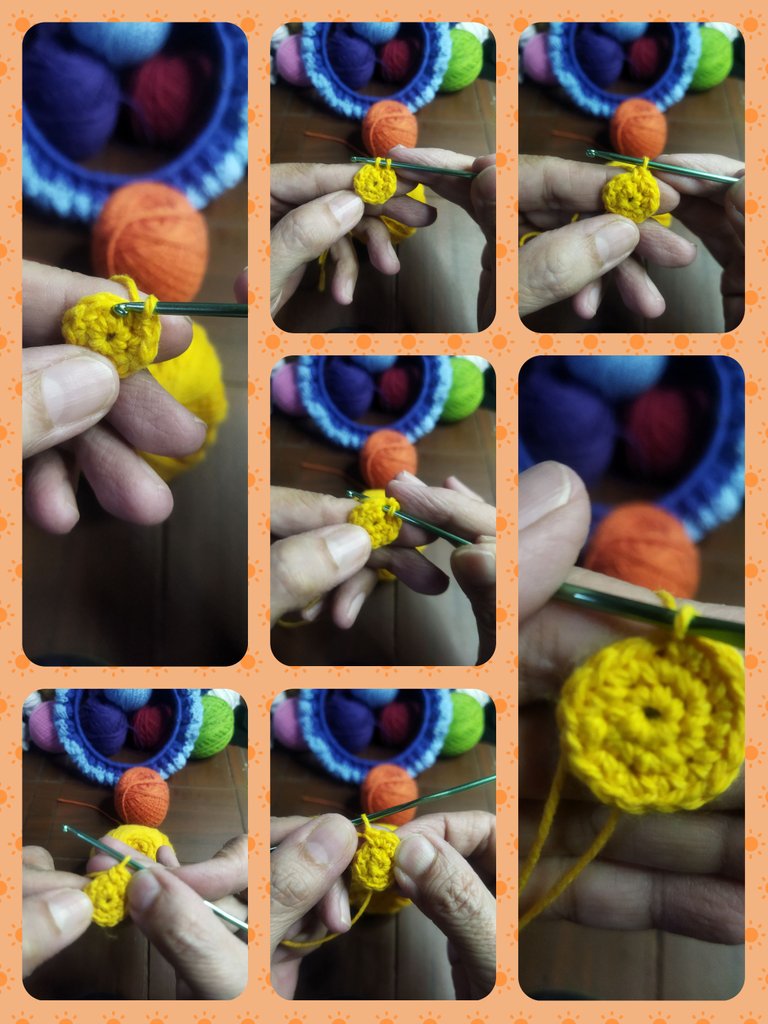
ROUND Nº 6: We will make four single crochets in the first stitch, then an increase in the next stitch and we repeat until obtaining 36 single crochets.
VUELTA Nº 6: Realizaremos cuatro puntos bajo en el primer punto, luego un aumento en el siguiente punto y repetimos hasta obtener 36 puntos bajos.
ROUND Nº 7: We make five single crochets in the first stitch, then an increase in the next stitch and we repeat until obtaining 42 single crochets.
VUELTA Nº 7: Realizamos cinco puntos bajo en el primer punto, luego un aumento en el siguiente punto y repetimos hasta obtener 42 puntos bajos.
ROUND Nº 8: We make 6 single crochets in the first stitch, then an increase in the next stitch and we repeat until obtaining 48 single crochets.
VUELTA Nº 8: Realizamos 6 puntos bajo en el primer punto, luego un aumento en el siguiente punto y repetimos hasta obtener 48 puntos bajos.
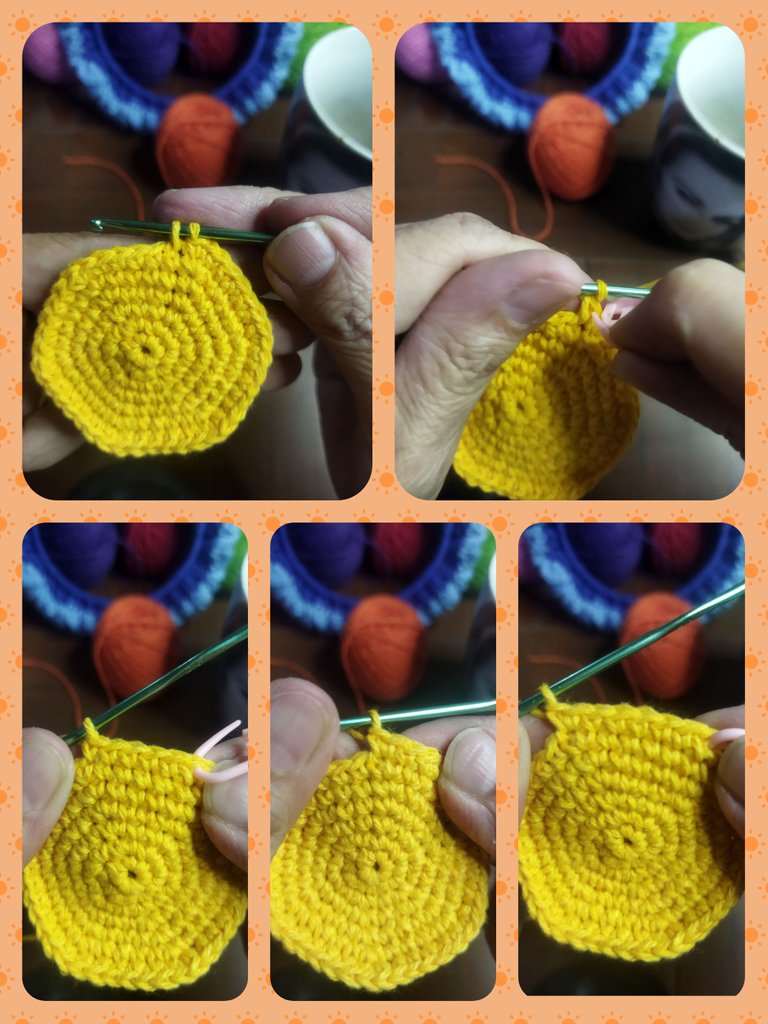
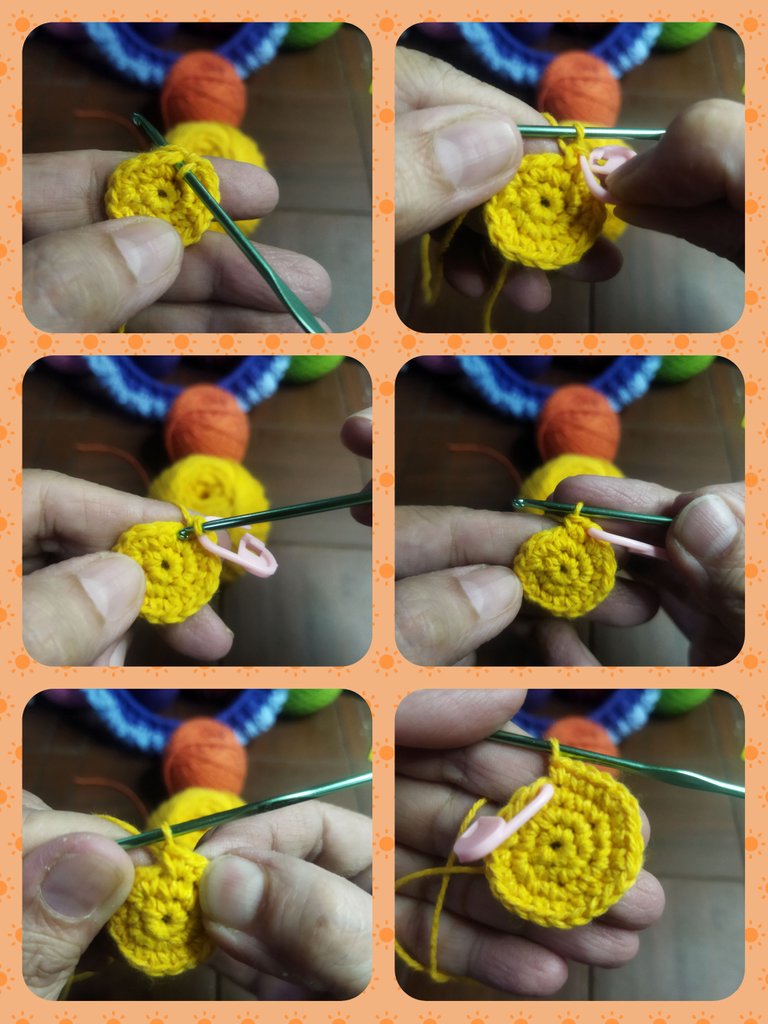
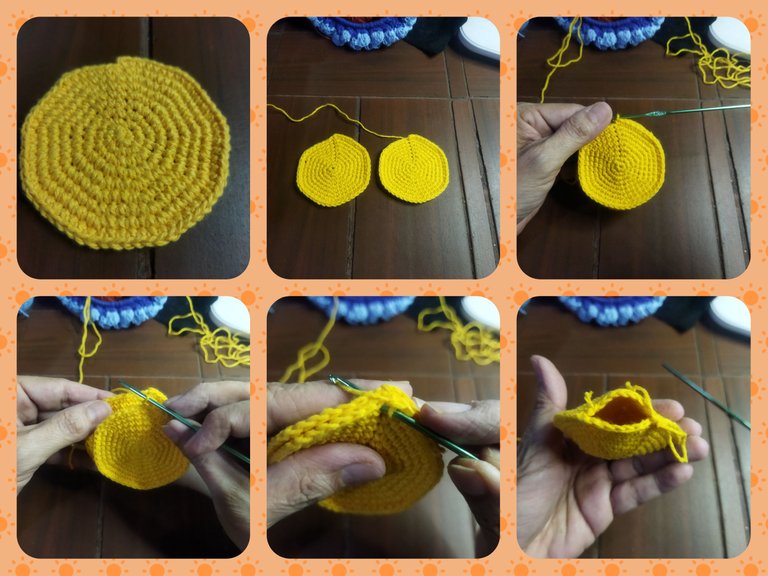
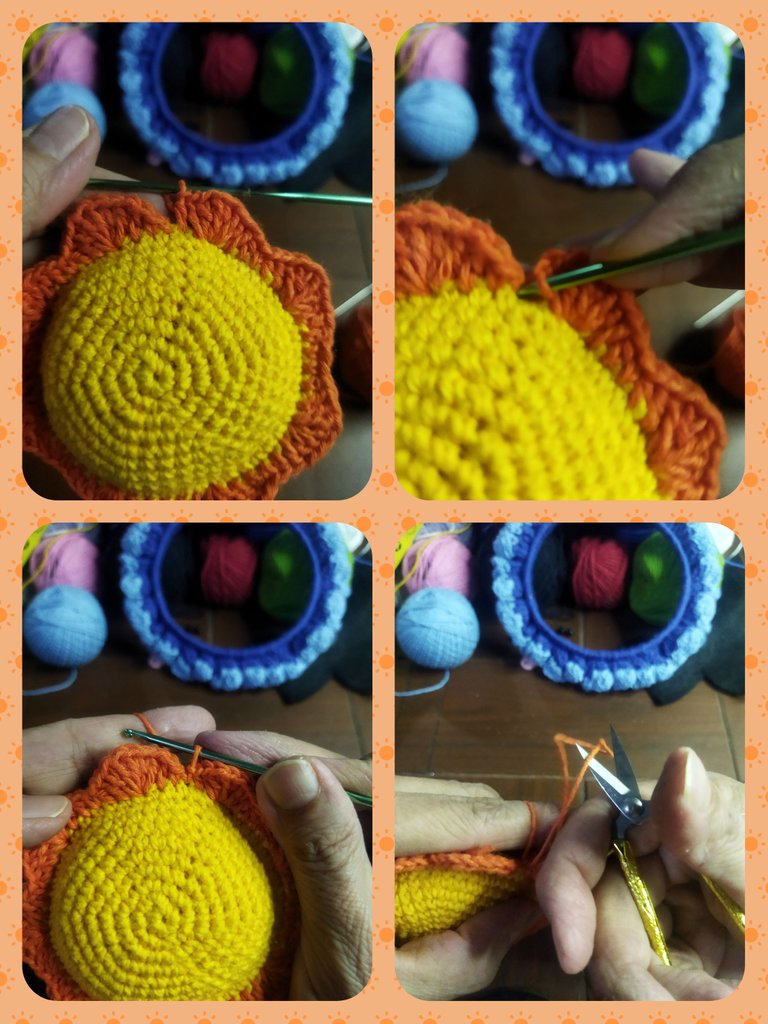
ROUND Nº 9: We make 1 single crochet in each point of the previous row until obtaining 48 single crochet and we close with a slip stitch. Cut the thread leaving a 7 cm strand.
VUELTA Nº 9: Realizamos 1 punto bajo en cada punto de la vuelta anterior hasta obtener 48 puntos bajo y cerramos con un punto deslizado. Cortamos el hilo dejando una hebra de 7 cm.
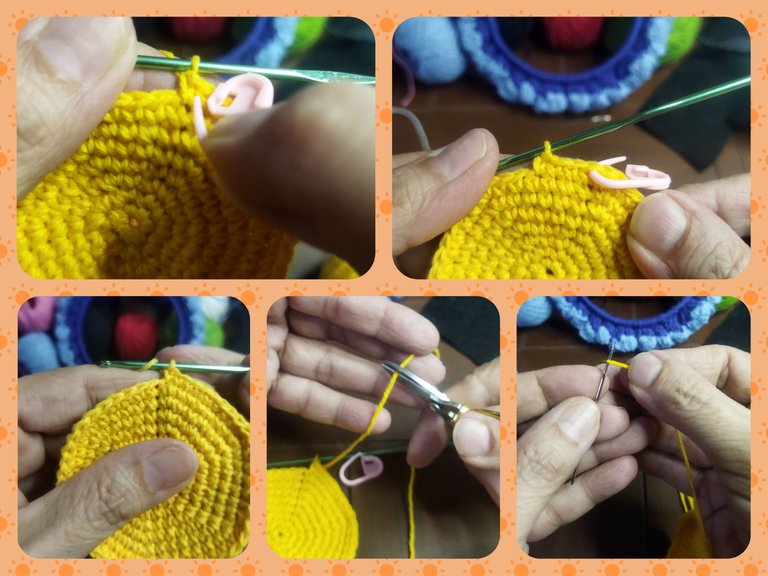
We introduce the excess thread in the tapestry needle and make a stitch in the first stitch of the round and then pass the thread through the wrong side of the fabric until it is hidden and cut the excess.
Introducimos el hilo sobrante en la aguja lanera y hacemos una puntada en el primer punto de la vuelta y luego pasamos el hilo por el reverso del tejido hasta esconderlo y cortamos el exceso.
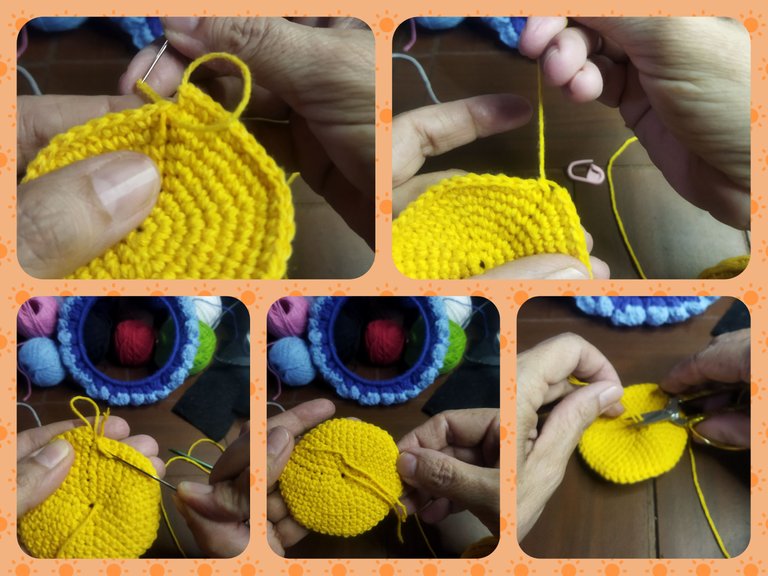
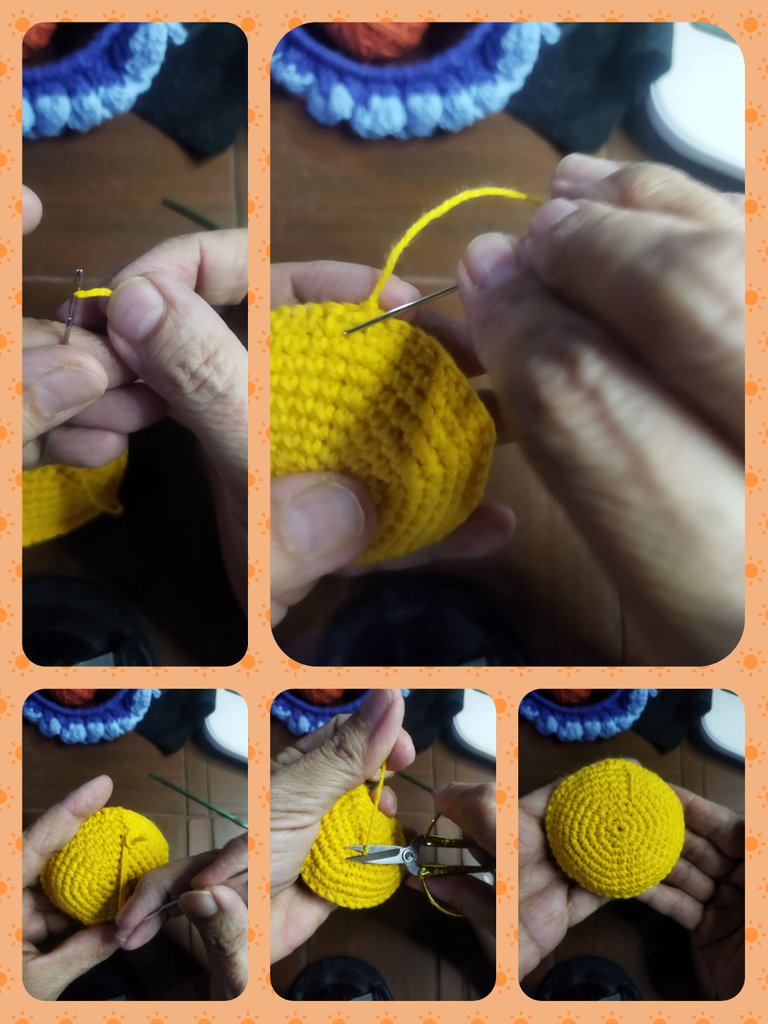
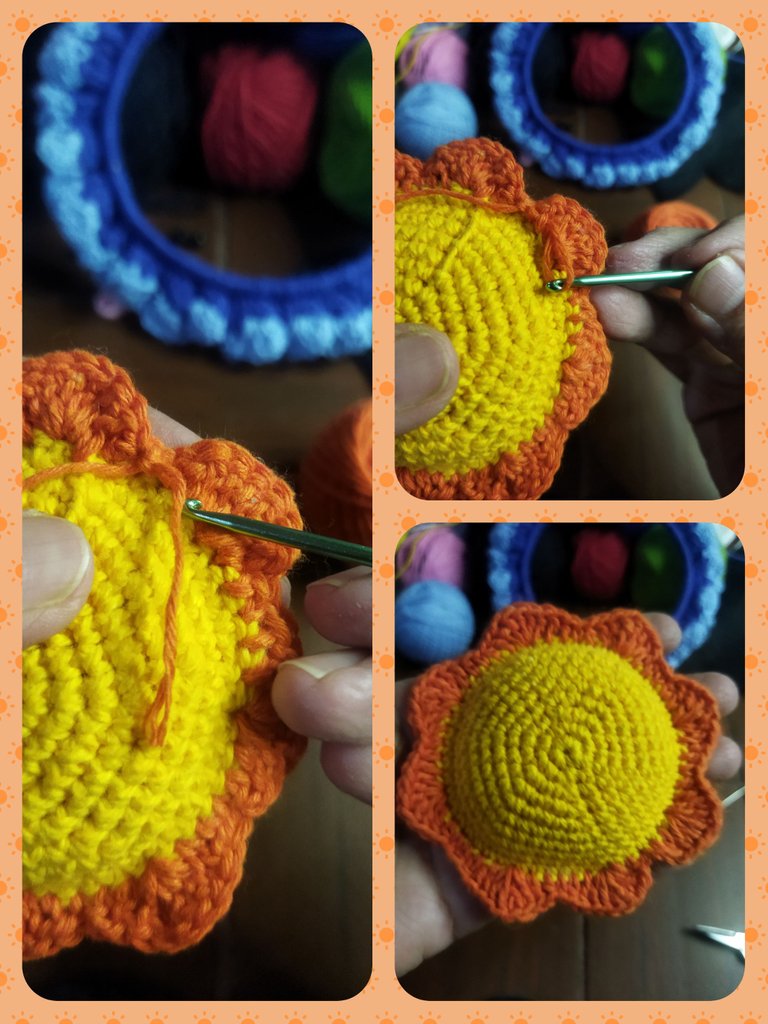
We make another equal piece and with both pieces we proceed to join them with low stitches in each of the points of both fabrics, leaving an opening for the filling.
Realizamos otra pieza igual y ya con ambas piezas procedemos a unirlas con puntos bajos en cada uno de los puntos de ambos tejidos, dejando una abertura para el relleno.
We cut pieces of synthetic padding and fill it up to the top and finish closing with low stitches, we make a slip stitch to finish and then with the wool needle we hide on the back of the piece.
Cortamos retazos de relleno sintético y rellenamos hasta el tope y terminamos de cerrar con puntos bajos, realizamos un punto deslizado para finalizar y luego con la aguja lanera escondemos por el reverso de la pieza.

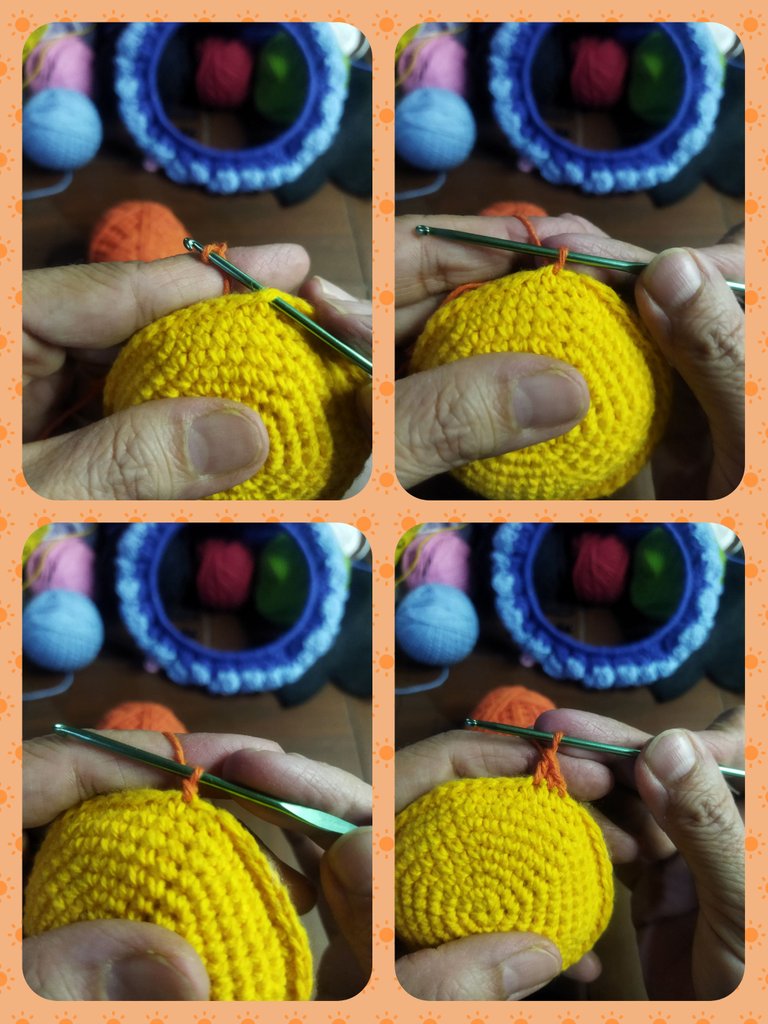
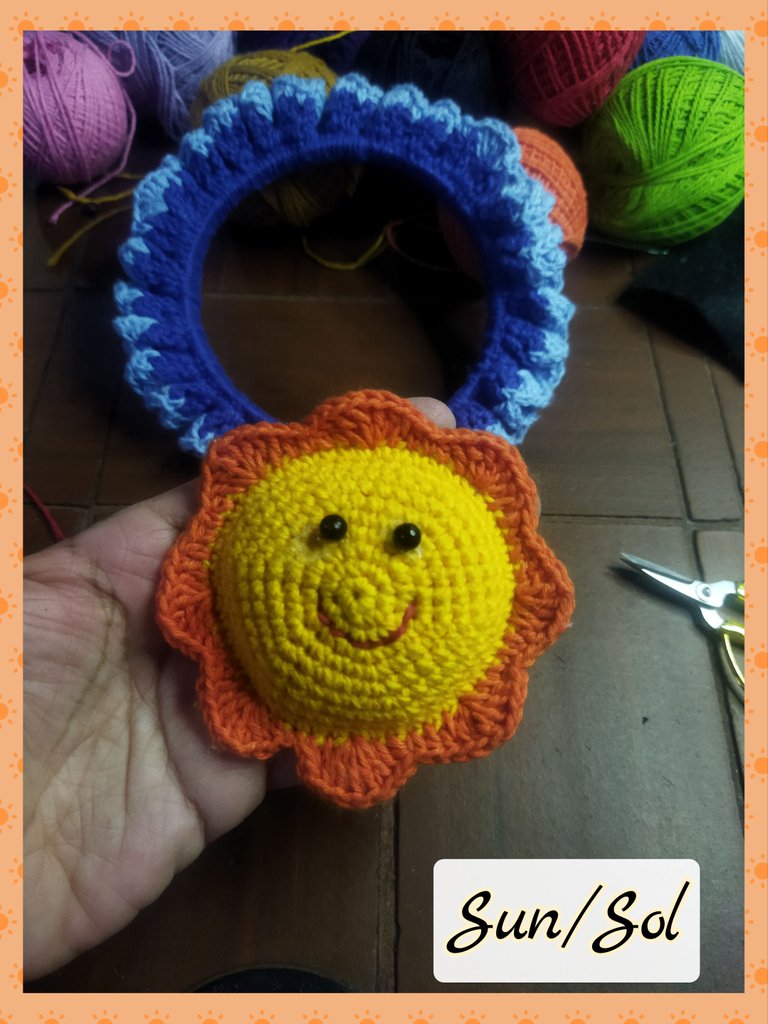
To make the border we use the orange thread and 2.5 mm needle. We start with a slip stitch and introduce the circular knitting, we make a single crochet, then the next stitch we make a half point, in the next point we are going to make five double crochets, then we repeat a half point and a single point in the two continuous stitches . We repeat until we obtain 8 fans to complete the edge of the sun. We close with a slip stitch in the first single crochet of the round. We cut the thread and hide it on the back with the yarn needle.
Para realizar el borde utilizamos el hilo naranja y aguja 2,5 mm. Comenzamos con un punto corredizo e introducimos al tejido circular, realizamos un punto bajo, luego el punto siguiente realizamos un punto medio, en el siguiente punto vamos a realizar cinco puntos altos, luego repetimos un punto medio y un punto bajo en los dos puntos continuos. Repetimos hasta obtener 8 abanicos para completar el borde del sol. Cerramos con un punto deslizado en el primer punto bajo de la vuelta. Cortamos el hilo y escondemos por el reverso con la aguja lanera.

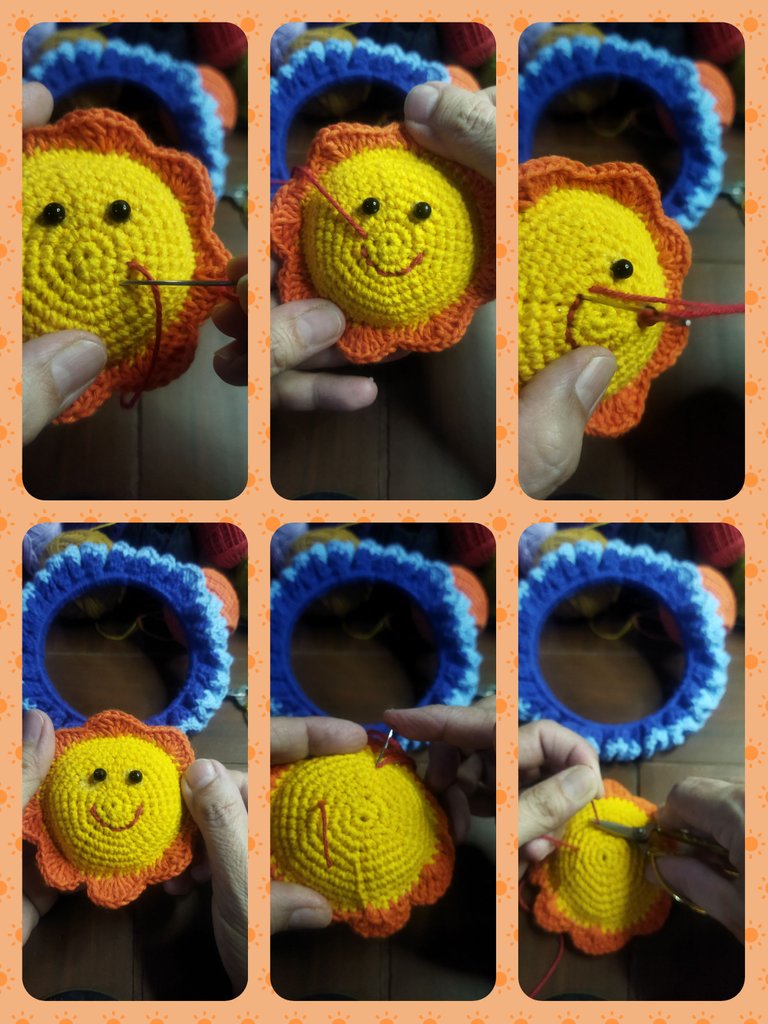
For the eyes we use two 6 mm black beads that we will glue with a silicone dot.
Para los ojitos utilizamos dos cuentas negras de 6 mm que pegaremos con un punto de silicón.
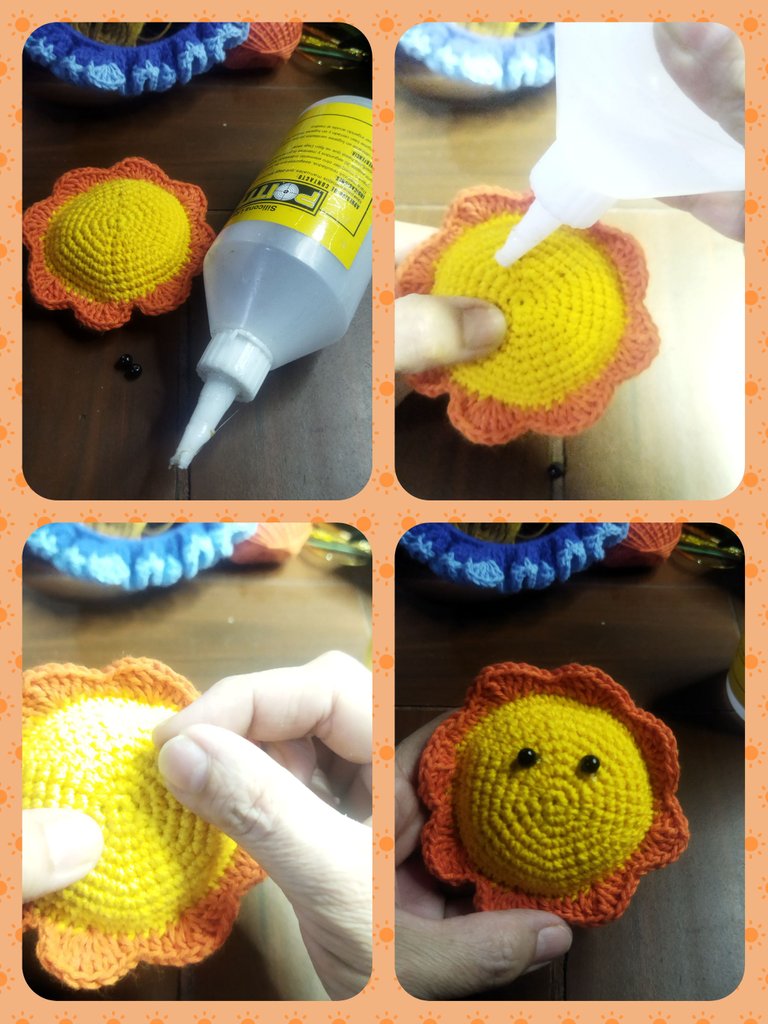
We make the mouth with red thread and the woolen needle, inserting the needle behind the piece and form the mouth and pass the thread back to the reverse side and cut.
Realizamos la boca con hilo rojo y la aguja lanera, introduciendo por detrás de la pieza la aguja y formamos la boca y pasamos el hilo nuevamente al reverso y cortamos.
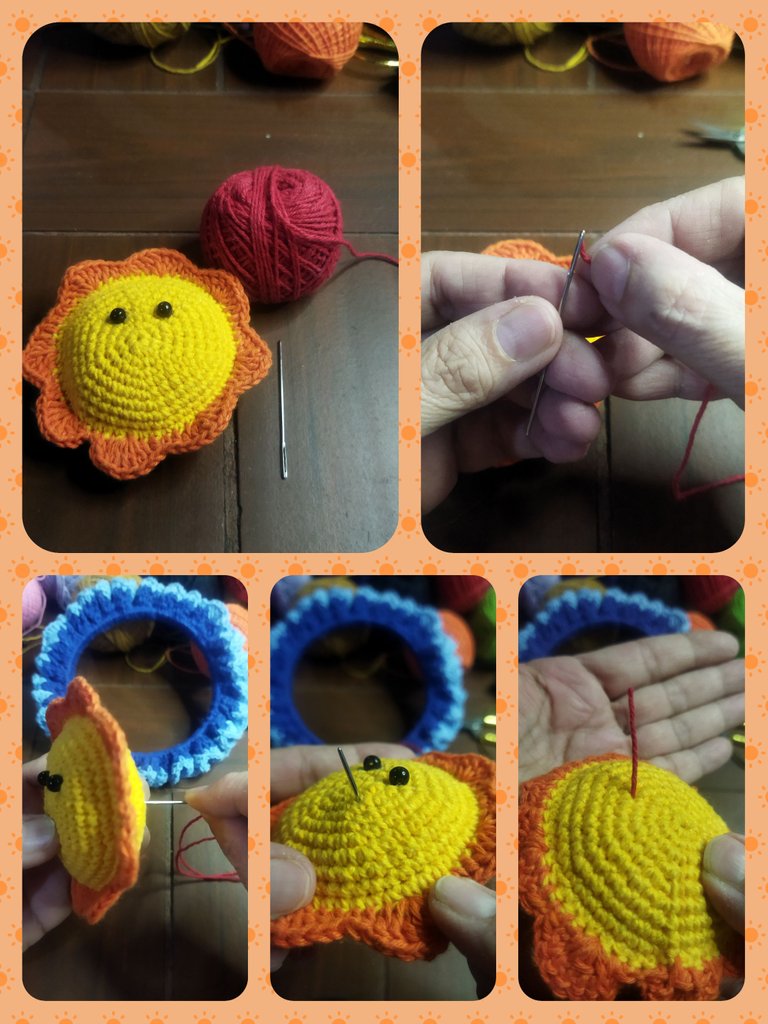
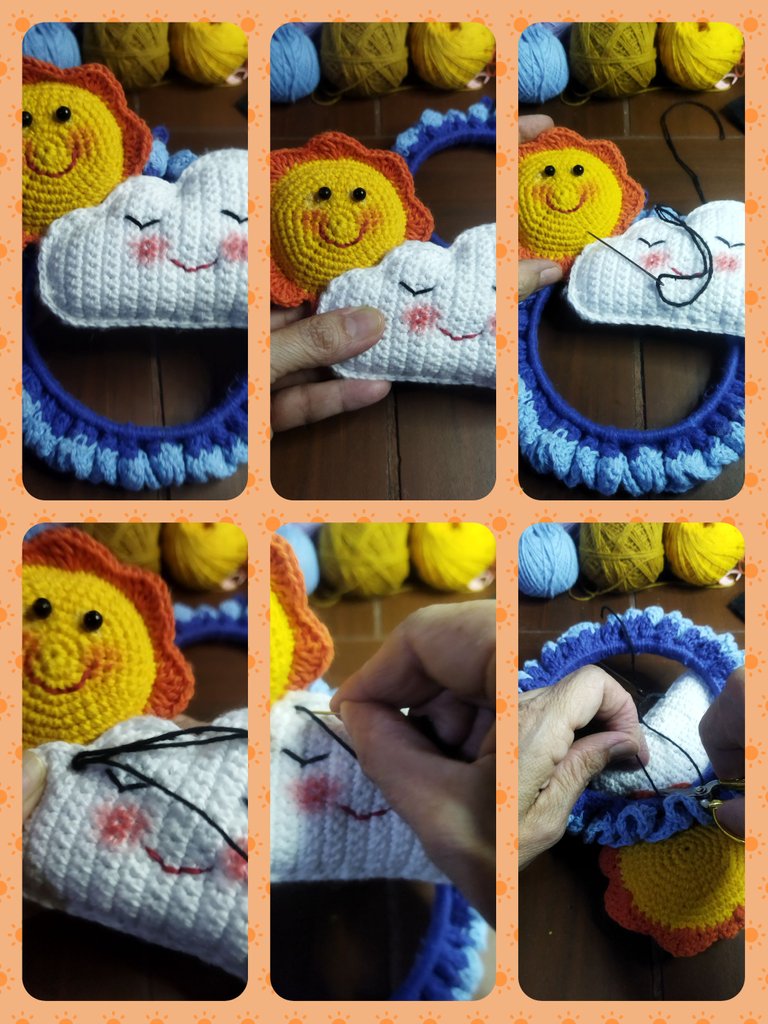
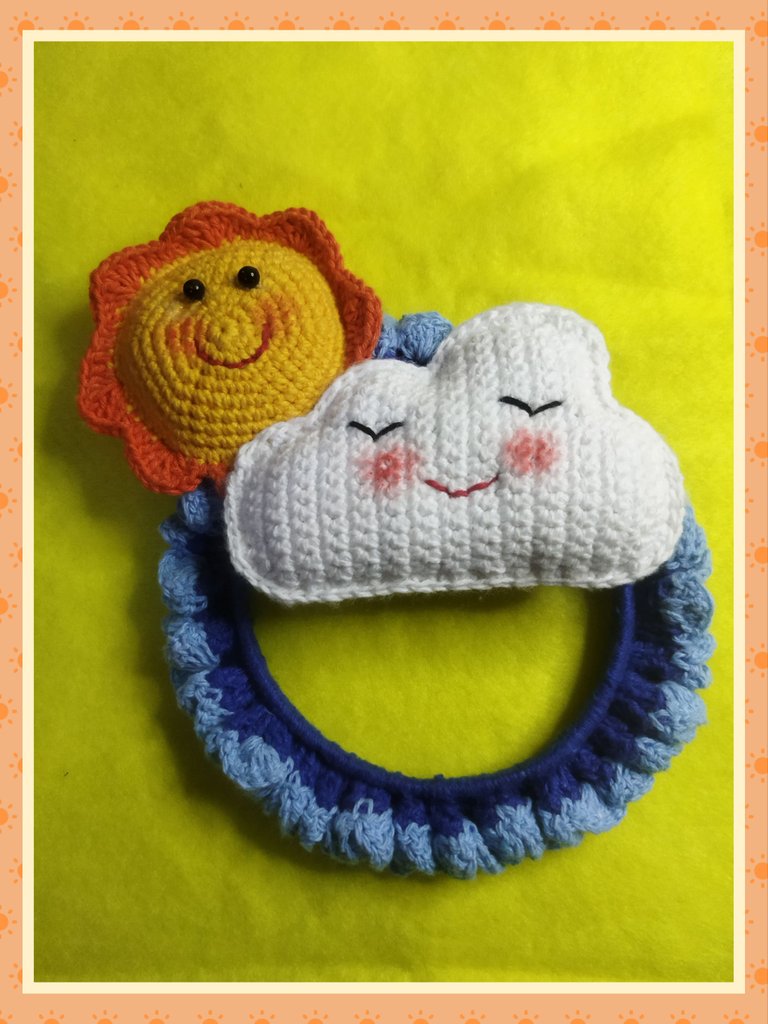
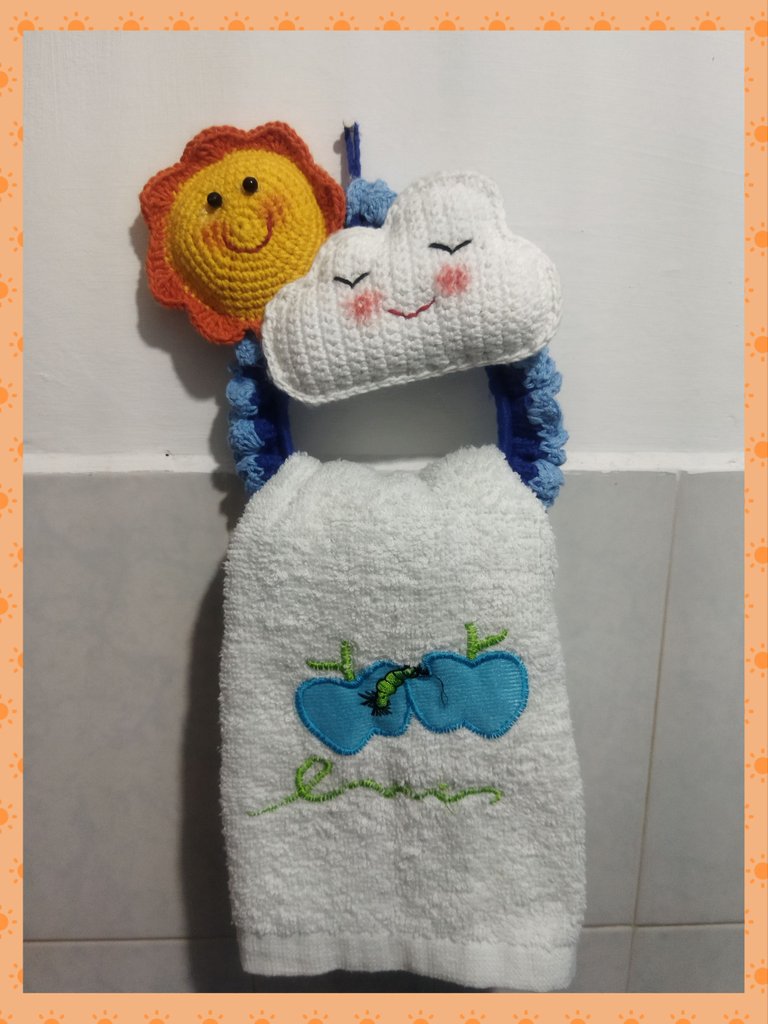
** THE TOWEL RACK **
To join the pieces to the ring, first we join the sun to the cloud, which I will show you how I did in another tutorial, and once joined we sew to the ring, always making hidden stitches. through the holes in the fabric. Cut the thread on the back and tie a knot to secure the fabric.
** EL TOALLERO**
Para unir las piezas al anillo, primeramente unimos el sol a la nube, que ya te mostraré cómo la realicé en otro tutorial, y una vez unidos cosemos al anillo, siempre realizando puntadas ocultas. por los agujeros del tejido. Cortamos el hilo por el reverso y realizamos un nudo para asegurar el tejido.
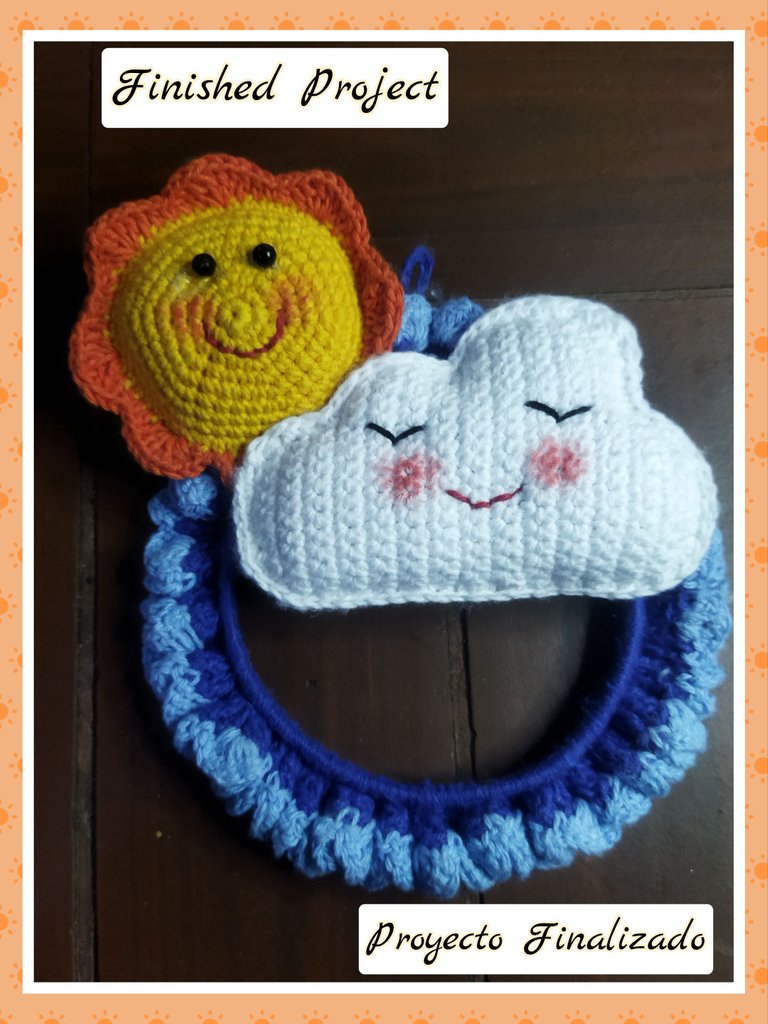
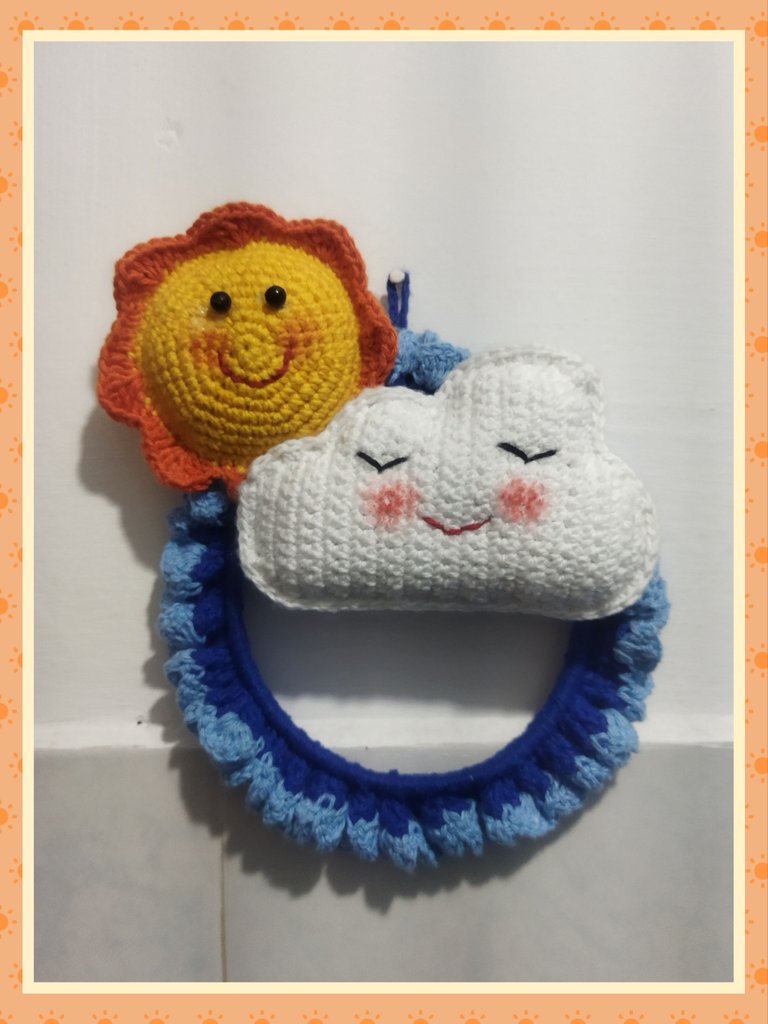
A very nice and useful project to decorate your bathroom or kitchen and at the same time place your towels. Thanks to @creacioneslelys for the invitation and in the same way I extend it to @agathalara, @vicmito74 and @katiuskamata to participate in this dynamic and fun contest.
Un proyecto muy lindo y útil, para decorar tu sala de baño o cocina y a la vez colocas tus toallas. Gracias a @creacioneslelys por la invitación y de igual manera la hago extensiva a @agathalara, a @vicmito74 y a @katiuskamata a participar de este dinámico y divertido concurso.
Hola @linita, has tenido una genial idea además de útil y decorativa...gracias por compartir cariño. Agradecida además por la invitación. Pensaré en algo..abrazos.
you just made us realize that you can pretty crochet anything. So adorable. Thank you for your entry.
Good luck
#hive #posh #diy #crochet
https://twitter.com/obo2004/status/1673373758889893889?t=oYhAnDTQ4I6aEHNFCT2ubg&s=19
Te felicito @linita tu proyecto está genial. Combinaste varias técnicas además del reciclaje ♻️, el toallero se ve muy lindo. Para iluminar con nuestro sol cualquier espacio es un estupenda opción. Gracias 🫂 por compartir.
https://leofinance.io/threads/dayadam/re-leothreads-wbrsbygv
The rewards earned on this comment will go directly to the people ( dayadam ) sharing the post on LeoThreads,LikeTu,dBuzz.
Wowww amiga @linita, este es un trabajo realmente hermoso, lo ame. Dios bendiga esas manos creadoras de tanta belleza. La mejor de las suertes en el concurso.
Bella semana para ti... 🌈✨
Muchas gracias, me alegro mucho que te guste. Saludos y gracias por tus buenos deseos ☺️☺️
Realmente precioso 😍
Congratulations @linita! You have completed the following achievement on the Hive blockchain And have been rewarded with New badge(s)
Your next target is to reach 350 posts.
Your next target is to reach 700 comments.
You can view your badges on your board and compare yourself to others in the Ranking
If you no longer want to receive notifications, reply to this comment with the word
STOPTo support your work, I also upvoted your post!
Check out our last posts:
Precioso y muy delicado te quedo tu porta toallas @linita, suerte en el concurso.