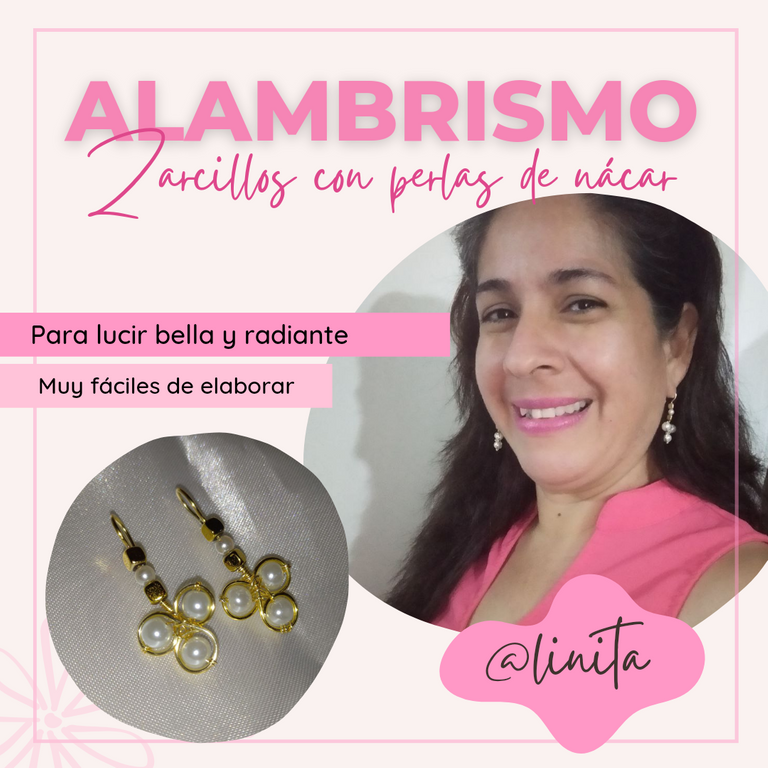
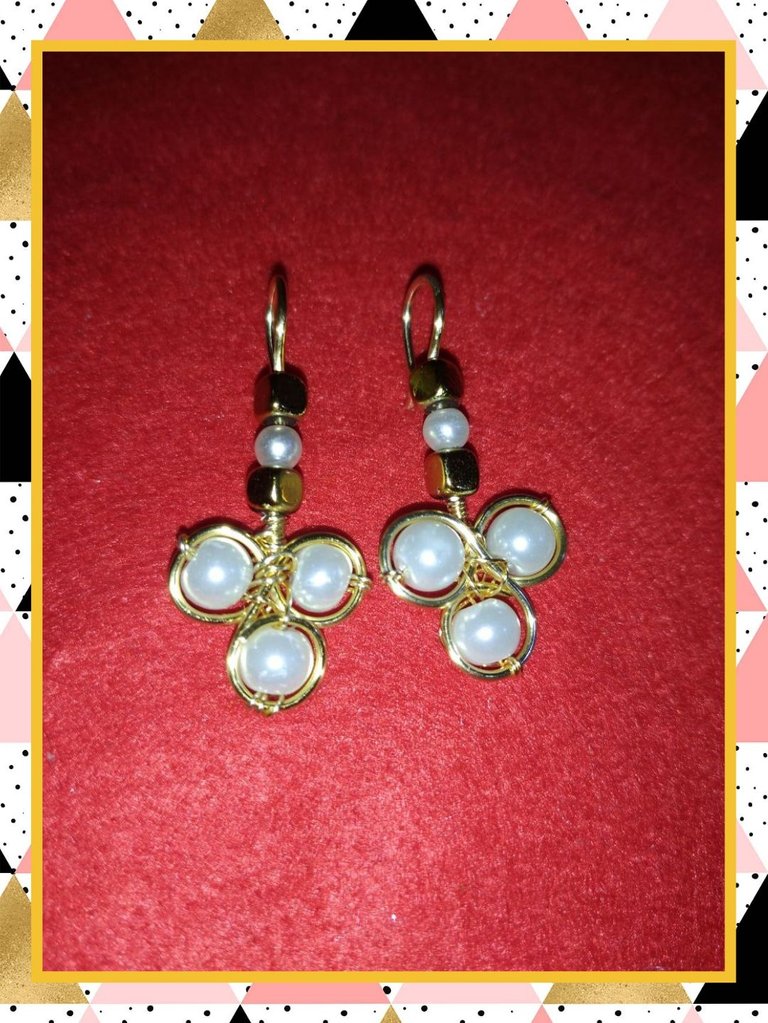
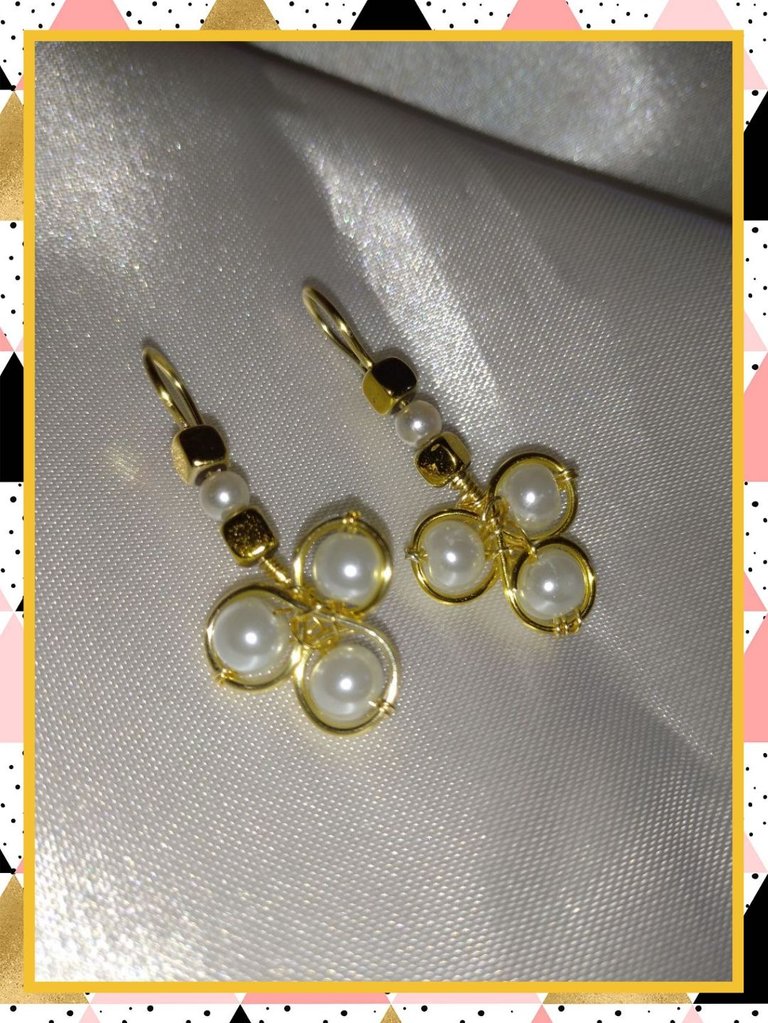
[ENG-ESP] WIRE: TENDRILS WITH NACRE PEARLS
WELCOME TO MY BLOG
Hellooooo, hellooooo! A pleasure to greet you, I hope you are enjoying a good week. Today I'm going to share some earrings that I made with the wire rope technique and using some pretty pearls that I bought at the jewelry store. As I have already told you, working with wire is still somewhat difficult for me, I have not yet trained myself in handling wire and I also think that I am missing some tools to facilitate handling, but this is no reason not to continue trying and practicing. to make beautiful clothes that will make us look charming.
I love the pieces made in this technique and although I am not one to wear many accessories because I am allergic to some metals since I was born, from time to time I risk suffering a little discomfort. My skin is somewhat sensitive to fantasy, it only accepts gold, silver and steel, at least so far they are the ones that I can wear permanently without any risk. but as you already know, in Venezuela it is a risk to use gold because you will be exposed to theft, as happened to me on one occasion, 8 years ago. Walking very calmly through the center of the city with my sister I was a victim of robbery and less than 10 seconds, my gold earrings that I had been wearing since I was 10 years old were torn from my ears. And until today's sun, my ears only sport a few permanent steel tendrils and when I want to be pretty, I risk wearing gold-plated fantasy so that the damage is not very strong.
So my work today is made with gold field wire so that when I wear them I have a good time and feel pretty with these earrings made with my own hands. Without further comment. let's get started
BIENVENIDOS A MI BLOG
¡Holaaaaa, holaaaaa! Un gusto en saludarlos, espero que estén disfrutando de una buena semana. Hoy les compartiré unos zarcillos que realicé con la técnica de alambrismo y utilizando unas lindas perlitas que compré en la tienda de insumos para bisutería. Como ya les he contado, trabajar con alambre todavía se me hace algo difícil, aún no me he adiestrado con el manejo del alambre y que además creo que me faltan algunas herramientas para facilitar el manejo pero esto no es motivo para no seguir intentando y practicando para realizar lindas prendas que nos harán lucir encantadoras.
A mi me encantan las piezas hechas en esta técnica y aunque no soy de usar muchos accesorios debido a que soy alérgica a algunos metales desde mi nacimiento, de vez en cuando me arriesgo a padecer un poco molestia. Mi piel es algo sensible a la fantasía, sólo acepta oro, plata y acero, por lo menos hasta ahora son las que puedo usar permanentemente sin ningún riesgo. pero como ya saben, en Venezuela es un riesgo usar oro porque estarás expuesta al hurto, como ya me sucedió en una ocasión, hace 8 años. Paseando muy tranquila por el centro de la ciudad con mi hermana fui víctima de robo e menos de 10 segundos, me fue arrancadas de mis orejas mis zarcillos de oro que usaba desde que tenía 10 años. Y hasta el sol de hoy, mis orejas solo lucen unos zarcillos de acero de forma permanente y cuando quiero estar linda, me arriesgo a usar de fantasia con baño de oro para que el daño no sea muy fuerte.
Así que mi trabajo de hoy es realizado con alambre de gold field para que cuando los use tener un buen rato encanto y sentirme linda con estos zarcillos hechos con mis propias manos. Sin más que comentarles. Comencemos.
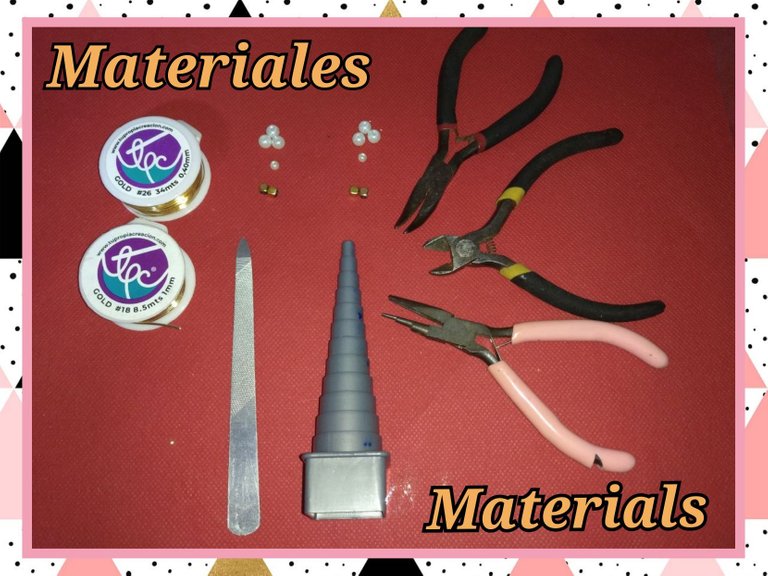
MATERIALS
- Wire #18
- Wire #26
- 6 pearls #6
- 2 beads #4
- 4 silver square dividers
- Cutting clamp
- Curved clamp
- Conical clamp
- metal file
- Round chuck
MATERIALES
- Alambre #18
- Alambre #26
- 6 perlas #6
- 2 perlas #4
- 4 separadores cuadrados plateados
- Pinza de corte
- Pinza curva
- Pinza cónica
- Lima de metal
- Mandril redondo
STEP BY STEP // PASO A PASO
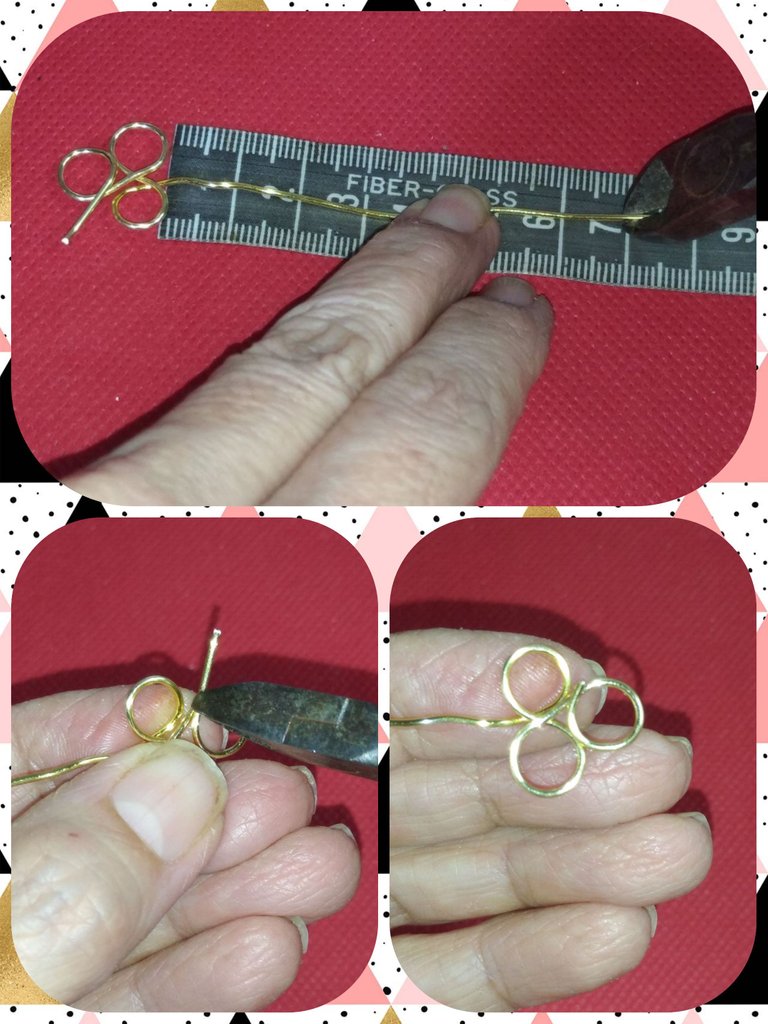
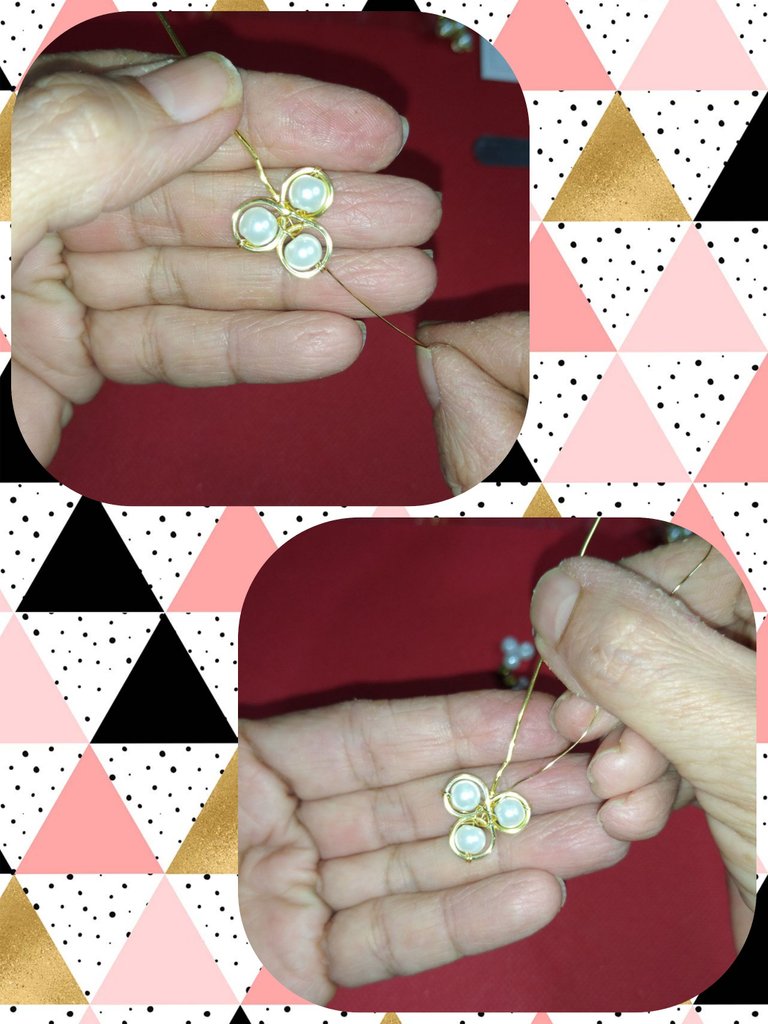
We begin by making a kind of clover but round with wire #18. It is already very resistant and strong and the mandrel, to the extent that it adjusts to the size of the pearl. We make a first circle and measure to see if the pearl passes and there is some space between the pearl and the circle.
Comenzamos realizando una especie de trébol pero redondo con el alambre #18. ya es es bien resistente y fuerte y el mandril, en la medida que se ajuste al tamaño de la perla. Realizamos un primer círculo y medimos para ver i la perla pasa y quede algo de espacio entre la perla y el círculo.
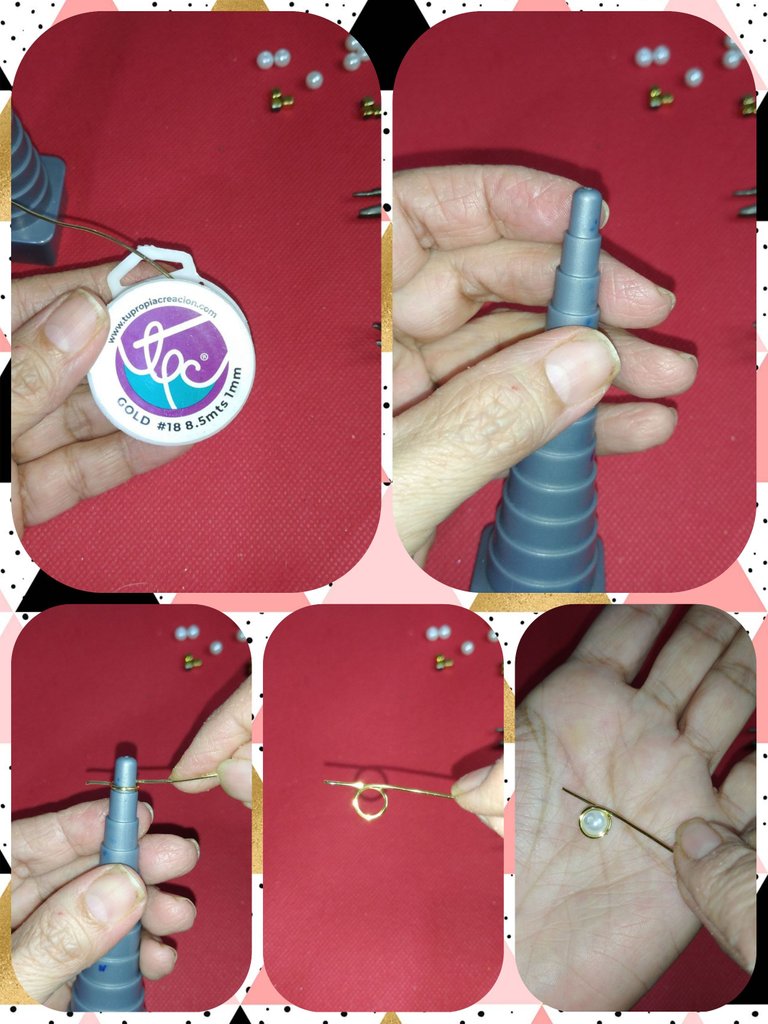
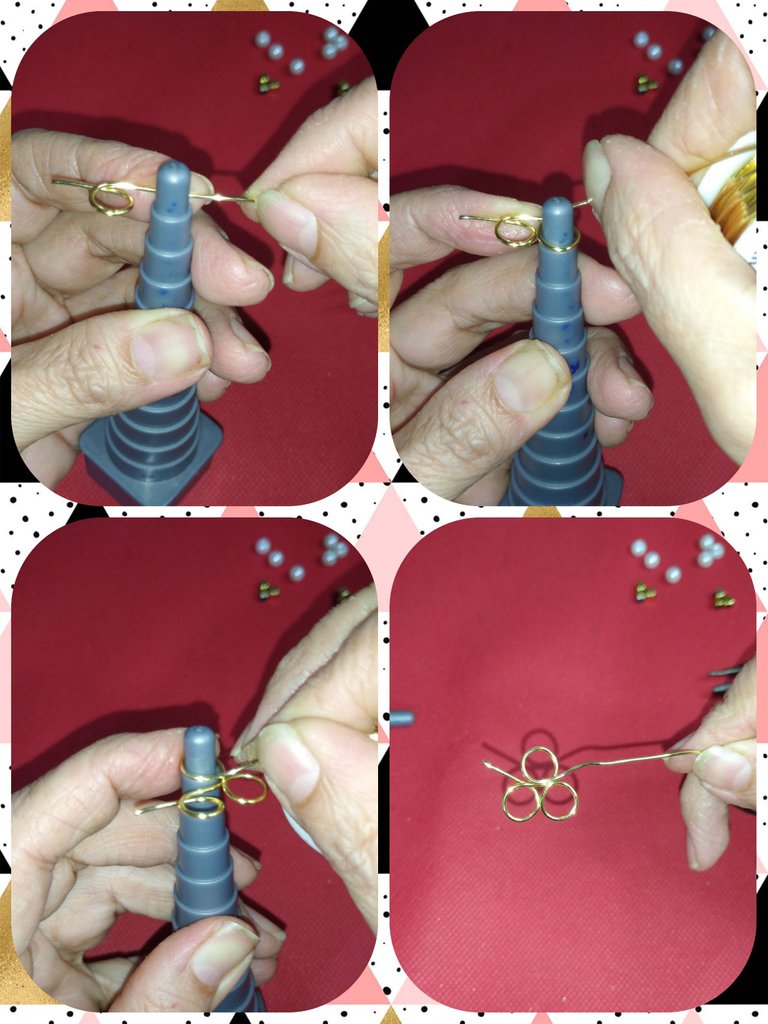
We make a second circle placing the mandrel next to the first one and we wrap it with the wire and as we slide we roll it so that it is right next to the other.
And to make the third circle we just have to place the mandrel in the center of both circles and turn the wire.
Hacemos un segundo círculo colocando el mandril al lado del primero y envolvemos con el alambre y a medida que vamos deslizando rodamos para que quede justo al lado del otro.
Y para realizar el tercer círculo sólo debemos colocar el mandril en el centro de ambos círculos y damos vuelta al alambre.
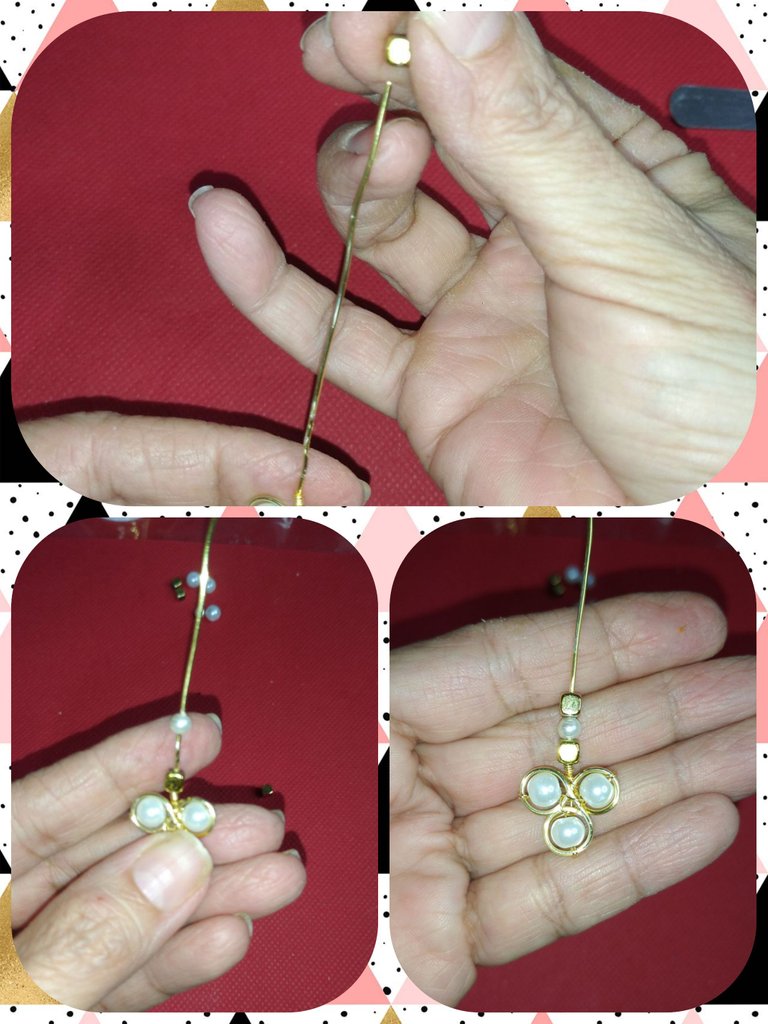
Once the clover is ready, we measure 7 cm of wire from the end of the last circle. and we cut. And we also eliminate the excess wire from the other end.
Una vez listo el trébol, medimos 7 cm de alambre a partir del final del último circulo. y cortamos. E igualmente eliminamos el alambre sobrante del otro extremo.
Now we will use the wire #2 to adjust the clover and begin to set the pearls inside and that in turn have a better finish. We make three turns and cut the excess and begin to work with the crimp.
Ahora utilizaremos el alambre #2 para ajustar el trébol y comenzar a engarzar las perlas dentro y que a su vez tenga un mejor acabado. Realizamos tres vueltas y cortamos el exceso y comenzamos a trabajar con el engarce.
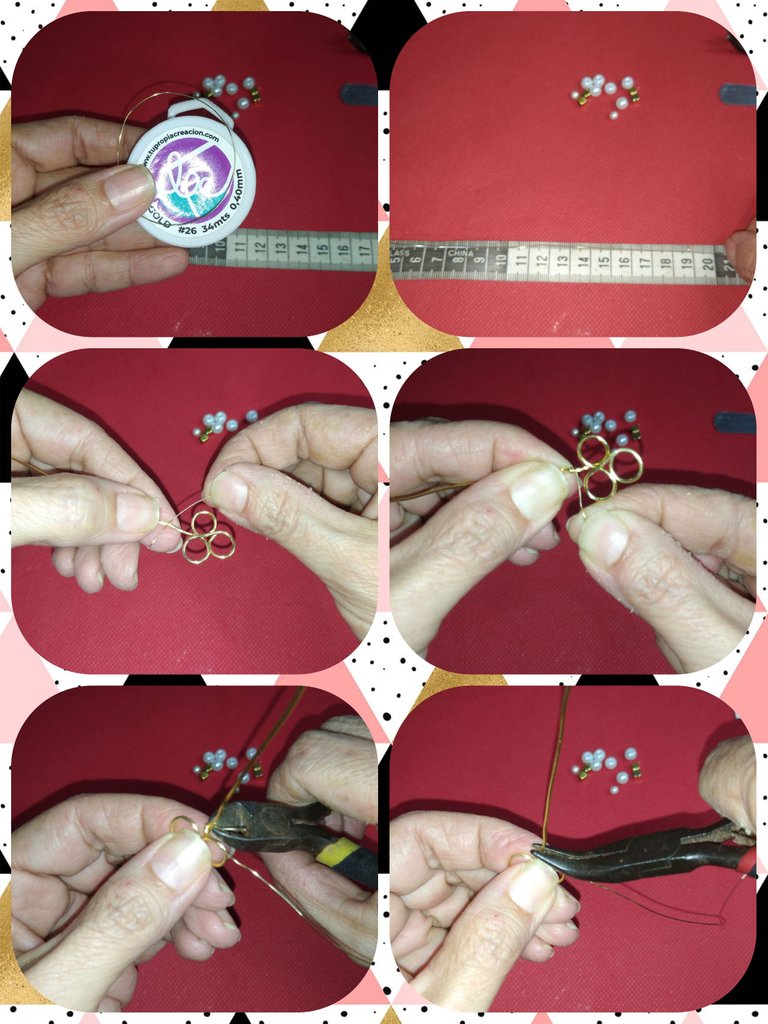
We take the wire inside the circle and make a link between the three circles making two turns of wire and tightening so that it fits well. We introduce a pearl through the wire and center it inside the circle. We adjust the pearl by passing the wire twice through the ring and take it to the next circle, and if we turn around we can see that the wire goes through the center of the pearl.
When we already have the first pearl well attached, we place the next one and carry out the same procedure and also with the third pearl. Once the three pearls are adjusted, we make three turns with the wire right at the junction of the three, that is, in the center of the triangle.
Llevamos el alambre para dentro del círculo y realizamos un enlace entre los tres círculos realizando dos vueltas de alambre y apretado para que quede bien ajustado. Introducimos una perla por el alambre y centramos dentro del círculo. Ajustamos la perla pasando el alambre dos veces por el anillo y llevamos hasta el círculo siguiente, y si damos vuelta podemos ver que el alambre pasa por el centro de la perla.
Cuando ya tenemos la primera perla bien sujeta colocamos la siguiente y realizamos el mismo procedimiento e igualmente con la tercera perla. Una vez ajustadas las tres perlas, damos tres vueltas con el alambre justo en la unión de las tres, es decir en el centro del triángulo.
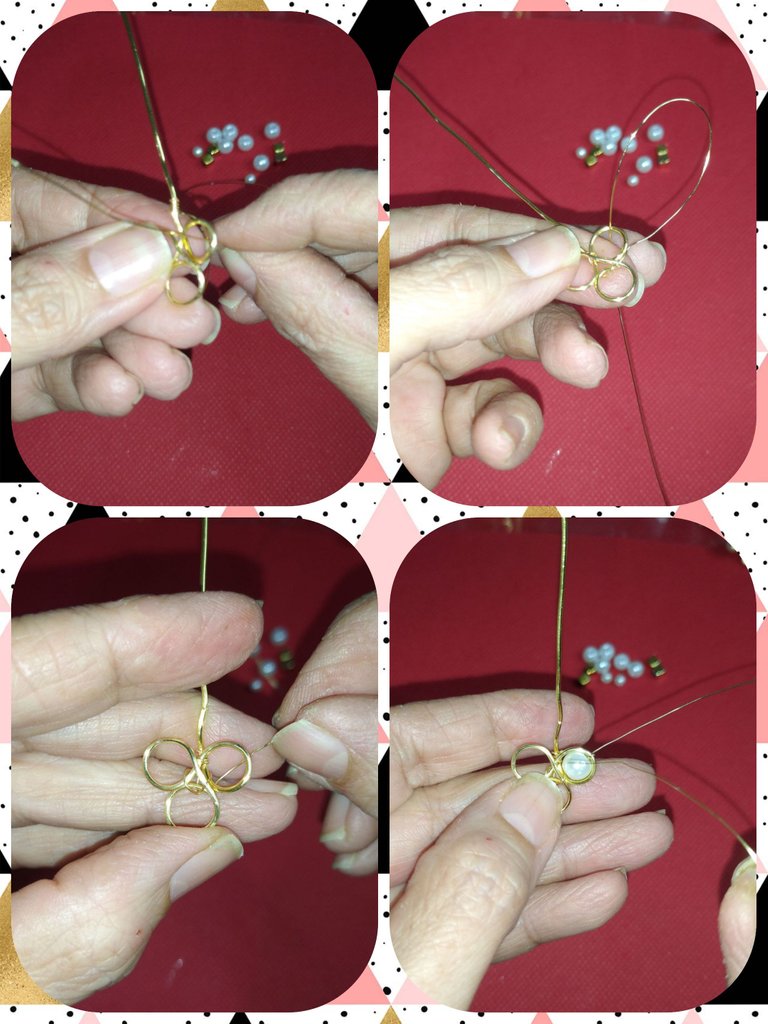
We raise the wire and on top of the base wire of the clover we make 4 turns, cut and adjust with the curved pliers.
Subimos el alambre y encima del alambre base del trébol realizamos 4 vueltas, cortamos y ajustamos con la pinza curva.

Now we will place the spacers and the #4 pearl on the remaining 7 cm wire. We put a separator, a pearl and a separator.
Ahora colocaremos los separadores y la perla #4 en el alambre sobrante de 7 cm. Colocamos un separador, una perla y un separador.
Then we make a 90º fold and with the mandrel we make a semi circle.
Luego hacemos un doblez de 90º y con el mandril hacemos un semi círculo.
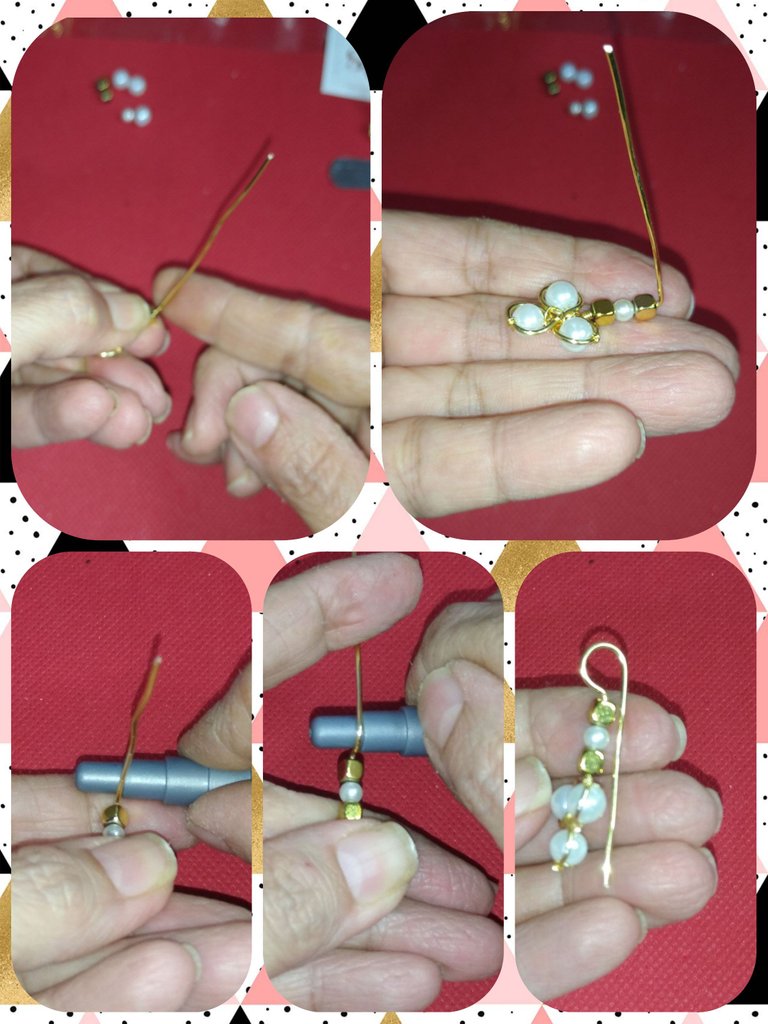
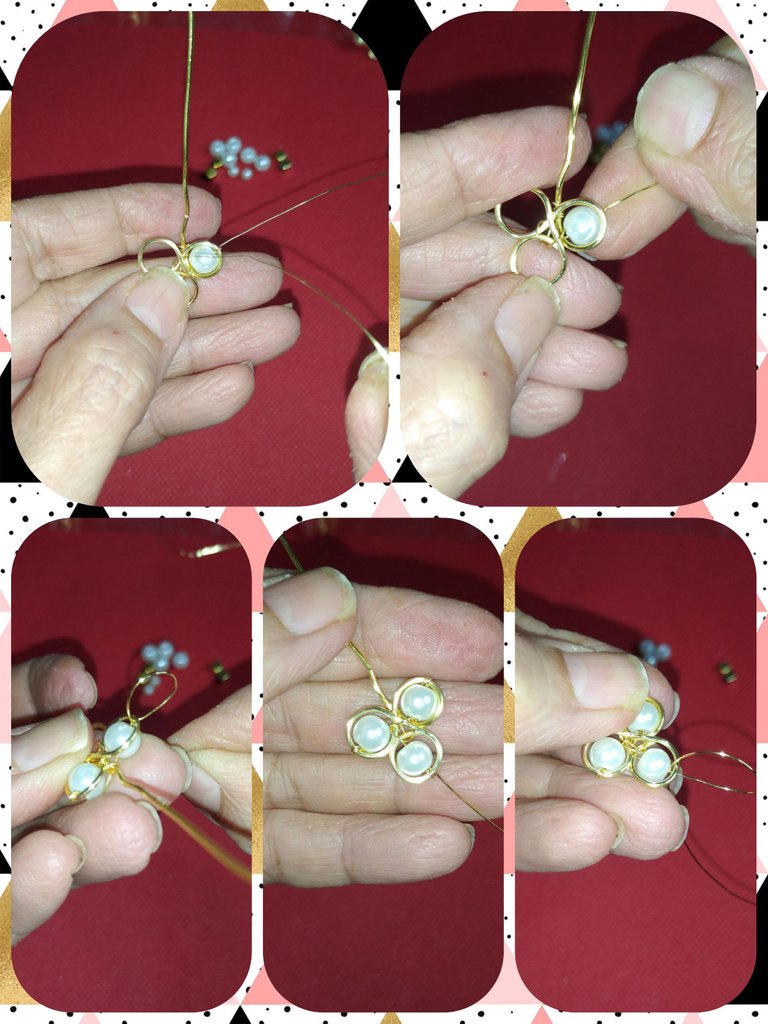
We cut the wire to the size that we want the hook to hang it and with the conical pliers we make a small double outward. In the same way we make the second tendril to form the pair.
Cortamos el alambre a la medida que deseemos el anzuelo para colgarlo y con la pinza cónica realizamos un pequeño dobles hacia afuera. De la misma forma realizamos el segundo zarcillo para formar el par.
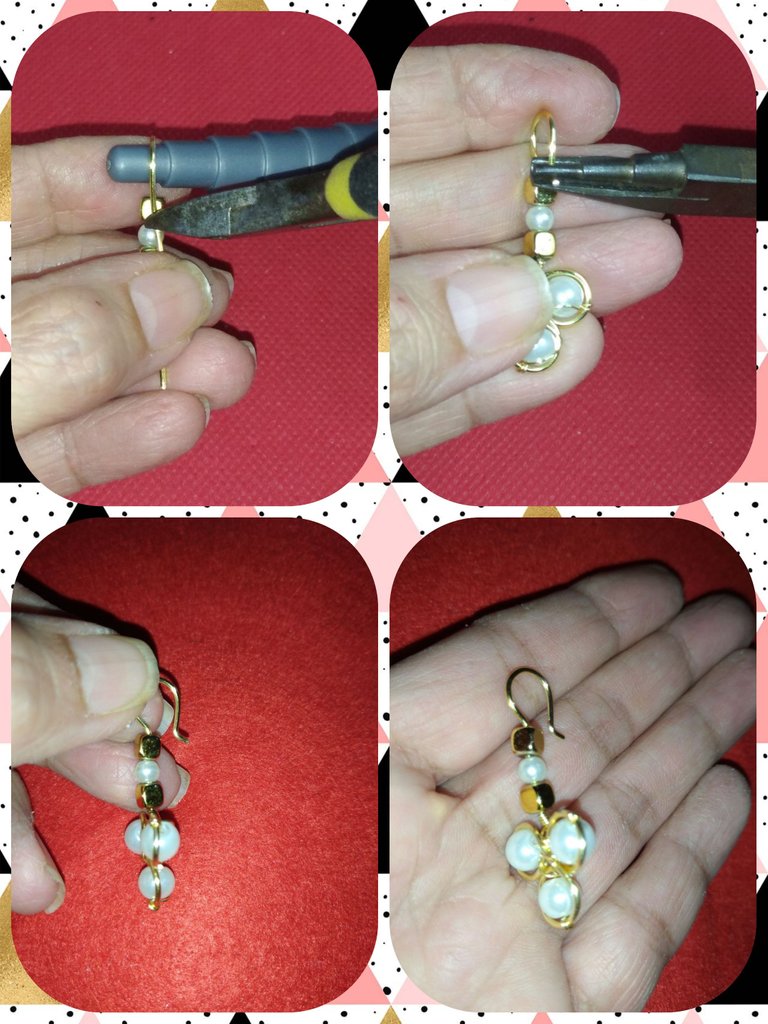
In this very easy way, we achieve some beautiful tendrils to look very pretty and incidentally be fashionable, since pearls are in fashion. I hope you liked it. See you next time.
De esta manera bien fácil, logramos unos bellos zarcillos para lucir bien guapas y de paso estar a la moda, ya que las perlas están de moda. Espero les haya gustado. Nos vemos en la próxima.

Todas las fotos son de mi autoría, tomadas con mi teléfono POCO M3
Para la edición de las fotos y separadores utilicé Polish
Utilicé https://translate.google.com para la traducción

Para la edición de las fotos y separadores utilicé Polish
Utilicé https://translate.google.com para la traducción
Congratulations @linita! You have completed the following achievement on the Hive blockchain And have been rewarded with New badge(s)
Your next target is to reach 300 posts.
You can view your badges on your board and compare yourself to others in the Ranking
If you no longer want to receive notifications, reply to this comment with the word
STOPTo support your work, I also upvoted your post!
Check out our last posts:
Support the HiveBuzz project. Vote for our proposal!
Un trabajo precioso amiga y muy bien explicado. Yo no he trabajo con alambrismo y la verdad no sé qué tal se me dé, sería cuestión de experimentar y tu paso.a paso esta perfecto para dejar el miedo y animarse.
Gracias por compartir y te felicito por tan lindo trabajo!
Holaaaa, @rlathulerie. Yo también estaba insegura la primera vez que tuve el alambre en mis manos. Aún lo sigo, pero pienso que con la práctica vamos perdiendo el miedo y teniendo destreza, Anímate, son muchas cosas bellas las que se hacen en esta técnica. Saludos.
Hey! Me encantan los zarcillos de ese material, tengo unos parecidos desde hace 3 años y están intactos, así que puedo dar fe de que sin buenos. Me encanta el diseño, porque se ve elegante y a la modelo le quedan perfecto 😁✨